The Tamiya 1/72 Republic P-47D thunderbolt 'Bubbletop'
- IMG_20140523_215334.jpg (185.13 KiB) Viewed 2981 times
About the Republic P-47D Thunderbolt "Bubbletop"
In May 1941, as the war raged in Europe, a single-engine fighter of more than 4t made its first flight. This fighter was the XP-47B, prototype of the Republic P-47 Thunderbolt of which a total of 15683 units will be built. Thanks to war experience, this aircraft was equipped with a 2000hp radial R-2800 engine, a supercharger and eight 12,7mm machine-guns. The XP-47B was to reach 633km/h and in January 1942, just after the USA went to war, the production of P-47B began. It was followed by the P-47C that incorporated various improvements and, from April 1943, by the P-47D, the most built version. The P-47D was equipped with an R-2800-59 engine, which can develop up to 2300hp with combat emergency water injection system engaged. The ducts that were passing on the sides and below the cockpit to connect the supercharger placed behind the pilot's seat gave to this plane its massive aspect. Many sub-types of the P-47D, designated D-1 to D-40, were produced but the first versions were called "Razorback" because of their sharp edge dorsal fin. The D-25 sub-type, which was introduced around June 1944, was fitted with an electrically actuated bubble canopy in order to improve pilot visibility and increased capacity fuel tanks. This decision resulted in a completely remodeled plane shape. All subsequent sub-types were also fitted with the bubble canopy and became a characteristic feature of late production Thunderbolts. The P-47 "Bubbletop" proved to be an excellent, well-balanced fighter-bomber.
I will do this version :
- IMG_20140523_215631.jpg (189.17 KiB) Viewed 2981 times
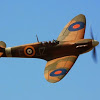
A Photo of the real plane :
- wzpbmayo226551.jpg (45.64 KiB) Viewed 2981 times
The 78th Fighter Group was activated at Baer Field, IN as the 78th Pursuit Group in January 1942, receiving its cadre from the 14th Fighter Group. and redesignated as a fighter group four months later. It initially trained for combat with P-38's and served as part of the west coast air defense organization. It moved to England in November 1942 and was assigned to Eighth Air Force. The group lost its P-38's and most of its pilots in February 1943 when they were assigned to the Twelfth Air Force for service in the North African campaign.
The group was reassigned to Duxford airfield in April 1943 and reequipped with Republic P-47 Thunderbolts. Aircraft of the group were identified by a black/white chequerboard pattern.
The group consisted of the following squadrons:
82d Fighter Squadron (MX)
83d Fighter Squadron (HL)
84th Fighter Squadron (WZ)
From Duxford, the 78th flew many missions to escort Boeing B-17 Flying Fortress and Consolidated B-24 Liberator bombers that attacked industries, submarine yards and docks, V-weapon sites, and other targets on the Continent. In 1943, the group had the first American ace in Eighth Air Force. The group also claimed a victory over a German Messerschmitt Me-262 jet fighter. The unit also engaged in counter-air activities and on numerous occasions strafed and dive-bombed airfields, trains, vehicles, barges, tugs, canal locks, barracks, and troops.
In addition to other operations, the 78th participated in the intensive campaign against the German Air Force and aircraft industry during Big Week, 20–25 February 1944 and helped to prepare the way for the invasion of France. The group supported the landings in Normandy in June 1944 and contributed to the breakthrough at Saint-Lô in July.
The group converted to North American P-51 Mustangs in December 1944 and participated in the Battle of the Bulge, from December 1944 to January 1945. It also supported the airborne assault across the Rhine in March.
The 78th Fighter Group received a Distinguished Unit Citation for activities connected with the Operation Market-Garden combined ground and airborne attack through on Holland in September 1944 when the group covered troop carrier and bombardment operations and carried out strafing and dive-bombing missions. It suffered its heaviest casualties of the war in this operation. The group received a second DUC for destroying numerous aircraft on five airfields near Prague and Pilsen on 16 April 1945.
The 78th Fighter Group returned to Camp Kilmer New Jersey and October 1945 and was inactivated on 18 October.