Dragon 1:35 flakpanzer 38t and Opel Maultier ambulance
-
eoinfinnegan
- Sergeant First Class

- Posts: 321
- Joined: Sun Oct 27, 2013 12:52 pm
Re: Dragon 1:35 flakpanzer 38t and Opel Maultier ambulance
fantastic work as always Mark 

-
Nige201980

- Captain

- Posts: 4095
- Joined: Wed Jun 05, 2013 9:30 am
- Location: Doncaster South Yorkshire UK
- Contact:
Re: Dragon 1:35 flakpanzer 38t and Opel Maultier ambulance
Looking great mate.
http://www.youtube.com/channel/UCy-TGcs5u_ZXSZ9kObNfsPg
On the go at the Mo
Quite a few
On the go at the Mo
Quite a few
-
UKguyInUSA
- Second Lieutenant

- Posts: 3429
- Joined: Sun Mar 30, 2014 10:19 pm
- Location: New Hampshire, USA formerly Palm Beach, Florida, USA and Leicestershire, UK (until 1999)
- Contact:
Re: Dragon 1:35 flakpanzer 38t and Opel Maultier ambulance
Hmm....another vehicle with this build...this could be interesting....
WIP:: Tamiya 1/48 F4U-1A Corsair
Non-WIP::Eduard 1/48 Fokker DVII, Revell 1/32 Arado AR196 and 1/32 BF109G10 Erla,
Non-WIP::Eduard 1/48 Fokker DVII, Revell 1/32 Arado AR196 and 1/32 BF109G10 Erla,

Re: Dragon 1:35 flakpanzer 38t and Opel Maultier ambulance
Omg, I'm loving the ambulance 
Like you say, loaded with detail, grill and louvres open (and no sanding needed... ). Love the separate wheels and tires, makes it so much easier for painting.
As I am a fan of truckie thingies (like halftracks), I have got to get me one off these
Keep it up like this Mark.
Like you say, loaded with detail, grill and louvres open (and no sanding needed...
As I am a fan of truckie thingies (like halftracks), I have got to get me one off these
Keep it up like this Mark.
Joined this forum to become a better modell builder. Now, if I can just put away my laptop and start building..
On the Bench:
Piper PA-18-150
Ford GPA
GMC cckw 1947
Ford V3000 "Bello"
On the Bench:
Piper PA-18-150
Ford GPA
GMC cckw 1947
Ford V3000 "Bello"


-
MarkVerploeg

- Major

- Posts: 4837
- Joined: Wed Oct 16, 2013 12:21 am
- Location: Oss, Noord Braband The Netherlands

Re: Dragon 1:35 flakpanzer 38t and Opel Maultier ambulance
Thanks guys
The comments are much apreciated
I started on the back section today
That is a bit more work i think
The construction that holds the stretchers during transport needed a whole lot of sanding and it will have 20 or so windows wich i plan on using after the inside is painted
Altough the ones that go in the roof could be added later then that
So i will have very little masking to do
but i think i will have the building part ready in a few days and then it will be time for the first test setting of the dio so i can work out wich figures and how many and some other stuff that is going to be used
but we'll see how.it goes
Cheers Mark
On the bench
GB builds
1/35 Trumpeter M1132 ESV
Personal builds
1/35 Hobby Boss M1070 tractor with M1000 semi trailer and Meng M1A2 TUSK II Abrams
1/35 Takom V2 rocket with the Meillerwagen and SS100 tractor
GB builds
1/35 Trumpeter M1132 ESV
Personal builds
1/35 Hobby Boss M1070 tractor with M1000 semi trailer and Meng M1A2 TUSK II Abrams
1/35 Takom V2 rocket with the Meillerwagen and SS100 tractor
-
MarkVerploeg
- Major
- Posts: 4837
- Joined: Wed Oct 16, 2013 12:21 am
- Location: Oss, Noord Braband The Netherlands
Re: Dragon 1:35 flakpanzer 38t and Opel Maultier ambulance
Not to be rude mateUKguyInUSA wrote:Hmm....another vehicle with this build...this could be interesting....
But the title sort of explains it
There could be a third though but that would be a kubelwagen that i want to turn into a ambulace aswell
It will be strach build as far as the conversion bit
Nothing big just 2 post that hold the stretcher in place and a tarp on the front
But it depends on the space i have left on the dio base
I am a bit limited to the size of it or it won't fit in the display cabinet
But i will have to finish building the others first to see if it will fit and looks good
Cheers Mark
On the bench
GB builds
1/35 Trumpeter M1132 ESV
Personal builds
1/35 Hobby Boss M1070 tractor with M1000 semi trailer and Meng M1A2 TUSK II Abrams
1/35 Takom V2 rocket with the Meillerwagen and SS100 tractor
GB builds
1/35 Trumpeter M1132 ESV
Personal builds
1/35 Hobby Boss M1070 tractor with M1000 semi trailer and Meng M1A2 TUSK II Abrams
1/35 Takom V2 rocket with the Meillerwagen and SS100 tractor

Re: Dragon 1:35 flakpanzer 38t and Opel Maultier ambulance
Lovely progress Mark, looks great
My Youtube Channel: http://m.youtube.com/user/MrBobsBuilds
-
MarkVerploeg
- Major
- Posts: 4837
- Joined: Wed Oct 16, 2013 12:21 am
- Location: Oss, Noord Braband The Netherlands
Re: Dragon 1:35 flakpanzer 38t and Opel Maultier ambulance
Thanks RobRob wrote:Lovely progress Mark, looks great
I will try to get the building done in the next couple of days
Then i will atart the painting and diorama setting
And figures
Those will be a big part of it all
On the bench
GB builds
1/35 Trumpeter M1132 ESV
Personal builds
1/35 Hobby Boss M1070 tractor with M1000 semi trailer and Meng M1A2 TUSK II Abrams
1/35 Takom V2 rocket with the Meillerwagen and SS100 tractor
GB builds
1/35 Trumpeter M1132 ESV
Personal builds
1/35 Hobby Boss M1070 tractor with M1000 semi trailer and Meng M1A2 TUSK II Abrams
1/35 Takom V2 rocket with the Meillerwagen and SS100 tractor
-
rhysloader90
- Private

- Posts: 12
- Joined: Thu May 29, 2014 4:08 pm
- Location: Wales
Re: Dragon 1:35 flakpanzer 38t and Opel Maultier ambulance
Nice intro and thred
-
MarkVerploeg
- Major
- Posts: 4837
- Joined: Wed Oct 16, 2013 12:21 am
- Location: Oss, Noord Braband The Netherlands
Re: Dragon 1:35 flakpanzer 38t and Opel Maultier ambulance
Thanks materhysloader90 wrote:Nice intro and thred
Glad you like them
On the bench
GB builds
1/35 Trumpeter M1132 ESV
Personal builds
1/35 Hobby Boss M1070 tractor with M1000 semi trailer and Meng M1A2 TUSK II Abrams
1/35 Takom V2 rocket with the Meillerwagen and SS100 tractor
GB builds
1/35 Trumpeter M1132 ESV
Personal builds
1/35 Hobby Boss M1070 tractor with M1000 semi trailer and Meng M1A2 TUSK II Abrams
1/35 Takom V2 rocket with the Meillerwagen and SS100 tractor
-
MarkVerploeg
- Major
- Posts: 4837
- Joined: Wed Oct 16, 2013 12:21 am
- Location: Oss, Noord Braband The Netherlands
Re: Dragon 1:35 flakpanzer 38t and Opel Maultier ambulance
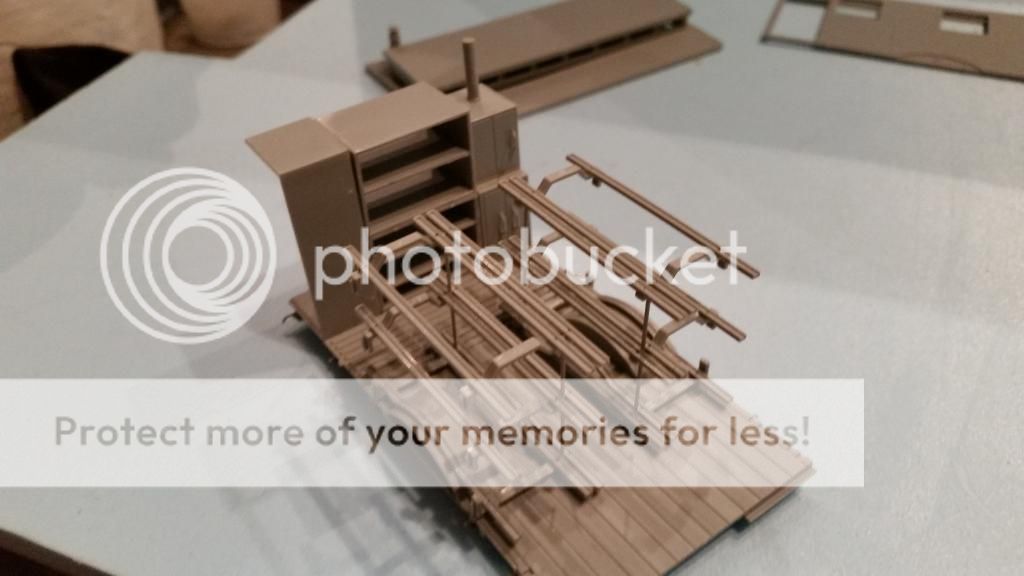
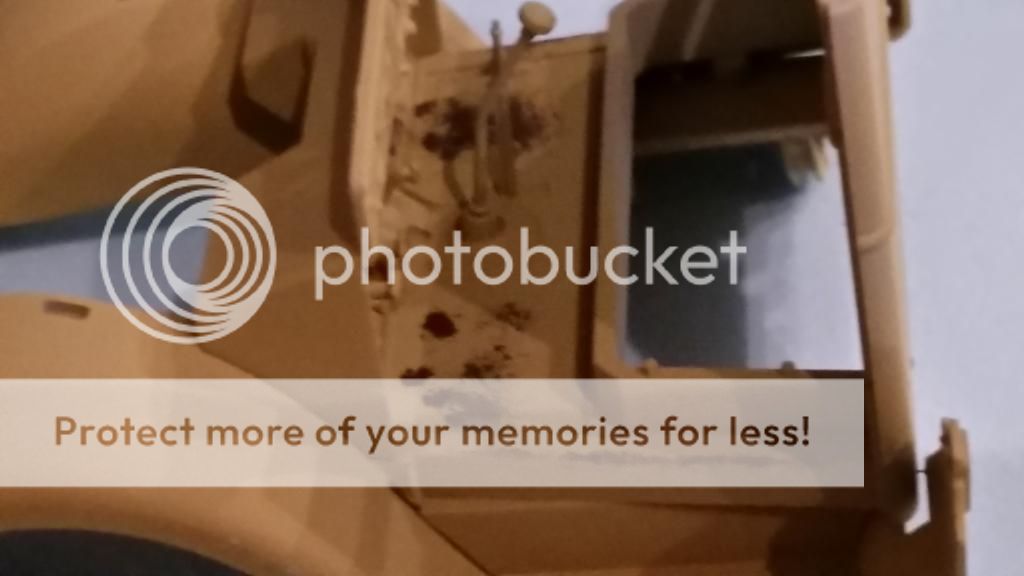
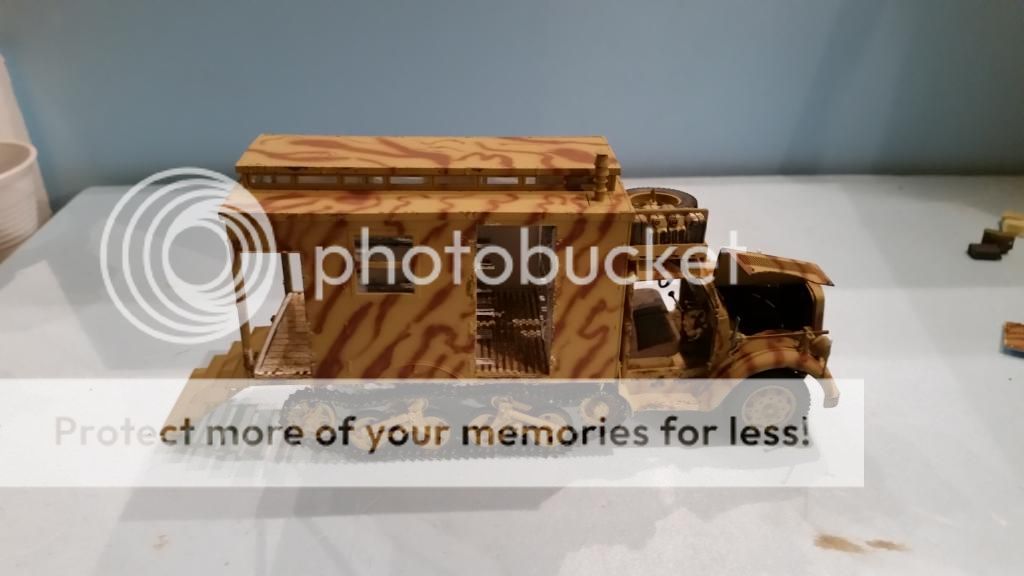
hi guys
and to yet another update for this build
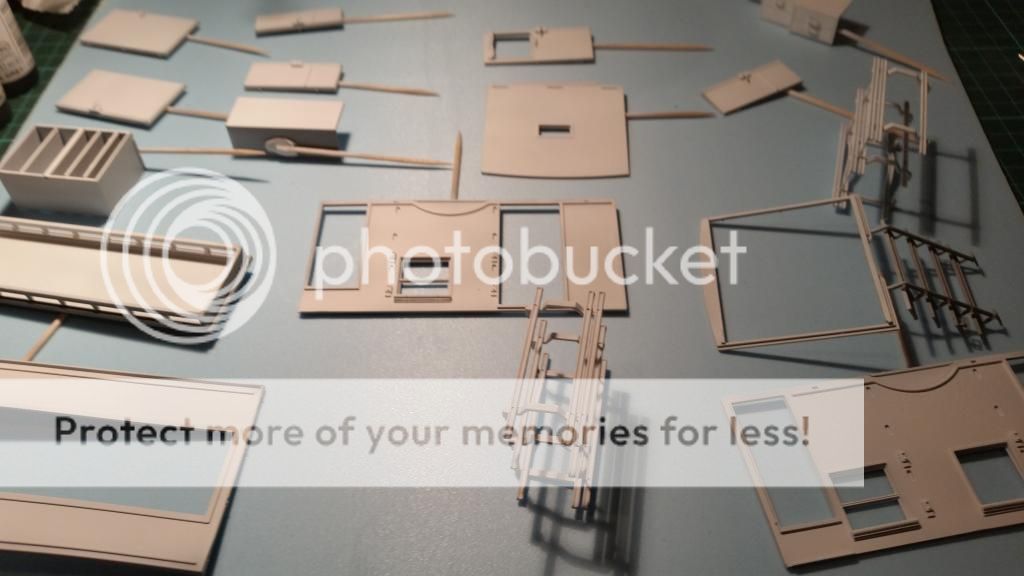
this time i have build the back compartment
well it is not really build ,i have all the pieces prepared for paint
but the last photo will explain why i haven't build it up yet
so let's go to the pictures shall we
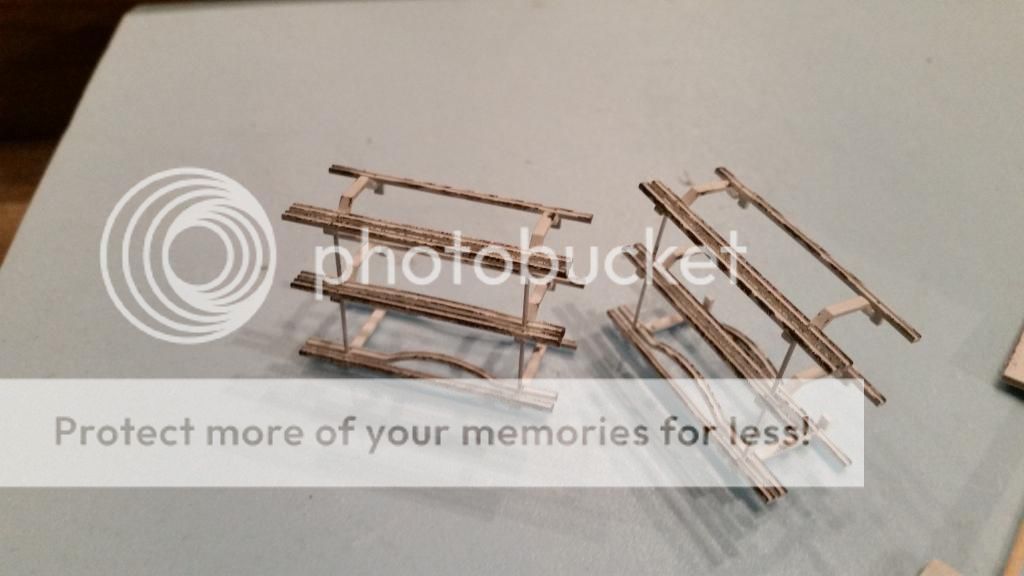
STEP 13
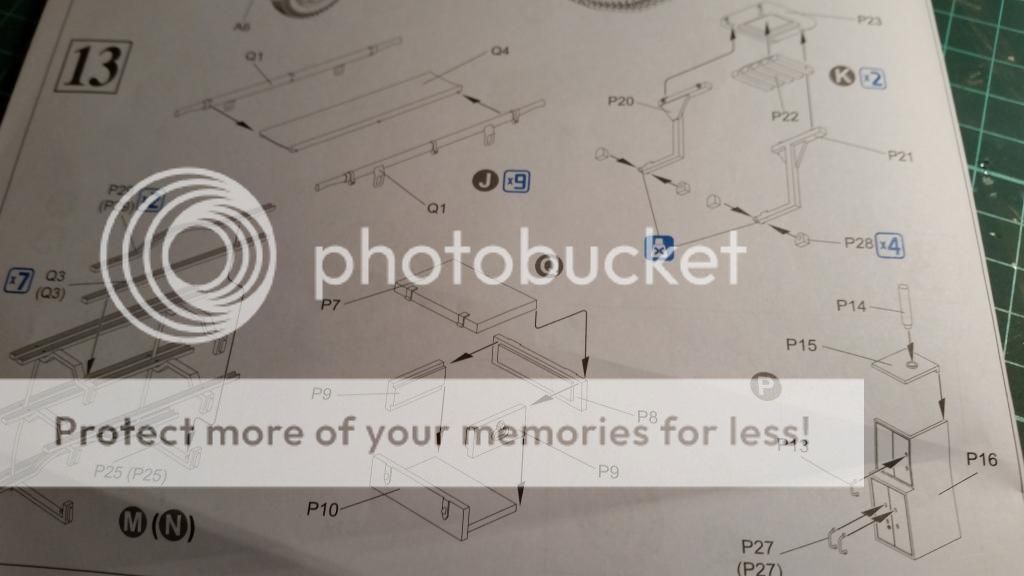
i don't know why it is on there but part K on the top right is no where to be seen in the instructions later on
i guess it is part of a other Maultier version and wasn't removed from the instructions
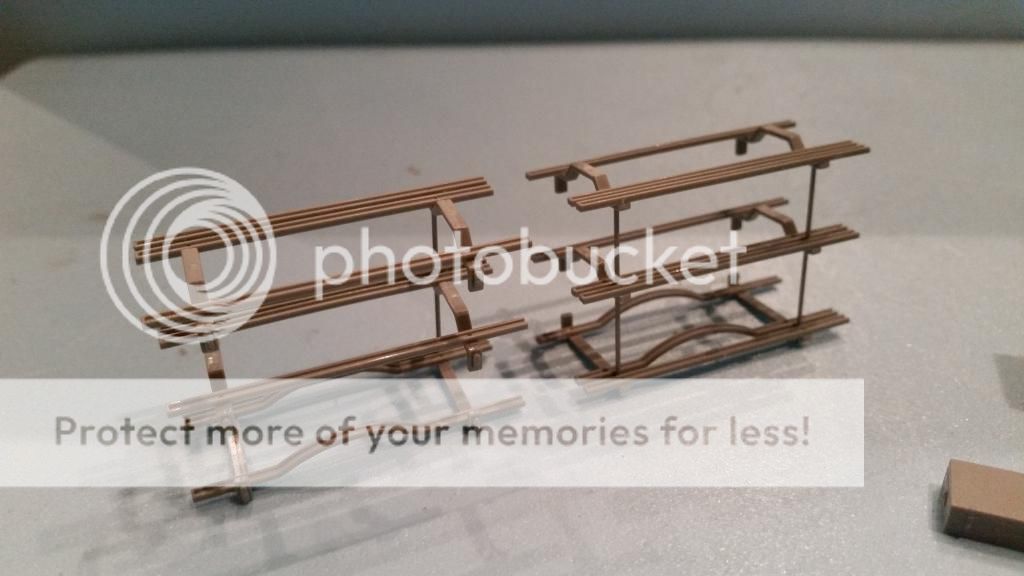
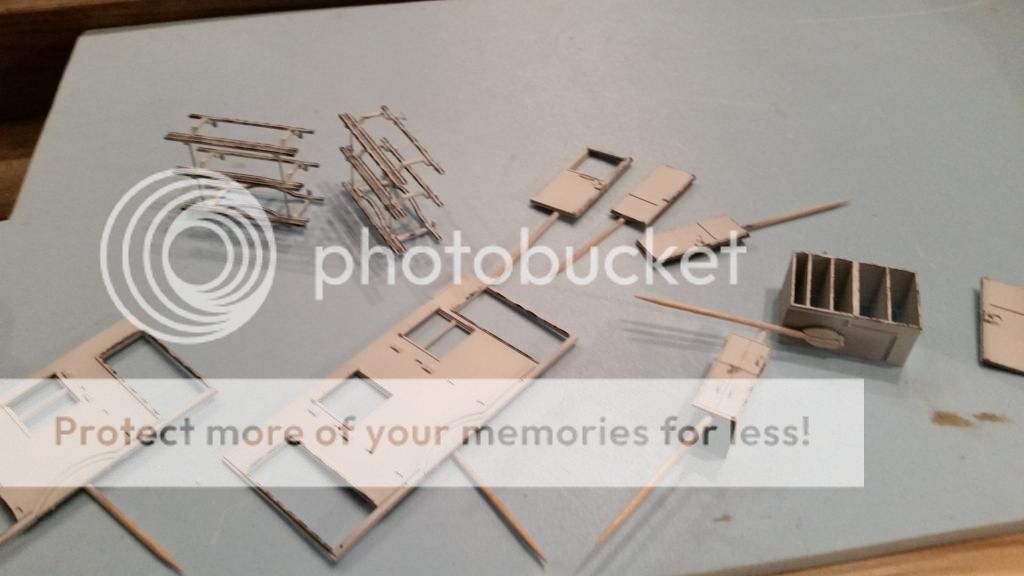
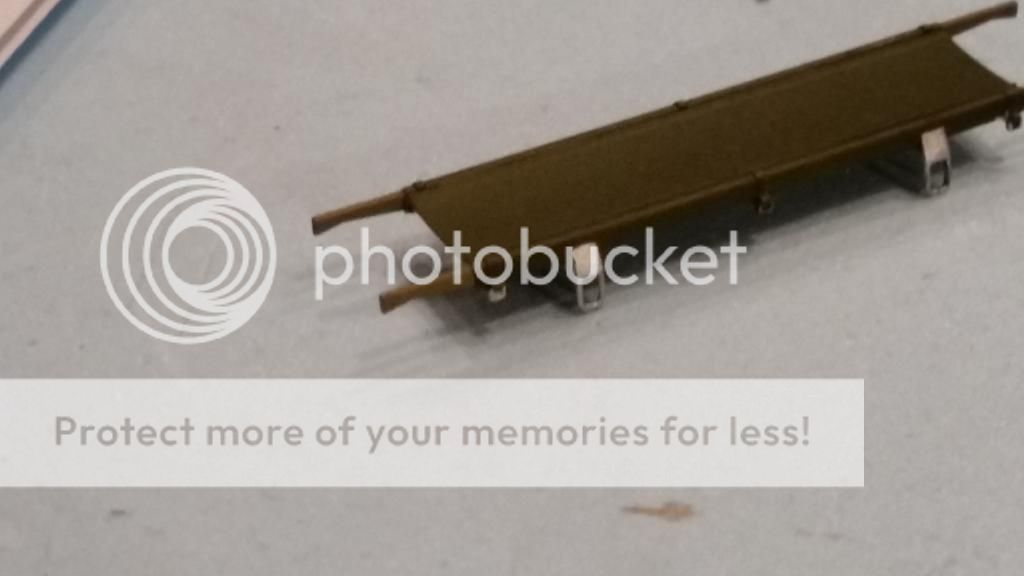
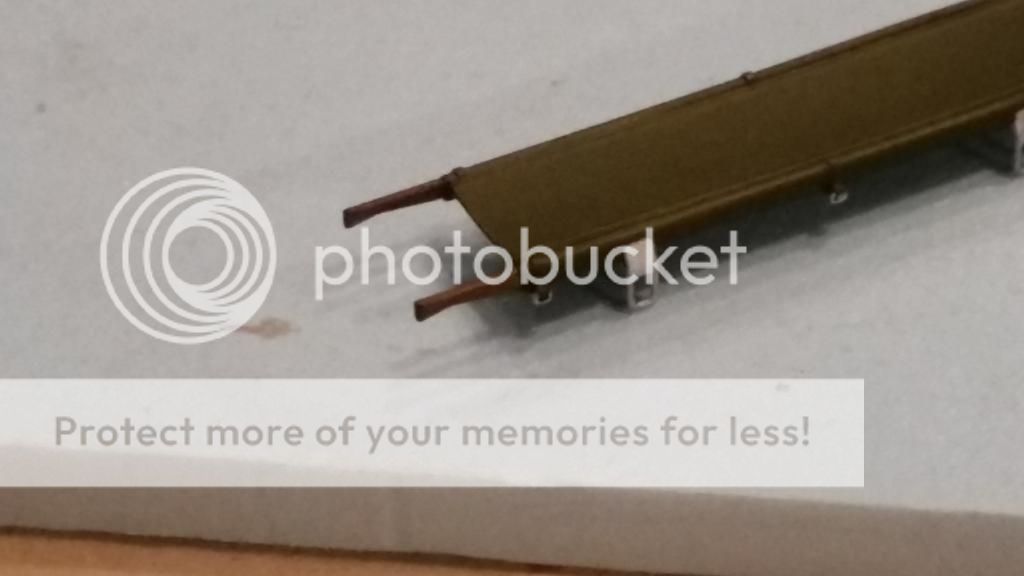
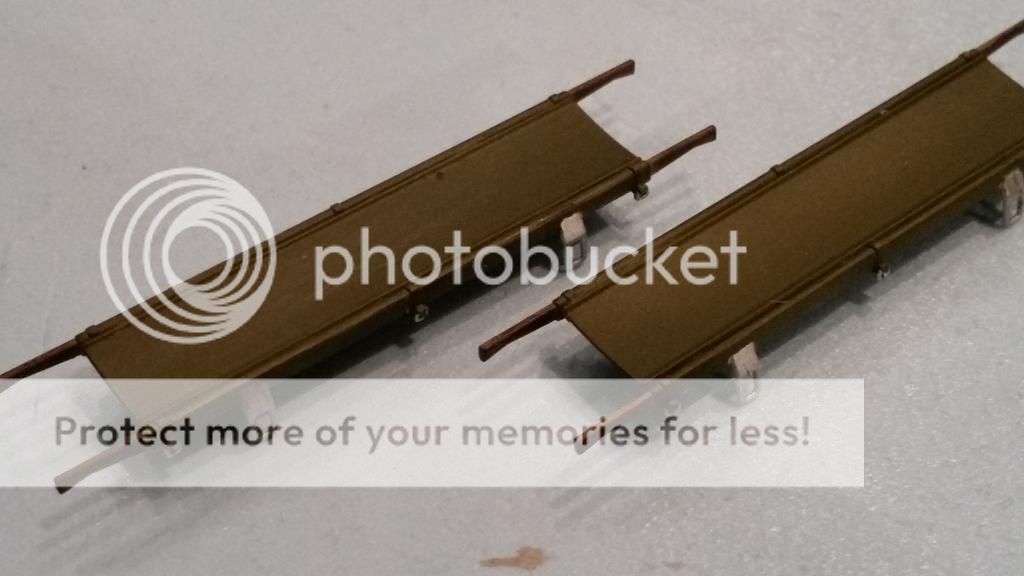
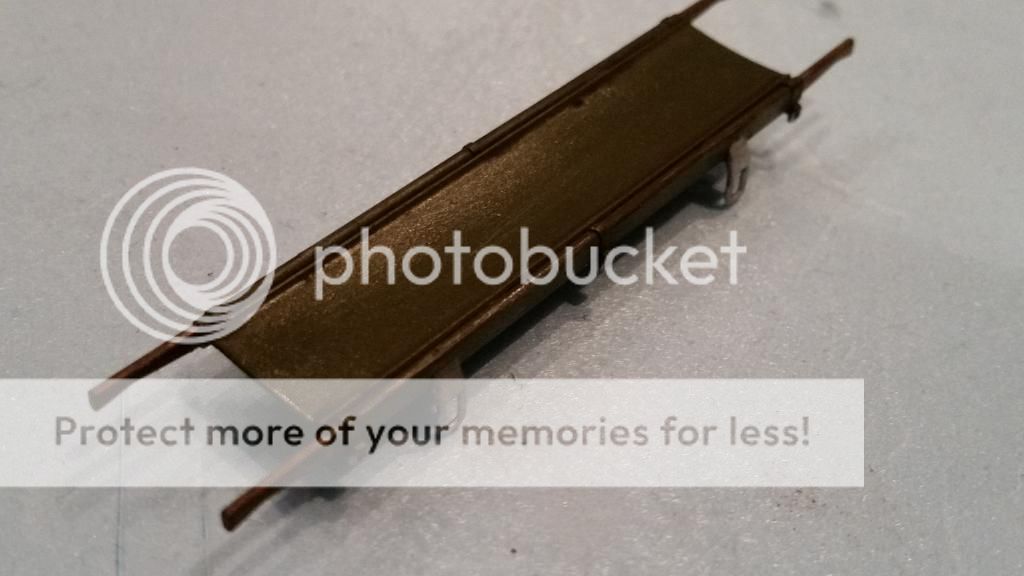
the stretcher carriers
a bit fidly at first but if you place the rails on the 4 corners first it will become a bit more ridgit and the other parts can be added with ease
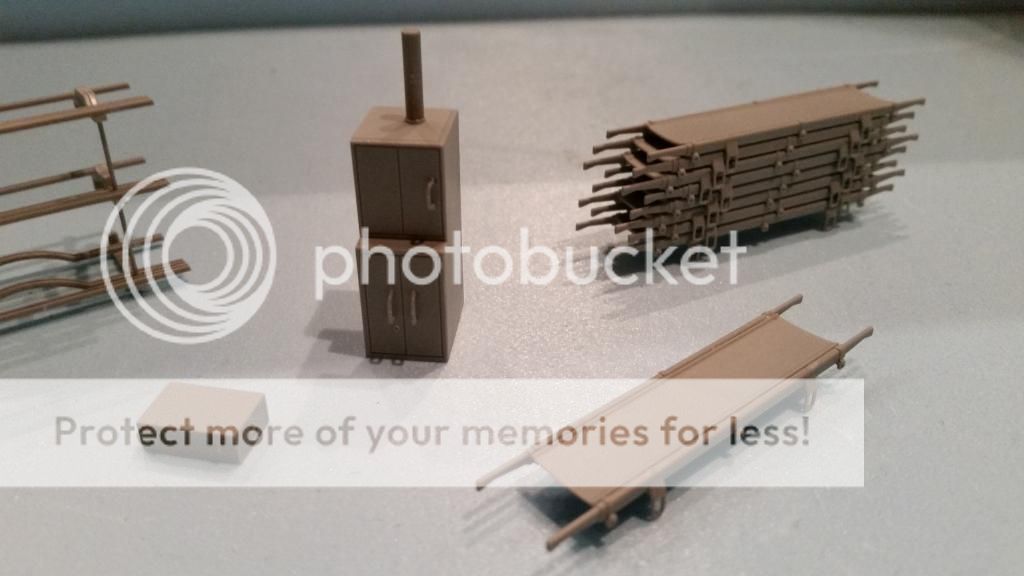
the other parts from this step
the stretchers are not the same as a field medic would use but these can be stacked and fit in the rails of the vehicle
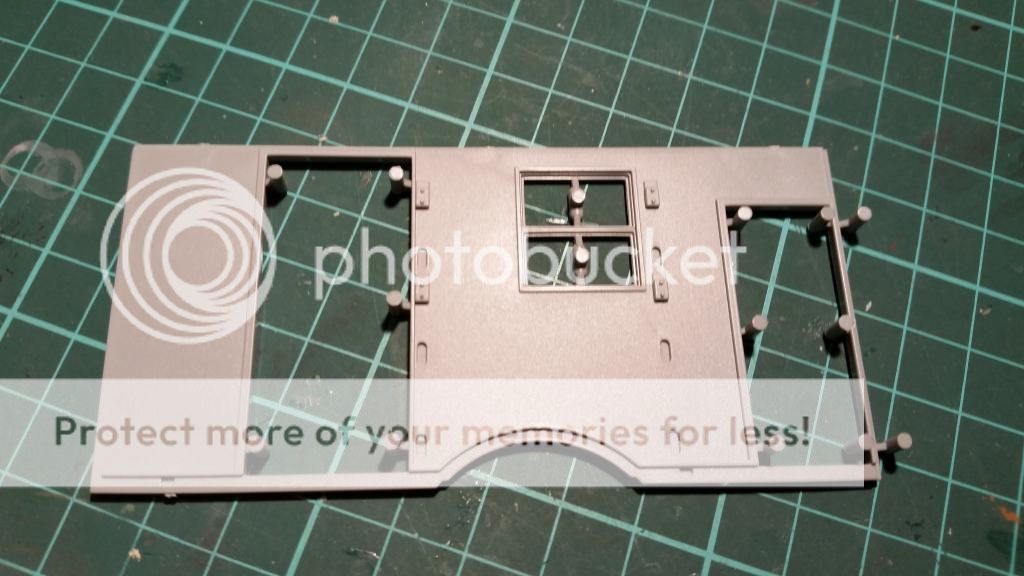
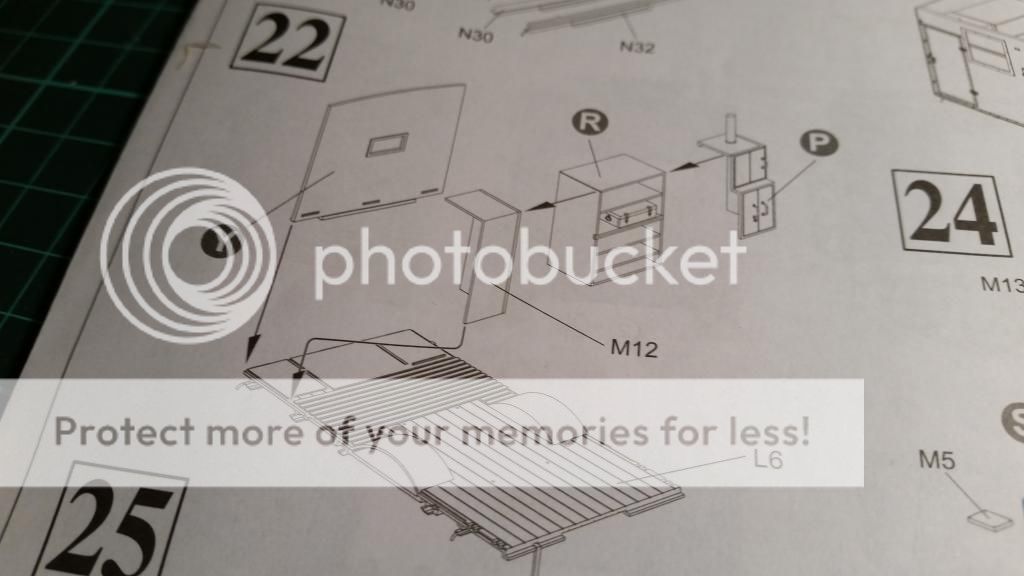
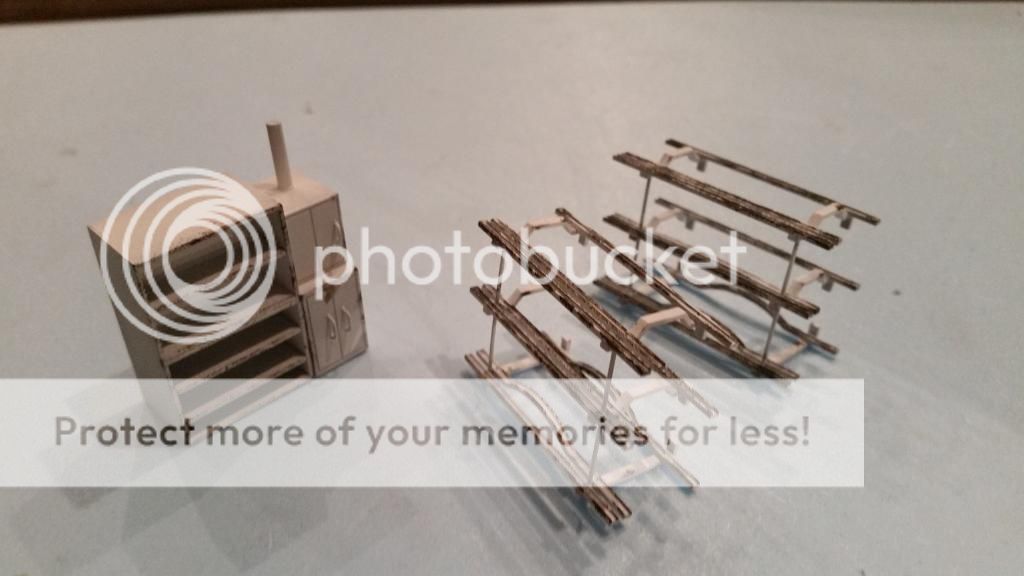
STEP 14
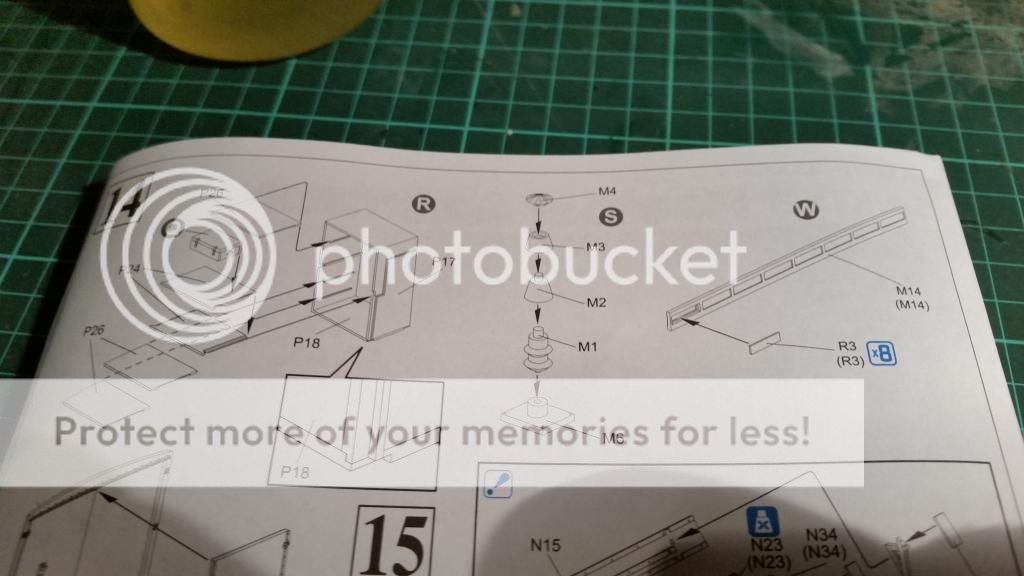
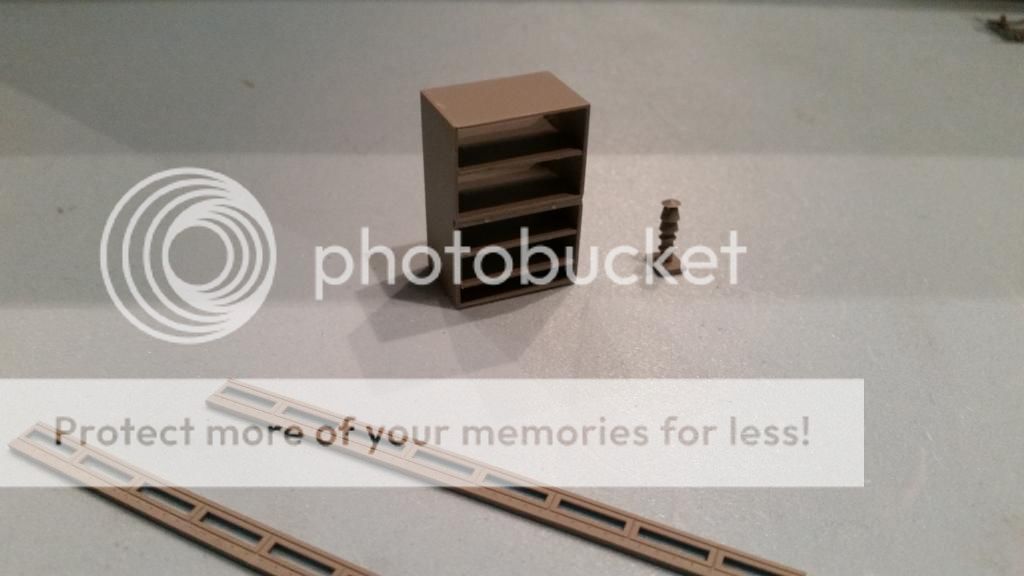
the big box should have had the box from the previous step in it
but this is a general storage cabinet so i left it out and i will put in some bits and piece from the spares box and resin collection later
i haven't put in the windows on the big strips
this saves me about a day of masking , yes i'm very slow when it comes to masking because i don't like it
STEP 15
oohh looks like a little challenge

and the stairs had proven to be a bit harder then the rest of the build
i'm beginning to doubt if it was a smart thing to glue it to the back already as it may snap off
STEP 16
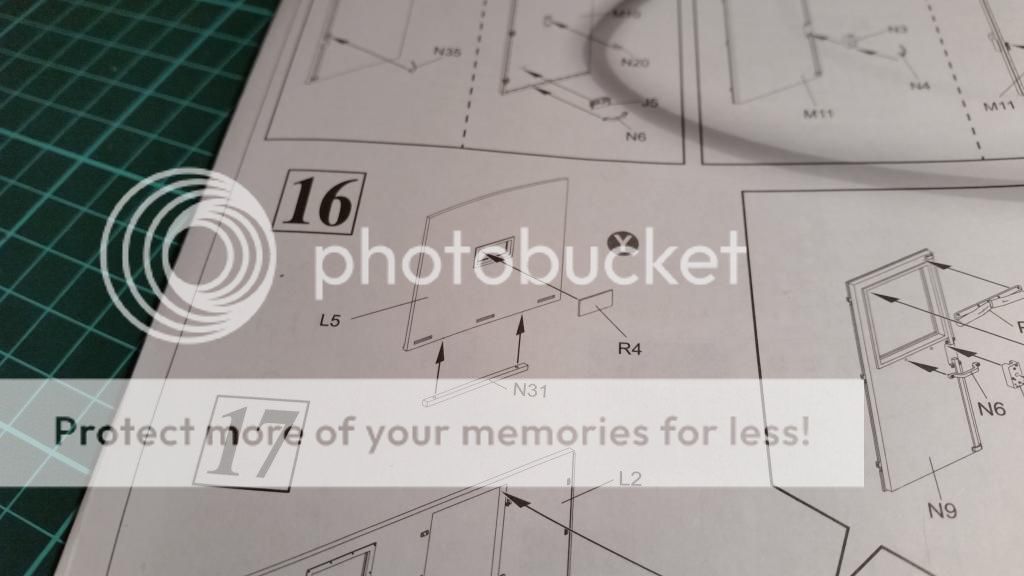
three parts and i haven't placed the window ,what a big step this was

STEP 17
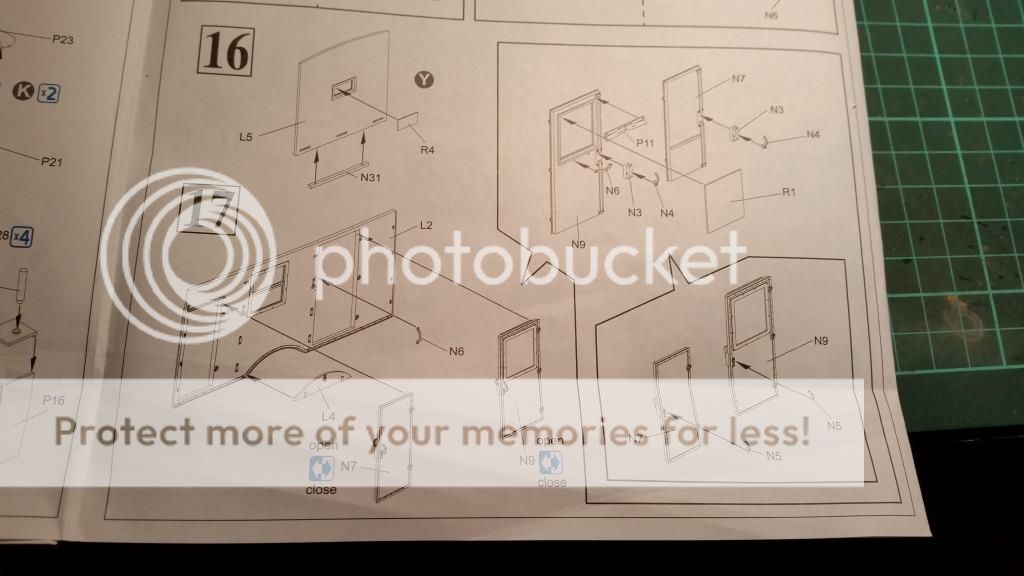
building up one of the sides
altough a bit more clean up work
no epm's and tons of sanding
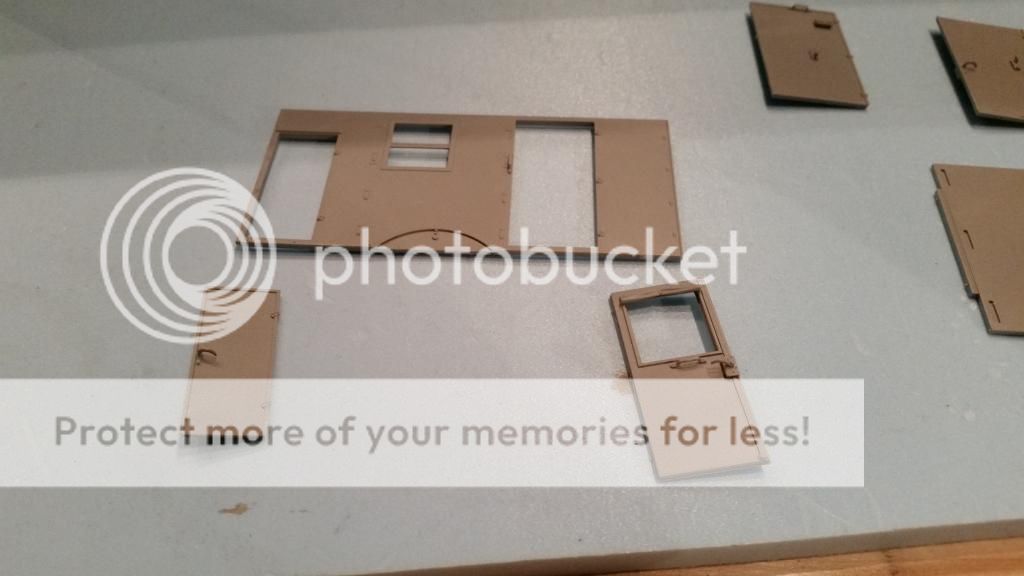
the doors have a lot of detail wich is good
and should hold a wash nicely
STEP 18
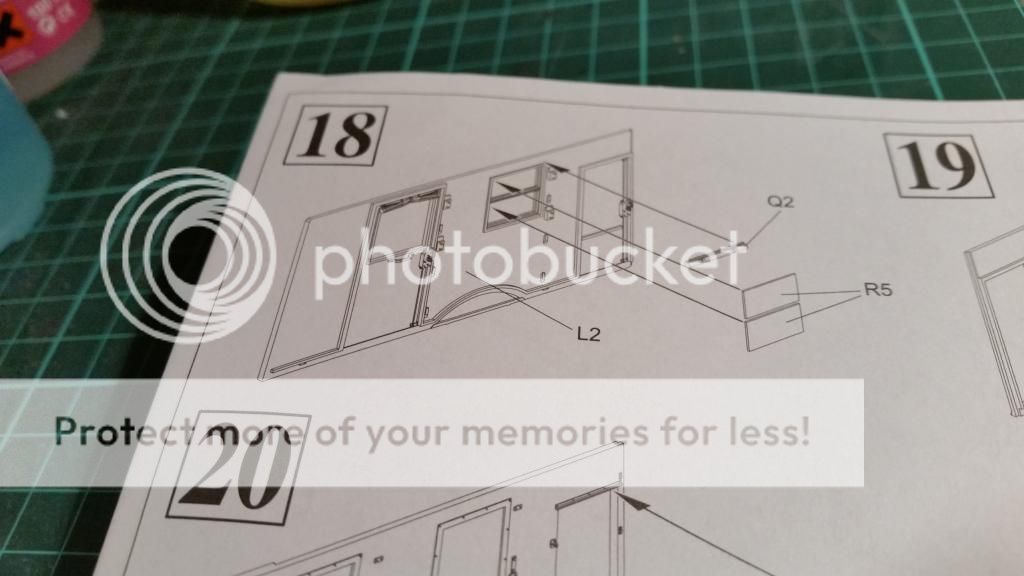
finishing the side wall
the blind has no detail on the side but it is very hard to carve it in and the part won't stand out once the construction is done
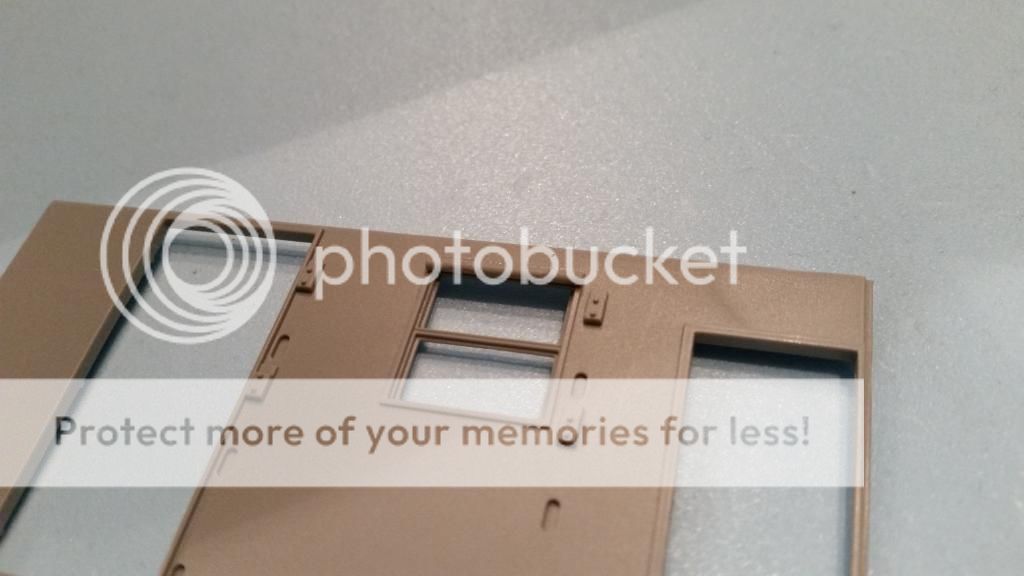
STEP 19
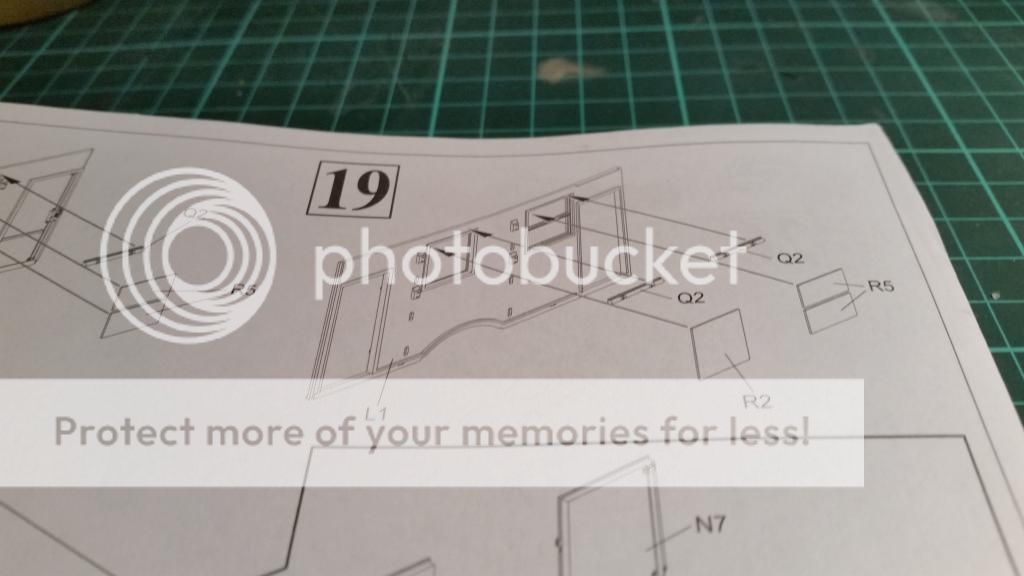
the other side wall
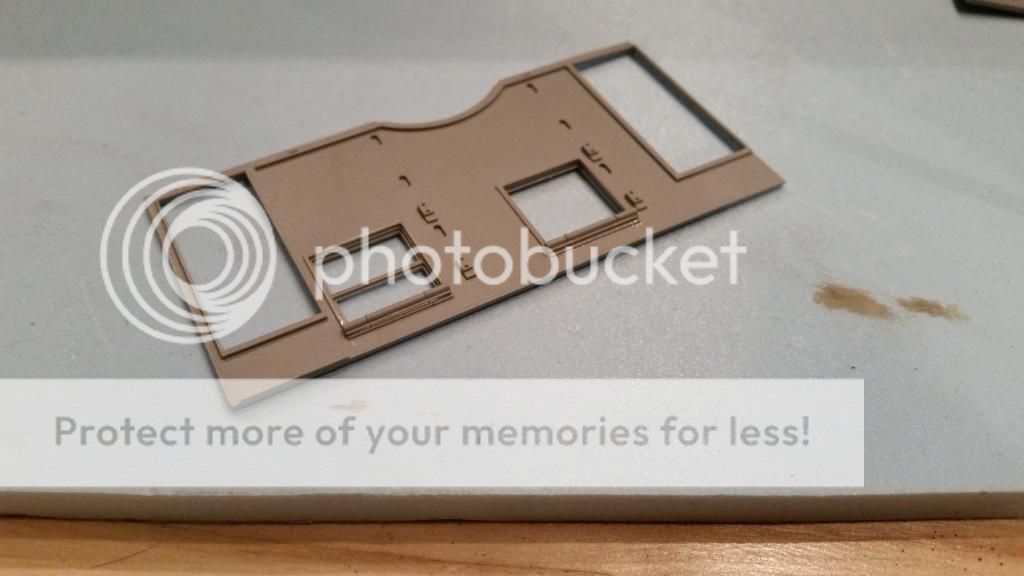
again the same thing with the blinds
STEP 20
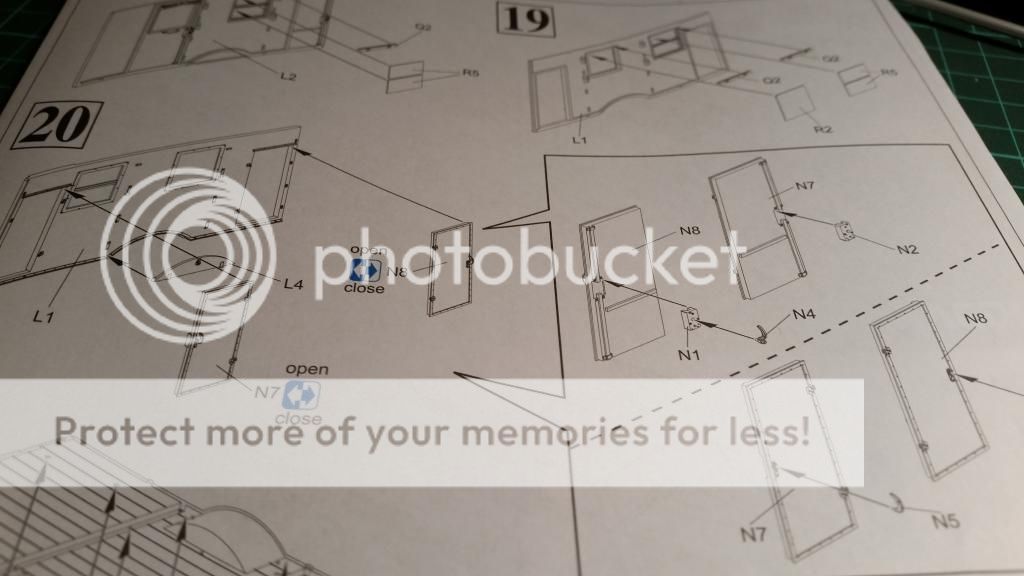
again the doors and the wheel well cover
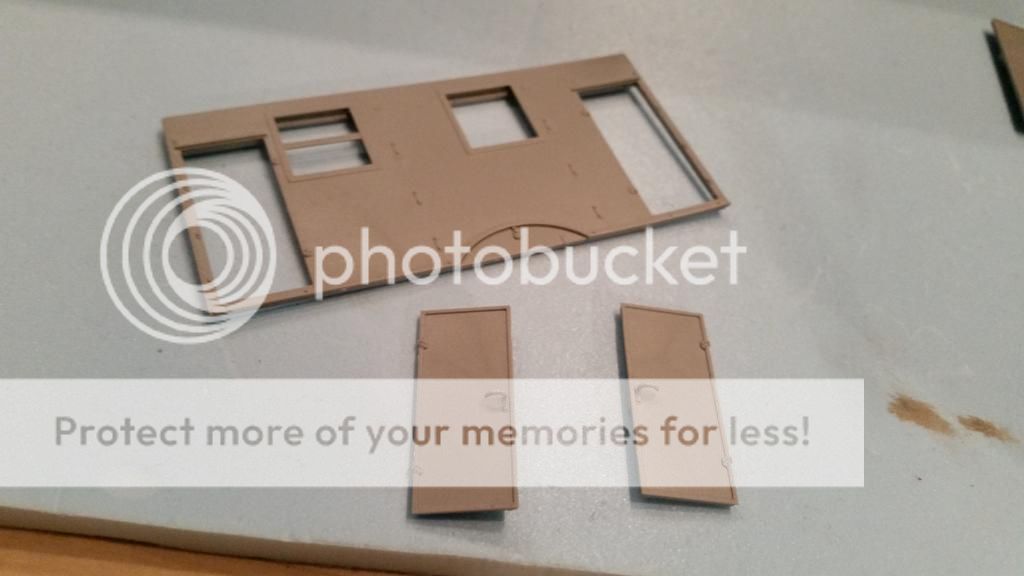
as i did with all the other doors they will remain seperate for now and once the interior is painted i will decide wich door will be opened and wich if any will be closed
STEP 21
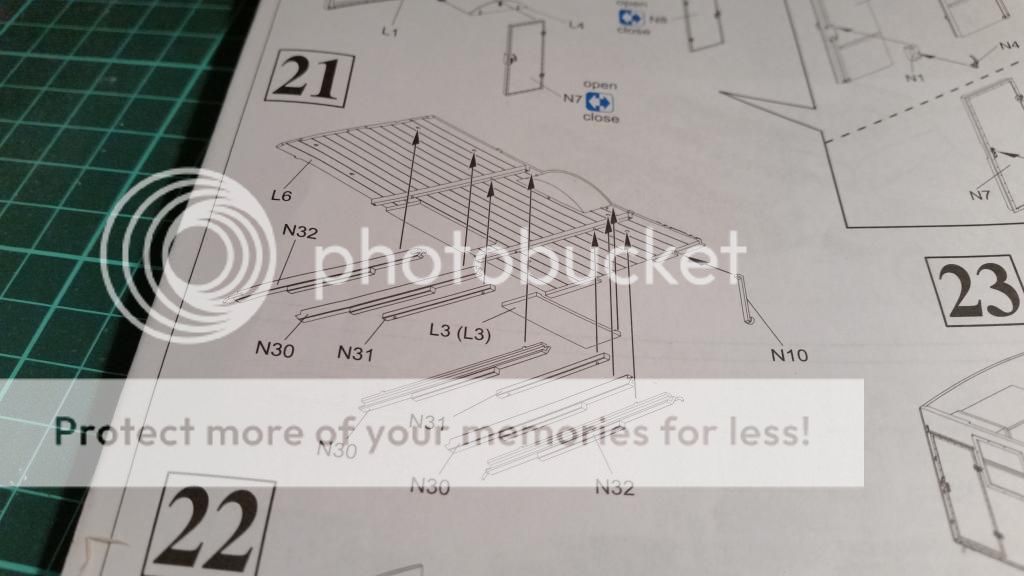
the flatbed
i left of the tail light before it ends up as a meal for the carpet monster
once the back compartment is on the chassis it will be glued in place as there is much less chance it will break by then
STEP 22
skipped , the explaination follows
STEP 23
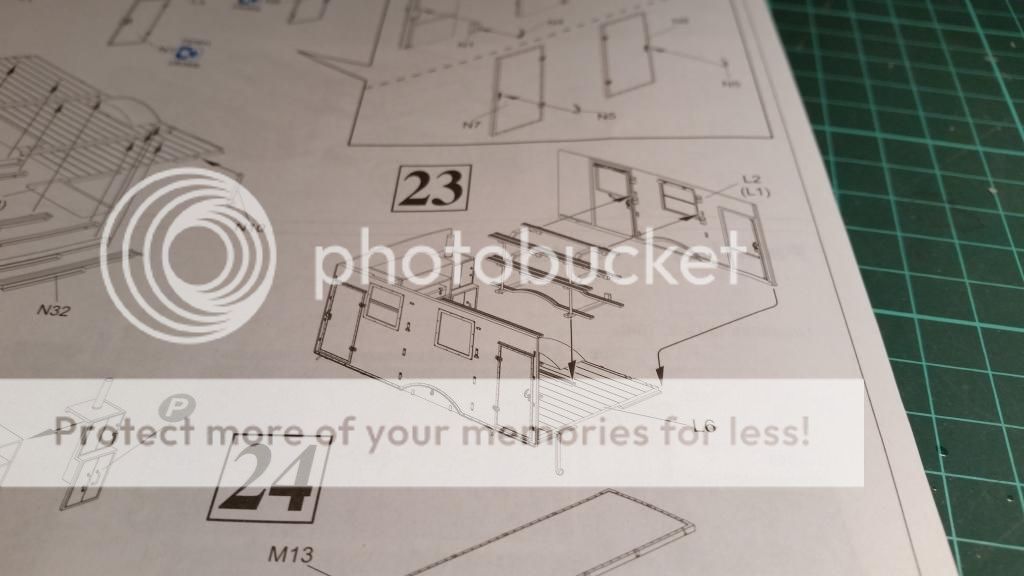
same thing here
STEP 24
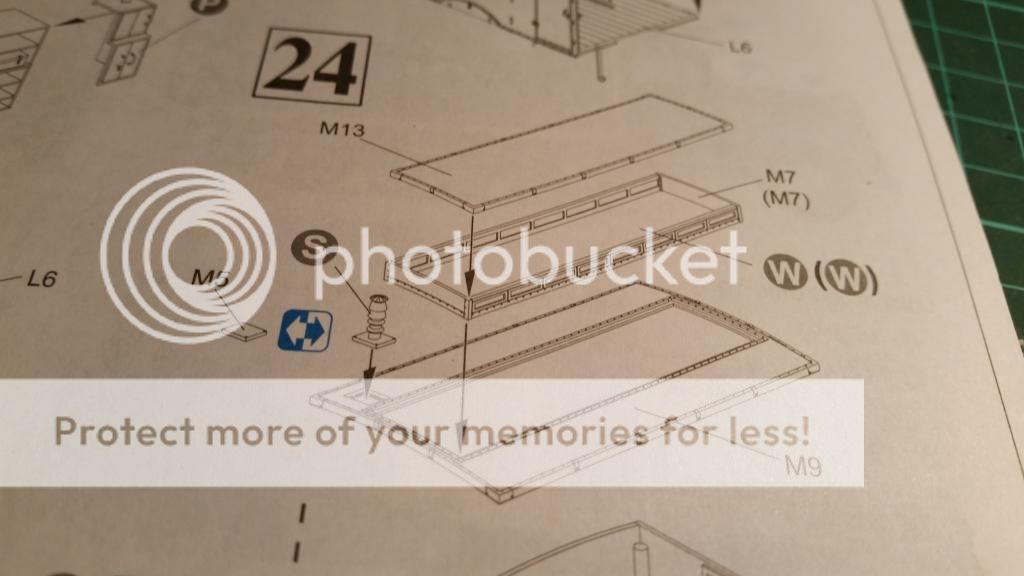
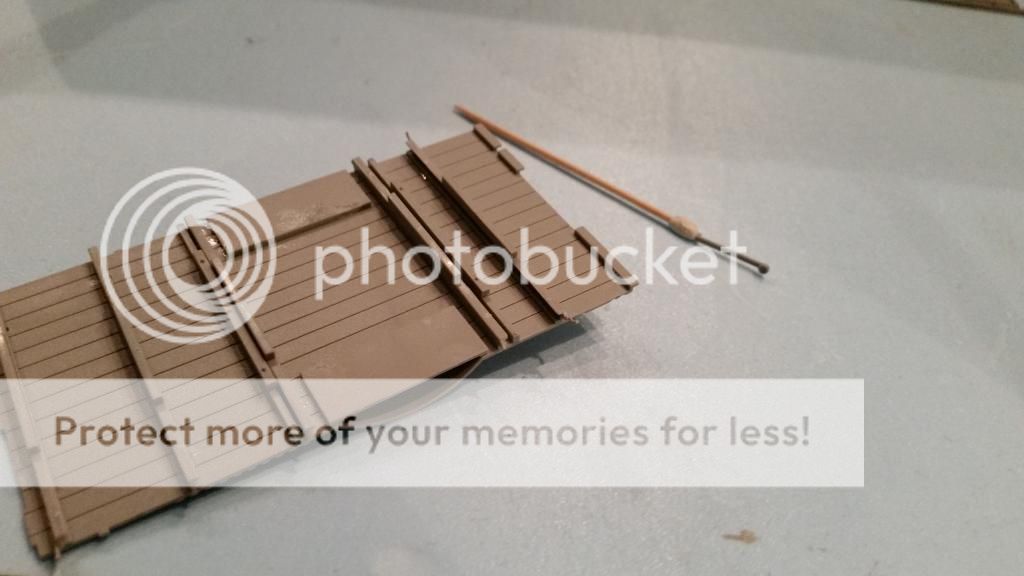
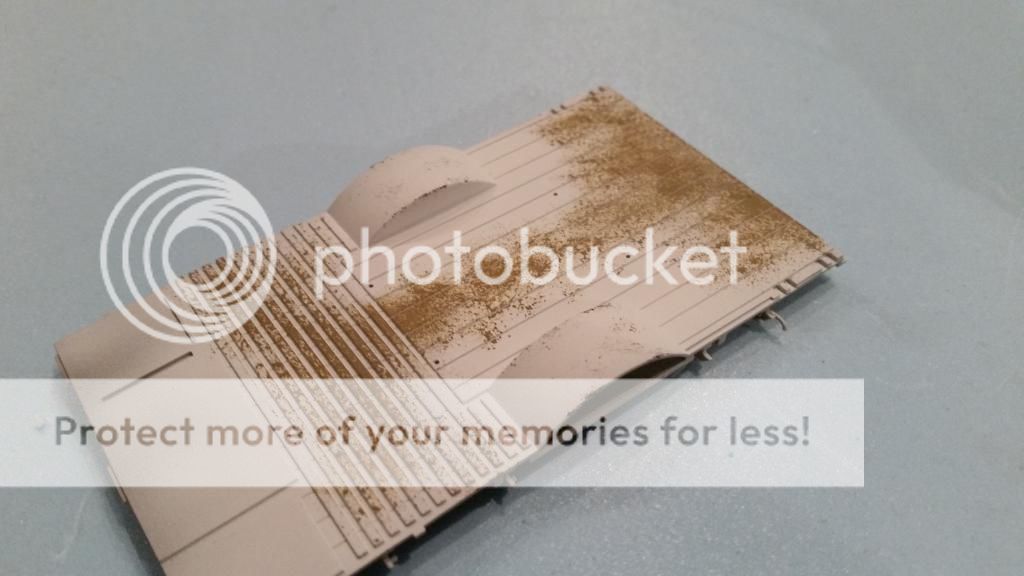
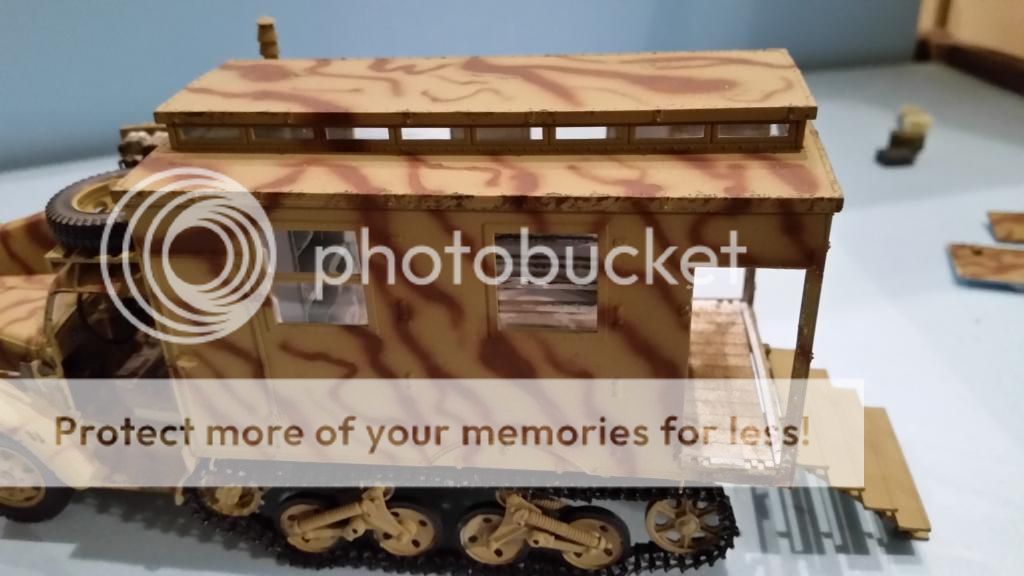
the roof construction
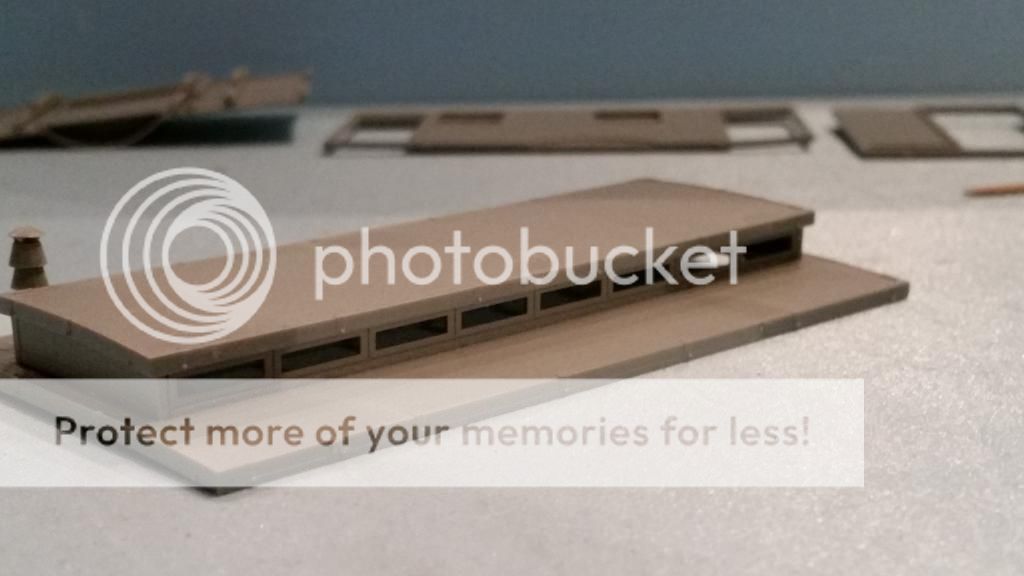
this goes together easy and as a great fit
the surface detail is good too
STEP 25
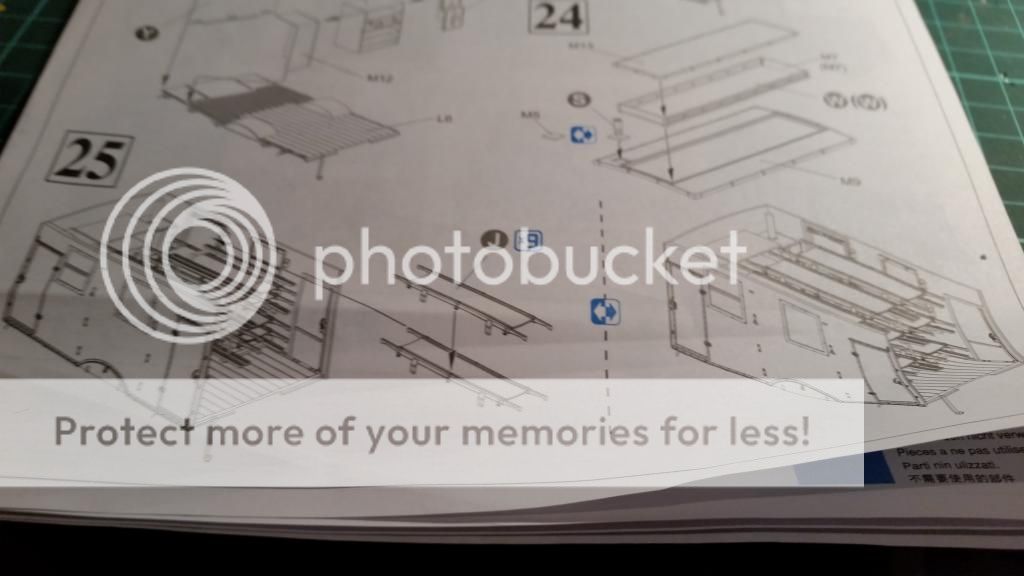
this lets you choose if you want all the stretchers in the vehicle
i skipped it for now
i will have to make a test setting of the diorama first to see how many i want on the ground the rest can go in the vehicle
step 26 will come later as this is the final fitting of the 3 components
so more a final thingy
and here is why i skipped a number of steps
this is way to thight for painting if it was assembled
so that is why it is still in pieces
this way i can get some paint on the entire surface and it makes weathering a whole lot better to do aswell
so the next step is painting the interiors of the back and the cab and i will most likely prime everything while i'm at it
and that is all i have for today i'm affraid
so thanks for watching and untill next time
cheers Mark
and
this time i have build the back compartment
well it is not really build ,i have all the pieces prepared for paint
but the last photo will explain why i haven't build it up yet
so let's go to the pictures shall we
STEP 13

i don't know why it is on there but part K on the top right is no where to be seen in the instructions later on
i guess it is part of a other Maultier version and wasn't removed from the instructions

the stretcher carriers
a bit fidly at first but if you place the rails on the 4 corners first it will become a bit more ridgit and the other parts can be added with ease

the other parts from this step
the stretchers are not the same as a field medic would use but these can be stacked and fit in the rails of the vehicle
STEP 14


the big box should have had the box from the previous step in it
but this is a general storage cabinet so i left it out and i will put in some bits and piece from the spares box and resin collection later
i haven't put in the windows on the big strips
this saves me about a day of masking , yes i'm very slow when it comes to masking because i don't like it
STEP 15

oohh looks like a little challenge

and the stairs had proven to be a bit harder then the rest of the build
i'm beginning to doubt if it was a smart thing to glue it to the back already as it may snap off
STEP 16

three parts and i haven't placed the window ,what a big step this was

STEP 17

building up one of the sides

altough a bit more clean up work
no epm's and tons of sanding

the doors have a lot of detail wich is good
and should hold a wash nicely
STEP 18

finishing the side wall

the blind has no detail on the side but it is very hard to carve it in and the part won't stand out once the construction is done
STEP 19

the other side wall

again the same thing with the blinds
STEP 20

again the doors and the wheel well cover

as i did with all the other doors they will remain seperate for now and once the interior is painted i will decide wich door will be opened and wich if any will be closed
STEP 21

the flatbed

i left of the tail light before it ends up as a meal for the carpet monster
once the back compartment is on the chassis it will be glued in place as there is much less chance it will break by then
STEP 22

skipped , the explaination follows
STEP 23

same thing here
STEP 24

the roof construction

this goes together easy and as a great fit
the surface detail is good too
STEP 25

this lets you choose if you want all the stretchers in the vehicle
i skipped it for now
i will have to make a test setting of the diorama first to see how many i want on the ground the rest can go in the vehicle
step 26 will come later as this is the final fitting of the 3 components
so more a final thingy
and here is why i skipped a number of steps

this is way to thight for painting if it was assembled
so that is why it is still in pieces
this way i can get some paint on the entire surface and it makes weathering a whole lot better to do aswell
so the next step is painting the interiors of the back and the cab and i will most likely prime everything while i'm at it
and that is all i have for today i'm affraid
so thanks for watching and untill next time
cheers Mark
On the bench
GB builds
1/35 Trumpeter M1132 ESV
Personal builds
1/35 Hobby Boss M1070 tractor with M1000 semi trailer and Meng M1A2 TUSK II Abrams
1/35 Takom V2 rocket with the Meillerwagen and SS100 tractor
GB builds
1/35 Trumpeter M1132 ESV
Personal builds
1/35 Hobby Boss M1070 tractor with M1000 semi trailer and Meng M1A2 TUSK II Abrams
1/35 Takom V2 rocket with the Meillerwagen and SS100 tractor
-
MarkVerploeg
- Major
- Posts: 4837
- Joined: Wed Oct 16, 2013 12:21 am
- Location: Oss, Noord Braband The Netherlands
Re: Dragon 1:35 flakpanzer 38t and Opel Maultier ambulance
A small addition to the update
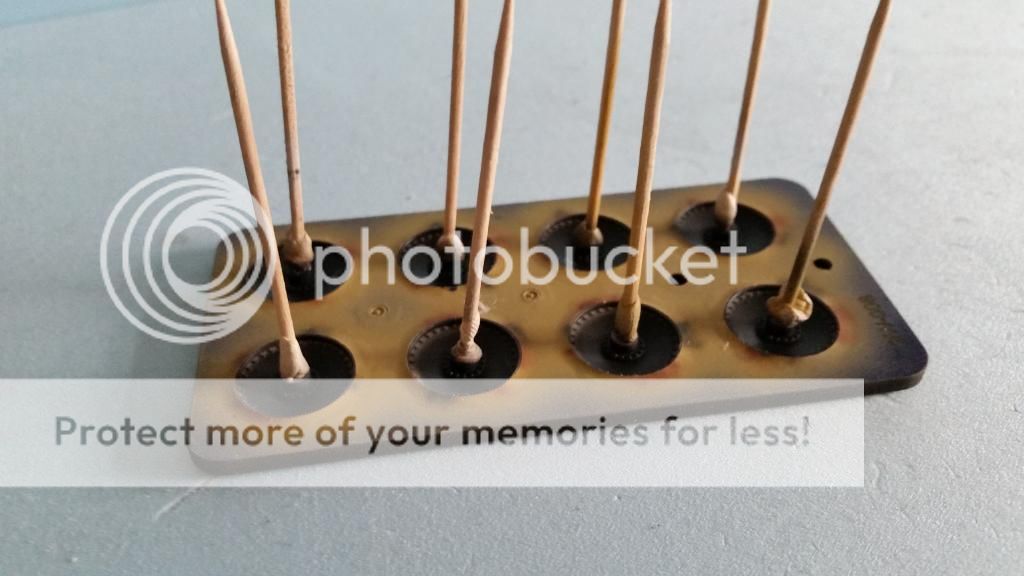
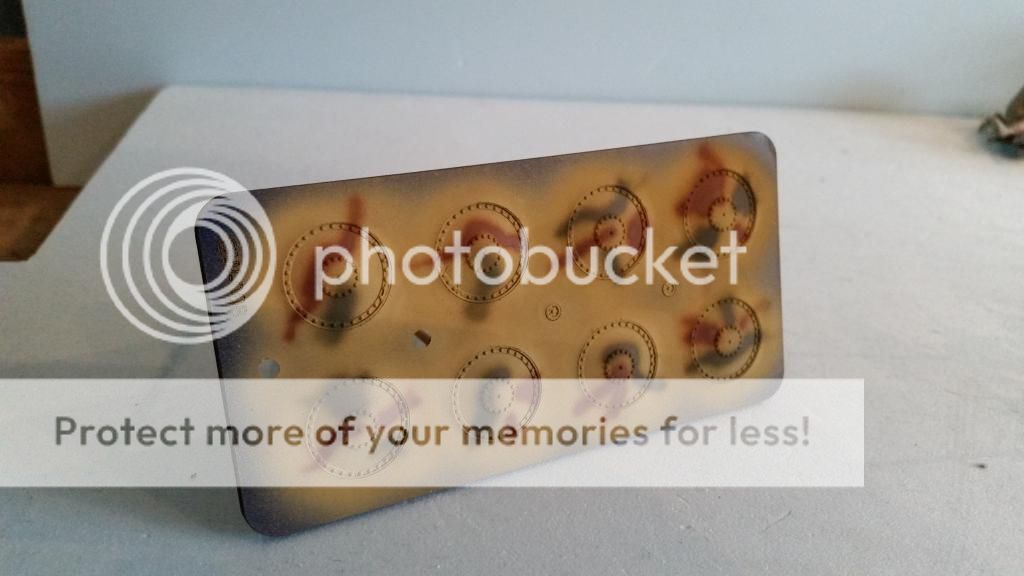
Welcome to the styrene forest

this is the way i prep all the parts for priming and painting
Cheers Mark
Welcome to the styrene forest

this is the way i prep all the parts for priming and painting
Cheers Mark
On the bench
GB builds
1/35 Trumpeter M1132 ESV
Personal builds
1/35 Hobby Boss M1070 tractor with M1000 semi trailer and Meng M1A2 TUSK II Abrams
1/35 Takom V2 rocket with the Meillerwagen and SS100 tractor
GB builds
1/35 Trumpeter M1132 ESV
Personal builds
1/35 Hobby Boss M1070 tractor with M1000 semi trailer and Meng M1A2 TUSK II Abrams
1/35 Takom V2 rocket with the Meillerwagen and SS100 tractor
-
MarkVerploeg
- Major
- Posts: 4837
- Joined: Wed Oct 16, 2013 12:21 am
- Location: Oss, Noord Braband The Netherlands
Re: Dragon 1:35 flakpanzer 38t and Opel Maultier ambulance
hi guys
so a new update
the Maultier is getting there but is still not finished as i underesstemated the amount of work that comes with it
i did do most of the work for the interiors of the back and the cab
so here is the progress so far
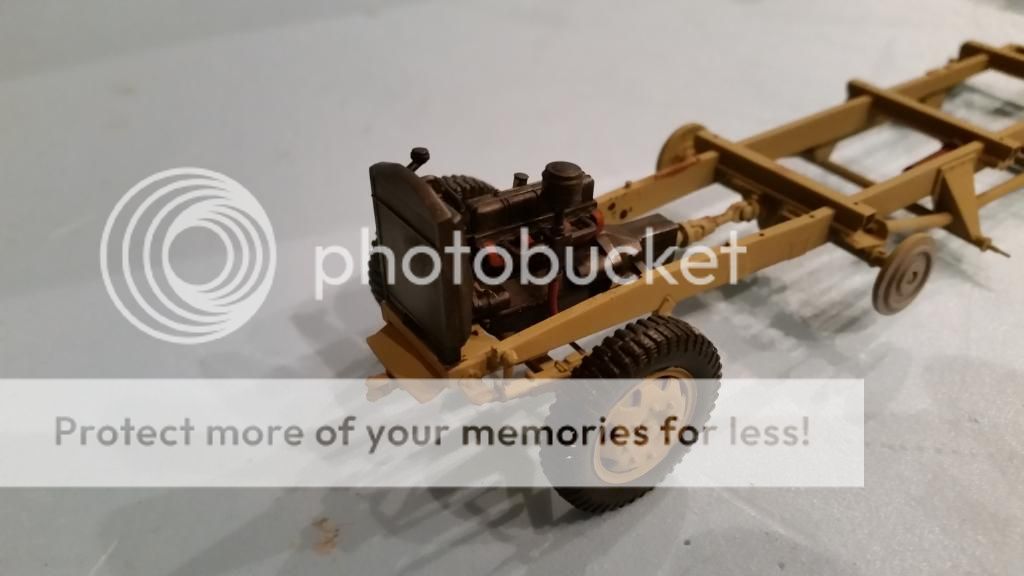
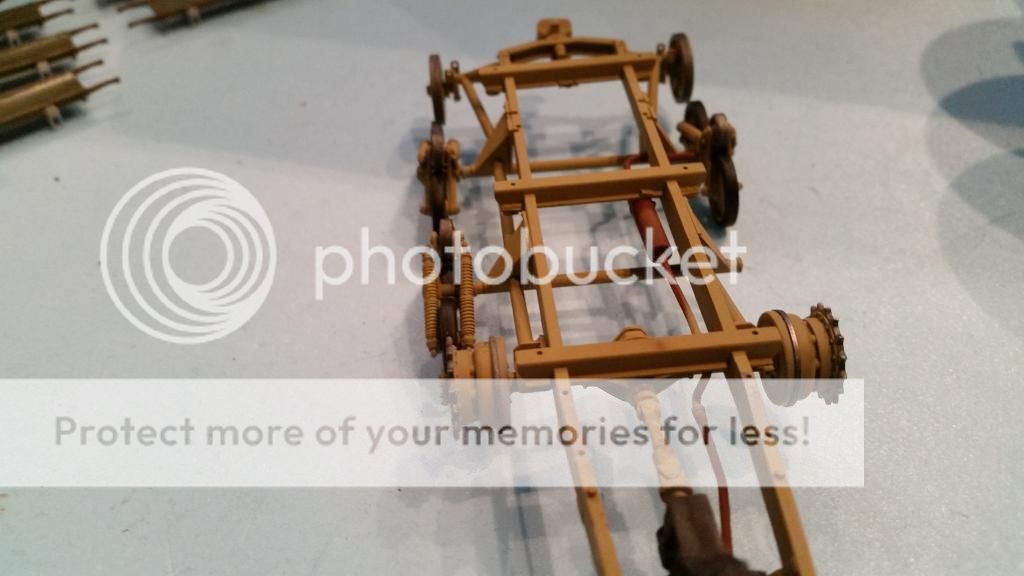
i started with the chassis
the base color is tamiya dark yellow mixed with buff in a 5:1 ratio
the engine is hand painted with mr metal dark iron and then slightly buffed
the rust is made by mixing mig productions old rust pigments with a drop of tamiya thinner to amke a sort of paint
this was then brushed on the exhaust
the tyres where painted with revell 09 antracite but unlike the normal paint i have thinned mine to use in the airbrush so the covering is a bit bad since i brush painted it , i need a second coat to get a good result
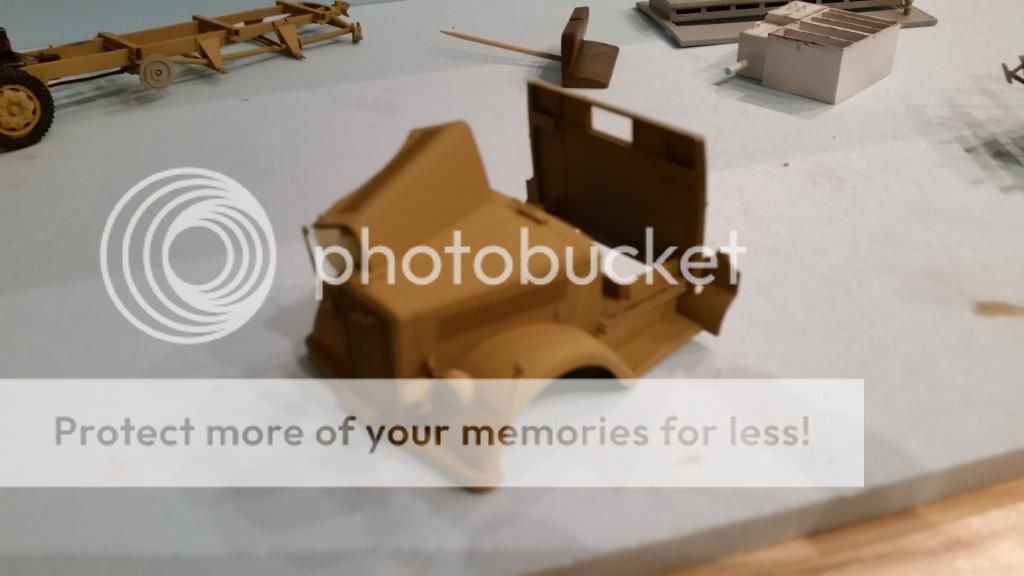
the entire cab is painted with dark yellow
the seats are painted with vallejo leather brown
then i mixed in a bit of vallejo german camo beige this was done in about a 3:1 ratio
this color was dry brushed over the most used parts of the seats

next a bit of mig dark wash to get some shadow in the creases
the most wear sensitive areas of the cab floor where chipped with a sponge and vallejo german came black brown
this was repeated with vallejo gunmetal grey but i kept these chips a bit smaller
this way you get the effect of bare metal inside the rusted paintchipping
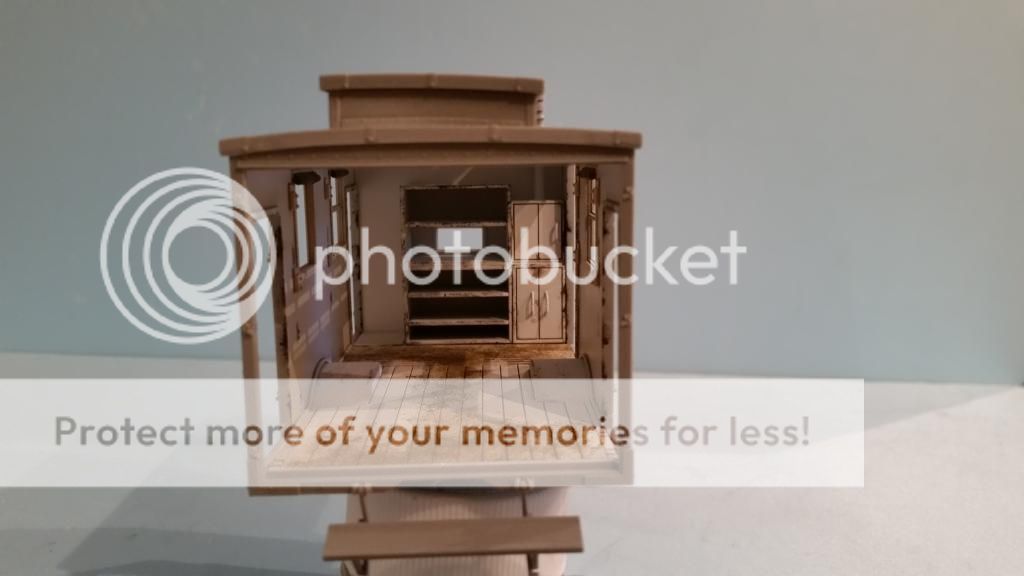
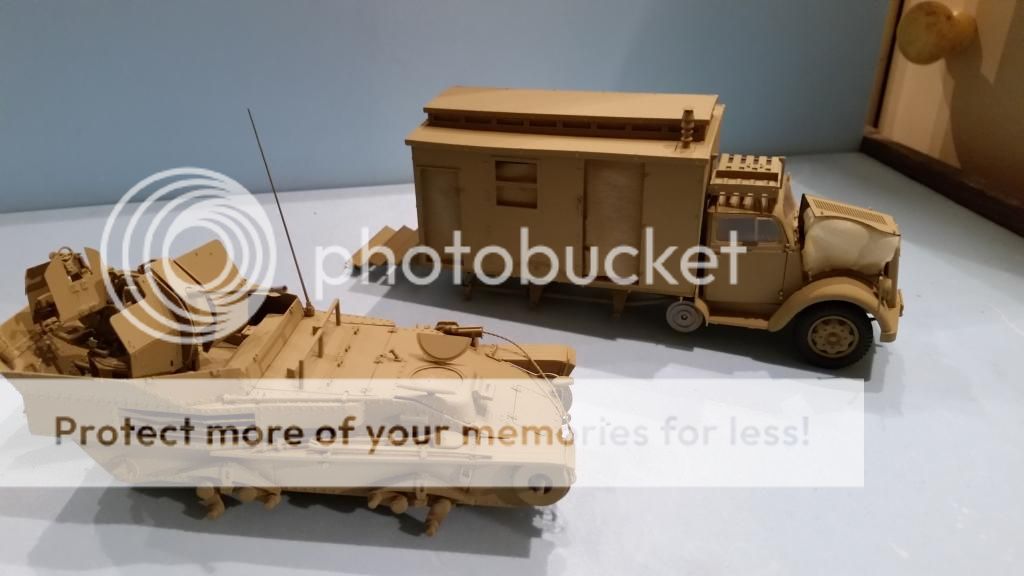
next up the back compartment
first the white base color
to get some wear and tear on the floor i used the sponge method again
the paint is a mix of vallejo English uniform and white mixed 5:1 (roughly) this gives a nice wood color
a bit hard to see but i did some chipping on these parts
the color is again is german camo black brown
the stretcher holders have these chips on the top sides of the rails where the stretcher is slided on and bumps into during use
next i used a pencil to crete the metal effect inside the rails
and a bit of neutral wash by mig on some edges
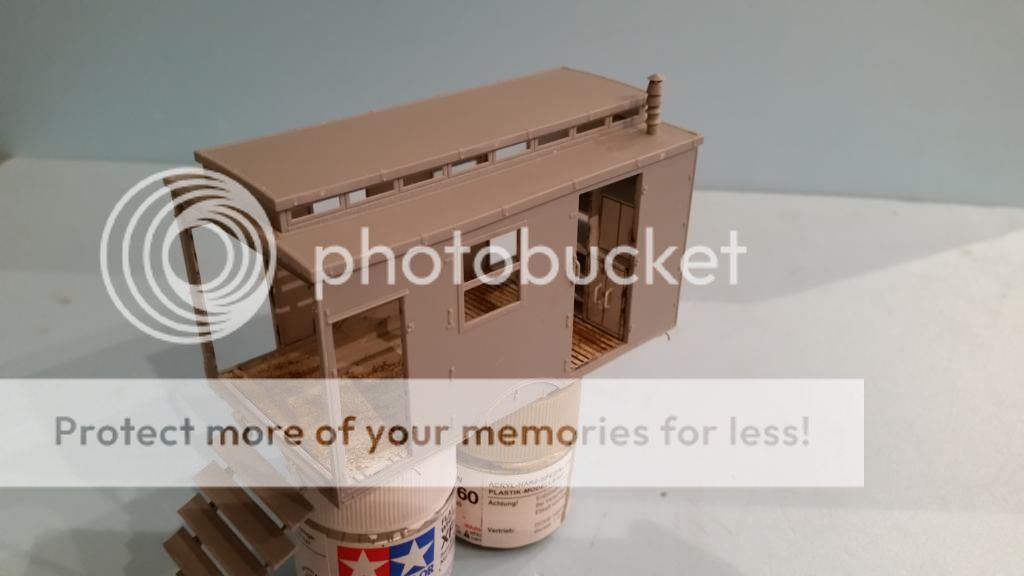
then i glued the side walls to the baseplate
a touch that i like is that the roof is not glued
this way i can put in the stretcher holders and other stuff later on
it also makes masking the windows and doors a easy thing
the same stage
but from the back to the front
once the cab interior is done i can start masking and painting of the exterior
but that is all i have for now
i hope you like it and untill next time
cheers Mark
so a new update
the Maultier is getting there but is still not finished as i underesstemated the amount of work that comes with it
i did do most of the work for the interiors of the back and the cab
so here is the progress so far

i started with the chassis
the base color is tamiya dark yellow mixed with buff in a 5:1 ratio
the engine is hand painted with mr metal dark iron and then slightly buffed
the rust is made by mixing mig productions old rust pigments with a drop of tamiya thinner to amke a sort of paint
this was then brushed on the exhaust
the tyres where painted with revell 09 antracite but unlike the normal paint i have thinned mine to use in the airbrush so the covering is a bit bad since i brush painted it , i need a second coat to get a good result

the entire cab is painted with dark yellow

the seats are painted with vallejo leather brown
then i mixed in a bit of vallejo german camo beige this was done in about a 3:1 ratio
this color was dry brushed over the most used parts of the seats

next a bit of mig dark wash to get some shadow in the creases

the most wear sensitive areas of the cab floor where chipped with a sponge and vallejo german came black brown
this was repeated with vallejo gunmetal grey but i kept these chips a bit smaller
this way you get the effect of bare metal inside the rusted paintchipping

next up the back compartment
first the white base color

to get some wear and tear on the floor i used the sponge method again
the paint is a mix of vallejo English uniform and white mixed 5:1 (roughly) this gives a nice wood color

a bit hard to see but i did some chipping on these parts
the color is again is german camo black brown

the stretcher holders have these chips on the top sides of the rails where the stretcher is slided on and bumps into during use

next i used a pencil to crete the metal effect inside the rails
and a bit of neutral wash by mig on some edges

then i glued the side walls to the baseplate
a touch that i like is that the roof is not glued
this way i can put in the stretcher holders and other stuff later on
it also makes masking the windows and doors a easy thing

the same stage
but from the back to the front
once the cab interior is done i can start masking and painting of the exterior
but that is all i have for now
i hope you like it and untill next time
cheers Mark
On the bench
GB builds
1/35 Trumpeter M1132 ESV
Personal builds
1/35 Hobby Boss M1070 tractor with M1000 semi trailer and Meng M1A2 TUSK II Abrams
1/35 Takom V2 rocket with the Meillerwagen and SS100 tractor
GB builds
1/35 Trumpeter M1132 ESV
Personal builds
1/35 Hobby Boss M1070 tractor with M1000 semi trailer and Meng M1A2 TUSK II Abrams
1/35 Takom V2 rocket with the Meillerwagen and SS100 tractor
-
DC87

- Chief Warrant Officer 2

- Posts: 1799
- Joined: Wed Jun 05, 2013 7:16 pm
- Location: Exeter, Devon, UK

Re: Dragon 1:35 flakpanzer 38t and Opel Maultier ambulance
Incredible work on both kits - inspired me to order the Maultier Ambulance, allot of scope for diorama's inside.
Dan C
Filling the workbench with:
Sopwith Snipe late post war
WW1 RFC SE5a
WW1-1/32 Snipe
Workbench gets full with models being built - Buys another workbench!
Filling the workbench with:
Sopwith Snipe late post war
WW1 RFC SE5a
WW1-1/32 Snipe
Workbench gets full with models being built - Buys another workbench!
-
MarkVerploeg
- Major
- Posts: 4837
- Joined: Wed Oct 16, 2013 12:21 am
- Location: Oss, Noord Braband The Netherlands
Re: Dragon 1:35 flakpanzer 38t and Opel Maultier ambulance
Thanks DanDC87 wrote:Incredible work on both kits - inspired me to order the Maultier Ambulance, allot of scope for diorama's inside.
It is a good kit and there are lots of diorama settings that can be made with this kit
It is a bit of a shame that there are not that many figures for something like this
Atleast i haven't found many medics and wounded soldiers
Cheers Mark
On the bench
GB builds
1/35 Trumpeter M1132 ESV
Personal builds
1/35 Hobby Boss M1070 tractor with M1000 semi trailer and Meng M1A2 TUSK II Abrams
1/35 Takom V2 rocket with the Meillerwagen and SS100 tractor
GB builds
1/35 Trumpeter M1132 ESV
Personal builds
1/35 Hobby Boss M1070 tractor with M1000 semi trailer and Meng M1A2 TUSK II Abrams
1/35 Takom V2 rocket with the Meillerwagen and SS100 tractor
-
Nige201980
- Captain
- Posts: 4095
- Joined: Wed Jun 05, 2013 9:30 am
- Location: Doncaster South Yorkshire UK
- Contact:
Re: Dragon 1:35 flakpanzer 38t and Opel Maultier ambulance
Fantastic work mate can't wait to see the finished article
http://www.youtube.com/channel/UCy-TGcs5u_ZXSZ9kObNfsPg
On the go at the Mo
Quite a few
On the go at the Mo
Quite a few
-
MarkVerploeg
- Major
- Posts: 4837
- Joined: Wed Oct 16, 2013 12:21 am
- Location: Oss, Noord Braband The Netherlands
Re: Dragon 1:35 flakpanzer 38t and Opel Maultier ambulance
Thanks NigeNige201980 wrote:Fantastic work mate can't wait to see the finished article
That finished article may take a while though
I'm not sure about the diorama yet if i will use a piece of building or a wall i would have to scratch build that
Wich takes more time as i rarely do that
But i am sure i will get the build done in time
Cheers Mark
On the bench
GB builds
1/35 Trumpeter M1132 ESV
Personal builds
1/35 Hobby Boss M1070 tractor with M1000 semi trailer and Meng M1A2 TUSK II Abrams
1/35 Takom V2 rocket with the Meillerwagen and SS100 tractor
GB builds
1/35 Trumpeter M1132 ESV
Personal builds
1/35 Hobby Boss M1070 tractor with M1000 semi trailer and Meng M1A2 TUSK II Abrams
1/35 Takom V2 rocket with the Meillerwagen and SS100 tractor
-
UKguyInUSA
- Second Lieutenant
- Posts: 3429
- Joined: Sun Mar 30, 2014 10:19 pm
- Location: New Hampshire, USA formerly Palm Beach, Florida, USA and Leicestershire, UK (until 1999)
- Contact:
Re: Dragon 1:35 flakpanzer 38t and Opel Maultier ambulance
Love the wear and tear sponged effect on the woodwork...I need to look for a video showing how to do that. 
WIP:: Tamiya 1/48 F4U-1A Corsair
Non-WIP::Eduard 1/48 Fokker DVII, Revell 1/32 Arado AR196 and 1/32 BF109G10 Erla,
Non-WIP::Eduard 1/48 Fokker DVII, Revell 1/32 Arado AR196 and 1/32 BF109G10 Erla,
-
MarkVerploeg
- Major
- Posts: 4837
- Joined: Wed Oct 16, 2013 12:21 am
- Location: Oss, Noord Braband The Netherlands
Re: Dragon 1:35 flakpanzer 38t and Opel Maultier ambulance
Thanks mateUKguyInUSA wrote:Love the wear and tear sponged effect on the woodwork...I need to look for a video showing how to do that.
I don't knownif there is one with wood but that is only the paint color
I think there are video's wich have it
If you search for "mig jiminez" or "vallejo" there should be some video's
I know there is one from warfare in scale about a opel blitz with a flak cannon on the back
It is in Spanish but has subtitles and the guy shows how it works
Cheers Mark
On the bench
GB builds
1/35 Trumpeter M1132 ESV
Personal builds
1/35 Hobby Boss M1070 tractor with M1000 semi trailer and Meng M1A2 TUSK II Abrams
1/35 Takom V2 rocket with the Meillerwagen and SS100 tractor
GB builds
1/35 Trumpeter M1132 ESV
Personal builds
1/35 Hobby Boss M1070 tractor with M1000 semi trailer and Meng M1A2 TUSK II Abrams
1/35 Takom V2 rocket with the Meillerwagen and SS100 tractor


Re: Dragon 1:35 flakpanzer 38t and Opel Maultier ambulance
Wow, fantastic work going on here !  following with interest !
-
MarkVerploeg
- Major
- Posts: 4837
- Joined: Wed Oct 16, 2013 12:21 am
- Location: Oss, Noord Braband The Netherlands
Re: Dragon 1:35 flakpanzer 38t and Opel Maultier ambulance
Thank youPabbi wrote:Wow, fantastic work going on here !
Glad you like it so far
It will take some time before it is finished though
Cheers Mark
On the bench
GB builds
1/35 Trumpeter M1132 ESV
Personal builds
1/35 Hobby Boss M1070 tractor with M1000 semi trailer and Meng M1A2 TUSK II Abrams
1/35 Takom V2 rocket with the Meillerwagen and SS100 tractor
GB builds
1/35 Trumpeter M1132 ESV
Personal builds
1/35 Hobby Boss M1070 tractor with M1000 semi trailer and Meng M1A2 TUSK II Abrams
1/35 Takom V2 rocket with the Meillerwagen and SS100 tractor
-
fly1ngdutchm4n

- First Lieutenant

- Posts: 3554
- Joined: Fri Aug 09, 2013 11:17 pm
- Location: Hoogerheide The Netherlands
Re: Dragon 1:35 flakpanzer 38t and Opel Maultier ambulance
woah! 
Great work so far Mark!
Great work so far Mark!
Build what you love, Love what you build
-
MarkVerploeg
- Major
- Posts: 4837
- Joined: Wed Oct 16, 2013 12:21 am
- Location: Oss, Noord Braband The Netherlands
Re: Dragon 1:35 flakpanzer 38t and Opel Maultier ambulance
Thanls Fransfly1ngdutchm4n wrote:woah!
Great work so far Mark!
I got paint on both the builds now
I'm happy with the ambulance and it's tiger stripes but i completely messed up the flakpanzer
It looks like i used an airbrush for the first time
So i will clean it up and have a second try but that will take a few days
Good thing the panther that i'm building has a good paintjob or i would be getting insane
On the bench
GB builds
1/35 Trumpeter M1132 ESV
Personal builds
1/35 Hobby Boss M1070 tractor with M1000 semi trailer and Meng M1A2 TUSK II Abrams
1/35 Takom V2 rocket with the Meillerwagen and SS100 tractor
GB builds
1/35 Trumpeter M1132 ESV
Personal builds
1/35 Hobby Boss M1070 tractor with M1000 semi trailer and Meng M1A2 TUSK II Abrams
1/35 Takom V2 rocket with the Meillerwagen and SS100 tractor
-
fly1ngdutchm4n
- First Lieutenant
- Posts: 3554
- Joined: Fri Aug 09, 2013 11:17 pm
- Location: Hoogerheide The Netherlands
Re: Dragon 1:35 flakpanzer 38t and Opel Maultier ambulance
Been there, done that....MarkVerploeg wrote:Thanls Fransfly1ngdutchm4n wrote:woah!
Great work so far Mark!
I got paint on both the builds now
I'm happy with the ambulance and it's tiger stripes but i completely messed up the flakpanzer
It looks like i used an airbrush for the first time
So i will clean it up and have a second try but that will take a few days
Good thing the panther that i'm building has a good paintjob or i would be getting insane
Had the same problem ones...
It sucks big time, but the second time you will paint it, it will look awesome.
I had the same problem with my tiger1 and flakpanzer....
Good luck mate!
Build what you love, Love what you build
-
MarkVerploeg
- Major
- Posts: 4837
- Joined: Wed Oct 16, 2013 12:21 am
- Location: Oss, Noord Braband The Netherlands
Re: Dragon 1:35 flakpanzer 38t and Opel Maultier ambulance
Thanks but it is kind of a bummer that it has interior parts nowfly1ngdutchm4n wrote:Been there, done that....MarkVerploeg wrote:Thanls Fransfly1ngdutchm4n wrote:woah!
Great work so far Mark!
I got paint on both the builds now
I'm happy with the ambulance and it's tiger stripes but i completely messed up the flakpanzer
It looks like i used an airbrush for the first time
So i will clean it up and have a second try but that will take a few days
Good thing the panther that i'm building has a good paintjob or i would be getting insane
Had the same problem ones...
It sucks big time, but the second time you will paint it, it will look awesome.
I had the same problem with my tiger1 and flakpanzer....
Good luck mate!
Normally i fill up a big box with water and dasty and let it soak for a few days
I can't do that now ,this time i will have to use a brush and apply it
On the bench
GB builds
1/35 Trumpeter M1132 ESV
Personal builds
1/35 Hobby Boss M1070 tractor with M1000 semi trailer and Meng M1A2 TUSK II Abrams
1/35 Takom V2 rocket with the Meillerwagen and SS100 tractor
GB builds
1/35 Trumpeter M1132 ESV
Personal builds
1/35 Hobby Boss M1070 tractor with M1000 semi trailer and Meng M1A2 TUSK II Abrams
1/35 Takom V2 rocket with the Meillerwagen and SS100 tractor
-
MarkVerploeg
- Major
- Posts: 4837
- Joined: Wed Oct 16, 2013 12:21 am
- Location: Oss, Noord Braband The Netherlands
Re: Dragon 1:35 flakpanzer 38t and Opel Maultier ambulance
hi guys
so after a while i got back to this build
i did a lot of work on my entry for the dangerous cat sig and after that i barely did any modelling for a week
so it was about time i got back to the bench and got some modelling done
so for this update i finished the construction and painting on the ambulance
i also worked on the flakpanzer but that went wrong and i'm not happy with the result so that is being cleaned and stripped of it's paint so i can have a second attempt
so here is what i have done
both the vehicles where primed with ammo for mig grey primer
then i used tamiya buff to dull the dark yellow (tamiya) and sprayed it on as a basecoat
then i used the buff to dull the red brown
i think it is about 1 part buff for 9-10 parts red brown , just enough to take away the harshness of the color
the camoscheme is not from the instructions but from a picture in the ak late war color guide
it was actually used on a regular blitz truck but i liked the look and scheme from the instructions was messed up once already
so yeah 2 messed up paintjobs in 1 build project

ithen painted the wheels and boogies
the rubber is a mix of 2 parts black and 1 part german grey
i used vallejo model color for this
the metal color on the return roller is mr metal stainless ,wich was lightly buffed after it dried
it was brush painted on there ,this works fine if there is a primer or other paint layer on the surface before you use the mr metal

the drive sprockets where painted with the mr metal stainless aswell
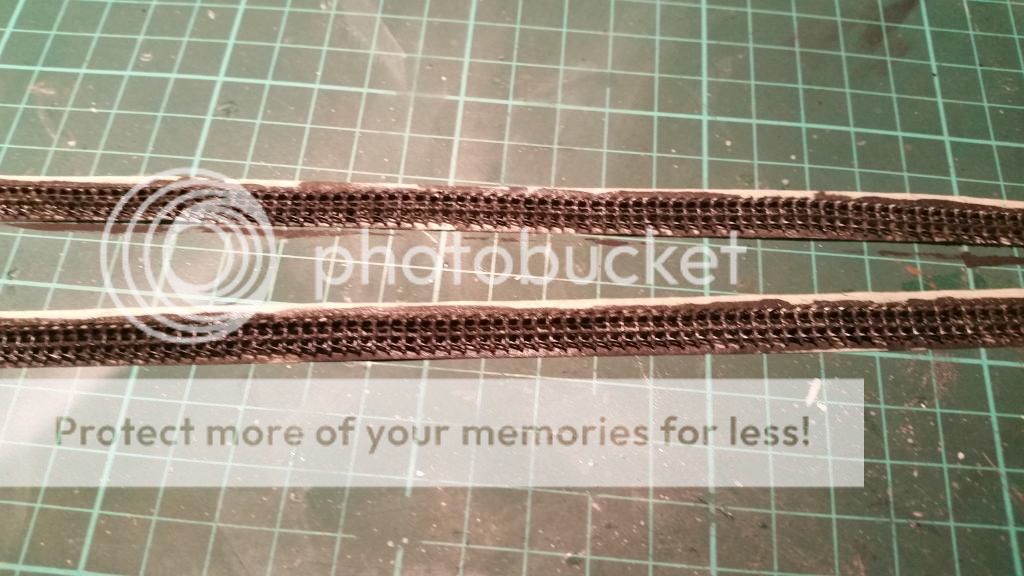
next came the tracks
unlike a lot of armor builders i don't really like the magic tracks , well the large ones are good but i always have trouble when i use small tracks
and these tracks are from a panzer 1 so they are small
the way i make them is to roll a large piece of tape on the cutting mat .this is turned sticky side up and then i use 2 small strips to tape it down on the ends of the large strip
then i place the required amount of track links on there
i then painted them with vallejo black
this was dry brushed with vallejo gunmetal grey after the black had dried
this is more of a sneak peak as i will come back to this later
but this is the way the wheels should line up
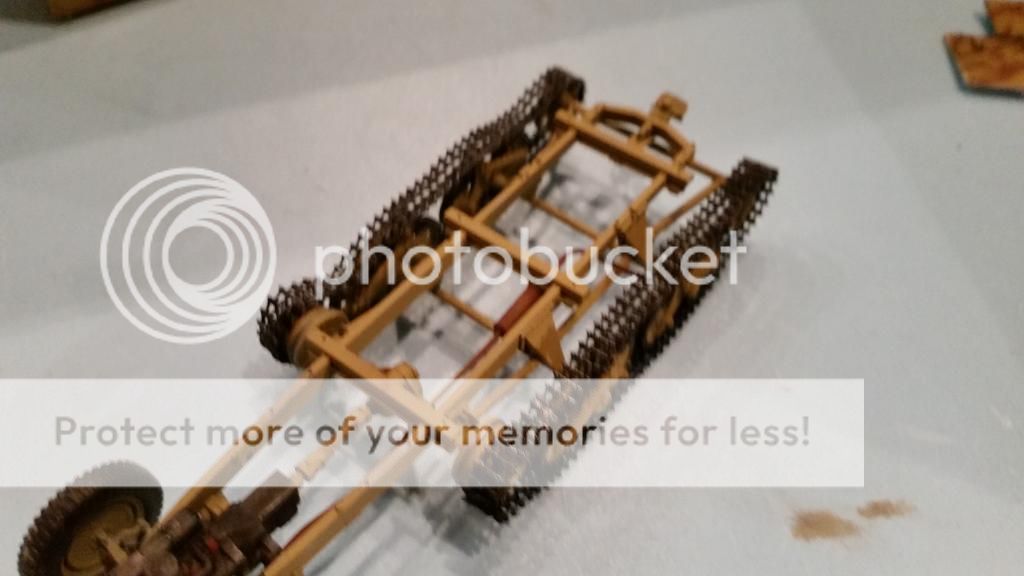
sorry that it is a bit blurry
but the tracks where rapped around the wheels and glued in place
after about 2 hours of drying i painted the outside of the tracks the same way as the inside

after testing the fit of the tracks i noticed that the cab would have to be removed from the chassis
so it also made it easier to paint the final details
the metal of the tools was painted with mr metal stainless
the wood is done in 2 steps
first i use a mix of english uniform and white from vallejo i think in about a 5 : 1 ratio
when this is dry i use vallejo smoke wich is dry brushed on the wood base to give a result that looks like laquered wood
the other nice thing is that it gives the look of a wood grain so you hit 2 birds with 1 ston this way
i did make a massive boo boo when i glued in the windscreen
i had the kit supplied mask on there and the tet just was drawn underneath it
but i think i can cover it up with some dust and maybe a piece of camo netting that is hanging from the roof
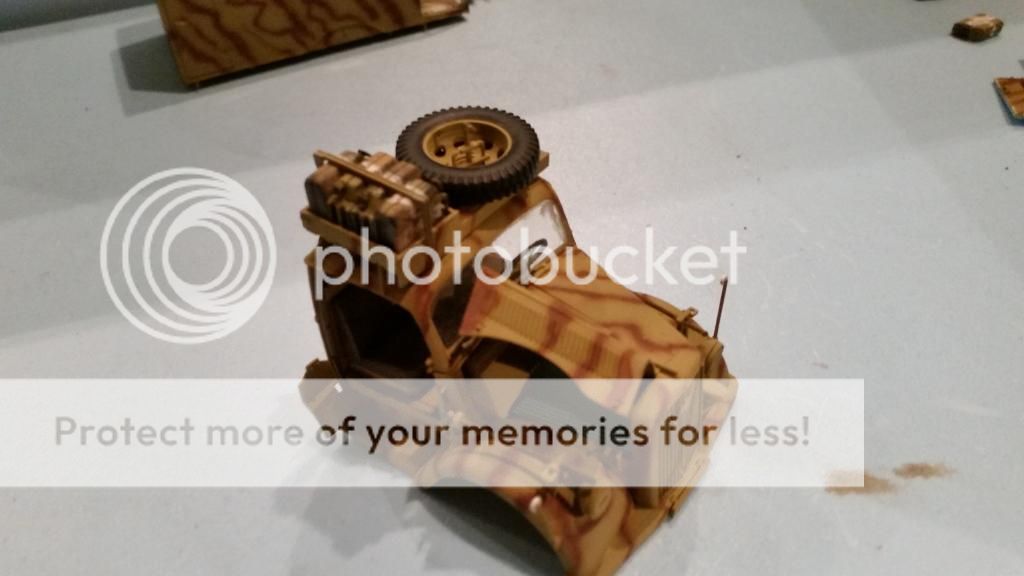
then i added the parts that go on the roof
i will show how i made the jerrycans later on in this update
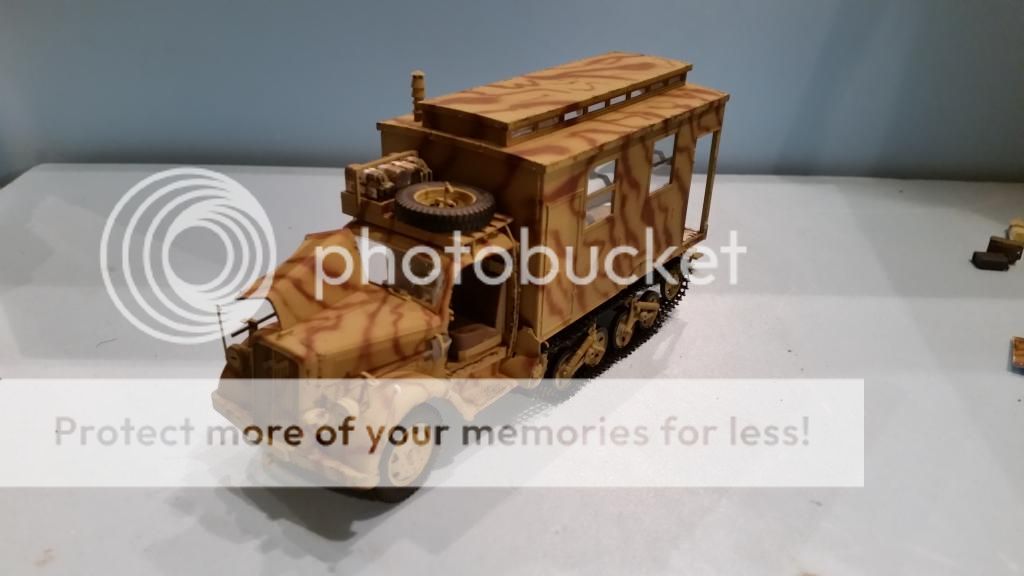
this is how the ambulance looks at the moment
i did notice the clear parts are very clear but deform the image on the other side
the doors will be weathered seperate and will be added later as the will be in the open position
and i will knock them off there if i glue them on now
after these photo's where taken i used some future as a clear coat
this was applied with a brush instead of the airbrush
i did this as a test since i have read that it works better this way (it was on ISM but i can't remember in wich thread of by who)
after my first attempt of painting this vehicle i started on the extra stuff that would be needed to go with it
i started with the stretchers ,wich come with a total of 9
after it was primed with ammo grey primer ,i spayed them with vallejo model air armor green
altough it is a tank camo color it will be a nice base color for the fabric strether covers
the metal supports are painted with mr metal aluminium as are the buckles of the straps
the wood is the mix i mentioned earlier
here is the look of the wood after the dry brushing with the vallejo smoke
after that was done i dry brushed the fabric aswell
only to give a somewhat worn look
this was done with a 50:50 mix of the armor green (model air) and pale sand (model color)
and after a coat klear i used mig production dark wash wich is used around all the details
and then they are finished
and now for the jerrycans

all the first steps
i used jerrycans from the italeri set
these are cheaper then most offerings and are good
so i painted them in german grey wich is a mix of tamiya german grey and sky grey in a 5 : 1 ratio ( did this some months ago as i made a big pile og them)
i then applied some humbrol maskol with a sponge on the parts that are more sensitive to wear and tear so the sides and bottom
then they are given a few thin coats og tamiya dark yellow wich was dulled down with buff (6 : 1 ratio)
the maskol was rubbed away to show the chipping but this can be skipped
i then used strips of masking tape to make the horizontal stripe of the white cross
this also was given the maskol treatment and then sprayes white (tamiya)
after it was dry the masking tape was removed and the process was repeated but this time vertical
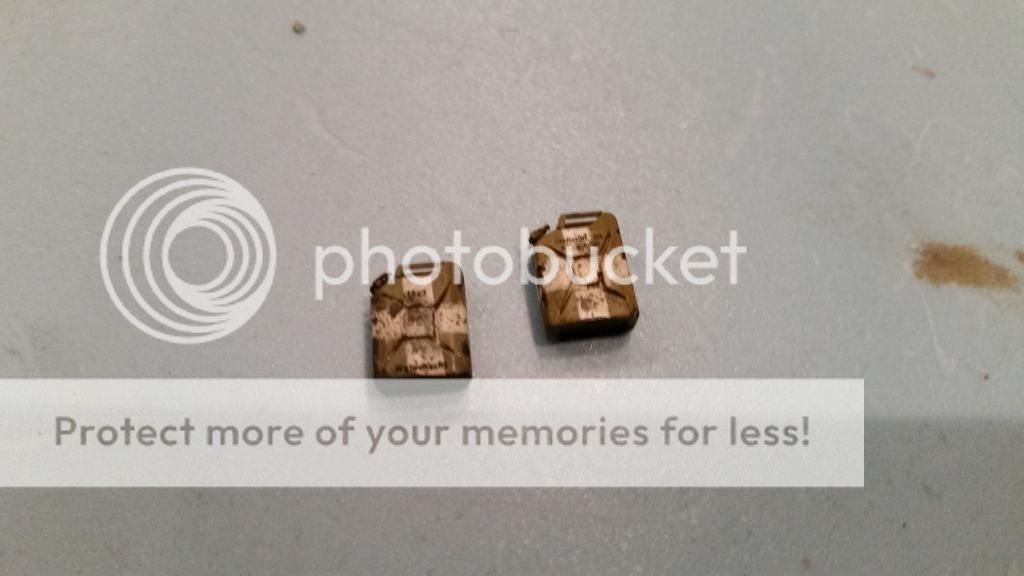
then the jerrycans received some mig productions dark wash to make the inbossed details stand out
the effect was dulled down by whiping it down with a flat brush and some thinner for washes (mig productions)
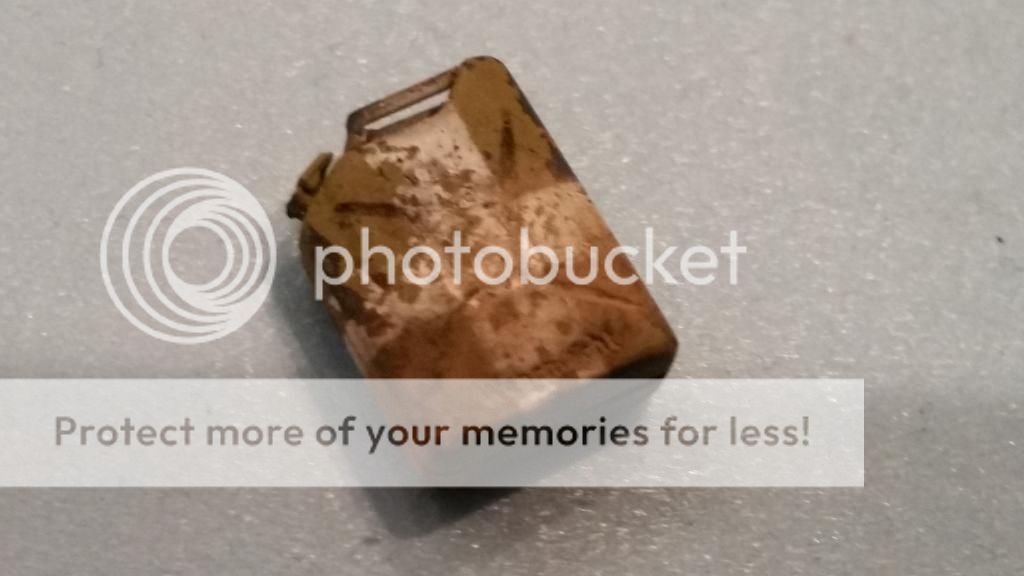
and as a last step i used some mig productions dry mud pigments to add the dust that collects on the jerrycans
and then they are done
this shows the way i make water jerrycans but i used the method from faq 2 by mig jiminez
if you want fuel cans just skip the white cross bit and youre done or you can do them in grey but then i would used a rust color first ,then apply maskol and finally spray them in the german grey of you're choice
A WORD OF WARNING IF YOU HAVE THIS KIT
in step 4 when you make the differential you are supossed to add parts H11 to the ends of the axle
this however is wrong and makes the axles to wide so the tracks won't fit
make sure you don't use them and all is good
and a piece of advice , put the tracks on before you glue on the cabine as they won't go in place if the cab is on
i found out these things the hard way so spare your self these problems
and that is all for now
i hope to get going on the flakpanzer soon but that needs to be cleaned and repainted
so i hope you like it and thanks for watching
untill next time
cheers Mark
so after a while i got back to this build
i did a lot of work on my entry for the dangerous cat sig and after that i barely did any modelling for a week
so it was about time i got back to the bench and got some modelling done
so for this update i finished the construction and painting on the ambulance
i also worked on the flakpanzer but that went wrong and i'm not happy with the result so that is being cleaned and stripped of it's paint so i can have a second attempt
so here is what i have done

both the vehicles where primed with ammo for mig grey primer
then i used tamiya buff to dull the dark yellow (tamiya) and sprayed it on as a basecoat

then i used the buff to dull the red brown
i think it is about 1 part buff for 9-10 parts red brown , just enough to take away the harshness of the color
the camoscheme is not from the instructions but from a picture in the ak late war color guide
it was actually used on a regular blitz truck but i liked the look and scheme from the instructions was messed up once already
so yeah 2 messed up paintjobs in 1 build project

ithen painted the wheels and boogies
the rubber is a mix of 2 parts black and 1 part german grey
i used vallejo model color for this
the metal color on the return roller is mr metal stainless ,wich was lightly buffed after it dried
it was brush painted on there ,this works fine if there is a primer or other paint layer on the surface before you use the mr metal

the drive sprockets where painted with the mr metal stainless aswell

next came the tracks
unlike a lot of armor builders i don't really like the magic tracks , well the large ones are good but i always have trouble when i use small tracks
and these tracks are from a panzer 1 so they are small
the way i make them is to roll a large piece of tape on the cutting mat .this is turned sticky side up and then i use 2 small strips to tape it down on the ends of the large strip
then i place the required amount of track links on there
i then painted them with vallejo black
this was dry brushed with vallejo gunmetal grey after the black had dried

this is more of a sneak peak as i will come back to this later
but this is the way the wheels should line up

sorry that it is a bit blurry
but the tracks where rapped around the wheels and glued in place
after about 2 hours of drying i painted the outside of the tracks the same way as the inside

after testing the fit of the tracks i noticed that the cab would have to be removed from the chassis
so it also made it easier to paint the final details
the metal of the tools was painted with mr metal stainless
the wood is done in 2 steps
first i use a mix of english uniform and white from vallejo i think in about a 5 : 1 ratio
when this is dry i use vallejo smoke wich is dry brushed on the wood base to give a result that looks like laquered wood
the other nice thing is that it gives the look of a wood grain so you hit 2 birds with 1 ston this way
i did make a massive boo boo when i glued in the windscreen
i had the kit supplied mask on there and the tet just was drawn underneath it
but i think i can cover it up with some dust and maybe a piece of camo netting that is hanging from the roof

then i added the parts that go on the roof
i will show how i made the jerrycans later on in this update


this is how the ambulance looks at the moment
i did notice the clear parts are very clear but deform the image on the other side
the doors will be weathered seperate and will be added later as the will be in the open position
and i will knock them off there if i glue them on now
after these photo's where taken i used some future as a clear coat
this was applied with a brush instead of the airbrush
i did this as a test since i have read that it works better this way (it was on ISM but i can't remember in wich thread of by who)
after my first attempt of painting this vehicle i started on the extra stuff that would be needed to go with it
i started with the stretchers ,wich come with a total of 9

after it was primed with ammo grey primer ,i spayed them with vallejo model air armor green
altough it is a tank camo color it will be a nice base color for the fabric strether covers
the metal supports are painted with mr metal aluminium as are the buckles of the straps
the wood is the mix i mentioned earlier

here is the look of the wood after the dry brushing with the vallejo smoke

after that was done i dry brushed the fabric aswell
only to give a somewhat worn look
this was done with a 50:50 mix of the armor green (model air) and pale sand (model color)

and after a coat klear i used mig production dark wash wich is used around all the details
and then they are finished
and now for the jerrycans

all the first steps
i used jerrycans from the italeri set
these are cheaper then most offerings and are good
so i painted them in german grey wich is a mix of tamiya german grey and sky grey in a 5 : 1 ratio ( did this some months ago as i made a big pile og them)
i then applied some humbrol maskol with a sponge on the parts that are more sensitive to wear and tear so the sides and bottom
then they are given a few thin coats og tamiya dark yellow wich was dulled down with buff (6 : 1 ratio)
the maskol was rubbed away to show the chipping but this can be skipped
i then used strips of masking tape to make the horizontal stripe of the white cross
this also was given the maskol treatment and then sprayes white (tamiya)
after it was dry the masking tape was removed and the process was repeated but this time vertical

then the jerrycans received some mig productions dark wash to make the inbossed details stand out
the effect was dulled down by whiping it down with a flat brush and some thinner for washes (mig productions)

and as a last step i used some mig productions dry mud pigments to add the dust that collects on the jerrycans
and then they are done
this shows the way i make water jerrycans but i used the method from faq 2 by mig jiminez
if you want fuel cans just skip the white cross bit and youre done or you can do them in grey but then i would used a rust color first ,then apply maskol and finally spray them in the german grey of you're choice
A WORD OF WARNING IF YOU HAVE THIS KIT
in step 4 when you make the differential you are supossed to add parts H11 to the ends of the axle
this however is wrong and makes the axles to wide so the tracks won't fit
make sure you don't use them and all is good
and a piece of advice , put the tracks on before you glue on the cabine as they won't go in place if the cab is on
i found out these things the hard way so spare your self these problems
and that is all for now
i hope to get going on the flakpanzer soon but that needs to be cleaned and repainted
so i hope you like it and thanks for watching
untill next time
cheers Mark
On the bench
GB builds
1/35 Trumpeter M1132 ESV
Personal builds
1/35 Hobby Boss M1070 tractor with M1000 semi trailer and Meng M1A2 TUSK II Abrams
1/35 Takom V2 rocket with the Meillerwagen and SS100 tractor
GB builds
1/35 Trumpeter M1132 ESV
Personal builds
1/35 Hobby Boss M1070 tractor with M1000 semi trailer and Meng M1A2 TUSK II Abrams
1/35 Takom V2 rocket with the Meillerwagen and SS100 tractor
-
AchtungPanzer

- Chief Warrant Officer 3

- Posts: 2299
- Joined: Mon Oct 07, 2013 7:59 am
- Location: Cracow PL
Re: Dragon 1:35 flakpanzer 38t and Opel Maultier ambulance
Well, well  You've done here a great job. The Jewels in the road . Well done Mark
  P.S. I I had many difficulties with the chassis in my Sd.Kfz. 4/1 - all was so small .
My PORTFOLIO all finished models : http://intscalemodeller.com/viewtopic.php?f=69&t=2864
-
MarkVerploeg
- Major
- Posts: 4837
- Joined: Wed Oct 16, 2013 12:21 am
- Location: Oss, Noord Braband The Netherlands
Re: Dragon 1:35 flakpanzer 38t and Opel Maultier ambulance
Thanks mate
The chassis itself is not that bad but the magic tracks are
they are not sitting on there completly the way they should but i'm happy that they are on there in one piece
The chassis itself is not that bad but the magic tracks are
they are not sitting on there completly the way they should but i'm happy that they are on there in one piece
On the bench
GB builds
1/35 Trumpeter M1132 ESV
Personal builds
1/35 Hobby Boss M1070 tractor with M1000 semi trailer and Meng M1A2 TUSK II Abrams
1/35 Takom V2 rocket with the Meillerwagen and SS100 tractor
GB builds
1/35 Trumpeter M1132 ESV
Personal builds
1/35 Hobby Boss M1070 tractor with M1000 semi trailer and Meng M1A2 TUSK II Abrams
1/35 Takom V2 rocket with the Meillerwagen and SS100 tractor
-
davidowers
- Corporal

- Posts: 89
- Joined: Sun Feb 16, 2014 7:42 pm
- Location: essex UK
Re: Dragon 1:35 flakpanzer 38t and Opel Maultier ambulance
-
MarkVerploeg
- Major
- Posts: 4837
- Joined: Wed Oct 16, 2013 12:21 am
- Location: Oss, Noord Braband The Netherlands
Re: Dragon 1:35 flakpanzer 38t and Opel Maultier ambulance
Thanks Daviddavidowers wrote:
And if you want to try some armor , just go for it
If you have a look in the kitreviews you can see what are the good kits and then try to find one
If it is not your regular subject it will ve a change but that is good every now and then
I build planes from time to time aswell just to break up.the monotamy
Cheers Mark
On the bench
GB builds
1/35 Trumpeter M1132 ESV
Personal builds
1/35 Hobby Boss M1070 tractor with M1000 semi trailer and Meng M1A2 TUSK II Abrams
1/35 Takom V2 rocket with the Meillerwagen and SS100 tractor
GB builds
1/35 Trumpeter M1132 ESV
Personal builds
1/35 Hobby Boss M1070 tractor with M1000 semi trailer and Meng M1A2 TUSK II Abrams
1/35 Takom V2 rocket with the Meillerwagen and SS100 tractor
-
FishBowlMan

- Sergeant First Class
- Posts: 317
- Joined: Wed Jan 29, 2014 9:42 pm
- Location: Kidderminster, England
Re: Dragon 1:35 flakpanzer 38t and Opel Maultier ambulance
Lovely work and a very interesting subject, Mark.
Great tips for the jerrycans, stretchers and other detail parts.
Great tips for the jerrycans, stretchers and other detail parts.
John
On the bench:
Tamiya 1/35 SAS Jeep, 1/35 BMW R75, 1/35 Pzkpfw III Ausf M/N
MiniArt 1/35 Bantam 40 BRC British Staff Car
Hasegawa 1/48 P-51D, originally for D-Day GB
Hobbyboss 1/35 Pzkpfw I ausf F
There is no room inside a box!
On the bench:
Tamiya 1/35 SAS Jeep, 1/35 BMW R75, 1/35 Pzkpfw III Ausf M/N
MiniArt 1/35 Bantam 40 BRC British Staff Car
Hasegawa 1/48 P-51D, originally for D-Day GB
Hobbyboss 1/35 Pzkpfw I ausf F
There is no room inside a box!
-
wappynutter

- Chief Warrant Officer 3
- Posts: 2256
- Joined: Mon Jun 17, 2013 11:39 pm
- Location: Sutton in Ashfield, Nottinghamshire. UK

Re: Dragon 1:35 flakpanzer 38t and Opel Maultier ambulance
Mark you have done an AMAZING... job with these kits.....WOW..
Dude, I must have missed loads while I was busy doing "Real life" stuff...
..but I am back watching now, and Boy you have worked this well...
I enjoyed the Engine and transmission work at the start, so should have guessed the potential of this thread from that alone...
Freeking Awesome mate....A Big well done from me, and I will be dropping by for a nosey more regular than I have been that's for sure!
Continued success Mark...
Thanks....

-
MarkVerploeg
- Major
- Posts: 4837
- Joined: Wed Oct 16, 2013 12:21 am
- Location: Oss, Noord Braband The Netherlands
Re: Dragon 1:35 flakpanzer 38t and Opel Maultier ambulance
ThanksFishBowlMan wrote:Lovely work and a very interesting subject, Mark.
Great tips for the jerrycans, stretchers and other detail parts.
The jerrycan method comes from the faq 2 book
It also has good ideas for fuel drums and ammo boxes and other stuff
I only replaced the chipping fluid with maskol as i don't like the stuff
But it does make for some intresting details
and the book is a real nice reference to have
Cheers Mark
On the bench
GB builds
1/35 Trumpeter M1132 ESV
Personal builds
1/35 Hobby Boss M1070 tractor with M1000 semi trailer and Meng M1A2 TUSK II Abrams
1/35 Takom V2 rocket with the Meillerwagen and SS100 tractor
GB builds
1/35 Trumpeter M1132 ESV
Personal builds
1/35 Hobby Boss M1070 tractor with M1000 semi trailer and Meng M1A2 TUSK II Abrams
1/35 Takom V2 rocket with the Meillerwagen and SS100 tractor
-
MarkVerploeg
- Major
- Posts: 4837
- Joined: Wed Oct 16, 2013 12:21 am
- Location: Oss, Noord Braband The Netherlands
Re: Dragon 1:35 flakpanzer 38t and Opel Maultier ambulance
Thanks Andywappynutter wrote:
Mark you have done an AMAZING... job with these kits.....WOW..
Dude, I must have missed loads while I was busy doing "Real life" stuff...
..but I am back watching now, and Boy you have worked this well...
I enjoyed the Engine and transmission work at the start, so should have guessed the potential of this thread from that alone...
Freeking Awesome mate....A Big well done from me, and I will be dropping by for a nosey more regular than I have been that's for sure!
Continued success Mark...

Thanks....
I'm not sure how much survived my cleaning though
I messed up the paint so i stripped it
But the degreaser gets in all the little places and probably in the interior aswell
But it was sealed with some varnish so maybe it is still okay
I have to check but if not atleast i got to share the way that i make the interiors of my vehicles
But i'm glad you like it
Cheers Mark
On the bench
GB builds
1/35 Trumpeter M1132 ESV
Personal builds
1/35 Hobby Boss M1070 tractor with M1000 semi trailer and Meng M1A2 TUSK II Abrams
1/35 Takom V2 rocket with the Meillerwagen and SS100 tractor
GB builds
1/35 Trumpeter M1132 ESV
Personal builds
1/35 Hobby Boss M1070 tractor with M1000 semi trailer and Meng M1A2 TUSK II Abrams
1/35 Takom V2 rocket with the Meillerwagen and SS100 tractor
-
Nige201980
- Captain
- Posts: 4095
- Joined: Wed Jun 05, 2013 9:30 am
- Location: Doncaster South Yorkshire UK
- Contact:
Re: Dragon 1:35 flakpanzer 38t and Opel Maultier ambulance
http://www.youtube.com/channel/UCy-TGcs5u_ZXSZ9kObNfsPg
On the go at the Mo
Quite a few
On the go at the Mo
Quite a few
-
MarkVerploeg
- Major
- Posts: 4837
- Joined: Wed Oct 16, 2013 12:21 am
- Location: Oss, Noord Braband The Netherlands
Re: Dragon 1:35 flakpanzer 38t and Opel Maultier ambulance
Thanks Nige glad you like itNige201980 wrote:
I think this camo scheme looks better then the ones from the instructions
And i think the dio will look better with a two tone and a tri tone vehicle instead of 2 tri tonal vehicles
But i will have to wait before i can paint the flakpanzer again
It was cleaned this morning but is still wet in some places
And then i will have a new attempt with the camo on that one
Cheers Mark
On the bench
GB builds
1/35 Trumpeter M1132 ESV
Personal builds
1/35 Hobby Boss M1070 tractor with M1000 semi trailer and Meng M1A2 TUSK II Abrams
1/35 Takom V2 rocket with the Meillerwagen and SS100 tractor
GB builds
1/35 Trumpeter M1132 ESV
Personal builds
1/35 Hobby Boss M1070 tractor with M1000 semi trailer and Meng M1A2 TUSK II Abrams
1/35 Takom V2 rocket with the Meillerwagen and SS100 tractor
-
fly1ngdutchm4n
- First Lieutenant
- Posts: 3554
- Joined: Fri Aug 09, 2013 11:17 pm
- Location: Hoogerheide The Netherlands
Re: Dragon 1:35 flakpanzer 38t and Opel Maultier ambulance
O wow... This is looking really great!
Love the camouflage on that ambulance Mark, superb
Love the camouflage on that ambulance Mark, superb
Build what you love, Love what you build
-
MarkVerploeg
- Major
- Posts: 4837
- Joined: Wed Oct 16, 2013 12:21 am
- Location: Oss, Noord Braband The Netherlands
Re: Dragon 1:35 flakpanzer 38t and Opel Maultier ambulance
Thanks Frans
I'm happy with the way it now looks
But i will set this one on the side line untill the flakpanzer is painted and ready for decals and weathering
So i can complete both of the at the same time
That should save some time and the mess i make when i do the weathering
Cheers Mark
I'm happy with the way it now looks
But i will set this one on the side line untill the flakpanzer is painted and ready for decals and weathering
So i can complete both of the at the same time
That should save some time and the mess i make when i do the weathering
Cheers Mark
On the bench
GB builds
1/35 Trumpeter M1132 ESV
Personal builds
1/35 Hobby Boss M1070 tractor with M1000 semi trailer and Meng M1A2 TUSK II Abrams
1/35 Takom V2 rocket with the Meillerwagen and SS100 tractor
GB builds
1/35 Trumpeter M1132 ESV
Personal builds
1/35 Hobby Boss M1070 tractor with M1000 semi trailer and Meng M1A2 TUSK II Abrams
1/35 Takom V2 rocket with the Meillerwagen and SS100 tractor

Re: Dragon 1:35 flakpanzer 38t and Opel Maultier ambulance
Great paint job there mate
-
MarkVerploeg
- Major
- Posts: 4837
- Joined: Wed Oct 16, 2013 12:21 am
- Location: Oss, Noord Braband The Netherlands
Re: Dragon 1:35 flakpanzer 38t and Opel Maultier ambulance
Thanks Gaz glad you like itgaz45 wrote:Great paint job there mate
On the bench
GB builds
1/35 Trumpeter M1132 ESV
Personal builds
1/35 Hobby Boss M1070 tractor with M1000 semi trailer and Meng M1A2 TUSK II Abrams
1/35 Takom V2 rocket with the Meillerwagen and SS100 tractor
GB builds
1/35 Trumpeter M1132 ESV
Personal builds
1/35 Hobby Boss M1070 tractor with M1000 semi trailer and Meng M1A2 TUSK II Abrams
1/35 Takom V2 rocket with the Meillerwagen and SS100 tractor
-
MarkVerploeg
- Major
- Posts: 4837
- Joined: Wed Oct 16, 2013 12:21 am
- Location: Oss, Noord Braband The Netherlands
Re: Dragon 1:35 flakpanzer 38t and Opel Maultier ambulance
Hi guys
This is just a mini update since i have been a bit busy with all kinds of things lately except for modelling
But i did managed to get a few things done
I messed up the camo on the flakpanzer the first time so it had to be cleaned
I used a regular house hold degreaser for this (dasty for the Dutch)
I just sprayed it on the model using the sprayhead that is on the bottle
I left it to soak in the paint and repeated this 2 more times
To get everything of the model i simply poured a bit of water in the airbrush and sprayed it on
It somewhat has the same effect as sand spayed on a actual vehicle
It just blasts the old paint off
After this i left it to dry

i then mixed in some tamiya buff into the dark yellow
I premixed it already but to make it a bit more dull i added more
The ratio is about 5 parts dark yellow and 3 parts buff
My normal mix is 5:2
And then i lost intrest in the painting
So i picked up the figures i had in mind for this build
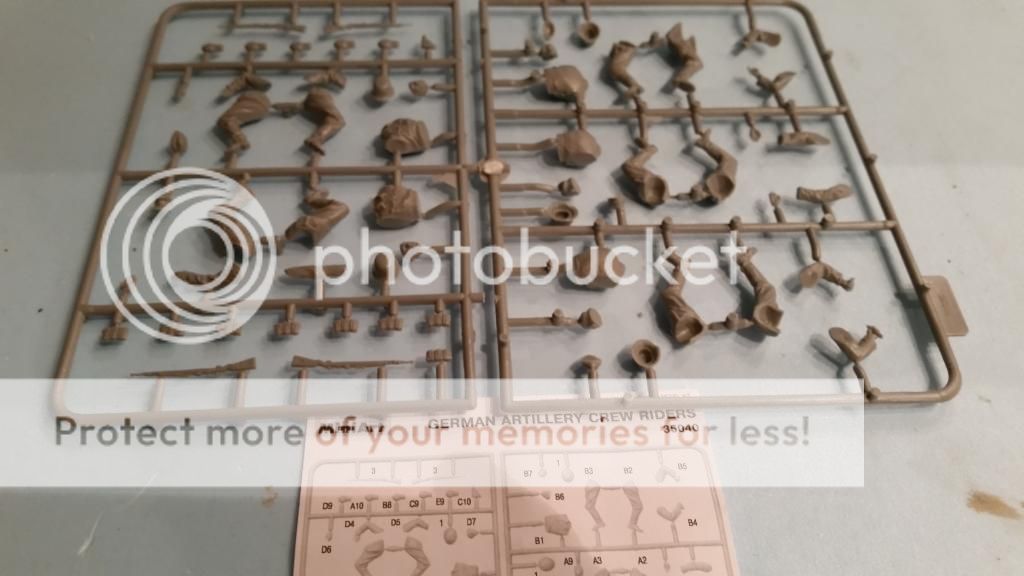
this is the mini art artillery riders set
It is not bad in terms of detail (for the price)
But i think the fit is a bit poor and some filling is needed
It did the filling with faller super expert glue
This is a (medium)thick fast drying glue that i use for this kind of filling and glueing fragile parts
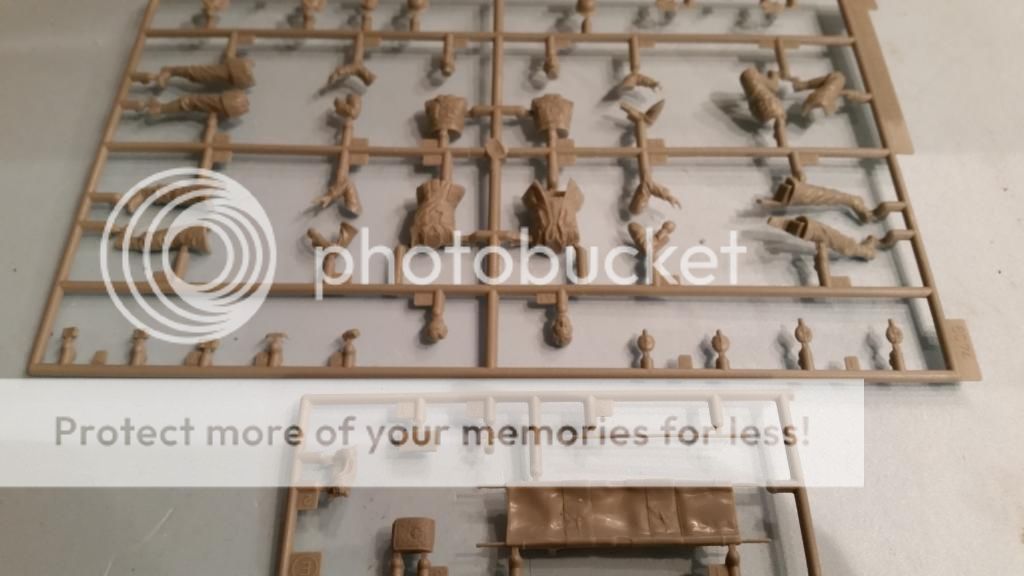
this us the dragon medical staff kit
It is a couple of years old and is re-released last year
The detail is pretty good and fit is a lot better then the other figures
Ofcourse these go very well with the ambulance

and here are all the figures i plan on using in the diorama
A few come from my stash of build figures
But i think they will have there use in this build
So next will be the rest of the camo painting and the detail painting on the flakpanzer
The figures will have to wait for a little bit since i will have figures for 2 other builds near the painting stage so i will do them all at once in a little assembly line setup
But i will do a update on them to show how i paint figures but don't expect much from it as i think figures aren't my best thing to make
So thanks for watching and i hope to have a update on the flakpanzer soon
Cheers Mark
On the bench
GB builds
1/35 Trumpeter M1132 ESV
Personal builds
1/35 Hobby Boss M1070 tractor with M1000 semi trailer and Meng M1A2 TUSK II Abrams
1/35 Takom V2 rocket with the Meillerwagen and SS100 tractor
GB builds
1/35 Trumpeter M1132 ESV
Personal builds
1/35 Hobby Boss M1070 tractor with M1000 semi trailer and Meng M1A2 TUSK II Abrams
1/35 Takom V2 rocket with the Meillerwagen and SS100 tractor
-
MarkVerploeg
- Major
- Posts: 4837
- Joined: Wed Oct 16, 2013 12:21 am
- Location: Oss, Noord Braband The Netherlands
Re: Dragon 1:35 flakpanzer 38t and Opel Maultier ambulance
hi guys
so yet another update but this time a bigger one then the previous
i have been hit by a sudden strike of mojo for this build
so i did the painting today to get this vehicle in the same stage as the ambulance
altough this vehicle will have a lot of extra stowage ,that will be in a upcoming update because i want to try some new techniques for things like ammo boxes and some other small items that will be used on both the ambulance and the flakpanzer
but let's go to the progress of the day
i added the camo patches altough i think it could be better the weathering should inprove the overall look
the red brown is done with a 5:2 mix of tamiya red brown and buff ,wich was thinned with about 20-30% of Ultimate thinner
the green is a 5:2 mix of tamiya dark green and dark yellow with a drop of buff ,this is also thinned with Ultimate thinner
the metal items are painted using mr metal stainless wich is not buffed very much
i used a old soft brush and simply brushed over them a little
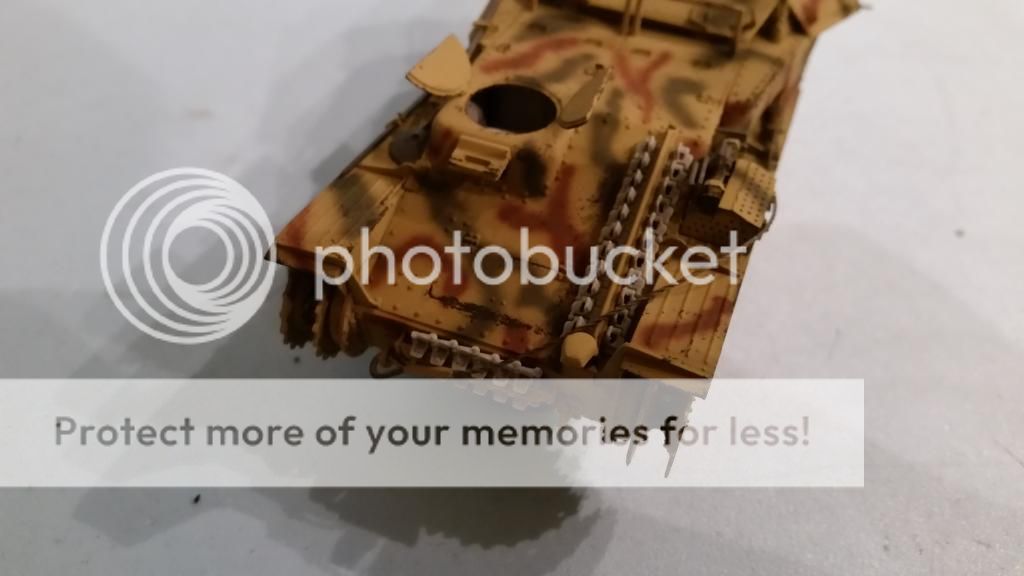
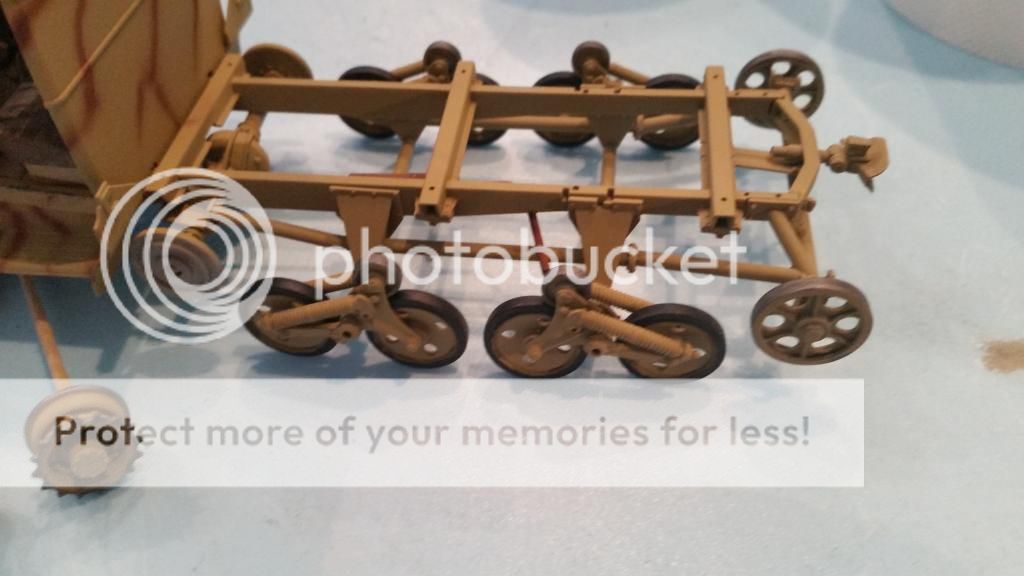
the spare track holders where added
i used the magic tracks from the kit for the spare tracks but i will use a set of friul tracks for the actual tracks
the will be left unpainted untill the matt varnish is on ,this is because i make rust "paints" from pigments and tamiya thinner but if i spray varnish on that it will ruin the rust effect

the seat is base painted using vallejo leather brown
then this was dry brushed with a 2:1 mix of the bse color and white
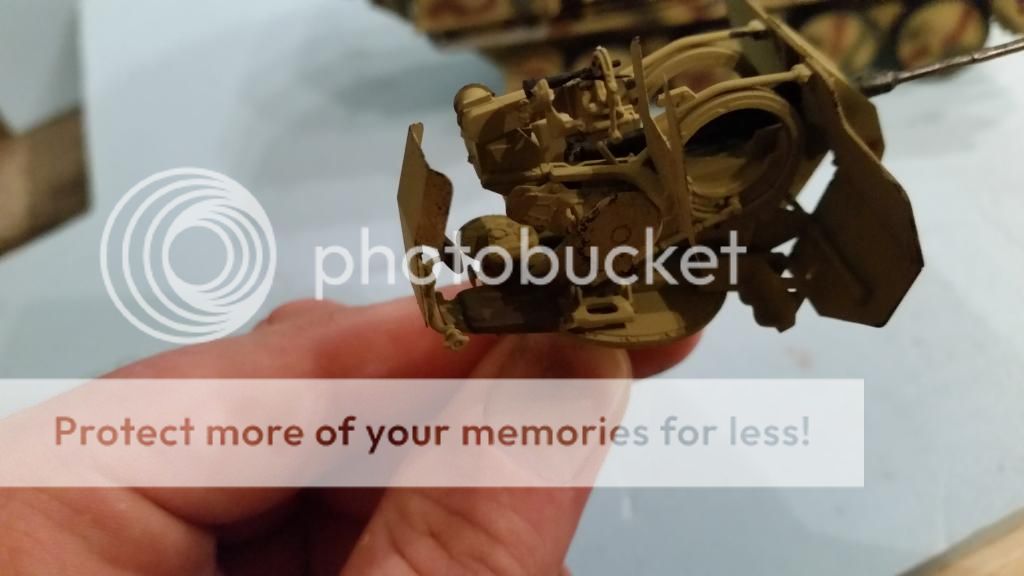
the gasmask tubes are painted with vallejo german grey and the straps are painted with leather brown
the mp 40 smg's in the back are painted black and then i dry brushed them with gunmetal grey both from vallejo

a better view of the back
the chipping and scratches are done with vallejo german camo black brown they are applied with a small brush and a sponge
this is done on both the interior and the exterior
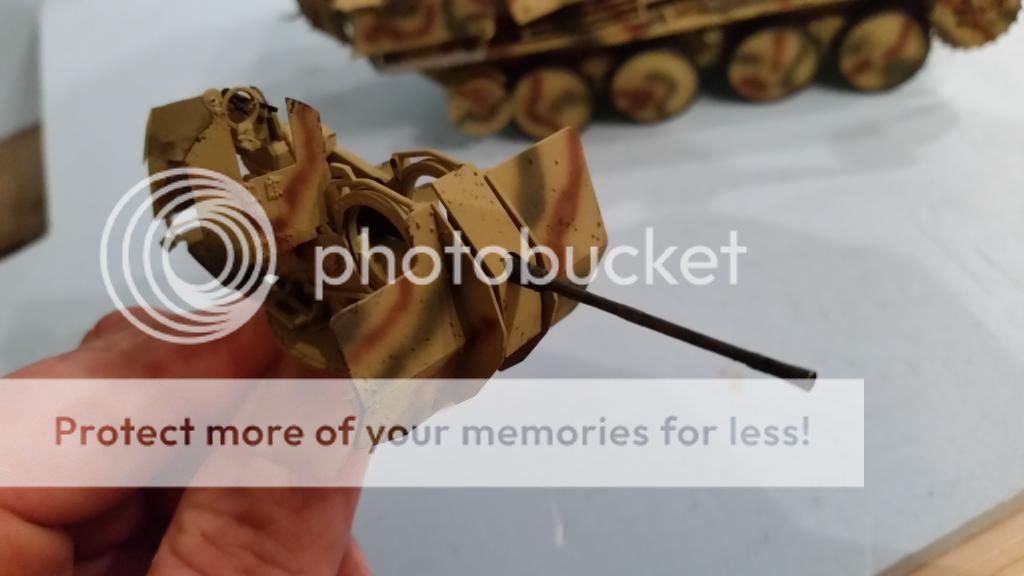
the gun was painted in the same colors as the rest of the vehicle
the actual cannon is painted using mr metal dark iron and was lightly buffed around details
it then was chipped aswell
the chipping is a bit basic now but i may add some more chipping and scratches later on
the seat was painted the same as the smaller seat in the vehicle
so i will use a quick wheel mask for this build
i started with the tyre color this is revell 09 antracite wich was thinned using Ultimate thinner
when i placed the wheels in the mask i left the cocktail sticks in the wheels
because when i paint the back of the wheels i want to be able to turn them around and paint the front

here they are painted on the back
i used the sticks to push them out of the mask without waiting for the paint to dry

then the front was painted dark yellow
the camo colors where sprayed on once the base color was dry

and this is the result
nice clean wheels with a real nice and even edge between the wheel and the tyre
the mask was used before as i have 3 more kits wich have the same chassis
most of these mask cost about 10 euro's wich is a bit expensive for a one time use
but the can be re used wich makes it a bit more cost effective
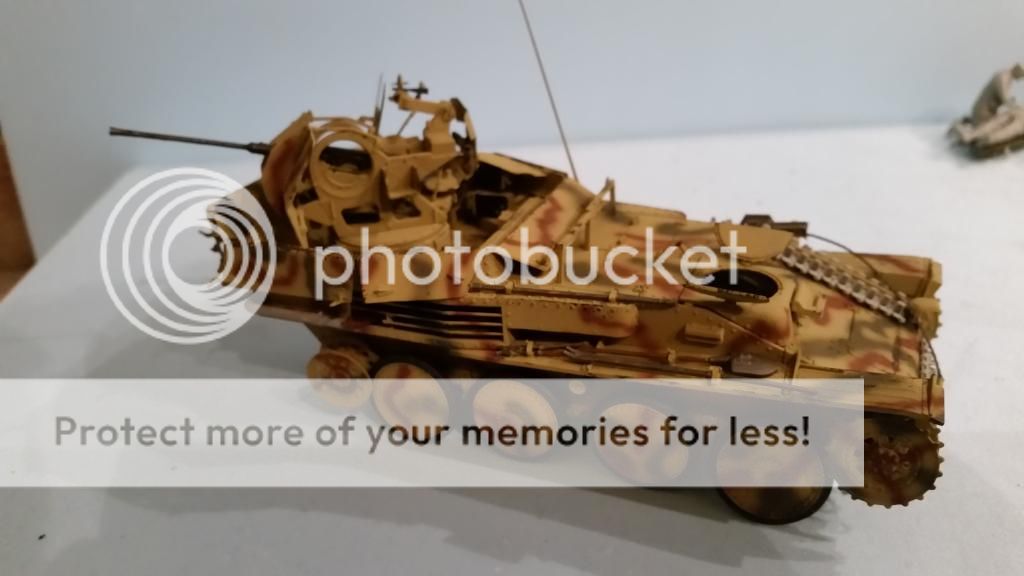
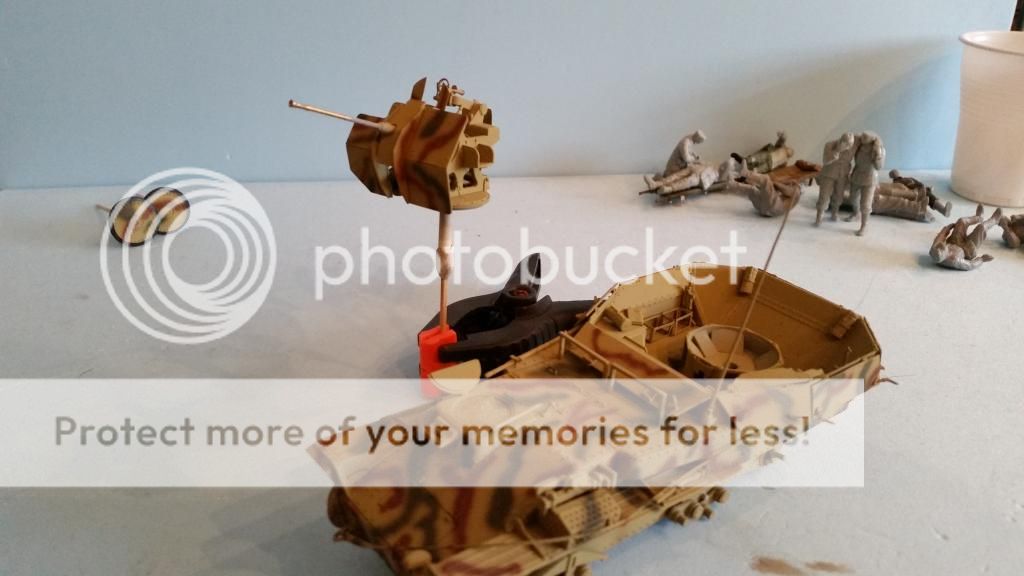
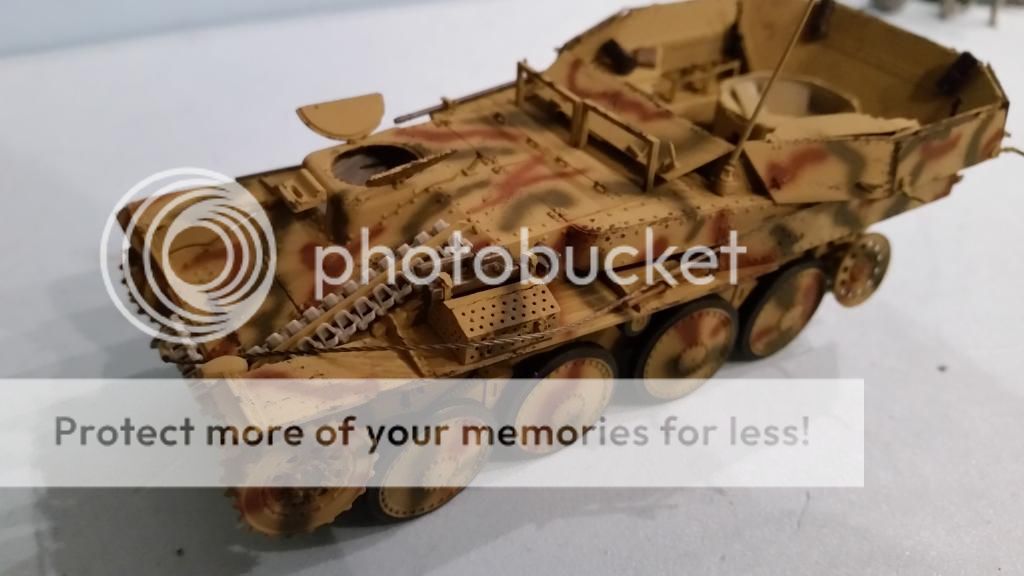
and here is the flakpanzer as it stand at the moment
the wheel are all unglued to make the weathering easy and to get some dirt behind the wheels
this is the way i plan on having it on the diorama ,with the gun pointing backwards
this gives a better view inside the fighting compartment and since all the crewmembers will be on the front this gives for some nice places to put some stowage like ammo cases and magazines for the flak
so this is ready for decals and weathering just like the ambulance
and that is all i have for now
i hope you like it and untill next time
cheers Mark
so yet another update but this time a bigger one then the previous
i have been hit by a sudden strike of mojo for this build
so i did the painting today to get this vehicle in the same stage as the ambulance
altough this vehicle will have a lot of extra stowage ,that will be in a upcoming update because i want to try some new techniques for things like ammo boxes and some other small items that will be used on both the ambulance and the flakpanzer
but let's go to the progress of the day

i added the camo patches altough i think it could be better the weathering should inprove the overall look
the red brown is done with a 5:2 mix of tamiya red brown and buff ,wich was thinned with about 20-30% of Ultimate thinner
the green is a 5:2 mix of tamiya dark green and dark yellow with a drop of buff ,this is also thinned with Ultimate thinner

the metal items are painted using mr metal stainless wich is not buffed very much
i used a old soft brush and simply brushed over them a little

the spare track holders where added
i used the magic tracks from the kit for the spare tracks but i will use a set of friul tracks for the actual tracks
the will be left unpainted untill the matt varnish is on ,this is because i make rust "paints" from pigments and tamiya thinner but if i spray varnish on that it will ruin the rust effect

the seat is base painted using vallejo leather brown
then this was dry brushed with a 2:1 mix of the bse color and white
the gasmask tubes are painted with vallejo german grey and the straps are painted with leather brown
the mp 40 smg's in the back are painted black and then i dry brushed them with gunmetal grey both from vallejo

a better view of the back
the chipping and scratches are done with vallejo german camo black brown they are applied with a small brush and a sponge
this is done on both the interior and the exterior

the gun was painted in the same colors as the rest of the vehicle
the actual cannon is painted using mr metal dark iron and was lightly buffed around details
it then was chipped aswell
the chipping is a bit basic now but i may add some more chipping and scratches later on

the seat was painted the same as the smaller seat in the vehicle

so i will use a quick wheel mask for this build
i started with the tyre color this is revell 09 antracite wich was thinned using Ultimate thinner
when i placed the wheels in the mask i left the cocktail sticks in the wheels
because when i paint the back of the wheels i want to be able to turn them around and paint the front

here they are painted on the back
i used the sticks to push them out of the mask without waiting for the paint to dry

then the front was painted dark yellow

the camo colors where sprayed on once the base color was dry

and this is the result
nice clean wheels with a real nice and even edge between the wheel and the tyre
the mask was used before as i have 3 more kits wich have the same chassis
most of these mask cost about 10 euro's wich is a bit expensive for a one time use
but the can be re used wich makes it a bit more cost effective

and here is the flakpanzer as it stand at the moment
the wheel are all unglued to make the weathering easy and to get some dirt behind the wheels
this is the way i plan on having it on the diorama ,with the gun pointing backwards
this gives a better view inside the fighting compartment and since all the crewmembers will be on the front this gives for some nice places to put some stowage like ammo cases and magazines for the flak
so this is ready for decals and weathering just like the ambulance
and that is all i have for now
i hope you like it and untill next time
cheers Mark
Last edited by MarkVerploeg on Wed Jul 16, 2014 1:30 pm, edited 1 time in total.
On the bench
GB builds
1/35 Trumpeter M1132 ESV
Personal builds
1/35 Hobby Boss M1070 tractor with M1000 semi trailer and Meng M1A2 TUSK II Abrams
1/35 Takom V2 rocket with the Meillerwagen and SS100 tractor
GB builds
1/35 Trumpeter M1132 ESV
Personal builds
1/35 Hobby Boss M1070 tractor with M1000 semi trailer and Meng M1A2 TUSK II Abrams
1/35 Takom V2 rocket with the Meillerwagen and SS100 tractor
-
mannloon

- Command Sergeant Major

- Posts: 985
- Joined: Thu Apr 17, 2014 10:57 pm
- Location: Madison, WI USA
- Contact:
Re: Dragon 1:35 flakpanzer 38t and Opel Maultier ambulance
Glad you got inspired. It looks great. And man do I love those figures, such a visceral scene.
On the bench:
Cyber-Hobby T-34 Under New Management
Cyber-Hobby Tiger I Kursk
Rye Field Tiger I w/ Interior
Academy T-34 with bed spring armor
Cyber-Hobby T-34 Under New Management
Cyber-Hobby Tiger I Kursk
Rye Field Tiger I w/ Interior
Academy T-34 with bed spring armor
-
fly1ngdutchm4n
- First Lieutenant
- Posts: 3554
- Joined: Fri Aug 09, 2013 11:17 pm
- Location: Hoogerheide The Netherlands
Re: Dragon 1:35 flakpanzer 38t and Opel Maultier ambulance
Great progress, and I agree on them figures, there brilliant! 
Got to love those dragon figures...
Got to love those dragon figures...
Build what you love, Love what you build
-
MarkVerploeg
- Major
- Posts: 4837
- Joined: Wed Oct 16, 2013 12:21 am
- Location: Oss, Noord Braband The Netherlands
Re: Dragon 1:35 flakpanzer 38t and Opel Maultier ambulance
Thanksmannloon wrote:Glad you got inspired. It looks great. And man do I love those figures, such a visceral scene.
i just hope it will all fit on the base because i have a pile of pre made bases that can just fit in one of my display cabinets (3 of the same cabinets) so i will have to make a test setting to see if it works
Cheers Mark
On the bench
GB builds
1/35 Trumpeter M1132 ESV
Personal builds
1/35 Hobby Boss M1070 tractor with M1000 semi trailer and Meng M1A2 TUSK II Abrams
1/35 Takom V2 rocket with the Meillerwagen and SS100 tractor
GB builds
1/35 Trumpeter M1132 ESV
Personal builds
1/35 Hobby Boss M1070 tractor with M1000 semi trailer and Meng M1A2 TUSK II Abrams
1/35 Takom V2 rocket with the Meillerwagen and SS100 tractor
-
MarkVerploeg
- Major
- Posts: 4837
- Joined: Wed Oct 16, 2013 12:21 am
- Location: Oss, Noord Braband The Netherlands
Re: Dragon 1:35 flakpanzer 38t and Opel Maultier ambulance
Thanks Fransfly1ngdutchm4n wrote:Great progress, and I agree on them figures, there brilliant!
Got to love those dragon figures...
It is pretty good for a days work
And the dragon figures are good too , resin figures may be a bit more detailed but cost the same for 1 figure compared to a 4 figure dragon kit
The gen2 figures are very good though but none of these is a gen2
But i will make the figures i need for my panther and my big tiger too
So i can paint all of them at the same time
And i will do the same with the actual tanks so i can do each step of the weathering on several vehicles at once
So i can make some free space on the bench and finish some of my builds before the vietnam sig starts and hopefully the shelf of doom
I plan to repaint my 1:35 leopold and make a dio with that giant
And i have a eduard phantom for the vietnam build
So both are pretty big and will take up a lot of workspace
But i will see how it all works out
Cheers Mark
On the bench
GB builds
1/35 Trumpeter M1132 ESV
Personal builds
1/35 Hobby Boss M1070 tractor with M1000 semi trailer and Meng M1A2 TUSK II Abrams
1/35 Takom V2 rocket with the Meillerwagen and SS100 tractor
GB builds
1/35 Trumpeter M1132 ESV
Personal builds
1/35 Hobby Boss M1070 tractor with M1000 semi trailer and Meng M1A2 TUSK II Abrams
1/35 Takom V2 rocket with the Meillerwagen and SS100 tractor
-
alextheblue

- Chief Warrant Officer 5

- Posts: 2679
- Joined: Mon Jul 15, 2013 11:30 am
- Location: Slough, United Kingdom
- Contact:

Re: Dragon 1:35 flakpanzer 38t and Opel Maultier ambulance
Great progress Mark, you've done a fantastic job on that cam scheme!!
Now you've put the figures together this is really looking great -you certainly don't do things by halves!!
Now you've put the figures together this is really looking great -you certainly don't do things by halves!!
-
MarkVerploeg
- Major
- Posts: 4837
- Joined: Wed Oct 16, 2013 12:21 am
- Location: Oss, Noord Braband The Netherlands
Re: Dragon 1:35 flakpanzer 38t and Opel Maultier ambulance
Thank you Alexalextheblue wrote:Great progress Mark, you've done a fantastic job on that cam scheme!!
Now you've put the figures together this is really looking great -you certainly don't do things by halves!!
It is more so i finally start to make things bigger and more complete
I have a lot figures that are already build so they have to be used sometime
And i like to think that i get a little better with my modelling when i challenge myself with these more elaborate builds
But as long as it is fun to do i'm happy with it
Cheers Mark
On the bench
GB builds
1/35 Trumpeter M1132 ESV
Personal builds
1/35 Hobby Boss M1070 tractor with M1000 semi trailer and Meng M1A2 TUSK II Abrams
1/35 Takom V2 rocket with the Meillerwagen and SS100 tractor
GB builds
1/35 Trumpeter M1132 ESV
Personal builds
1/35 Hobby Boss M1070 tractor with M1000 semi trailer and Meng M1A2 TUSK II Abrams
1/35 Takom V2 rocket with the Meillerwagen and SS100 tractor
-
wappynutter
- Chief Warrant Officer 3
- Posts: 2256
- Joined: Mon Jun 17, 2013 11:39 pm
- Location: Sutton in Ashfield, Nottinghamshire. UK
Re: Dragon 1:35 flakpanzer 38t and Opel Maultier ambulance
Wow... look at all those figures..
You got some major painting sessions coming up Mark.... wow dude..
Good luck buddy, the figures look to be in excellent poses and the detail is amazing..
Well done on the mojo "fix".... I need some now to push my build on!
All the best mate...
Happy Modelling..
You got some major painting sessions coming up Mark.... wow dude..
Good luck buddy, the figures look to be in excellent poses and the detail is amazing..
Well done on the mojo "fix".... I need some now to push my build on!
All the best mate...
Happy Modelling..
-
MarkVerploeg
- Major
- Posts: 4837
- Joined: Wed Oct 16, 2013 12:21 am
- Location: Oss, Noord Braband The Netherlands
Re: Dragon 1:35 flakpanzer 38t and Opel Maultier ambulance
Thanks Andywappynutter wrote:Wow... look at all those figures..
You got some major painting sessions coming up Mark.... wow dude..
Good luck buddy, the figures look to be in excellent poses and the detail is amazing..
Well done on the mojo "fix".... I need some now to push my build on!
All the best mate...
Happy Modelling..
And there are a few figures to paint indeed
But these are only a part of them
I have the figures from the panther sig and my big tiger aswell
I think 30 figures in total
But i will complete the weathering on the vehicles first so they can go in the display cabinet (saves some space on the bench)
And then i will start painting the little dudes
Cheers Mark
On the bench
GB builds
1/35 Trumpeter M1132 ESV
Personal builds
1/35 Hobby Boss M1070 tractor with M1000 semi trailer and Meng M1A2 TUSK II Abrams
1/35 Takom V2 rocket with the Meillerwagen and SS100 tractor
GB builds
1/35 Trumpeter M1132 ESV
Personal builds
1/35 Hobby Boss M1070 tractor with M1000 semi trailer and Meng M1A2 TUSK II Abrams
1/35 Takom V2 rocket with the Meillerwagen and SS100 tractor
