Tamiya M-106A1 Mortar Carrier

Post Reply
User avatar
snappercity
Staff Sergeant
Staff Sergeant
Posts: 229
Joined: Mon Dec 02, 2013 12:05 am
Location: Surrey

Tamiya M-106A1 Mortar Carrier

Post by snappercity »

This will be my entry to the GB and my first go at a GB on ISM. With Vietnam being my favorite subject area I just had to enter really and hope to enter more GB's & SiG's in the future.

The M-106 is an M-113 armored personnel carrier that was used as a mobile fire support vehicle. It was fitted with a M30 mortar mounted on a turntable in the rear troop compartment. On this variant, the single hatch over the rear troop compartment was exchanged for a three-part circular hatch. The mortar could be fired from the vehicle, but could also be fired dismounted.

The M30 107 mm (4.2 inch Mortar) heavy mortar is an American rifled, muzzle-loading, high-angle-of-fire weapon used for long-range indirect fire support to infantry units.
The M30 system weighs 305 kg including the complete mortar with a welded steel rotator, M24A1 base plate and M53 sight.

A point of interest in the design of this mortar is the rifled barrel. A rifled barrel requires the round to be a very tight fit to the bore in order for the rifling to engage the round and impart rotation to it. But in a muzzle loading mortar, the round has to be loose enough in the bore to drop in from the front. In order to have it both ways, these rounds have an expandable ring at the base which expands into the rifling under the pressure of the explosion of the firing charge which propels the round. Additionally, imparting a spin to a round causes it to drift away from the direction of fire during flight and the longer the flight (greater range to target), the farther the drift, so the computation for setting the direction for firing at a specific target has to account for this drift.

American rounds are designed to be drop-safe and bore-safe. As such, the fuzes in the rounds for this rifled mortar did not arm unless the round was spun a certain number of times i.e. the round was not armed until it had exited the barrel spinning and traveled a safe distance from the gun emplacement.

The M30 could fire an assortment of rounds including:
HE M329A1—max range 5,650 m (6,180 yd), weight 12.3 kg (27 lb)
HE M329A2—max range 6,800 m (7,400 yd), weight 10 kg (22 lb)
HE M34A1—max range 4,620 m (5,050 yd), weight 12.2 kg (26.9 lb)
WP M328A1—max range 5,650 m (6,180 yd)
ILLUM M335A2—max range 5,490 m (6,000 yd)

WP is white phosphorus ("Willy-Pete")
ILLUM is illumination, a parachute flare round with fixed timed detonation. Deployment height above ground is determined by gun elevation angle and propelling charge.
HE and WP rounds could be fitted with various fuses before firing including a proximity fuse set for detonation at about 30 feet above ground to maximize the effected target area and to spray shrapnel down into foxholes.
There was also a sub-caliber training device that utilized blank 20 gauge shotgun shells to propel an inert training round a few hundred meters. This training was for gunnery skills of laying (in a sense, aiming) the guns.

Due to the heavy weight the mortar was most often mounted in the M-106. This vehicle mounted mortar was crewed by 5 people: the track commander (mortar sergeant/gun commander), gunner, assistant gunner, loader and vehicle driver. Ground mounting of the mortar was time consuming and strenuous as a hole had to be dug for the base plate of the mortar to rest in, sandbags had to filled and placed around the base plate to stabilize it and to protect the exposed ammunition. Also this decreased the accuracy of the weapon as the recoil from firing caused the base plate to shift in the ground. This movement also made the crew have to "lay" the gun back on the aiming stakes more often, causing a temporary lack of fire while the weapon was repositioned and re-sighted back to its original reference point.

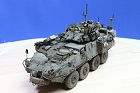
The Tamiya M-113's are showing their age now and are no match for the superior Academy kits but they still make up to be a decent models and is this is still the only M-106 in 1:35th. This is going to be a simple build for me with only a small amount of after market and possibly a bit of scratching. I will be purchasing a set of Friul Modellismo metal tracks to replace the vinyl crap that Tamiya provide with most of their AFV's. The .50 cal will be replaced by a Panzer Art Browning M2 with canvas cover to depict the weapon in a stored scenario. Lastly I will use a few items from the Legend M-113 accessory set that I have put aside for another M-113 build.

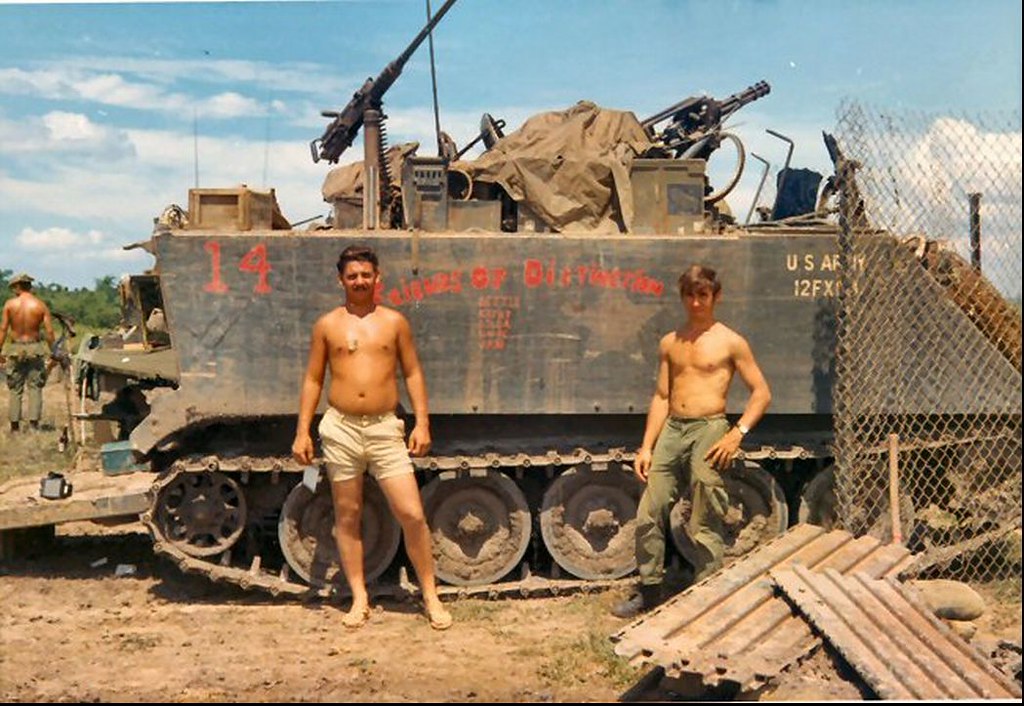
For weathering and reference I will be following Jerzy Krzminski's Flickr account as this is quite possibly one of the best sources of Vietnam War armour around with more M-113 pictures than you can shake a stick at.
https://www.flickr.com/photos/zippo132/

ImageM106 mortar track "B" troop 3/4th Cavalry 25th Infantry Division "Tropic Lightning" by Jerzy Krzemiński, on Flickr

ImageM106 mortar track "Charlie Company" 1/50th Infantry "Play the Game" by Jerzy Krzemiński, on Flickr

Image
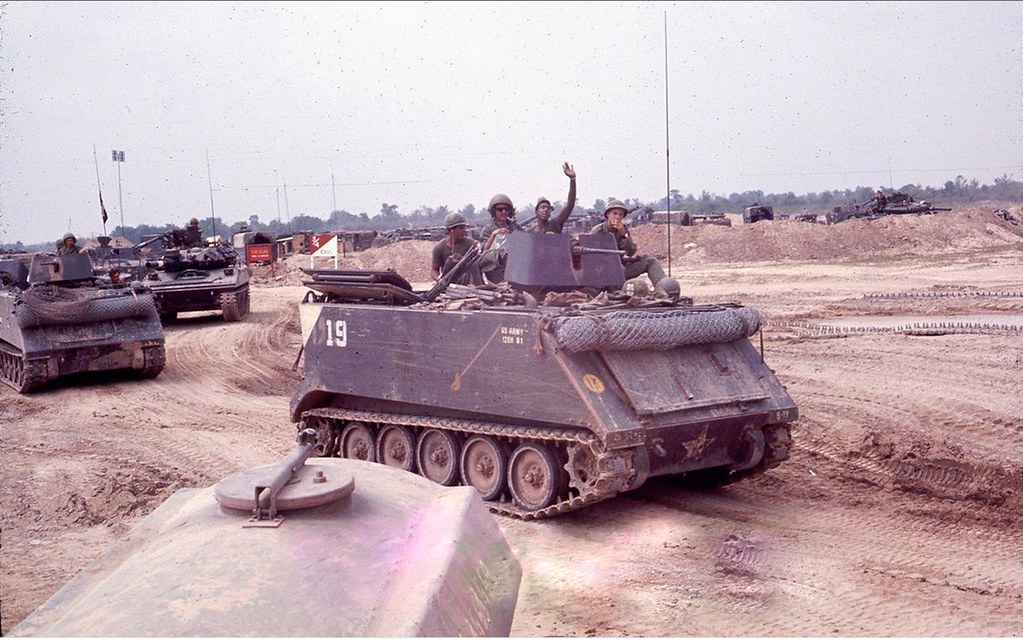
M106 mortar track 2/47th Infantry /mech/ "Black Panthers" 9th Infantry Division "Old Reliables" by Jerzy Krzemiński, on Flickr

ImageM106 mortar track 2/22nd Infantry "Triple Deuce" by Jerzy Krzemiński, on Flickr

Anyway here is what I will be working with... (sorry for the poor pics they were taken in low light.)

ImageIMG_4236 by Snapper_city, on Flickr

ImageIMG_4237 by Snapper_city, on Flickr

ImageIMG_4239 by Snapper_city, on Flickr

ImageIMG_4240 by Snapper_city, on Flickr

ImageIMG_4242 by Snapper_city, on Flickr

ImageIMG_4243 by Snapper_city, on Flickr

ImageIMG_4244 by Snapper_city, on Flickr

ImageIMG_4246 by Snapper_city, on Flickr

ImageIMG_4247 by Snapper_city, on Flickr

ImageIMG_4249 by Snapper_city, on Flickr

ImageIMG_4250 by Snapper_city, on Flickr

It could be a couple of weeks before I make a start on this as I'm finishing another couple of builds first.

Thanks for looking.
Mark - Too many models, Not enough time...

On the bench:
Airfix 1:72 Vulcan
Takom 1:35 Zwilling Flak 40
Roden 1:144 C-141B Starlifter
User avatar
EasyEight96
Sergeant Major of the Army
Posts: 1012
Joined: Sat Jul 20, 2013 2:04 pm
Location: Malaysia
Malaysia

Re: Tamiya M-106A1 Mortar Carrier

Post by EasyEight96 »

Nice entry
In -progress

Too many on the bench!!!

Matchbox Kits lover....
User avatar
Dunhill2005
Sergeant Major of the Army
Posts: 1195
Joined: Sat Aug 03, 2013 1:38 pm
Location: Wunstorf, Germany
Germany

Re: Tamiya M-106A1 Mortar Carrier

Post by Dunhill2005 »

Nice to see another M113 :th:

Have fun and I will watching you!!!! 8-)
User avatar
snappercity
Staff Sergeant
Staff Sergeant
Posts: 229
Joined: Mon Dec 02, 2013 12:05 am
Location: Surrey

Re: Tamiya M-106A1 Mortar Carrier

Post by snappercity »

Thanks Dunhill2005. For some strange reason the M113 is my all time favourite military vehicle. I have built more than I care to count... :cheers2:
Mark - Too many models, Not enough time...

On the bench:
Airfix 1:72 Vulcan
Takom 1:35 Zwilling Flak 40
Roden 1:144 C-141B Starlifter
User avatar
snappercity
Staff Sergeant
Staff Sergeant
Posts: 229
Joined: Mon Dec 02, 2013 12:05 am
Location: Surrey

Re: Tamiya M-106A1 Mortar Carrier

Post by snappercity »

During WWII many country did not think that armored personnel and weapon carriers for conveying infantry and weapons in the battlefield were very useful. As the mobility of tanks increased, it became impossible for infantry on foot or in unarmored wheeled vehicles, partly armored halftrack personnel carriers, etc., to perform operations in concert with tank troops. Motorized infantry in wheeled or half track personnel carriers were also vulnerable to nuclear weapons. Owing to the improvement of projectiles adapted to explode in the air to kill exposed men, it became necessary to give armor protection to advancing infantry. By the beginning of the 1970's  carriers for giving proximity fire support to combined arms teams comprising tank force, mechanized infantry and armored cavalry reconnaissance force, were developed on the basis of the armored personnel carrier. In 1954, the US Army Material Command declared a plan for a light, full track, amphibious air-portable armored personnel carrier. The M113 was started jointly by the weapon manufacturing Div. of Food machinery Corp. (FMC) of San Jose, California, and by Kaiser Aluminum Chemical Corporation (KACC) of Bistol, Rhode Island. Later, four each of the improved models, M113E1 and M113E2, were made. After tests the M113E2 was officially accepted as the M113 Armored Personnel Carrier in June 1959. As the M113 family, the following vehicles were manufactured  : M106 Armored S/P 107mm Heavy Mortar Carrier; M125 Armored S/P 81mm Mortar Carrier; M132 Armored support flame thrower, M730 S/P AA Missile; M741 Armored S/P 20mm machine gun; M577 Armored Command Post Car; M548 Cargo Carriers, etc. As the M113's successor with a longer range of action the M113E2 with a diesel engine was constructed in May 1965. After tests, the M113E2 was officially accepted as the M113A1 Armored Personnel Carrier. The production of the above mentioned family including the M113A1 totalled 60,000 units by 1975. From 1964 on, the M106A1 Armored S/P 107mm Heavy Mortar Carrier was supplied to the following units : Heavy Mortar platoons of support companies in tank and mechanized infantry battalions of armored divisions, mechanized divisions or infantry divisions, and mortar squads of armored cavalry platoons. The M106A1, a light weight carrier of the M30 107mm heavy mortar, permitted both the mounted and dismounted firing of the mortar. It had a crew of six and its dimensions were 4.93m long, 2.86m wide, 1.99m high, weight 11.9 tons. As auxiliary armament, an M2 50-caliber (12.7mm) Browning heavy machine gun was mounted. Its maximum speed was 68 km/h, range 483km.
Mark - Too many models, Not enough time...

On the bench:
Airfix 1:72 Vulcan
Takom 1:35 Zwilling Flak 40
Roden 1:144 C-141B Starlifter
User avatar
snappercity
Staff Sergeant
Staff Sergeant
Posts: 229
Joined: Mon Dec 02, 2013 12:05 am
Location: Surrey

Re: Tamiya M-106A1 Mortar Carrier

Post by snappercity »

Tonight saw things start to get moving. I had a couple of hours while watching the football and this is what I achieved. The road wheels are together along with the mortar base plate attached to the hull floor. The fuel tank, vehicle radio and mortar ammo racks are also built. Not much but it's a start.

ImageIMG_4252 by Snapper_city, on Flickr

The fuel tank and some sort of stowage rack that will require EPM clean up.

ImageIMG_4255 by Snapper_city, on Flickr

The mortar ammo racks will require some filler. I considered replacing these with scratch built parts as it shouldn't be too hard but I want to keep this build simple so sanding it will be.

ImageIMG_4254 by Snapper_city, on Flickr

Thanks for looking.
Mark - Too many models, Not enough time...

On the bench:
Airfix 1:72 Vulcan
Takom 1:35 Zwilling Flak 40
Roden 1:144 C-141B Starlifter
User avatar
schweinhund227
Chief Warrant Officer 4
Posts: 2627
Joined: Fri May 24, 2013 9:51 pm
Location: Ontario,Canada
Contact:
Canada

Re: Tamiya M-106A1 Mortar Carrier

Post by schweinhund227 »

:jd: Going to town on that old gal hey ?

Nice going and looking forward to more updates....

:thumb2:
longlance67
Warrant Officer
Warrant Officer
Posts: 1371
Joined: Fri Aug 16, 2013 5:22 pm
Location: Galway, Ireland

Re: Tamiya M-106A1 Mortar Carrier

Post by longlance67 »

very nice work and a lot of interesting facts on the subject


looking forward to seeing more mate


Shane.
On the Bench:
Trumpeter Stryker ESV
Hobby Boss 1/48 F18 Hornet
1/72 Dragon King Tiger with Zimm
28mm Napoleonic project
28mm Norman Conquest of Ireland painting project

My Channel:
http://www.youtube.com/user/longlance67
User avatar
snappercity
Staff Sergeant
Staff Sergeant
Posts: 229
Joined: Mon Dec 02, 2013 12:05 am
Location: Surrey

Re: Tamiya M-106A1 Mortar Carrier

Post by snappercity »

Hi guys

Back with a small update. Time has been quite limited lately but I have found a bit of time here and there to work on this.

The Friul tracks arrived. I started building these tonight after checking out Paul's video as it is the first time I have ventured into metal tracks. I have been putting them together in groups of six track links then joining them up. I am finding it quite easy and am already impressed so far.

ImageIMG_4295 by Snapper_city, on Flickr

The floor is glued into the hull along with the commanders perch and drivers instruments. I'm going to keep most of the inside clear until painting. Items will be individually painted and weathered on cocktail sticks before being brought together. The inside of the roof has been cleaned up in areas that will be on show through the rear door but as you wont see much I haven't gone as mad as I would normally.

ImageIMG_4296 by Snapper_city, on Flickr

The parts that are already built. Bottom right is the drivers seat and commanders seat. The long thin two pronged item is the drivers control sticks. These snapped on one side at the base while removing from the sprue. Above these are the mortar ammo storage. Quite possibly the worst plastic parts of the whole kit. These have been tidied up with Squadron Green and will probably require a little more work once primer shows all the imperfections. The item at the top of the board is the radio with the fuel tank to the left. Left and down is a couple of benches, all the wheels and the kit internal stowage.

ImageIMG_4297 by Snapper_city, on Flickr

Driver and commanders seats.

ImageIMG_4298 by Snapper_city, on Flickr

The dreaded mortar ammo storage.

ImageIMG_4299 by Snapper_city, on Flickr

Here are the instructions in all their simplicity.

ImageIMG_4300 by Snapper_city, on Flickr

ImageIMG_4301 by Snapper_city, on Flickr

ImageIMG_4302 by Snapper_city, on Flickr

ImageIMG_4303 by Snapper_city, on Flickr

ImageIMG_4304 by Snapper_city, on Flickr

Thanks for looking.
Mark - Too many models, Not enough time...

On the bench:
Airfix 1:72 Vulcan
Takom 1:35 Zwilling Flak 40
Roden 1:144 C-141B Starlifter
ROBOPAUL
Staff Sergeant
Staff Sergeant
Posts: 186
Joined: Mon Dec 16, 2013 3:49 pm
England

Re: Tamiya M-106A1 Mortar Carrier

Post by ROBOPAUL »

This is coming along nicely. I have this kit in my stash and so i'm looking forward to seeing how you get on. I to have an interest in the Vietnam war and I also like the M113 and have been busy collecting kits from this conflict. I have to agree that the Tamiya kits are showing their age but they go together so well. Good luck.
User avatar
snappercity
Staff Sergeant
Staff Sergeant
Posts: 229
Joined: Mon Dec 02, 2013 12:05 am
Location: Surrey

Re: Tamiya M-106A1 Mortar Carrier

Post by snappercity »

Cheers RoboPaul. Vietnam war subjects are right up there in my eyes. The Tamiya kit is a good starting point for the vehicle. The M113 for some reason is my favorite AFV and I have built quite a few of them in my time. Here are my Tamiya M113 ACAV & M106 that I built nearly 20 years ago. I can't believe they have survived this long but I felt it was time to redo the M106 up to current build standards.

Update: I have now built 30 track links.

ImageIMG_4305 by Snapper_city, on Flickr
Mark - Too many models, Not enough time...

On the bench:
Airfix 1:72 Vulcan
Takom 1:35 Zwilling Flak 40
Roden 1:144 C-141B Starlifter
User avatar
Hillbilly
Command Sergeant Major
Posts: 858
Joined: Sun Mar 23, 2014 9:15 pm
Location: Missouri,USA

Re: Tamiya M-106A1 Mortar Carrier

Post by Hillbilly »

Lookin good so far :thumb1: I also like Friul tracks,you really can't beat them for getting realistic track sag.
Steve

Make something idiot proof and someone will come along and make a better idiot.
User avatar
snappercity
Staff Sergeant
Staff Sergeant
Posts: 229
Joined: Mon Dec 02, 2013 12:05 am
Location: Surrey

Re: Tamiya M-106A1 Mortar Carrier

Post by snappercity »

The sag was one of the reasons I wanted to try them as I plan to leave the side skirts off.
Mark - Too many models, Not enough time...

On the bench:
Airfix 1:72 Vulcan
Takom 1:35 Zwilling Flak 40
Roden 1:144 C-141B Starlifter
User avatar
snappercity
Staff Sergeant
Staff Sergeant
Posts: 229
Joined: Mon Dec 02, 2013 12:05 am
Location: Surrey

Re: Tamiya M-106A1 Mortar Carrier

Post by snappercity »

Small update before I'm back to work tomorrow.

The hole that is in the front right wing has been filled with plasticard and green stuff.

ImageIMG_4307 by Snapper_city, on Flickr

ImageIMG_4308 by Snapper_city, on Flickr

ImageIMG_4309 by Snapper_city, on Flickr

Next up work has started on the rear door. The four EPM's have been filled along with the removal of the locator tabs and the kits poor excuse for a door handle. I plan to scratch the handle, door mech unit in the bottom left corner and possibly the door hinge.

ImageIMG_4312 by Snapper_city, on Flickr

ImageM113 acav "E" troop 1/1st cavalry 23rd Infantry Division "Americal" by Jerzy Krzemiński, on Flickr

ImageM113 acav "A" company 1/50th Infantry "Play the Game" by Jerzy Krzemiński, on Flickr

ImageM113 acav "A" troop 3/4th cavalry 25th Infantry Division "Tropic Lightning" by Jerzy Krzemiński, on Flickr

ImageM113 apc 104th Air Police Security Squadron by Jerzy Krzemiński, on Flickr

Here is where things are up to on the tracks..

ImageIMG_4315 by Snapper_city, on Flickr

A couple of pics of the M106 I built some 15 odd years ago. Hoping to do a much better job on this one..

ImageIMG_4313 by Snapper_city, on Flickr

ImageIMG_4314 by Snapper_city, on Flickr
Mark - Too many models, Not enough time...

On the bench:
Airfix 1:72 Vulcan
Takom 1:35 Zwilling Flak 40
Roden 1:144 C-141B Starlifter
Russ72
Sergeant Major
Sergeant Major
Posts: 666
Joined: Tue Jan 21, 2014 12:30 pm
Location: Brisbane, Australia

Re: Tamiya M-106A1 Mortar Carrier

Post by Russ72 »

Nice work so far Mark, and some damn fine photos to accompany. :cheers2:
User avatar
snappercity
Staff Sergeant
Staff Sergeant
Posts: 229
Joined: Mon Dec 02, 2013 12:05 am
Location: Surrey

Re: Tamiya M-106A1 Mortar Carrier

Post by snappercity »

Cheers Russ
Mark - Too many models, Not enough time...

On the bench:
Airfix 1:72 Vulcan
Takom 1:35 Zwilling Flak 40
Roden 1:144 C-141B Starlifter
Yevgeny
Sergeant Major
Sergeant Major
Posts: 730
Joined: Tue Sep 30, 2014 10:37 am
Location: Worthing, UK

Re: Tamiya M-106A1 Mortar Carrier

Post by Yevgeny »

Progressing nicely.
Will be interesting to compare with the old models when completed.
Sir, we're surrounded!
Excellent! Now we can attack in any direction!
------------------------------------------------
Model N1 DONE! - Tamiya 1:35 Panzerkampfwagen V Panther Sd.kfz.171 Ausf.A
Model N2 DONE! - Academy 1:72 M1126 Stryker
Working on:Trumpeter (00204)
Waiting: Meng (SS-004), Airfix (A50125), Tamiya (35068)
User avatar
snappercity
Staff Sergeant
Staff Sergeant
Posts: 229
Joined: Mon Dec 02, 2013 12:05 am
Location: Surrey

Re: Tamiya M-106A1 Mortar Carrier

Post by snappercity »

Continuing with a small update from today.

One of the plastic handles snapped when removing from the sprue so I formed a replacement from wire.

ImageIMG_4317 by Snapper_city, on Flickr

Here it is in situ on the underside of the roof. I have also done more work filling holes and EPM's.

ImageIMG_4318 by Snapper_city, on Flickr

ImageIMG_4319 by Snapper_city, on Flickr

The outside of the rear door is complete.

ImageIMG_4320 by Snapper_city, on Flickr

The inside of the drivers and commanders hatches both had an EPM that required filling. I have also removed and replaced the grab handles with wire.

ImageIMG_4322 by Snapper_city, on Flickr

Here is what they used to look like.

ImageIMG_4323 by Snapper_city, on Flickr

Most of the roof items have been added. All that is left is the three part folding mortar hatch that I will leave off until after painting and the hand tools.

ImageIMG_4324 by Snapper_city, on Flickr

I will be working on my Little Bird build a lot in the near future as I need to get it finished for next months club night but I will still be working this now and then. Hopefully it will be ready for paint in the next couple of weeks where I plan to give the black basing technique a go.

The weathering is going to be great fun. These things really did get filthy. Not sure if that is a stiff on the rear loading hatch?

ImageM113 acav "K" troop 11 ACR "Blackhorse" by Jerzy Krzemiński, on Flickr

This is going to be my next M113 project. Minigun and .50 Cal combo.

ImageM113 apc 1/5th Infantry "Bobcats" 25th Infantry Division "Tropic Lightning" by Jerzy Krzemiński, on Flickr

Another one for the future. Military Police with twin M60 goodness.

ImageM113 apc 560th MP company by Jerzy Krzemiński, on Flickr

The distraction:

ImageIMG_3756 by Snapper_city, on Flickr

Until next time.
Mark - Too many models, Not enough time...

On the bench:
Airfix 1:72 Vulcan
Takom 1:35 Zwilling Flak 40
Roden 1:144 C-141B Starlifter
User avatar
UKguyInUSA
Second Lieutenant
Second Lieutenant
Posts: 3429
Joined: Sun Mar 30, 2014 10:19 pm
Location: New Hampshire, USA formerly Palm Beach, Florida, USA and Leicestershire, UK (until 1999)
Contact:

Re: Tamiya M-106A1 Mortar Carrier

Post by UKguyInUSA »

Great work so far, Mark. Can't wait to see you emulate the weathering seen in the photos of the actual craft :) :thumb1:
WIP:: Tamiya 1/48 F4U-1A Corsair

Non-WIP::Eduard 1/48 Fokker DVII, Revell 1/32 Arado AR196 and 1/32 BF109G10 Erla,
User avatar
snappercity
Staff Sergeant
Staff Sergeant
Posts: 229
Joined: Mon Dec 02, 2013 12:05 am
Location: Surrey

Re: Tamiya M-106A1 Mortar Carrier

Post by snappercity »

Nothing much more to say other than one side of the tracks are complete. The kit rubber band style tracks have 69 links but only 62 are required for the Fruil set. I thought they wouldn't be exact so I built 66 to check it but then had to remove 4. They are looking cool.

ImageIMG_4327 by Snapper_city, on Flickr
Mark - Too many models, Not enough time...

On the bench:
Airfix 1:72 Vulcan
Takom 1:35 Zwilling Flak 40
Roden 1:144 C-141B Starlifter
User avatar
FlyingCoffin
Corporal
Corporal
Posts: 56
Joined: Wed Oct 01, 2014 10:20 pm
Location: Houston, Texas
United States of America

Re: Tamiya M-106A1 Mortar Carrier

Post by FlyingCoffin »

She's coming along really nicely! Those Fruil tracks must be a nightmare... As an aircraft guy... I honestly can't even imagine! :wall:

Maybe some day I'll join an armor group build and give them a shot just to see for myself. :)
Per Ardua ad Astra

"In the end, this thing has earned its morbid moniker. This "flying coffin" lends a war which they call great, a glamour that it simply does not have."

On the Bench: On Deck:
  • Eduard 1:72 Fokker Dr. I
In the Aerodrome:
  • Nothing, yet!
User avatar
snappercity
Staff Sergeant
Staff Sergeant
Posts: 229
Joined: Mon Dec 02, 2013 12:05 am
Location: Surrey

Re: Tamiya M-106A1 Mortar Carrier

Post by snappercity »

They are not too bad really. I clean out all the holes from all tracks first. Then clean any flash off. Then construction. I find breaking it down like this works for me and keeps me in a better rhythm. After building maybe upwards of 300 aircraft in my life I fancied my hand at armour. They provide different challenges both in the build, painting and weathering. I even build the odd ship also. I highly recommend stepping out of your comfort zone once in a while. You never know, you might just like it.
Mark - Too many models, Not enough time...

On the bench:
Airfix 1:72 Vulcan
Takom 1:35 Zwilling Flak 40
Roden 1:144 C-141B Starlifter
User avatar
alextheblue
Chief Warrant Officer 5
Posts: 2679
Joined: Mon Jul 15, 2013 11:30 am
Location: Slough, United Kingdom
Contact:
Scotland

Re: Tamiya M-106A1 Mortar Carrier

Post by alextheblue »

Some fantastic work there Mark and great attention to detail - all of the replacement handles and rails look really nice. Plus, you can't beat Friul tracks, they look the biz and putting them together can be quite "therapeutic"! :th:
"Courage is feeling fear and acting anyway."

www.alextheblue.com
User avatar
snappercity
Staff Sergeant
Staff Sergeant
Posts: 229
Joined: Mon Dec 02, 2013 12:05 am
Location: Surrey

Re: Tamiya M-106A1 Mortar Carrier

Post by snappercity »

Another hours work tonight and I was wondering how to drill the holes in the side of the hull where the side skirts would attach. Most Vietnam M113's they were either removed or ripped off. I started by using one of my latest techniques by making a stencil from some tracing paper that covers decal sheets these days. They are see through (ish) and can be used to make and measure stencils for masking or in this case where to drill holes. I was measuring the drill points when I looked at the side skirts and had a keep it simple moment. Why not just drill through the original bolts. I was not planning to keep the skirts so why not. Ta Da. Problem solved. If I had more time and effort I would have probably made a remaining damaged attachment strip (see pic 2 & 3) out of some 90' angled plastic card strip.

ImageM113 acav 1/61st Infantry 5th Infantry Division "Red Diamond" " by Jerzy Krzemiński, on Flickr

ImageM132 "zippo" track "A" troop 1/4th cavalry "The Quarterhorse" 1st Infantry Division "Big Red One" by Jerzy Krzemiński, on Flickr

ImageM113 apc 3rd Cavalry Regiment by Jerzy Krzemiński, on Flickr

Here is how it worked out. I still have to smooth out the side skirt locating guides on the undersides of the track arches..

ImageIMG_4332 by Snapper_city, on Flickr

ImageIMG_4333 by Snapper_city, on Flickr
Mark - Too many models, Not enough time...

On the bench:
Airfix 1:72 Vulcan
Takom 1:35 Zwilling Flak 40
Roden 1:144 C-141B Starlifter
User avatar
snappercity
Staff Sergeant
Staff Sergeant
Posts: 229
Joined: Mon Dec 02, 2013 12:05 am
Location: Surrey

Re: Tamiya M-106A1 Mortar Carrier

Post by snappercity »

Hi all

A little bit of progression with this.

The weapon attachment point to the commanders cupola was very thick and covered the forward looking viewing window. I sanded it back so this is now unobstructed.

ImageIMG_4335 by Snapper_city, on Flickr

ImageIMG_4338 by Snapper_city, on Flickr

ImageIMG_4340 by Snapper_city, on Flickr

The rear of the front part of the vehicle has been cleaned up as this is where the drivers feet would go and will be visible.

ImageIMG_4341 by Snapper_city, on Flickr

Priming has began for the inside of the crew area and some of the bits & bobs that will require painting soon. It has also highlighted the areas that require more clean up. I started off using the last of a halfords rattle can before switching to a Tamiya RLM grey sprayed on. I was going to use Vallejo grey primer but decided to switch to standard Tamiya as I wanted to spray another colour or two straight after. I find Vallejo Primer can take longer to cure and is fine if left for 24-48 hrs but I wanted to continue spraying today. This never happened unfortunately due to daddy day care reasons. For the interior I'm going to use white to highlight areas, some dark wear & tear sponge & brush chipping before the final thin coat of Ammo US APC interior green. This is the first time I am trying this technique. It basicly allows you to correct the chipping/scratches to perfection without defacing the final colour layer, a second chance if you like... I will then continue to weather with washes, oils and pigments.

ImageIMG_4344 by Snapper_city, on Flickr

ImageIMG_4345 by Snapper_city, on Flickr

Until next time.
Mark - Too many models, Not enough time...

On the bench:
Airfix 1:72 Vulcan
Takom 1:35 Zwilling Flak 40
Roden 1:144 C-141B Starlifter
Deacon
Staff Sergeant
Staff Sergeant
Posts: 235
Joined: Mon Jul 21, 2014 7:45 pm

Re: Tamiya M-106A1 Mortar Carrier

Post by Deacon »

Looking good mate and some nice work there with the clean up. :thumb2:
User avatar
snappercity
Staff Sergeant
Staff Sergeant
Posts: 229
Joined: Mon Dec 02, 2013 12:05 am
Location: Surrey

Re: Tamiya M-106A1 Mortar Carrier

Post by snappercity »

Thanks Deacon. Hopefully I will get some more time on this over the weekend.
Mark - Too many models, Not enough time...

On the bench:
Airfix 1:72 Vulcan
Takom 1:35 Zwilling Flak 40
Roden 1:144 C-141B Starlifter
Post Reply

Return to “Builds”