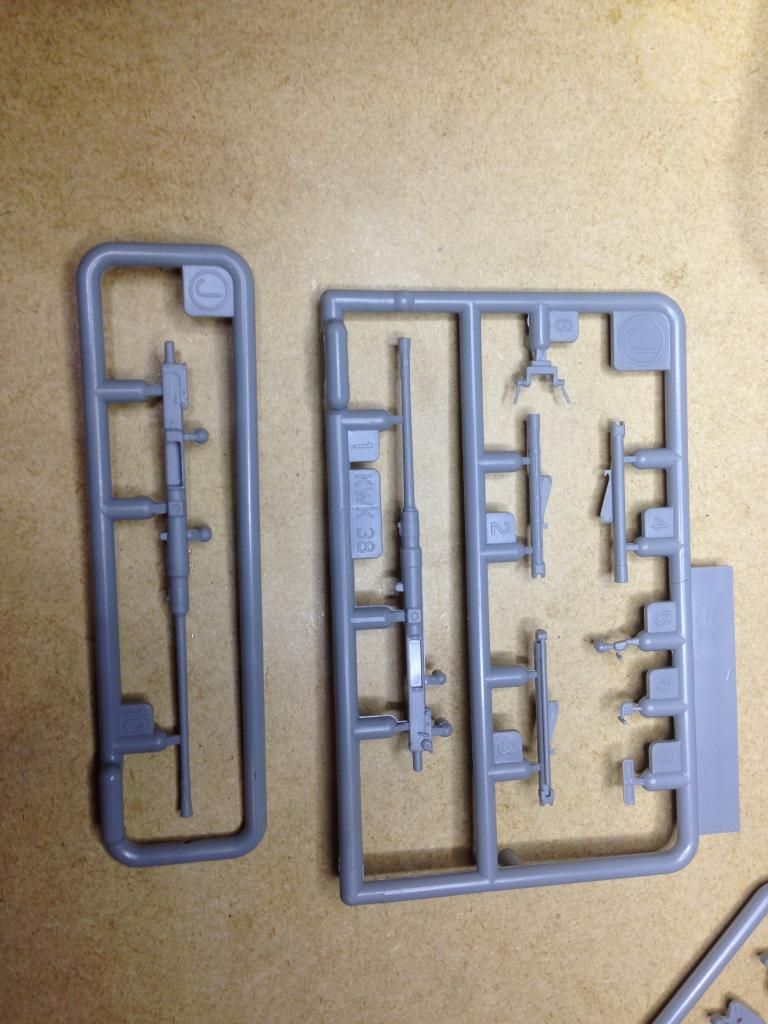
My entry into the D-day GB

Post Reply
Scaleman
Staff Sergeant
Staff Sergeant
Posts: 186
Joined: Sun Jan 12, 2014 5:33 pm
Location: North pole Sweden

My entry into the D-day GB

Post by Scaleman »

My entry into the D-day GB Better late than never, and its 2 full months left If im right. Lets see if I can do this forum thingy. :scratch::

Youtube: WarWarNeverChanges

Jonas
Attachments
DML-SdKfz-10-5-Armoured2.jpg
DML-SdKfz-10-5-Armoured2.jpg (121.55 KiB) Viewed 3164 times
Youtube Channel WarWarNeverChanges

On the bench 10+
Im a multi build addict trying to reduce
trekfanj
Sergeant Major
Sergeant Major
Posts: 721
Joined: Mon Jun 17, 2013 8:01 pm
Location: Mesa, AZ USA
United States of America

Re: My entry into the D-day GB

Post by trekfanj »

Good choice! :th:
I built this kit a couple of years ago; it was my first Dragon kit and though extremely fiddly, I like how it turned out.
It was also my first halftrack!
Jarod

"That which we persist in doing becomes easier, not that the task itself has become easier, but that our ability to perform it has improved."
-Ralph Waldo Emerson


On the bench
Bandai 1/144 Millennium Falcon Lando Calrissian version
Scaleman
Staff Sergeant
Staff Sergeant
Posts: 186
Joined: Sun Jan 12, 2014 5:33 pm
Location: North pole Sweden

My entry into the D-day GB

Post by Scaleman »

Starting with the weels, The front weels are multi part, wich offers exellent detail. The road weels are two part and the drive sprockets have three parts, minimum of flash as usual with Dragon. Of cause I ran into a problem 256 KiB is the maximum picture size??? That wont work at all. So Im guessing I need photo bucket. Then my question is why the option to add pictures??? :think:
Youtube Channel WarWarNeverChanges

On the bench 10+
Im a multi build addict trying to reduce
Scaleman
Staff Sergeant
Staff Sergeant
Posts: 186
Joined: Sun Jan 12, 2014 5:33 pm
Location: North pole Sweden

Re: My entry into the D-day GB

Post by Scaleman »

Image
Image
Image
Image
Image
Youtube Channel WarWarNeverChanges

On the bench 10+
Im a multi build addict trying to reduce
Scaleman
Staff Sergeant
Staff Sergeant
Posts: 186
Joined: Sun Jan 12, 2014 5:33 pm
Location: North pole Sweden

Re: My entry into the D-day GB

Post by Scaleman »

So Im all sorted out for now with uploading my progress. Anyway the plan for this one Is to just build the model and who knows what ideas come up as I go along, Iwe decided to build it with the sides up in transport mode not deployed, for now. I like the ammo boxes on the sides and the compact look. This little thig was used all thrugh the war almost, markings in the kit includes 1941 to 1944. Im making the asumption that it was easy to manuvre and culd fall back if thretened and quite easy to conseal. So the survivability of the wehicle must have been fairly good. I did some reserch and found pictures of one on D-day or in the days right after. 2 Brittish soldiers have captured one, and from how it appears crusing along some hedgerows. Pls feel free to share, if you have a special interest in this wehicle or suggestions.

Image
Youtube Channel WarWarNeverChanges

On the bench 10+
Im a multi build addict trying to reduce
Scaleman
Staff Sergeant
Staff Sergeant
Posts: 186
Joined: Sun Jan 12, 2014 5:33 pm
Location: North pole Sweden

My entry into the D-day GB

Post by Scaleman »

A very impressive kit, at first glance I didnt notice the workable suspention I knew Dragon made it for their larger wehicles not for something as tiny as this.

Image
Image
Image
Youtube Channel WarWarNeverChanges

On the bench 10+
Im a multi build addict trying to reduce
Scaleman
Staff Sergeant
Staff Sergeant
Posts: 186
Joined: Sun Jan 12, 2014 5:33 pm
Location: North pole Sweden

Re: My entry into the D-day GB

Post by Scaleman »

So here goes the chassi Fiddly bits but easy to clean up.Image
First misstakes in the instructions, Im in search for a tweak list. I will be doing some more reserch on the kit and on actual wehicle pictures. I doubt that I will find any pictures of the underside of the hull, But the parts are in the kit. The first one part A 72 shuld be there but is missing in the Instructions, its there but it wont say what part it is. This needs no reserch cause you clearly see its the right part and it wont affect the kit in any way. Parts A 41 and 42 are also in the kit but missing in the instructions, clearly they are there in the overall wiew. I will be making my own corrections list at the end of the build and share on the forum.
Image
Youtube Channel WarWarNeverChanges

On the bench 10+
Im a multi build addict trying to reduce
Scaleman
Staff Sergeant
Staff Sergeant
Posts: 186
Joined: Sun Jan 12, 2014 5:33 pm
Location: North pole Sweden

Re: My entry into the D-day GB

Post by Scaleman »

When gluing the chassi parts A 55 A 56. Jump forward to place part B 56 to get a correct alignment as theese are the parts holding up the whole front bumper. Chanses are you get a crooked front bumper. You might want that but lets make it straight to start with.
Image

Image
Youtube Channel WarWarNeverChanges

On the bench 10+
Im a multi build addict trying to reduce
Scaleman
Staff Sergeant
Staff Sergeant
Posts: 186
Joined: Sun Jan 12, 2014 5:33 pm
Location: North pole Sweden

Re: My entry into the D-day GB

Post by Scaleman »

Almost forgot,In step 2 it helps to glue part A1 to the hull before aligning up the steering rods A23 A22 A35 someone at Dragon wants you to glue them hanging free in the air :doh: :bash:
Youtube Channel WarWarNeverChanges

On the bench 10+
Im a multi build addict trying to reduce
User avatar
WirbelwindModelling
Corporal
Corporal
Posts: 91
Joined: Sun Mar 30, 2014 5:16 pm
Location: Suffolk, UK

Re: My entry into the D-day GB

Post by WirbelwindModelling »

Hey Jonas,

Good work so far but to participate in th build you need to post this in the official forum section. If you send a private message to one of the moderators Paul or Lee and ask nicely (They don't bite :) ) they will move this post to the official section.

Hope this helps, and by the way I am a great fan of your work on YouTube

Wirbel
On the small desk in the corner of my room:

Zvezda 1/72 IS-2

And i have YouTube now: https://www.youtube.com/channel/UClMVSN ... LouPy4IM_Q
Scaleman
Staff Sergeant
Staff Sergeant
Posts: 186
Joined: Sun Jan 12, 2014 5:33 pm
Location: North pole Sweden

Re: My entry into the D-day GB

Post by Scaleman »

Thank you I know, this is my first post thread, I saw some other D-day posts that shuld have been moved in this thread Its on its way wirbelwind. Thank you for notifying me anyway.
Youtube Channel WarWarNeverChanges

On the bench 10+
Im a multi build addict trying to reduce
Scaleman
Staff Sergeant
Staff Sergeant
Posts: 186
Joined: Sun Jan 12, 2014 5:33 pm
Location: North pole Sweden

Re: My entry into the D-day GB

Post by Scaleman »

So moving on to the engine, it contains of 17 parts and is very detailed, to the average modeller, not much is to be asked for here exept for some fule lines. But rivet counters have classed it out as faulty in some areas. As Im not one that cares much about 0,000001 accuracy especially when the "original" comes from a drawing of a engine. I got a tweak tutorial to get the supposedly 110% correct engine , There is supposed to be a more correct engine offered by Great wall hobby, am I going to get the 60Euro kit to hack up the enging on this kit, naaaw dont thik so. Ill add some of the vital parts. As this wehicle was in service thrugh out the war who knows what engine was in there and all of its modifications. I am going to keep looking for more originals, for reserch purposes. I used to work with a old German guy, who was into old cars, he worked on that everyday after work and made all kinds of modifications he was also a history nerd and claimed they used everything they had to make feild modifications, with that in mind Im going for the plausable that who ever used this wehicle and had its life depending on it working, wuld add and remove whatever they found nessesary. Anyway this is just my own opinion.
Image
Youtube Channel WarWarNeverChanges

On the bench 10+
Im a multi build addict trying to reduce
Scaleman
Staff Sergeant
Staff Sergeant
Posts: 186
Joined: Sun Jan 12, 2014 5:33 pm
Location: North pole Sweden

Re: My entry into the D-day GB

Post by Scaleman »

So the engine is the wrong engine at least it seems like there is 2 similar types mixed together in the kit Its the Maybach HL 42 TRKM and Maybach HL 42 TUK. So no open engine compartment. The engine provided will still, be in there for what little you culd see in there. I got lots of pictures and within resonable time there is no way to try to scratchbuild a whole engine compartment. If I start I want it complete or nothing at all. There is alot of exrea bits in there, oil can holders etc etc that is not provided.
Youtube Channel WarWarNeverChanges

On the bench 10+
Im a multi build addict trying to reduce
Scaleman
Staff Sergeant
Staff Sergeant
Posts: 186
Joined: Sun Jan 12, 2014 5:33 pm
Location: North pole Sweden

Re: My entry into the D-day GB

Post by Scaleman »

So the engine and transmission are getting done and Im dryfitting other larger parts too see if the litte injection marks in the lower tub is visible. Im good here, they are not, especially after weathering. I will paint alot of parts seperatly with this model. As you can see its a very detailed engine, but lacks some vital parts.
Image

If you were to open the hood, you wuld have to glue part A37 and A40 and fill the gap on the backside. This also helps to align the dashboard sides and back.
Image
Youtube Channel WarWarNeverChanges

On the bench 10+
Im a multi build addict trying to reduce
Scaleman
Staff Sergeant
Staff Sergeant
Posts: 186
Joined: Sun Jan 12, 2014 5:33 pm
Location: North pole Sweden

Re: My entry into the D-day GB

Post by Scaleman »

Dry fitting the lover hull.
Image

The injection marks
Image

Back of the seats needs to be sanded
Image

The 2 boxes under the drivers and passenges seat will be covered by the flatbed, There is an option here on the right side to have a side mounted smaller box, but Im going for the one on the picture.
Image
Youtube Channel WarWarNeverChanges

On the bench 10+
Im a multi build addict trying to reduce
Scaleman
Staff Sergeant
Staff Sergeant
Posts: 186
Joined: Sun Jan 12, 2014 5:33 pm
Location: North pole Sweden

Re: My entry into the D-day GB

Post by Scaleman »

More magical parts that appear on the overall drawings but does not show in any steps in the instrucktions. Im used to it so I always study them a bit extra and try to do as much reserch as possible. You can also see the optional storage box.
Image
Youtube Channel WarWarNeverChanges

On the bench 10+
Im a multi build addict trying to reduce
Scaleman
Staff Sergeant
Staff Sergeant
Posts: 186
Joined: Sun Jan 12, 2014 5:33 pm
Location: North pole Sweden

Re: My entry into the D-day GB

Post by Scaleman »

As some of you I like to build up all the larger parts first, so from here I will be jumping around the instrucktions, and add the finer details later. Im going to start the construcktion of the side panels to the flatbed, and the flatbed itself as this will be painted seperate. Im also going to paint the inside of the hull and engin and transmission detail. Theese parts will be posted before primer and after paiint. Now Im working on cleaning the very complicated flatbed frame.

Image

This pice is a little bit warped, but what can you expect from somethin like this amazing maze. The exellent dragon plastic lets you carefully cut everything out without breaking any parts. If you put your model in a stash for 10 years, you might have a problem with dry aged plastic :)

Image

Displaying the sides in transport position, will add alot more interest, with the nice detail and all that PE and the surface the ammo boxes gives you.
Image
Youtube Channel WarWarNeverChanges

On the bench 10+
Im a multi build addict trying to reduce
Scaleman
Staff Sergeant
Staff Sergeant
Posts: 186
Joined: Sun Jan 12, 2014 5:33 pm
Location: North pole Sweden

Re: My entry into the D-day GB

Post by Scaleman »

So Im getting no feedback :shhh: from anyone who built this kit or know more about the engine or such. I cant let the engine issue go. I know they are in total 9 kits from Dragon all with the same engine, and this was the second kit to come out in 2011. The newest Sd.Kfz.10 Ausf.A w/5cm Pak 38 still have the same engine. I want to get more of theese kits as the rest of the kit is very nice. Im guessing if Im doing a open engine, In the future I wuld have to make extensive reserch or just get a Great wall hobby kit :thumb1: .
Youtube Channel WarWarNeverChanges

On the bench 10+
Im a multi build addict trying to reduce
User avatar
Art17847
Master Sergeant
Master Sergeant
Posts: 386
Joined: Mon Jun 30, 2014 3:43 pm
Location: smack dab in the middle of PA.......

Re: My entry into the D-day GB

Post by Art17847 »

Yeah that sucs about the engine....its hard to believe that a manufacture like dragon cant get the details rite....i have yet to do one of these halftracks but have 2 of these in the stash so im lookin forward to seeing u complete this...great job so far
On the bench........uummmmm i dont have a bench......not yet anyway

Ike jokingly to Patton......"funny thing George every time I get a new star I get attacked"

Patton...."yes and every time you get attacked i bail you out"
Scaleman
Staff Sergeant
Staff Sergeant
Posts: 186
Joined: Sun Jan 12, 2014 5:33 pm
Location: North pole Sweden

Re: My entry into the D-day GB

Post by Scaleman »

Art17847 wrote:Yeah that sucs about the engine....its hard to believe that a manufacture like dragon cant get the details rite....i have yet to do one of these halftracks but have 2 of these in the stash so im lookin forward to seeing u complete this...great job so far
Thank you, whats funny is that its a half and half of 2 very similar engines. There is no fan either wich is funny such a big part smack middle in the front thats missing.
Youtube Channel WarWarNeverChanges

On the bench 10+
Im a multi build addict trying to reduce
Scaleman
Staff Sergeant
Staff Sergeant
Posts: 186
Joined: Sun Jan 12, 2014 5:33 pm
Location: North pole Sweden

Re: My entry into the D-day GB

Post by Scaleman »

So Im moving on with cleaning up the flatbed, and side panels lots and lots of connnection ponts on very fragile peices, luckily I had not a single one snap, the flexibility of the plastic is very impressing. I dreaded putting on all the pe for the sidepanels , but as you can see the pe mesh has tiny indentations where you mount the flat brackets for the ammo boxes, a real nice touch otherwise spacing them right wuld have been a nightmare. The platform was a bit warped in one cornet, but it fit perfectly when glued with a little clamp.

Image
Image
Image
Image

Lastly another Ghost part that magically appear, its in the kit.
Image
Youtube Channel WarWarNeverChanges

On the bench 10+
Im a multi build addict trying to reduce
Scaleman
Staff Sergeant
Staff Sergeant
Posts: 186
Joined: Sun Jan 12, 2014 5:33 pm
Location: North pole Sweden

Re: My entry into the D-day GB

Post by Scaleman »

Trying to finnish the transmission everything but the cover is glued in place. The PE cover provided in the kit dont seem right. Its there but I cant see how to ben this pice into the right shape, It just dont look right. I might have missed something.
Image
Image
Image
Youtube Channel WarWarNeverChanges

On the bench 10+
Im a multi build addict trying to reduce
Scaleman
Staff Sergeant
Staff Sergeant
Posts: 186
Joined: Sun Jan 12, 2014 5:33 pm
Location: North pole Sweden

Re: My entry into the D-day GB

Post by Scaleman »

More Ghost parts, this is the pice between the exaust and the exaustpipe.
Image

Some beautiful detail under the flatbed, option to add extra pe to get even more detail. dont really know what :wall: :bash: :doh: desing this but unless your building a model with a blown off flatbed this wont be visible at all. And with a little common sense logick, anything that causes the flatbed to copletley blow off the hull wuld most likley made this softskin wehicle into a pile of rubbish.

Image


The dashboard is an exellent copy of the real thing, I drilled a hole for a connection vire of some sort clearly visible, there is tiny injection marks at the bottom front, they wont be visible in the final model.
Youtube Channel WarWarNeverChanges

On the bench 10+
Im a multi build addict trying to reduce
Scaleman
Staff Sergeant
Staff Sergeant
Posts: 186
Joined: Sun Jan 12, 2014 5:33 pm
Location: North pole Sweden

Re: My entry into the D-day GB

Post by Scaleman »

Tiny parts, finnishing detail on the hull.
Image
Image
Youtube Channel WarWarNeverChanges

On the bench 10+
Im a multi build addict trying to reduce
Scaleman
Staff Sergeant
Staff Sergeant
Posts: 186
Joined: Sun Jan 12, 2014 5:33 pm
Location: North pole Sweden

Re: My entry into the D-day GB

Post by Scaleman »

PE work on the side panels, or the fold up fighting area. Som presicion is needed here, everything fits perfectly. Heads up on the first flat brackets, you have to put the short side up, but glue the smaller brackets against eachother.The indentaition in the bracke suggests only one side. The brackets or plates for the back are marked wrong in the instructions, they are a bit longer. My fantastic PE tools 2 tweesers, I have to inverst in a PE bending tool, but 50Euro for a tool or another model, the model has alwys won.
Image
Image
Image
Image
Image
Image
Youtube Channel WarWarNeverChanges

On the bench 10+
Im a multi build addict trying to reduce
Scaleman
Staff Sergeant
Staff Sergeant
Posts: 186
Joined: Sun Jan 12, 2014 5:33 pm
Location: North pole Sweden

Re: My entry into the D-day GB

Post by Scaleman »

On this part, I tapped some CA glue in the corners before applying the netting, and made some battle damage to one of the, YOu guys have to exuse the flipping of the pictures, Im correcting and saving in photobucket, meby they will change in a few.
Image
Youtube Channel WarWarNeverChanges

On the bench 10+
Im a multi build addict trying to reduce
Scaleman
Staff Sergeant
Staff Sergeant
Posts: 186
Joined: Sun Jan 12, 2014 5:33 pm
Location: North pole Sweden

Re: My entry into the D-day GB

Post by Scaleman »

Sides are all done, I use as little CA glue as possible, pint gluing with a toothpick, then sealing everything with whiteglue and water mix, it seeps in like tamiya extra thin, inside the joints and seals everything it also gives a more flexible joint, so we dont get alot of things poppin off and not too much residue from too much CA.
Image :th: For PE this was a very sucessful mission for tonight.
Youtube Channel WarWarNeverChanges

On the bench 10+
Im a multi build addict trying to reduce
Scaleman
Staff Sergeant
Staff Sergeant
Posts: 186
Joined: Sun Jan 12, 2014 5:33 pm
Location: North pole Sweden

Re: My entry into the D-day GB

Post by Scaleman »

So Im done with the fladbed or fighting compartment. It was a bit fiddly, Its a advanced kit with not that much positive fit, meaning alot of fitting parts in mid air, no attatchment pins whatsoever. In some areas you wuld like that to get all the angles straight, but changing assembly steps, and alot of dry fitting, anyone with some experience with dragon kits will finally get perfect fits.
Image

Image

On to another sub assembly the front armour plates and the driving compartment armour.
Image
Image
Image

As you can see here compared to a standard exacto knife, the super thin armour plate, no need for PE
Image
Youtube Channel WarWarNeverChanges

On the bench 10+
Im a multi build addict trying to reduce
Scaleman
Staff Sergeant
Staff Sergeant
Posts: 186
Joined: Sun Jan 12, 2014 5:33 pm
Location: North pole Sweden

Re: My entry into the D-day GB

Post by Scaleman »

The finnished armour. Leaving off the connection arm between the armour and the rest of the wehicle untill final assembly.
Image
I left one side open for the driver, theese vision ports are fully movable if assembeled correctly.
Image

From here I move on to more sub assemblys, putiing to gether as many large parts as possible, The engin cove and grill the cooler are next, this has again not much fositive fit, as there are few connections to start from.

Image

The weel fenders are quuite thick.
Image

Image

Image
Image
Youtube Channel WarWarNeverChanges

On the bench 10+
Im a multi build addict trying to reduce
Scaleman
Staff Sergeant
Staff Sergeant
Posts: 186
Joined: Sun Jan 12, 2014 5:33 pm
Location: North pole Sweden

Re: My entry into the D-day GB

Post by Scaleman »

Dryfitting, from here on I cant glue any more parts to connect the armour and the flatbed, I will have to paint the dashboard and drivers compartment and decal then continue on with the rest of the build. Whil Im doing this I will be working on the radiator armour plates, and starting the gun.
Image

Im held up here as Im not shure if I shuld fit the fenders flush to the side or under the ledge, logically the brackets shuld go halfway over the hull but they are not molded that way and the instructions dont give anything away. I will place them afte the armour cab, so the rods connecting the two dont end up too short or long.
Image


Radiator armour panels, lots of tiny parts, they are also razor thin.
Image
Image
Image
Youtube Channel WarWarNeverChanges

On the bench 10+
Im a multi build addict trying to reduce
Scaleman
Staff Sergeant
Staff Sergeant
Posts: 186
Joined: Sun Jan 12, 2014 5:33 pm
Location: North pole Sweden

Re: My entry into the D-day GB

Post by Scaleman »

THE GUN :pistols:
We have an option here between 2 guns 2cm Flak 38 or 2 cm KwK 38 the Flak 38 is 5mm longer than the KvK. This gun was made in 144.000 examples during the war, so choosing either one wuld be right. unless you are doing a specific model, I wuld imagine looking at pictures it wuld be hard to determine wich one your using, basically its the mussle break difference in length. Overall its a super detailed gun with many sub assemblies and very detailed parts, a very impressing gun. You can also get this seperate from dragon both in singe and 4 barreld vertions, the gun it self can be replaced with a metal barrel but its a very detailed full cast barrel with next to zero flash or mold seam its your choice. One specific detail are the magazines, with ultra thin edges and a molded round inside, The detailed bullet leaves nothing to ask for. I had some issues zooming in here but the picture gives some away, you have to see this one in reality. I really recomend getting any of theese AA guns if yo u come by them. They will be an exellent extra on a base vignett or diorama.

Image

Image
Image
Image

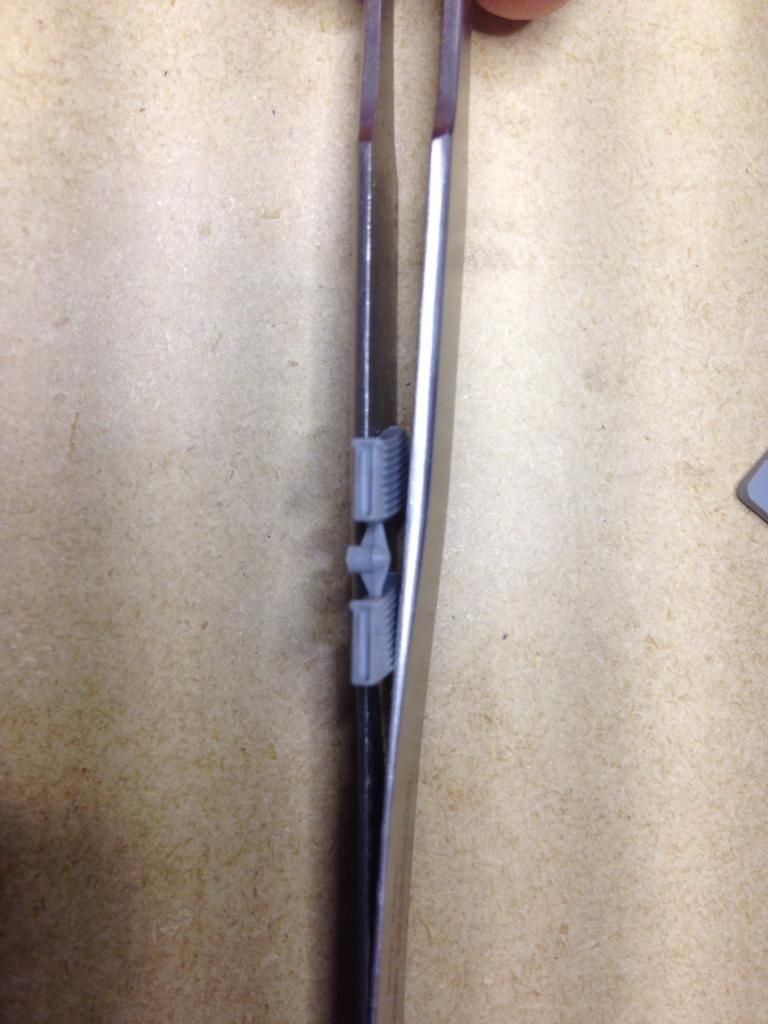
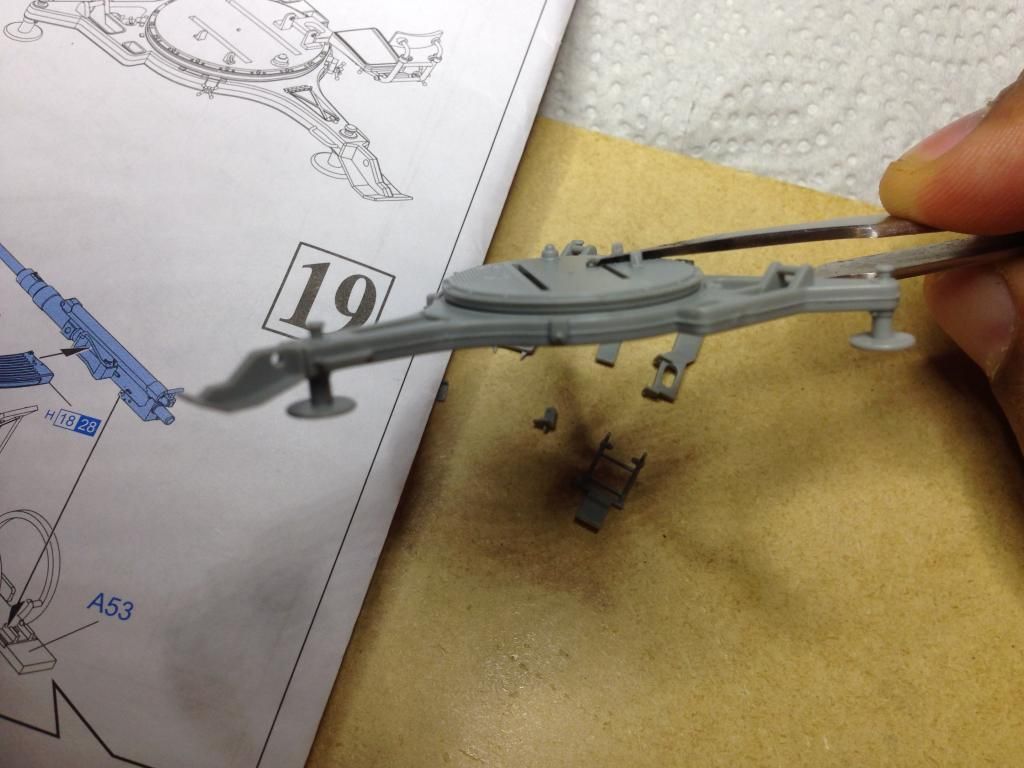
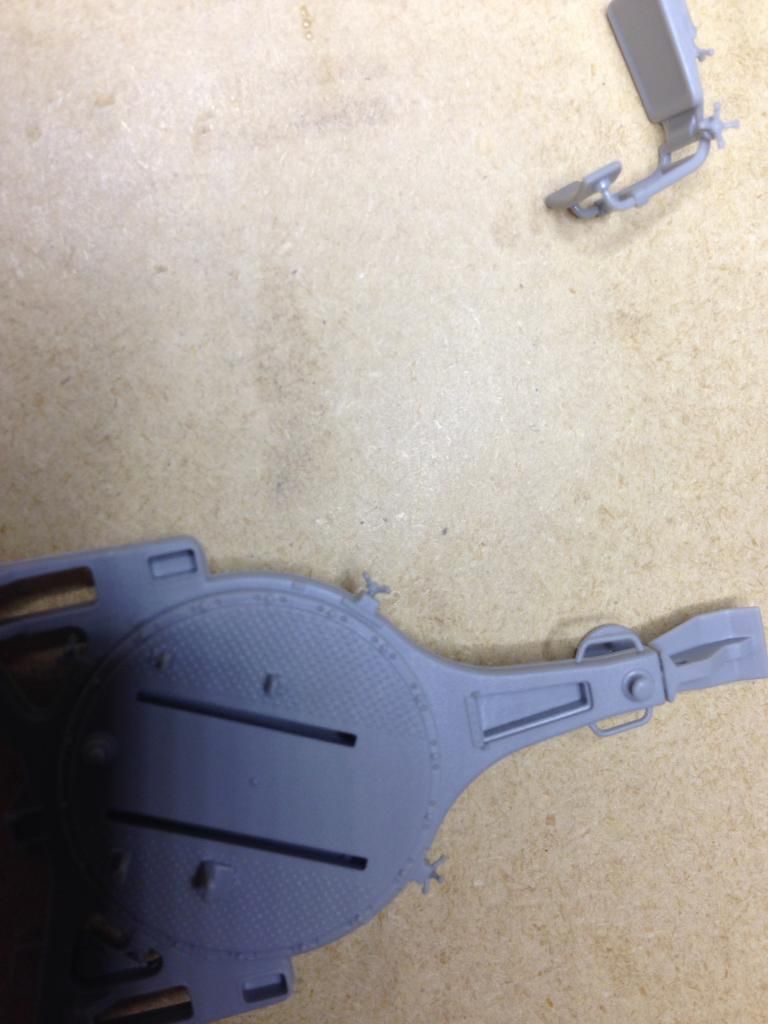
Be careful when removing the injection nubs from the gun mount, as there Is a weld seam all around it, and on other parts as the upwards structures, fine surgery requierd, or cut them off and add new ones.
Image
Image
Image
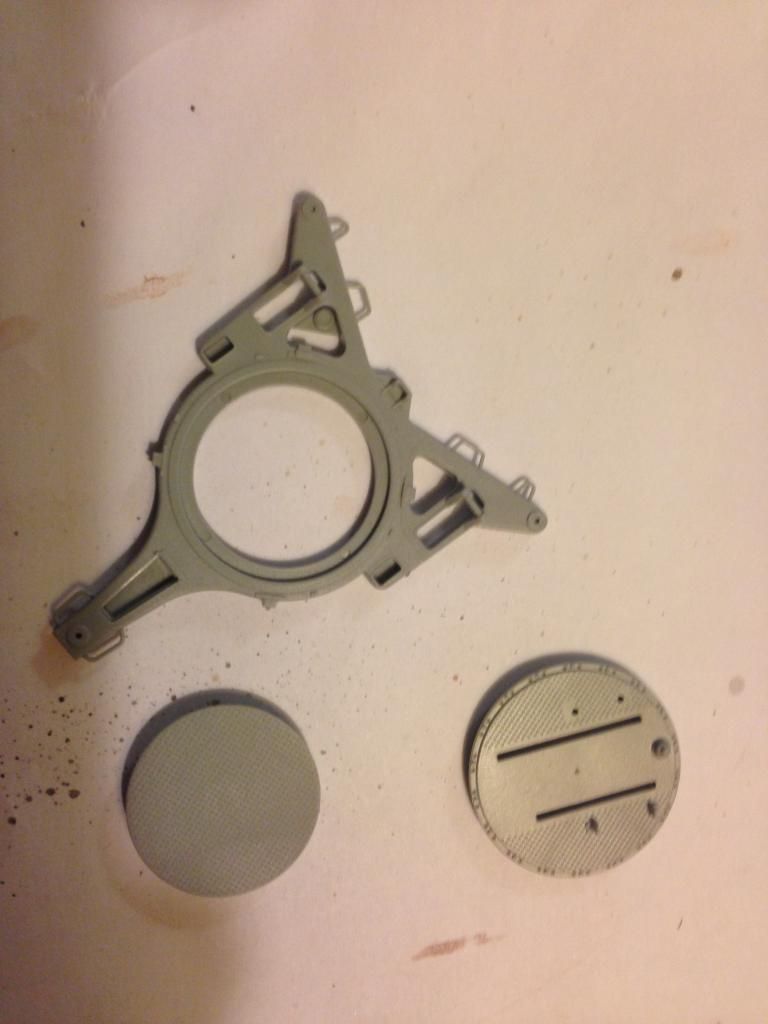
The "jig" on the sprue has no explanation in the instructions Im going to have to do some reserch out of curiosity. There´s 3 options for the top part of the gun itself use your pictures for reference, Im going to use the one with the net shape, as Iwe got some reference of it and belive its the later vertion.
Image
Youtube Channel WarWarNeverChanges

On the bench 10+
Im a multi build addict trying to reduce
Scaleman
Staff Sergeant
Staff Sergeant
Posts: 186
Joined: Sun Jan 12, 2014 5:33 pm
Location: North pole Sweden

Re: My entry into the D-day GB

Post by Scaleman »

Image
Image
Image
Image
Image
Image
Youtube Channel WarWarNeverChanges

On the bench 10+
Im a multi build addict trying to reduce
Scaleman
Staff Sergeant
Staff Sergeant
Posts: 186
Joined: Sun Jan 12, 2014 5:33 pm
Location: North pole Sweden

Re: My entry into the D-day GB

Post by Scaleman »

As you can see many many small parts and su assemblys and an extremly busy instruction step. It all fits perfectly and the cleanup is minimum.
Image

While the gun dries a bit, and all the small parts come together, I spray the drivers compartment and dashboard, as it needs to be finnished first, I will also paint the transmission seperatly. Hull red as base and a somewhat light dust, of late war Dunkel gelb. I want the wehicle to looked primed and rushed out quite new to defend the coast of france and its villiages. The AA guns were also used against ground targets as much as against aircraft, especially theese smaller calibers as the war moved on, The allied bombers flew way too high for this tiny thing to have any effect, but was effective to supress ground forces.
Image
Youtube Channel WarWarNeverChanges

On the bench 10+
Im a multi build addict trying to reduce
Scaleman
Staff Sergeant
Staff Sergeant
Posts: 186
Joined: Sun Jan 12, 2014 5:33 pm
Location: North pole Sweden

Re: My entry into the D-day GB

Post by Scaleman »

I have not got a metal replacement barrel, but according to this article the dragon plastic barrel has the right length compared to many after market metal barrels who dont.
http://www.perthmilitarymodelling.com/r ... arrels.htm
Youtube Channel WarWarNeverChanges

On the bench 10+
Im a multi build addict trying to reduce
Scaleman
Staff Sergeant
Staff Sergeant
Posts: 186
Joined: Sun Jan 12, 2014 5:33 pm
Location: North pole Sweden

Re: My entry into the D-day GB

Post by Scaleman »

The Gun is pretty much ready, exept I have not decided the angle yet, there is different parts for different angles. I think im going with 20 or 45. Iwe been cleaning up the track links, there is a little injection pinmark on all of them and it will be visible if you dont clean them up, just scraping no filing.
Image
Image

Flak 38 with its ejector hatch, can be modeled open or closed
Image

Mags actually click in fully workable, amazing
Image
Youtube Channel WarWarNeverChanges

On the bench 10+
Im a multi build addict trying to reduce
Scaleman
Staff Sergeant
Staff Sergeant
Posts: 186
Joined: Sun Jan 12, 2014 5:33 pm
Location: North pole Sweden

Re: My entry into the D-day GB

Post by Scaleman »

There is a nub on the drive sprocket that needs to be cut down for the weels to line up.
I painted up the interrior to be able to put decals on, Im using the mig decal soft and set, dont do anything, I have to find some microsol, lots of detail anyway, I had to glue down the flatbed and paint it up, so I can mask off the drivers compartment, I also painted and weathered the transmission. The add on armour and flat bed and the two front fenders needs to be clamped together, this is the most difficult part so far, I have let the flatbed and the armour dried fully before trying to get them all together with the two pins in the kit, we will see how it goes, the thin armour is a little bit warped on one side. Its important to center it with the engine cover beeing the center looking from the front and back.
Image
Image
Image
Image
Youtube Channel WarWarNeverChanges

On the bench 10+
Im a multi build addict trying to reduce
User avatar
GIACOMER
Corporal
Corporal
Posts: 59
Joined: Tue Sep 03, 2013 1:30 pm
Location: Rome

Re: My entry into the D-day GB

Post by GIACOMER »

Fantastic work :jd: :jd: !!! I'm following it! :pop: :pop:
Sorry for my english.
User avatar
Nige201980
Captain
Captain
Posts: 4095
Joined: Wed Jun 05, 2013 9:30 am
Location: Doncaster South Yorkshire UK
Contact:

Re: My entry into the D-day GB

Post by Nige201980 »

Great work mate.
http://www.youtube.com/channel/UCy-TGcs5u_ZXSZ9kObNfsPg


On the go at the Mo

Quite a few :banana:
User avatar
UKguyInUSA
Second Lieutenant
Second Lieutenant
Posts: 3429
Joined: Sun Mar 30, 2014 10:19 pm
Location: New Hampshire, USA formerly Palm Beach, Florida, USA and Leicestershire, UK (until 1999)
Contact:

Re: My entry into the D-day GB

Post by UKguyInUSA »

Fabulous work mate! :) :thumb1: :thumb1:
WIP:: Tamiya 1/48 F4U-1A Corsair

Non-WIP::Eduard 1/48 Fokker DVII, Revell 1/32 Arado AR196 and 1/32 BF109G10 Erla,
User avatar
FishBowlMan
Sergeant First Class
Posts: 317
Joined: Wed Jan 29, 2014 9:42 pm
Location: Kidderminster, England

Re: My entry into the D-day GB

Post by FishBowlMan »

This is shaping up very nicely, despite the issues with the random engine pieces! The interior looks excellent. KUTGW :th:
John

On the bench:

Tamiya 1/35 SAS Jeep, 1/35 BMW R75, 1/35 Pzkpfw III Ausf M/N
MiniArt 1/35 Bantam 40 BRC British Staff Car
Hasegawa 1/48 P-51D, originally for D-Day GB
Hobbyboss 1/35 Pzkpfw I ausf F

There is no room inside a box!
Scaleman
Staff Sergeant
Staff Sergeant
Posts: 186
Joined: Sun Jan 12, 2014 5:33 pm
Location: North pole Sweden

Re: My entry into the D-day GB

Post by Scaleman »

Thank you all for the nice coments, I had a bit of a delay in the build but I will post more pictures, as the GB ends today and Im not finnished, Im not shure if the thread will close. BUt the end result will be in my portfolio. Its now in the stages of getting weathered into a dio base with 2 figures.
Youtube Channel WarWarNeverChanges

On the bench 10+
Im a multi build addict trying to reduce
Post Reply

Return to “Builds”