Update # 1: turret and body assembling
Hey folks

!
During the week I started my ride on the PzKpfw 35(t):dance:. Would like to give you a short summary on this little vehicle beforehand

:
“The PzKpfw. 35(t) was built in 1936 in Czechoslovakia and entered service under the name Škoda LT vz. 35. By 1938, a total of 424 units had been produced. After the occupation of Czechoslovakia by the Wehrmacht, 202 of these vehicles were taken over and used under the designation PzKpfw. 35(t). The (t) stands for tschechisch (Czech). Some of these vehicles were also in service with the Rumanian Army. The well-balanced chassis and the reliable transmission bestowed the tank with good mobility. Its main armament was a 3.72 cm Model 43 L/40 Tank Cannon.” [reference: Revell, 2013]
Ok … let’s start with the build (and please excuse my awful English … hopefully I’ll not offend somebody


):
The lower hull is made up of four main components (two sidewalls, bottom panel and front cover bonnet). Before you can fix the two sidewalls to the bottom panel you have to remove a ring-shaped gate mark on the forefront of each sidewall …

After sanding:

In order to hold the sidewalls in place while glueing them I used some UHU-Patafix (I’m not exactly sure if everyone knows this stuff

? If not … UHU patafix is a repositionable, reusable adhesive for quick and clean bonding, to attach small objects to virtually any surface such as walls, furniture, windows, etc.) …

Completed lower hull with front cover bonnet (in addition a plastic sheet is centrally arranged to firm both sidewalls):

In my opinion most parts are relatively nice detailed but a little bit chunky moulded on their insides

. That’s important in terms of the joint faces cos as a consequence, some fitting inaccuracies arises (as you can see on the above pic). The main problem in this regard are the rivet lines around the edges … those entails that it’s virtually impossible to carry out any major corrective measures (filler, sanding, etc.)

. On these grounds you should take your time to prepare all joint faces accurately. In avoidance of getting into deeper trouble you should also use care on attaching the parts together very exactly.
Some flash on the fenders …

Use care on two gaps between the fenders and each sidewall (red arrows in the following pic)

. That’s not a flaw

. You have to put the front armor plate (driver’s observation slit) into those two notches … so please don’t jam or fill them

…

Front armor plate with upper hull and several parts are glued in place. Antenna will be added later on (red arrow) – a Notek-light is not contained

:
Some rework on several areas is required here
...

... and on the rear hull, too
…

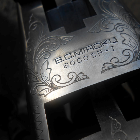
Nicely reproduced wood texture on this little box

:

Turret assembling isn’t that arduously. The gun mantlet consists of 3 parts which had to be glued together …


Somewhat different the cannon itself! One important point of criticism that I made with regard to this kit are those enormous gate marks even on the tiniest parts. The major problem here is not alone the fact that you run the risk of tearing deep and ugly holes in your parts it also could happen that you break them entirely while trying to cut them off from the sprue. The reason this can happen is that the whole sprue material is very thick and the plastic is tough and recalcitrant ... therefore use care here. I did not comply whit this and broke a thin nib at the front side of the cannon (red line) consequently which should supported the positioning of the muzzle break. The muzzle break itself is two-section moulded and shows a bit of flesh (red circles). It was a bit tricky for my fat fingers to get them cleaned up and putting them together was “great fun”.

As you hopefully can see (or rather not


) the result looks so-so that some fine tuning will be necessary later on …

Turret completed:

Finally some pics from the intermediate result:


Last but not least some words of advice to everyone who’s interested in buying/building this kit:
1. Generally it’s not a bad kit even with the stated deficiencies (using some putty or handling some fitting inaccuracies are always part of business and as far as it stays within reason I would never count this as an exclusion criteria).
2. When it comes to the tracks it’s a bit different. As I’ve said in my entry post the contained “Revell” tracks (not the Friuls, of course) are not that nice… but we’ll get to that in a later update.
3. Up to here I would recommend this kit to everyone who’s interested in a relatively nice and cheap build or if it’s needed a training subject.
4. “Huge PzKpfw 35(t)-fans” or everyone who places high demands concerning the level of detail on his models might be better adviced in buying another kit. But for me personally it’s a nice kit and I had great fun by now.
Thanks for looking

!
Please feel free to post any comments (also criticism is allowed)!