Tamiya 1:35 M41 Walker Bulldog

Post Reply
User avatar
MikeyKb
Command Sergeant Major
Posts: 873
Joined: Thu Sep 26, 2013 4:57 pm
Location: Vancouver, Canada

Tamiya 1:35 M41 Walker Bulldog

Post by MikeyKb »

Hey folks. This is my first submission for the Vietnam GB. and I'm super excited!
For my first model I'll be doing the M41 Walker Bulldog.

Image

Now, some wiki:
The M41 Walker Bulldog was a U.S. light tank developed to replace the M24 Chaffee. It was named for General Walton Walker who died in a jeep accident in Korea. On 7 November 1950, the US Ordnance Committee Minutes (OCM) issued item #33476, re-designating the heavy, medium, and light tank, according to the armament; the 120mm (heavy) Gun Tanks, 90mm (medium) Gun Tanks, and the 76mm (light) Gun tanks.

While the M24 Chaffee was a successful design, its main gun was not effective enough against well armored opponents. Although the primary mission of a light tank was scouting, the U.S. Army wanted one with more powerful armament. The development of the new tank, T37, began in 1947. The vehicle was designed to be air-transportable, and the desired anti-tank capabilities were provided by installing a long 76 mm gun with an advanced rangefinder. In 1949, with the adoption of a less ambitious rangefinder, the project's designation was changed to T41. Production started in 1951 at Cadillac's Cleveland Tank Plant, and by 1953 the new tank completely replaced the M24 in the United States Army. Initially it was nicknamed "Little Bulldog", then renamed "Walker Bulldog" after General Walton Walker, who was killed in a jeep accident in Korea in 1950.

The M41 was an agile and well armed vehicle. On the other hand, it was noisy, fuel-hungry and heavy enough to cause problems with air transport. In 1952 work began on lighter designs (T71, T92), but those projects came to naught and were eventually abandoned.

The Walker Bulldog saw limited combat with the U.S. Army during the Korean War, but for the most part, the conflict served as a testing ground to work out the tank's deficiencies, especially with its rangefinder. At the time, it was designated as the T41, and was rushed to the battlefield even before its first test run. This was due to the fact that the North Koreans were supplied with Soviet T-34 tanks, which were superior to the M24. By 1961, 150 were delivered to the Japan Ground Self-Defense Force to supplement their Type 61 medium tanks.

Vietnam
In 1964 the M41 light tank was selected to replace the Army of the Republic of Vietnam (ARVN) M24 Chaffee light tank, which they had inherited from the French, who in turn had received them from the United States during the First Indochina War. The first M41A3s arrived in January 1965, equipping five ARVN squadrons by the end of the year. The M41 was an instant success with South Vietnamese armour crewmen, who found its interior to be just perfect for their stature, which had been a principal criticism by US armour crewmen who had been assigned to the vehicle. This, combined with the tank's "mechanical reliability, simplicity, and excellent handling" made the Bulldog a worthy war machine.

In 1971, the ARVN and US forces commenced Operation Lam Son 719, a disruption of North Vietnamese Army (NVA) supply lines in neighbouring Laos; a combination of armour and airmobile attacks on three axes into enemy held territory. The ARVN 1st Armor Brigade, accompanied by two airborne battalions and two cavalry regiments penetrated approximately 4 miles into Laos on 8 February, enemy reaction was swift, with this first engagement between NVA and ARVN tanks, the 17 M41s knocked out 22 NVA tanks; six T-54s and sixteen PT-76s. Friendly units lost 5 M-41s and 25 APCs.

By 1973, over 200 M41 light tanks remained in service with the ARVN. US units in Europe and CONUS equipped with the M41 Walker Bulldog eventually transitioned to the M48 Patton medium tank.

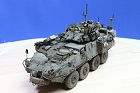
Due to my excitement, it wasn't until after I cut the wheels off the sprues did I remember that I needed to photo everythin - so hopefully this will be OK. I started this build around 1pm today, and completed the entire build by 9pm. This is a super amazing kit that quite literally snaps together. Quite detailed for such a small tank, with lots of moving parts.

Enough talking, here are the shots and my progress

Here are the sprues and pieces - as you can see, all that was done was wheels glued and then prepped for paint
Image

Not very much flash at all, anywhere - and the figures are actually quite nicely detailed.
Image
Image
Image

Instructions
Image
Image
Image

Decals - 3 options
Image

awful tamiya tracks in this metallic plastic
Image

Both halves of the gun have been connected, and seem removed - I not only use Tamiya thin to seal the seam, but also super glue and insta-set to fill the cracks and then instantly sand it down.
Image
Image

Lower hull
Image
Image
Image

Upper hull
Image

Turret
Image
Image
Image
Image
Image

Turret and upper hull dry-fit
Image
Image
Image

And that's all. I'm going to let it dry overnight and then connect the top to the bottom - with the clip included, you don't even need to glue it together... but I will... and cut out the middle section some more so that I can get inside to attach the paint holder.

Thanks for looking in!
:thumb2:
Mikey
User avatar
EasyEight96
Sergeant Major of the Army
Posts: 1012
Joined: Sat Jul 20, 2013 2:04 pm
Location: Malaysia
Malaysia

Re: Tamiya 1:35 M41 Walker Bulldog

Post by EasyEight96 »

A bulldog!! I'm currently building one too but I don't have any decals for it .. Nice progress I'll be keeping an eye on your thread
In -progress

Too many on the bench!!!

Matchbox Kits lover....
User avatar
snappercity
Staff Sergeant
Staff Sergeant
Posts: 229
Joined: Mon Dec 02, 2013 12:05 am
Location: Surrey

Re: Tamiya 1:35 M41 Walker Bulldog

Post by snappercity »

Great progress. I want to build the AFV Club kit sometime... Watching with interest. :pop:
Mark - Too many models, Not enough time...

On the bench:
Airfix 1:72 Vulcan
Takom 1:35 Zwilling Flak 40
Roden 1:144 C-141B Starlifter
User avatar
AlkaSeltzer
Staff Sergeant
Staff Sergeant
Posts: 234
Joined: Tue Aug 19, 2014 7:21 pm
Location: U.S.A.

Re: Tamiya 1:35 M41 Walker Bulldog

Post by AlkaSeltzer »

looking good! Nice kit!
My Dog Looks Like A Jack Rabbit and he ate my model that's why it looks like that :banana:
User avatar
jdog102398
Sergeant
Sergeant
Posts: 129
Joined: Fri Nov 29, 2013 9:33 pm
Location: Auburn, Illinois. USA
United States of America

Re: Tamiya 1:35 M41 Walker Bulldog

Post by jdog102398 »

Nice job so far Mikey! I built this kit awhile ago and had very few problems...can't wait to see how it turns out!
:cheers2:
User avatar
MikeyKb
Command Sergeant Major
Posts: 873
Joined: Thu Sep 26, 2013 4:57 pm
Location: Vancouver, Canada

Re: Tamiya 1:35 M41 Walker Bulldog

Post by MikeyKb »

small update time.
Went through the stash and found some equipment to add to the tank.
Image

Image

Also found some sandbags that I'm gonna throw on too. Based on the fit, I'm going to have the scratch build one with milliput for the front hull.
Image

Image

One of the stowage bags has a pretty large hole in the middle, and based on view point I needed to fill it in with a sanded down piece of plasticard
Image
Image
Image

Should get the base coat on the M41 tonight, and hopefully the stowage.

:thumb2:
Mikey
User avatar
schweinhund227
Chief Warrant Officer 4
Posts: 2627
Joined: Fri May 24, 2013 9:51 pm
Location: Ontario,Canada
Contact:
Canada

Re: Tamiya 1:35 M41 Walker Bulldog

Post by schweinhund227 »

for a 1975 era kit ! still a nice little tank to put together....

Nice job thus far ! :cheers2:
User avatar
AlkaSeltzer
Staff Sergeant
Staff Sergeant
Posts: 234
Joined: Tue Aug 19, 2014 7:21 pm
Location: U.S.A.

Re: Tamiya 1:35 M41 Walker Bulldog

Post by AlkaSeltzer »

I like the Bulldog so far please post images of your use of the sandbags it would help me to learn how to proper use them on a tank. Great Job! :th:
My Dog Looks Like A Jack Rabbit and he ate my model that's why it looks like that :banana:
User avatar
MikeyKb
Command Sergeant Major
Posts: 873
Joined: Thu Sep 26, 2013 4:57 pm
Location: Vancouver, Canada

Re: Tamiya 1:35 M41 Walker Bulldog

Post by MikeyKb »

Time for a long overdue update!

It's gonna be photo heavy - so just a heads up // sorry if they're not too good.

So I got some NATO black down as a primer - nice even coat.

Image
Image
Image
Image

Then it was time to add some rust to the exhausts - gave a nice mottled coating to some of the surface...
Image

I used 3 colours from MM.
Image

Decided to try out a new paint set I picked up at my LHS
Image

It's pretty detailed in terms of colours and technique
Image

I think it gave a nice variation of colour. it came with an Olive Drab primer that I gave a very light coat, as it also comes with an Olive Drab paint - the two are very different tones and work nicely together. The NATO black still provides some nice shading.

Image
Image
Image

Then I painted the stowage some Russian Green and some Brown Camo - they came with the Model Air set
Painted the sandbags in Sand.
Image

Gave the wheels a coat of the darker Olive Drab primer, they'll be covered in mud anyway... also saw some reference photos with the bolts in yellow - thought after a dark wash it would add some character to the wheels.
Image

Hee Hee :lol:
Image

I added the Vallejo Chipping Medium on the exhausts
Image

I gave it a Flat Coat afterwards and then messes around with the Olive Drab paint and mixed it with the 'Bright' colour and Russian Green accordingly for shadow and highlight... obviously the cam doesn't show it off well
Image
Image
Image

You can see the Chipping Medium under the paint - that's next, to give it a little stern-brush bristelling... (just made that up, but you know what I mean)
Image

For AlkaSeltzer...
For Sure!

Here is what the sandbags look like OOB
Image

You can see there are 2 different kinds, 3 lines of model 'A' and 1 of 'B' - there are 2 sprues
Image

I glued two of them together and left 1 alone, and painted them Sand
Image
Image

Here's a dry-fit onto the tank where I want them
Image

I wanted to add a 3rd, but the plastic ones don't bend so easy - also too thick and wouldn't fit - so I pulled out my milliput and got creative with some plastic wrap (to keep it's shape and not mess with the plastic or paint
Image
Image

Also took a stab and making my own stowage... meh, it's OK, still lots of room for improvement :wtf:
Image

Well, that's all for now!
Thanks for looking in!

Cheers.
:thumb2:
Mikey
User avatar
felisbarcinonensis
Command Sergeant Major
Posts: 860
Joined: Tue Jun 10, 2014 9:42 pm
Location: BCN

Re: Tamiya 1:35 M41 Walker Bulldog

Post by felisbarcinonensis »

Looking great! Both the tank and the stowage are really cool. I'm going to use sand bags too and I was not sure whether this Tamiya kit was a full block or a set of indiviual bags, so thanks for sharing. Do they fit at all on top of each other? Thanks mate! :cheers2:
User avatar
AlkaSeltzer
Staff Sergeant
Staff Sergeant
Posts: 234
Joined: Tue Aug 19, 2014 7:21 pm
Location: U.S.A.

Re: Tamiya 1:35 M41 Walker Bulldog

Post by AlkaSeltzer »

MikeyKb wrote:Time for a long overdue update!

It's gonna be photo heavy - so just a heads up // sorry if they're not too good.

So I got some NATO black down as a primer - nice even coat.

Image
Image
Image
Image

Looks great so far please move pictures of how you are using the tamiya sandbags. Looks great :banana:
Then it was time to add some rust to the exhausts - gave a nice mottled coating to some of the surface...
Image

I used 3 colours from MM.
Image

Decided to try out a new paint set I picked up at my LHS
Image

It's pretty detailed in terms of colours and technique
Image

I think it gave a nice variation of colour. it came with an Olive Drab primer that I gave a very light coat, as it also comes with an Olive Drab paint - the two are very different tones and work nicely together. The NATO black still provides some nice shading.

Image
Image
Image

Then I painted the stowage some Russian Green and some Brown Camo - they came with the Model Air set
Painted the sandbags in Sand.
Image

Gave the wheels a coat of the darker Olive Drab primer, they'll be covered in mud anyway... also saw some reference photos with the bolts in yellow - thought after a dark wash it would add some character to the wheels.
Image

Hee Hee :lol:
Image

I added the Vallejo Chipping Medium on the exhausts
Image

I gave it a Flat Coat afterwards and then messes around with the Olive Drab paint and mixed it with the 'Bright' colour and Russian Green accordingly for shadow and highlight... obviously the cam doesn't show it off well
Image
Image
Image

You can see the Chipping Medium under the paint - that's next, to give it a little stern-brush bristelling... (just made that up, but you know what I mean)
Image

For AlkaSeltzer...
For Sure!

Here is what the sandbags look like OOB
Image

You can see there are 2 different kinds, 3 lines of model 'A' and 1 of 'B' - there are 2 sprues
Image

I glued two of them together and left 1 alone, and painted them Sand
Image
Image

Here's a dry-fit onto the tank where I want them
Image

I wanted to add a 3rd, but the plastic ones don't bend so easy - also too thick and wouldn't fit - so I pulled out my milliput and got creative with some plastic wrap (to keep it's shape and not mess with the plastic or paint
Image
Image

Also took a stab and making my own stowage... meh, it's OK, still lots of room for improvement :wtf:
Image

Well, that's all for now!
Thanks for looking in!

Cheers.
:thumb2:
My Dog Looks Like A Jack Rabbit and he ate my model that's why it looks like that :banana:
User avatar
MikeyKb
Command Sergeant Major
Posts: 873
Joined: Thu Sep 26, 2013 4:57 pm
Location: Vancouver, Canada

Re: Tamiya 1:35 M41 Walker Bulldog

Post by MikeyKb »

Alright, time for a long overdue update!

So, last time, I ended the update with the top coat of Olive Drab on the M41....

Here's what it looked like after I spread some water over the area that had the Vallejo chipping fluid painted on... in my haste, I completely forgot to take a photo of what it looked like, and seemed to have only taken a photo of me mixing an added rust coat before giving it a gloss coat. I mixed Vallejo Dark Brown wash with some light rust pigments.

Image
Image
Image

And now, it's all dry. You can barely see the chipped undercoat, but that's OK, it was more a test of the fluid.
About Vallejo Chipping Medium = (sorry if this is common knowledge) The longer you let the top coat (painted over the chipping medium) dry, the more difficult it is to get the desired chipping effect. I would recommend not waiting anything longer than a couple of hours after applying - depending on your desired effect...

Image
Image

I'm going to give it a gloss coat (everything except the exhausts) in order to apply decals. After that I'll give it a matt coat and get to the weathering and improving upon the rust look of the exhausts.

Thanks for looking!
:thumb2:
Mikey
Eric
Private
Private
Posts: 20
Joined: Tue Oct 21, 2014 7:16 pm
Location: Lavergne, TN, USA

Re: Tamiya 1:35 M41 Walker Bulldog

Post by Eric »

Great progress!
User avatar
Tiger131
Chief Warrant Officer 2
Posts: 1700
Joined: Tue May 28, 2013 3:44 pm
Location: walsall
England

Re: Tamiya 1:35 M41 Walker Bulldog

Post by Tiger131 »

one of my first tanks i ever built and it still looks superb really like what you've done so far keep the pics a coming
Image
Deacon
Staff Sergeant
Staff Sergeant
Posts: 235
Joined: Mon Jul 21, 2014 7:45 pm

Re: Tamiya 1:35 M41 Walker Bulldog

Post by Deacon »

So many great builds tempting me to buy kits. Looking so good sir. :thumb1:
User avatar
MikeyKb
Command Sergeant Major
Posts: 873
Joined: Thu Sep 26, 2013 4:57 pm
Location: Vancouver, Canada

Re: Tamiya 1:35 M41 Walker Bulldog

Post by MikeyKb »

Wow - it's been a while that I haven't given any update! My apologies, got a lot going on at the moment.

Got me some decals on this doggy. then applied a Matt coat over the decals, attached my stowage - not super happy with the sandbags...but they'll do. Finished up the detail painting too. Time for chipping, and hopefully weathering will make it all come together... then gotta mess around with the rusting of the tracks and exhausts. Maybe some barbed wire bundles on the empty side (stowage-wise) of the turret.
:cheers2:

Image
Image
Image
Image
Image

Thanks for checkin' in!
:thumb2: :th:
Mikey
Deacon
Staff Sergeant
Staff Sergeant
Posts: 235
Joined: Mon Jul 21, 2014 7:45 pm

Re: Tamiya 1:35 M41 Walker Bulldog

Post by Deacon »

Looking so good mate. :thumb2:

Man I've got to get my mojo back soon else I'm going to freak out! ;)
Yevgeny
Sergeant Major
Sergeant Major
Posts: 730
Joined: Tue Sep 30, 2014 10:37 am
Location: Worthing, UK

Re: Tamiya 1:35 M41 Walker Bulldog

Post by Yevgeny »

Stowage looks good :) Looking forward for more!
Sir, we're surrounded!
Excellent! Now we can attack in any direction!
------------------------------------------------
Model N1 DONE! - Tamiya 1:35 Panzerkampfwagen V Panther Sd.kfz.171 Ausf.A
Model N2 DONE! - Academy 1:72 M1126 Stryker
Working on:Trumpeter (00204)
Waiting: Meng (SS-004), Airfix (A50125), Tamiya (35068)
User avatar
Tiger131
Chief Warrant Officer 2
Posts: 1700
Joined: Tue May 28, 2013 3:44 pm
Location: walsall
England

Re: Tamiya 1:35 M41 Walker Bulldog

Post by Tiger131 »

love tanks with lots of stowage and loving yours
Image
User avatar
MikeyKb
Command Sergeant Major
Posts: 873
Joined: Thu Sep 26, 2013 4:57 pm
Location: Vancouver, Canada

Re: Tamiya 1:35 M41 Walker Bulldog

Post by MikeyKb »

tanks everyone :lol:

Hopefully after some dry brushing and some filters it'll all pop a bit more. I really like the red bag, adds some colour. I also have a blue bucket to add as well, but want to try and get some heavy chipping on it first.

8-)
Mikey
Post Reply

Return to “Builds”