Panzer III with SIG 33

All your builds here...

Moderator: T3hGuppy

Post Reply
User avatar
hansolo
Warrant Officer
Warrant Officer
Posts: 1524
Joined: Mon Jun 17, 2013 12:36 pm
Location: Amsterdam
Contact:
Netherlands

Panzer III with SIG 33

Post by hansolo »

Hi guys,

My entry for this GB is of course a conversion!

Here is some info on the vehicle:

Troops are very resourceful and often make battlefield modifications to existing equipment. One such example was the 15cm sIG 33 L/11(Sf) auf Fahrgestell Panzerkampfwagen III Ausf.H (Sf). Only one was ever made and it did not survive the war. Luckily photographs are available to prove its existence.
A Panzer III Ausf H tank chassis was used to mount the same 15 cm s.I.G. 33 L/11 heavy field howitzer that was used on 15 cm sIG 33 auf Fahrgestell Panzerkampfwagen II (Sf) that had an extended Panzer II tank chassis.

15cm sIG 33 L/11 auf Fahrgestell Panzerkampfwagen III Ausf.H (Sf)15cm sIG 33 L/11 auf Fahrgestell Panzerkampfwagen III Ausf.H (Sf) in a ‘hull down’ position. Photo:Eckbaustein
As with it’s baby brother this self-propelled artillery gun also has a problem with its name (The 15 cm sIG 33 auf Fahrgestell Panzerkampfwagen II (Sf) has wrongly been called the Bison II or the Sturmpanzer II: this started after the war). Some scale model kit companies, military history authors and museums wrongly call the field modification 15cm sIG 33 L/11 auf Fahrgestell Panzerkampfwagen III Ausf.H (Sf) SPG the Bison III. It was never called that during WW2.
It is believed that it was used by the German Afrika Korps Schützen-Regiment.200 (90 leichte Infanterie-Division) attached to the s.I.G Kompanie (Sfl.)708 between 1942-1943 and first saw action in September 1942.

Image
Construction of the 15cm sIG 33 L/11 auf Fahrgestell Panzerkampfwagen III Ausf.H (Sf). Photo:Eckbaustein

Why was it built?
In 1941 Field Marshal Erwin Rommel needed heavy artillery to support his advancing armored divisions in North Africa. Horse drawn artillery was impractical in the heat of the desert. The logistics of supplying these animals with enough feed and water was a nightmare. Each towed artillery gun would require a team of six horses to pull it.
He demanded a solution be found. A small number of 10.5cm and 15cm artillery field Howitzers were mounted on captured enemy tank and tractor chassis and sent to support the men and machines of the German Afrika Korps DAK. Some were fitted to obsolete German tank chassis like the Panzer I and Panzer II. These tanks were replaced by the Panzer III and Panzer IV as they came off the factory production line and entered service.
These self-propelled German artillery guns are some times referred to as ‘Rommel’s Funnies’. This vehicle was not designed to advance towards heavily fortified gun emplacements and blow them up whilst under heavy fire. It has only a thinly armoured fighting compartment: the crew have very little protection. It was intended to keep up with the advancing infantry and tanks but remain behind them out of harm’s way and fire shells over their heads at enemy targets.

Image
Heavy lifting gear was needed to fit the 15cm sIG 33 L/11 gun into the Panzer III Ausf.H tank chassis. Photo:Eckbaustein
The 15cm sIG 33 Gun

The Germany Army Infantry regiments could call on the support of a large 15 cm caliber towed artillery field howitzer called the 15cm schweres Infanterie Geschütz 33 (heavy infantry gun). They were designed by Rheinmetall in 1927 and were formally accepted introduced into the German military in 1933, hence the designation 33. This long name was shortened to 15 cm sIG 33 or 15 cm s.I.G. 33. About 4,600 were made between 1936 – 45.
This gun was not designed as an anti-tank gun. It was normally used to fire high explosive HE shells over the heads of advancing German troops at targets plotted on a map. This is called indirect fire. Occasionally it was called upon to fire at enemy positions it could see. This is called direct fire. The two part I Gr 33 HE shell was filled with 8.3 kg (18 lbs) of pressed TNT with smoke box and standard Zdlg. 36 exploder system. The total weight of the fused round was 38 kg (84 lbs).
Unlike anti-tank gun shells that came in one piece artillery shells were loaded into the gun breach in two separate pieces. The high explosive HE shell was always loaded first and this was followed by the propellant cartridge.
The rimmed brass propellant cartridge case, with a c 12 n/A percussion primer was closed at the top by a cardboard closing cap and loaded after the HE shell had been rammed home into the gun. The gun crew had a range chart that told them what amount of explosive propellant to put into the empty brass cartridge case. More was added for longer range targets and less was used to hit targets closer to the gun.
The propellant consisted of six removable silk bags numbered 1 to 6 that contained Nitroglyzerin Blättchen Pulver (nitroglycerin flaked powder) or Diglykolnitrat Blättchen Pulver (diglycolnitrate flaked powder). For long distant targets all six bags would be put in the brass propellant cartridge case. For shorter distances fewer bags would be used.
The gun could also fire smoke rounds to cover the retreat or advance of an infantry or armored column. These shells were called 15-cm Igr. 38 Nebel and weighed 38.50 kg (85 lbs) These smoke shells were identified by the white letters ‘Nb’ on a field-gray projectile. The bursting charge consisted of picric acid, and the exploder system comprised of a detonator set in penthrite wax enclosed in an aluminium container. The shell produces a smoke cloud 50 meters (55 yards) thick.
It had an effective firing range of 4.7 km – 4,700 m (2.89 miles – 5,140 yd). When firing HE shells it had a muzzle velocity of 240 m/s (790 ft/s). A good gun crew could fire three rounds a minute. The shell fuze s.Igr.Z. 23 was a highly sensitive, nose-percussion fuze with an optional delay of .4 second. It operated on impact or graze. It fired two types of HE shell, the 15cm I.Gv.33 and the 15cm I.Gv.38. For all practical purposes they were identical.
The breach was a horizontal sliding block. The gun’s recoil was controlled by a hydropneumatic chamber. The gun was made by a number of different companies: Rheinmetall, AEG-Fabriken, Bohemisch and Waffenfabrik
The gun cradle is situated below the gun barrel. It is trough-shaped and is provided with guide ways, in which guides on the gun move as it recoils and runs out. On either side at the front is a pad to receive the unabsorbed force of run-out, and between them is the expansion chamber which receives the buffer fluid forced from the buffer by expansion as it becomes heated. Towards the rear are the two cradle arms to which the trunnions are fixed. Each trunnion is provided with a cranked compensator lever which compresses the compensator spring.

Image
15cm sIG 33 L/11(Sf) auf Fahrgestell Panzerkampfwagen III Ausf.H (Sf) in indirect fire mode

Gallery

Image
15cm sIG 33 L/11(Sf) auf Fahrgestell Panzerkampfwagen III Ausf.H (Sf) with the gun in indirect fire mode in North Africa 1941. Photographer:
unknown

Image
The crew of the 15 cm s.I.G. 33 B (Sfl.) auf Fahrgestell Pz.Kpfw. III Ausf. H relaxing in the North African desert.Photographer: unknown

Image
If you look at the rear of the vehicle you will notice a metal frame. This was designed to enable boxes of ammunition, supplies and equipment to be strapped to it. Photo:Eckbaustein

Image
You can see in this hull down photograph how the kit was stored on the back of this SPG. Water and fuel cans were put in the rear rack and spare bogie road wheels were fixed to the engine hatches and covered by the foul weather tarpaulin. Photo:Eckbaustein

Why was only one built?
When vehicles get damaged on the battlefield they are recovered by the engineers who try to repair them back behind the front line. Some times parts of an armoured fighting vehicle are damaged beyond repair but the rest of the vehicle is in good working order. The Afrika Korps engineers had problems getting replacement parts in North Africa because of the sinking of Axis transport ships in the Mediterranean by the Allies.
Rommel’s forces were out numbered by the Allies in North Africa who had more tanks, artillery guns and armoured fighting vehicles. The German engineers were under pressure to repair to get as many serviceable fighting vehicles to the front line as they could. It wold have seemed logical to them that a working 15cm s.I.G heavy infantry gun salvaged from a knocked out self-propelled gun should be sent back to the front on a new chassis. In this situation they used a turret less recovered panzer III Ausf.H tank chassis. Development of the 10.5cm ‘Wespe’ self-propelled artillery infantry gun was already started back in Germany. This took priority.

Specifications
Dimensions 5.41m x 2.95 x 2.44 m (17’9″ x 9’8″ x 8’0″ ft.inches)
Total weight, battle ready 20.3 tons
Crew 5
Propulsion Maybach V12 gasoline HL 120 TRM (220 kW) 300 bhp
Speed on /off road 40/20 km/h (25/12 mph)
Armament 15.cm (5.9 in) leFH 18 howitzer 7.92 mm Maschinengewehr 34 machine gun
Range 165 km (102 mi)
Total production 5774

Sources
German Infantry Weapons – US Military Intelligence Service, Special Series No. 14, May 25, 1943. U.S. War Department
Allied Expeditionary Force German Guns – Brief Notes and Range Tables for Allied Gunners – SHAEF/16527/2A/GCT July 1944
Chamberlain, Peter, and Hilary L. Doyle. Thomas L. Jentz (Technical Editor). Encyclopedia of German Tanks of World War
A Complete Illustrated Directory of German Battle Tanks, Armoured Cars, Self-propelled Guns, and Semi-tracked Vehicles, 1933–1945 – Arms and Armour Press

Again I was a little hasty with buying, because when reading the info, I saw only one ever saw action. And that was in africa!
Not much winter there!
But what the hack; I'll make it a "whet if" it was to have served on the eastern front.
So my version will be with dunkel gelb and green camo. And on top of that winter camo. And Winterketten!

These are the kits that I bought:

Image

Image

Image

And some burnishing fluid.

Image

The kit contents:

Image

Image

Image

Image

Image

Image

Image

Image

Image

Image

Image

I started the build with the Sig 33

Image

Image

Image

In the pictures below you can clearly see what part of the gun is used and what they left or cut off.
So I will have to cut off the rear end of the guns foot lateron.

Image

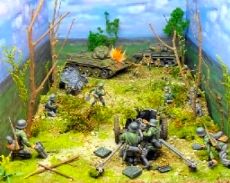
Another nice picture of the vehicle. Apparently it was quite soggy there. It's almost a pillbox!

Image

I also started on some dio stuff. A little country house. Made some molds with a 3D printer.
The walls are going to be of plaster and the roof tiles will be plastic.

Image

Two plaster wall parts drying.

Image

That's it for now folks.
Next up: buildng the P3.
Cheers
Hansolo

May the sprue be with you. :th:
privatepete
First Lieutenant
First Lieutenant
Posts: 3871
Joined: Thu Dec 11, 2014 1:13 pm

Re: Panzer III with SIG 33

Post by privatepete »

Hi Hans another interesting project where do you find them, I have never heard of ‘Rommel’s Funnies’ until now, something to look up,but I did find this.

Rommel's Funnies: Pz. Sfl. II - 7.5 Cm Kan. L/41 Auf Zgkw. 5t (HKP902), 7.62 Cm F.K.(r) Auf Gp. Sfl. (Sd. Kfz. 6/3), 15 Cm S.I.G.33 B Sfl., Lg.s.F.H.13 (Sfl.) Sfl. Auf Lorraine-Schlepper, Landwasserschlepper

Image

Thomas L. Jentz
Darlington Productions, 1997 - Armored vehicles

Good luck with the build.
User avatar
hansolo
Warrant Officer
Warrant Officer
Posts: 1524
Joined: Mon Jun 17, 2013 12:36 pm
Location: Amsterdam
Contact:
Netherlands

Re: Panzer III with SIG 33

Post by hansolo »

privatepete wrote:Hi Hans another interesting project where do you find them, I have never heard of ‘Rommel’s Funnies’ until now, something to look up,but I did find this.

Rommel's Funnies: Pz. Sfl. II - 7.5 Cm Kan. L/41 Auf Zgkw. 5t (HKP902), 7.62 Cm F.K.(r) Auf Gp. Sfl. (Sd. Kfz. 6/3), 15 Cm S.I.G.33 B Sfl., Lg.s.F.H.13 (Sfl.) Sfl. Auf Lorraine-Schlepper, Landwasserschlepper

Image

Thomas L. Jentz
Darlington Productions, 1997 - Armored vehicles

Good luck with the build.
Thanks Pete! I never heard of them before either. Good term though! Hobart's counterpart.
Apparently I did build some of the funnies, without knowing the term.

Here's one:

Image

And this one:

Image

This one's awesome too. Not mine. Might be interesting to build! :banana:

Image

Thanks for this input, Pete! :th:
Cheers
Hansolo

May the sprue be with you. :th:
User avatar
AdamLuscombe
First Sergeant
First Sergeant
Posts: 523
Joined: Mon Oct 13, 2014 6:57 pm
Location: texas
United States of America

Re: Panzer III with SIG 33

Post by AdamLuscombe »

Interesting build! :th:
On the bench:
Dragon
1/35 Jagdpanzer IV L/48
Italeri
1/24 Ford Escort Mk. II
User avatar
hansolo
Warrant Officer
Warrant Officer
Posts: 1524
Joined: Mon Jun 17, 2013 12:36 pm
Location: Amsterdam
Contact:
Netherlands

Re: Panzer III with SIG 33

Post by hansolo »

AdamLuscombe wrote:Interesting build! :th:
Thanks Adam!
Cheers
Hansolo

May the sprue be with you. :th:
User avatar
hansolo
Warrant Officer
Warrant Officer
Posts: 1524
Joined: Mon Jun 17, 2013 12:36 pm
Location: Amsterdam
Contact:
Netherlands

Re: Panzer III with SIG 33

Post by hansolo »

Darn. Just found out that the Sd. Kfz. 6/3 already exists as a kit! From Bronco. :roll:
Cheers
Hansolo

May the sprue be with you. :th:
User avatar
hansolo
Warrant Officer
Warrant Officer
Posts: 1524
Joined: Mon Jun 17, 2013 12:36 pm
Location: Amsterdam
Contact:
Netherlands

Update

Post by hansolo »

Hi guys,

No P3 yet but more work done on the dio and the gun.

Looking at the reference images, I saw that part of the gun's under carriage is cut off to fit it better in the P3.
So I cut it off too.

Image

The cast of the house front. With flattened surface.

Image

The cast of the house front and the gate out of the molds and cleaned up.

Image

Bricks drawn out on the cast of the gate part.

Image

Carved out with a piercer.

Image

The setup.

Image

I made the doors and shutters from a combo of plywood en balsa wood.
Shutter hinges are made of ps-plate.

Image

Doors and shutters completed.

Image

Image

Image

That's it for now folks!
Next up: More dio or P3...
Cheers
Hansolo

May the sprue be with you. :th:
privatepete
First Lieutenant
First Lieutenant
Posts: 3871
Joined: Thu Dec 11, 2014 1:13 pm

Re: Panzer III with SIG 33

Post by privatepete »

Hi Hans, I'm running out of words to describe your work :jd:

:clap: uitstekend :clap:
User avatar
spock1701
Master Sergeant
Master Sergeant
Posts: 449
Joined: Wed Apr 29, 2015 1:58 pm
Location: Upstate New York
United States of America

Re: Panzer III with SIG 33

Post by spock1701 »

Great build so far, hans! That gun is going to look good in winter camo. Nice work on the dio as well. Looks fantastic :jd:
There is always time for modeling.
User avatar
hansolo
Warrant Officer
Warrant Officer
Posts: 1524
Joined: Mon Jun 17, 2013 12:36 pm
Location: Amsterdam
Contact:
Netherlands

Re: Panzer III with SIG 33

Post by hansolo »

Thanks guys! :bow::
Cheers
Hansolo

May the sprue be with you. :th:
User avatar
hansolo
Warrant Officer
Warrant Officer
Posts: 1524
Joined: Mon Jun 17, 2013 12:36 pm
Location: Amsterdam
Contact:
Netherlands

Update

Post by hansolo »

Hi guys,

I started building the Panzer III.

First up: the wheels.

Image

The suspension.

Image

Lower hull completed.

Image

Gave the Friul Winterketten a burnishing bath and started assembly..
I love that burnising effect. Almost no further weathering required.

Image

Dry fitted the tracks for length.

Image

The upper hull.

Image

I had to cut several parts of, in order to accommodate the Sig 33.

Image

I closed the back of the interior off with plate and laid down a floor of plate and on top of that the metal look relief plate.

Image

Image

I couldn't find any images or explanation of how the gun would be elevated for sitting at the appropriate height on the chassis.
So I build a steel rod frame which might have been constructed to accomplish this. Though I might be totally of here...

Image

Back and sides of the super structure completed.

Image

Frontal armour completed.
Images of the real vehicle showed that there is no machine gun placed through the frontal armour plate. So I closed that off.

Image

Image

I constructed the box to go onto the right side of the super structure.

Image

Added the tools on the left.

Image

Finished constructing the building. Added the 3d-printed roof tiles and 3d-printed rain barrel.

Image

That's it for now folks.
Next up: scrap building some stowage to go on the back of the vehicle
and maybe some more work on the dio...
Cheers
Hansolo

May the sprue be with you. :th:
User avatar
StarFar
Corporal
Corporal
Posts: 53
Joined: Fri Jun 17, 2016 4:51 pm
Location: Kraków, Poland

Re: Panzer III with SIG 33

Post by StarFar »

Tracks look really amazing! Also the gun and the new armor.
User avatar
hansolo
Warrant Officer
Warrant Officer
Posts: 1524
Joined: Mon Jun 17, 2013 12:36 pm
Location: Amsterdam
Contact:
Netherlands

Re: Panzer III with SIG 33

Post by hansolo »

StarFar wrote:Tracks look really amazing! Also the gun and the new armor.
Thanks mate! :th:
Cheers
Hansolo

May the sprue be with you. :th:
privatepete
First Lieutenant
First Lieutenant
Posts: 3871
Joined: Thu Dec 11, 2014 1:13 pm

Re: Panzer III with SIG 33

Post by privatepete »

:clap: uitstekend :clap:
User avatar
hansolo
Warrant Officer
Warrant Officer
Posts: 1524
Joined: Mon Jun 17, 2013 12:36 pm
Location: Amsterdam
Contact:
Netherlands

Re: Panzer III with SIG 33

Post by hansolo »

privatepete wrote::clap: uitstekend :clap:
Dank je, Pete! :thumb1:
Cheers
Hansolo

May the sprue be with you. :th:
User avatar
SergioSolo
Sergeant Major
Sergeant Major
Posts: 643
Joined: Sun Apr 03, 2016 10:31 pm
Location: Colombia
Contact:

Re: Panzer III with SIG 33

Post by SergioSolo »

Amazing attention to detail! :jd:
User avatar
hansolo
Warrant Officer
Warrant Officer
Posts: 1524
Joined: Mon Jun 17, 2013 12:36 pm
Location: Amsterdam
Contact:
Netherlands

Re: Panzer III with SIG 33

Post by hansolo »

Sergiotron wrote:Amazing attention to detail! :jd:
Thanks Sergio. :bow::
Cheers
Hansolo

May the sprue be with you. :th:
User avatar
Stokesy44
Major General
Major General
Posts: 8227
Joined: Thu Jun 18, 2015 10:13 am
Location: The Midlands, UK
Great Britain

Re: Panzer III with SIG 33

Post by Stokesy44 »

StarFar wrote:Tracks look really amazing! Also the gun and the new armor.
What he said!
Its been tried and tested, it works! So don't blame the system if you're no good. :doh:
User avatar
hansolo
Warrant Officer
Warrant Officer
Posts: 1524
Joined: Mon Jun 17, 2013 12:36 pm
Location: Amsterdam
Contact:
Netherlands

Re: Panzer III with SIG 33

Post by hansolo »

Stokesy44 wrote:
StarFar wrote:Tracks look really amazing! Also the gun and the new armor.
What he said!
Thanks Stokesy!
Cheers
Hansolo

May the sprue be with you. :th:
User avatar
panzerman825
Corporal
Corporal
Posts: 70
Joined: Thu Jan 19, 2017 10:23 am
Location: Maryland, USA
Contact:
United States of America

Re: Panzer III with SIG 33

Post by panzerman825 »

Awesome job on the self propelled gun conversion. Nicely built upper armor casement. Scratch built building is fantastic as well.
Bill
Image
User avatar
hansolo
Warrant Officer
Warrant Officer
Posts: 1524
Joined: Mon Jun 17, 2013 12:36 pm
Location: Amsterdam
Contact:
Netherlands

Re: Panzer III with SIG 33

Post by hansolo »

panzerman825 wrote:Awesome job on the self propelled gun conversion. Nicely built upper armor casement. Scratch built building is fantastic as well.
Bill
Thanks Bill! :)
Cheers
Hansolo

May the sprue be with you. :th:
User avatar
hansolo
Warrant Officer
Warrant Officer
Posts: 1524
Joined: Mon Jun 17, 2013 12:36 pm
Location: Amsterdam
Contact:
Netherlands

Update

Post by hansolo »

Hi guys,

Small update here.

I finished adding the stowage.

I used bandage gauze for the camouflage netting roll. Soaking it in water diluted white glue, in order to make it keep it's shape when dry.
For tarps I used toilet paper, treated in the same fashion.

Image

To push 'n shape the wet paper into it's desired form, I used wet que tips, so the paper wouldn't tare.

Image

The completed stowage. I added more paper tarps, a bag and a roll. Some boxes and stuff.
The barbed wire is made from one line cut out of a mosquito net.

Image

Image

That's already it for today.
Next up: Some painting or work on the dio.
Cheers
Hansolo

May the sprue be with you. :th:
User avatar
spock1701
Master Sergeant
Master Sergeant
Posts: 449
Joined: Wed Apr 29, 2015 1:58 pm
Location: Upstate New York
United States of America

Re: Panzer III with SIG 33

Post by spock1701 »

That stowage looks super. I've been looking for a DIY alternative to camouflage netting, too. Interesting idea, the gauze
There is always time for modeling.
privatepete
First Lieutenant
First Lieutenant
Posts: 3871
Joined: Thu Dec 11, 2014 1:13 pm

Re: Panzer III with SIG 33

Post by privatepete »

Looking good and the barbed wire made from one line cut out of a mosquito net is :crazy: . :th:
User avatar
hansolo
Warrant Officer
Warrant Officer
Posts: 1524
Joined: Mon Jun 17, 2013 12:36 pm
Location: Amsterdam
Contact:
Netherlands

Update

Post by hansolo »

Hi guys,

Did some painting on the P3.

Black primer.

Image

Base coat of Dunkel Gelb.

Image

The camo colors.

Image

Decals and detail painting.

Image

Gloss coat.

Image

Ultimate Dark wash.

Image

Cleared off.

Image

Matt coat.

Image

Hairspray.

Image

Tamiya white winter coat.

Image

Chipped with brush and water.

Image

My tool for making little paint chips the easy and fast way.

Image

Detail painted and dark washed the stowage.

Image

Dry painted and finished the stowage.

Image

That's it for now, folks.
Next up: Oil paint rendering. :banana:
Cheers
Hansolo

May the sprue be with you. :th:
User avatar
SergioSolo
Sergeant Major
Sergeant Major
Posts: 643
Joined: Sun Apr 03, 2016 10:31 pm
Location: Colombia
Contact:

Re: Update

Post by SergioSolo »

You're doing an amazing job! Really inspiring :clap:
hansolo wrote: Image
I love this picture. Looks very realistic, like if it just rained and everything is wet :jd:
User avatar
Tomcat64
Brigadier General
Brigadier General
Posts: 7034
Joined: Thu Sep 22, 2016 3:24 pm
Location: Swindon, UK
England

Re: Panzer III with SIG 33

Post by Tomcat64 »

That's an amazing build of a really unusual subject - phenomenal work especially the speed you've progressed with it :jd:
Cheers, Neil

On the Bench:
Tamiya 1/35 PzKpfwIB
Tamiya 1/35 Willys Jeep
Revell 1/72 Millennium Falcon
User avatar
hansolo
Warrant Officer
Warrant Officer
Posts: 1524
Joined: Mon Jun 17, 2013 12:36 pm
Location: Amsterdam
Contact:
Netherlands

Re: Panzer III with SIG 33

Post by hansolo »

Thanks guys! :th:
Cheers
Hansolo

May the sprue be with you. :th:
User avatar
hansolo
Warrant Officer
Warrant Officer
Posts: 1524
Joined: Mon Jun 17, 2013 12:36 pm
Location: Amsterdam
Contact:
Netherlands

Update

Post by hansolo »

Hi guys,

Oil paint rendering on the P3.

First I added small highlights to the white wash.

Image

Image

Some yellow and light brown filtering.

Image

Pin washing and darker areas.

Image

Image

Image

Image

Grime and rust on the interior.

Image

Did some mud with pigments.
First I moistened the sides. Then sprinkled the pigments on. To make heaver mud in the lower areas, I wetted those again and sprinkled more pigments. To give those parts a remaining moister look I used slightly darker pigments there.

Image

More work is also done on the dio.

I started with the gate.

Primed it with black and base painted with different shades of grey.

Image

With Vallejo washes I made the color variations. And dry brushed some highlights with acrylics.

Image

Painted my 3D-printed barrel.

First primed with black.

Image

Then the base colors.

Image

Did the wood effect with brown and black washes. And the metal bands with metal powder.

Image

I filled the barrel 3/4 with water. That is with this resin-water.
Later on I plan to weather the top of the water to mimmic ice.

Image

Primed the house with grey and used hair spray to chip the next layer of white.

Image

White applied.

Image

And chipped.

Image

Door and windows painted.

Image

I made the ground of my dio with my good ol' dirt-glue-water mix.

Image

After applying the mixture dipping with and old brush, I sprinkled dry dirt on top to get a 'dry look' and not a muddy one.

Dry fitted the house an' barrel on the sandy base.

Image

Image

Image

That's it for today, folks.
Next up: More work to do on the dio and the P3.
Cheers
Hansolo

May the sprue be with you. :th:
User avatar
Tomcat64
Brigadier General
Brigadier General
Posts: 7034
Joined: Thu Sep 22, 2016 3:24 pm
Location: Swindon, UK
England

Re: Panzer III with SIG 33

Post by Tomcat64 »

Wow - that's fantastic progress! I feel like I'm moving at the speed of continental drift by comparison - and your dio is definitely behaving itself much better than mine has :D

Quick question about the rust effects you've used on the interior - did you just use dry pigments in there or did you wet them up (or do something else entirely)?
Cheers, Neil

On the Bench:
Tamiya 1/35 PzKpfwIB
Tamiya 1/35 Willys Jeep
Revell 1/72 Millennium Falcon
User avatar
hansolo
Warrant Officer
Warrant Officer
Posts: 1524
Joined: Mon Jun 17, 2013 12:36 pm
Location: Amsterdam
Contact:
Netherlands

Re: Panzer III with SIG 33

Post by hansolo »

Tomcat64 wrote:Wow - that's fantastic progress! I feel like I'm moving at the speed of continental drift by comparison - and your dio is definitely behaving itself much better than mine has :D

Quick question about the rust effects you've used on the interior - did you just use dry pigments in there or did you wet them up (or do something else entirely)?
Thanks!
For the floor I used Vallejo and Mig washes. For the effects on the gun I used Oil paint rendering. :th:
Cheers
Hansolo

May the sprue be with you. :th:
User avatar
Tomcat64
Brigadier General
Brigadier General
Posts: 7034
Joined: Thu Sep 22, 2016 3:24 pm
Location: Swindon, UK
England

Re: Panzer III with SIG 33

Post by Tomcat64 »

Cool - thanks mate!
Cheers, Neil

On the Bench:
Tamiya 1/35 PzKpfwIB
Tamiya 1/35 Willys Jeep
Revell 1/72 Millennium Falcon
User avatar
hansolo
Warrant Officer
Warrant Officer
Posts: 1524
Joined: Mon Jun 17, 2013 12:36 pm
Location: Amsterdam
Contact:
Netherlands

Update

Post by hansolo »

Hi guys,

More work done on the dio.

I made a road sign from cocktail stick, balsa wood and print.
I copied it off of a photo. I set it up in Illustrator with some boxes and some typefaces.

Here's what it looks like in Illustrator.

Image

I glued the printout on the balsa wood.

Image

And cut out the pieces.

Image

And stuck 'm on the stick.

Image

I forgot to take a picture of the painted and weathered result. That's later...

I bought this kit of figures to go on the dio.

Image

Image

Assembled.

Image

Ready for paint.
I only used 3 of the set and added another one.

Image

Primed.

Image

Base colored.

Image

Painted.

Image

Gloss coated for the wash.

Image

Ultimate Wash applied.

Image

Cleaned up with some q tips.

Image

Flat coated.

Image

Weathered with washes and oil paint.

Image

Made some chop wood from branches to go in front of the house.

Glued the blocks together with white glue on some tape to stop them from sliding.

Image

Image

Made an emaille sign for the wall from printout glued to thin PS and glossed with gloss coat.

Image

Made a fence from balsa wood.

Image

Image

Image

Weathered with washes and oil paint.

Image

That's all for now, folks.
Next up: more work on the dio.
Cheers
Hansolo

May the sprue be with you. :th:
User avatar
Fridgy
Sergeant Major of the Army
Posts: 1282
Joined: Wed Nov 30, 2016 6:46 am
Location: Melbourne, Australia
Australia

Re: Panzer III with SIG 33

Post by Fridgy »

Holy crap... looking at your build makes me feel like a 7yr old again
You have some serious skills Han :clap:
Mick
WIP: 1/12 Bandai BB-8 & R2-D2
User avatar
hansolo
Warrant Officer
Warrant Officer
Posts: 1524
Joined: Mon Jun 17, 2013 12:36 pm
Location: Amsterdam
Contact:
Netherlands

Re: Panzer III with SIG 33

Post by hansolo »

Fridgy wrote: Mon Feb 06, 2017 11:57 am Holy crap... looking at your build makes me feel like a 7yr old again
You have some serious skills Han :clap:
Thanks Fridgy! :bow::
Cheers
Hansolo

May the sprue be with you. :th:
User avatar
Tomcat64
Brigadier General
Brigadier General
Posts: 7034
Joined: Thu Sep 22, 2016 3:24 pm
Location: Swindon, UK
England

Re: Panzer III with SIG 33

Post by Tomcat64 »

Great work on all those dio bits - love the axe on the chopping block - lovely touch!

:clap:
Cheers, Neil

On the Bench:
Tamiya 1/35 PzKpfwIB
Tamiya 1/35 Willys Jeep
Revell 1/72 Millennium Falcon
User avatar
hansolo
Warrant Officer
Warrant Officer
Posts: 1524
Joined: Mon Jun 17, 2013 12:36 pm
Location: Amsterdam
Contact:
Netherlands

Re: Panzer III with SIG 33

Post by hansolo »

Tomcat64 wrote: Wed Feb 08, 2017 3:42 pm Great work on all those dio bits - love the axe on the chopping block - lovely touch!

:clap:
Thanks Tom! :th:
Cheers
Hansolo

May the sprue be with you. :th:
Bissyboat
Sergeant Major of the Army
Posts: 1254
Joined: Sun Jan 05, 2014 9:49 pm
Location: Norway

Re: Panzer III with SIG 33

Post by Bissyboat »

Fantastic progress. Lots of cool stuff that grabs your eyes. :th:
Where`s my dinghy?
User avatar
hansolo
Warrant Officer
Warrant Officer
Posts: 1524
Joined: Mon Jun 17, 2013 12:36 pm
Location: Amsterdam
Contact:
Netherlands

Re: Panzer III with SIG 33

Post by hansolo »

Bissyboat wrote: Wed Feb 08, 2017 10:45 pm Fantastic progress. Lots of cool stuff that grabs your eyes. :th:
Thanks Bizzy! :th:
Cheers
Hansolo

May the sprue be with you. :th:
User avatar
SergioSolo
Sergeant Major
Sergeant Major
Posts: 643
Joined: Sun Apr 03, 2016 10:31 pm
Location: Colombia
Contact:

Re: Panzer III with SIG 33

Post by SergioSolo »

Such an inspiring work! :clap:
User avatar
hansolo
Warrant Officer
Warrant Officer
Posts: 1524
Joined: Mon Jun 17, 2013 12:36 pm
Location: Amsterdam
Contact:
Netherlands

Re: Panzer III with SIG 33

Post by hansolo »

Sergiotron wrote: Thu Feb 09, 2017 1:48 am Such an inspiring work! :clap:
Gracias! Sergio. :th:
Cheers
Hansolo

May the sprue be with you. :th:
User avatar
hansolo
Warrant Officer
Warrant Officer
Posts: 1524
Joined: Mon Jun 17, 2013 12:36 pm
Location: Amsterdam
Contact:
Netherlands

Update

Post by hansolo »

Hi guys,

More work done on the dio.

I made a gutter for the house out of PS plate and balsa wood.
First off the PS plate inner part representing the zinc.

Image

Image

Covered the outside with salsa wood.

Image

Image

Painted the PS grey.

Image

Gave it a zinc look with white oil paint.

Image

Tinted the wood with brown wash.

Image

Image

Gave it the old wood look with a white wash of oil paint.
And installed it into it's place.

Image

Gave my fireplace wood stack a nice place on the dio.

Image

The finished road sign in place.

Image

Made a drainpipe out of sprue.

Image

Painted grey.

Image

Weathered with white oil paint and brown and yellow washes.

Image

And installed.

Image

Redid the mud on the dio, because it was to flat and dry looking.
I those for a more loose muddy look with tracks of the P3 showing.
Added some grass here and there and planted some small trees.
And here's the dio before snowing commences...

Image

Image

Image

Image

Image

Image

Image

Image

Image

Image

Image

Image

Image

Image

Image

Image

Image

That's it for now folks.
Next up: The final touches on the P3 and it might have been snowing... 8-)
Cheers
Hansolo

May the sprue be with you. :th:
Bissyboat
Sergeant Major of the Army
Posts: 1254
Joined: Sun Jan 05, 2014 9:49 pm
Location: Norway

Re: Panzer III with SIG 33

Post by Bissyboat »

I´m gob smacked. Incredible level and fantastic workmanship on the dio. There´s so much here that grabs your eye. No doubt when the tank comes rolling in, it will be even more spectacular. :thumb2:
Where`s my dinghy?
User avatar
Fridgy
Sergeant Major of the Army
Posts: 1282
Joined: Wed Nov 30, 2016 6:46 am
Location: Melbourne, Australia
Australia

Re: Panzer III with SIG 33

Post by Fridgy »

Bissyboat wrote: Sun Feb 12, 2017 11:00 pm I´m gob smacked. Incredible level and fantastic workmanship on the dio. There´s so much here that grabs your eye. No doubt when the tank comes rolling in, it will be even more spectacular. :thumb2:
What he said :thumb1:

I can only wish I can get to this level one day
Mick
WIP: 1/12 Bandai BB-8 & R2-D2
User avatar
hansolo
Warrant Officer
Warrant Officer
Posts: 1524
Joined: Mon Jun 17, 2013 12:36 pm
Location: Amsterdam
Contact:
Netherlands

Final Update!

Post by hansolo »

Hi guys,

It has been snowing!
You can see the final reveals here: http://www.intscalemodeller.com/viewtop ... 83&t=21513
Cheers
Hansolo

May the sprue be with you. :th:
User avatar
Les
First Sergeant
First Sergeant
Posts: 545
Joined: Wed Feb 05, 2014 7:53 am
Location: Westminster, Colorado, United States

Re: Panzer III with SIG 33

Post by Les »

Congratulations on your finish! :cheers2:
Image
Post Reply

Return to “Build Threads”