Skybow Tiger 1 Late in 1/48


-
wappynutter

- Chief Warrant Officer 3

- Posts: 2256
- Joined: Mon Jun 17, 2013 11:39 pm
- Location: Sutton in Ashfield, Nottinghamshire. UK

Re: Skybow Tiger 1 Late in 1/48
Thanks Paul glad you like my figure, I just gotta manage to paint him okay now! Lol....PaulAyrey wrote:just brilliant!
...and thanks again Russ for supplying such an excellent little dude to convert!


Re: Skybow Tiger 1 Late in 1/48
Yup! What he said... brilliant.
That's really clever work on that fig Andy and those tools look great, the wood is excellent.
Well done dude!!!
That's really clever work on that fig Andy and those tools look great, the wood is excellent.
Well done dude!!!


-
wappynutter
- Chief Warrant Officer 3
- Posts: 2256
- Joined: Mon Jun 17, 2013 11:39 pm
- Location: Sutton in Ashfield, Nottinghamshire. UK
Re: Skybow Tiger 1 Late in 1/48
Thanks again Mike, means a lot mate.... Much appreciated!....Coen wrote:Yup! What he said... brilliant.
That's really clever work on that fig Andy and those tools look great, the wood is excellent.
Well done dude!!!
More soon hopefully....

Re: Skybow Tiger 1 Late in 1/48
That was some gruesome surgery you had to do on that figure  Looks great in the end though.Those tools look great too,especially being in 1/48 scale.
Steve
Make something idiot proof and someone will come along and make a better idiot.
Make something idiot proof and someone will come along and make a better idiot.
-
wappynutter
- Chief Warrant Officer 3
- Posts: 2256
- Joined: Mon Jun 17, 2013 11:39 pm
- Location: Sutton in Ashfield, Nottinghamshire. UK
Re: Skybow Tiger 1 Late in 1/48
Thanks Steve, i chopped him good...Hillbilly wrote:That was some gruesome surgery you had to do on that figure
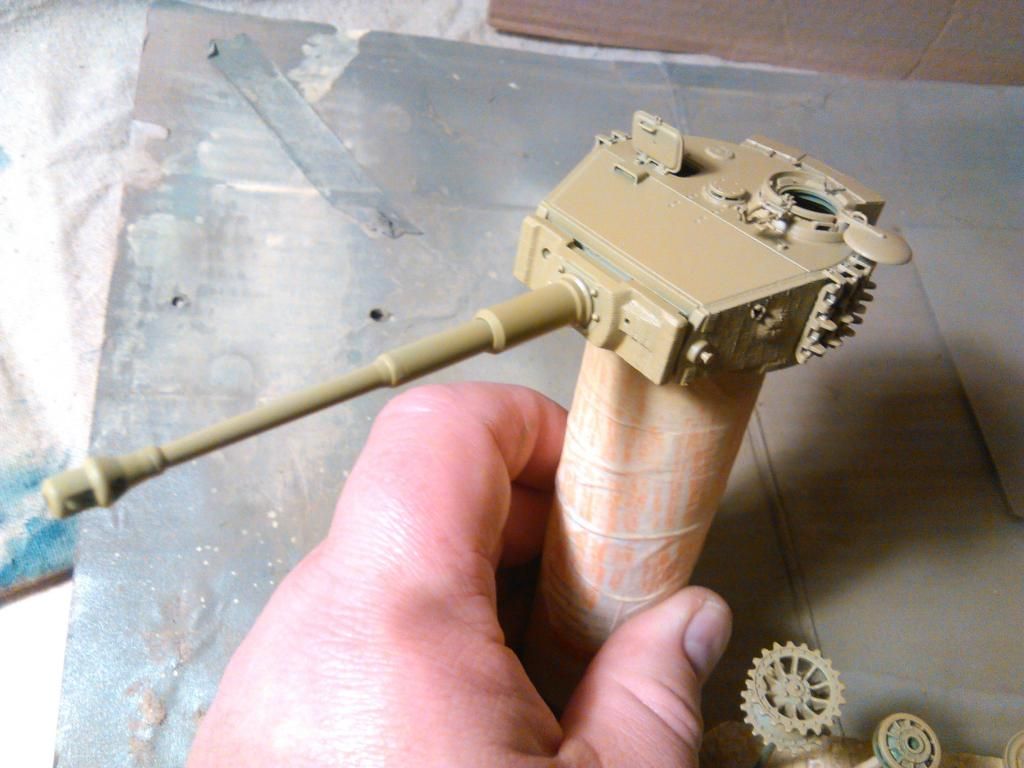
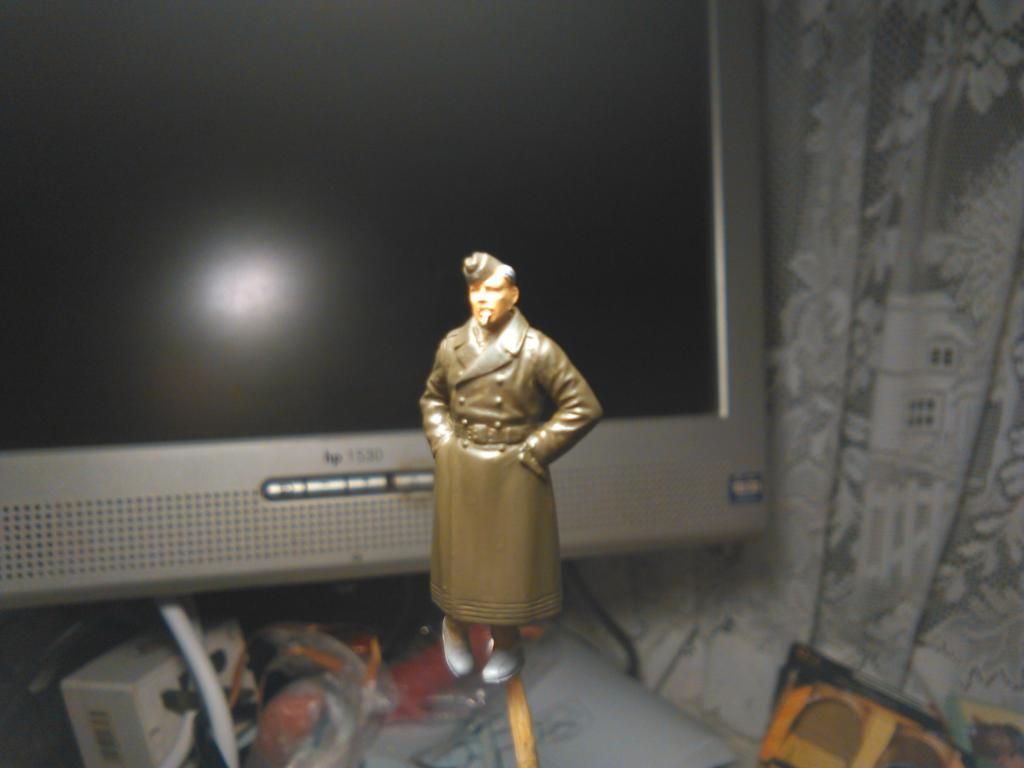
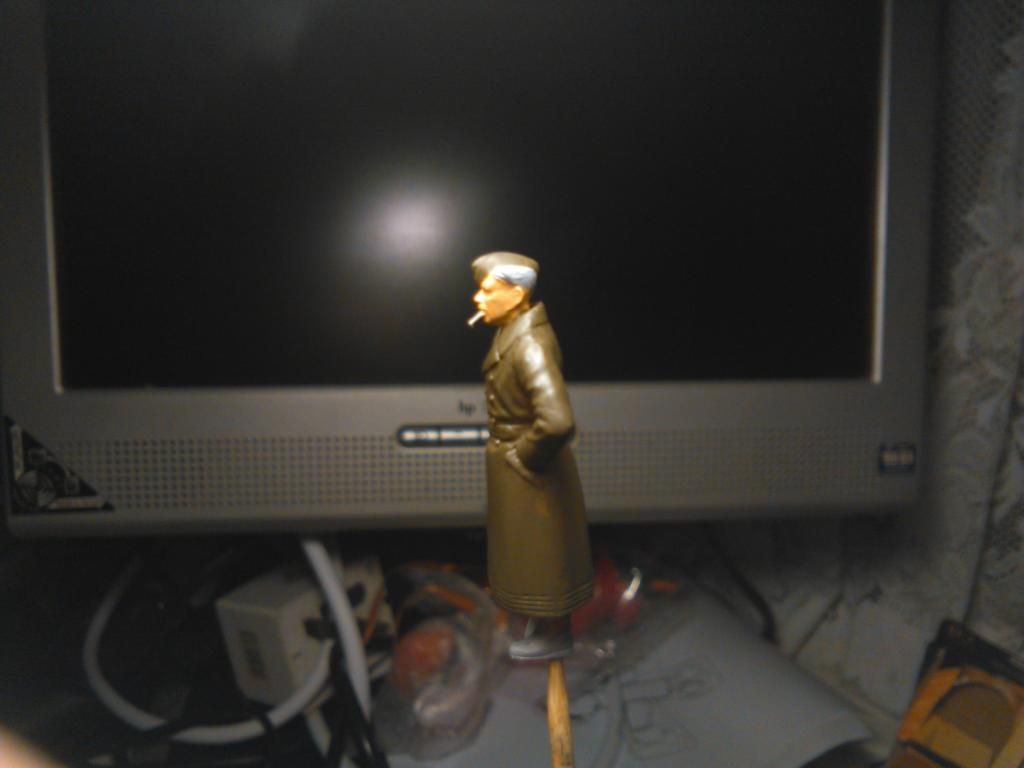
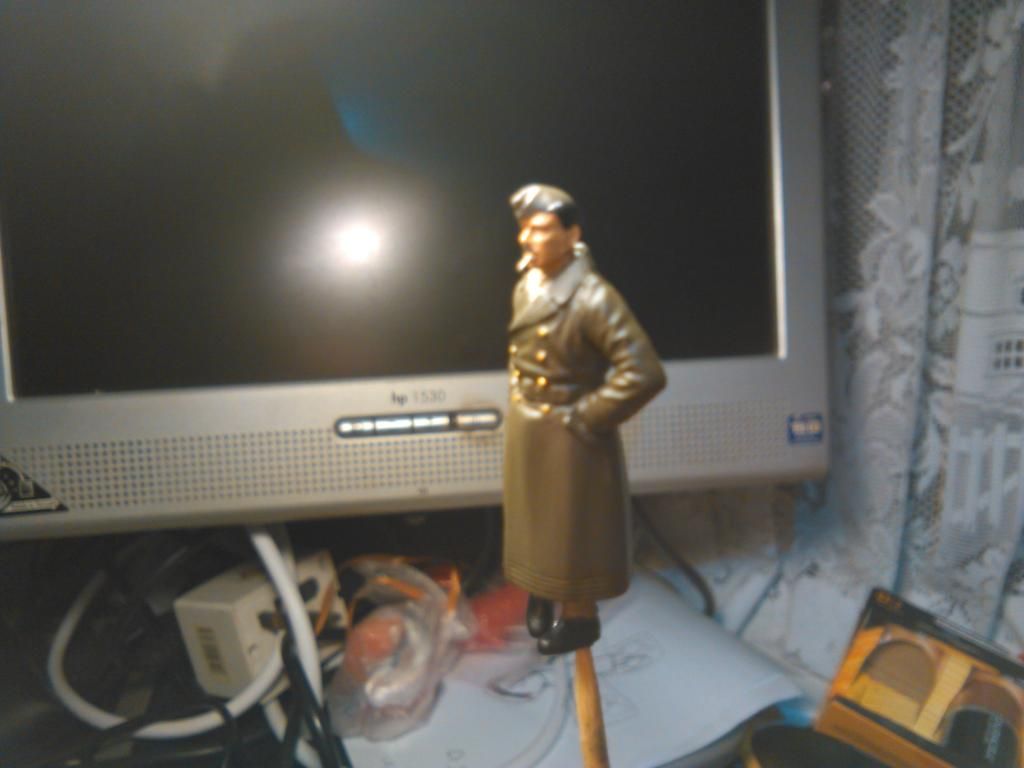
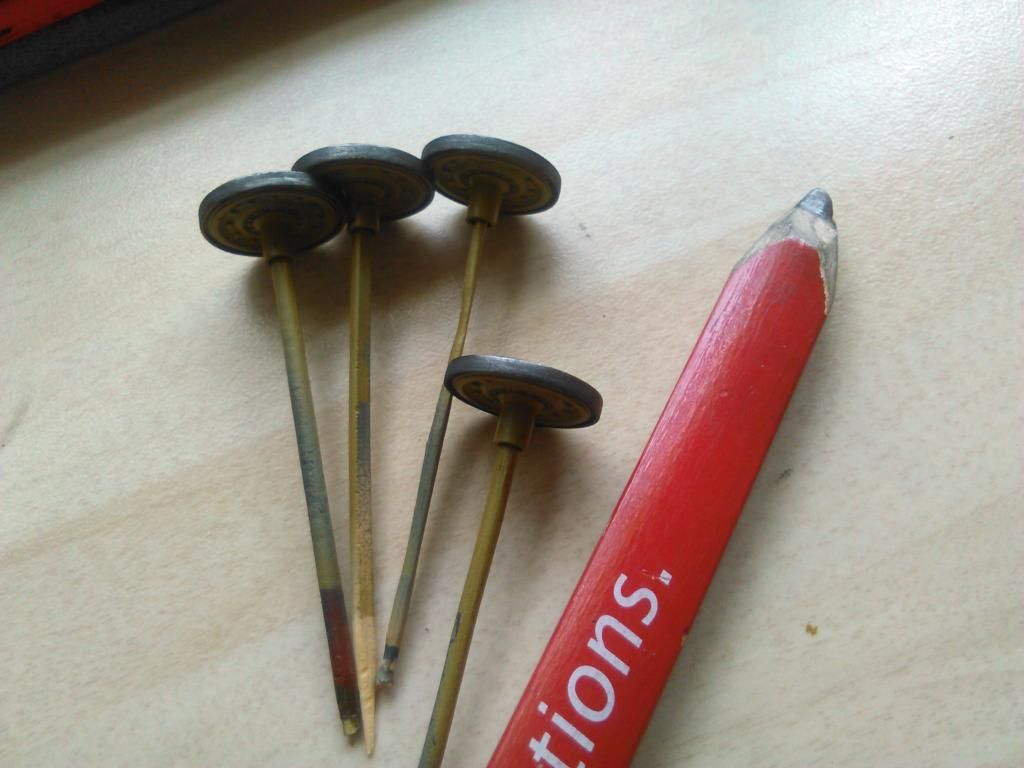
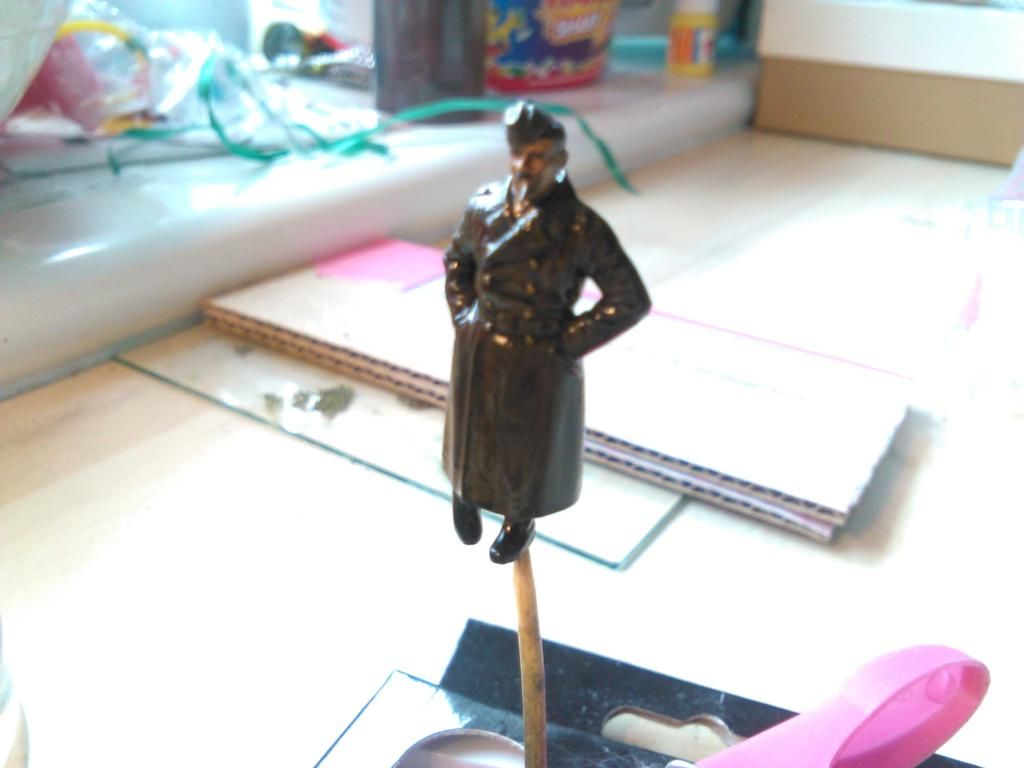
Today i had to remove the Iron Cross from around his neck,( he is a Luftwaffe figure doctored to fit the scene!).. insert an oversize wire Cigarette in his mouth and give him a coat or two of primer...
Or in true Wappy style, here are lots of pictures to show what i have done tonight...lol...
Thanks again mate...
...and here are the pictures as mentioned...


...and now some primer to make him all ready for painting...


I think it looks okay?? Maybe once i get some colour on he will start and look the part?
Anyways, thanks for taking a look guys....
All the best, stay safe and well....Happy Modelling
More soon!
-
Donkeywalloper

- Chief Warrant Officer 4

- Posts: 2618
- Joined: Sun Apr 13, 2014 8:06 pm
- Location: Burton upon Trent
Re: Skybow Tiger 1 Late in 1/48
You think it looks good.....so do I mate.
Lovely jubbly job.
John
Lovely jubbly job.
John
Bench:1/35 HobbyBoss Nagmachon with oodles of Aftermarket
Completed: Vespid 1/72 Comet A10
Shelf: Lots (82 Kits of multiple scales) of Armour + couple of Flappy / Wing Things, found a KV2 95% built and primed four years ago. Plus a few Lego Tech kits, to help restore MoJo
Completed: Vespid 1/72 Comet A10
Shelf: Lots (82 Kits of multiple scales) of Armour + couple of Flappy / Wing Things, found a KV2 95% built and primed four years ago. Plus a few Lego Tech kits, to help restore MoJo
-
wappynutter
- Chief Warrant Officer 3
- Posts: 2256
- Joined: Mon Jun 17, 2013 11:39 pm
- Location: Sutton in Ashfield, Nottinghamshire. UK
Re: Skybow Tiger 1 Late in 1/48
Thanks John, much appreciated buddy....Donkeywalloper wrote:You think it looks good.....so do I mate.
Lovely jubbly job.
John
The smoke is slightly oversized but close enough. I used the wire from inside a sandwich bag twist tie.
At 1/48 scale, cigarettes are damn small.... But might I just add, still bad for your health..lol...
Thanks again mate, all the best...
Re: Skybow Tiger 1 Late in 1/48
Very slick!!
He looks excellent, love the smoke.
He looks excellent, love the smoke.
-
wappynutter
- Chief Warrant Officer 3
- Posts: 2256
- Joined: Mon Jun 17, 2013 11:39 pm
- Location: Sutton in Ashfield, Nottinghamshire. UK
Re: Skybow Tiger 1 Late in 1/48
Hey Mike, thanks dude...Coen wrote:Very slick!!
He looks excellent, love the smoke.
The smoke is a little oversized but will do for this fella.
Nearly finished with the home redecorating/ reorganising so will get back on the modelling horse soon.
Still awaiting my new Airbrush, was hoping for today?.. Time yet I suppose..
More soon!
-
wappynutter
- Chief Warrant Officer 3
- Posts: 2256
- Joined: Mon Jun 17, 2013 11:39 pm
- Location: Sutton in Ashfield, Nottinghamshire. UK
Re: Skybow Tiger 1 Late in 1/48
Yay!! Finally managed to get some time on the Skybow build..... 
Shared a couple of images on Facebook so thought i had better make a post to keep the thread up to date...
Its been a while so bare with me, i had to wait for a new Airbrush to arrive, then find some spare time for Hobby related activities...
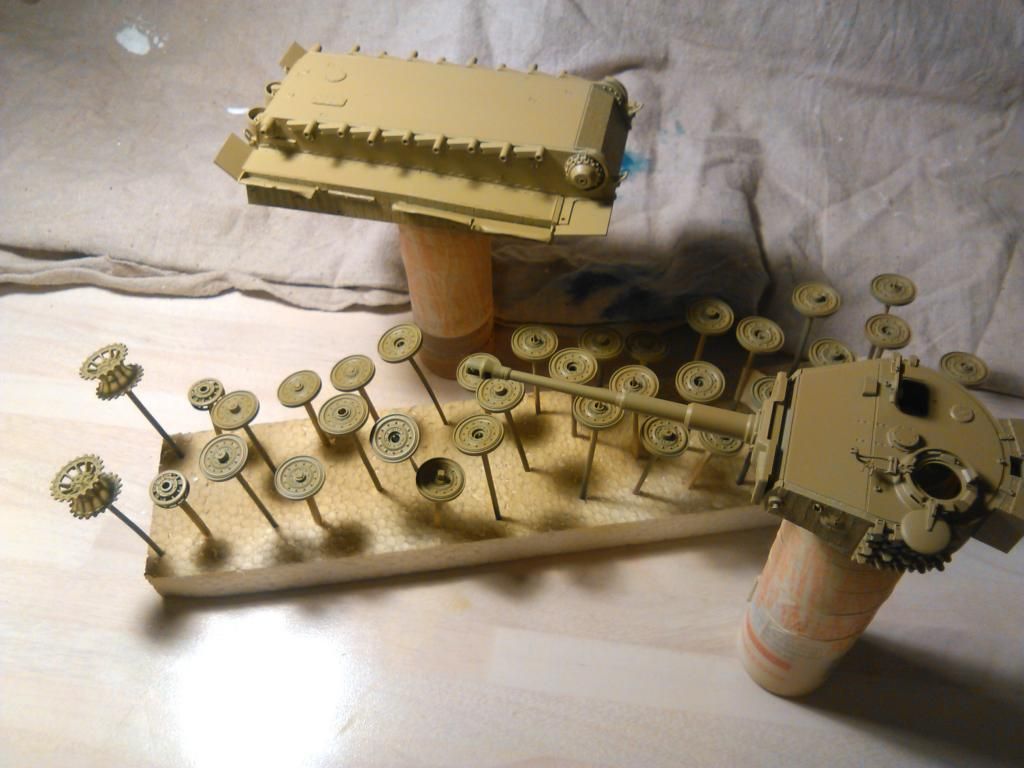
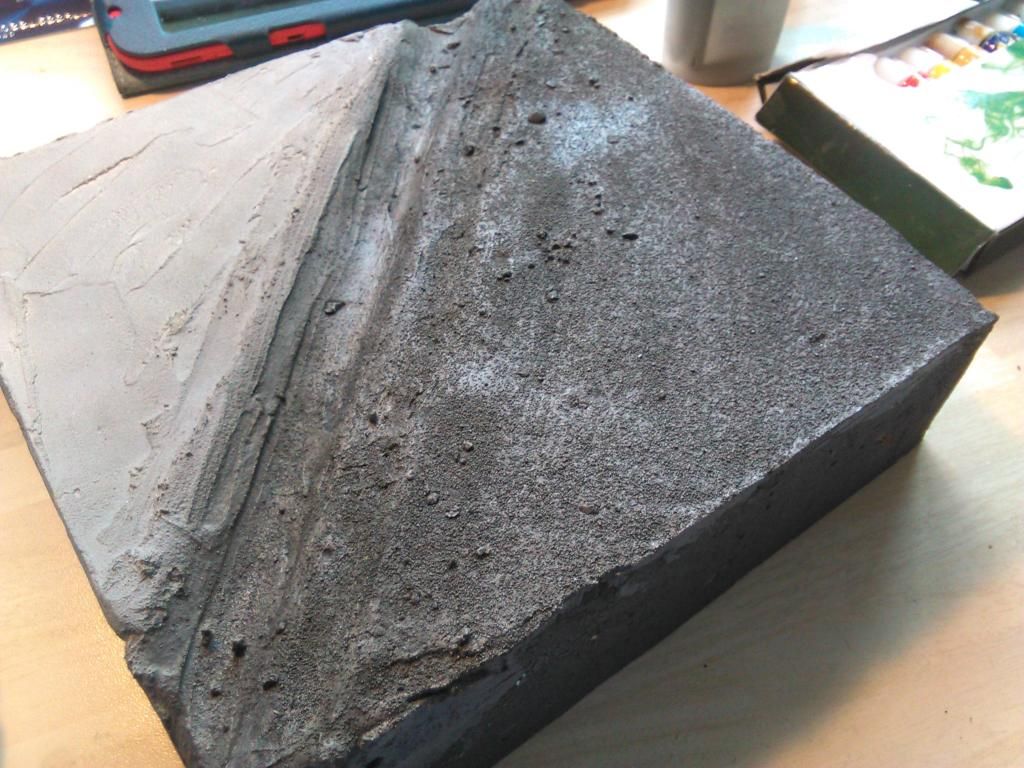
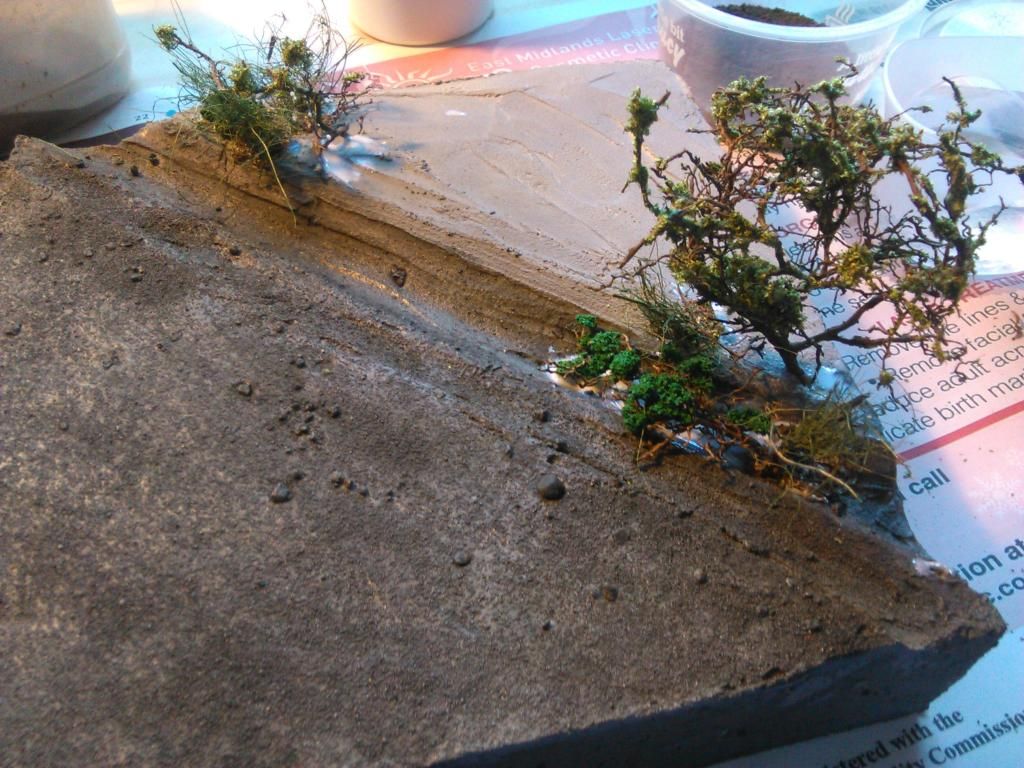
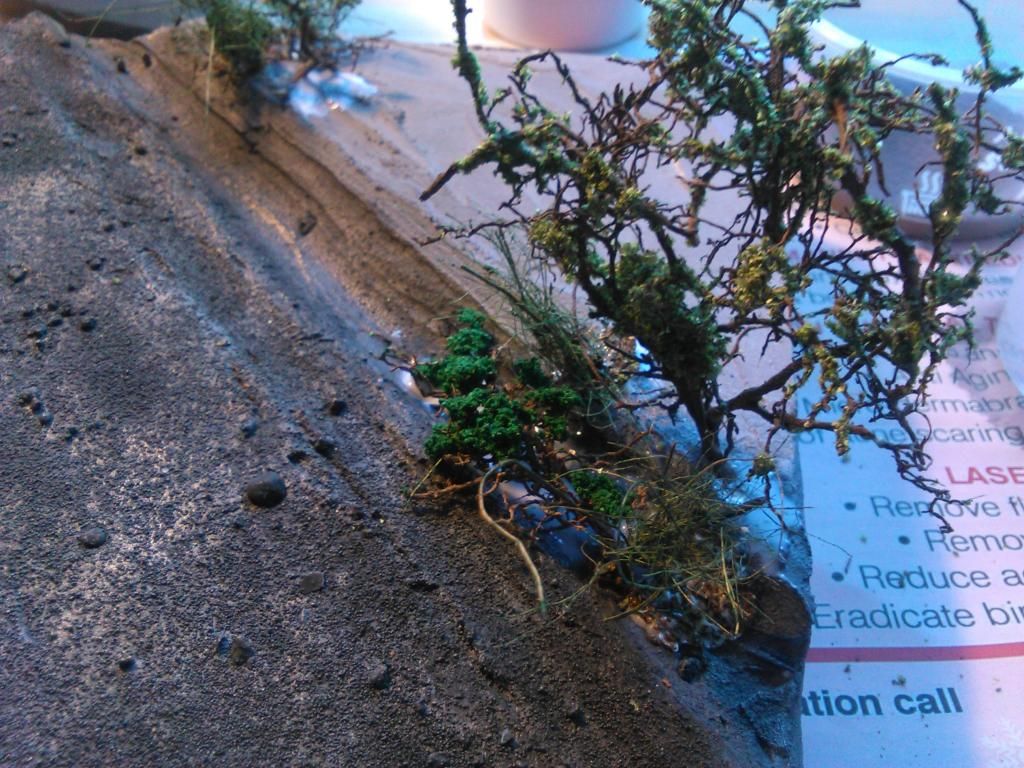
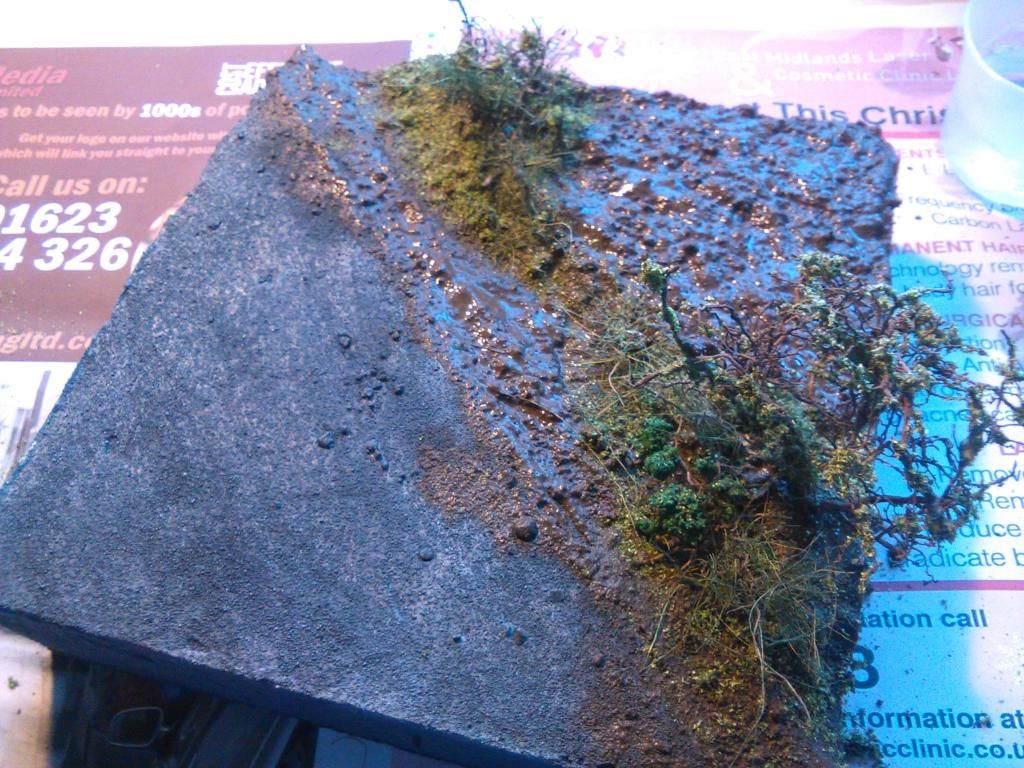
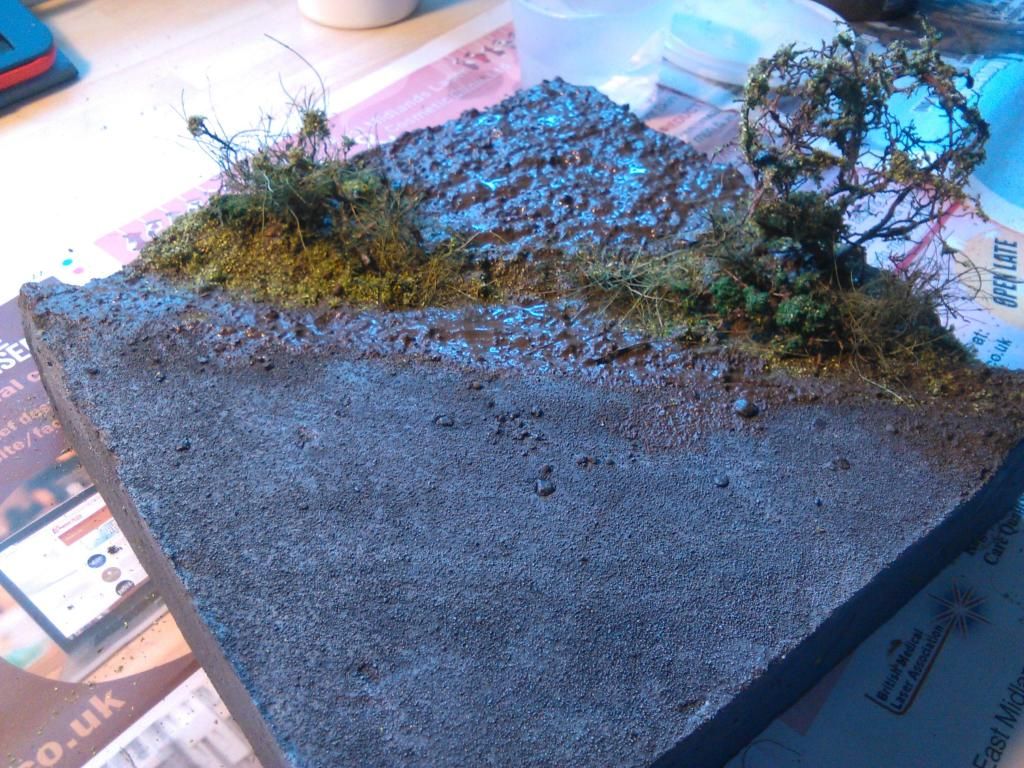
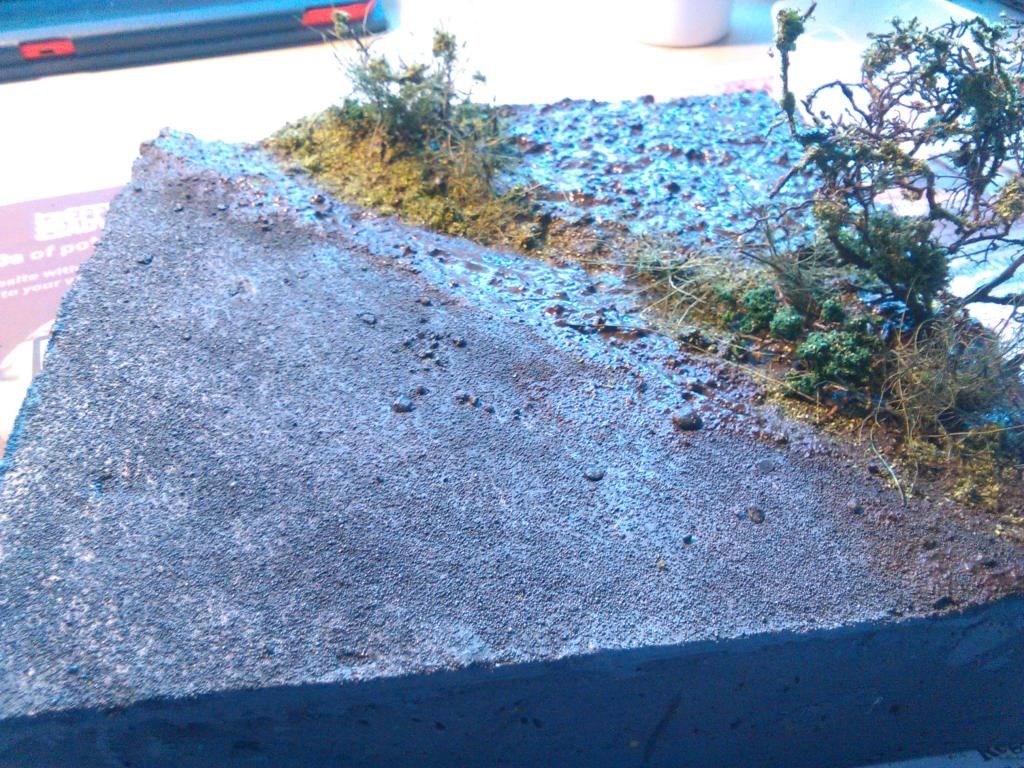
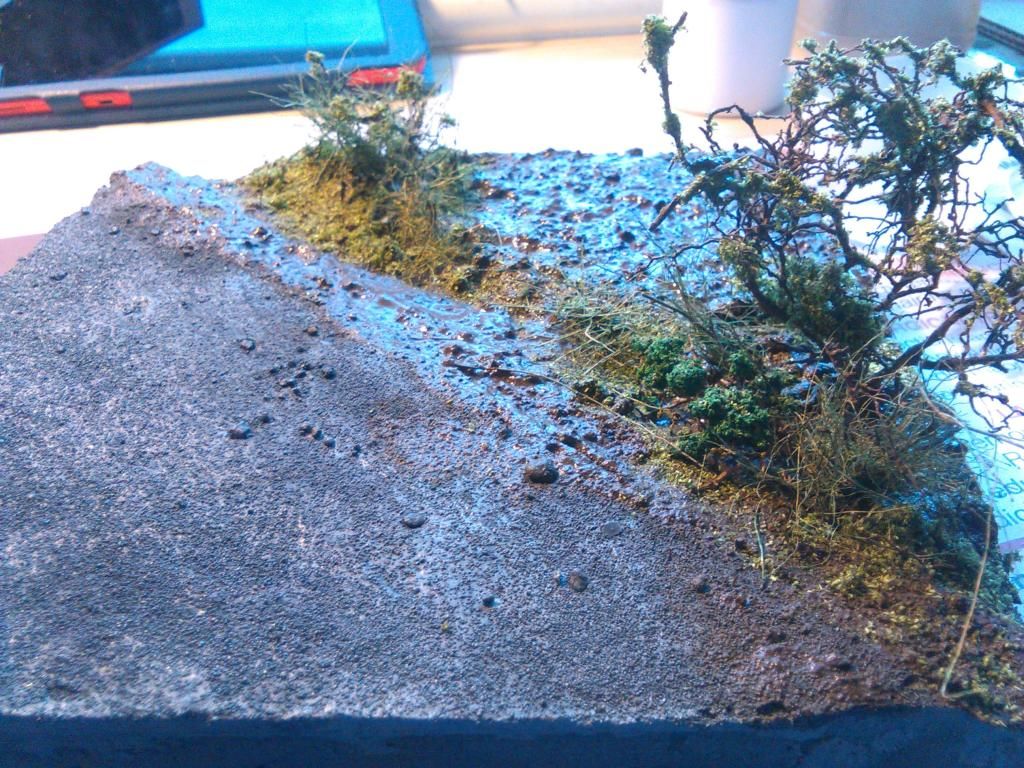
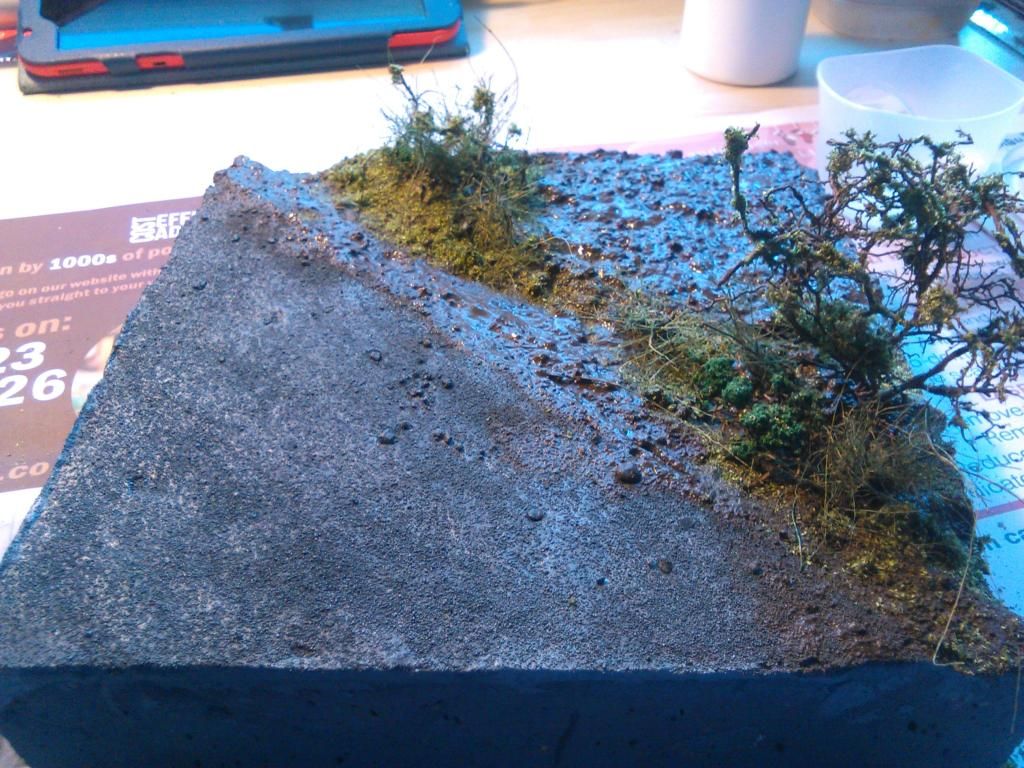
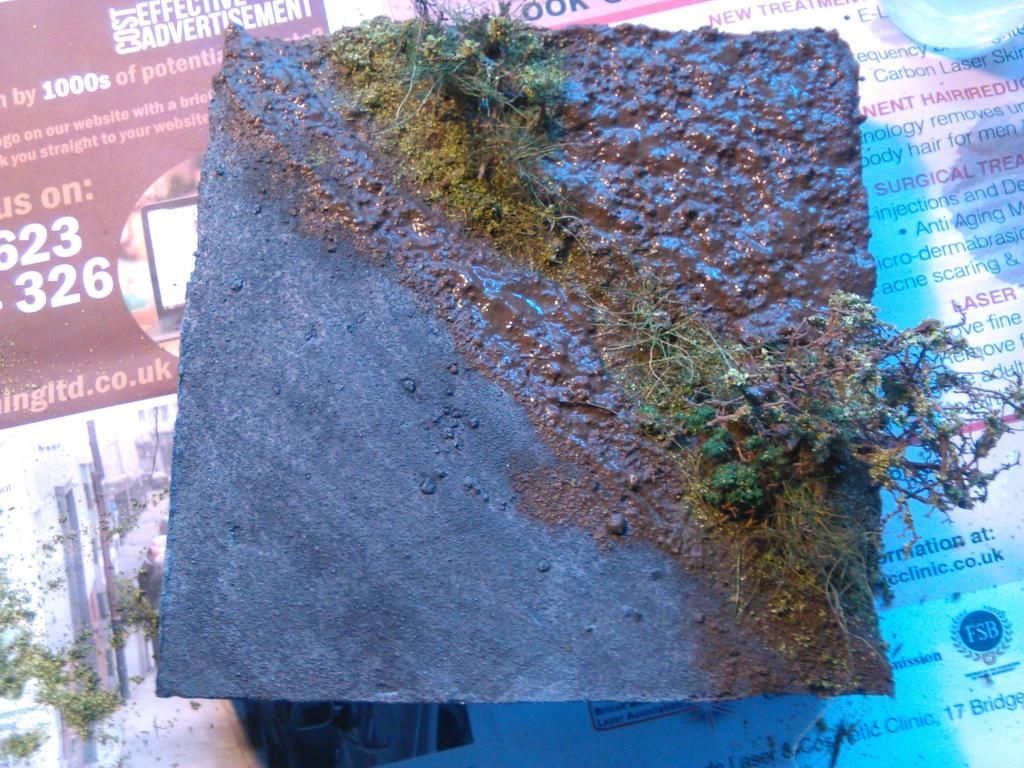
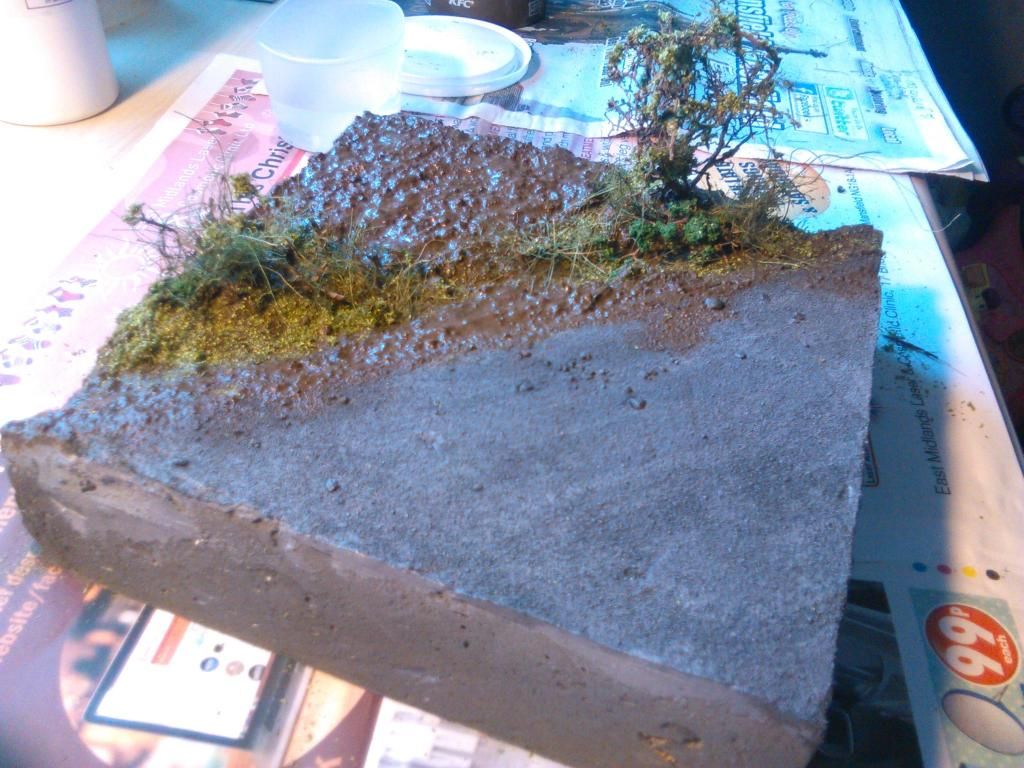
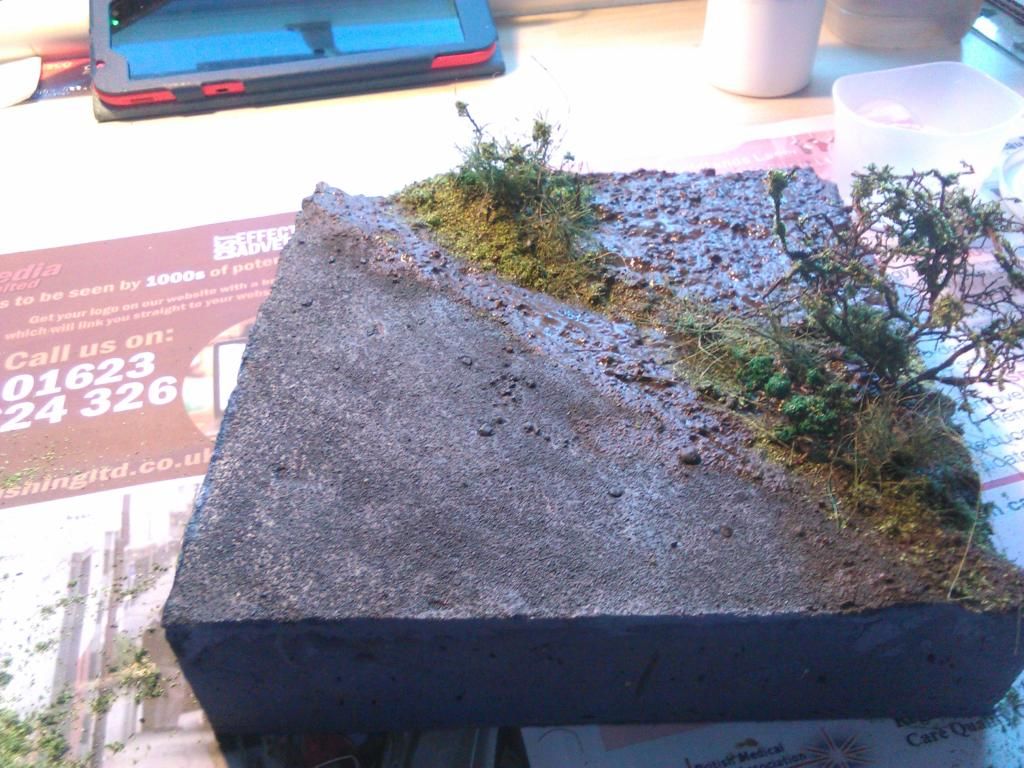
Firstly, and just for a break from the norm, i decided to create some grasses and small bush type bits for the dio....

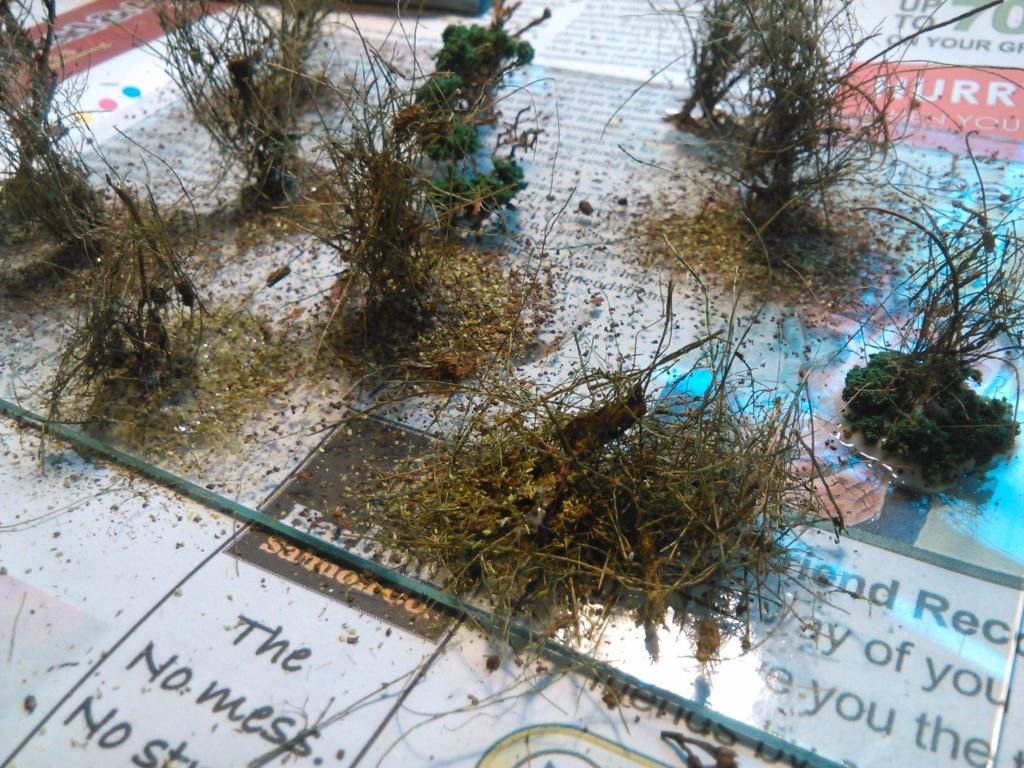
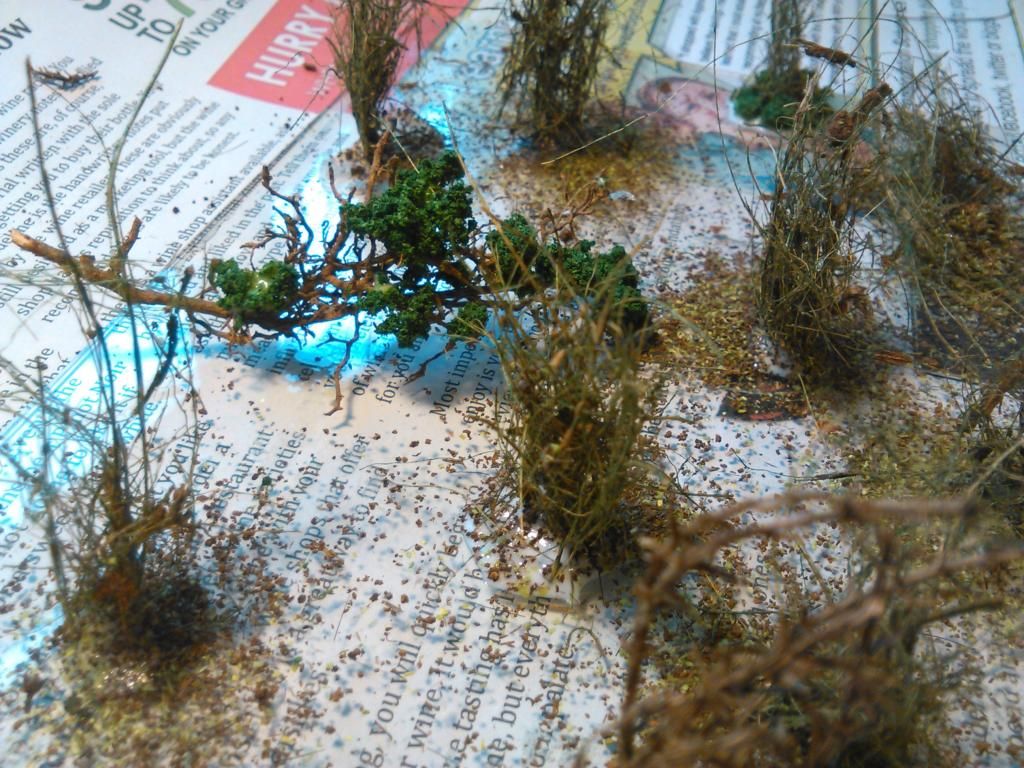
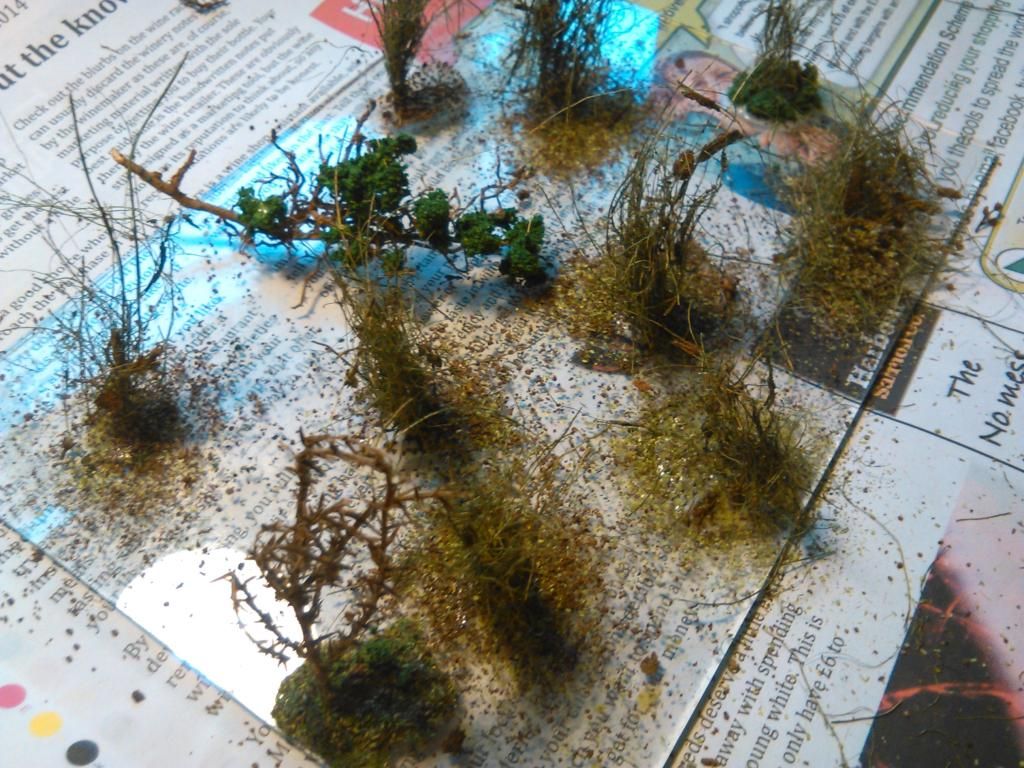
Everything goes into my grass patches.... including dried tea-leaves ...
...
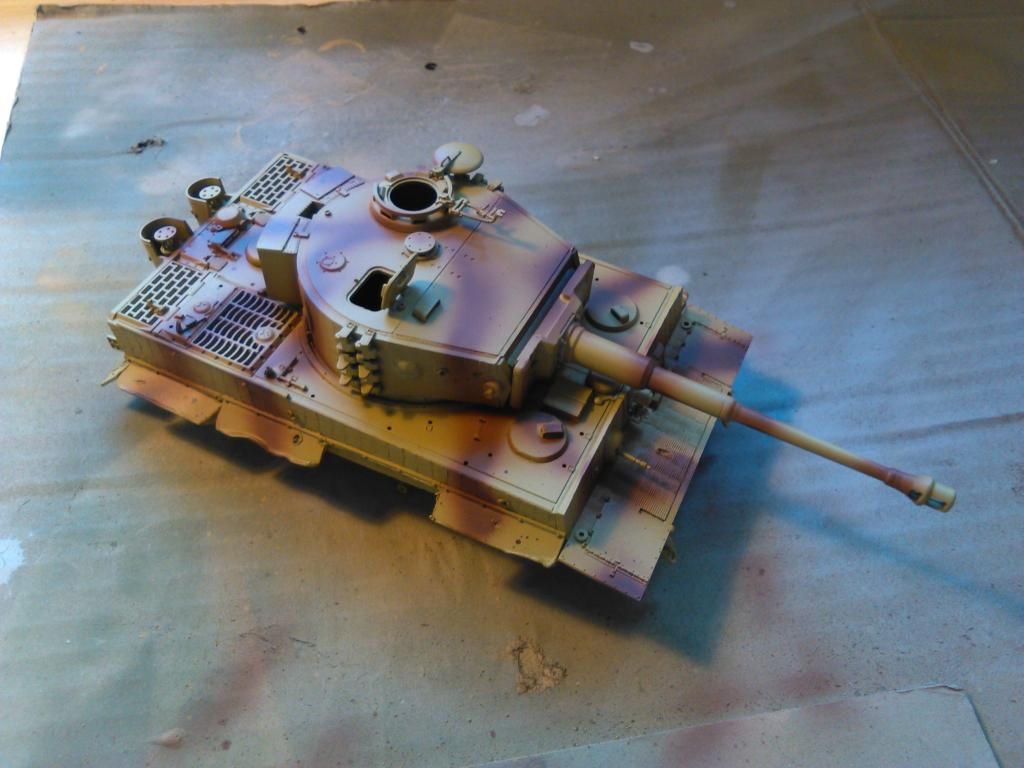
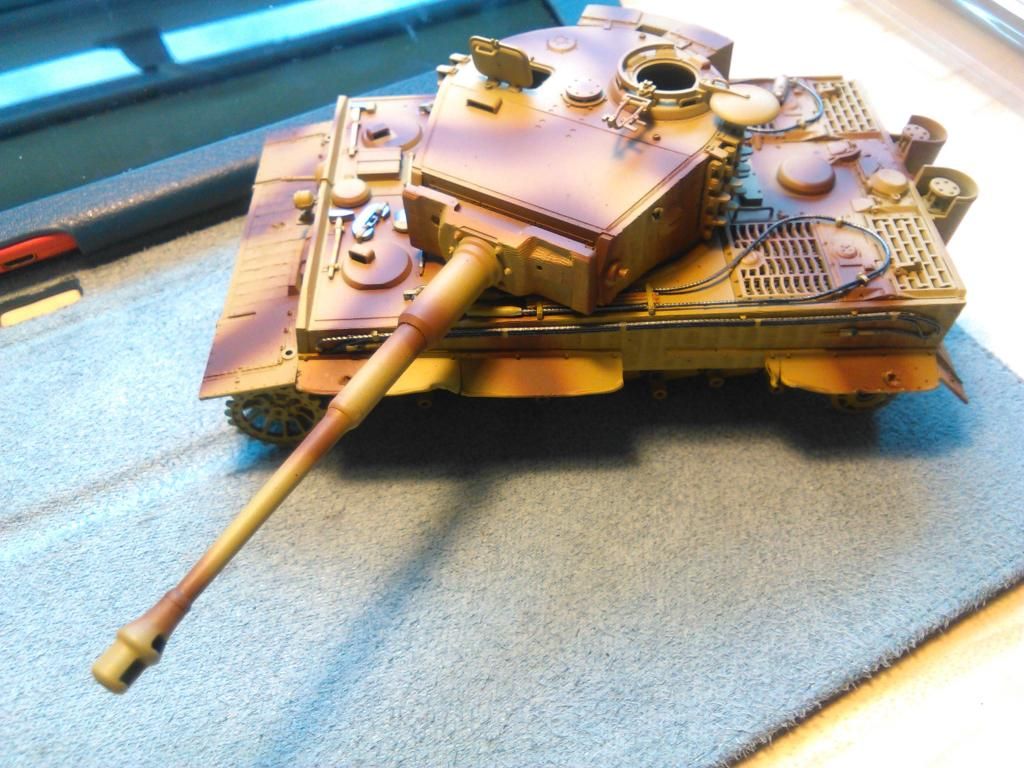
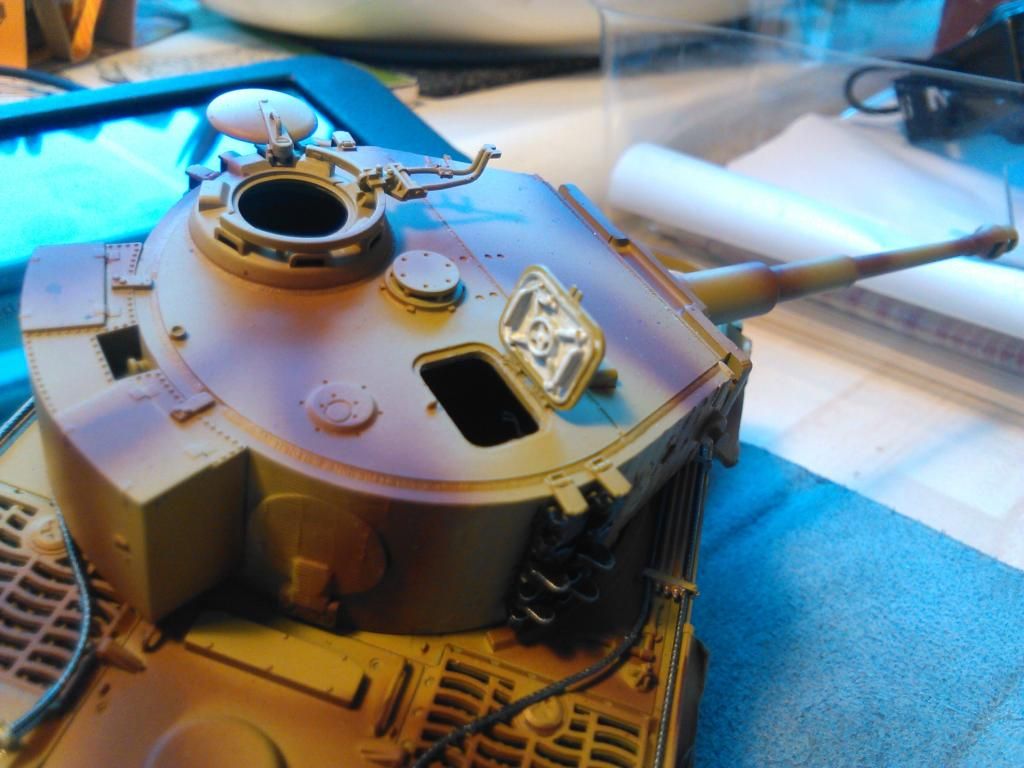
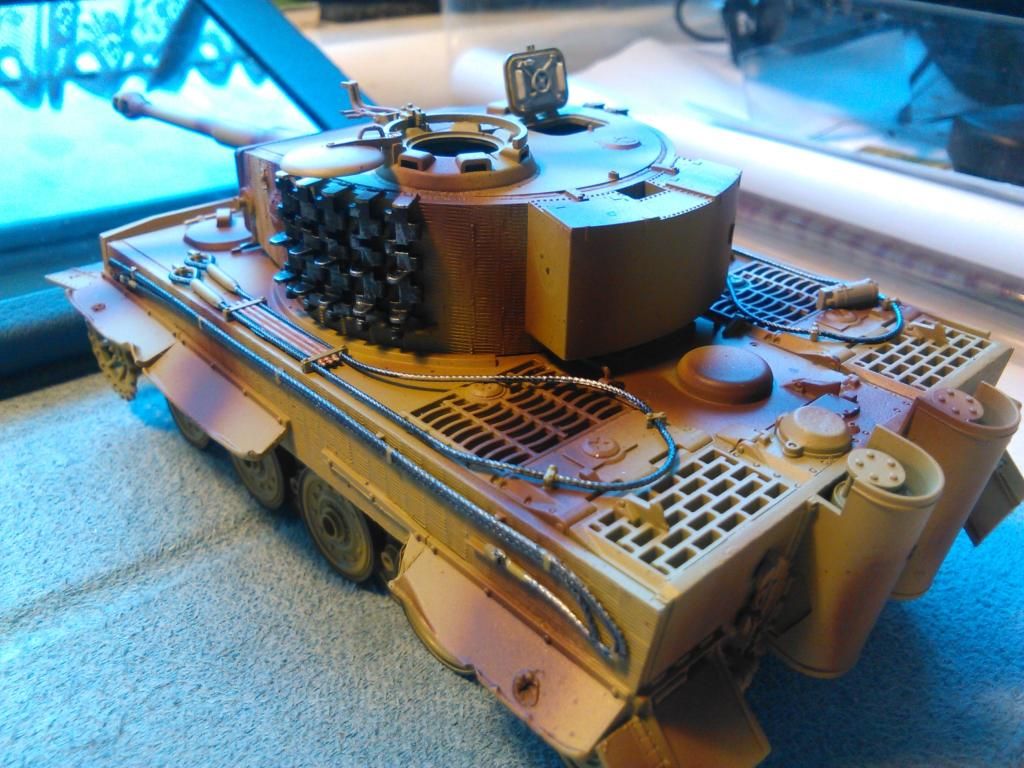
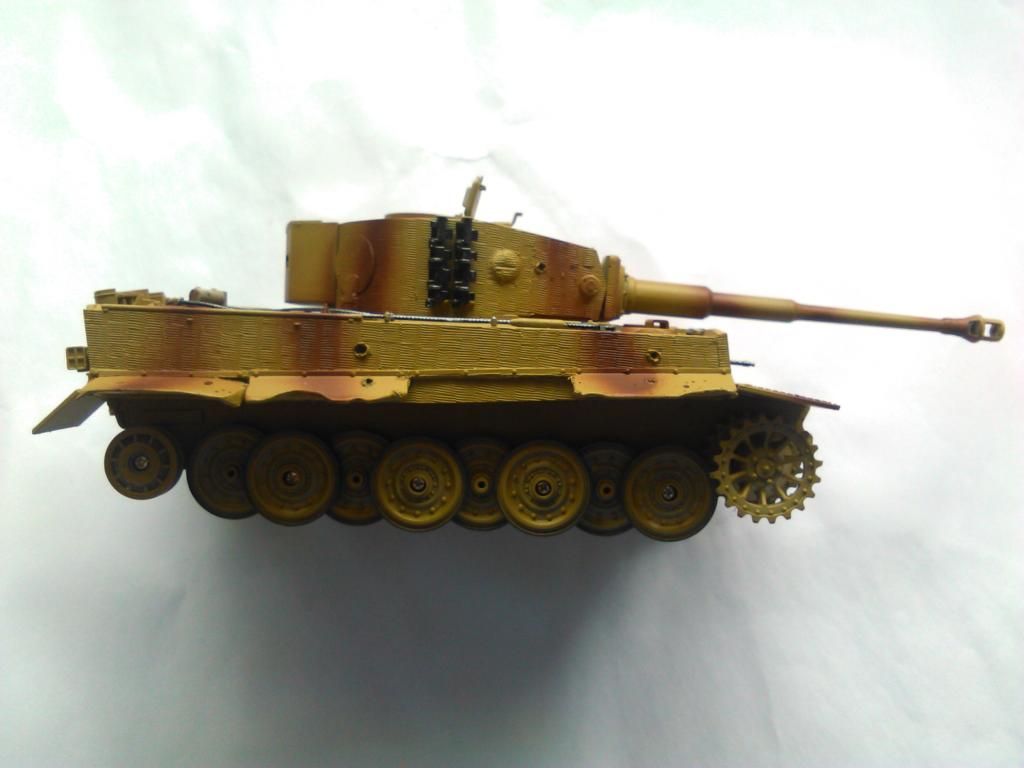
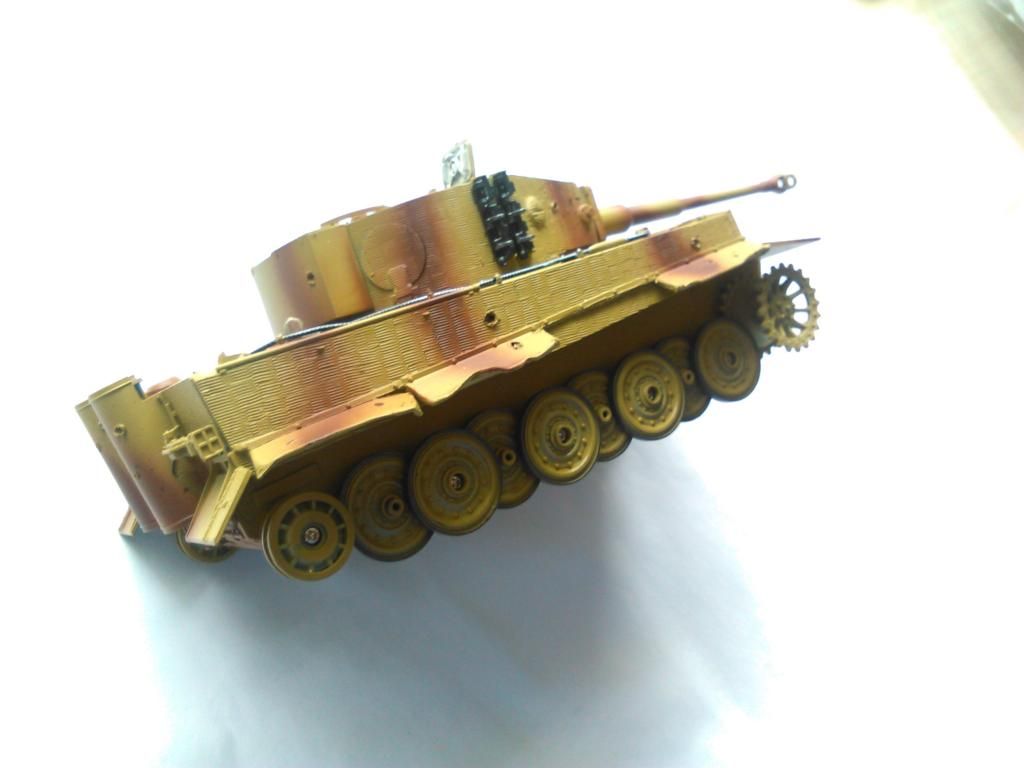
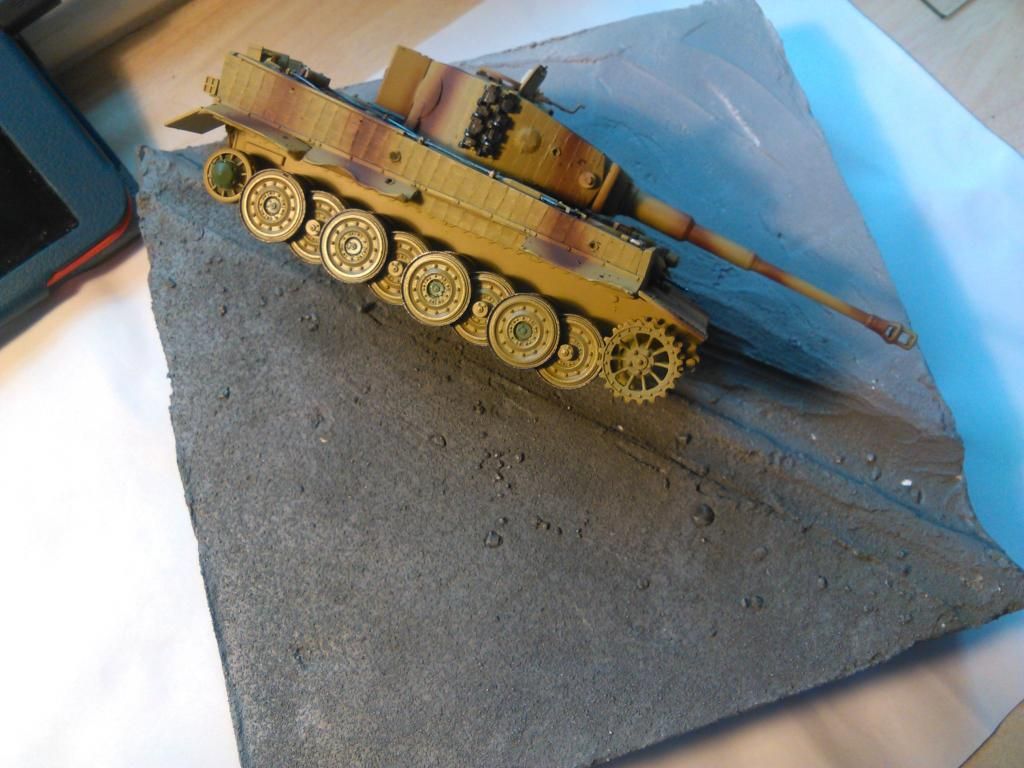
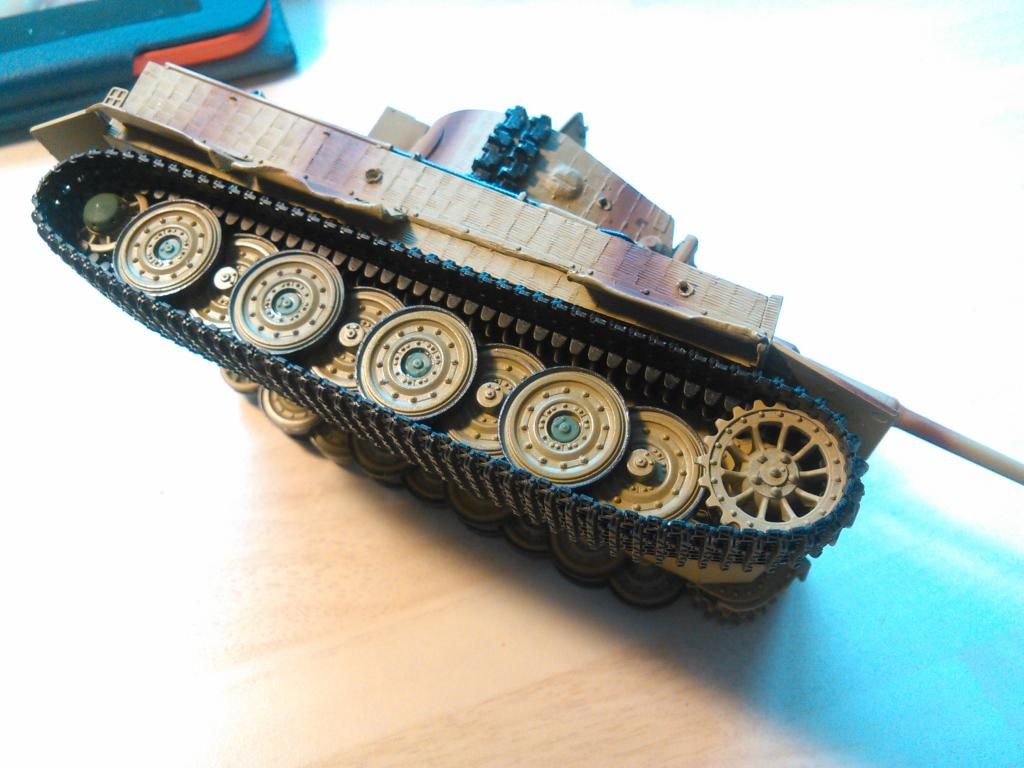
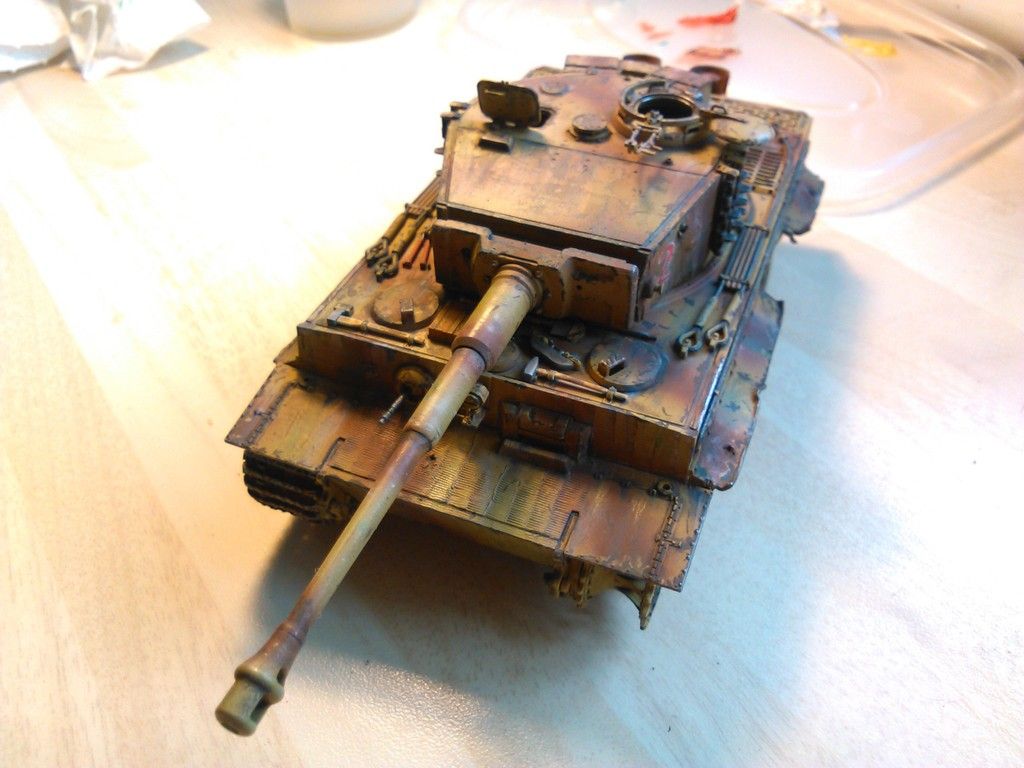
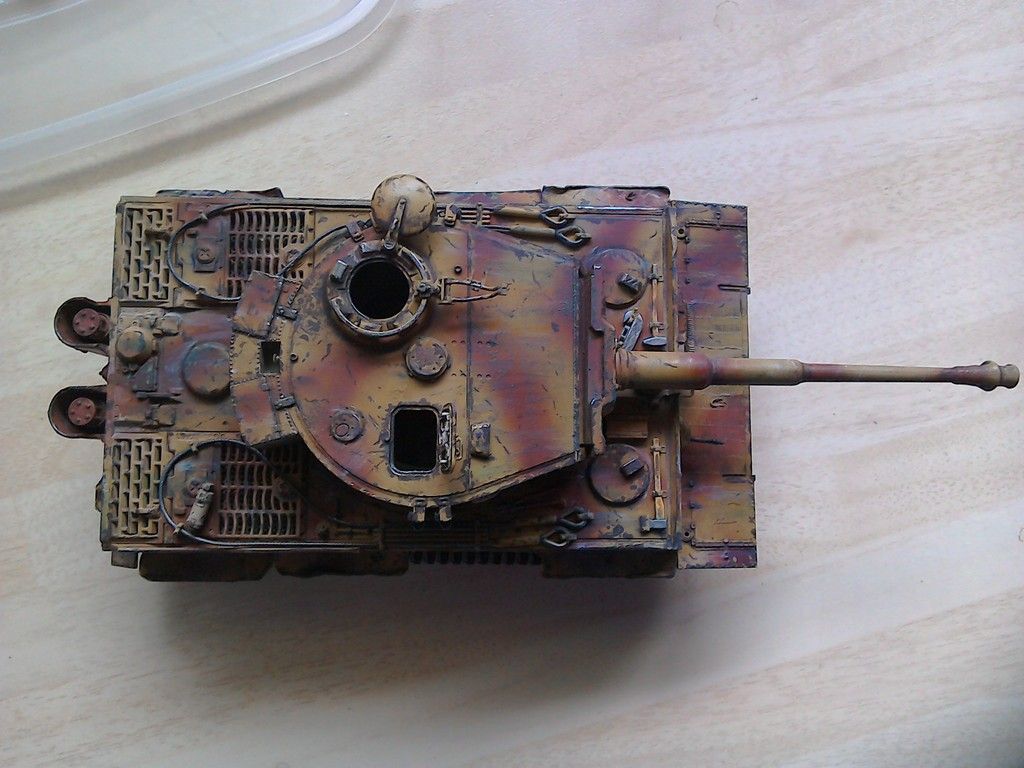
So while practising with the new H&S Ultra, i gave the Tiger a base coat of dunkelgelb by Vallejo model air..
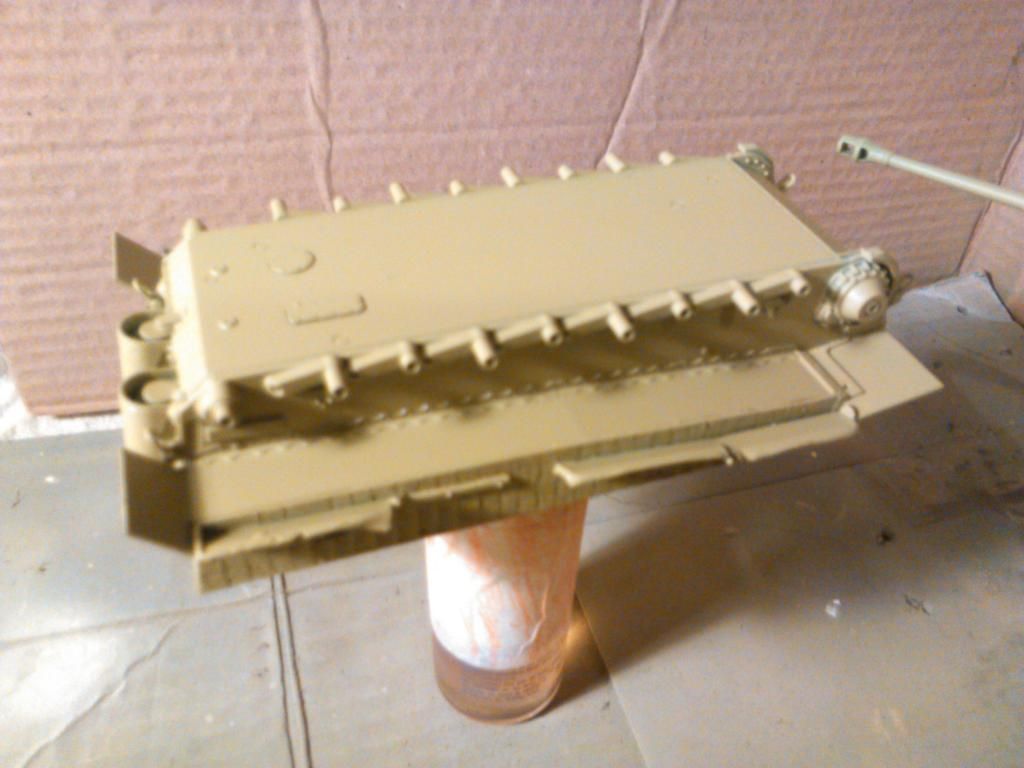
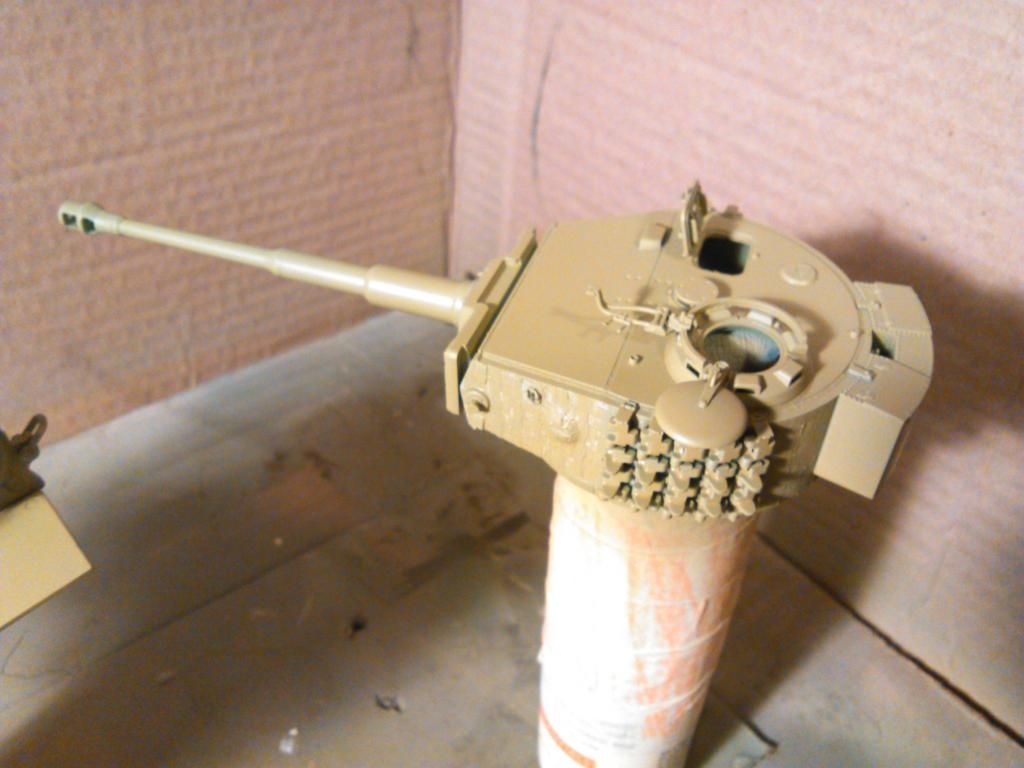

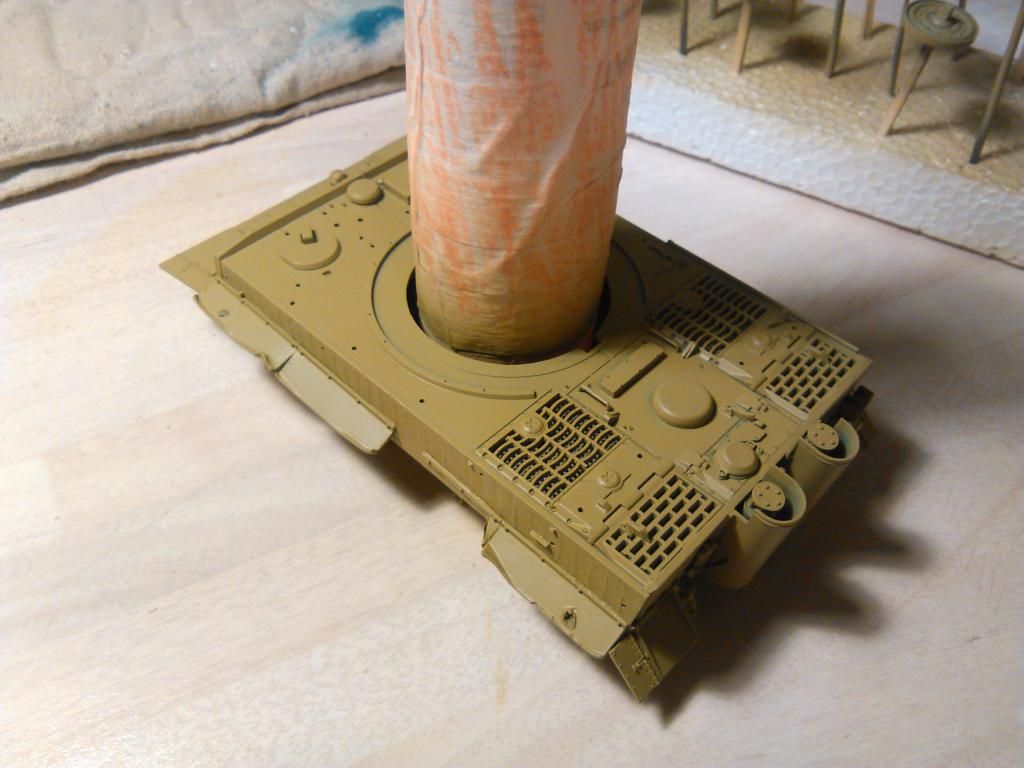
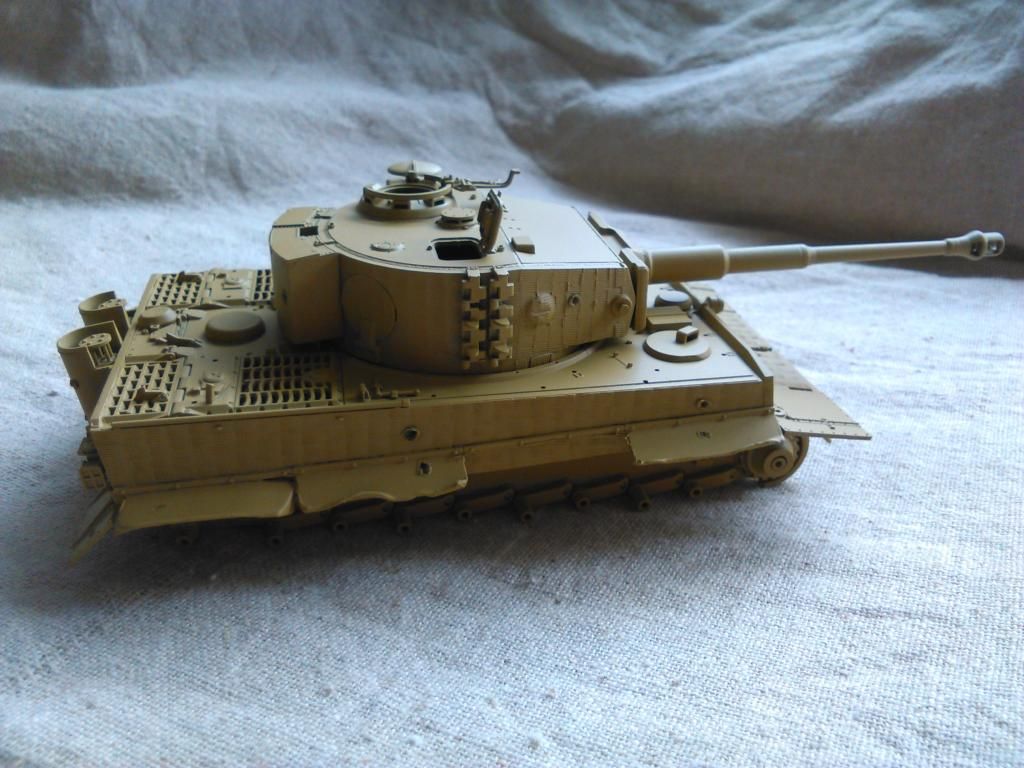
So yeah...... looks about the right colour i guess??....
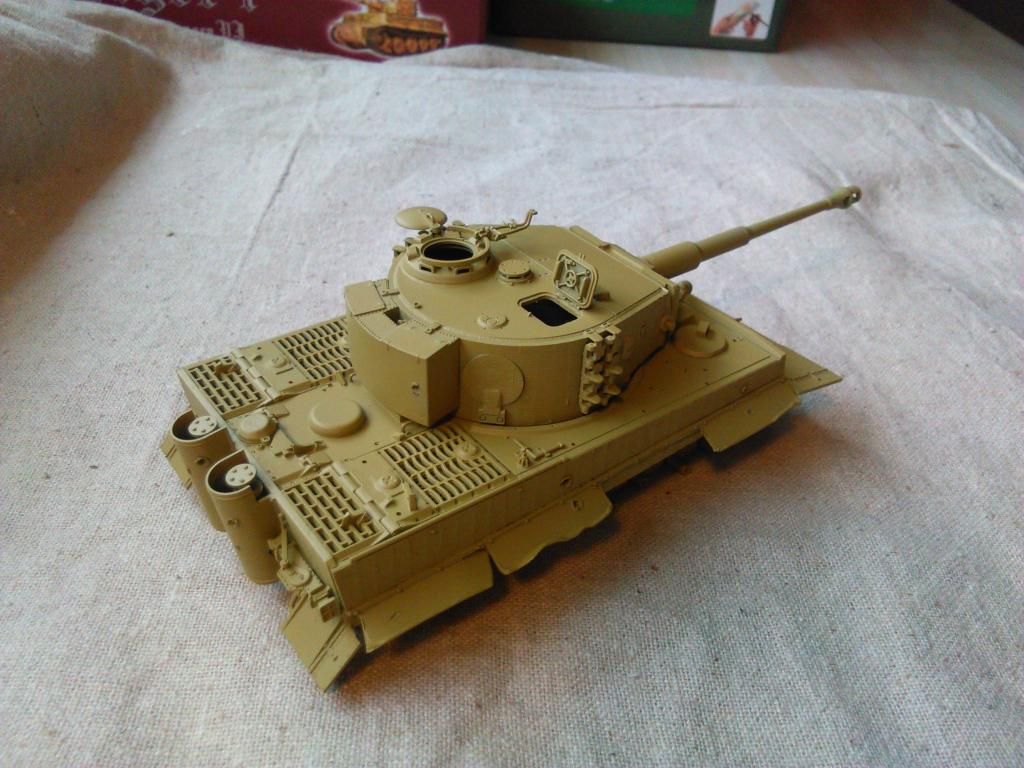
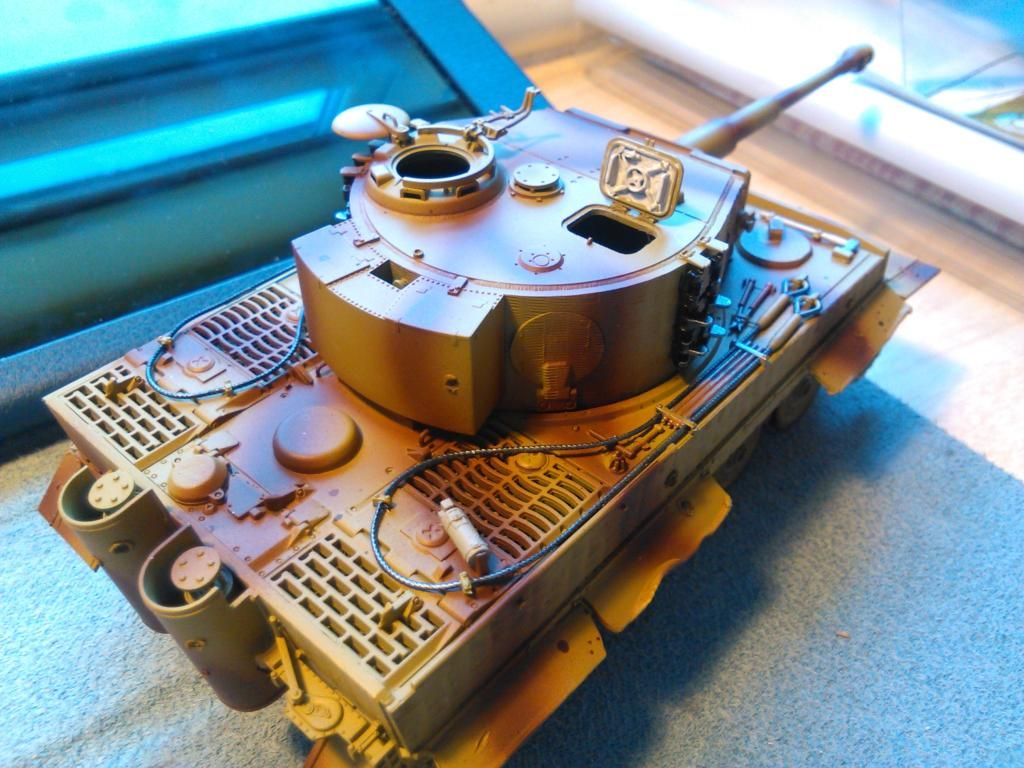
30 pictures later and well... i think it covered okay.... but next is some Camo type work and i am gonna try to NOT paint thick dark brown lines all over it... Light, gentle lines are what i am hoping for... Never attempted free hand camo before.....
So we will do some work on the figure while i pluck up courage to spray DunkelBraun on it...
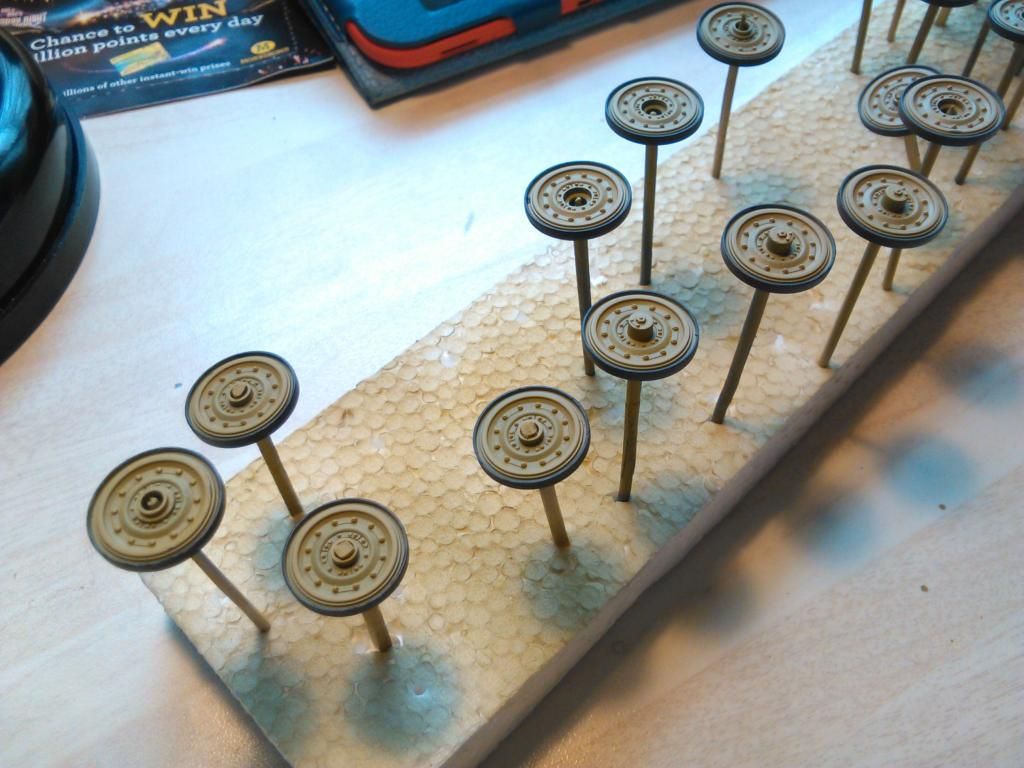
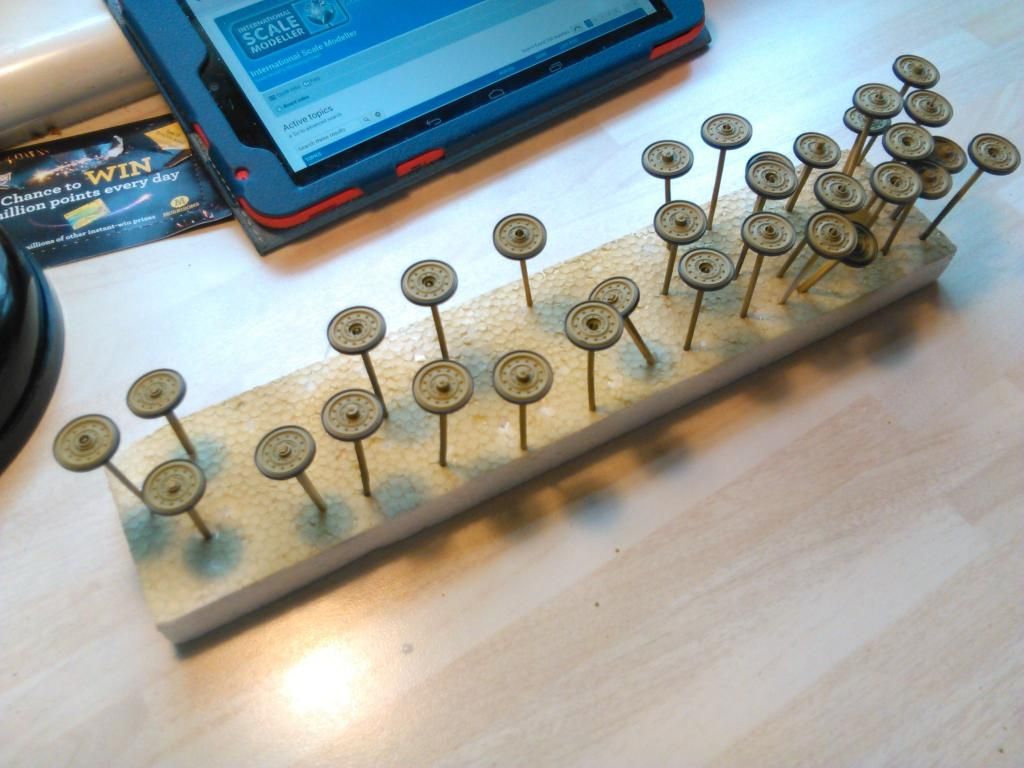
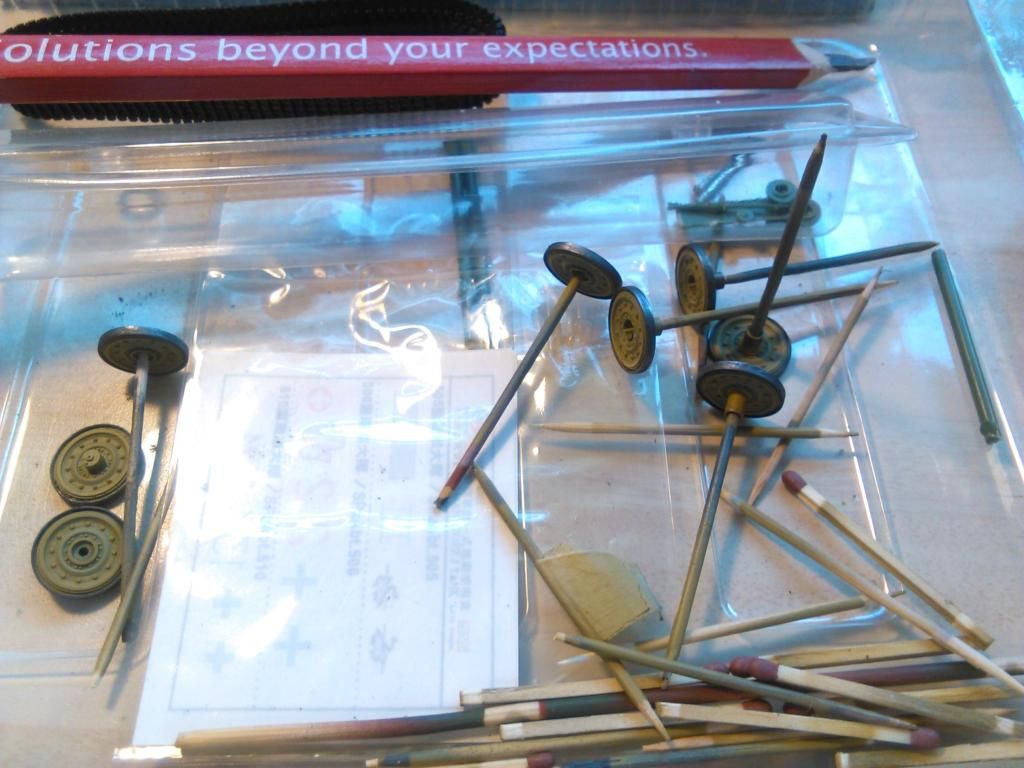
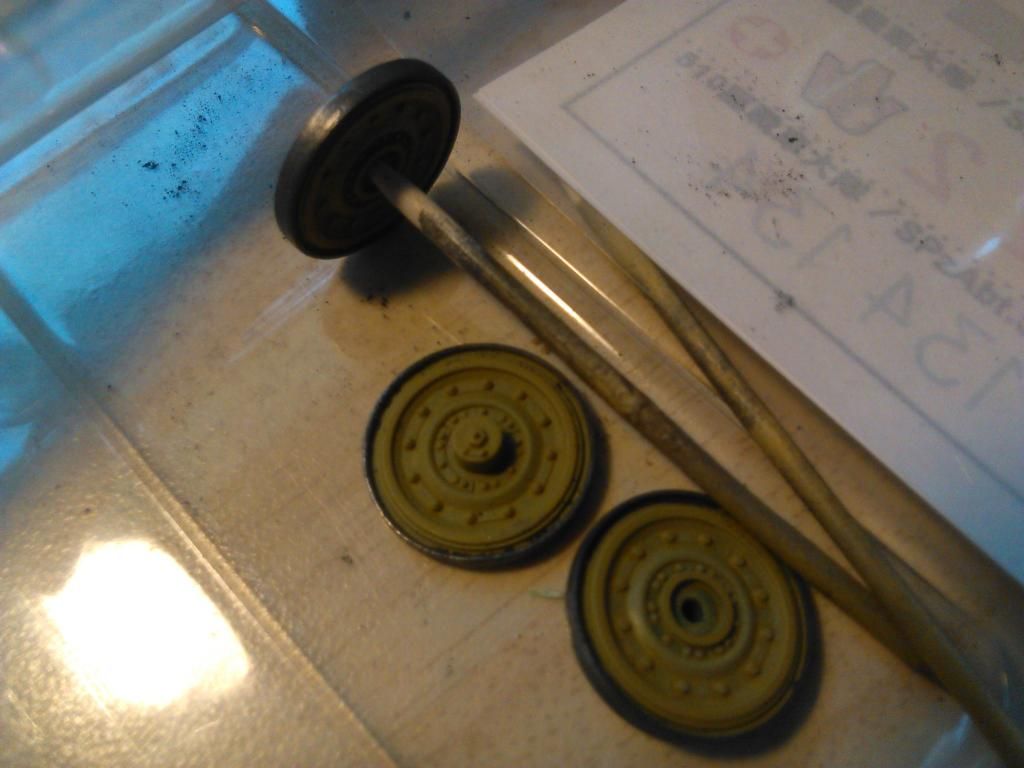
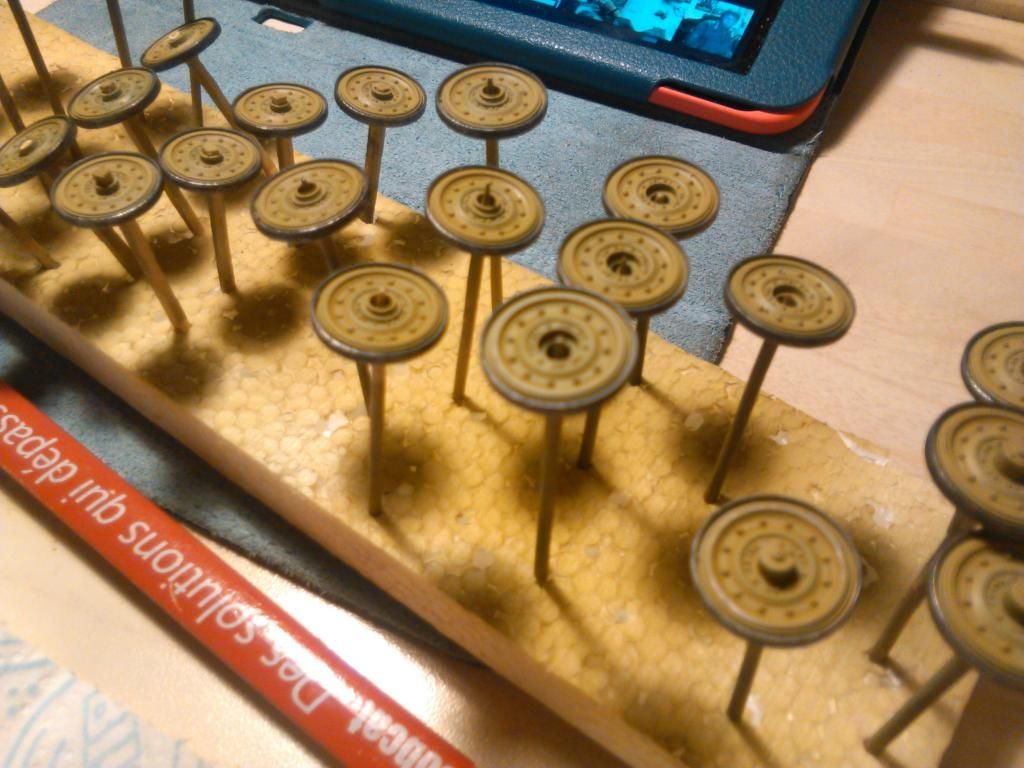
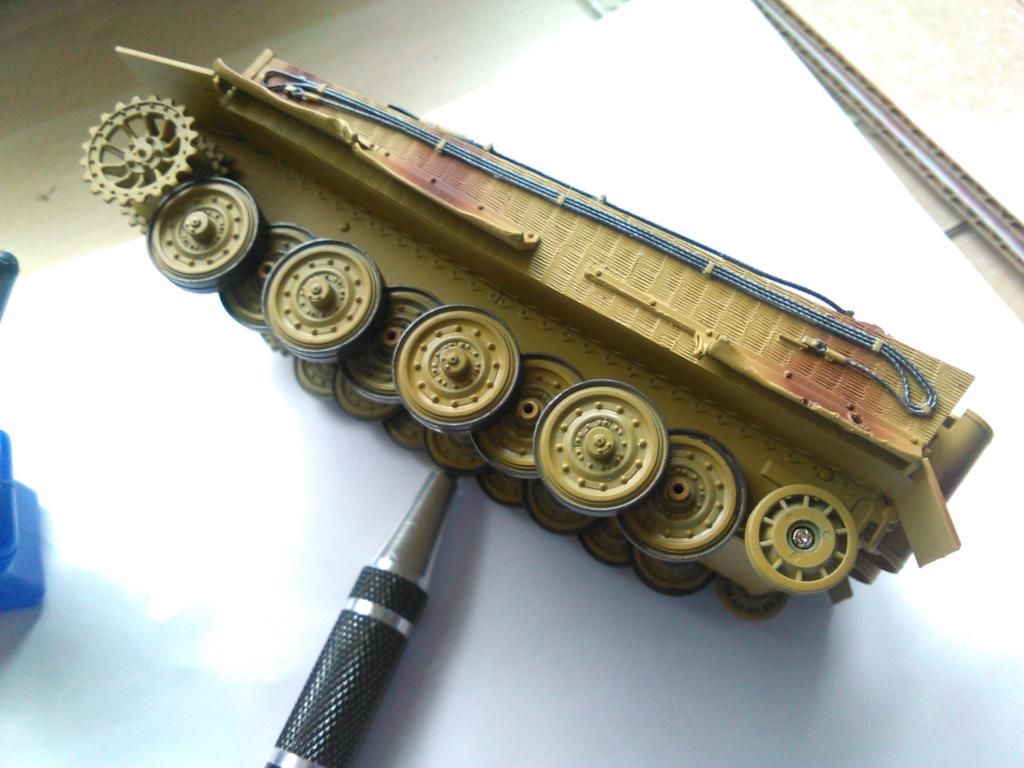
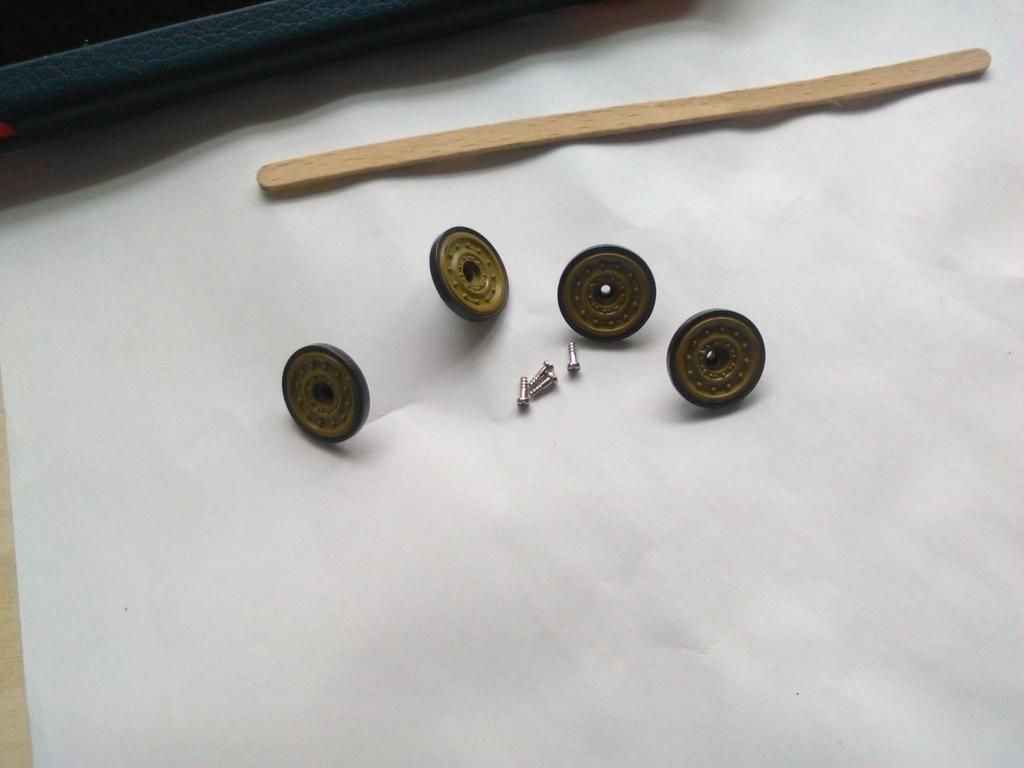
Erm... maybe some rubber tyres first while they are to hand.....

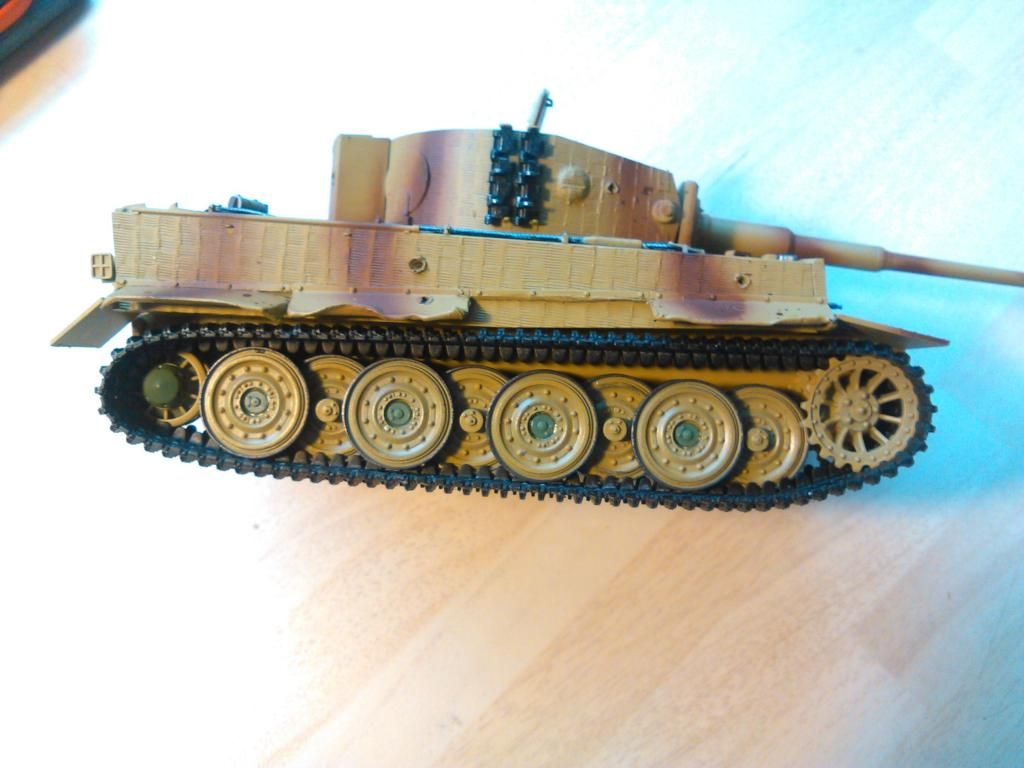
Now we can paint the figure.... All vallejo colours... mid flesh, black, Khaki and Olive drab. My only low is the fact i cannot build teeny spectacles for him to complete the photo look... Pretty close tho', first few pictures are in Artificial light...


Sorry, camera is rubbish at macro pictures....
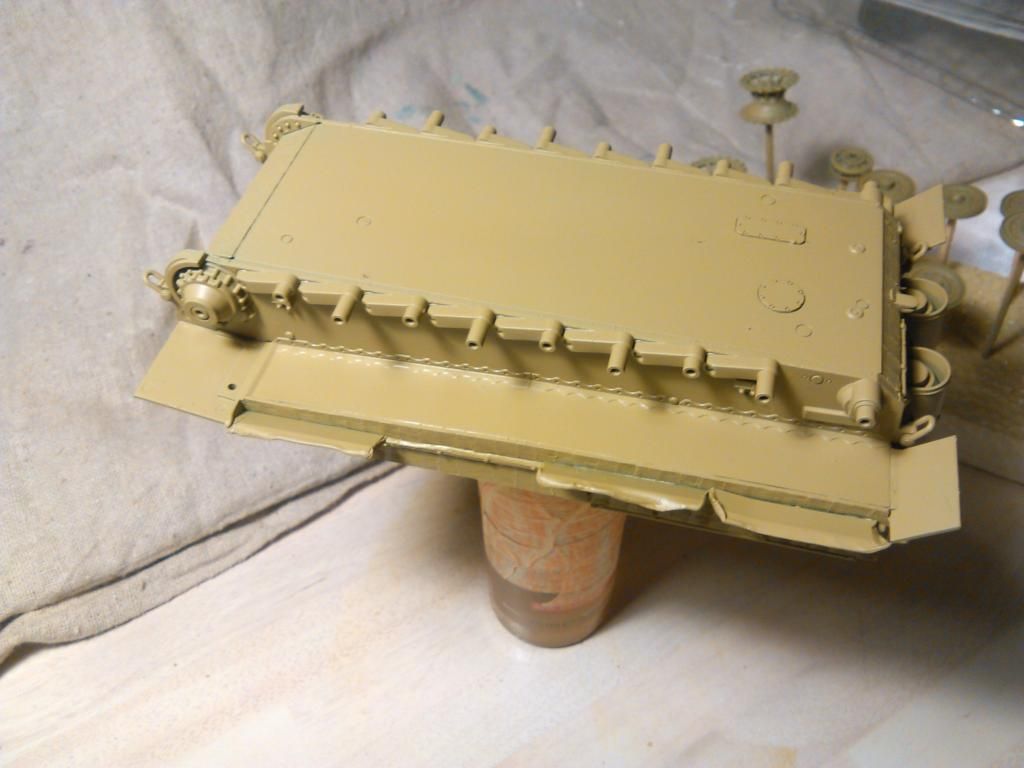
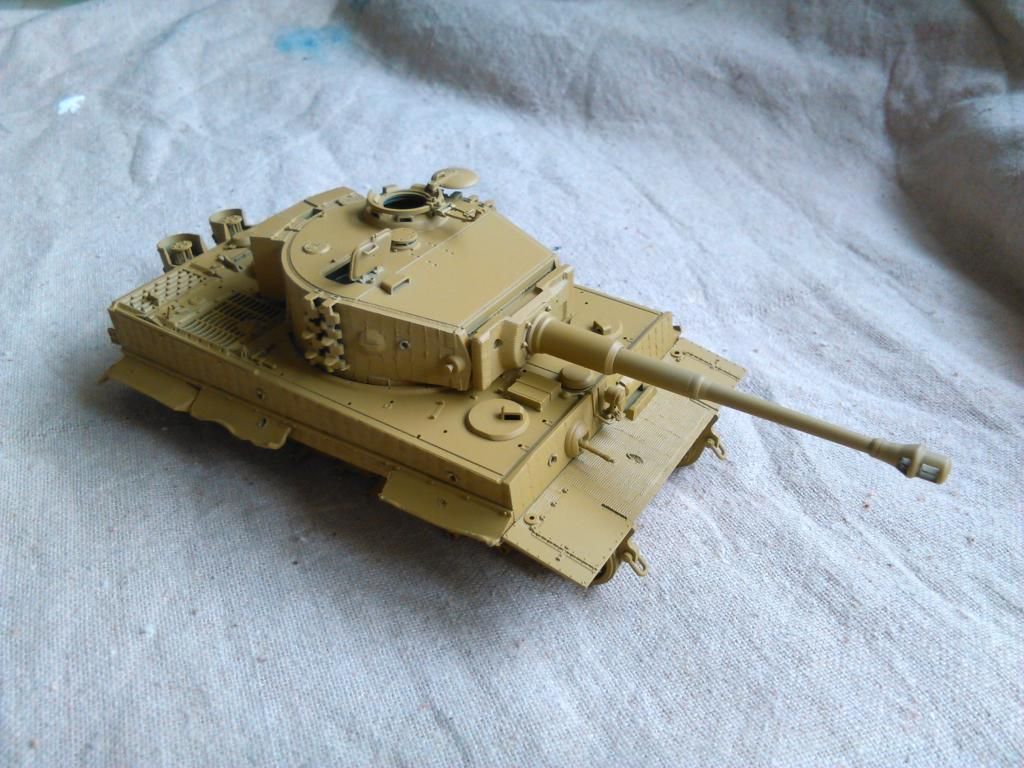
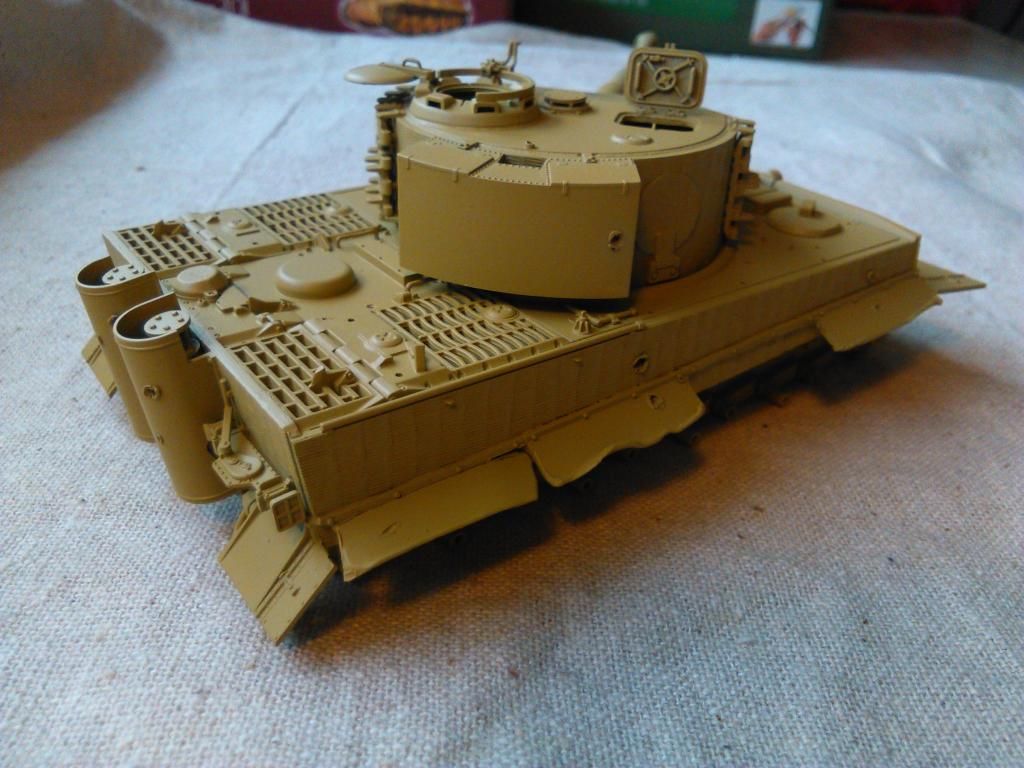
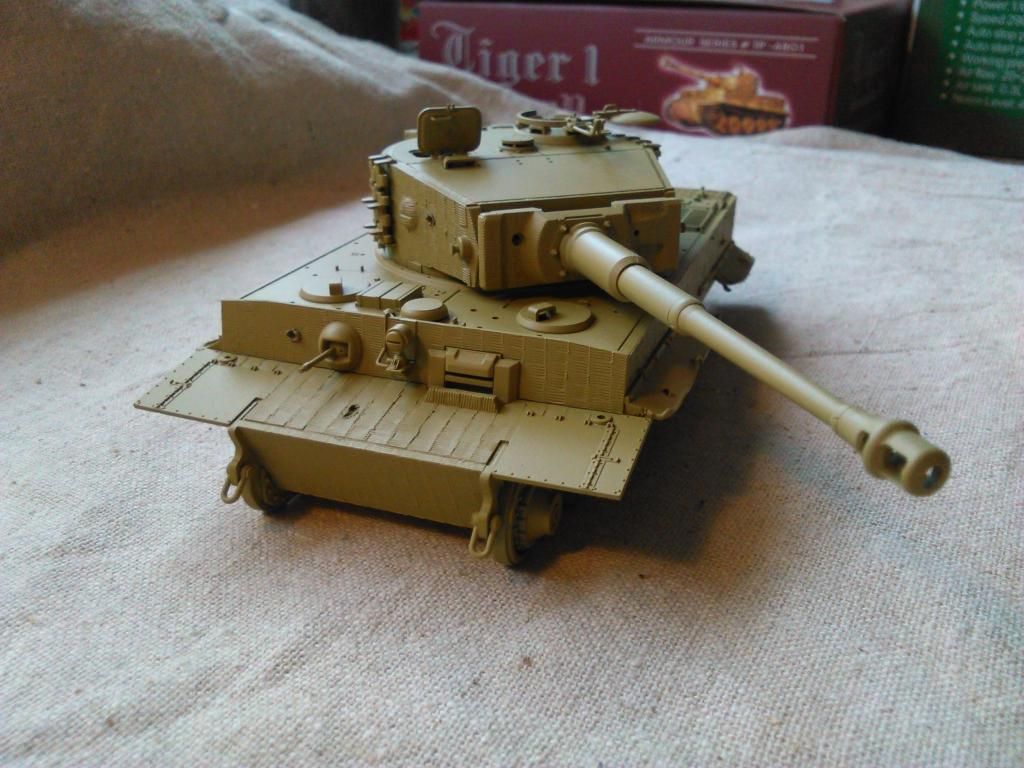
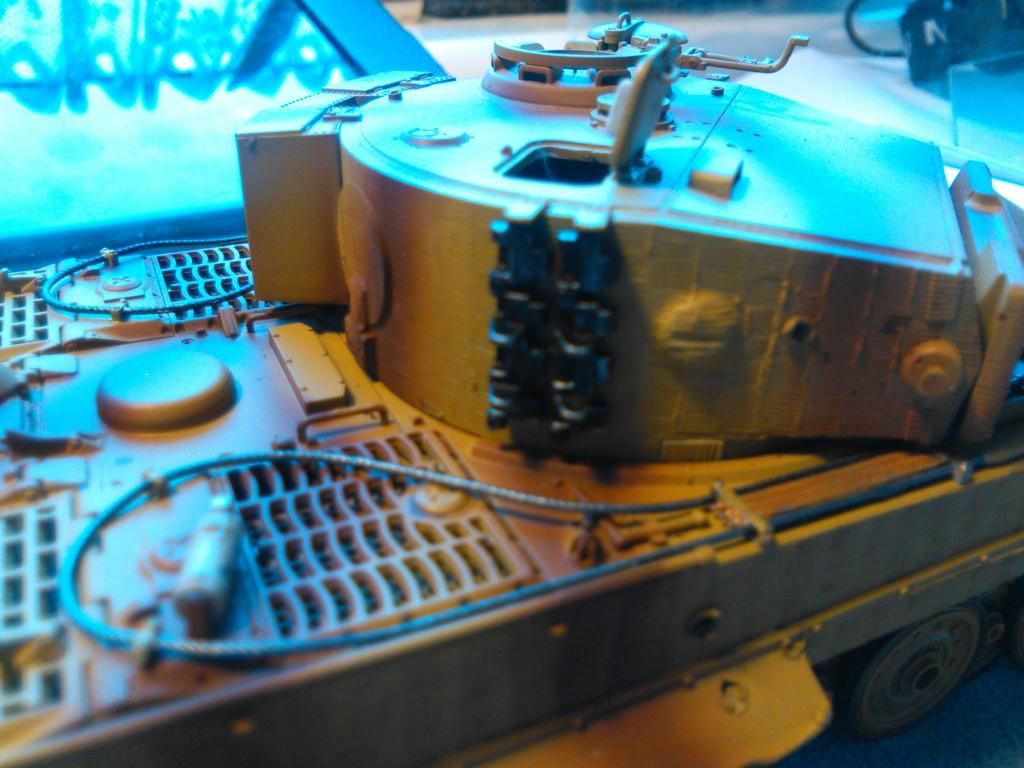
So on with the camo colouring.....


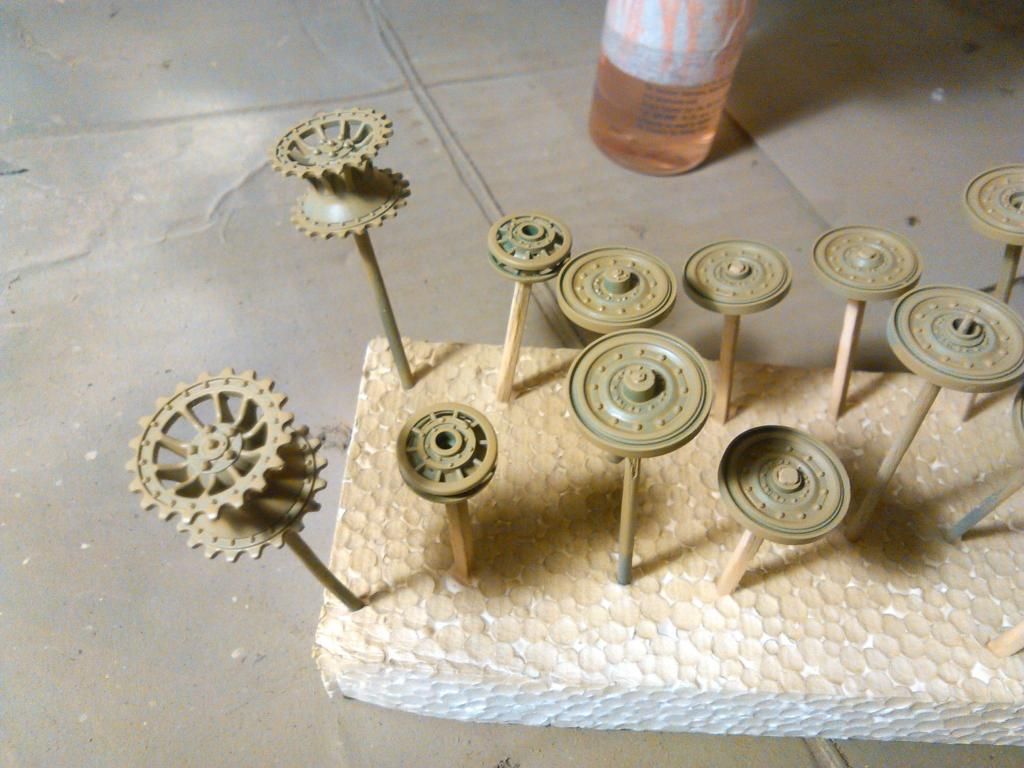
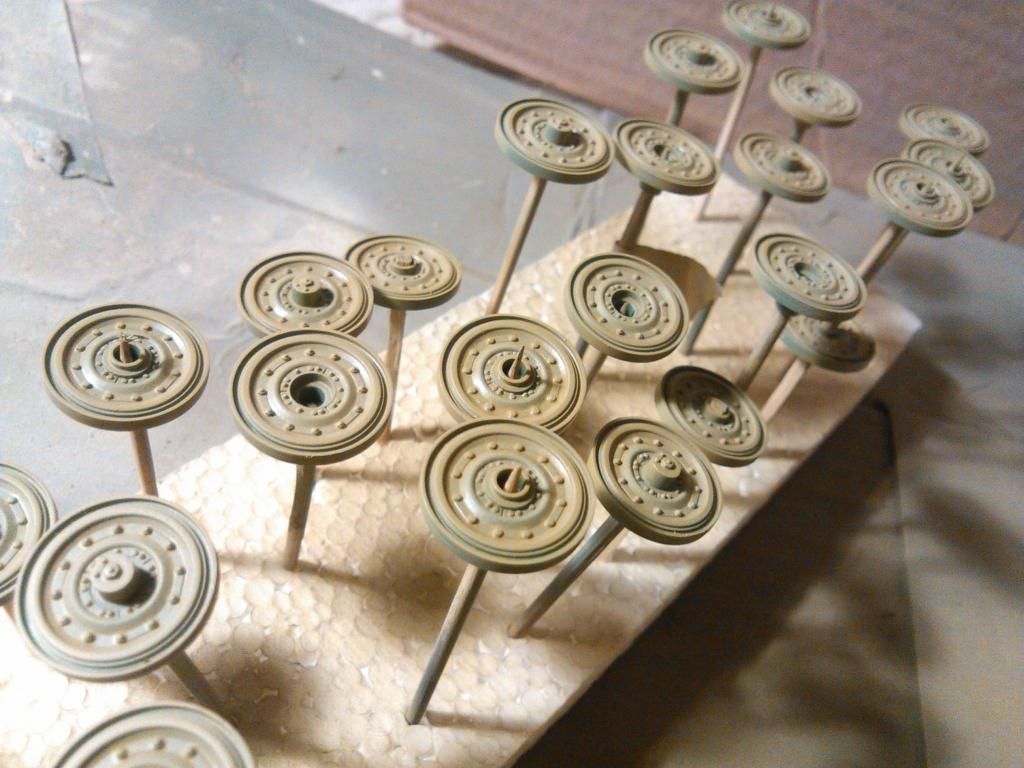
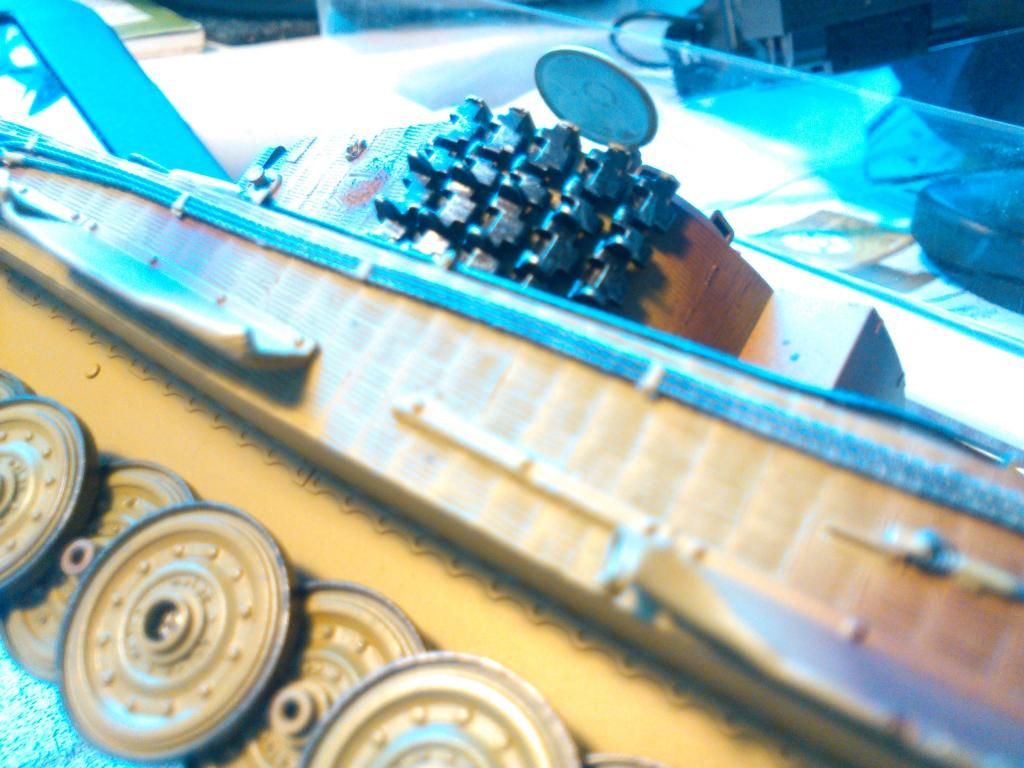
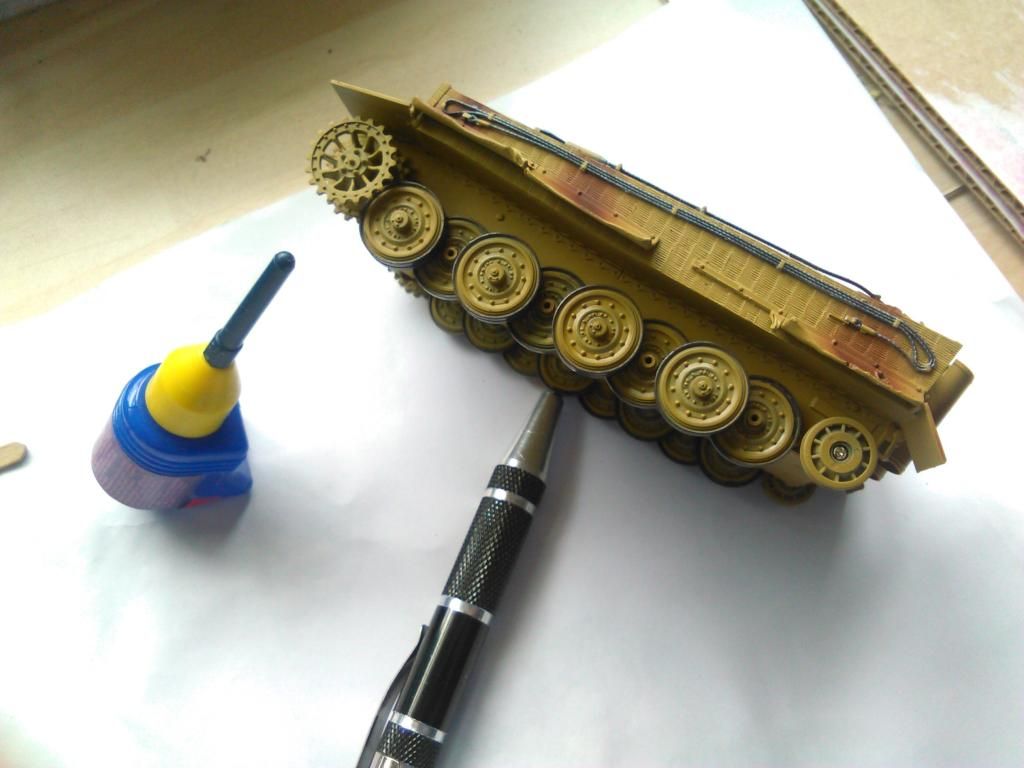
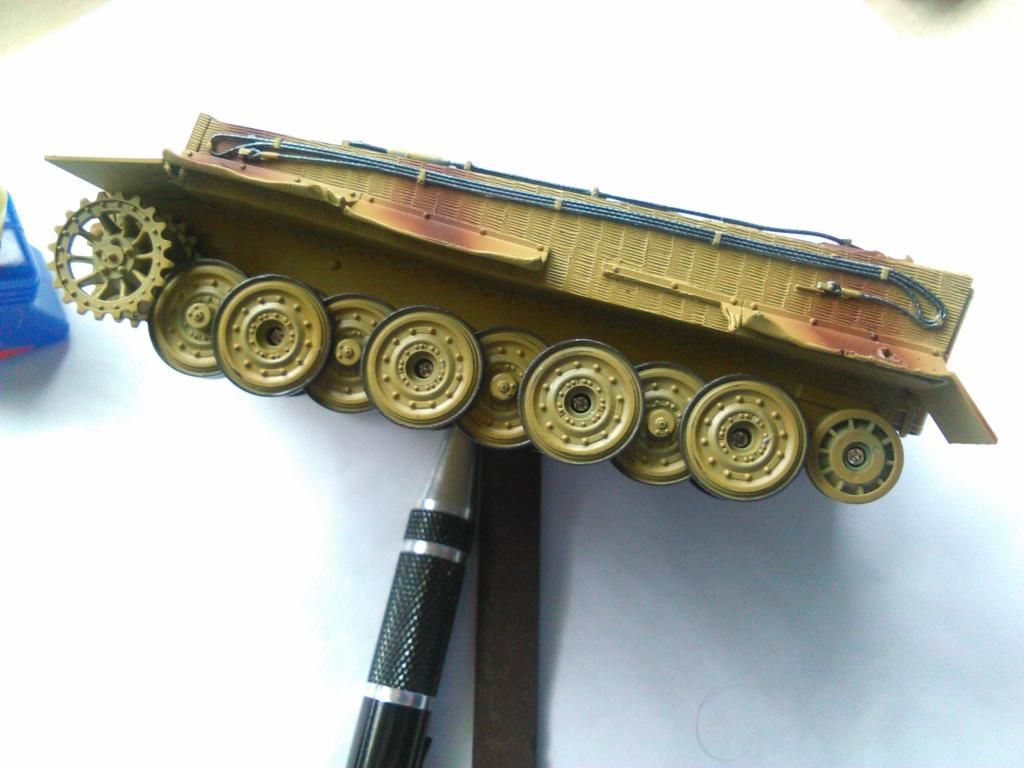
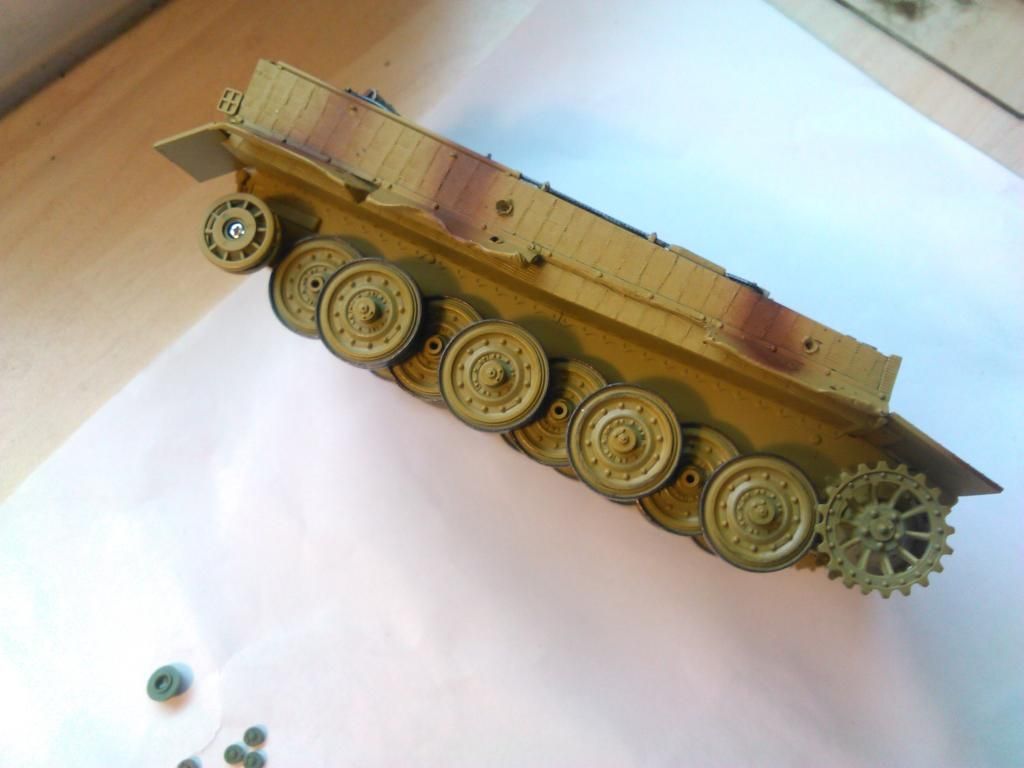
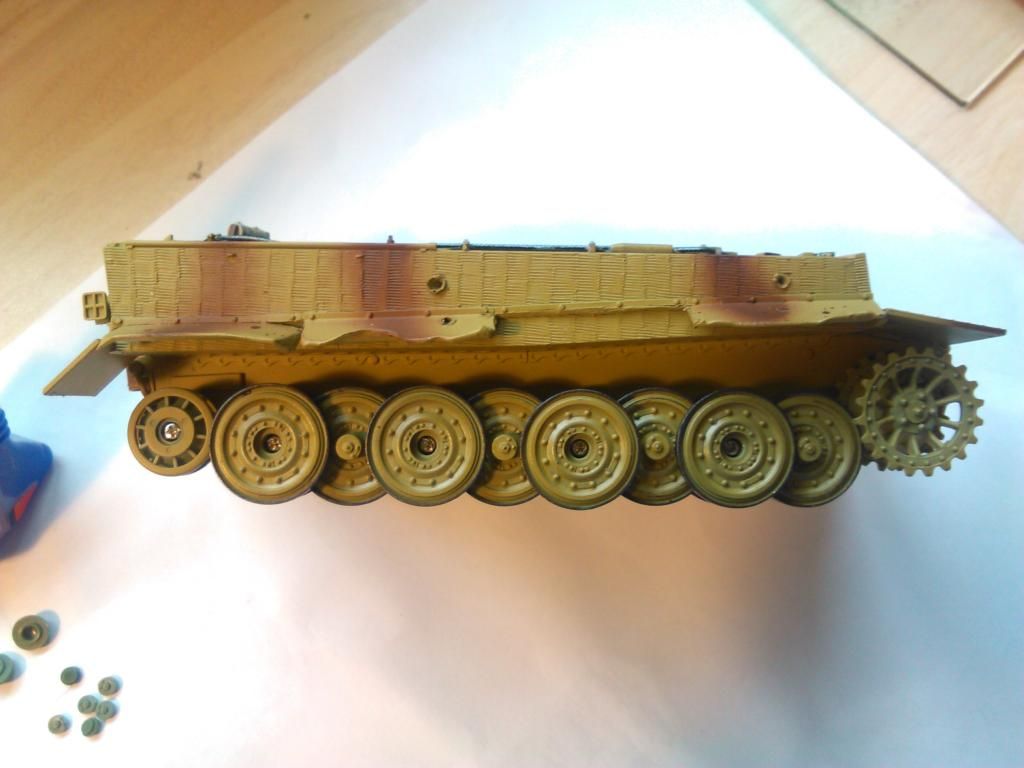
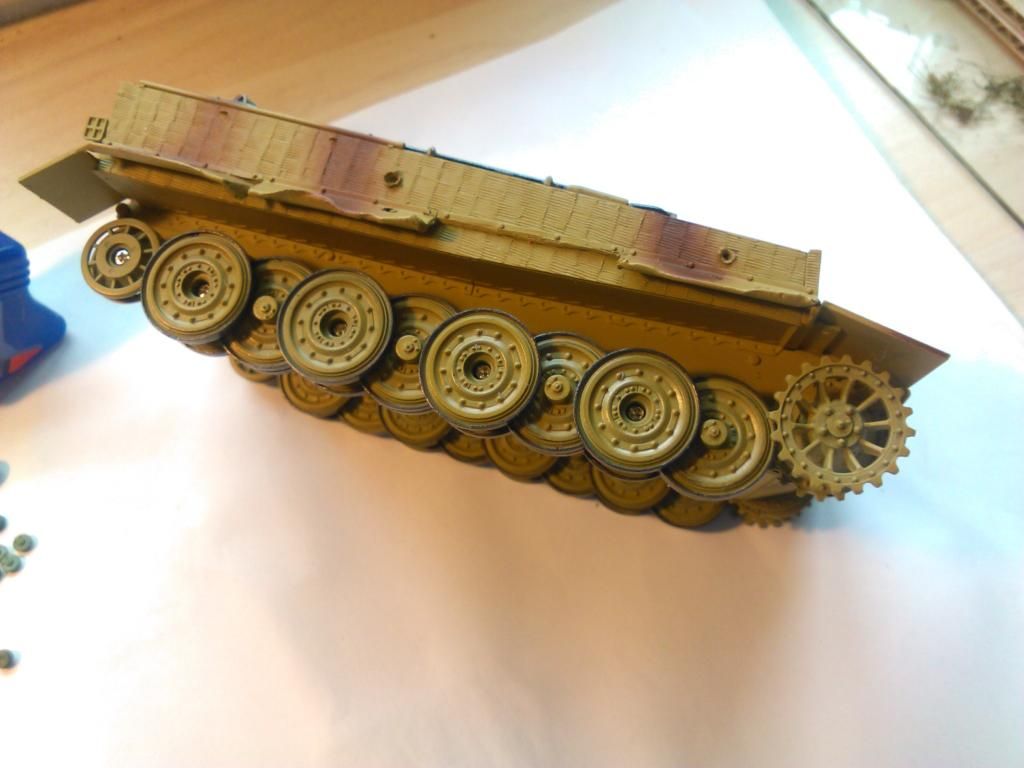
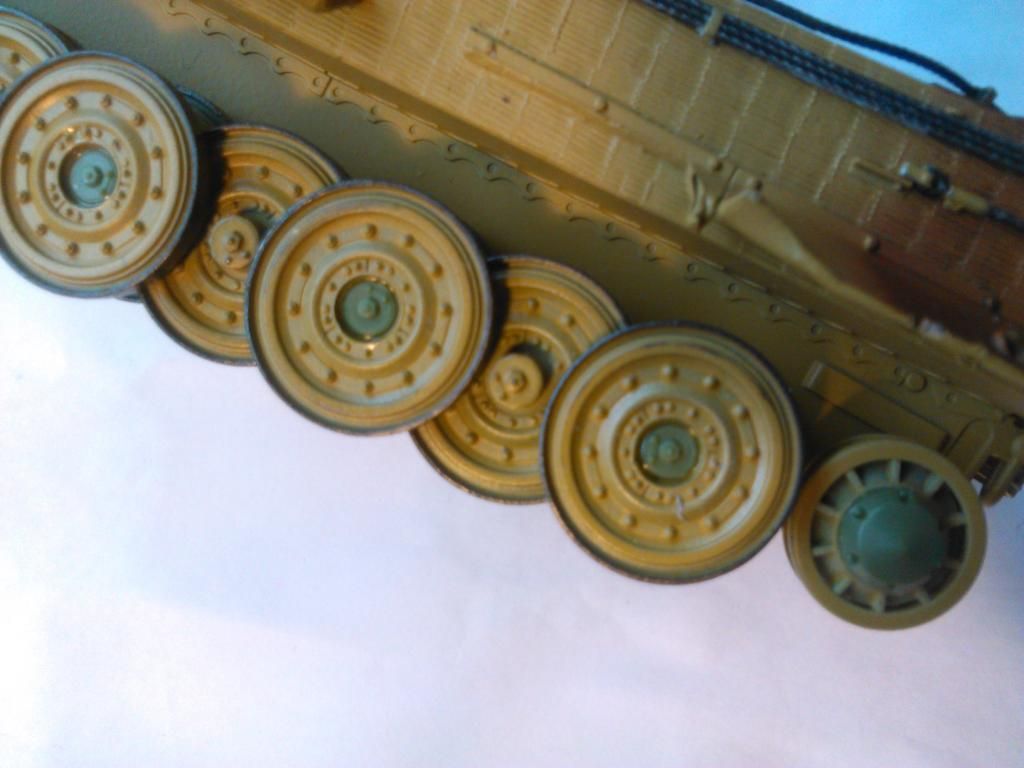
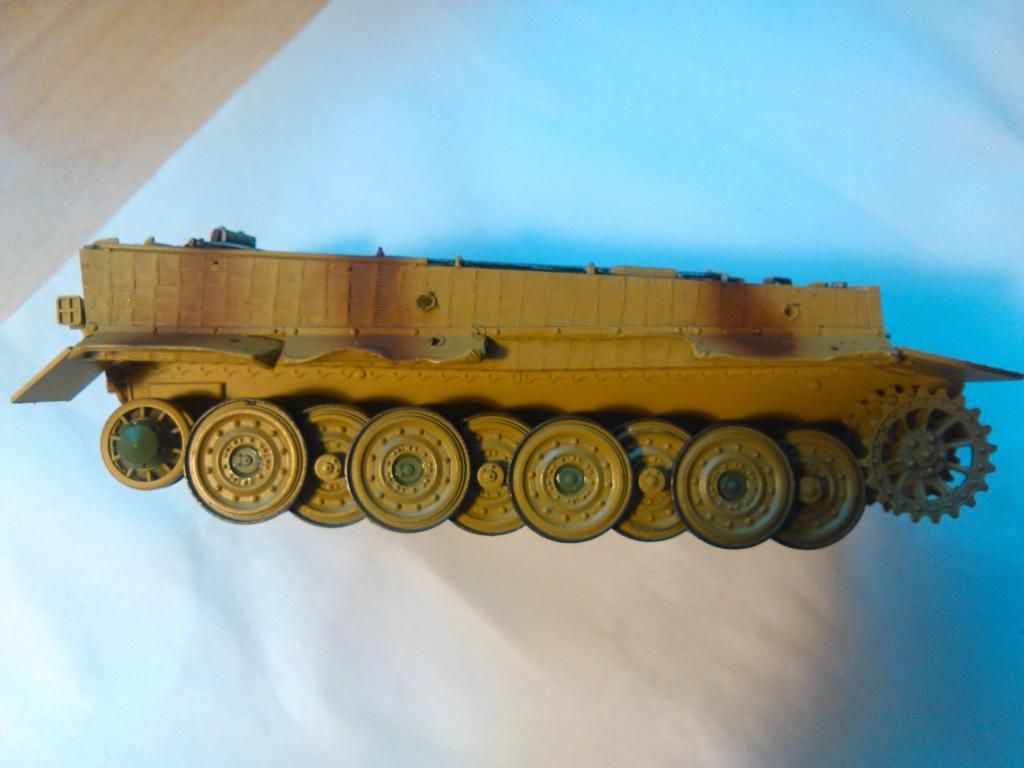
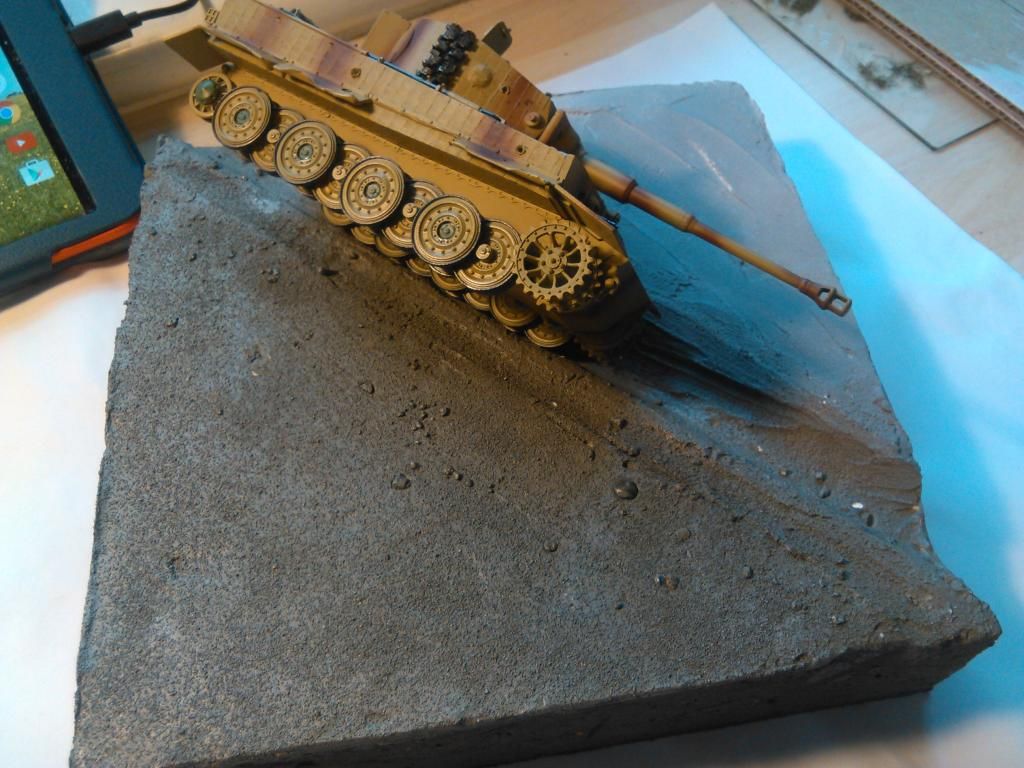
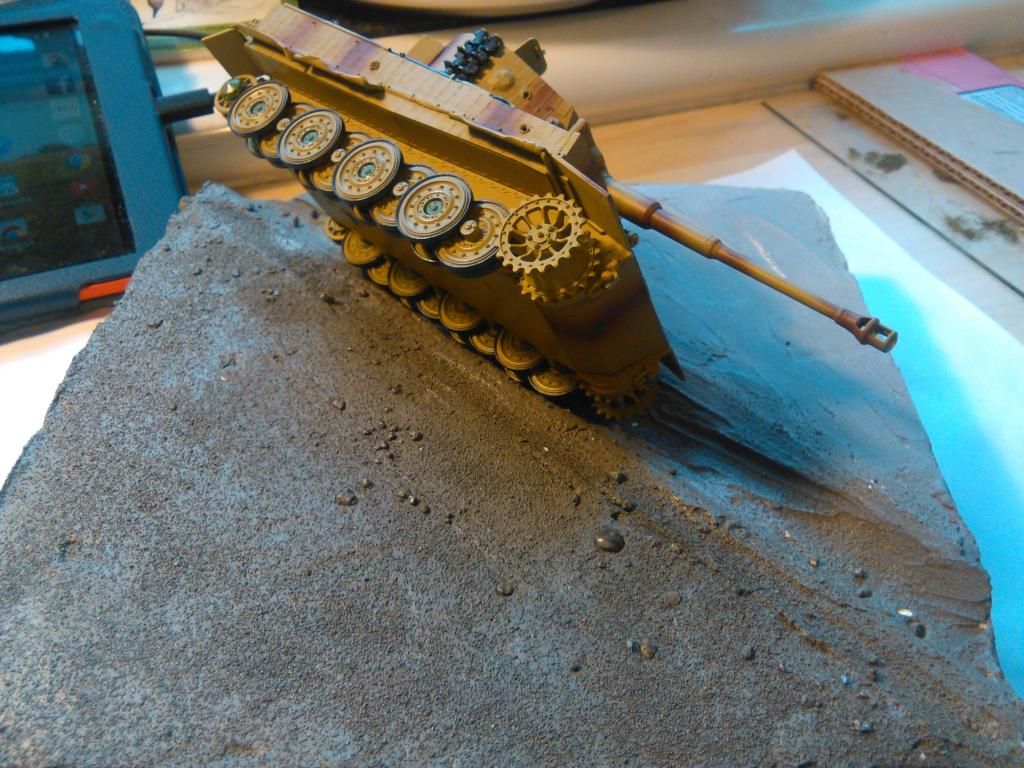
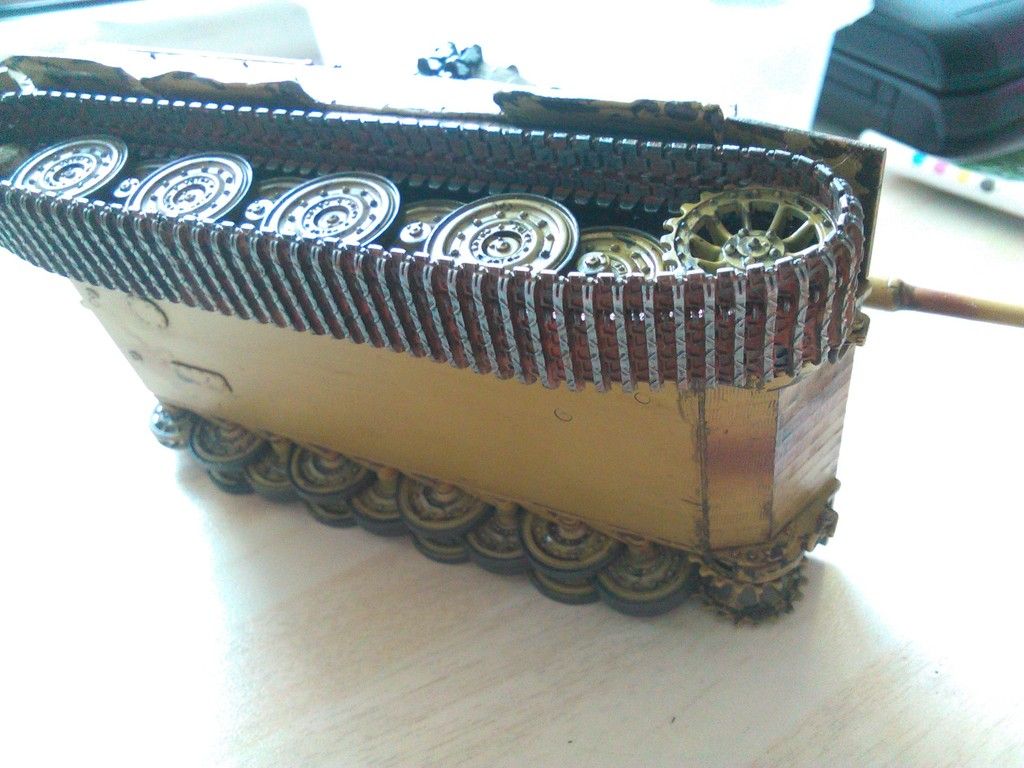
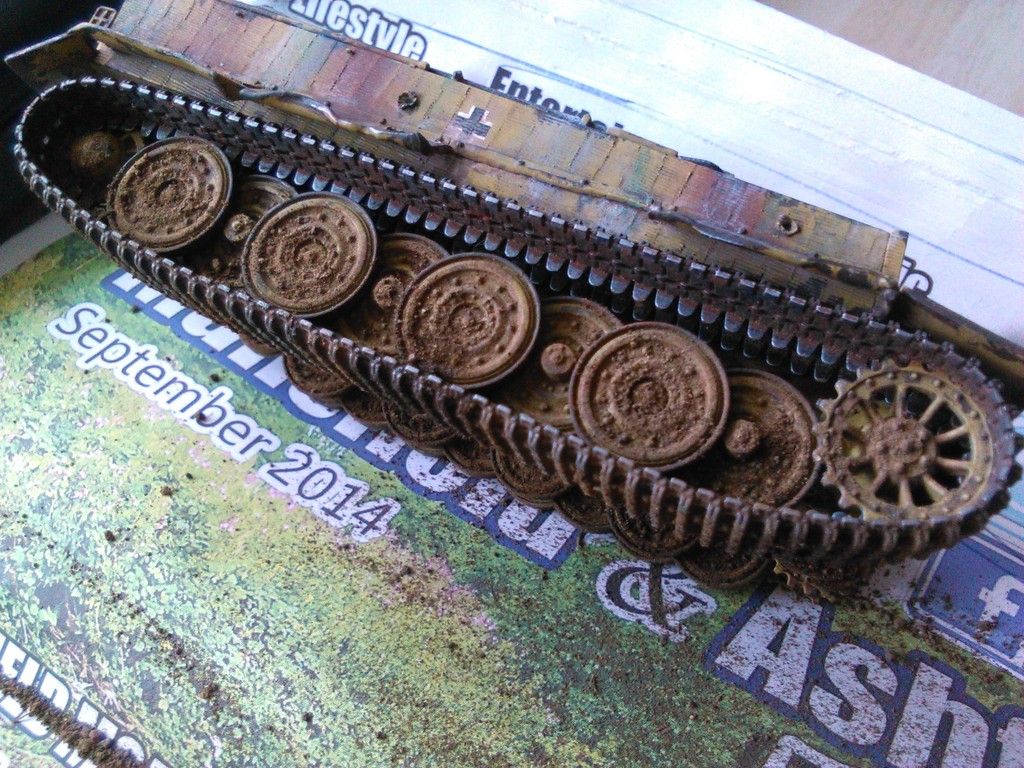
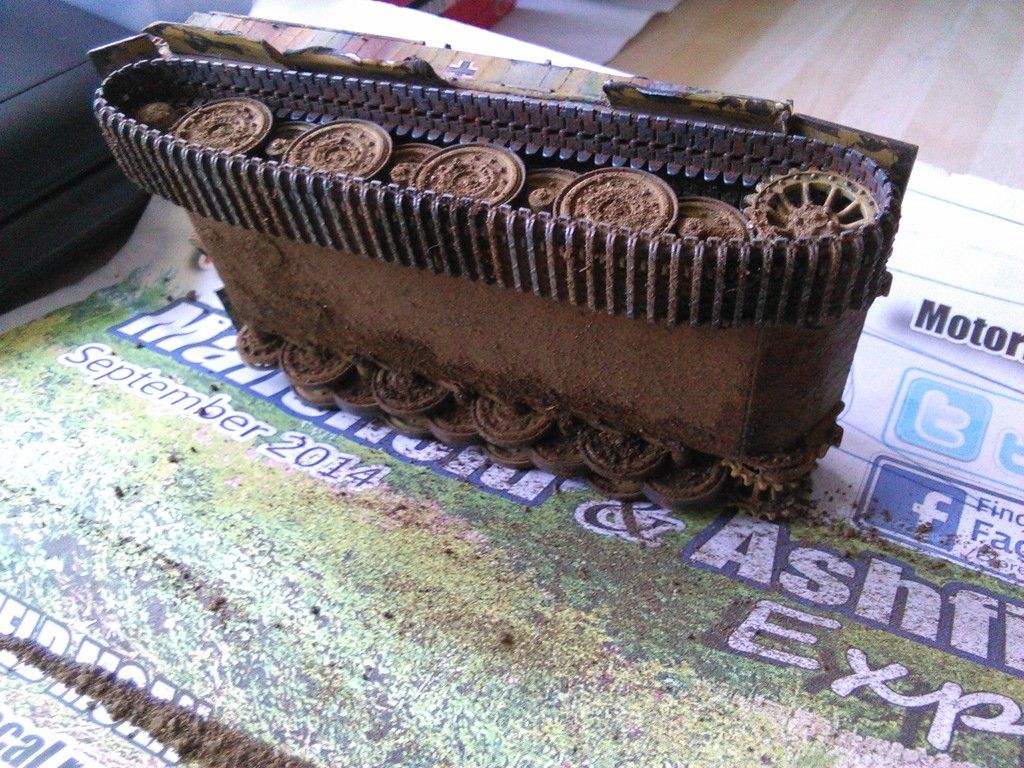
...and to finish this post and bring the build up to date, I started to screw the wheels and sprockets on, caps still need to be glued in place once all wheels are screwed and tracks are on.....
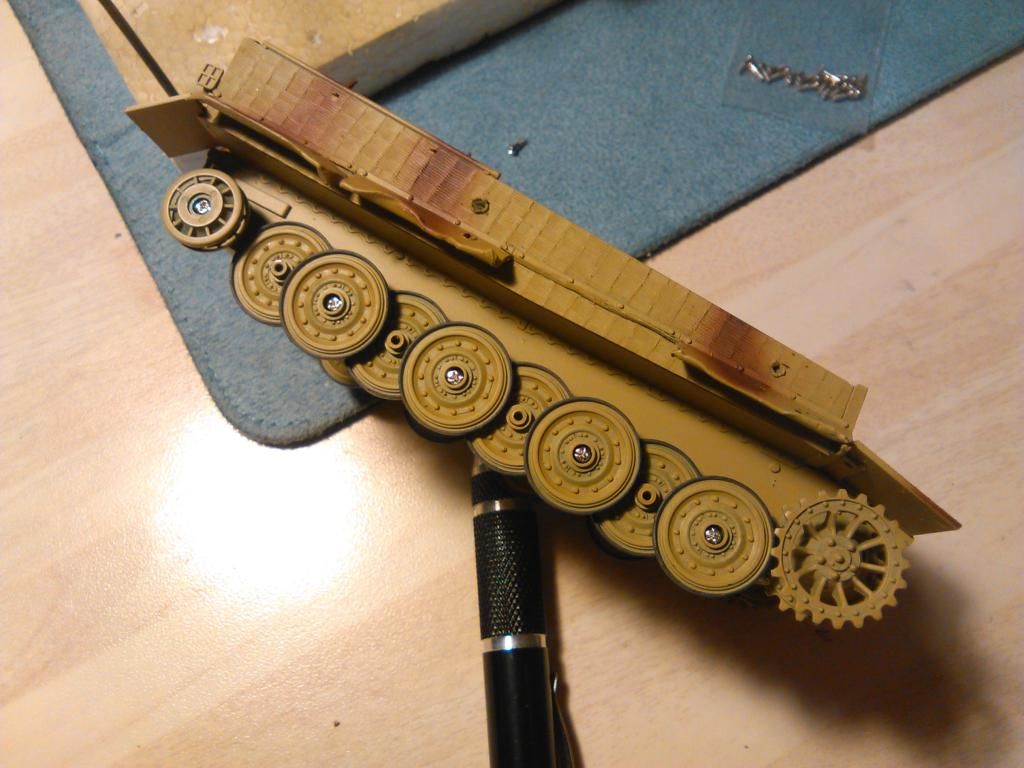
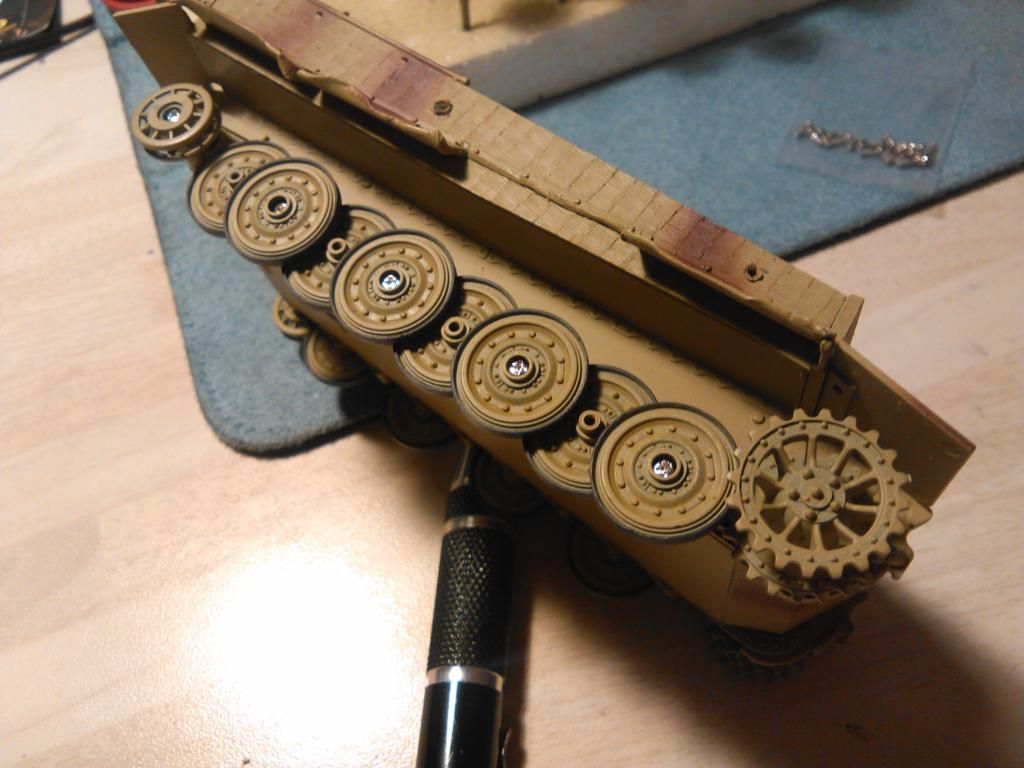
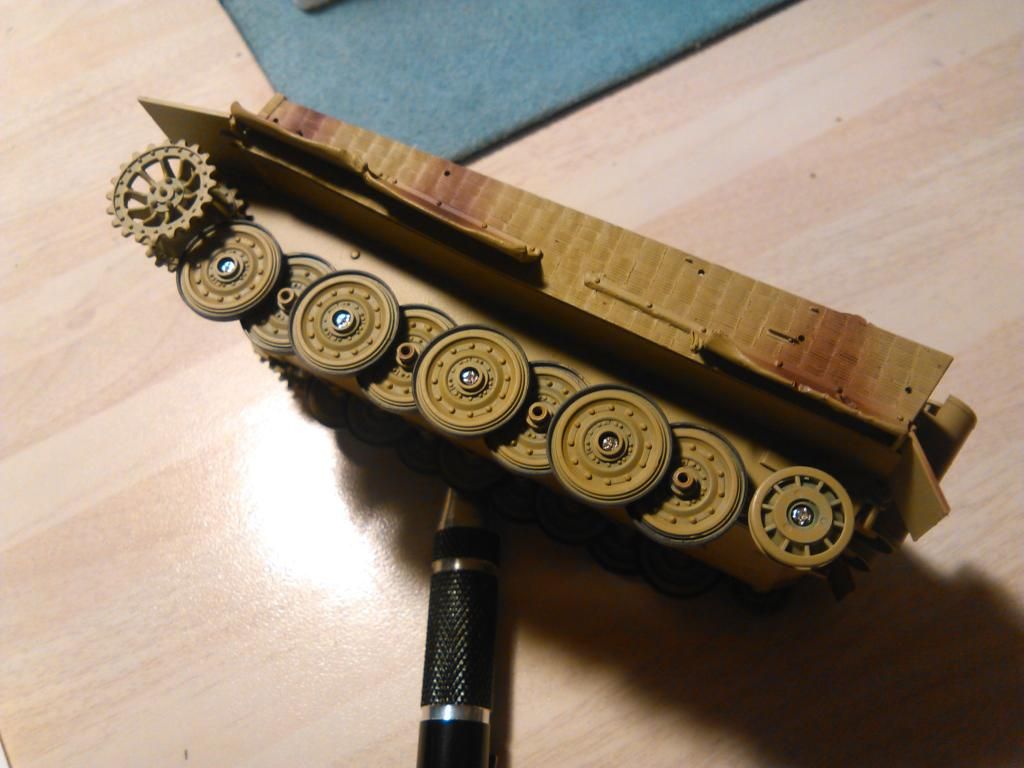
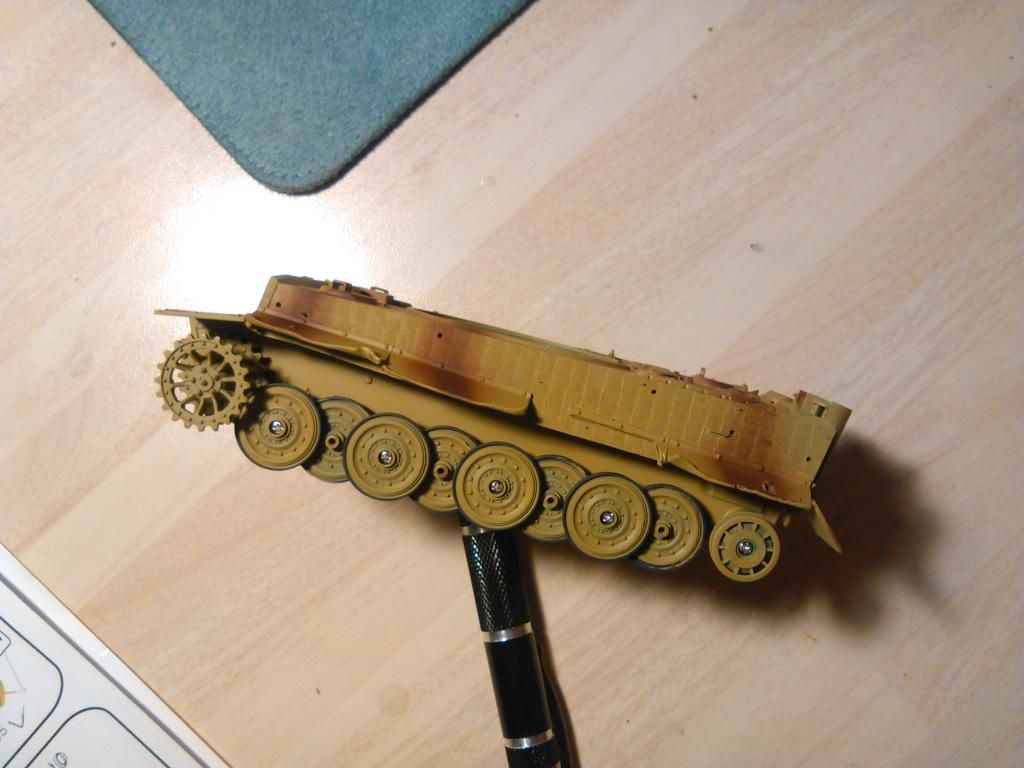
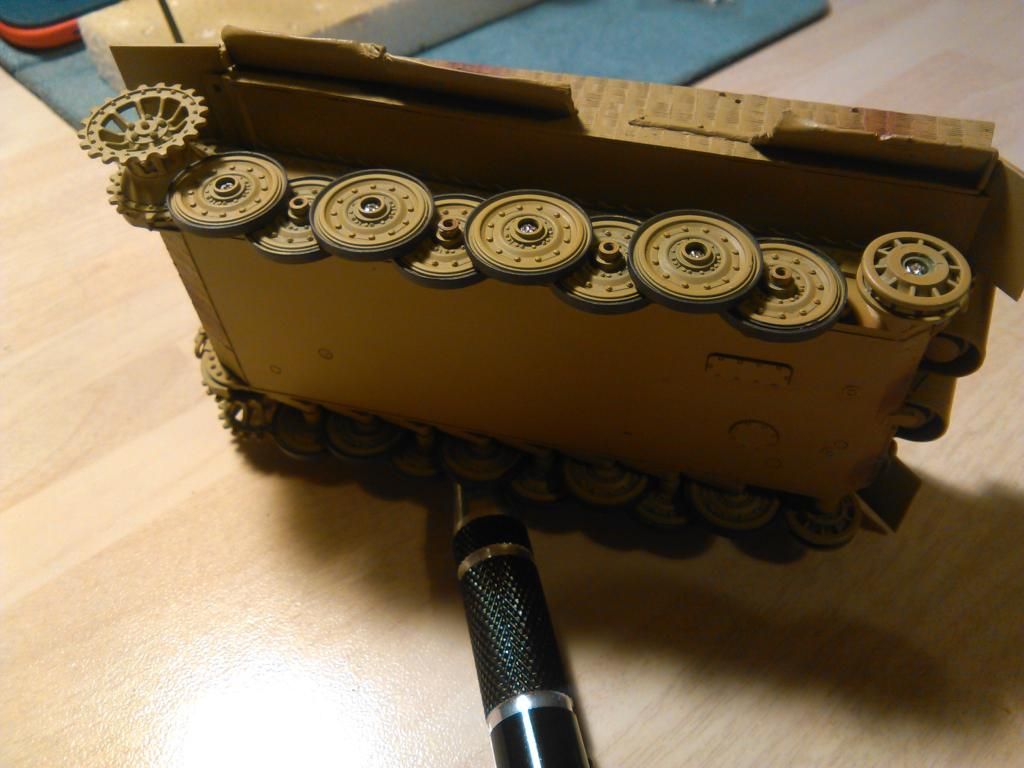
Mustn't forget...
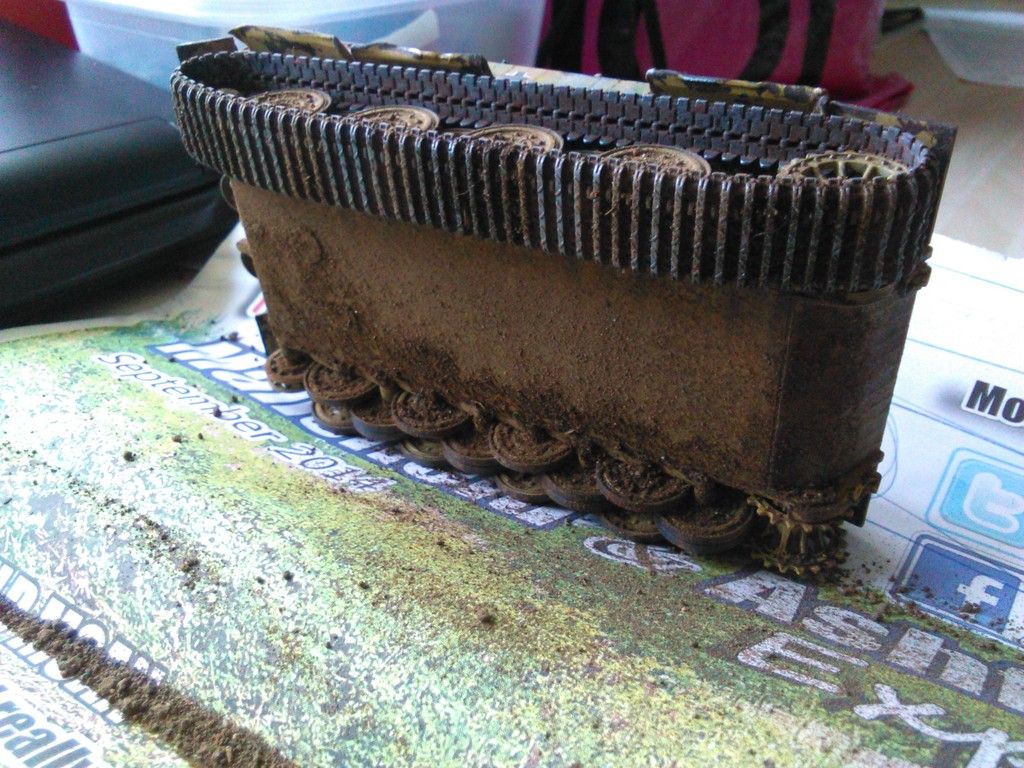
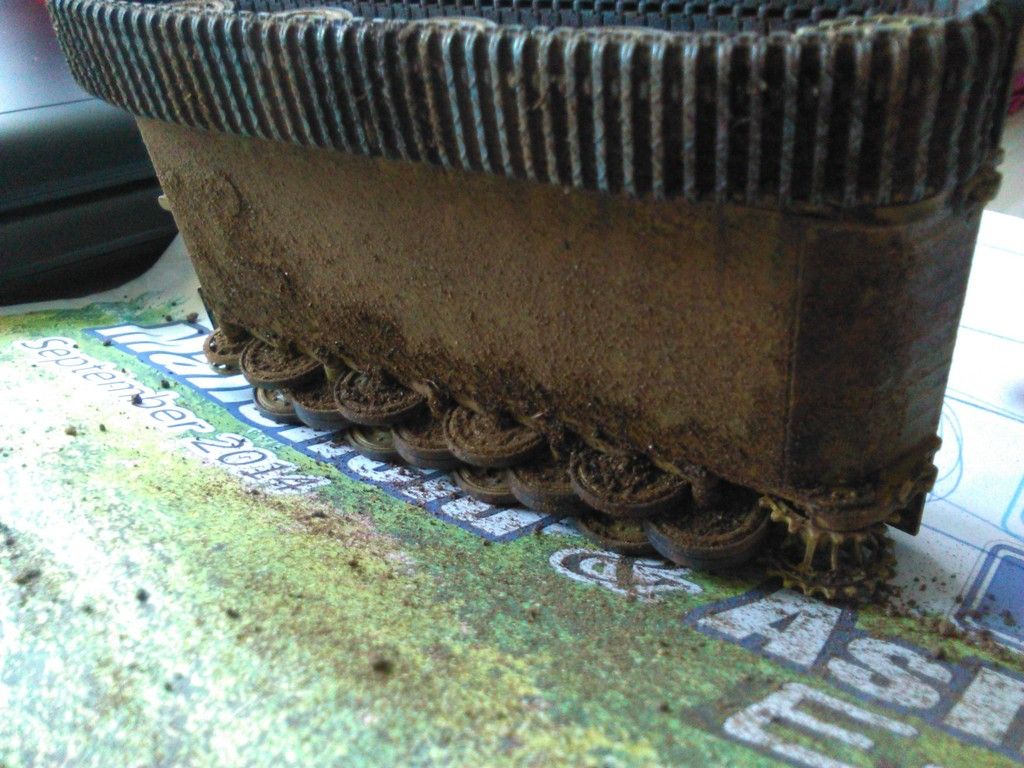
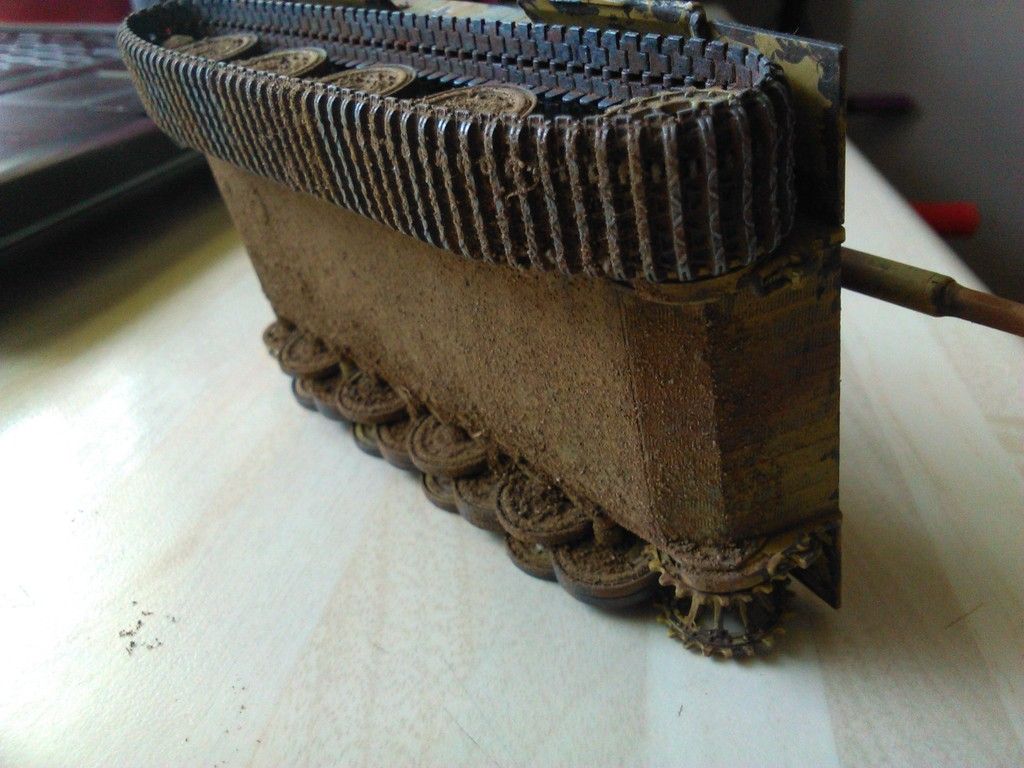
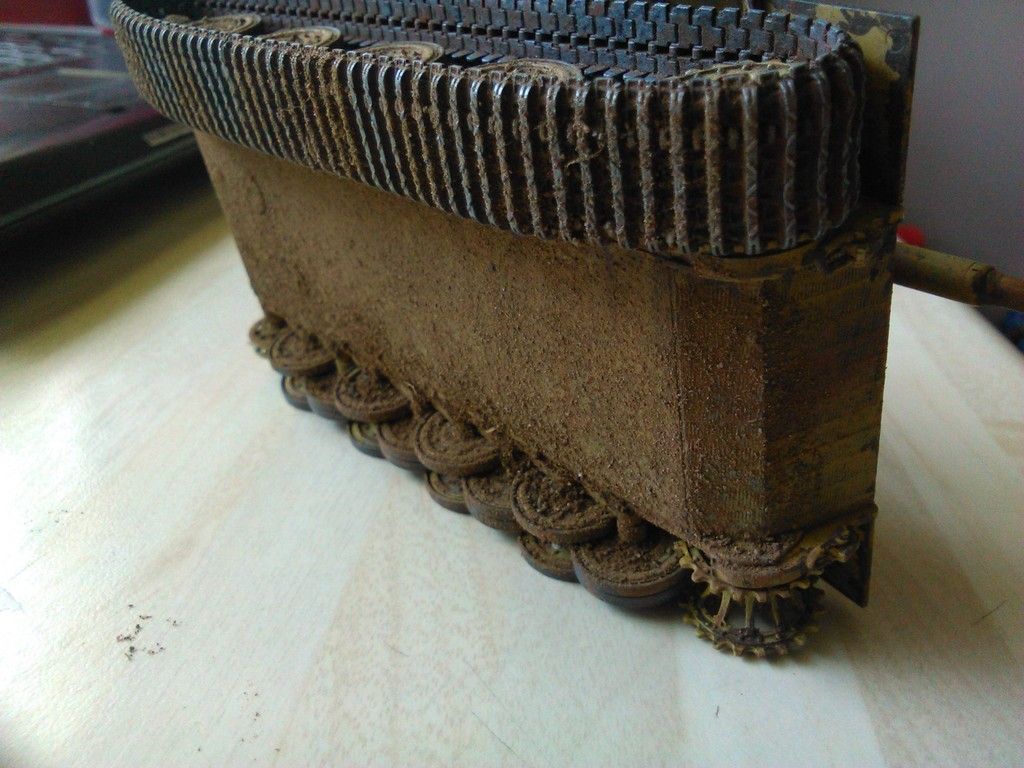
Gave the tracks a coat of Ammo grey primer, then once dry a coat or two of flat black. Later i will dry brush with Iron then dust with a coat of Ammo rusty tracks as per the reference photo..
So we come to the end of another image spamming, hope you guys are still here?? lol... Sorry! 
As always, thanks for taking a look and commenting, much appreciated...
Take care, stay safe and well.....
Till next time... Happy Modelling...
More soon!

Shared a couple of images on Facebook so thought i had better make a post to keep the thread up to date...
Its been a while so bare with me, i had to wait for a new Airbrush to arrive, then find some spare time for Hobby related activities...
Firstly, and just for a break from the norm, i decided to create some grasses and small bush type bits for the dio....


Everything goes into my grass patches.... including dried tea-leaves
So while practising with the new H&S Ultra, i gave the Tiger a base coat of dunkelgelb by Vallejo model air..


So yeah...... looks about the right colour i guess??....


30 pictures later and well... i think it covered okay.... but next is some Camo type work and i am gonna try to NOT paint thick dark brown lines all over it... Light, gentle lines are what i am hoping for... Never attempted free hand camo before.....
So we will do some work on the figure while i pluck up courage to spray DunkelBraun on it...
Erm... maybe some rubber tyres first while they are to hand.....


Now we can paint the figure.... All vallejo colours... mid flesh, black, Khaki and Olive drab. My only low is the fact i cannot build teeny spectacles for him to complete the photo look... Pretty close tho', first few pictures are in Artificial light...


Sorry, camera is rubbish at macro pictures....
So on with the camo colouring.....


...and to finish this post and bring the build up to date, I started to screw the wheels and sprockets on, caps still need to be glued in place once all wheels are screwed and tracks are on.....


Mustn't forget...
Gave the tracks a coat of Ammo grey primer, then once dry a coat or two of flat black. Later i will dry brush with Iron then dust with a coat of Ammo rusty tracks as per the reference photo..


So we come to the end of another image spamming, hope you guys are still here?? lol... Sorry!
As always, thanks for taking a look and commenting, much appreciated...
Take care, stay safe and well.....
Till next time... Happy Modelling...
More soon!
-
Kingdan
- Warrant Officer

- Posts: 1407
- Joined: Thu Jun 05, 2014 11:42 pm
- Location: Sutton in Ashfield nr Mansfield Nottinghamshire
- Contact:

Re: Skybow Tiger 1 Late in 1/48
Looks ace mate however in one of the pics it looks like your holding a errm well you know a cock 
-
alextheblue

- Chief Warrant Officer 5

- Posts: 2679
- Joined: Mon Jul 15, 2013 11:30 am
- Location: Slough, United Kingdom
- Contact:

Re: Skybow Tiger 1 Late in 1/48
Still here, just try and get rid of me!!! 
Thats a beautiful little Tiger there Andy, you've done a masterful job on the camo. Really looking forward to seeing it all come together as it's a really interesting topic. Well done mate, another masterpiece from the wappynutter production line!! 
Thats a beautiful little Tiger there Andy, you've done a masterful job on the camo. Really looking forward to seeing it all come together as it's a really interesting topic. Well done mate, another masterpiece from the wappynutter production line!!
Re: Skybow Tiger 1 Late in 1/48
Excellent work Andy and nice choices on the colours. They look great. That figure looks superb dude.
Before you get too far along... but knowing you you may already be. This variant of tiger had steel wheels, no rubber buddy.
You did such an incredibly neat job of painting them, but those are steel. You can just take an HB pencil to the edge though and give it a little shine. The dark colour that you've used for the rubber would give it a nice base.
-
Donkeywalloper
- Chief Warrant Officer 4
- Posts: 2618
- Joined: Sun Apr 13, 2014 8:06 pm
- Location: Burton upon Trent
Re: Skybow Tiger 1 Late in 1/48
Good God man its brilliant.
That is some work your putting in.
John
That is some work your putting in.
John
Bench:1/35 HobbyBoss Nagmachon with oodles of Aftermarket
Completed: Vespid 1/72 Comet A10
Shelf: Lots (82 Kits of multiple scales) of Armour + couple of Flappy / Wing Things, found a KV2 95% built and primed four years ago. Plus a few Lego Tech kits, to help restore MoJo
Completed: Vespid 1/72 Comet A10
Shelf: Lots (82 Kits of multiple scales) of Armour + couple of Flappy / Wing Things, found a KV2 95% built and primed four years ago. Plus a few Lego Tech kits, to help restore MoJo

Re: Skybow Tiger 1 Late in 1/48
The new airbrush is doing good things there Andy. Everything's looking pretty damn good.
-
wappynutter
- Chief Warrant Officer 3
- Posts: 2256
- Joined: Mon Jun 17, 2013 11:39 pm
- Location: Sutton in Ashfield, Nottinghamshire. UK
Re: Skybow Tiger 1 Late in 1/48
Hahaha..... Its my Tiger tool I told ya before...... I even coloured all over it to make it look less like a..... You know..... ERM.... Extra! Lol...Kingdan wrote:Looks ace mate however in one of the pics it looks like your holding a errm well you know a cock
Thanks Alex, not really tried to paint camo before so happy it doesn't look too heavy... Hopefully some weathering and dusting will tone and blend it right. Back!alextheblue wrote:Still here, just try and get rid of me!!!
Thats a beautiful little Tiger there Andy, you've done a masterful job on the camo. Really looking forward to seeing it all come together as it's a really interesting topic. Well done mate, another masterpiece from the wappynutter production line!!
Thanks again mate, much appreciated...
Hi Mike thanks buddy...... and Damn and blast...... I thought possibly they were but Google searches and other builds I seen shown rubber...... Knew I should have put the question to the experts, just thought it was a lame question to ask... Damn it!..... Luckily the wheels are only on for photos, still removable and repaintable if required. Can I just over paint a steel finish?? Or rub lead pencil over the entire rubber colour not just the edges like you suggested?Coen wrote:Excellent work Andy and nice choices on the colours. They look great. That figure looks superb dude.
Before you get too far along... but knowing you you may already be. This variant of tiger had steel wheels, no rubber buddy.
You did such an incredibly neat job of painting them, but those are steel. You can just take an HB pencil to the edge though and give it a little shine. The dark colour that you've used for the rubber would give it a nice base.
Thanks again buddy, I will do what I can. All the best mate...
Haha..., thanks Hendrik, much appreciated sir!...HollywoodModelling wrote:
Thanks John, will keep plodding onwards with this build, just about 4 weeks left to finish...Donkeywalloper wrote:Good God man its brilliant.
That is some work your putting in.
John
All the best mate...
Hey Russ, thanks buddy, much appreciated. Hope you like the figure so far?Russ72 wrote:The new airbrush is doing good things there Andy. Everything's looking pretty damn good.
Not long now and hopefully it'll be all done .
Thanks again for your donation towards this build, still a way to go but we getting there now!
Stay safe and well mate...
More soon guys...
Re: Skybow Tiger 1 Late in 1/48
you can do either Andy. Paint over it or just rub some pencil over it. I'd go with the pencil myself as it's easier. But it's up to you bud.wappynutter wrote:Hi Mike thanks buddy...... and Damn and blast...... I thought possibly they were but Google searches and other builds I seen shown rubber...... Knew I should have put the question to the experts, just thought it was a lame question to ask... Damn it!..... Luckily the wheels are only on for photos, still removable and repaintable if required. Can I just over paint a steel finish?? Or rub lead pencil over the entire rubber colour not just the edges like you suggested?
Thanks again buddy, I will do what I can. All the best mate...
-
wappynutter
- Chief Warrant Officer 3
- Posts: 2256
- Joined: Mon Jun 17, 2013 11:39 pm
- Location: Sutton in Ashfield, Nottinghamshire. UK
Re: Skybow Tiger 1 Late in 1/48
Cheers Mike, will give it a go...... Got a thick leaded Carpenters pencil here so may try that...Coen wrote:you can do either Andy. Paint over it or just rub some pencil over it. I'd go with the pencil myself as it's easier. But it's up to you bud.wappynutter wrote:Hi Mike thanks buddy...... and Damn and blast...... I thought possibly they were but Google searches and other builds I seen shown rubber...... Knew I should have put the question to the experts, just thought it was a lame question to ask... Damn it!..... Luckily the wheels are only on for photos, still removable and repaintable if required. Can I just over paint a steel finish?? Or rub lead pencil over the entire rubber colour not just the edges like you suggested?
Thanks again buddy, I will do what I can. All the best mate...
Happy Modelling guys..
-
OliveDrab

- Command Sergeant Major

- Posts: 823
- Joined: Thu Dec 25, 2014 4:48 am
- Location: Missouri, USA

Re: Skybow Tiger 1 Late in 1/48
Superb build, and in 1/48 too! The camo paint job looks great and grass and bushes are fantastic
Curt
Re: Skybow Tiger 1 Late in 1/48
Excellent progress! As OD said,that paintjob is superb
Steve
Make something idiot proof and someone will come along and make a better idiot.
Make something idiot proof and someone will come along and make a better idiot.
-
wappynutter
- Chief Warrant Officer 3
- Posts: 2256
- Joined: Mon Jun 17, 2013 11:39 pm
- Location: Sutton in Ashfield, Nottinghamshire. UK
Re: Skybow Tiger 1 Late in 1/48
Well i will try again with this post.... 
Spent an hour making a post last night only to push a combination of buttons accidentally on the laptop and have the browser shut down and lose it all..
So i shut down and went to bed....
Back today though and ready with the #save draft# button...
Long picture busy post incoming!.... Sorry!.
Even sorted out the diorama, i will add the pictures at the end of this post so stay tuned buddy...
Thanks again!
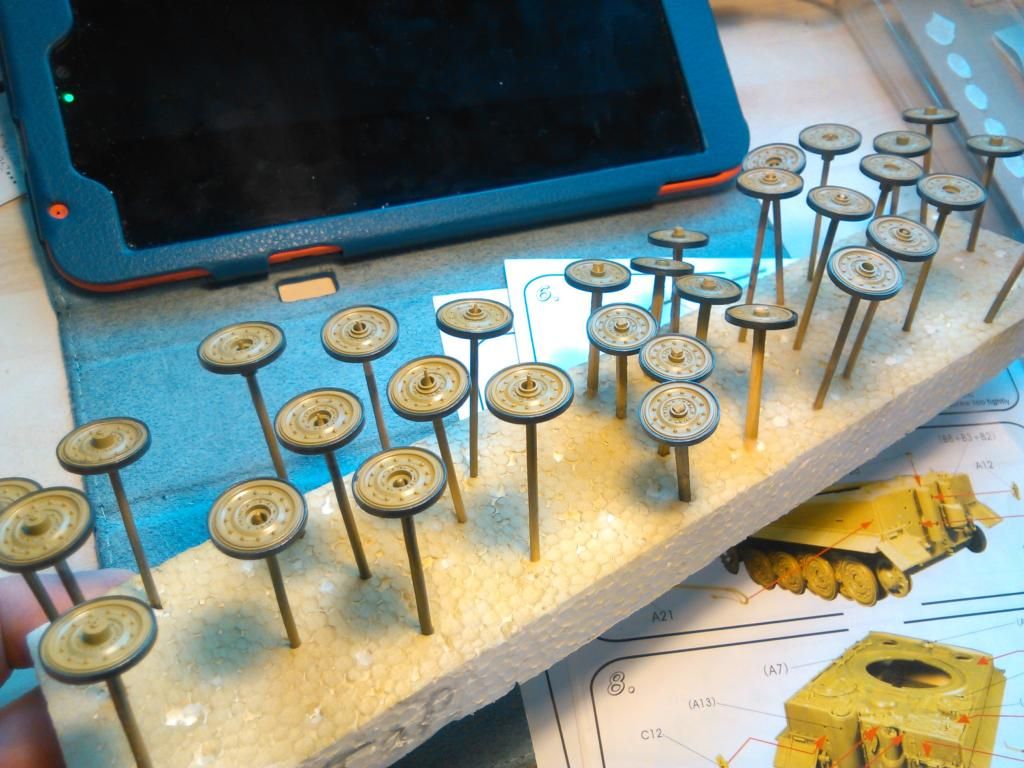
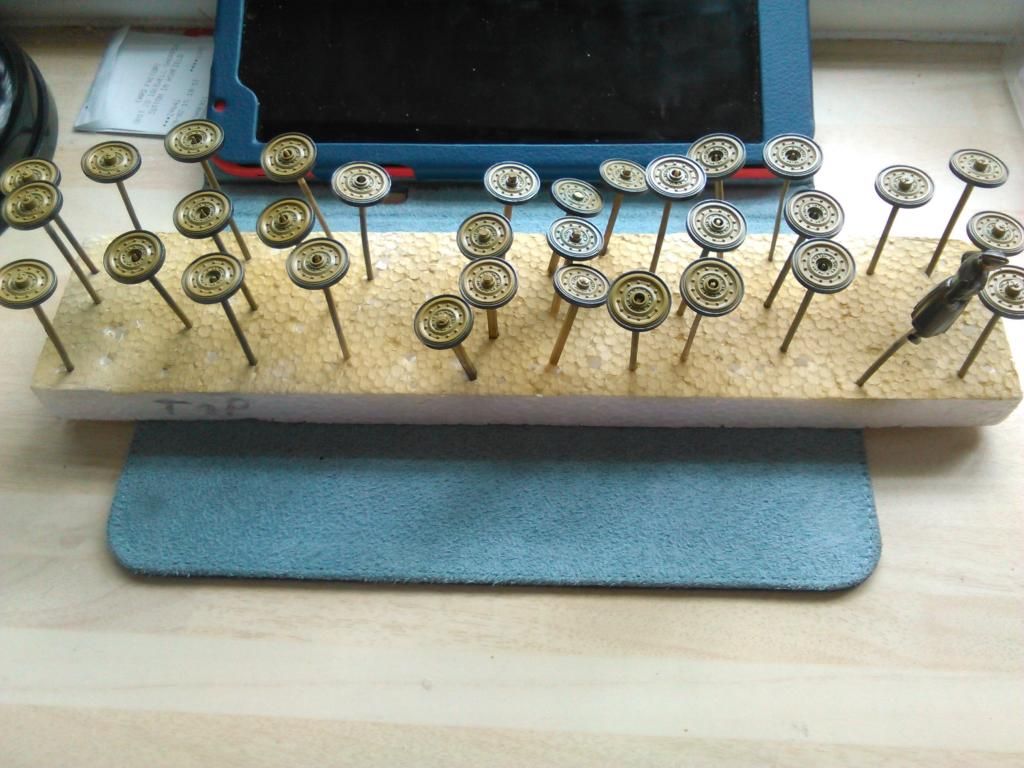
So where was we?? Oh yeah, slight boo boo with the wheels #Thanks Mike for pointing it out # Out with the carpenters pencil and colour away!!
Who's that in the background i wonder??
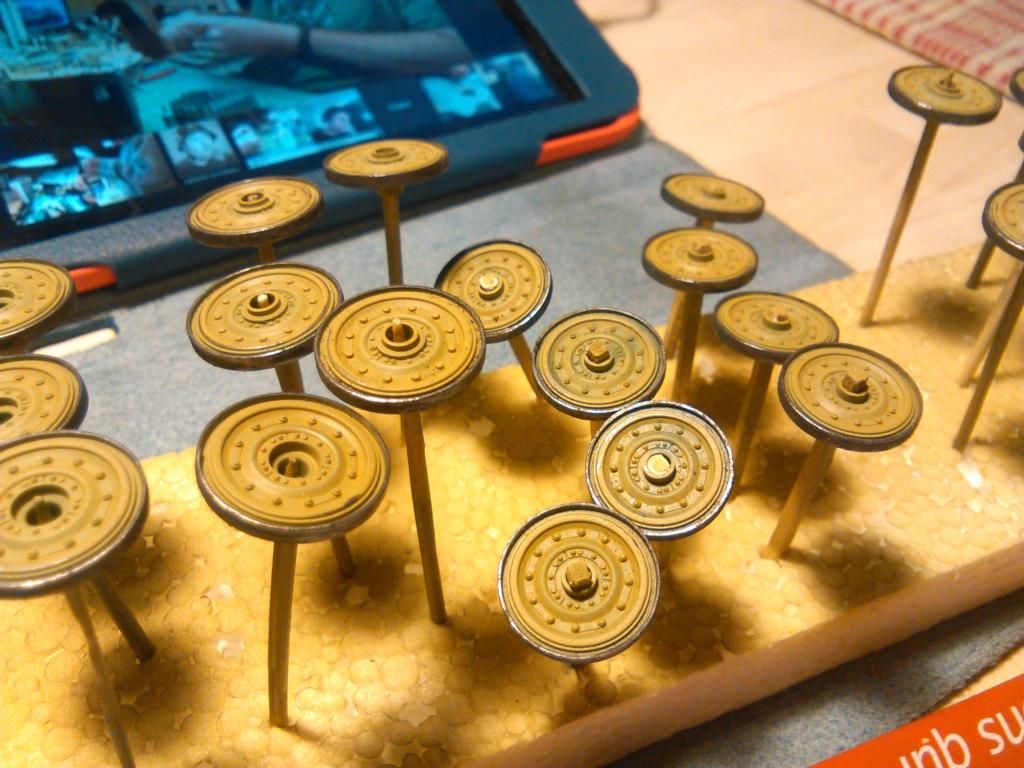
Gonna give them a gloss coat so i don't smudge the lead dust all over the Tiger...
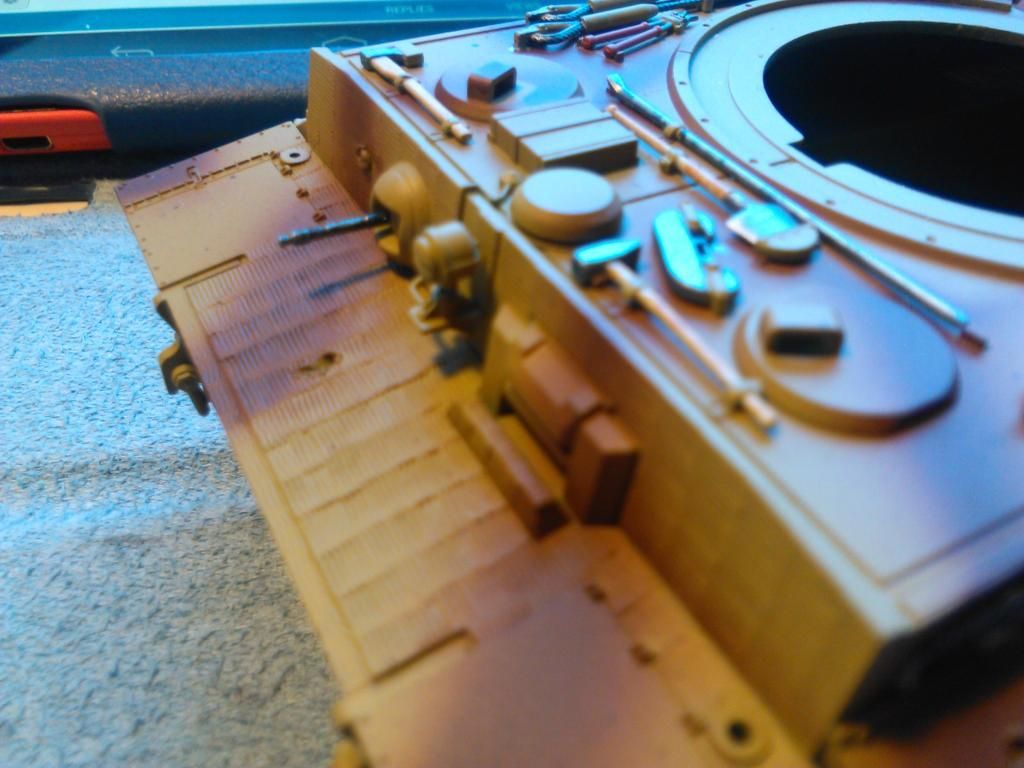
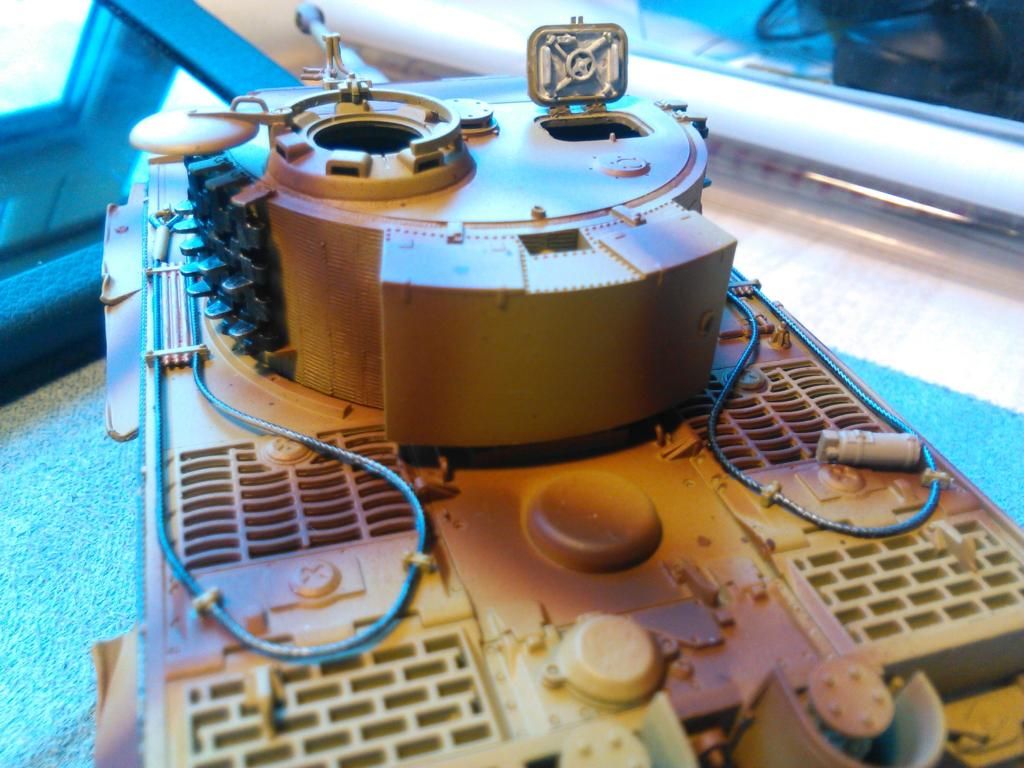
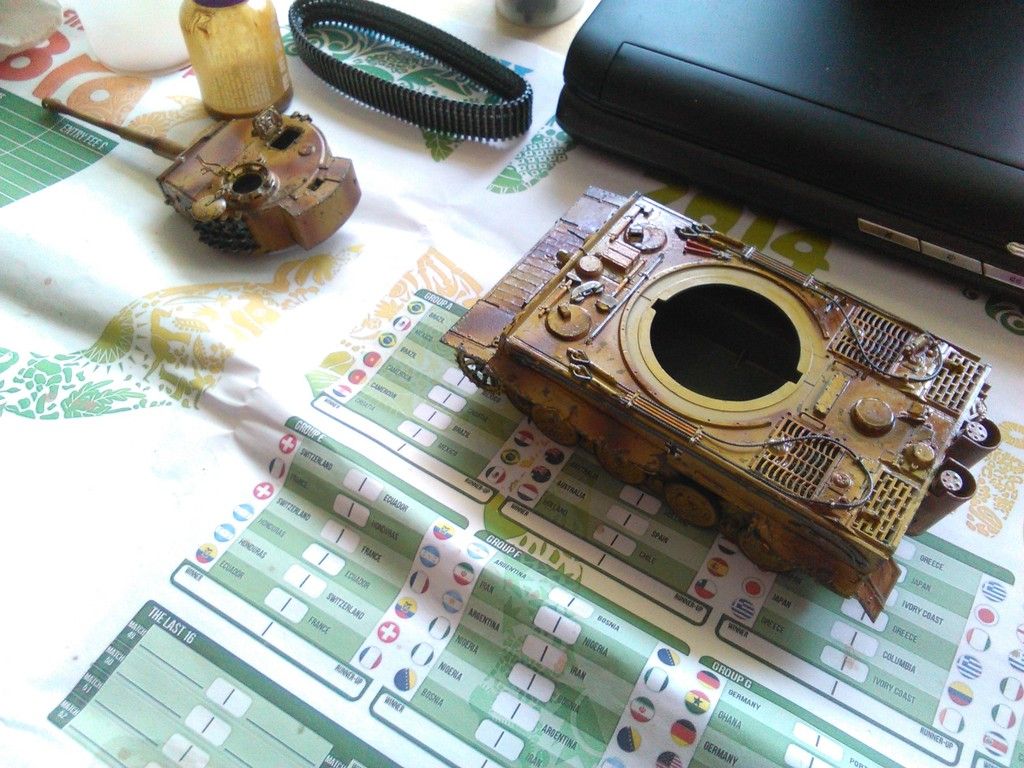
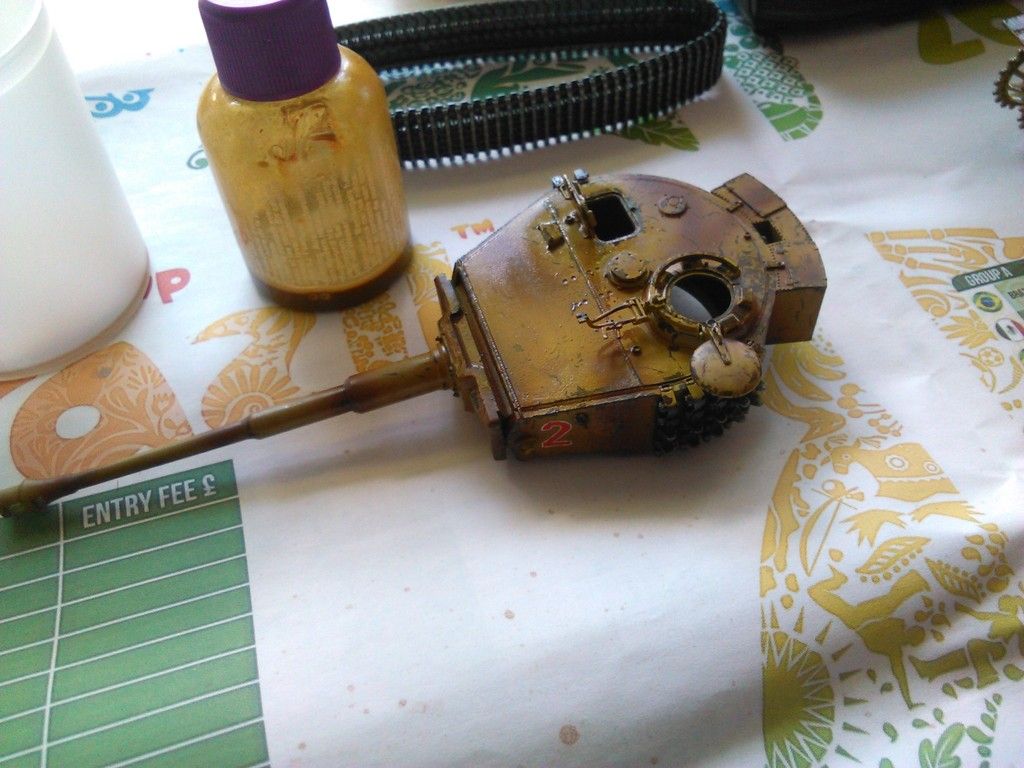
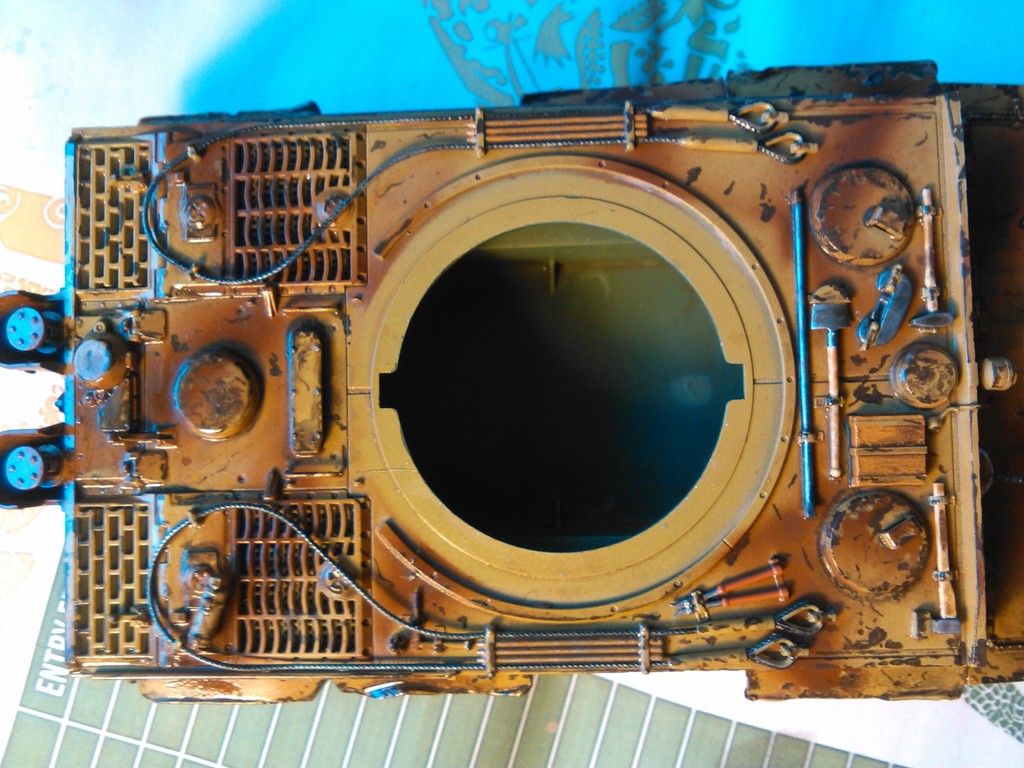
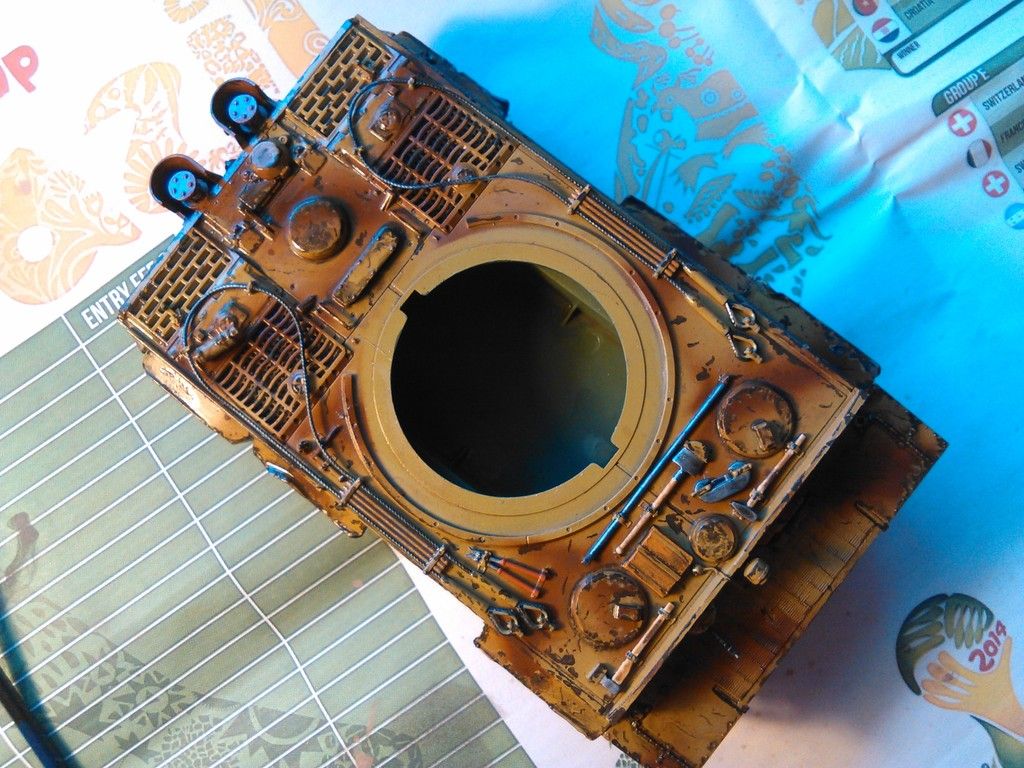
Starting to attach the tools and paint up the details.... ( still got some to do today even...)
...and cables...

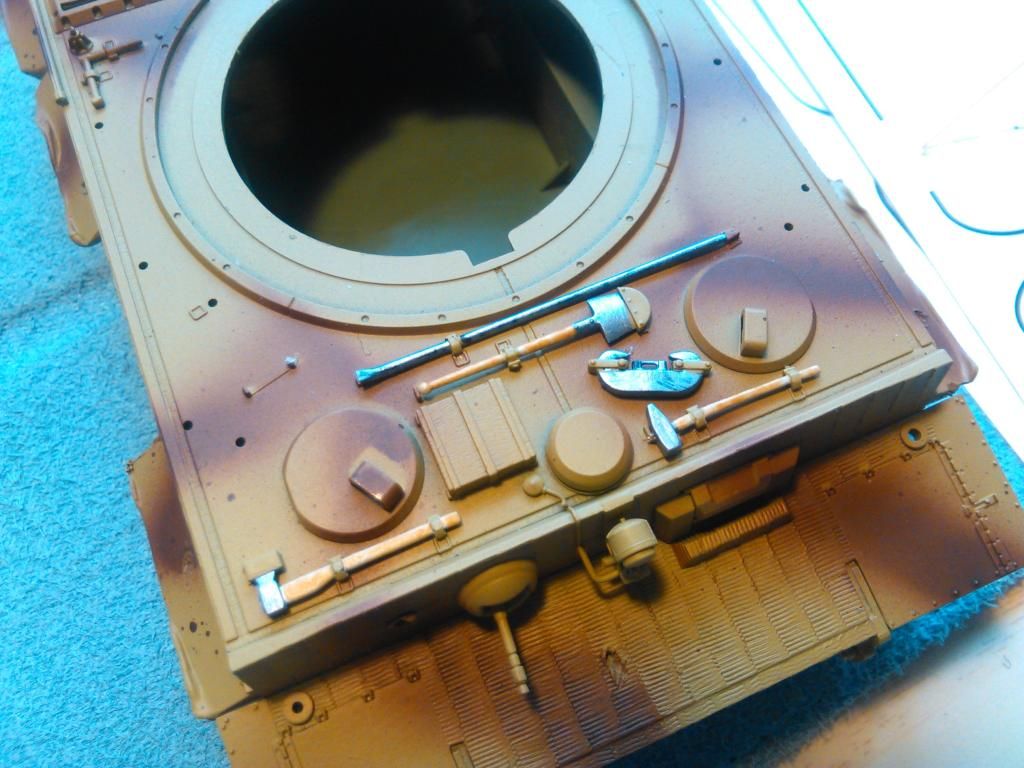
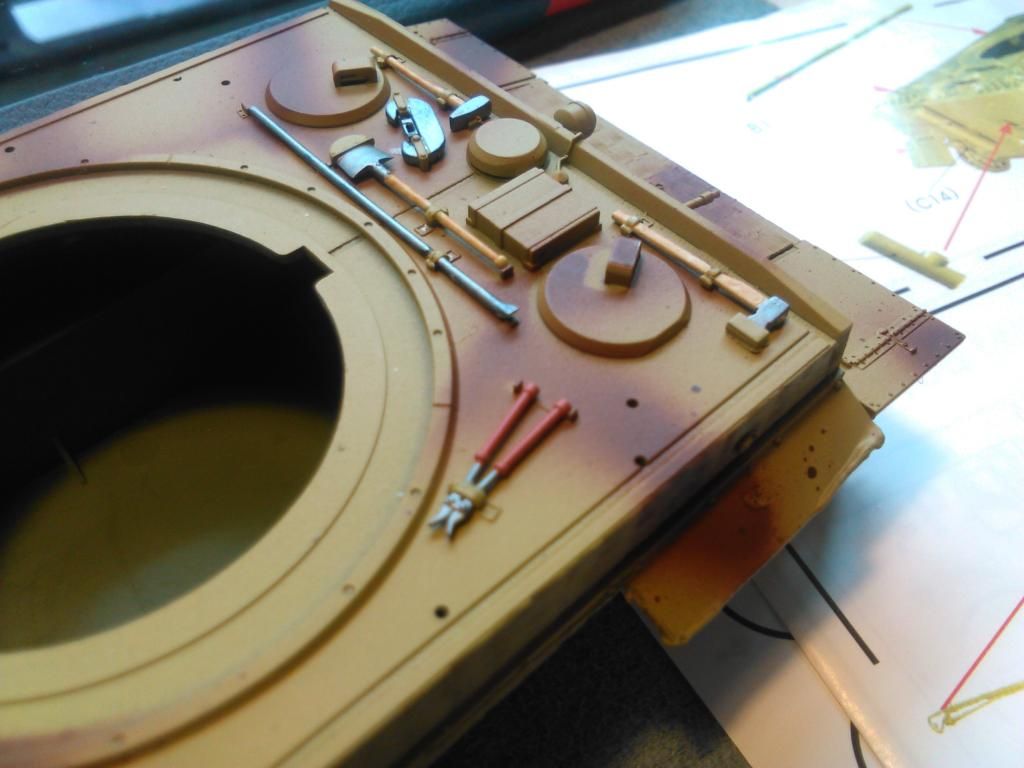
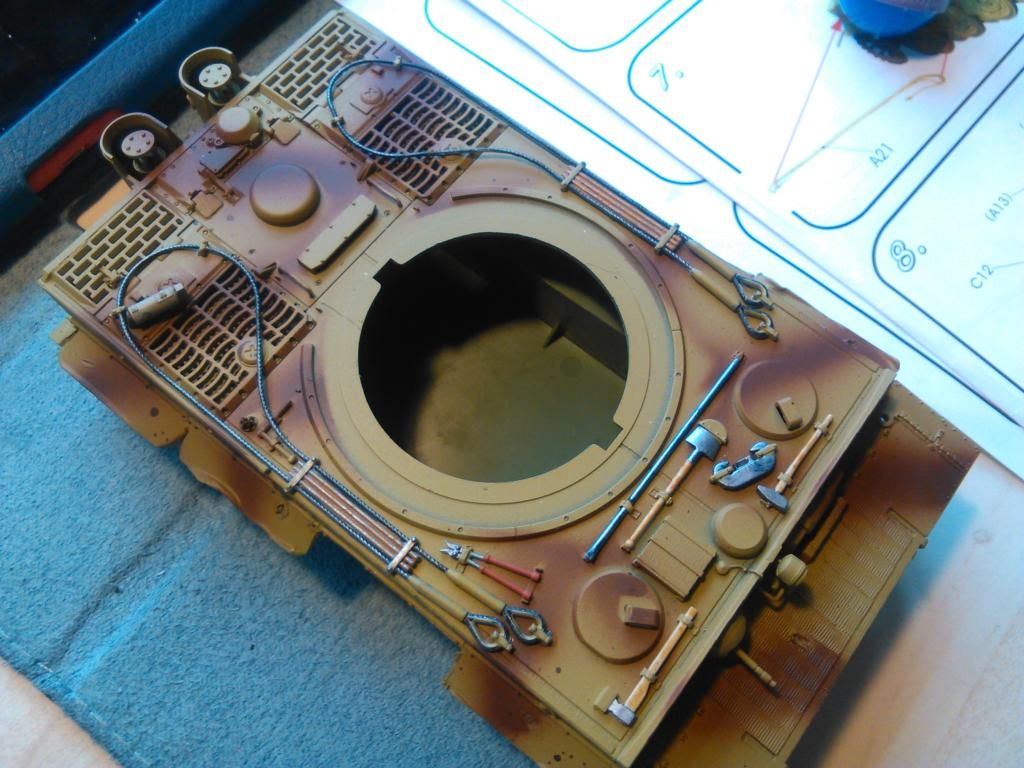

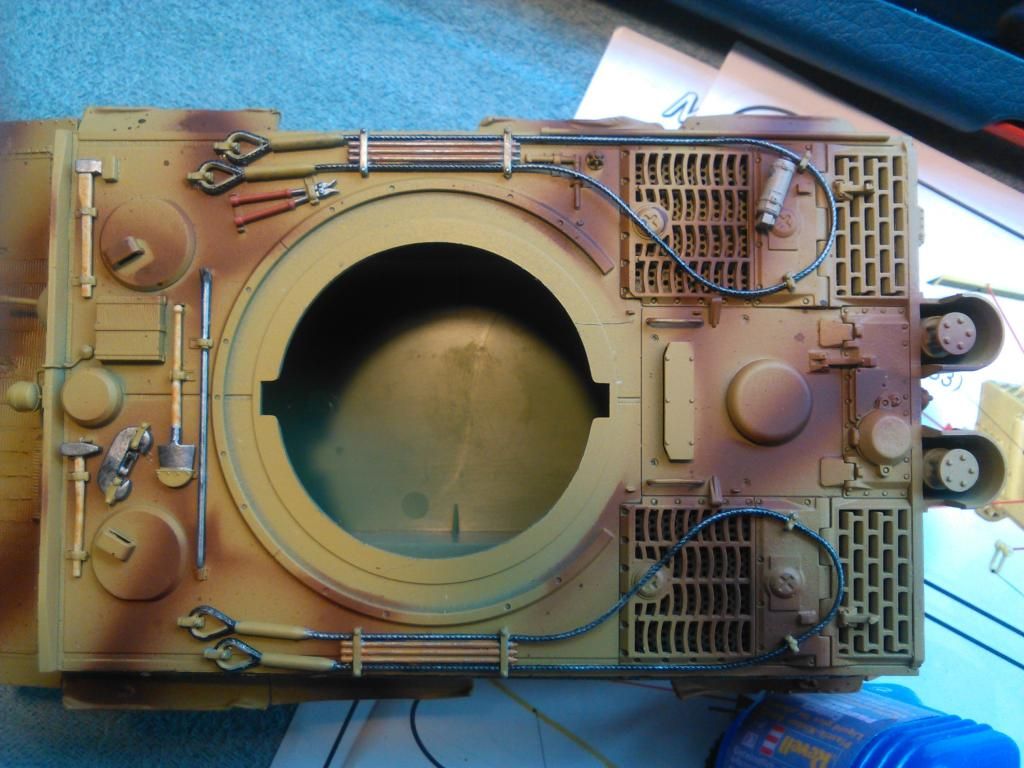
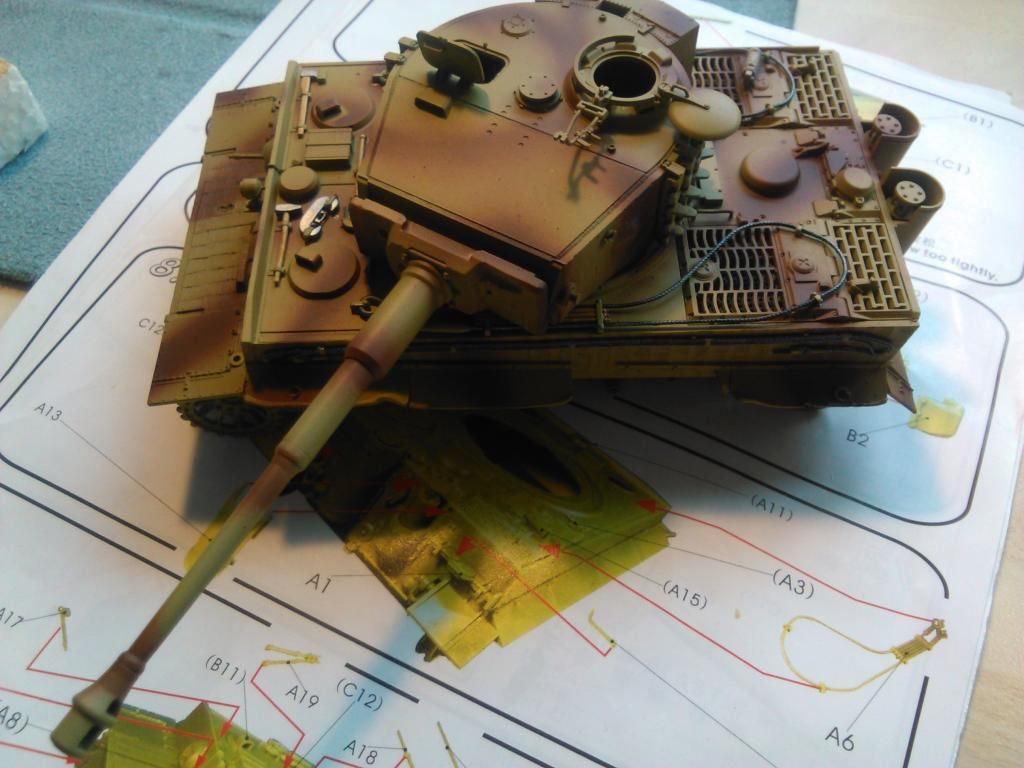
All gloss coated..
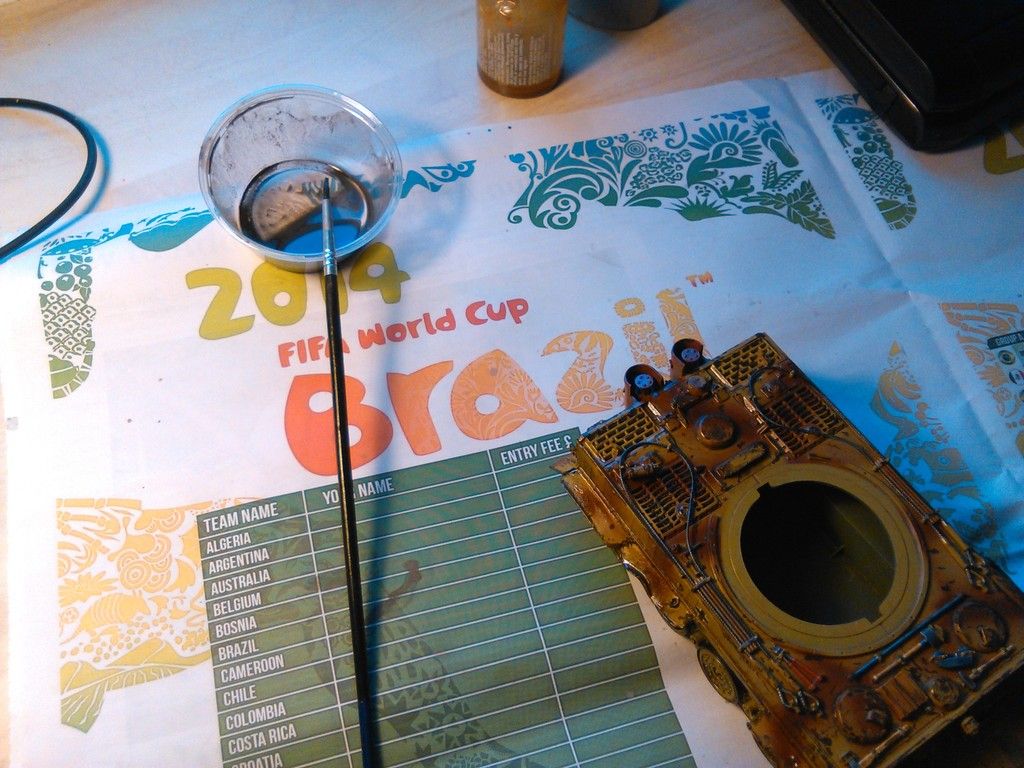
.... and the figure ready for an oil wash...

The MG and turret track links all received a black coat followed by a drybrushing of Vallejo Model Air Metallic Gun.
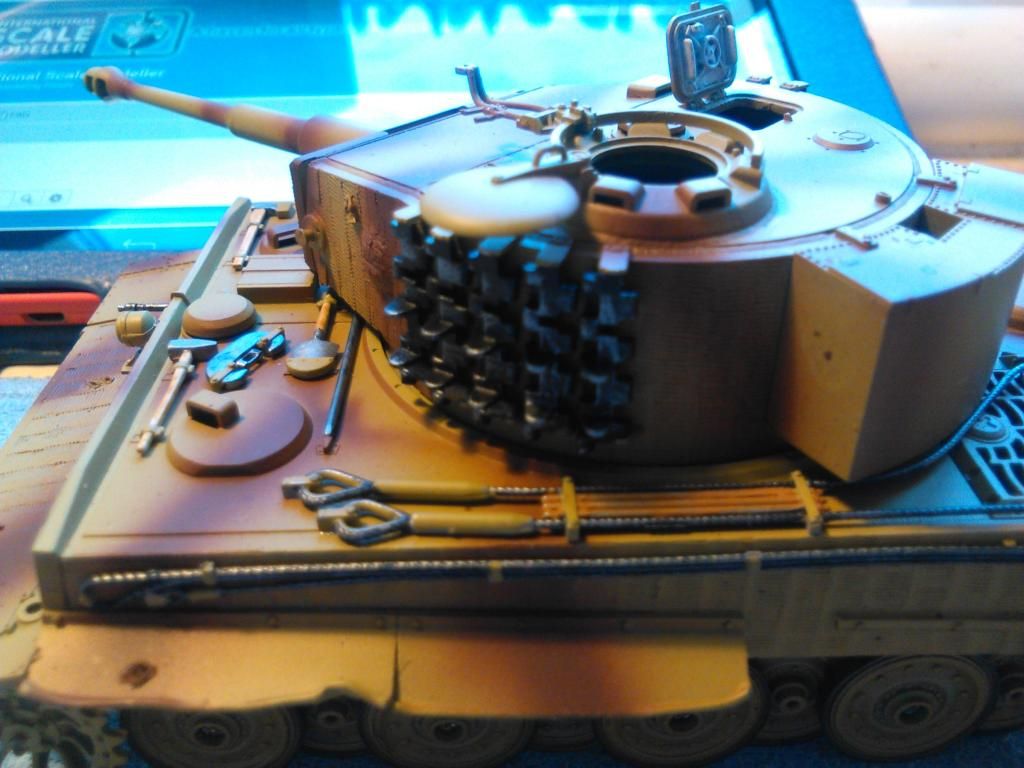
The inside of both hatches got a washy coat of white paint...
Now the wheels are dry, its time to start and screw then back in place...
No turning back now..... glue has been used!!
...and the last set to screw on... this side anyways.... one more side to go..
 RL]
RL]
Caps and hubs to glue on covering the screws...
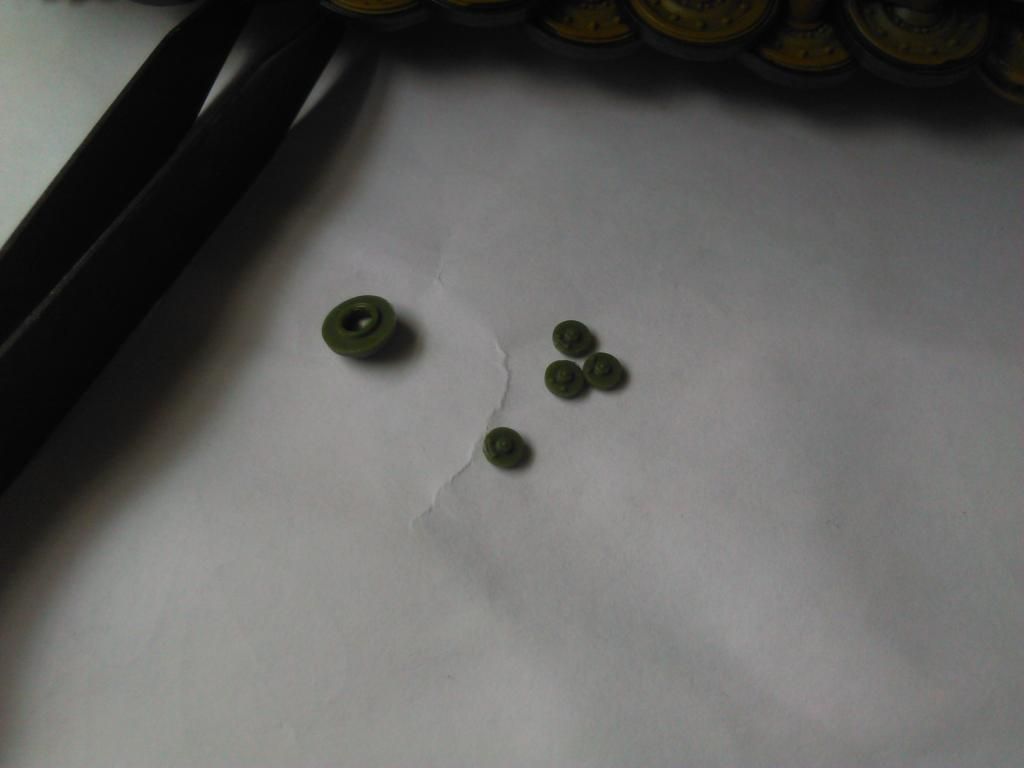
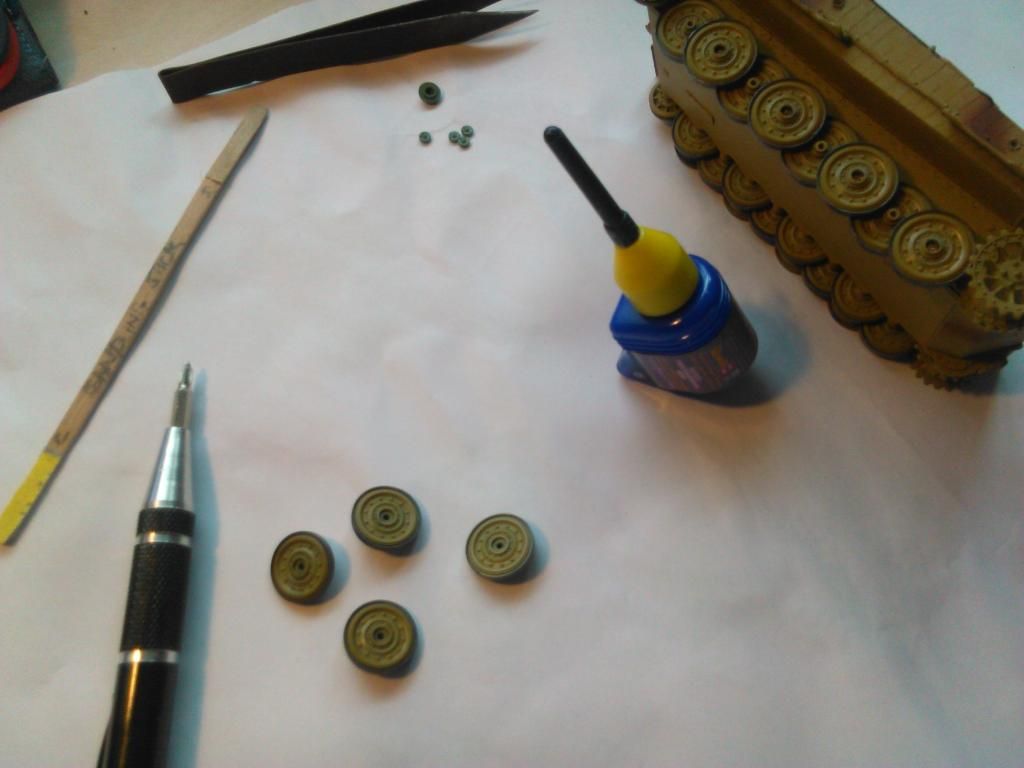
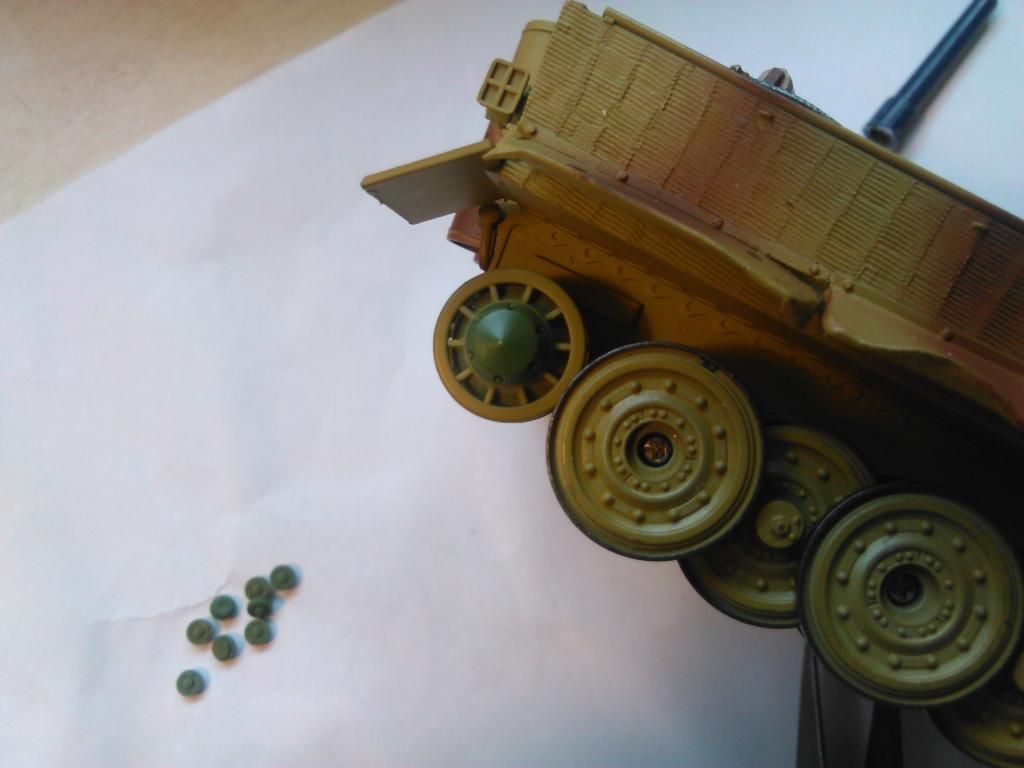
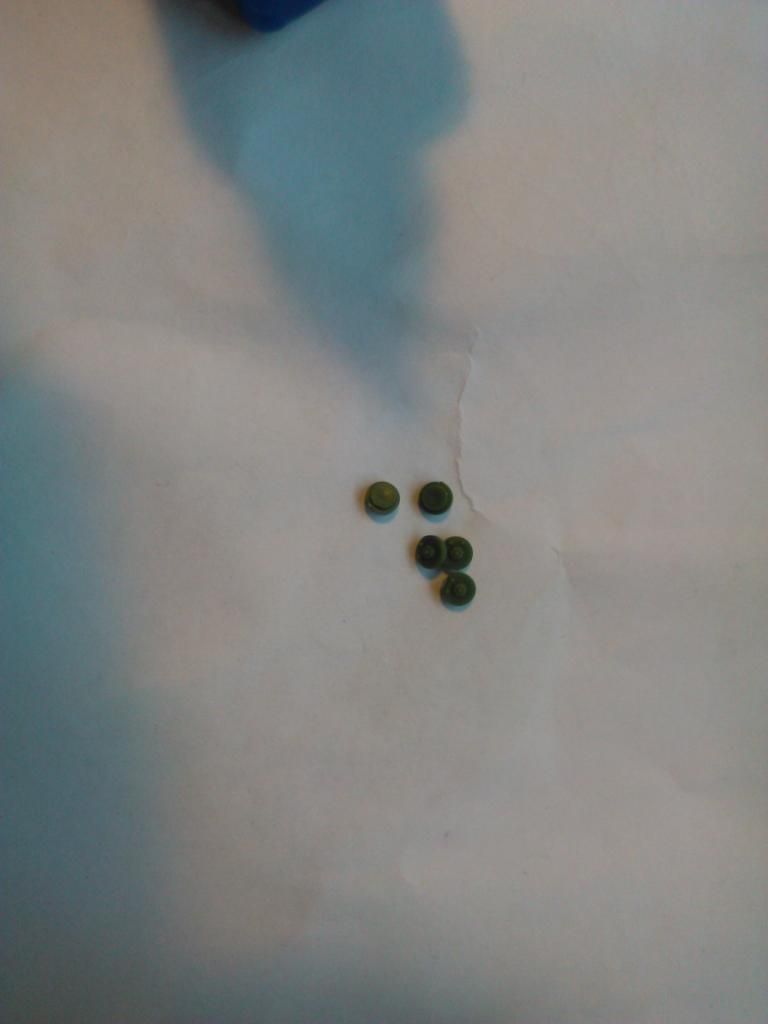
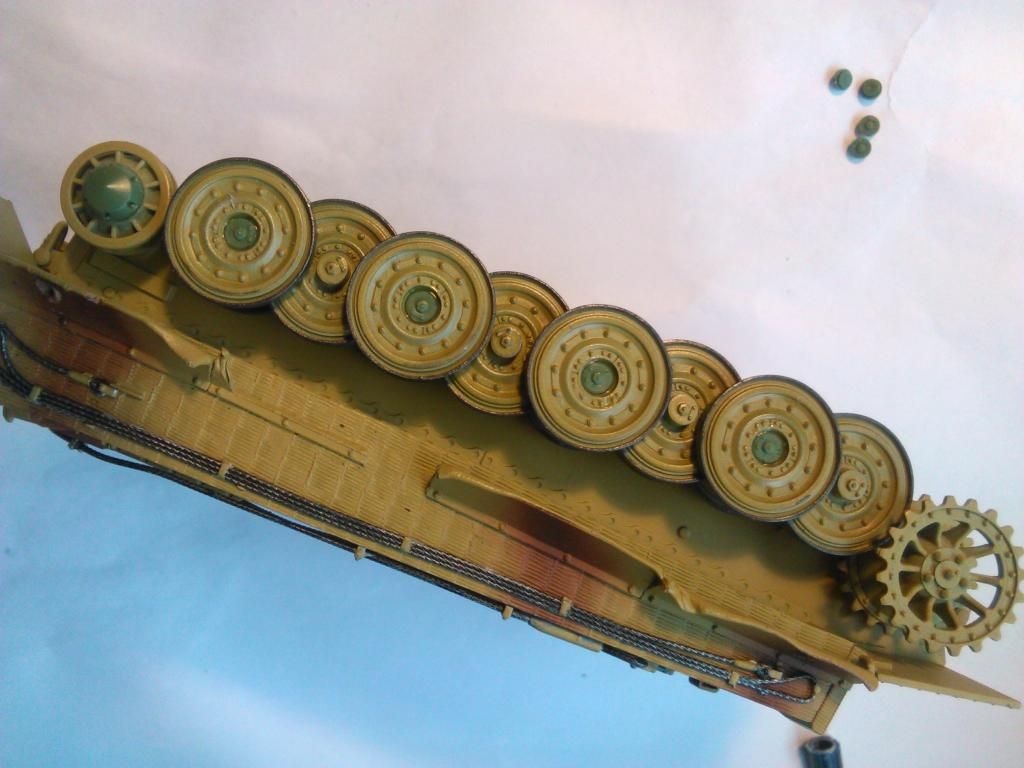

...and gonna leave all of this to dry and set as i made another boo boo... put glue down the screw hole and have now turned the axle stubs all pliable and melty.. Hope they dry solid ... ... Once they do i can paint up the caps to match the wheels and we good!
Trying on the dio base for fit...
Gonna work on the diorama too but first best try the tracks.... Oh no i mean TRACK.. as only one side is required for my dio scene...
Yeah they all good just need an Iron drybrush and a rust and dust up!...
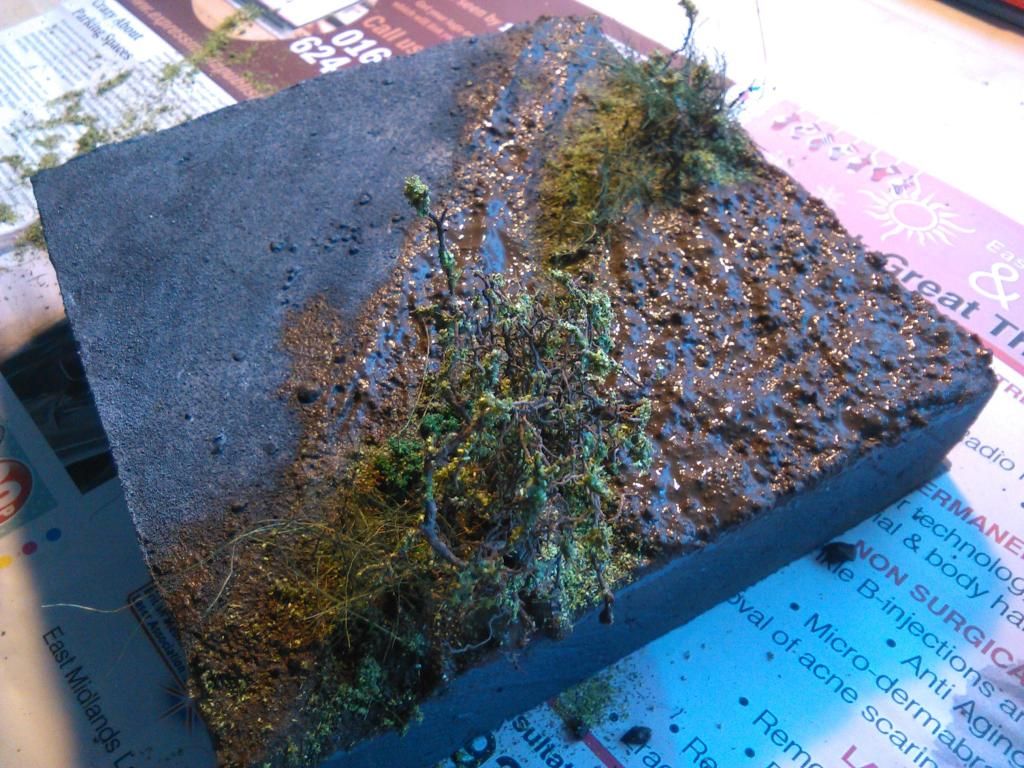
Diorama time!
Yay, my favourite bit.... well apart from the building......
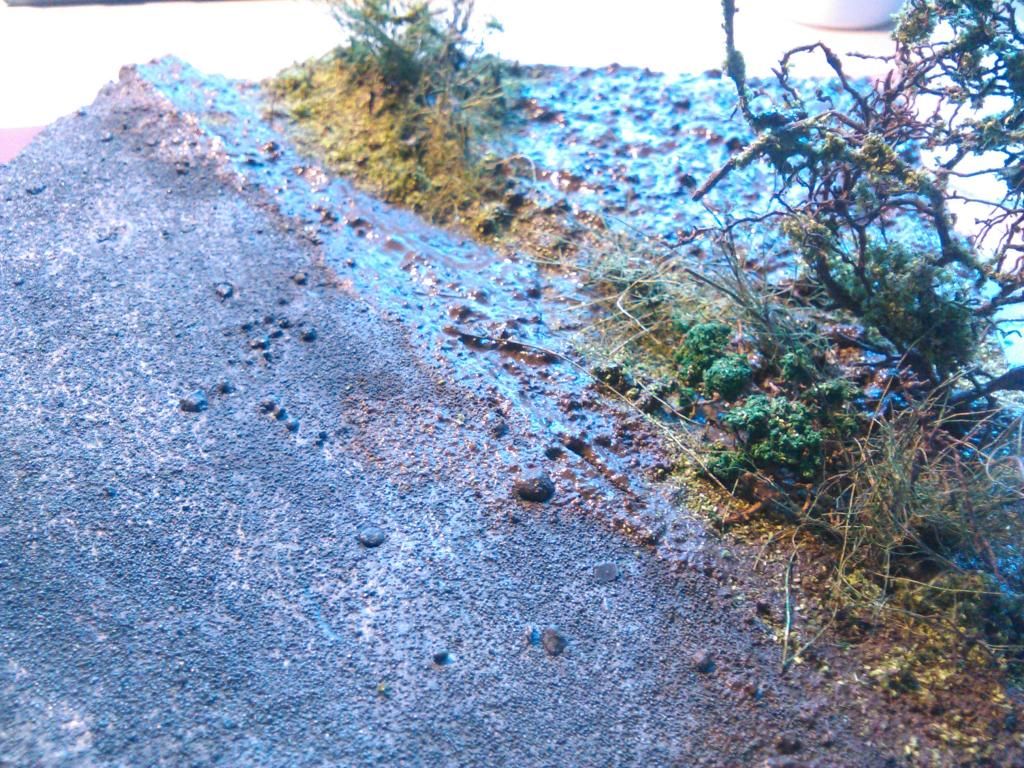
So we will start with an oil wash to the road surface...

...and figure while we at it!..
Mud time...... building trees and bushes as we go from old roots, scatter and the grasses we made from the old hanging basket liner...

We are all done, just gotta leave to dry now!
Thanks for sticking till the end, sorry again for such a jumbled flood of poorly taken pictures...
As always, thanks for taking the time to drop by for a look and to comment, much appreciated guys..
Take care, stay safe and well... Until next time, Happy Modelling..
More soon!
Spent an hour making a post last night only to push a combination of buttons accidentally on the laptop and have the browser shut down and lose it all..
So i shut down and went to bed....
Back today though and ready with the #save draft# button...
Long picture busy post incoming!.... Sorry!.
Thanks OD, been a busy boy over the weekend so this post may get a little busy today!OliveDrab wrote:Superb build, and in 1/48 too! The camo paint job looks great and grass and bushes are fantastic
Even sorted out the diorama, i will add the pictures at the end of this post so stay tuned buddy...
Hey Steve, thanks buddy.. As i mentioned to OD i have been busy so i hope you drop by and check out the progress..... it may be a long post!Hillbilly wrote:Excellent progress!
Thanks again!
So where was we?? Oh yeah, slight boo boo with the wheels #Thanks Mike for pointing it out


Who's that in the background i wonder??


Gonna give them a gloss coat so i don't smudge the lead dust all over the Tiger...
Starting to attach the tools and paint up the details.... ( still got some to do today even...)

...and cables...


All gloss coated..


.... and the figure ready for an oil wash...


The MG and turret track links all received a black coat followed by a drybrushing of Vallejo Model Air Metallic Gun.


The inside of both hatches got a washy coat of white paint...


Now the wheels are dry, its time to start and screw then back in place...


No turning back now..... glue has been used!!

...and the last set to screw on... this side anyways.... one more side to go..

 RL]
RL]Caps and hubs to glue on covering the screws...


...and gonna leave all of this to dry and set as i made another boo boo... put glue down the screw hole and have now turned the axle stubs all pliable and melty.. Hope they dry solid ...
Trying on the dio base for fit...


Gonna work on the diorama too but first best try the tracks.... Oh no i mean TRACK.. as only one side is required for my dio scene...


Yeah they all good just need an Iron drybrush and a rust and dust up!...
Diorama time!
Yay, my favourite bit.... well apart from the building......
So we will start with an oil wash to the road surface...


...and figure while we at it!..

Mud time...... building trees and bushes as we go from old roots, scatter and the grasses we made from the old hanging basket liner...


We are all done, just gotta leave to dry now!
Thanks for sticking till the end, sorry again for such a jumbled flood of poorly taken pictures...
As always, thanks for taking the time to drop by for a look and to comment, much appreciated guys..
Take care, stay safe and well... Until next time, Happy Modelling..
More soon!
-
Donkeywalloper
- Chief Warrant Officer 4
- Posts: 2618
- Joined: Sun Apr 13, 2014 8:06 pm
- Location: Burton upon Trent
Re: Skybow Tiger 1 Late in 1/48
Way to go Andy.
Worth the wait (happens a lot mate and I get so many problems with he crap Photo-Bucket).
Absolutely brilliant build mate.
Love it.
John
Worth the wait (happens a lot mate and I get so many problems with he crap Photo-Bucket).
Absolutely brilliant build mate.
Love it.
John
Bench:1/35 HobbyBoss Nagmachon with oodles of Aftermarket
Completed: Vespid 1/72 Comet A10
Shelf: Lots (82 Kits of multiple scales) of Armour + couple of Flappy / Wing Things, found a KV2 95% built and primed four years ago. Plus a few Lego Tech kits, to help restore MoJo
Completed: Vespid 1/72 Comet A10
Shelf: Lots (82 Kits of multiple scales) of Armour + couple of Flappy / Wing Things, found a KV2 95% built and primed four years ago. Plus a few Lego Tech kits, to help restore MoJo
-
wappynutter
- Chief Warrant Officer 3
- Posts: 2256
- Joined: Mon Jun 17, 2013 11:39 pm
- Location: Sutton in Ashfield, Nottinghamshire. UK
Re: Skybow Tiger 1 Late in 1/48
Thanks John, photo bucket I can manage apart from the occasional flash player reload issue or install redirect..Donkeywalloper wrote:Way to go Andy.
Worth the wait (happens a lot mate and I get so many problems with he crap Photo-Bucket).
Absolutely brilliant build mate.
Love it.
John
Its the Arsey keyboard on the old Dell Laptop that does my nut in!!
Oh well, I gave up the old Desktop PC corner for a worthy cause....
Little Evie-mai... 7 months and all Teeth and Commando crawling shouting for dinner! My best creation this past year!
Thanks again John... All the best mate.
Re: Skybow Tiger 1 Late in 1/48
Every single time I see that kit of yours Andy I get more impressed. Not only have you done a wonderful job on the build and paint of her (those tools look awesome), but the kit itself is just a sweet thing. Wow!
I'm seriously loving that dio too. Those trees are excellently done and that mud is going to look superb.
Lots of good stuff this update.
You shouldn't be watching the pricks bud... they'll rot your mind.
I'm seriously loving that dio too. Those trees are excellently done and that mud is going to look superb.
Lots of good stuff this update.
You shouldn't be watching the pricks bud... they'll rot your mind.
Re: Skybow Tiger 1 Late in 1/48
This project is really coming together now Excellent job on the tools and the dio base,this project is going to be a real stunner when you get done with it.
Steve
Make something idiot proof and someone will come along and make a better idiot.
Make something idiot proof and someone will come along and make a better idiot.
-
wappynutter
- Chief Warrant Officer 3
- Posts: 2256
- Joined: Mon Jun 17, 2013 11:39 pm
- Location: Sutton in Ashfield, Nottinghamshire. UK
Re: Skybow Tiger 1 Late in 1/48
Thanks Mike, much appreciated bud.....Coen wrote:Every single time I see that kit of yours Andy I get more impressed. Not only have you done a wonderful job on the build and paint of her (those tools look awesome), but the kit itself is just a sweet thing. Wow!
I'm seriously loving that dio too. Those trees are excellently done and that mud is going to look superb.
Lots of good stuff this update.
You shouldn't be watching the pricks bud... they'll rot your mind.
...and as the GB states.... All in your Honour mate!...
Well deserved too, you are both a gentleman and a scholar!
As for the pricks, gotta keep watching to see all you guys build all those real cool kits!!
I'll close my eyes and watch with the sound off from now on tho'.... Lol....
Take care mate, thanks again..
Hey Steve, thanks again mate for dropping by for a look and a comment, much appreciated..Hillbilly wrote:This project is really coming together now
Stay safe and well guys, till the next time....
-
wappynutter
- Chief Warrant Officer 3
- Posts: 2256
- Joined: Mon Jun 17, 2013 11:39 pm
- Location: Sutton in Ashfield, Nottinghamshire. UK
Re: Skybow Tiger 1 Late in 1/48
......Take 2......
So...... back with an image spamming to bring the thread up to date. I have shared a couple of progress pictures on the Facebook page recently so best see to the thread..
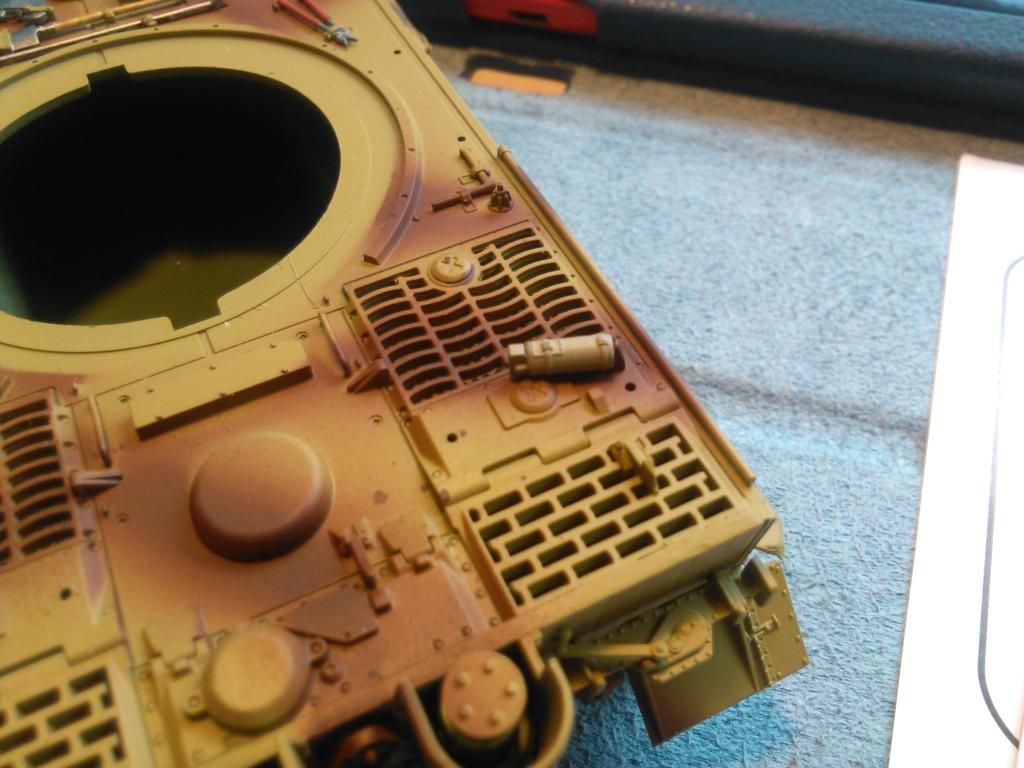
Firstly i re test the Tiger and Dio for any problems....

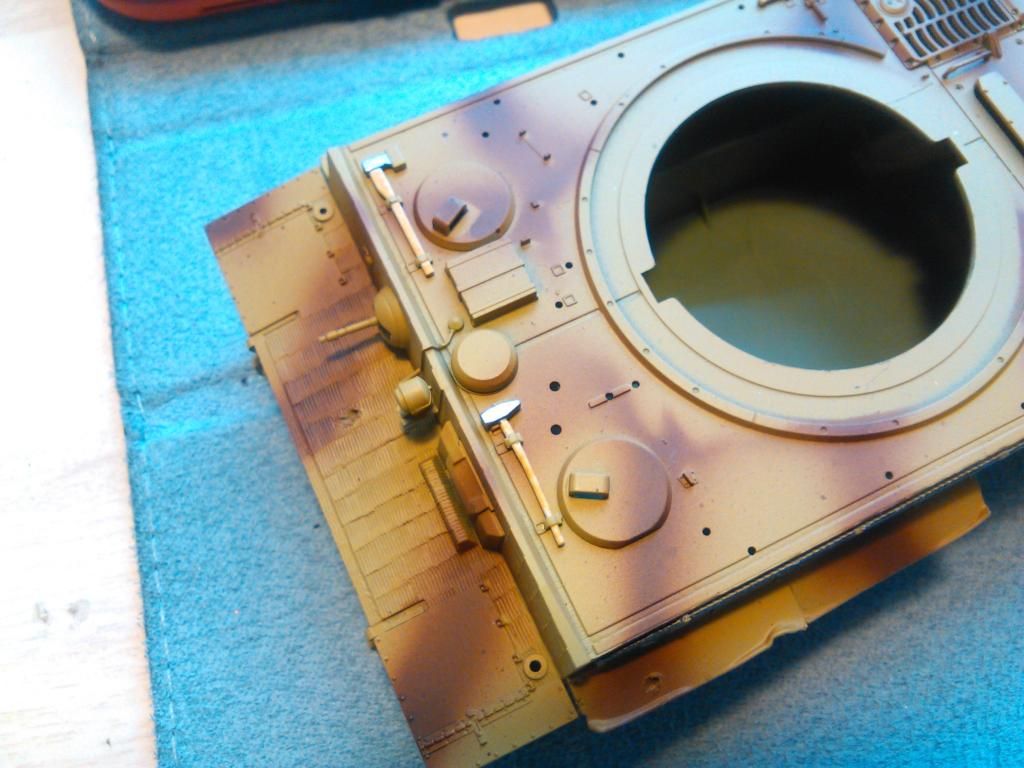
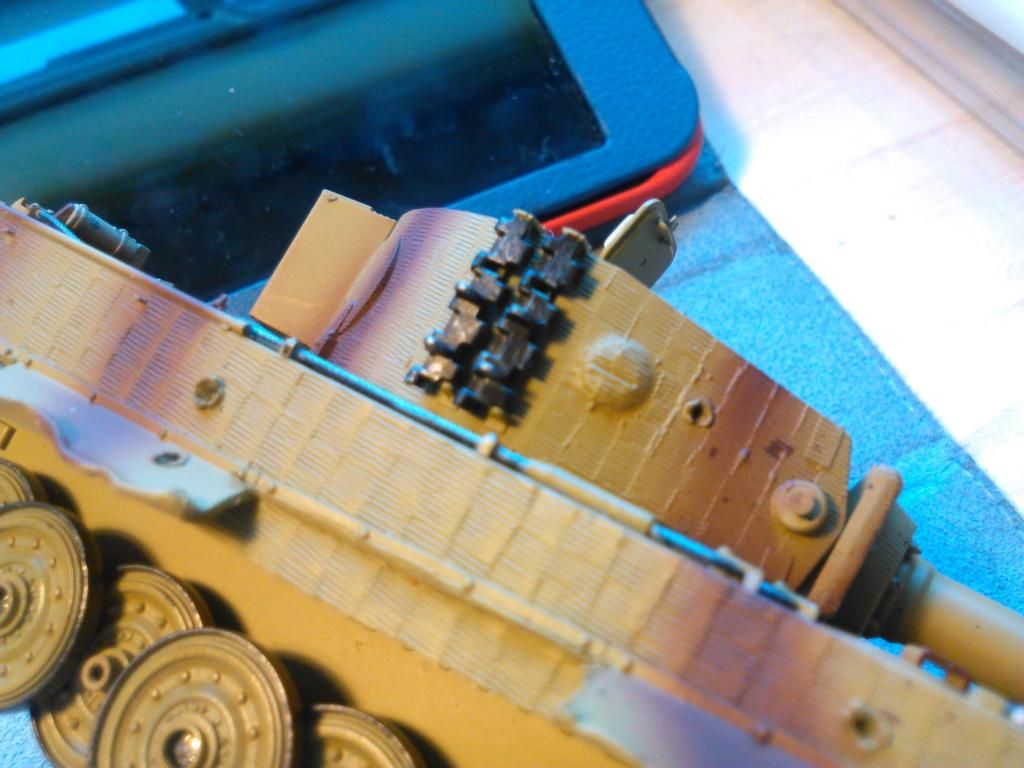
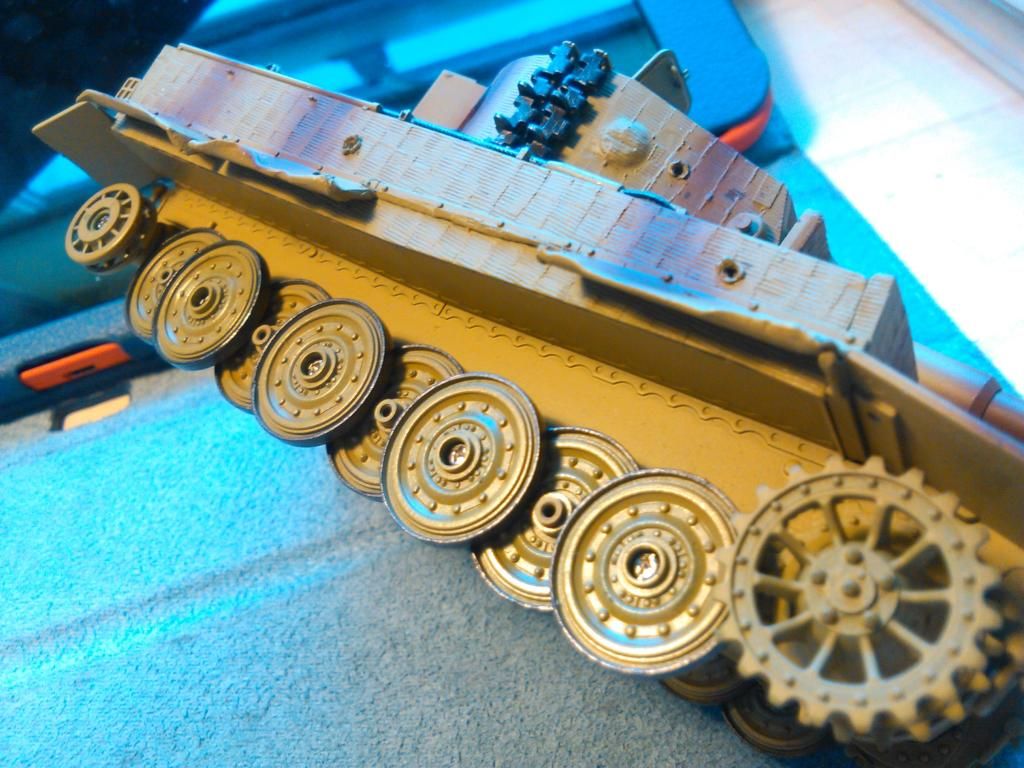
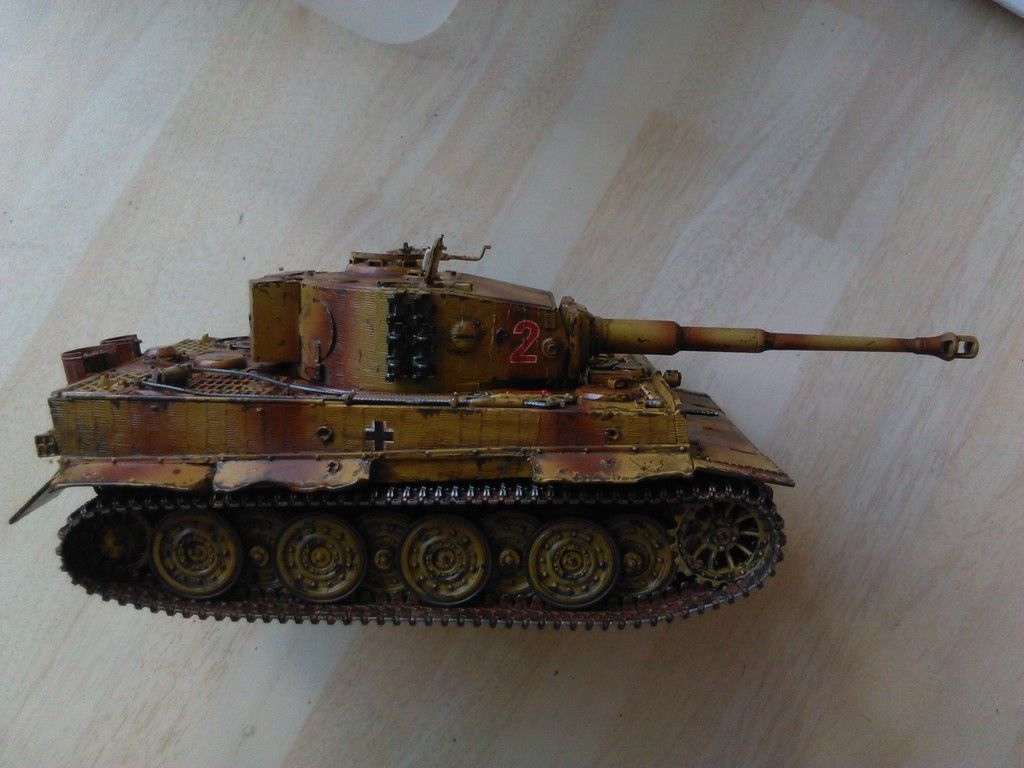
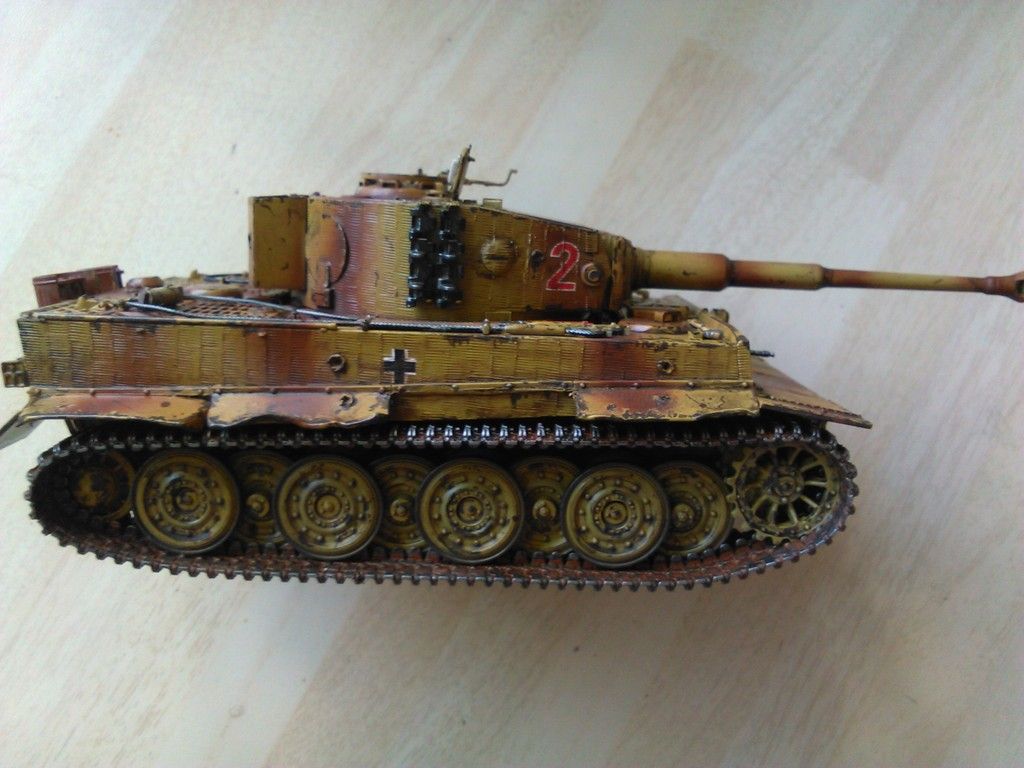
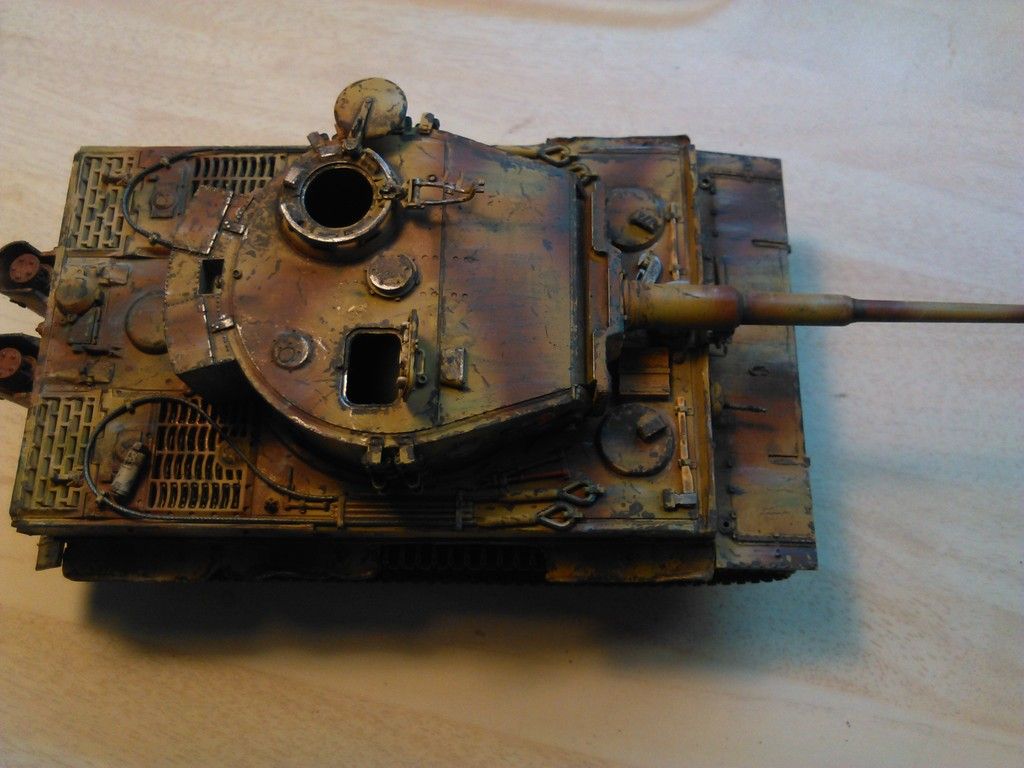
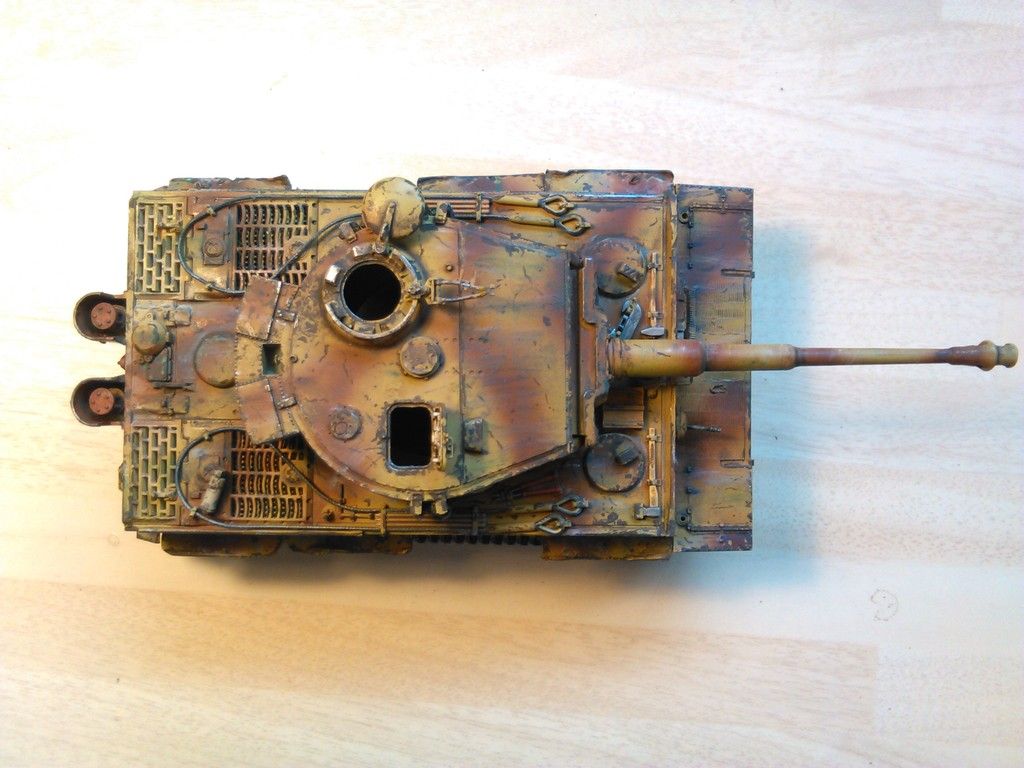
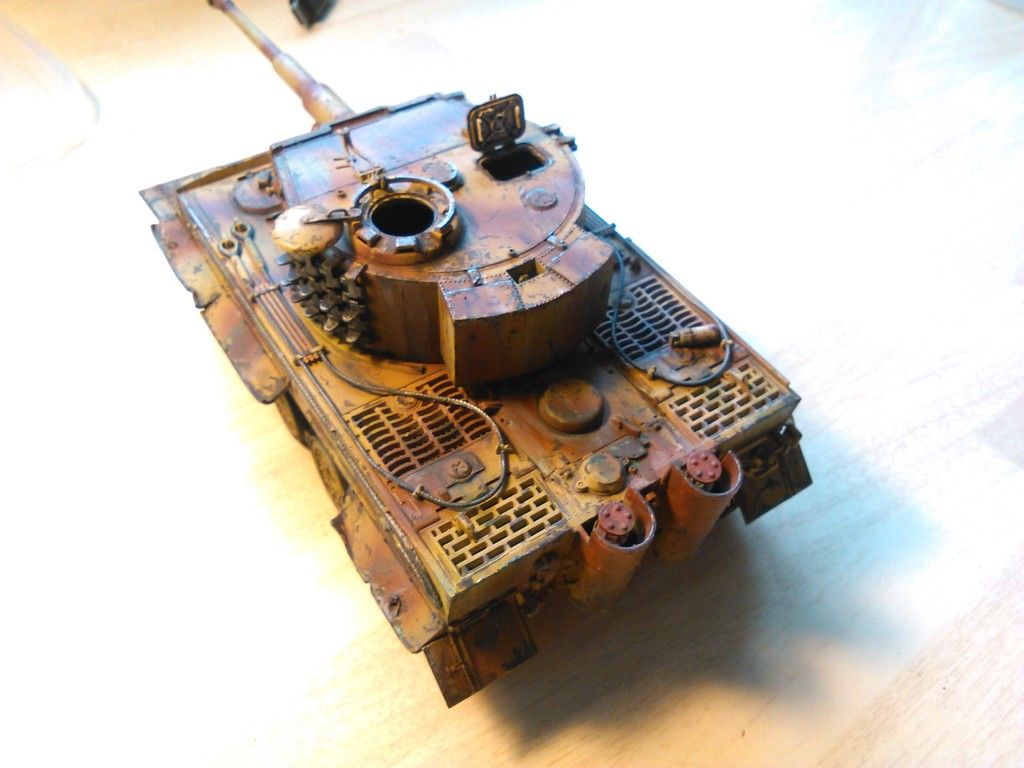
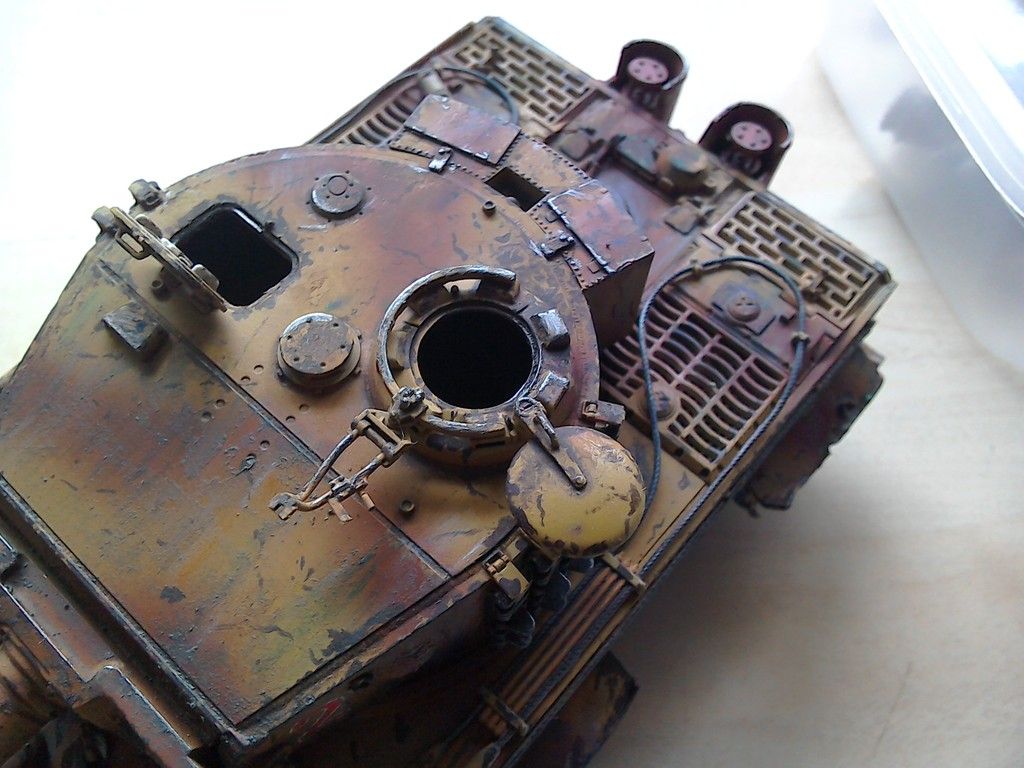
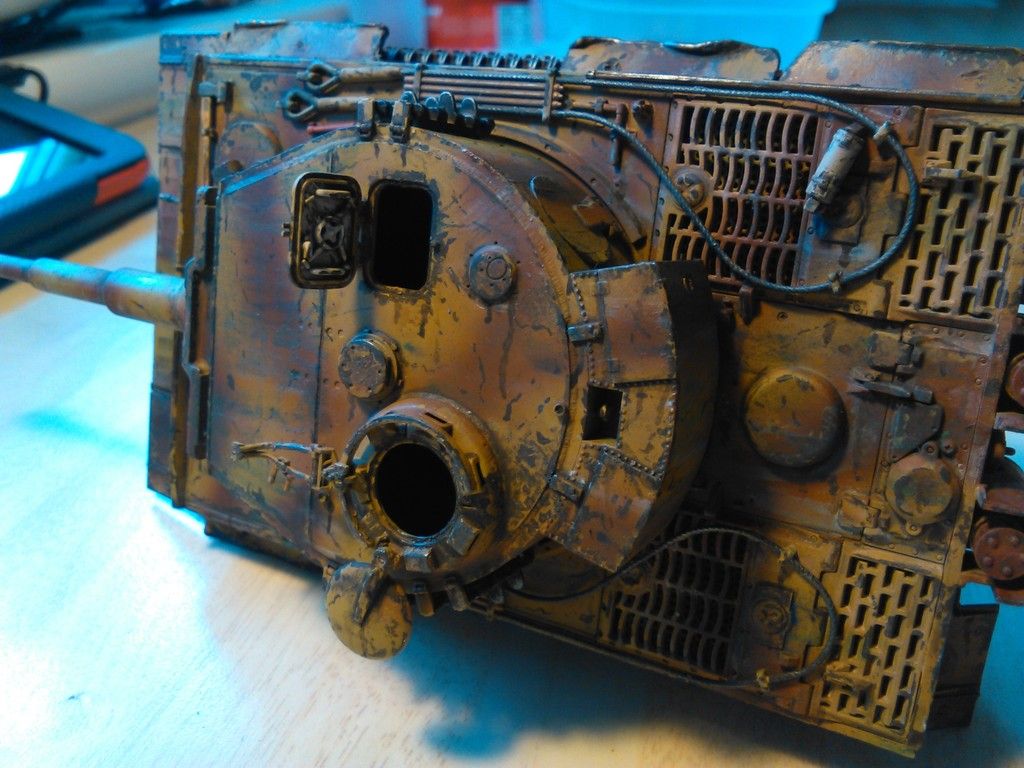
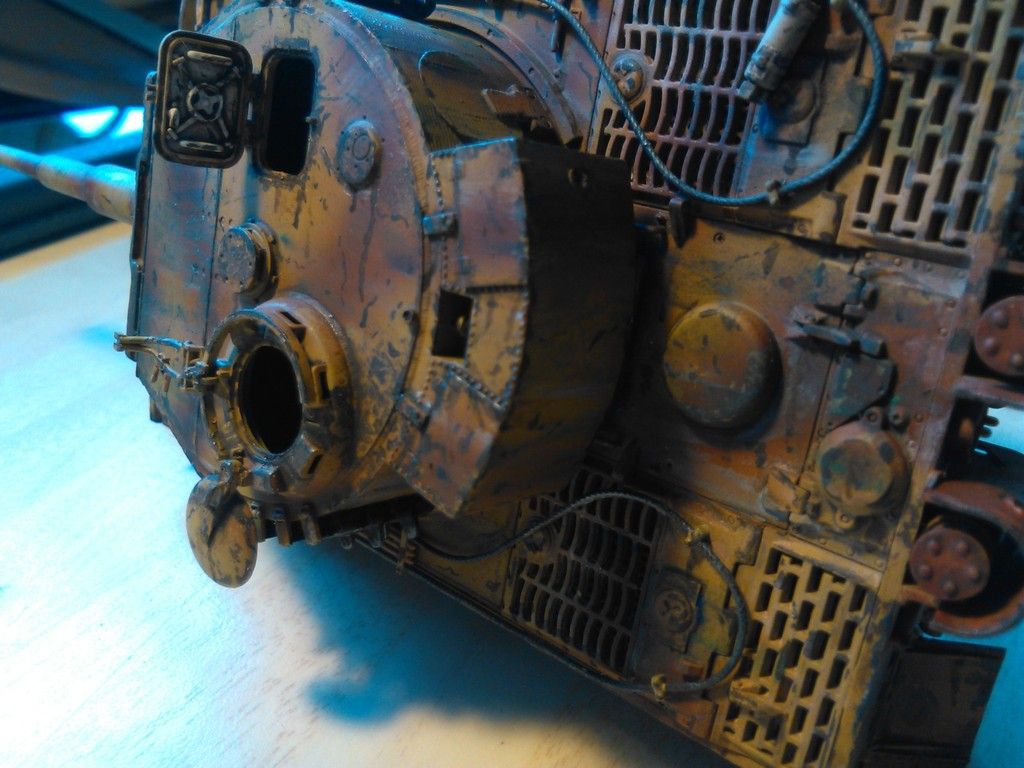
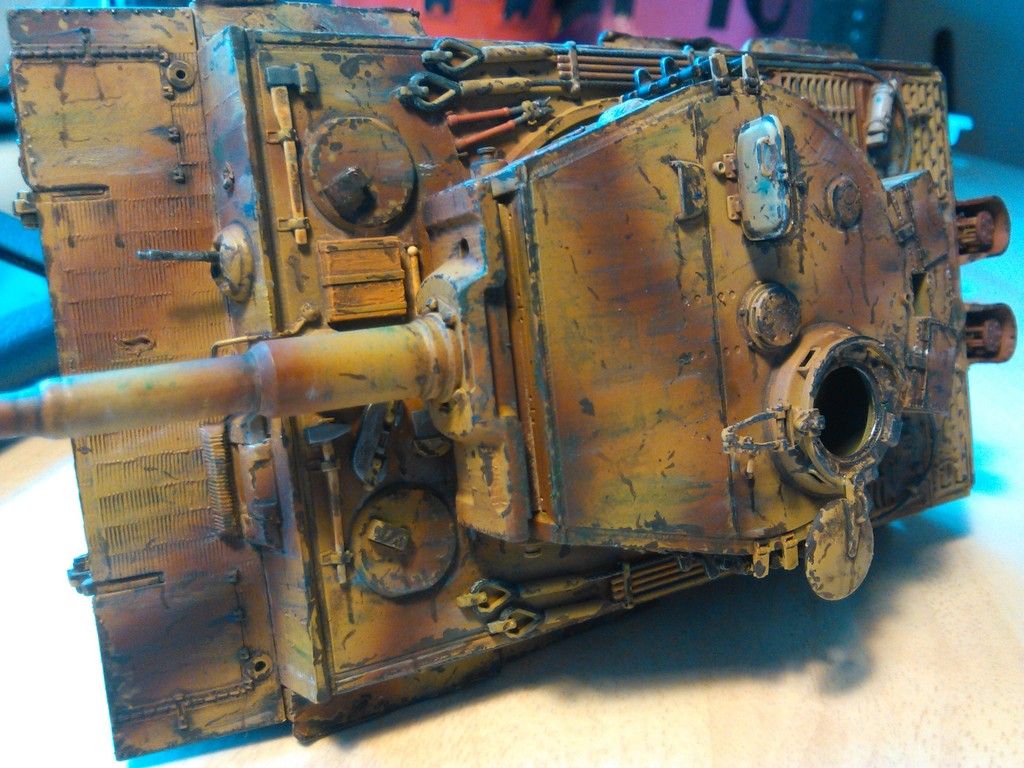
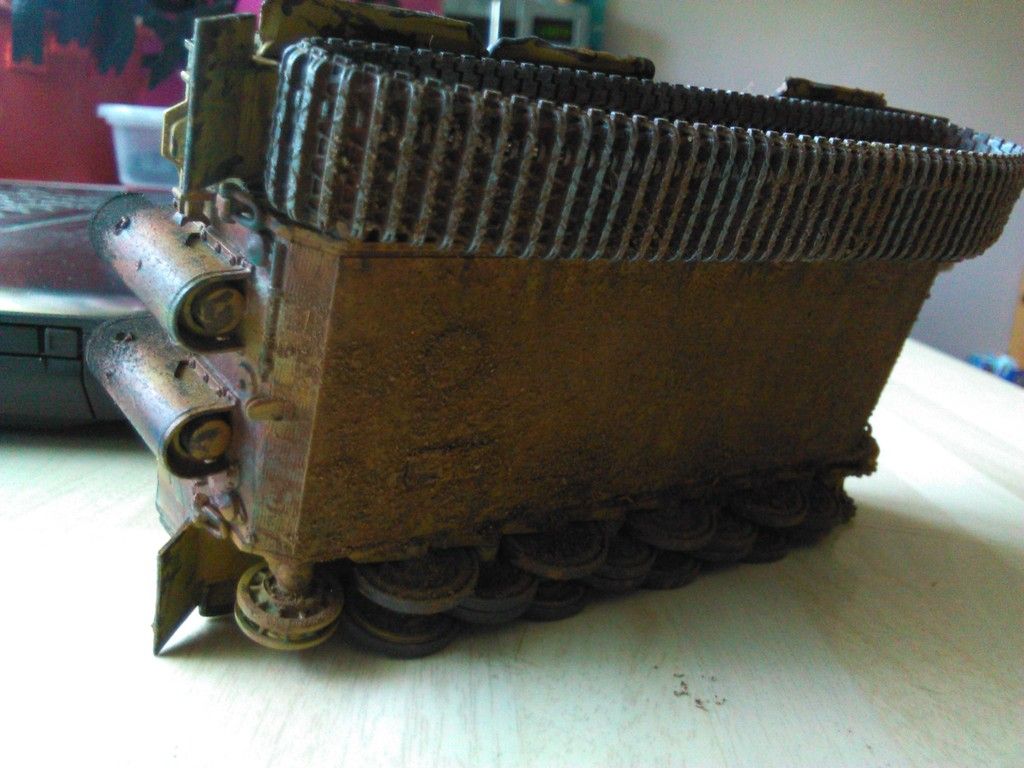
Then set about finishing off the final details..... Wooden box on the front first..


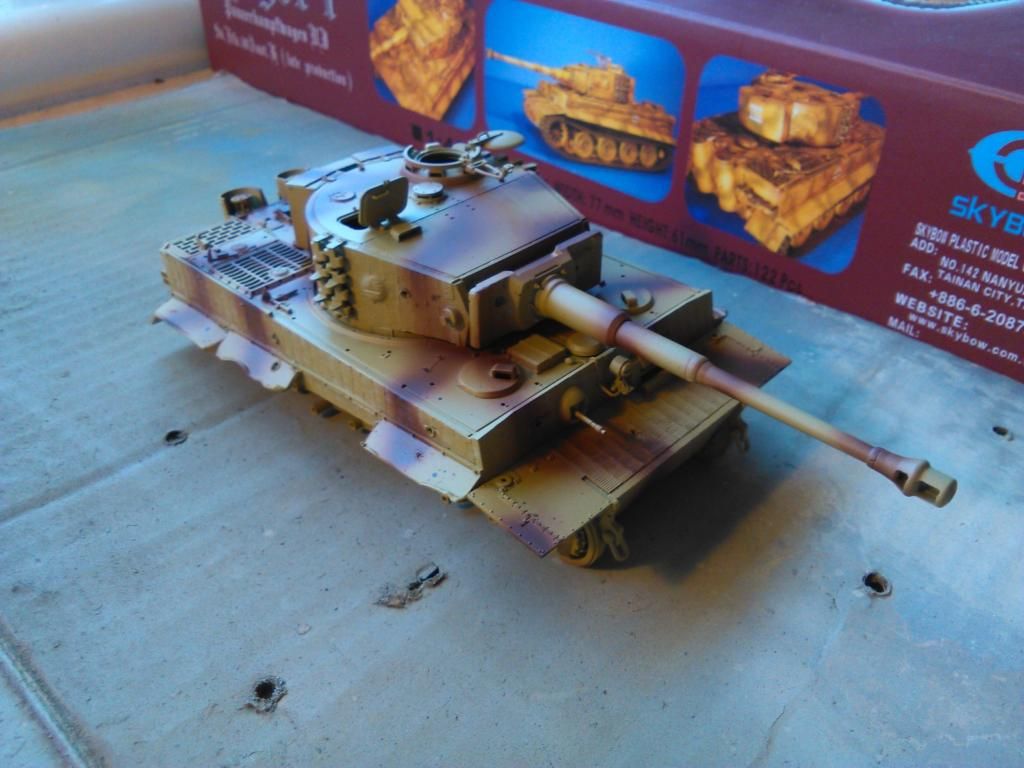
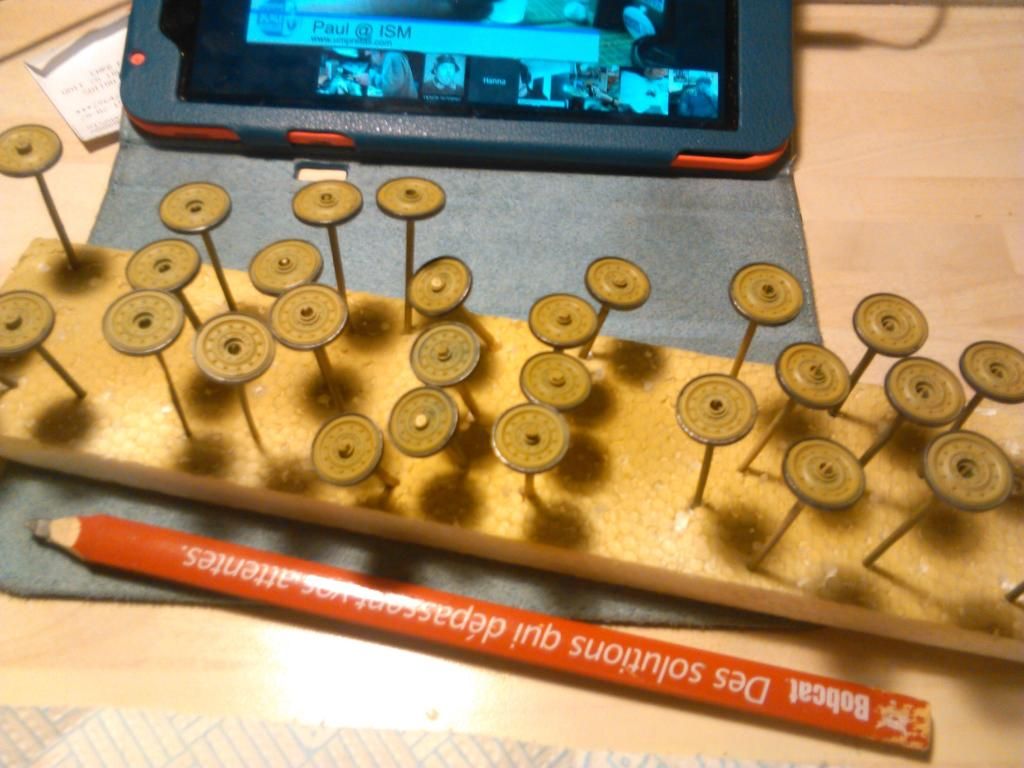
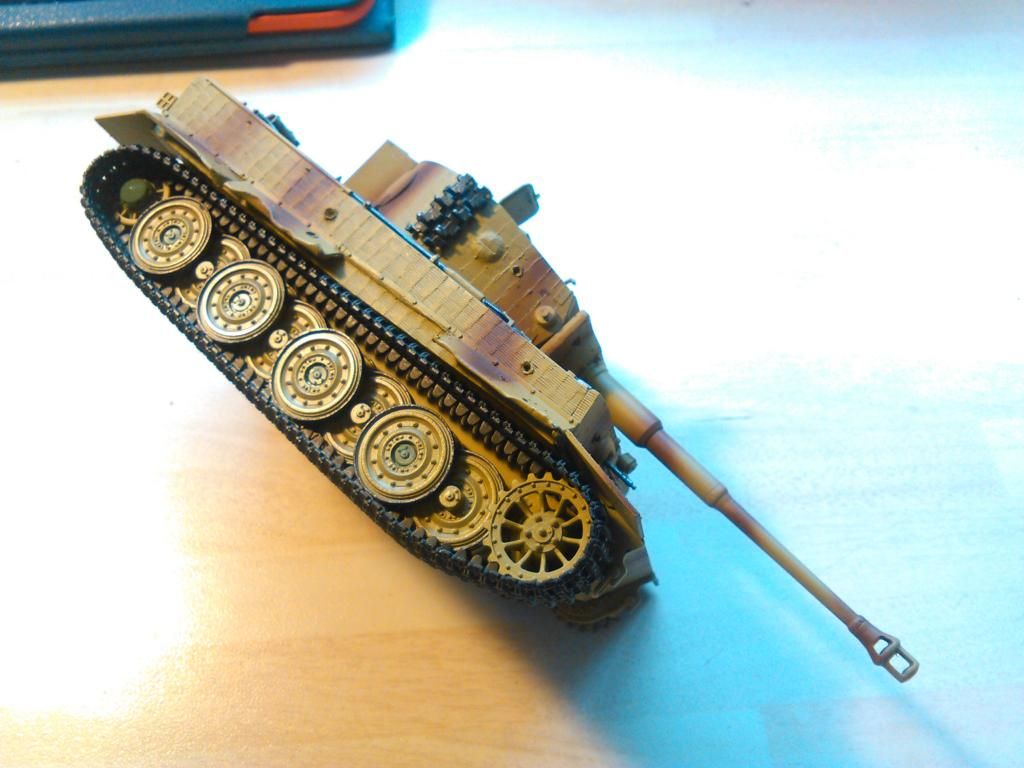
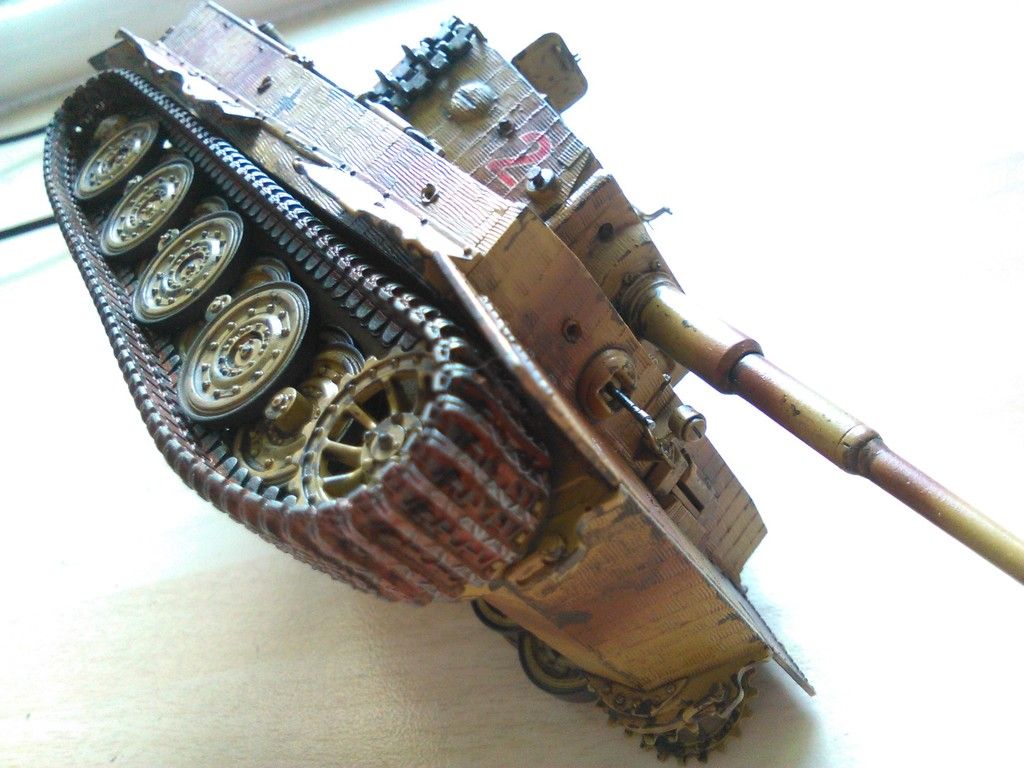
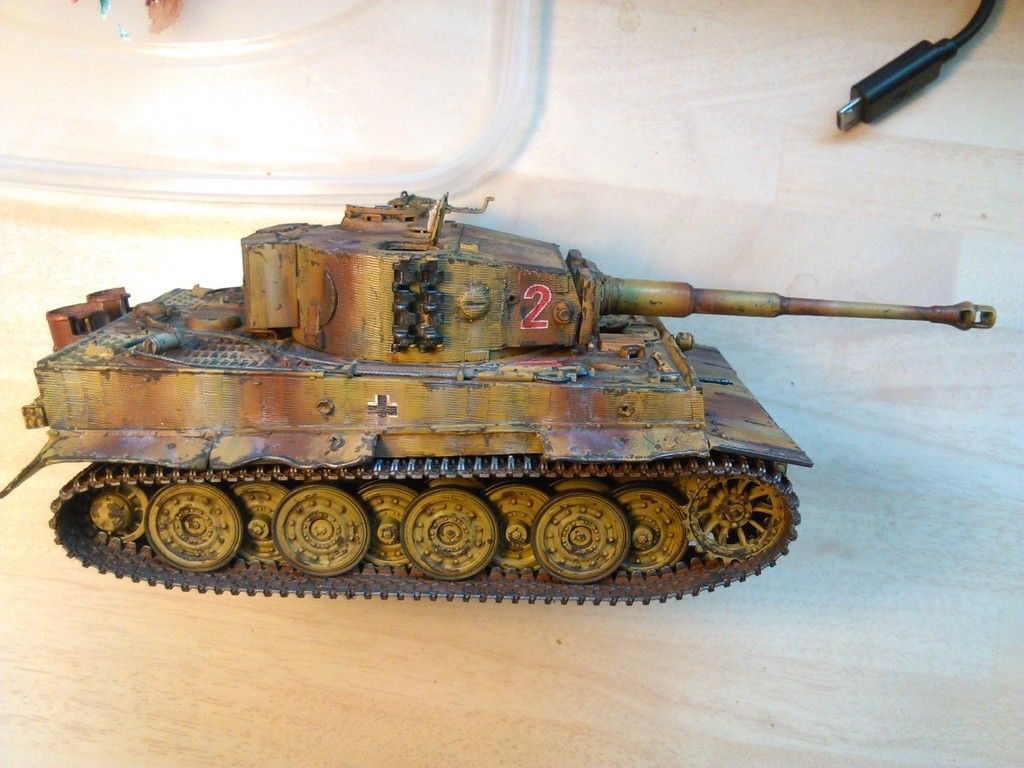
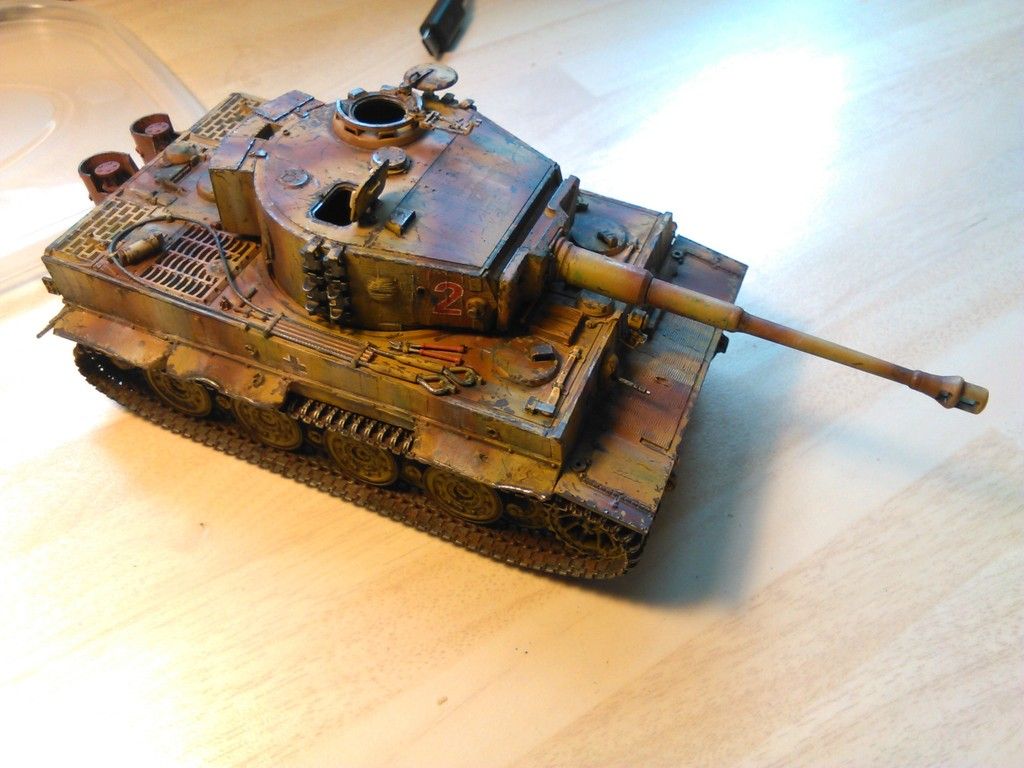
Hubs and Caps are dry so they get the Dunkelgelb treatment...


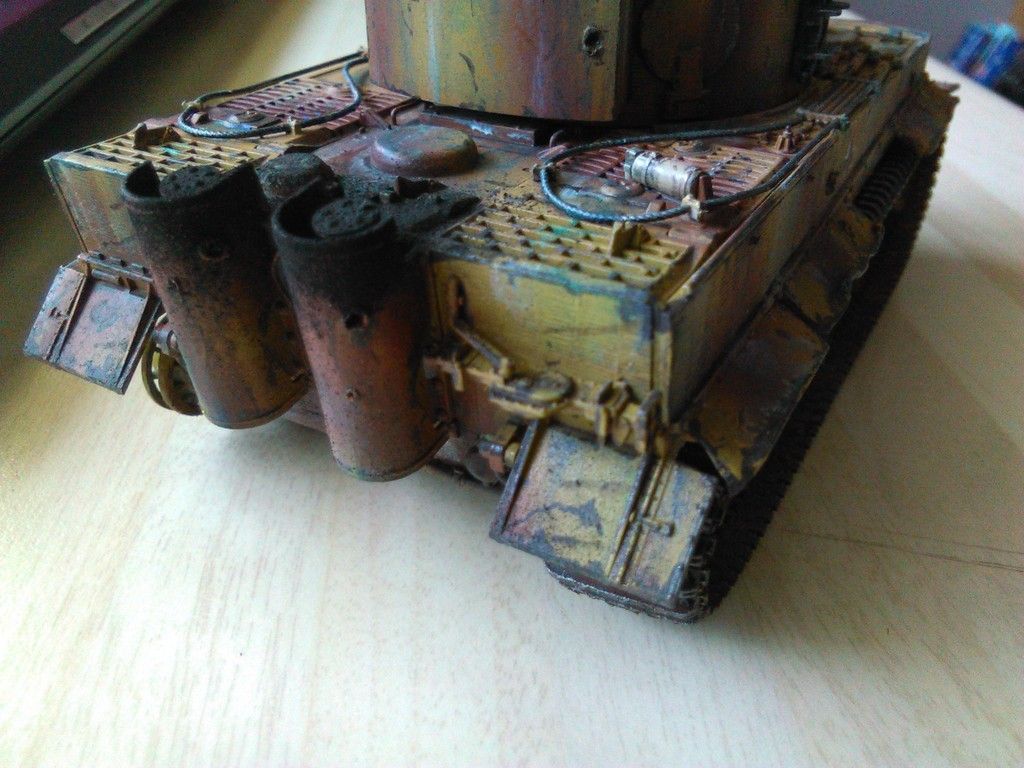
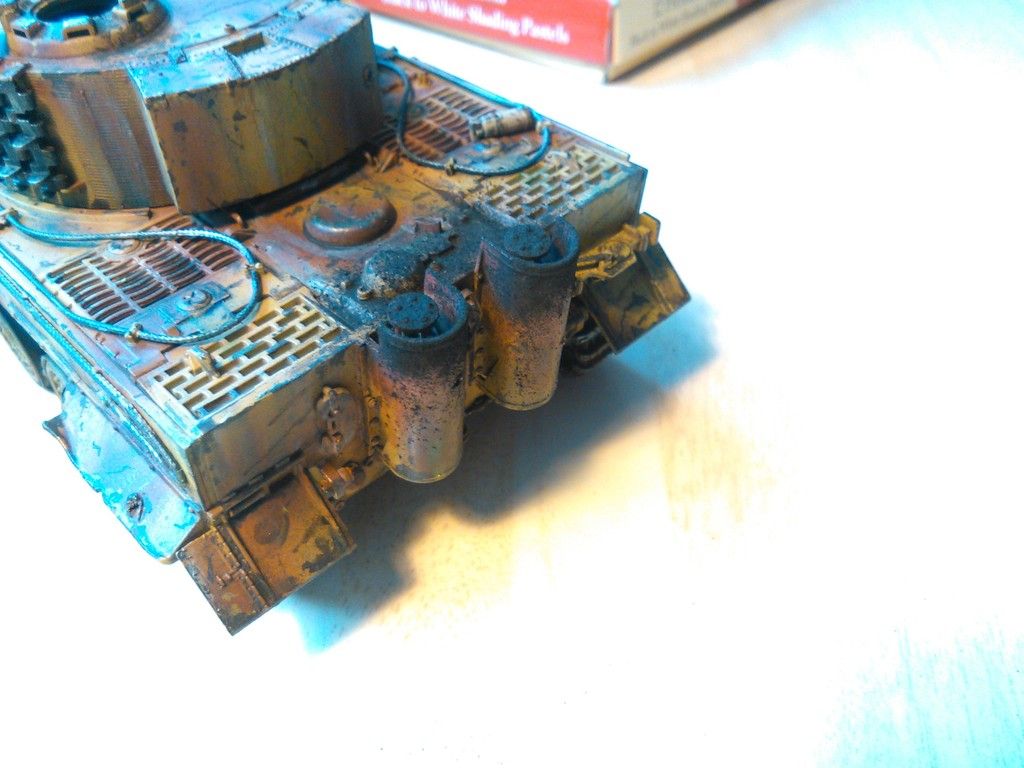
Exhaust stacks get a rust coloured paint up....


Finished...


...and finally ready for a Gloss coat..
In order to give the Tank a chance to dry fully on all the details, and prepare myself for the bad part of the build..... we start and make an "edge" for the diorama base..


After making up this i decided that it was too tight and had too many glued joints so scrapped this and re made exactly the same but slightly bigger and with only one glue joint at the rear corner...
Ready.....

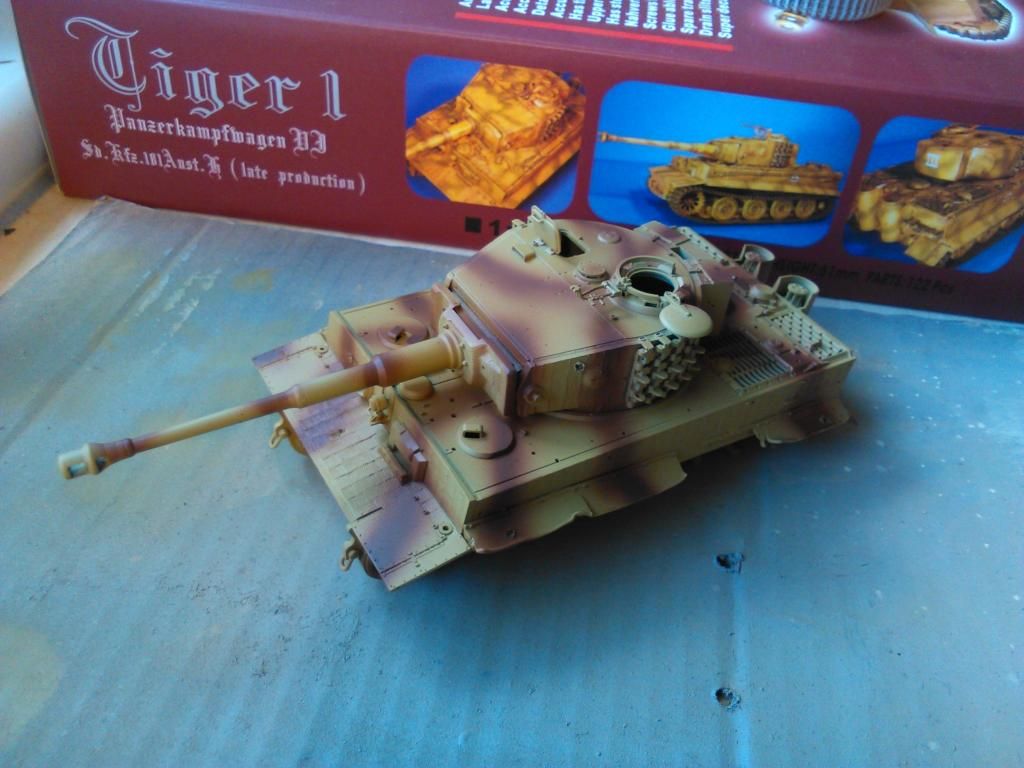
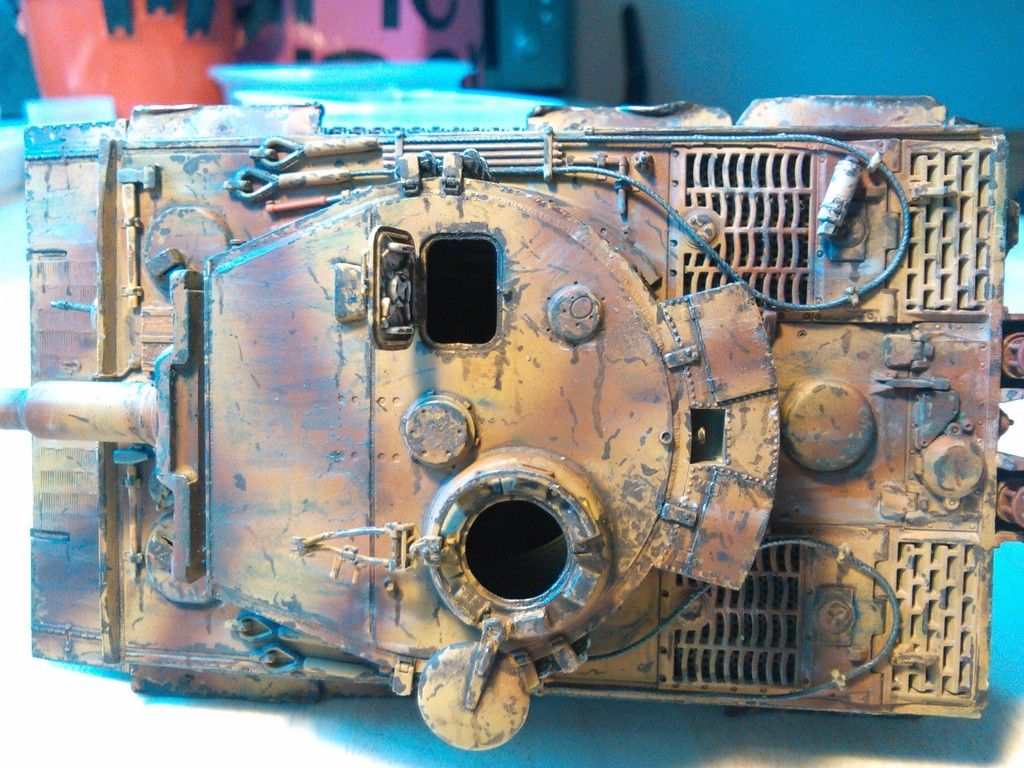
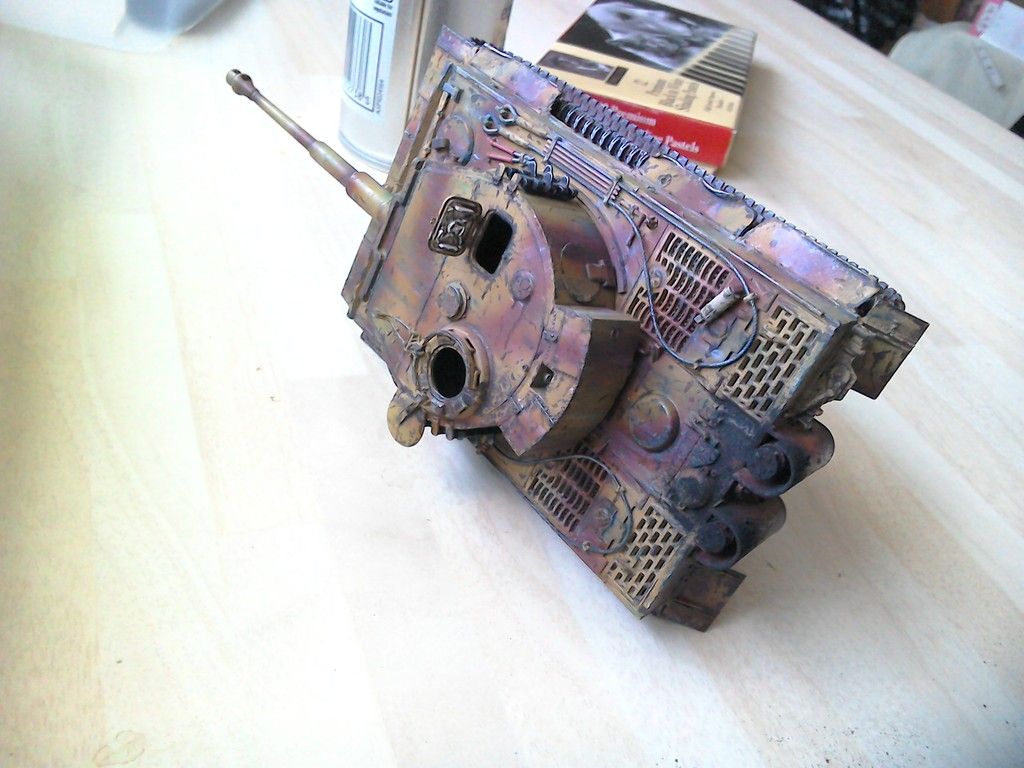
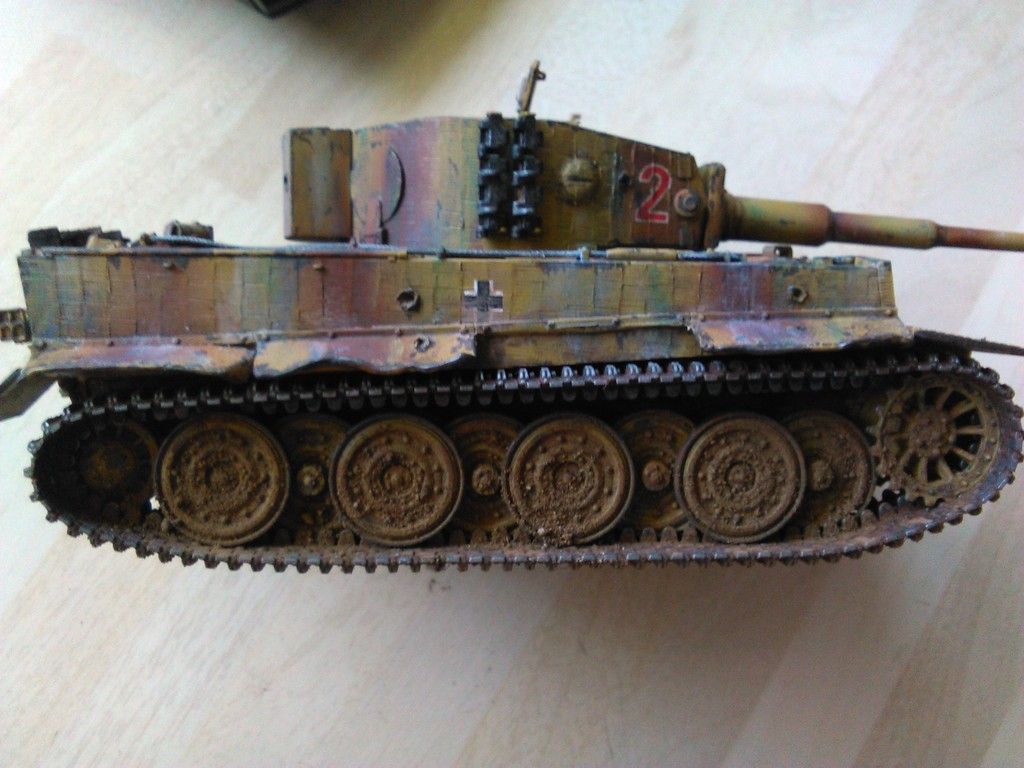
...and this is where it all goes a little bit rough as i choose to "Chip" the build and totally ruin it in my opinion... Well... maybe not totally, but i wish i had been a little more " Less is more " minded as some of the chips look just too big and brush like....
We live and learn, my first real attempt at this technique at the larger scale.....
I decided too add a dunkelgelb chipping to the Rotbraun camo and once dry add the darker chips inside the lighter colour...


Then over kill with the dark chips....


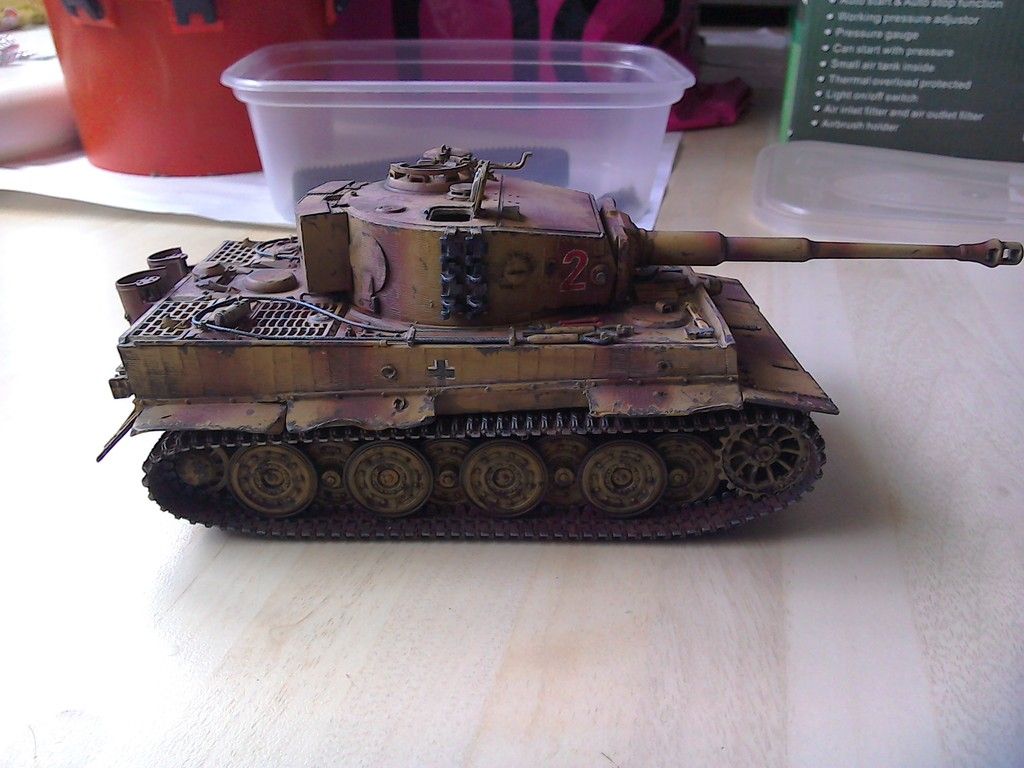
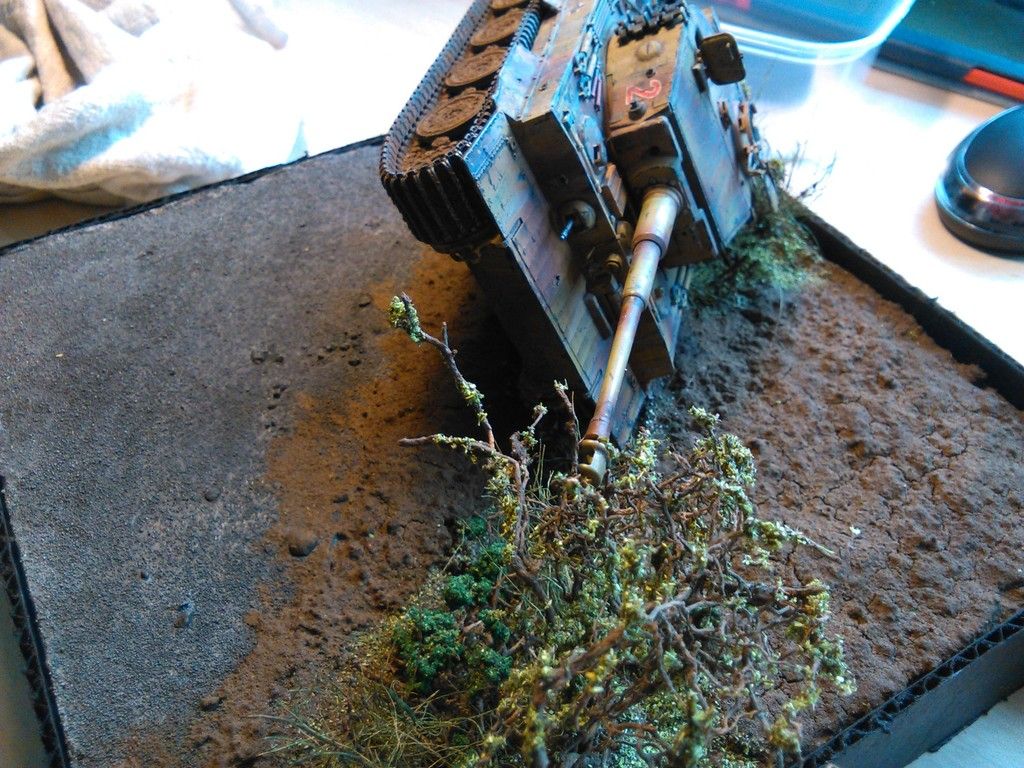
Well, as you can see a little OTT, but she is a broken down, pushed off the road, dumped on its side on the roadside Battle damaged Beast...
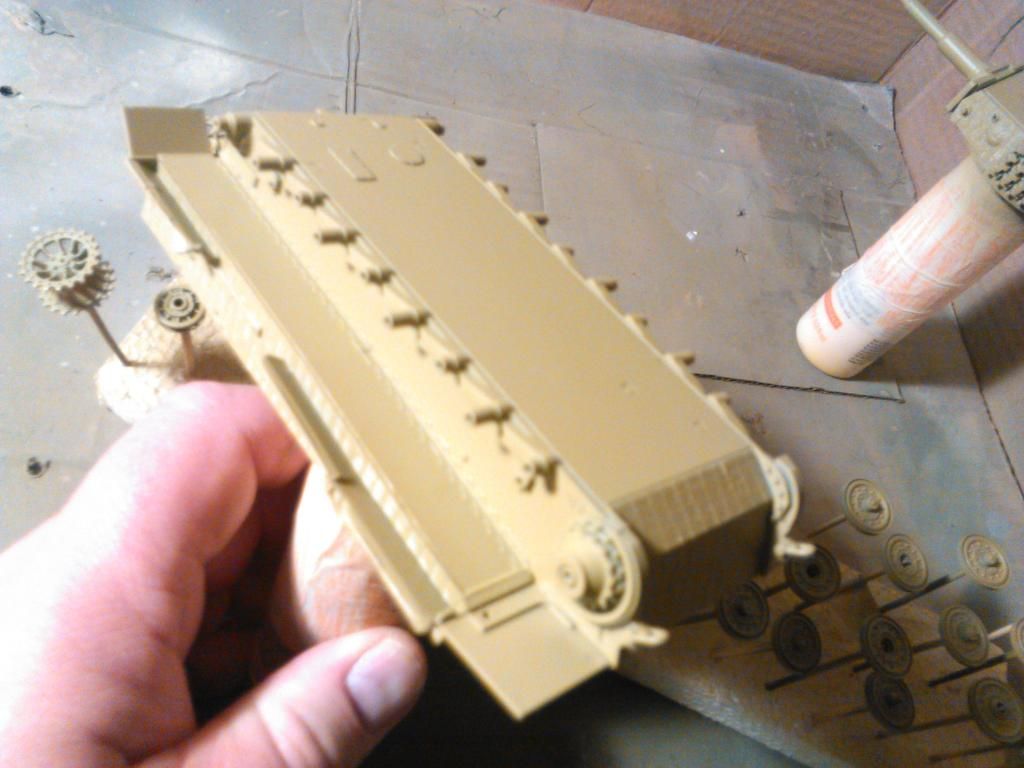
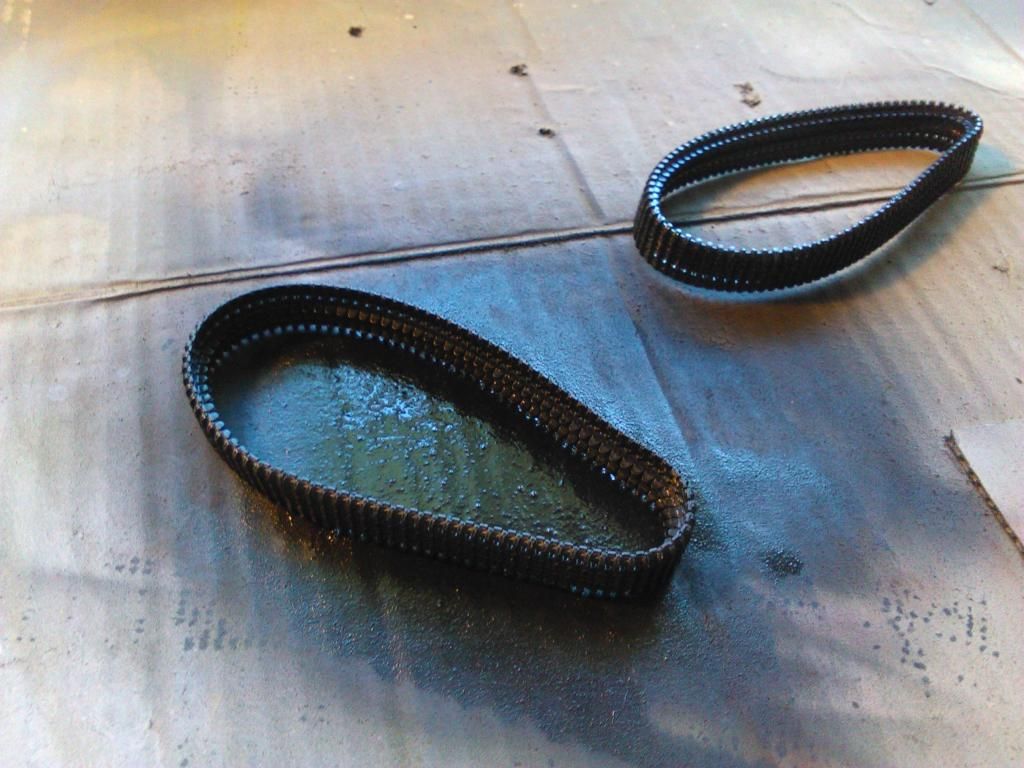
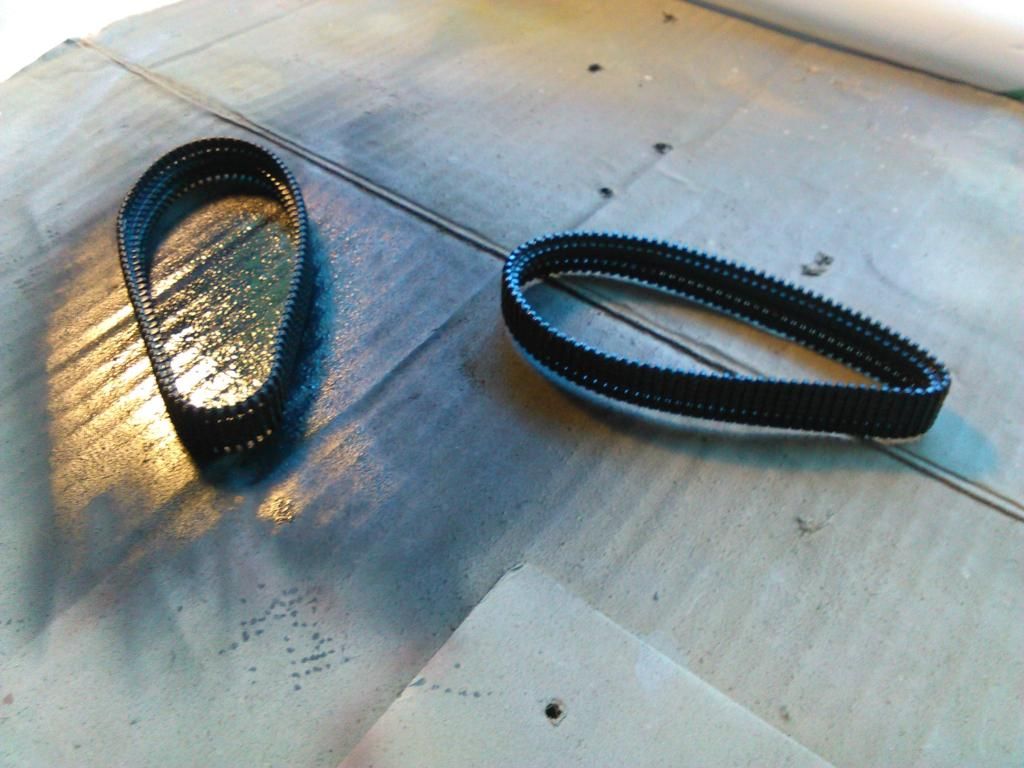
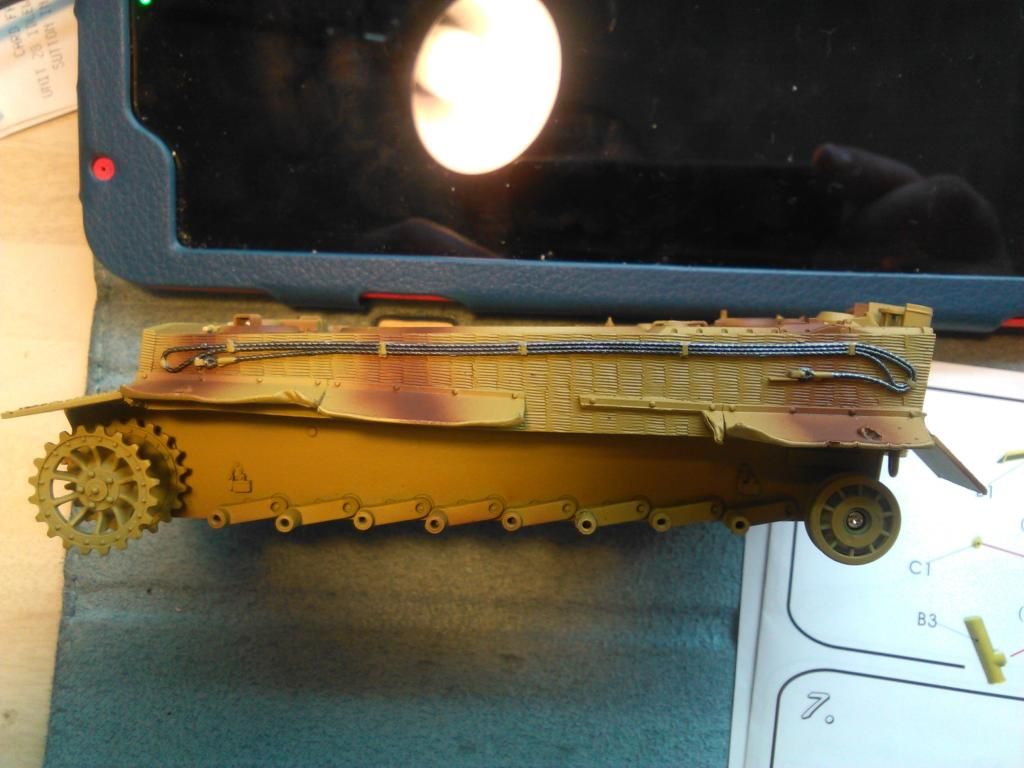
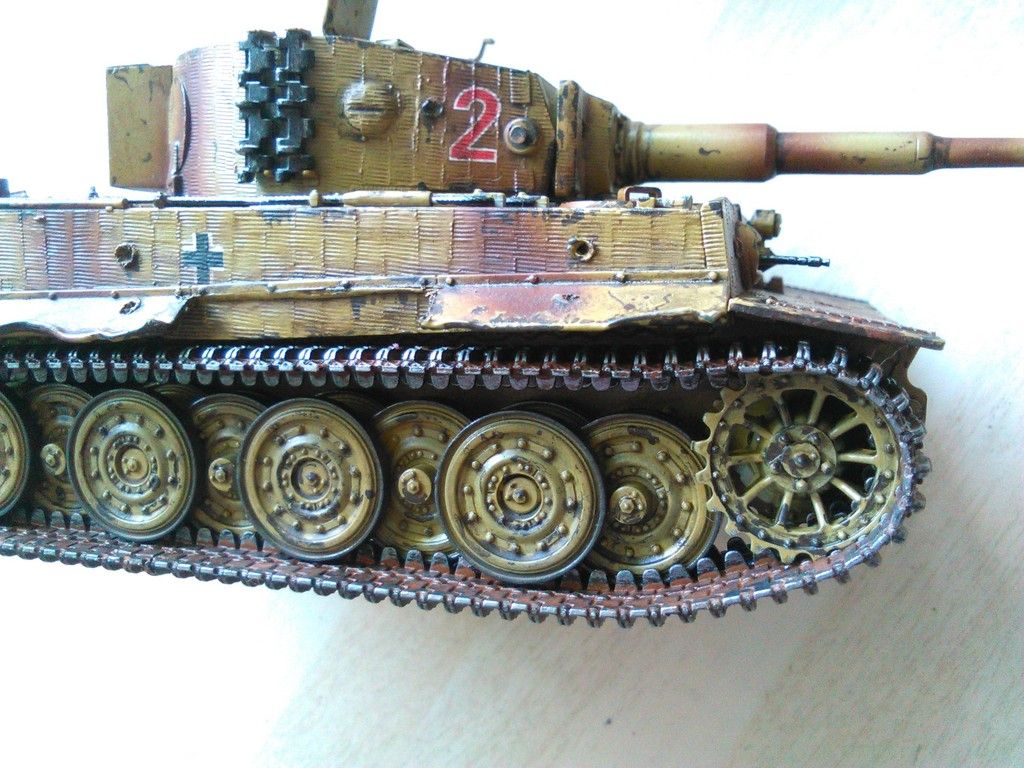
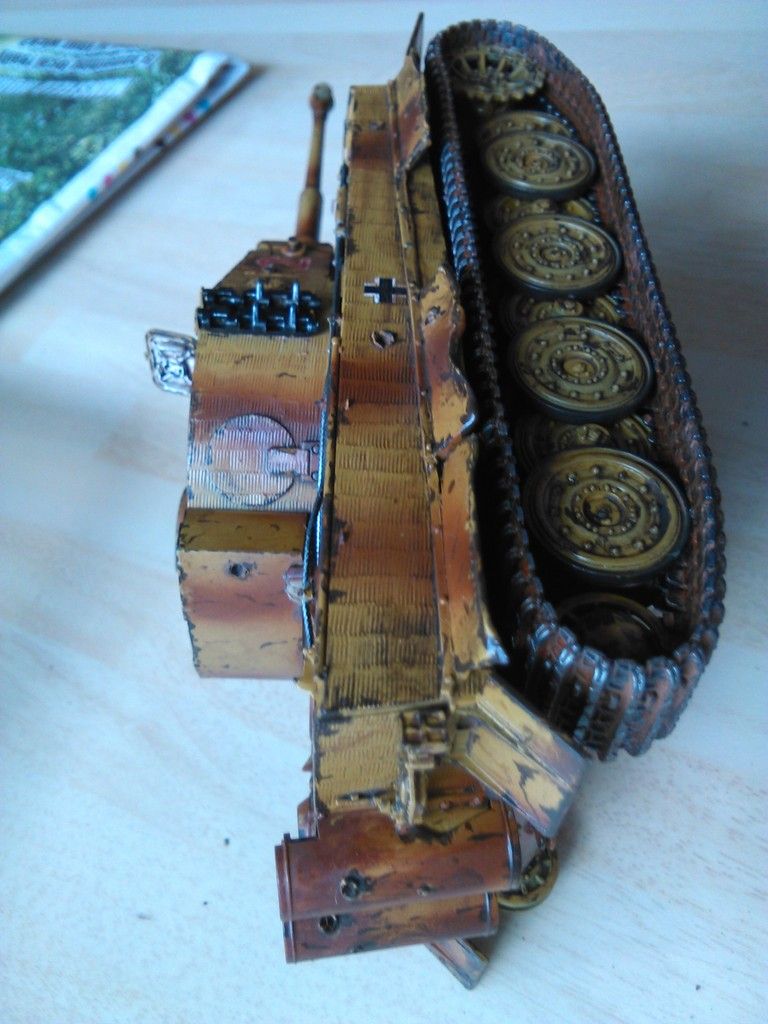
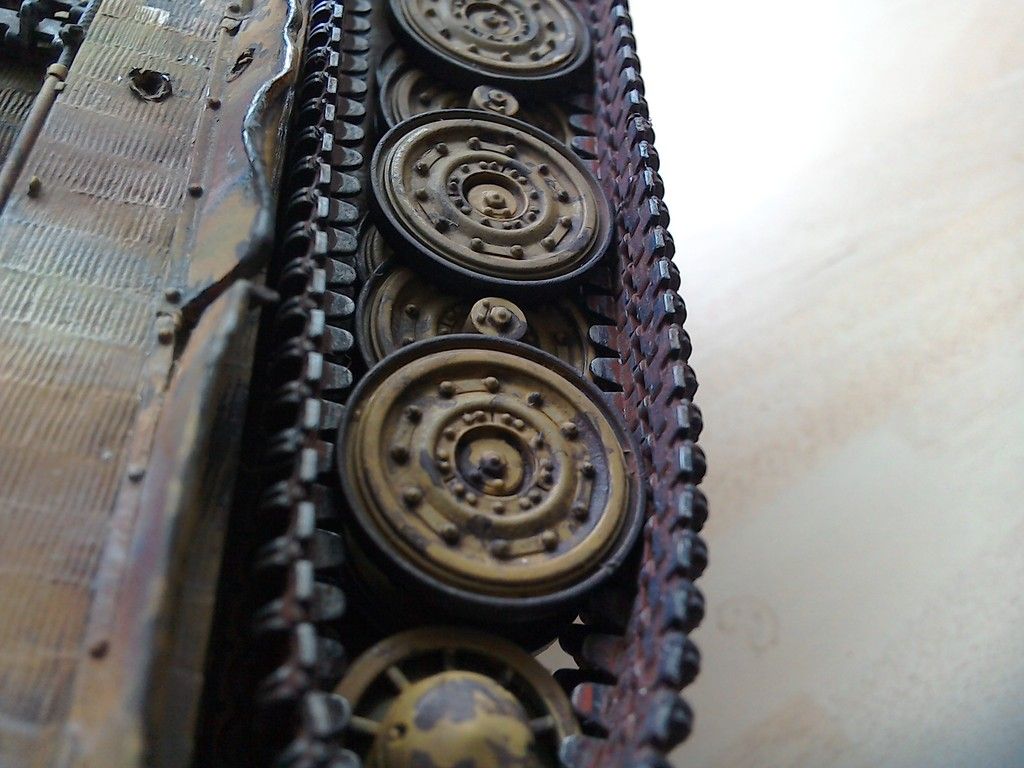
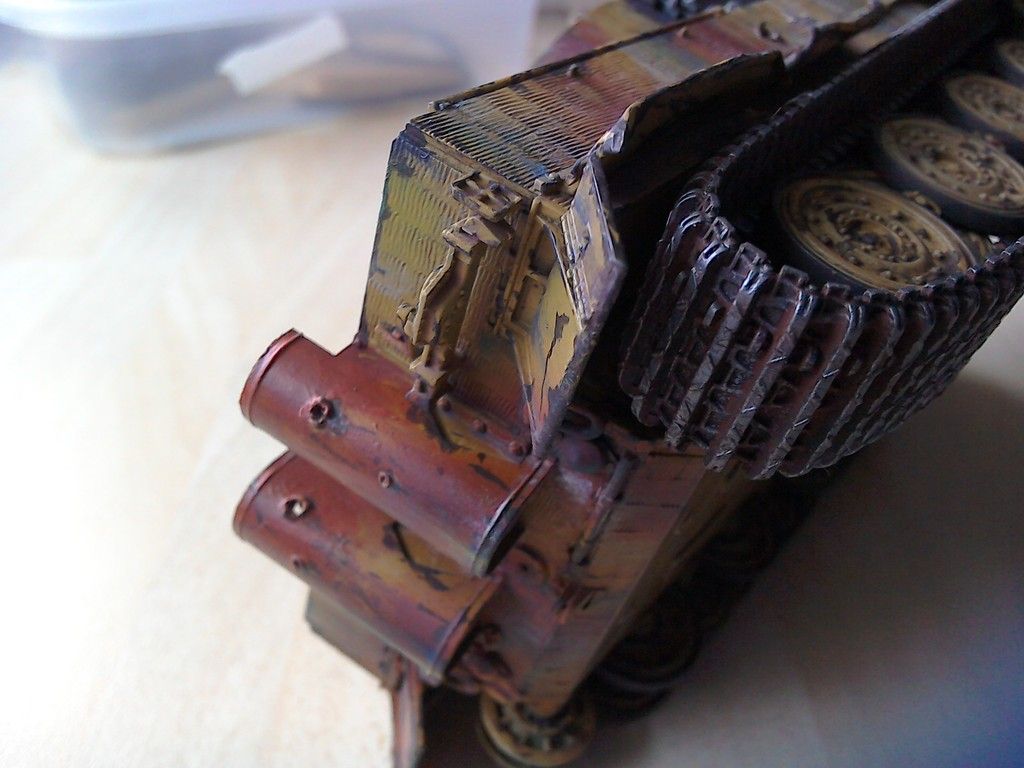
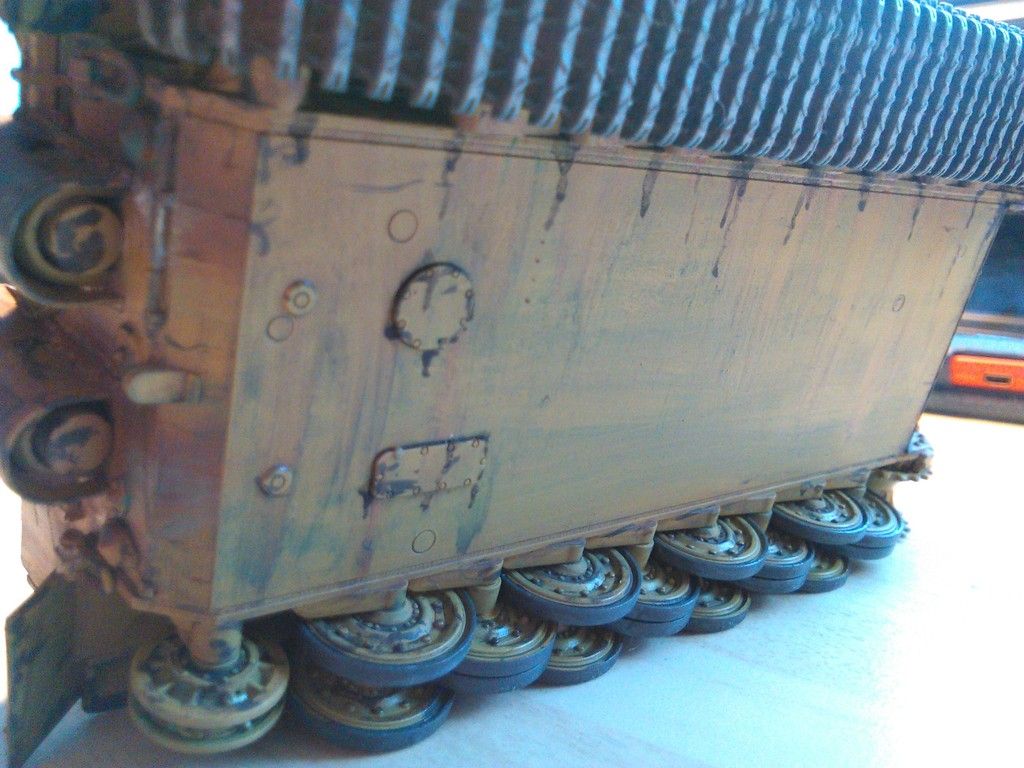
The old rubber track gets a dry brush of steel gun colour....

For a rubber band the detail is quite good....


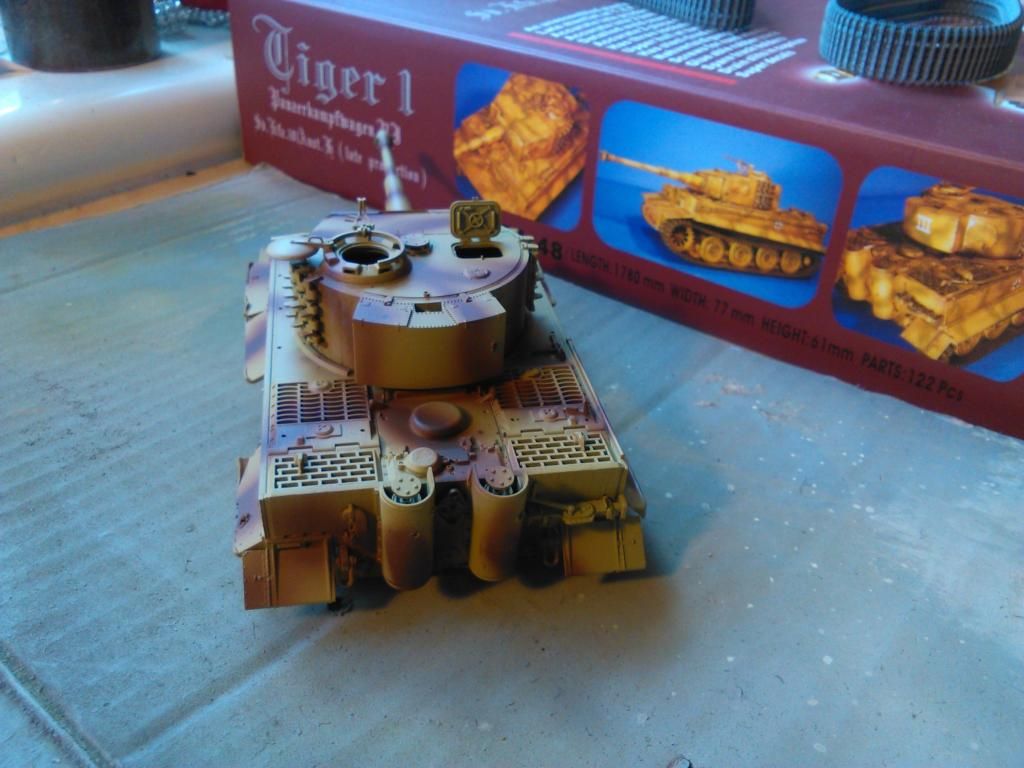
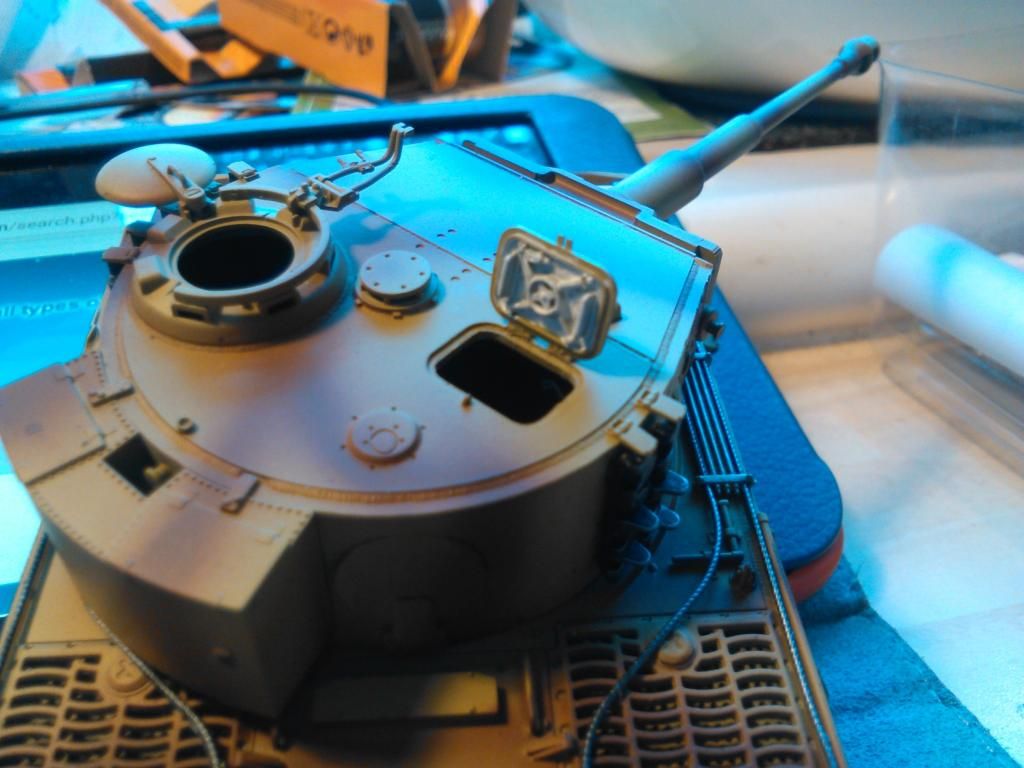
Outside getting a gloss coat to seal them in for decalling....


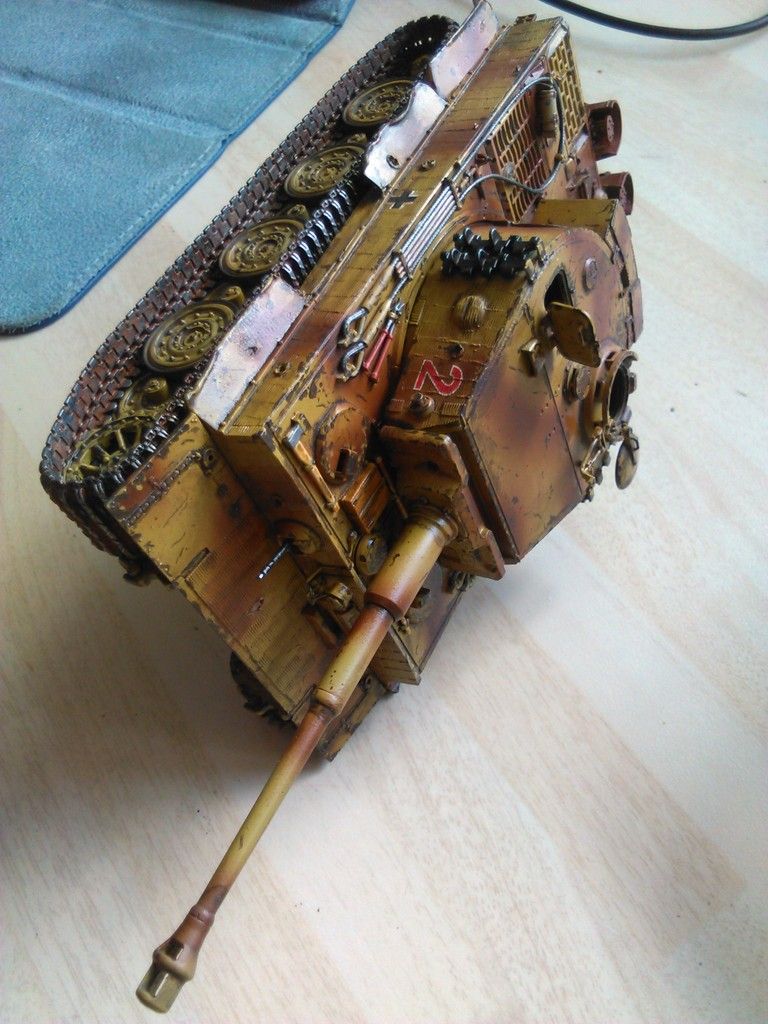
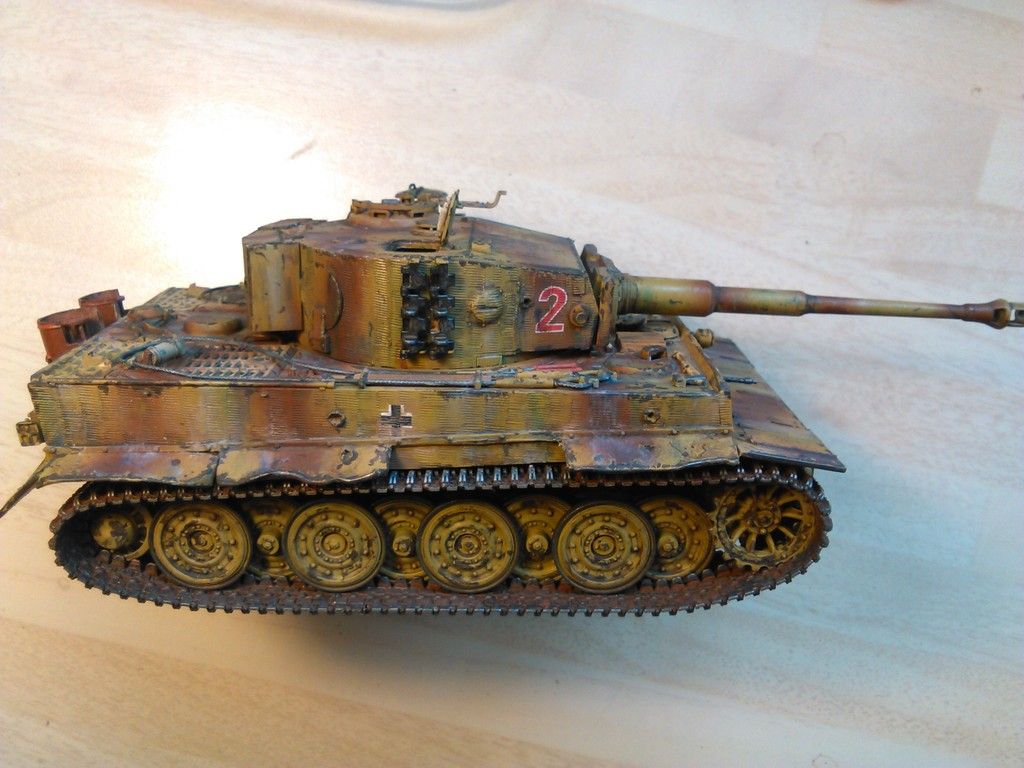
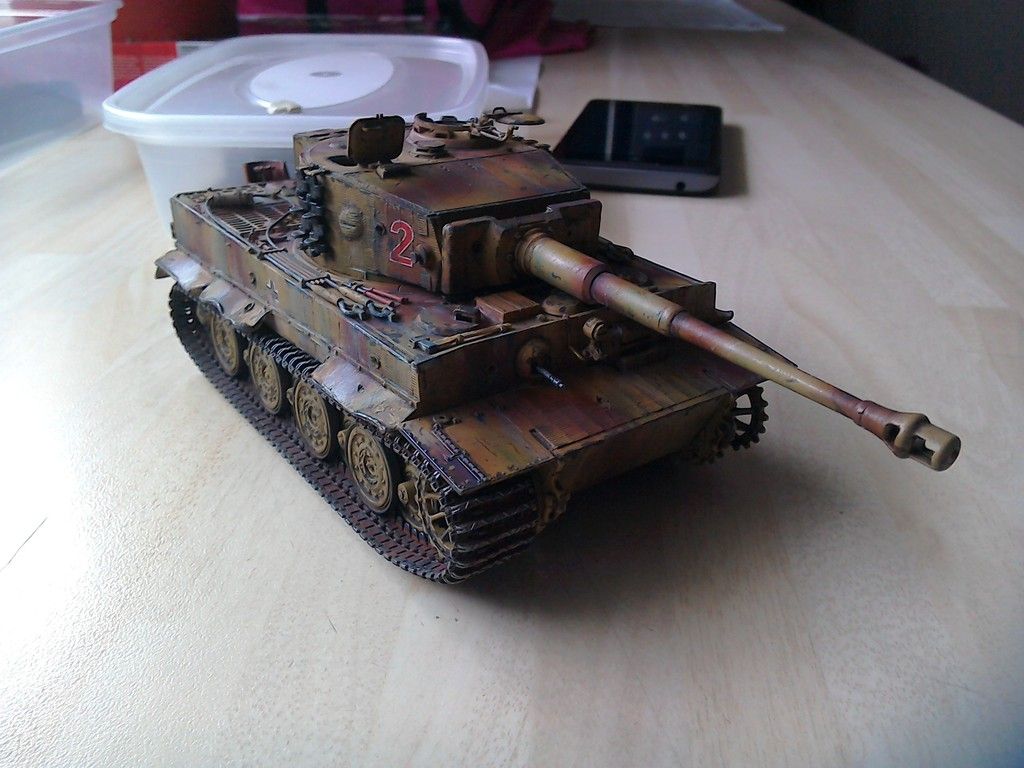
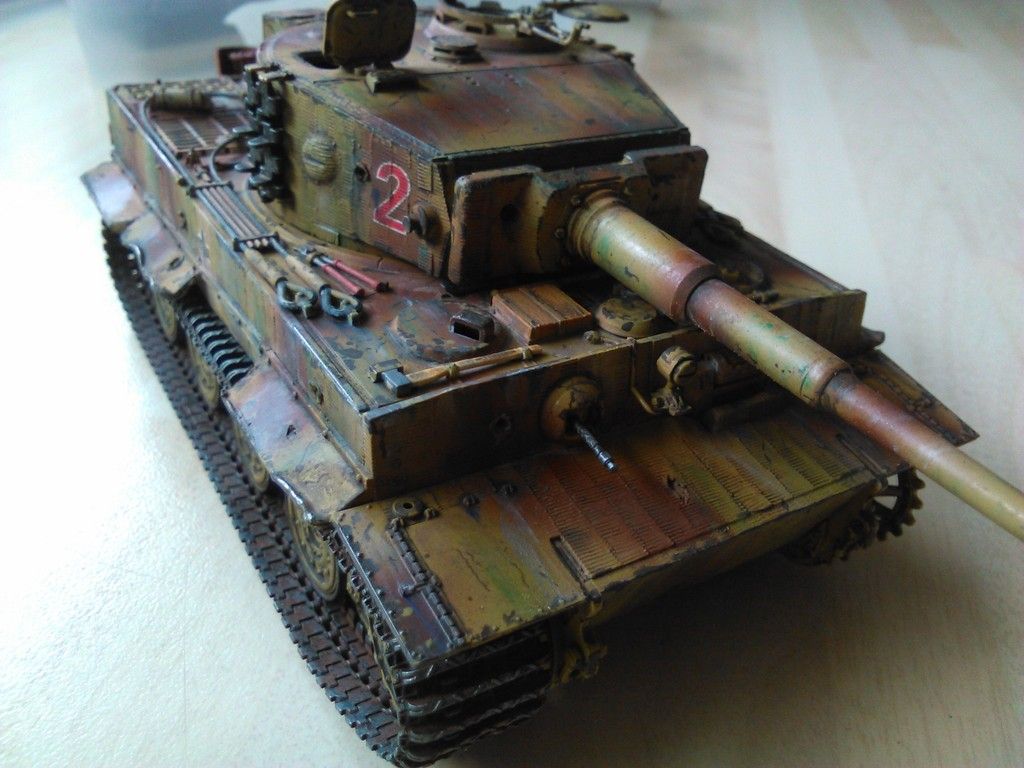
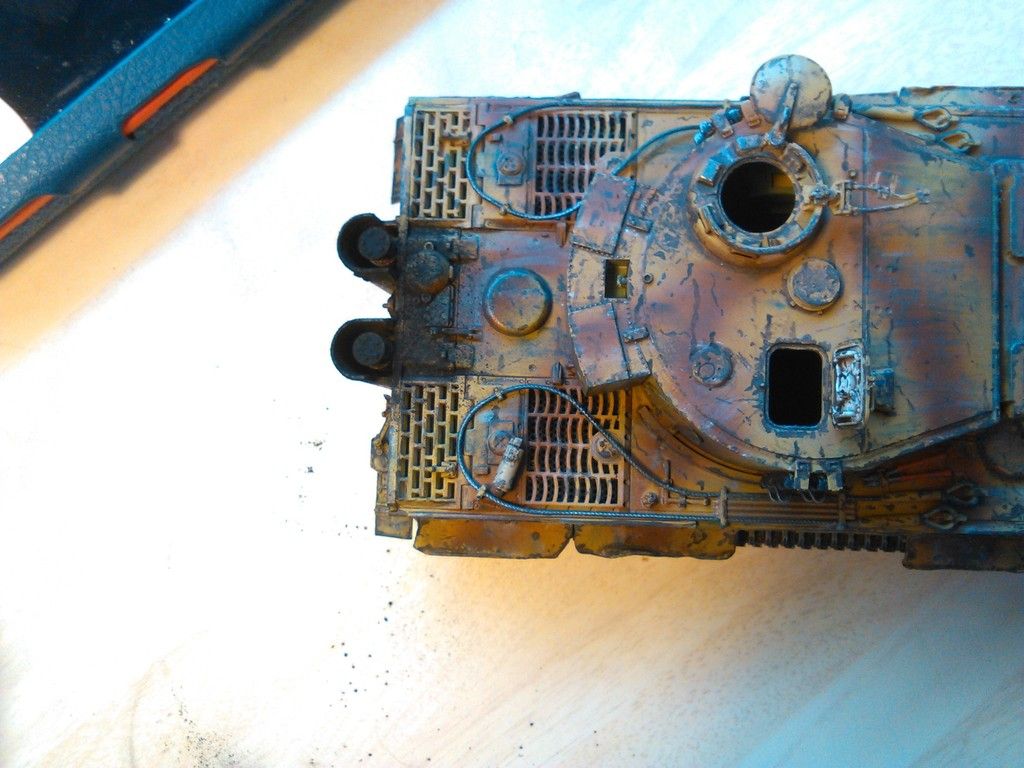
Decals....... Chose a Uniform Balkan cross and number for the turret....


So that's the decals on, dried and glossed over ready for a pin wash and weathering...
As mentioned, i re made the base edge as i wasn't happy with the first build..Primed then Matt blacked....


That is where we are at as of now guys......
Sorry as always for the picture intense post flooding..... I just cannot help myself, i start out with a couple then the urge to show many pictures from different angles takes over and........ well you guys know the rest!... lol...
Hopefully you all haven't got bored and gone to look at some of the excellent builds on offer on the forum at the moment, i send out sincere congratulations to all the guys who have completed and posted final reveal threads and videos, some awesome pieces on show!..
As always, thank you for all the continued support, all your views and comments, they do mean a lot and i appreciate you guys for finding the time to scroll through all the pictures!..
Take care, stay safe and well, Happy Modelling.... Till next time... All the best..
More soon!..
-
felisbarcinonensis

- Command Sergeant Major
- Posts: 860
- Joined: Tue Jun 10, 2014 9:42 pm
- Location: BCN
Re: Skybow Tiger 1 Late in 1/48
Looking gorgeous mate!! What a wonderful thread! Looking forward to the final phase!!

Re: Skybow Tiger 1 Late in 1/48
Magnificent Andy! You told the story of your work perfectly. No need to apologise.
I love your posts
I love your posts
Re: Skybow Tiger 1 Late in 1/48
Brilliant looking stuff mate. The tank's nicely battered, not like a piece of fish, the other battered. Looking forward to your next post.
-
wappynutter
- Chief Warrant Officer 3
- Posts: 2256
- Joined: Mon Jun 17, 2013 11:39 pm
- Location: Sutton in Ashfield, Nottinghamshire. UK
Re: Skybow Tiger 1 Late in 1/48
Thanks Daniel, much appreciated mate. Got lots of weathering to do, may even follow Coen's own weathering "How-to" and see how it goes...felisbarcinonensis wrote:Looking gorgeous mate!! What a wonderful thread! Looking forward to the final phase!!
Everything else is all but done now.....
Time to get back on the Type 97 build..
Take care mate...
Just mentioned you above to Daniel..... May well follow your excellent guide to give this battered build some weathering magic!Coen wrote:Magnificent Andy! You told the story of your work perfectly. No need to apologise.
I love your posts
Thanks again matey, for your always kind comments.. Glad you enjoy my photo frenzies.. lol...
Stay safe and well all snowed in there...
Cheers Russ mate, much appreciated.... nearly finished, not a patch on your masterpiece but i think it'll do for now!..Russ72 wrote:Brilliant looking stuff mate. The tank's nicely battered, not like a piece of fish, the other battered. Looking forward to your next post.
If all else fails i may just dip it, fry it and serve it with fries... lol..... Tiger and Chips anyone??
Thanks again Sir, all the best...
-
wappynutter
- Chief Warrant Officer 3
- Posts: 2256
- Joined: Mon Jun 17, 2013 11:39 pm
- Location: Sutton in Ashfield, Nottinghamshire. UK
Re: Skybow Tiger 1 Late in 1/48
Yay!!! Final update..... long update, but a final one until the reveal post!
Many pictures incoming.... Sorry!..... Again!...
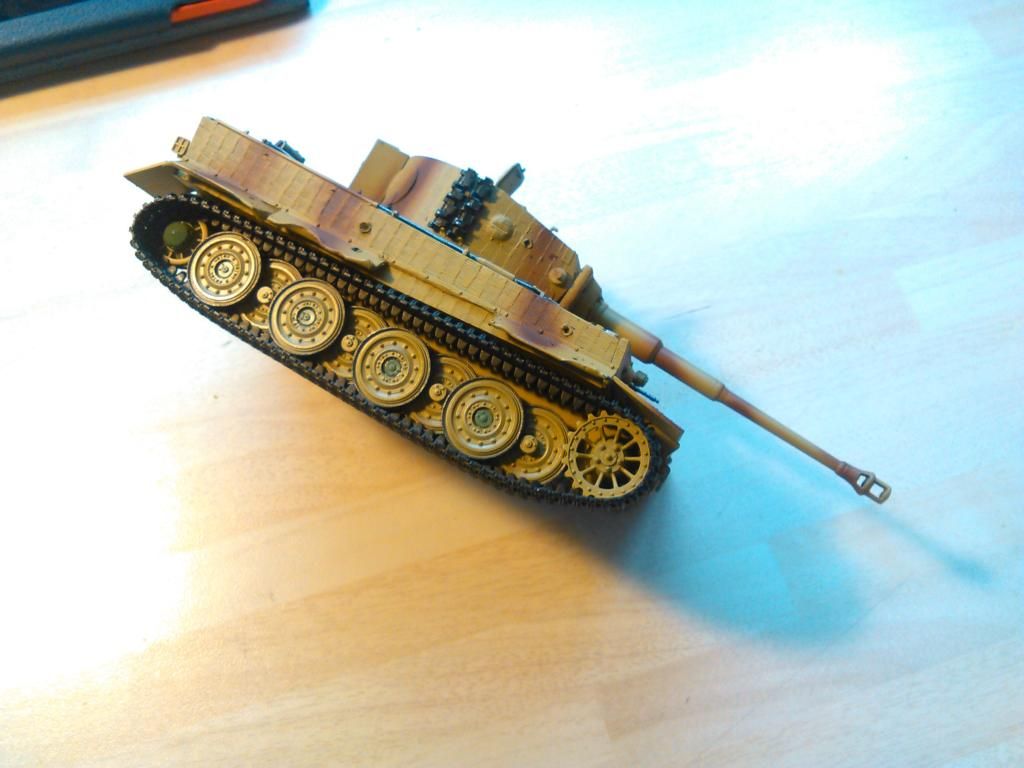
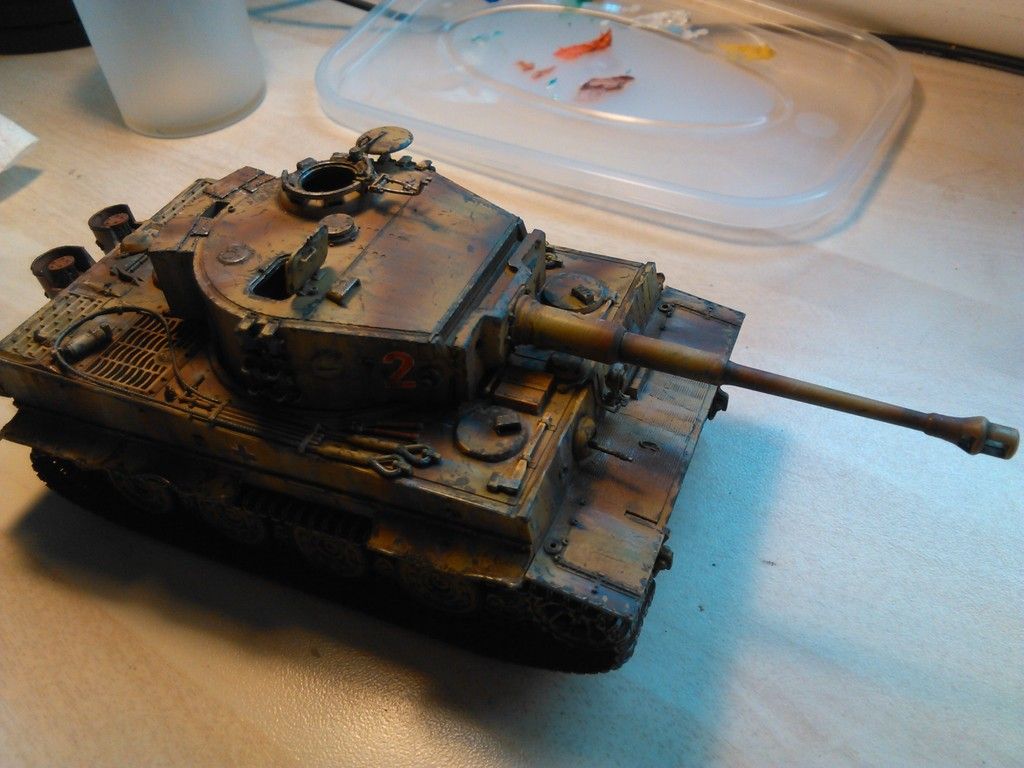
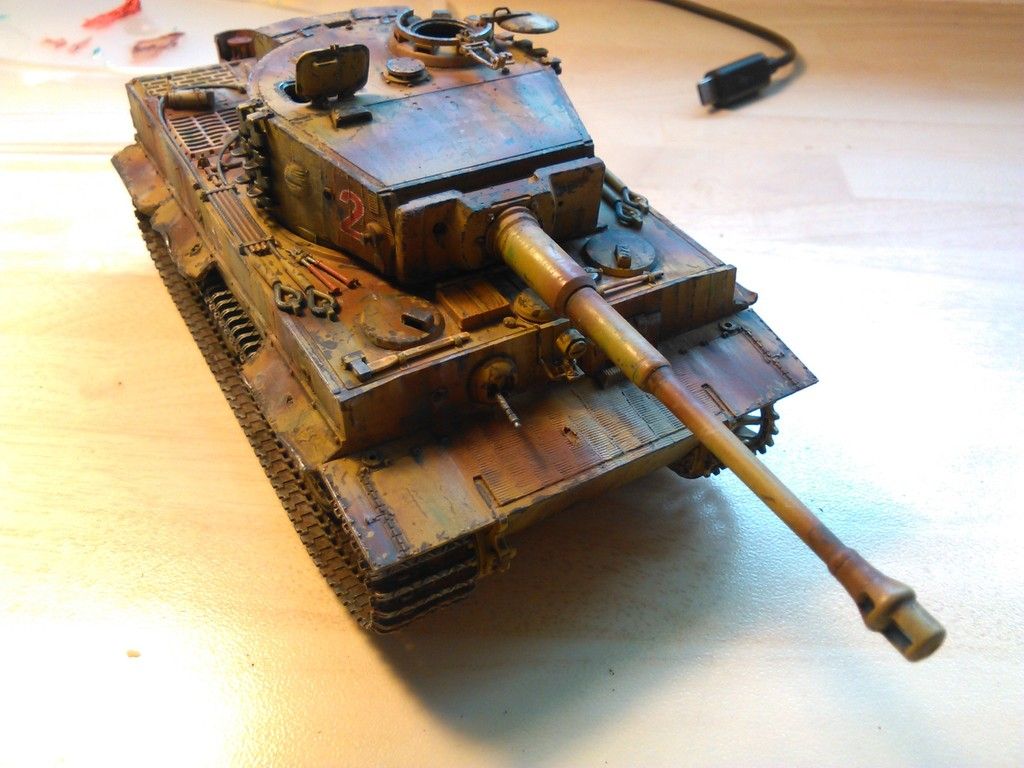
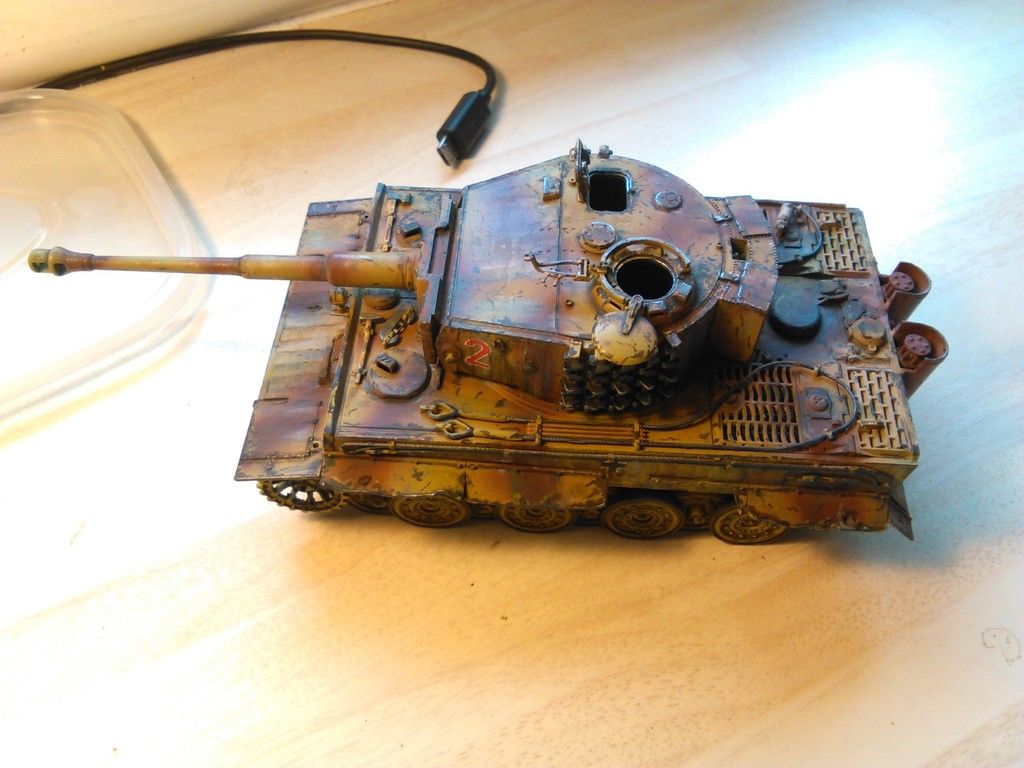
So... after a quick PM with Mike Coen we start with a Burnt Umber wash....
and then i darkened the Burnt Umber with a little Lamp black to pin wash a little....

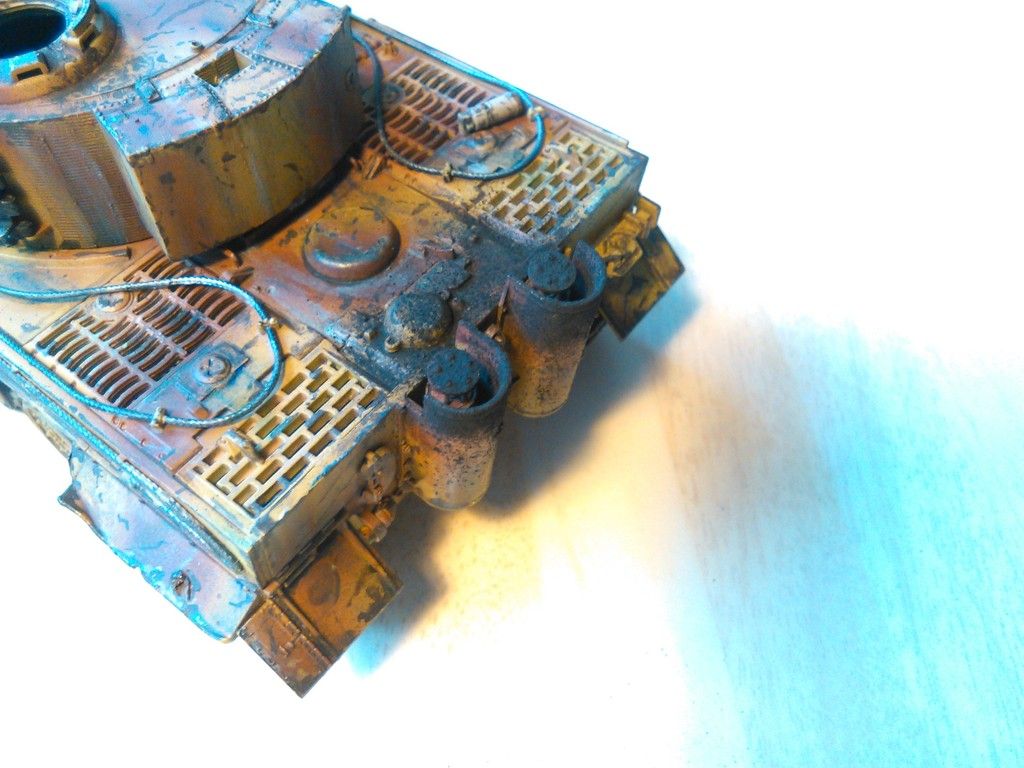
Overkill on the pictures just to show the track and the rusting effect....
Oil dot filter after the Matt flat coat...
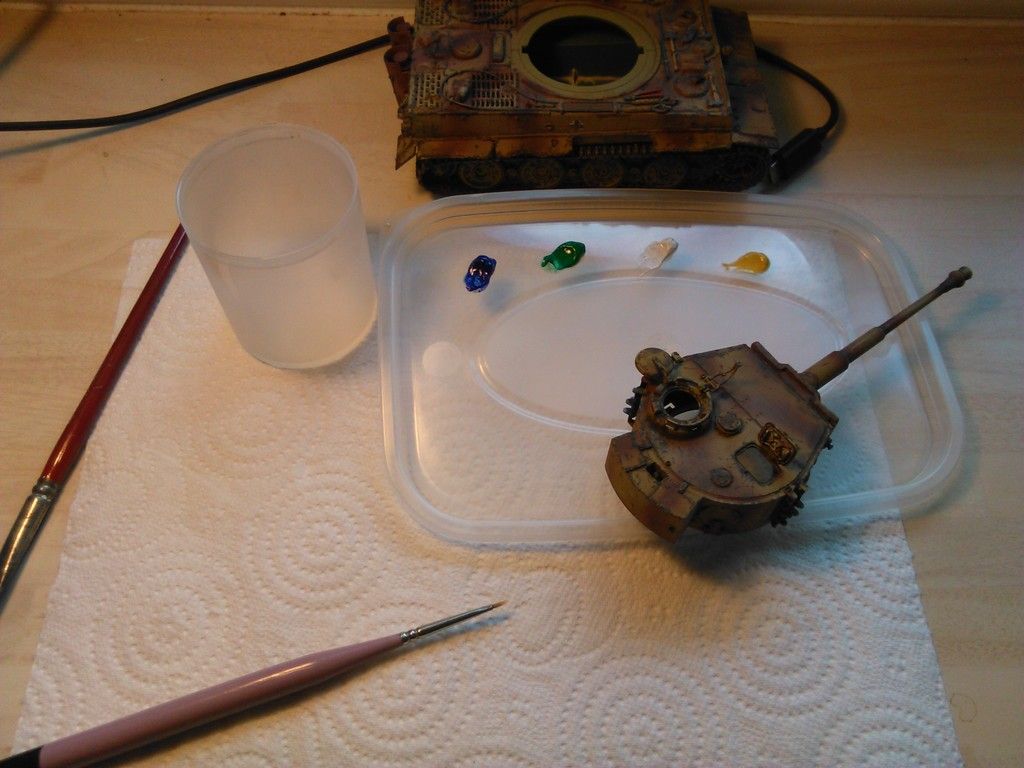
...and its all scruffy and patchy colours....
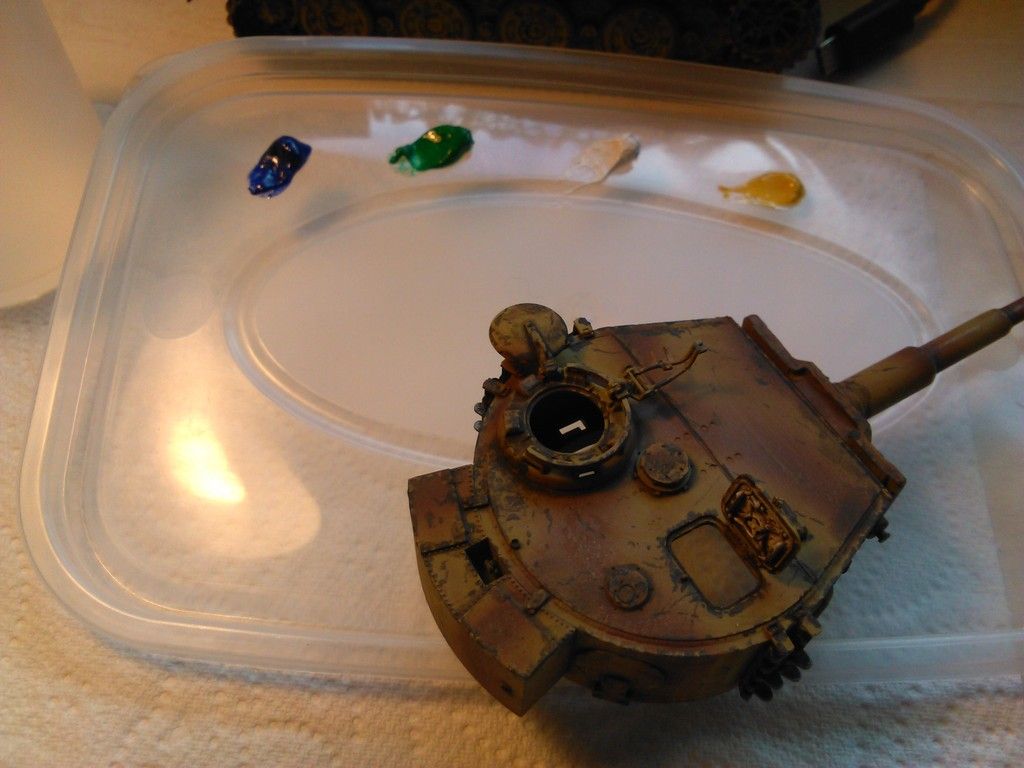
Rubbed the lead pencil around some edges and machine gun rail while i was at it...
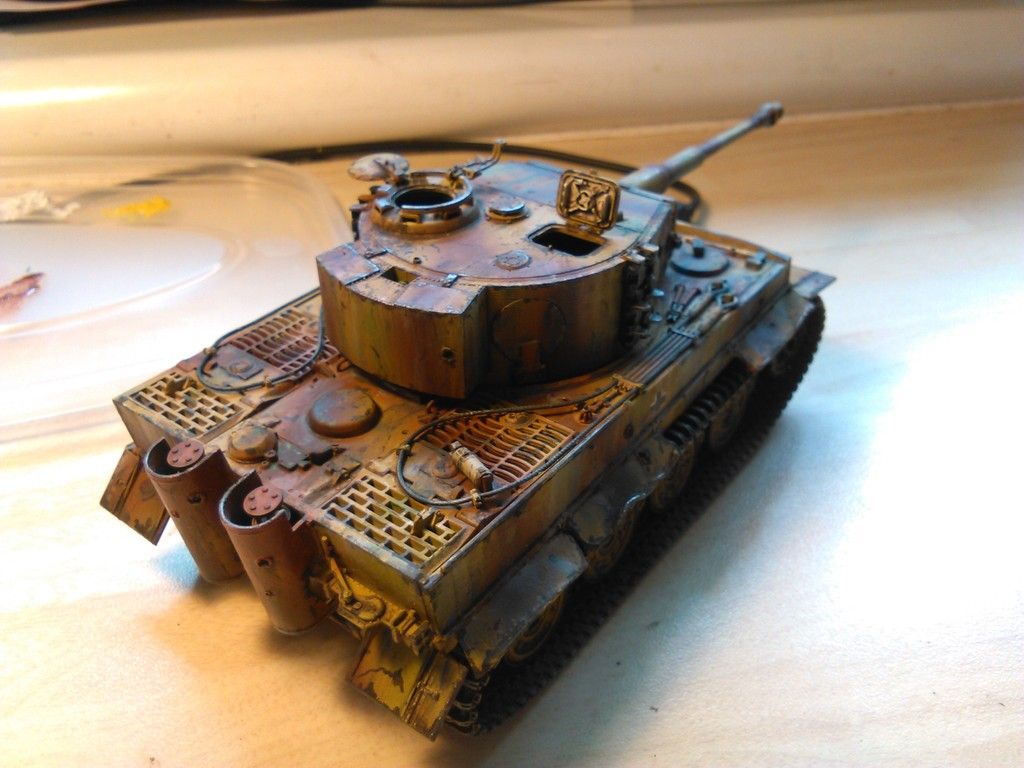
Added oils to the exhaust stacks too...

Light mud Ultimate wash applied to create runs..... after dry i took a damp brush and thinned them out a little...
Soot is added the old fashioned way with Pastel dust...
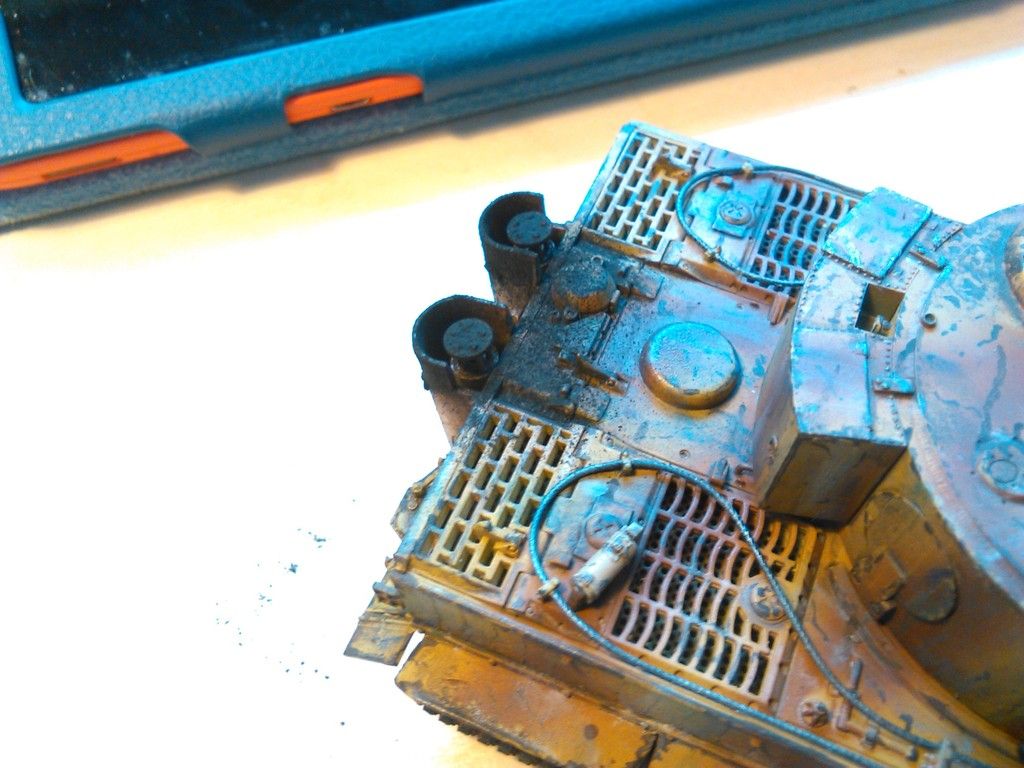

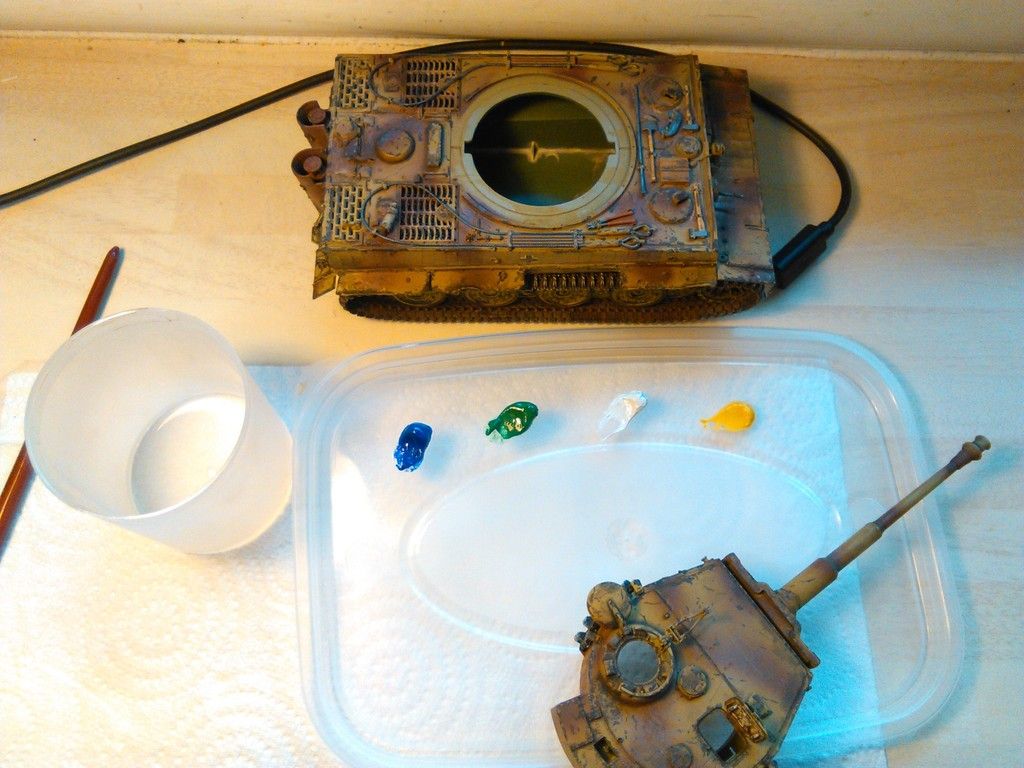
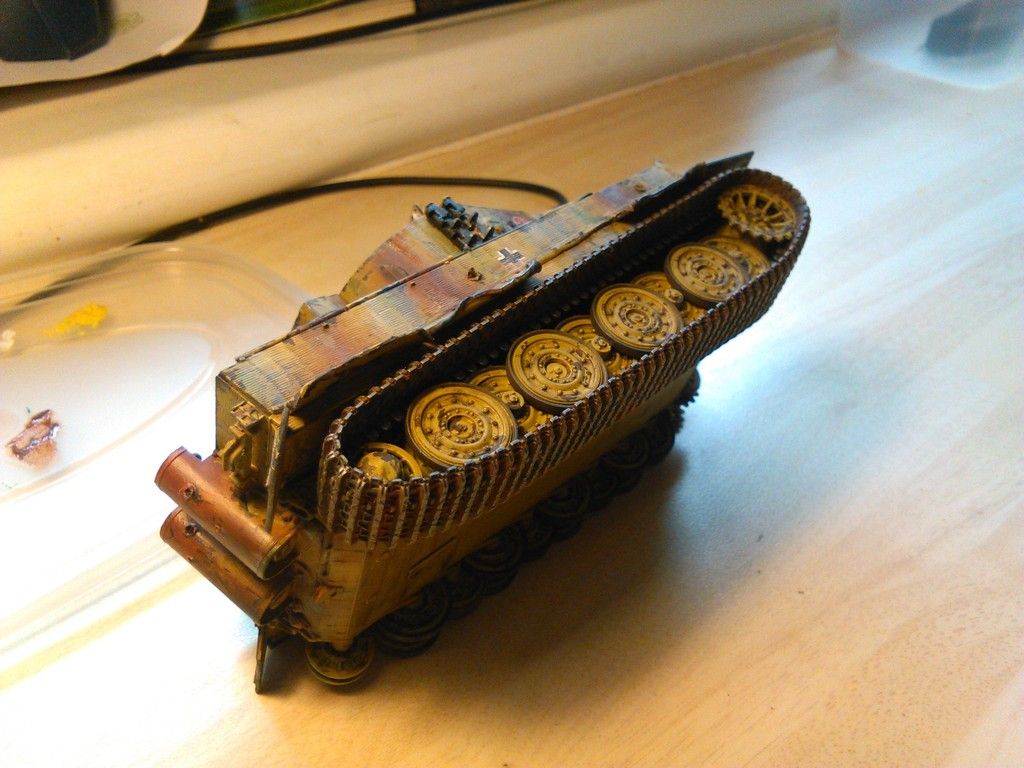
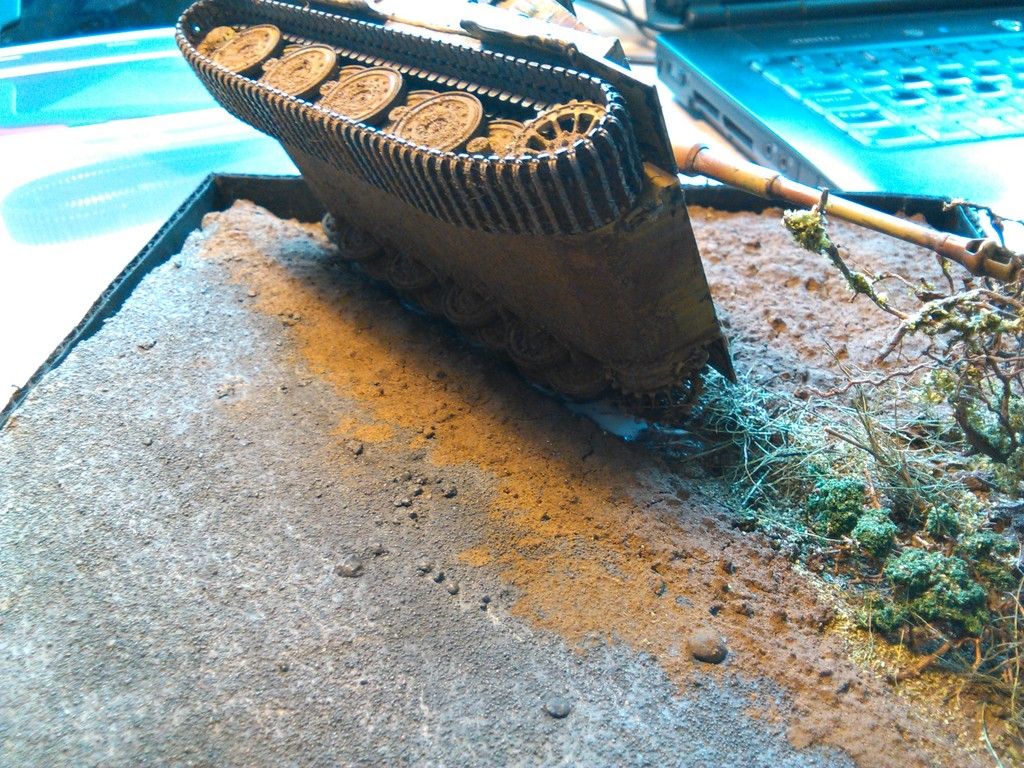
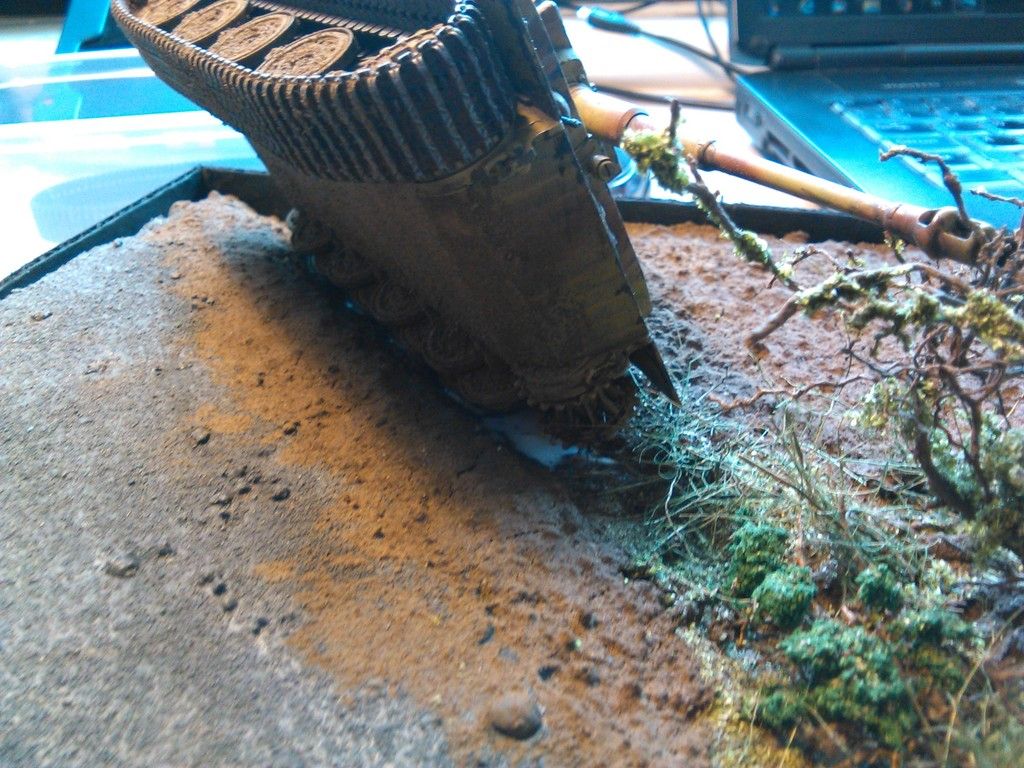
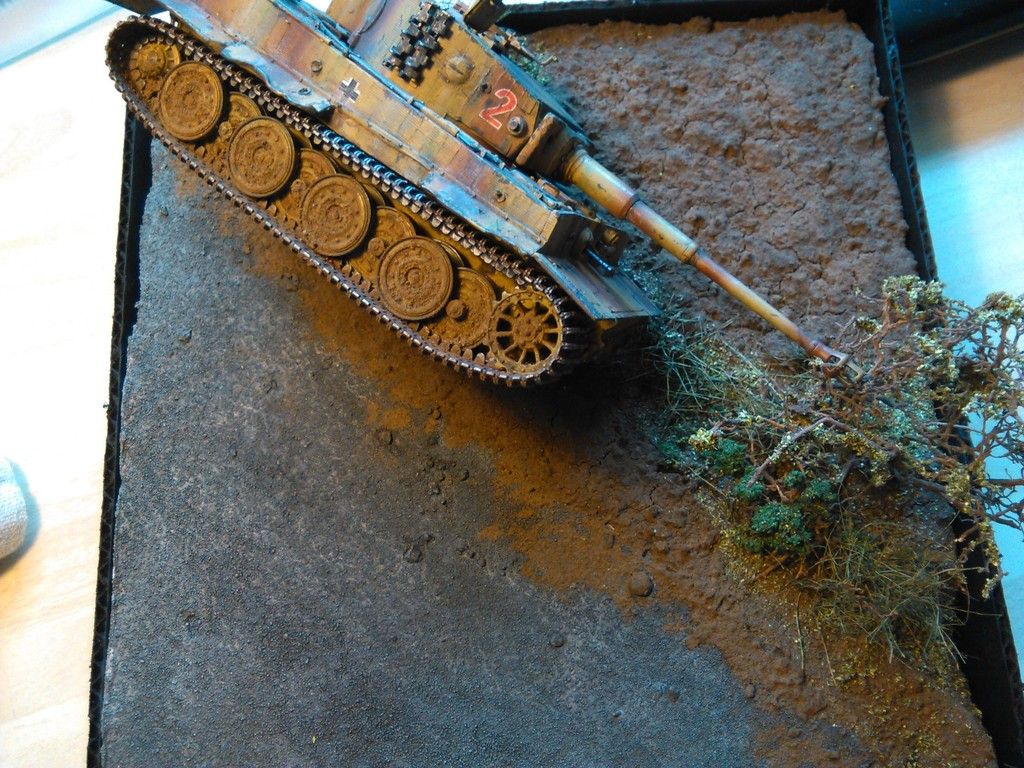
Now we come to the end.... The final weathering to the lower hull and track and wheels and sprockets...
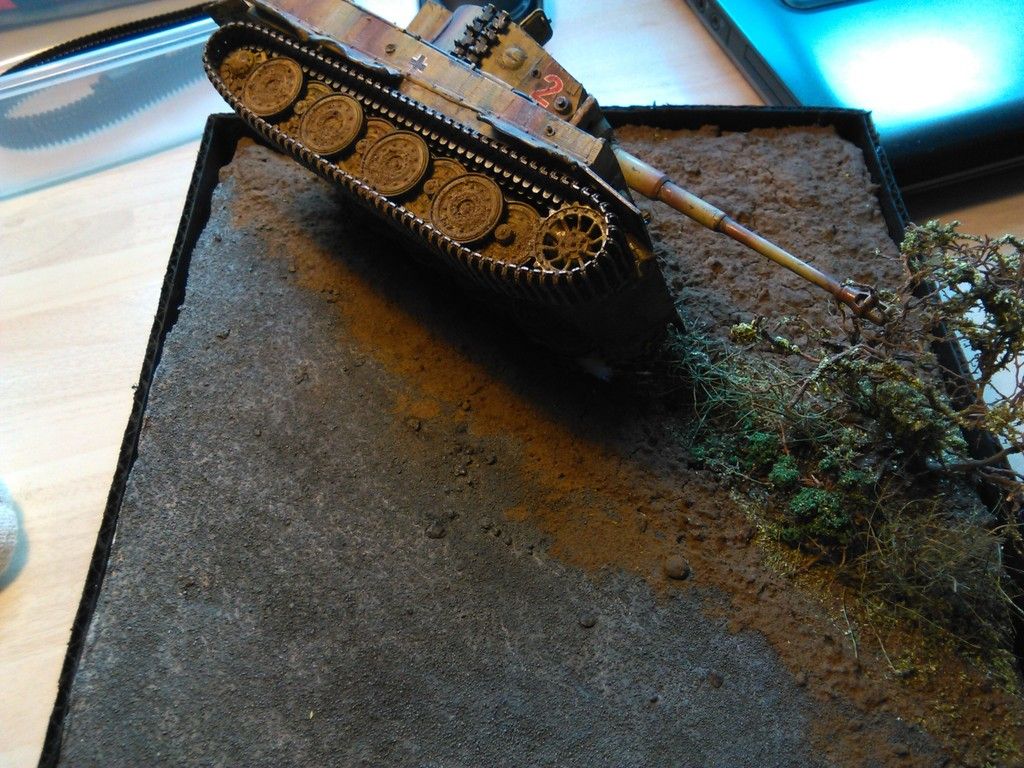
Using a wash of Ultimate mud on the Tank floor i then sprinkled the same mud/dust used on the ditch and field of the diorama.
Using the old favourite Hairspray i decanted some and brushed it on the wheels etc... and continued to sprinkle dirt.
Once i was happy i fixed with a spray of the hairspray...

The last images are of the gluing in place of the Tiger...
Once all is dry and i have touched up glue marks on the soil and finished gluing the figure in i will post a final reveal...

Okay guys...... that's the lot. Thanks for your continued support and all the positive posts you guys give me, much appreciated..
As always, thoroughly enjoyed every moment i have managed to squeeze into modelling this beautiful piece of styrene goodness. Gonna miss working on her, Gotta admit, Tiger's are a way cool piece of Armour... May well have to purchase and build me another one in the future.
Until the final Reveal.... Take care, stay safe and well..... Happy Modelling...
Many pictures incoming.... Sorry!..... Again!...
So... after a quick PM with Mike Coen we start with a Burnt Umber wash....


and then i darkened the Burnt Umber with a little Lamp black to pin wash a little....


Overkill on the pictures just to show the track and the rusting effect....
Oil dot filter after the Matt flat coat...


...and its all scruffy and patchy colours....

Rubbed the lead pencil around some edges and machine gun rail while i was at it...


Added oils to the exhaust stacks too...


Light mud Ultimate wash applied to create runs..... after dry i took a damp brush and thinned them out a little...


Soot is added the old fashioned way with Pastel dust...


Now we come to the end.... The final weathering to the lower hull and track and wheels and sprockets...
Using a wash of Ultimate mud on the Tank floor i then sprinkled the same mud/dust used on the ditch and field of the diorama.
Using the old favourite Hairspray i decanted some and brushed it on the wheels etc... and continued to sprinkle dirt.
Once i was happy i fixed with a spray of the hairspray...


The last images are of the gluing in place of the Tiger...
Once all is dry and i have touched up glue marks on the soil and finished gluing the figure in i will post a final reveal...


Okay guys...... that's the lot. Thanks for your continued support and all the positive posts you guys give me, much appreciated..
As always, thoroughly enjoyed every moment i have managed to squeeze into modelling this beautiful piece of styrene goodness. Gonna miss working on her, Gotta admit, Tiger's are a way cool piece of Armour... May well have to purchase and build me another one in the future.
Until the final Reveal.... Take care, stay safe and well..... Happy Modelling...
Re: Skybow Tiger 1 Late in 1/48
Andy, even without seeing the finished piece I can easily say that this is your very best armour piece dude. I was reading through your post and I was truly impressed by what I was looking at, you did a few things that I had a doubt or two about, but then you worked your magic and made it do what you needed. It was a definite treat to read this latest post of yours.
I love your build buddy.
I love your build buddy.
-
Kingdan
- Warrant Officer
- Posts: 1407
- Joined: Thu Jun 05, 2014 11:42 pm
- Location: Sutton in Ashfield nr Mansfield Nottinghamshire
- Contact:
Re: Skybow Tiger 1 Late in 1/48
Gonna have to make a special trip round to see this one mate top job
-
mannloon

- Command Sergeant Major
- Posts: 985
- Joined: Thu Apr 17, 2014 10:57 pm
- Location: Madison, WI USA
- Contact:
Re: Skybow Tiger 1 Late in 1/48
This turned out wonderfully. Very good look to the weathering. Great piece.
On the bench:
Cyber-Hobby T-34 Under New Management
Cyber-Hobby Tiger I Kursk
Rye Field Tiger I w/ Interior
Academy T-34 with bed spring armor
Cyber-Hobby T-34 Under New Management
Cyber-Hobby Tiger I Kursk
Rye Field Tiger I w/ Interior
Academy T-34 with bed spring armor
-
wappynutter
- Chief Warrant Officer 3
- Posts: 2256
- Joined: Mon Jun 17, 2013 11:39 pm
- Location: Sutton in Ashfield, Nottinghamshire. UK
Re: Skybow Tiger 1 Late in 1/48
Hey Mike, thanks bud, my weathering got a little wacky, flat coats, gloss coats, before, after, between?? Chipping was a little OTT also, but we got there in the end mate... Would love to get some Constructive input about the doubts you had, privately or via Facebook messenger, even Skype or Hangout if its easier Sir??... If nobody mentions the bad points, I'll never learn techniques and will always develop the bad habits.. Just be gentle, lol...... Lots of Smilie faces etc.... Lol..Coen wrote:Andy, even without seeing the finished piece I can easily say that this is your very best armour piece dude. I was reading through your post and I was truly impressed by what I was looking at, you did a few things that I had a doubt or two about, but then you worked your magic and made it do what you needed. It was a definite treat to read this latest post of yours.
I love your build buddy.
Thanks again, as always you put a huge grin on my face!..
Really glad you love my finished build..... Thanks for all you do for the Hobby..
Take care, stay safe and well..
No problem Dan, are we off to Cosford on the 12th mate?? You can drive!...Kingdan wrote:Gonna have to make a special trip round to see this one mate top job
Thanks Adam, much appreciated, and good to see you on YouTube matemannloon wrote:This turned out wonderfully. Very good look to the weathering. Great piece.
All the best.....
