


Colonial Viper Mk1
Moderator: T3hGuppy
Re: Colonial Viper Mk1
I haven't had time to really "play" with the coupler yet. I did want to post a picture of the unit with a ruler. This shot by itself may rule out the idea.


-
RangerNeil

- Captain

- Posts: 4369
- Joined: Fri Jul 12, 2019 9:42 pm
- Location: Dagenham
- Contact:

Re: Colonial Viper Mk1
It - may - not.
On the board now:
Airfix 1/35 Alvis Stalwart Mk2 FV622
Airfix 1/72 Angel Interceptor
Academy 1/48 Grumman TBM-3 Avenger
Italeri 1/72 Saab JAS-29 Gripen
Airfix 1/24 Wallis Autogyro
Scalemates stash info
=58417&fkSTASHSTATUS[]=58417-Stash&page=stash]Scalemates Stash manager
-
RangerNeil
- Captain
- Posts: 4369
- Joined: Fri Jul 12, 2019 9:42 pm
- Location: Dagenham
- Contact:
Re: Colonial Viper Mk1
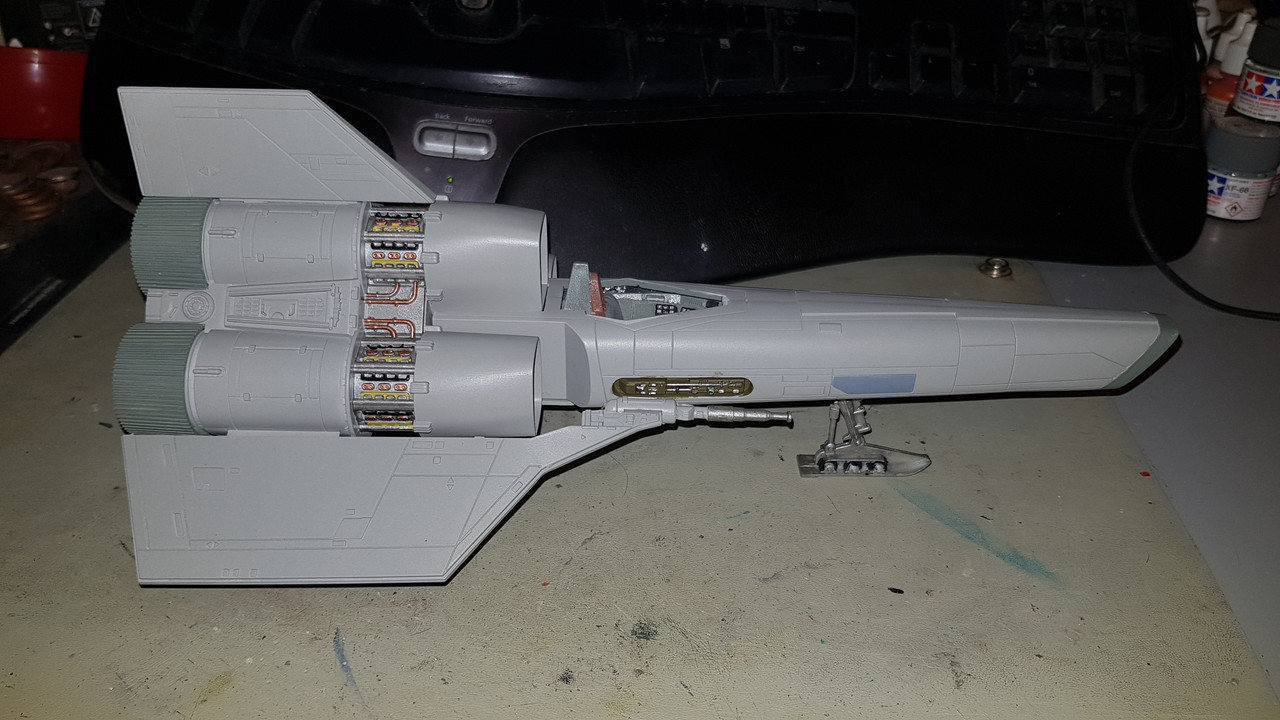
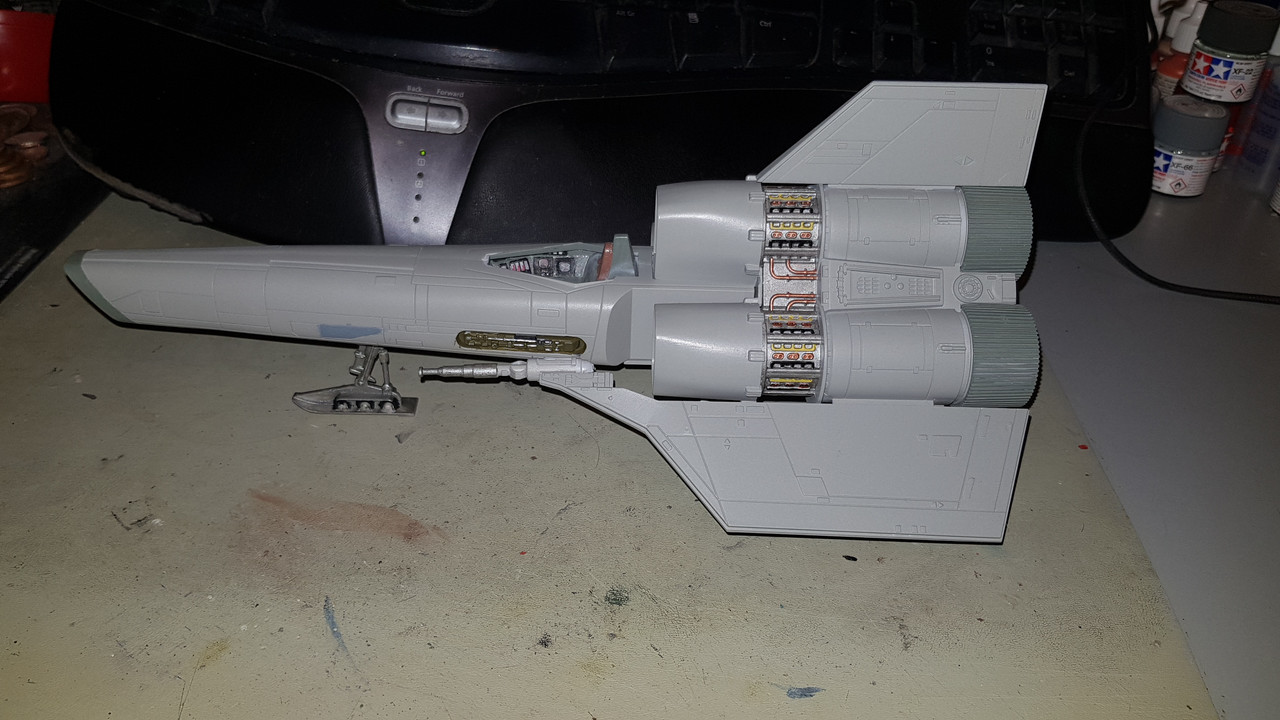
Unless I missed something - the paintwork is done now. Next step - tomorrow or whenever I get a chance - is to rig a tree up in the back to take the engine LED's.
Then it is a gloss coat overall on each module to help with the decals, and a try-out of Vallejo Modelwash for the panel lines before final assembly......
Then it is a gloss coat overall on each module to help with the decals, and a try-out of Vallejo Modelwash for the panel lines before final assembly......
On the board now:
Airfix 1/35 Alvis Stalwart Mk2 FV622
Airfix 1/72 Angel Interceptor
Academy 1/48 Grumman TBM-3 Avenger
Italeri 1/72 Saab JAS-29 Gripen
Airfix 1/24 Wallis Autogyro
Scalemates stash info
=58417&fkSTASHSTATUS[]=58417-Stash&page=stash]Scalemates Stash manager


Re: Colonial Viper Mk1
Great job Neil, it’s really starting to come together!
Re: Colonial Viper Mk1
The next thing to do is to try and light the led's with 5v. You will need to find a 5V wall wart and either cut the ends off or find another sacrificial part. The parts that we are considering have ICs that will limit the voltage to 5V. This isn't a huge difference and I suspect the lights will still work, just not quite as bright perhaps.

Re: Colonial Viper Mk1
Looking good!
-
RangerNeil
- Captain
- Posts: 4369
- Joined: Fri Jul 12, 2019 9:42 pm
- Location: Dagenham
- Contact:
Re: Colonial Viper Mk1
Thanks for the kind words folks - much appreciated. 
The VoodooFX kit says specifically NOT to connect them direct to a 9v supply but to use their circit board which has a resistor pack between the battery +ve and each LED +ve.
That being the case - if my distant (40 yr) memory of elektrikery still serves me - the resistor reduces the current going through a circuit. So if we put 5v through the circuit board instead of 9v how big an effect will those resistors have?
The brings me back to an original question I had: if you look on YouTube at people making their own lighting kits they are connecting a 9v supply direct to the LED's.bfrd wrote: ↑Tue Aug 04, 2020 2:15 pm The next thing to do is to try and light the led's with 5v. You will need to find a 5V wall wart and either cut the ends off or find another sacrificial part. The parts that we are considering have ICs that will limit the voltage to 5V. This isn't a huge difference and I suspect the lights will still work, just not quite as bright perhaps.
The VoodooFX kit says specifically NOT to connect them direct to a 9v supply but to use their circit board which has a resistor pack between the battery +ve and each LED +ve.
That being the case - if my distant (40 yr) memory of elektrikery still serves me - the resistor reduces the current going through a circuit. So if we put 5v through the circuit board instead of 9v how big an effect will those resistors have?
On the board now:
Airfix 1/35 Alvis Stalwart Mk2 FV622
Airfix 1/72 Angel Interceptor
Academy 1/48 Grumman TBM-3 Avenger
Italeri 1/72 Saab JAS-29 Gripen
Airfix 1/24 Wallis Autogyro
Scalemates stash info
=58417&fkSTASHSTATUS[]=58417-Stash&page=stash]Scalemates Stash manager
Re: Colonial Viper Mk1
You should be able to use the same board, just putting less voltage through it. The resistor array is limiting the amount of current going into the led. The formula for determining the correct resistance is based partly on voltage. Therefore if the resistance is good enough for 9v it will be fine for 5v. You will not have to change them. My only concern is that by under powering the leds they will not be bright enough. What I don’t really know is how much current the leds will draw. There are 2 flavors of the coupler, I bought the 1 watt version, but the smaller version may work. I really think the best thing to do is just try them out. The shipping from China was surprisingly fast. I *think* 300 mW should be sufficient for only 6 leds. I wish I had more time to mock something up, but I just don’t right now. Walking you through this circuit should be really easy, there just isn’t much. The biggest thing to keep straight is the polarity of the leds. They will just about instantly blow if wired backwards. To try out the circuit you could pick up a cheap breadboard and usb powered breadboard power supply. That will give you the 5v that you need.RangerNeil wrote: ↑Wed Aug 05, 2020 1:32 am Thanks for the kind words folks - much appreciated.
The brings me back to an original question I had: if you look on YouTube at people making their own lighting kits they are connecting a 9v supply direct to the LED's.bfrd wrote: ↑Tue Aug 04, 2020 2:15 pm The next thing to do is to try and light the led's with 5v. You will need to find a 5V wall wart and either cut the ends off or find another sacrificial part. The parts that we are considering have ICs that will limit the voltage to 5V. This isn't a huge difference and I suspect the lights will still work, just not quite as bright perhaps.
The VoodooFX kit says specifically NOT to connect them direct to a 9v supply but to use their circit board which has a resistor pack between the battery +ve and each LED +ve.
That being the case - if my distant (40 yr) memory of elektrikery still serves me - the resistor reduces the current going through a circuit. So if we put 5v through the circuit board instead of 9v how big an effect will those resistors have?
JBtek Breadboard Power Supply Module 3.3V/5V for Arduino Board Solderless Breadboard


Re: Colonial Viper Mk1
As Al Shepard said, ‘Just light this candle!’
Its been tried and tested, it works! So don't blame the system if you're no good. 
-
RangerNeil
- Captain
- Posts: 4369
- Joined: Fri Jul 12, 2019 9:42 pm
- Location: Dagenham
- Contact:
Re: Colonial Viper Mk1
Funny - was thinking that very thing myself!!
On the board now:
Airfix 1/35 Alvis Stalwart Mk2 FV622
Airfix 1/72 Angel Interceptor
Academy 1/48 Grumman TBM-3 Avenger
Italeri 1/72 Saab JAS-29 Gripen
Airfix 1/24 Wallis Autogyro
Scalemates stash info
=58417&fkSTASHSTATUS[]=58417-Stash&page=stash]Scalemates Stash manager
-
RangerNeil
- Captain
- Posts: 4369
- Joined: Fri Jul 12, 2019 9:42 pm
- Location: Dagenham
- Contact:
Re: Colonial Viper Mk1
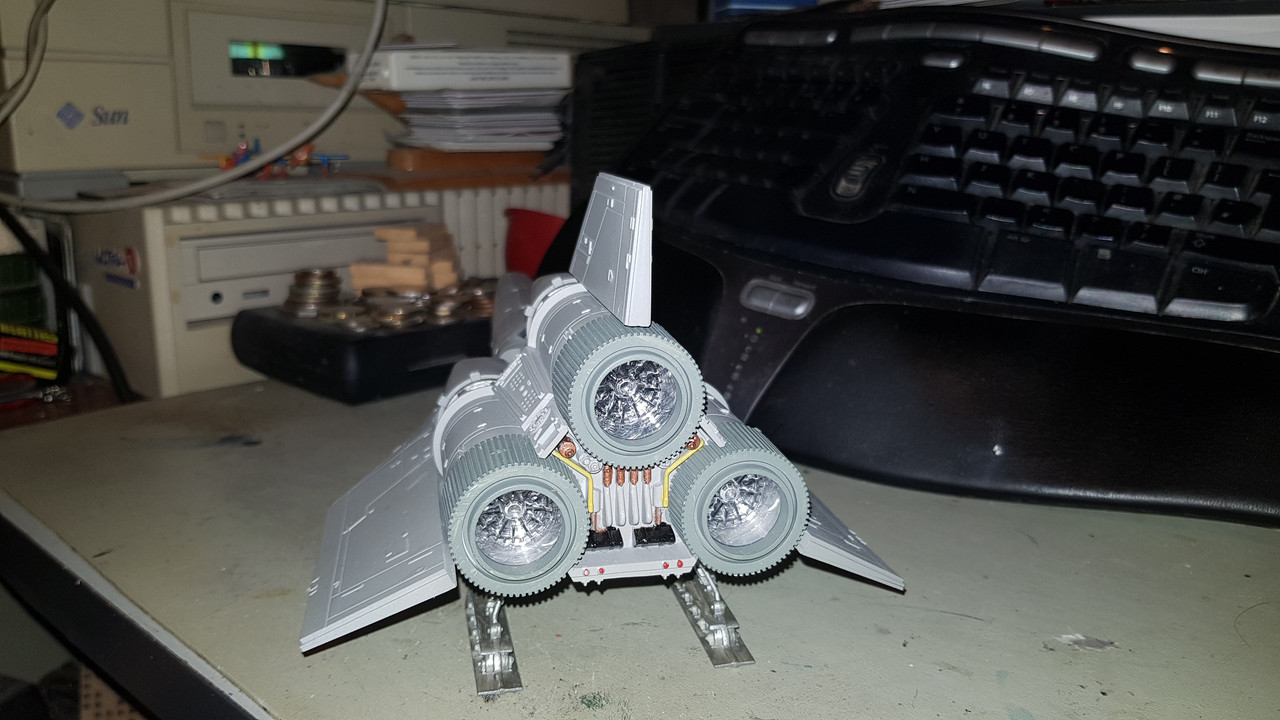
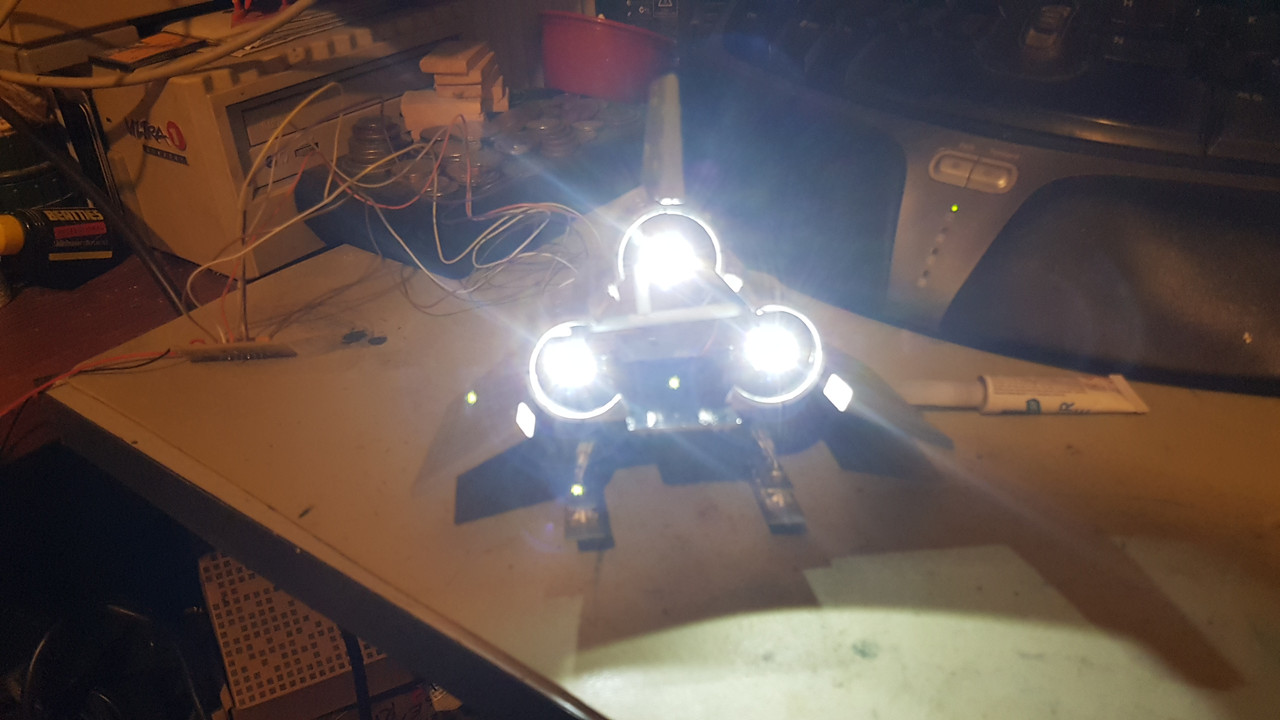
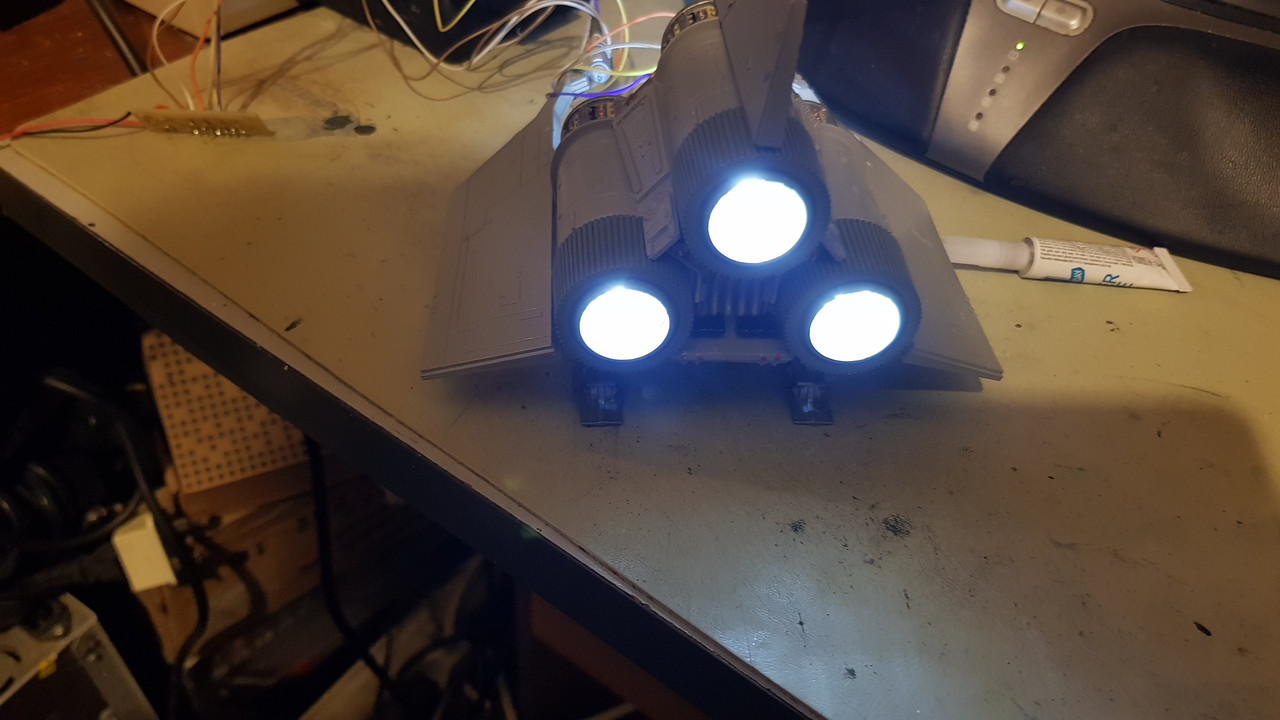
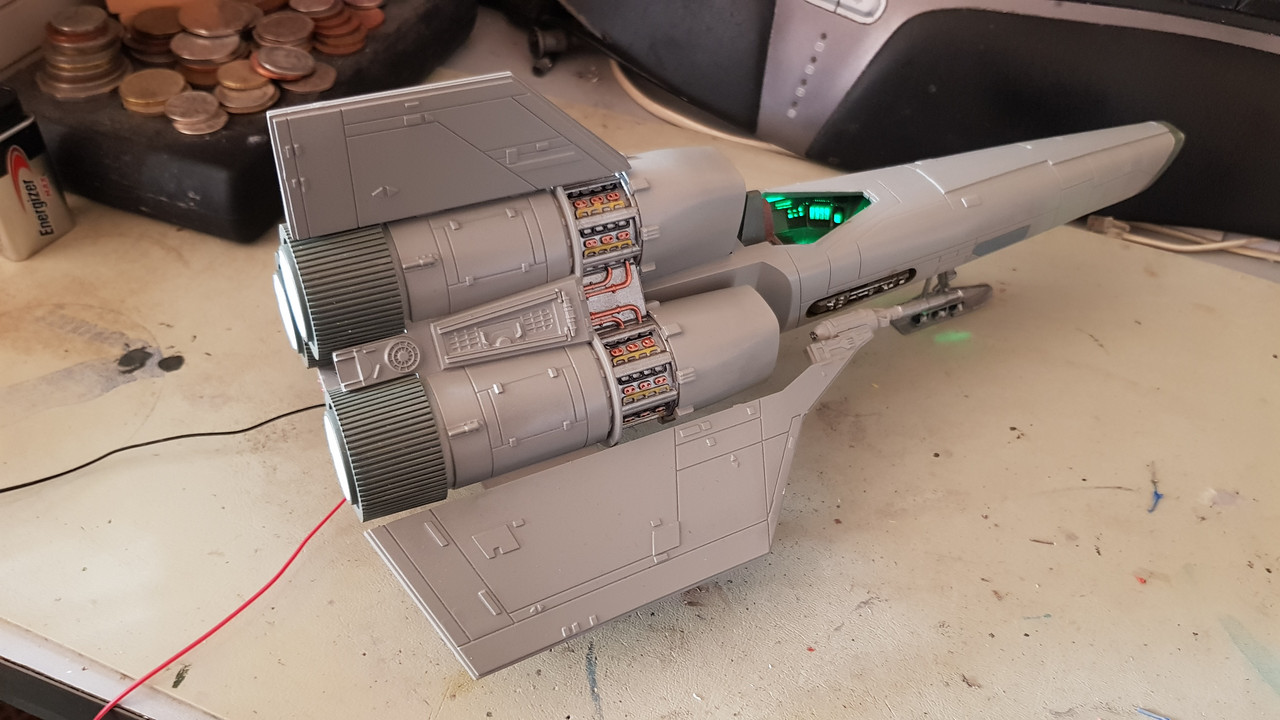
It occured to me tonight that I never tried the 3 LED's out in the rear...... So - I did.
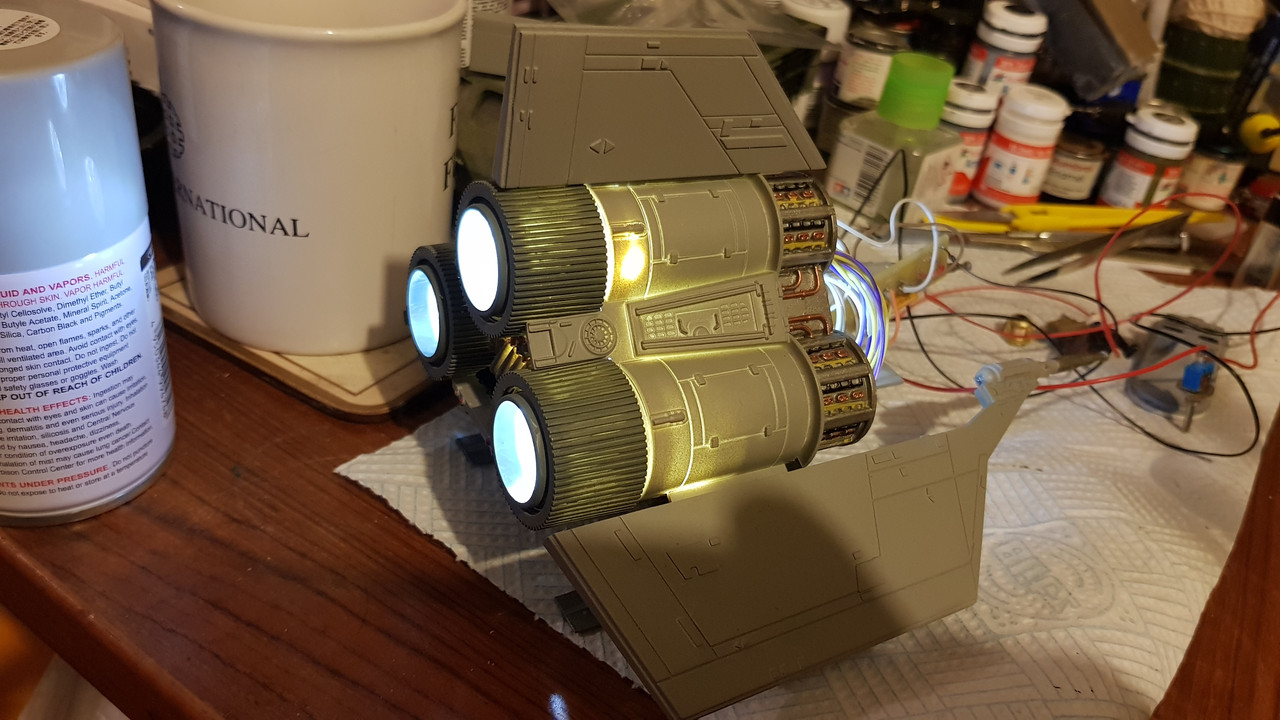
It just happened that 2 or 3 of the LEDS were positioned approximately right - the lower left one was too far inboard. But the effect isn't too bad even so. You can see that the inside definitely needs a coat of paint to stop the bleed-through though so that for now is the next step Then a way of mounting the LED's central to the 3 exhausts.
It just happened that 2 or 3 of the LEDS were positioned approximately right - the lower left one was too far inboard. But the effect isn't too bad even so. You can see that the inside definitely needs a coat of paint to stop the bleed-through though so that for now is the next step Then a way of mounting the LED's central to the 3 exhausts.
On the board now:
Airfix 1/35 Alvis Stalwart Mk2 FV622
Airfix 1/72 Angel Interceptor
Academy 1/48 Grumman TBM-3 Avenger
Italeri 1/72 Saab JAS-29 Gripen
Airfix 1/24 Wallis Autogyro
Scalemates stash info
=58417&fkSTASHSTATUS[]=58417-Stash&page=stash]Scalemates Stash manager
Re: Colonial Viper Mk1
Wow those LED’s out the rear look awesome Neil, great job, it’s looking the goods 

Re: Colonial Viper Mk1
Agreeing whole heartedly
My first thought on seeing this pic was WOW they do look really good and much like the movie shots....


-
RangerNeil
- Captain
- Posts: 4369
- Joined: Fri Jul 12, 2019 9:42 pm
- Location: Dagenham
- Contact:
Re: Colonial Viper Mk1
The paragrafix kit has some diffusers to go between the LED;s and the actual transparent exhausts - don't know if I will use those though. I quite like this look
On the board now:
Airfix 1/35 Alvis Stalwart Mk2 FV622
Airfix 1/72 Angel Interceptor
Academy 1/48 Grumman TBM-3 Avenger
Italeri 1/72 Saab JAS-29 Gripen
Airfix 1/24 Wallis Autogyro
Scalemates stash info
=58417&fkSTASHSTATUS[]=58417-Stash&page=stash]Scalemates Stash manager

Re: Colonial Viper Mk1
absolutely loving this WIP.
great work, Neil.
great work, Neil.
On The Bench (Dining Table) - CF-104 Starfighter

-
RangerNeil
- Captain
- Posts: 4369
- Joined: Fri Jul 12, 2019 9:42 pm
- Location: Dagenham
- Contact:
Re: Colonial Viper Mk1
Gave it a coat of white inside last night on the basis it would reflect the light - tried the LED's this afternoon - and wrong move. Bleed though was as bad as before. So gave it a coat of Model Color #861 that my daughter left behind this afternoon - just tried it again and that seems to have cured it.
Now to rig up supports for the LED's. Instructions seem to suggest the LED can be super-glued to the transparent exhaust part - it has a "dimple in the middle of each. Not sure how advisable or safe that is though.
And - I think - I am going to have to do some unsoldering, trimming and re-soldering as I think with the circuit board in the back there won't be room for all the cable bundles..... This electrickery is fun, fun, fun......
On the board now:
Airfix 1/35 Alvis Stalwart Mk2 FV622
Airfix 1/72 Angel Interceptor
Academy 1/48 Grumman TBM-3 Avenger
Italeri 1/72 Saab JAS-29 Gripen
Airfix 1/24 Wallis Autogyro
Scalemates stash info
=58417&fkSTASHSTATUS[]=58417-Stash&page=stash]Scalemates Stash manager


Re: Colonial Viper Mk1


Re: Colonial Viper Mk1
Finally got caught up on this thread (it's been on my reading list for weeks but keep getting distracted).
First up I hope things are going well with your wife and her treatment.
Secondly really well done for persevering with this and getting it all lit up - the cockpit looks superb, and the bright glow out of the back of the engines is awesome.
Cracking job all around mate really well done
First up I hope things are going well with your wife and her treatment.
Secondly really well done for persevering with this and getting it all lit up - the cockpit looks superb, and the bright glow out of the back of the engines is awesome.
Cracking job all around mate really well done
Cheers, Neil
On the Bench:
Revell 1/72 Millennium Falcon
Tamiya 1/48 P-38F/G
On the Bench:
Revell 1/72 Millennium Falcon
Tamiya 1/48 P-38F/G

-
RangerNeil
- Captain
- Posts: 4369
- Joined: Fri Jul 12, 2019 9:42 pm
- Location: Dagenham
- Contact:
Re: Colonial Viper Mk1
Many thanks for the kind words folks - they are appreciated and, over this last week, much needed.. 
Been rushed off my feet with the wife but there is light at the end of the tunnel now. District nurse paid her daily visit and was pleased to say the infection around the keyhole stitches is almost gone and the rest is healing very nicely indeed. Plus her surgeon called yesterday - the biopsy results were back and they confirmed that they had got everything!. Needless to say - the wife was overjoyed and which probably explains the sudden start in picking up today.
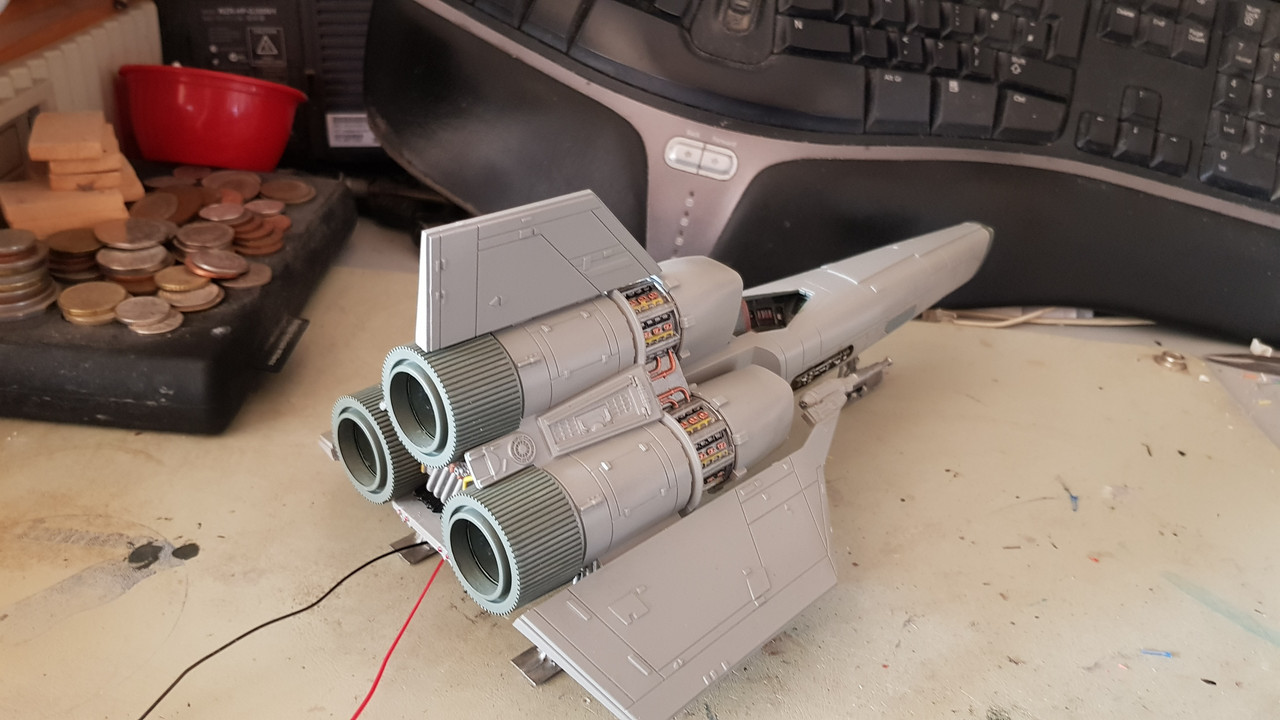
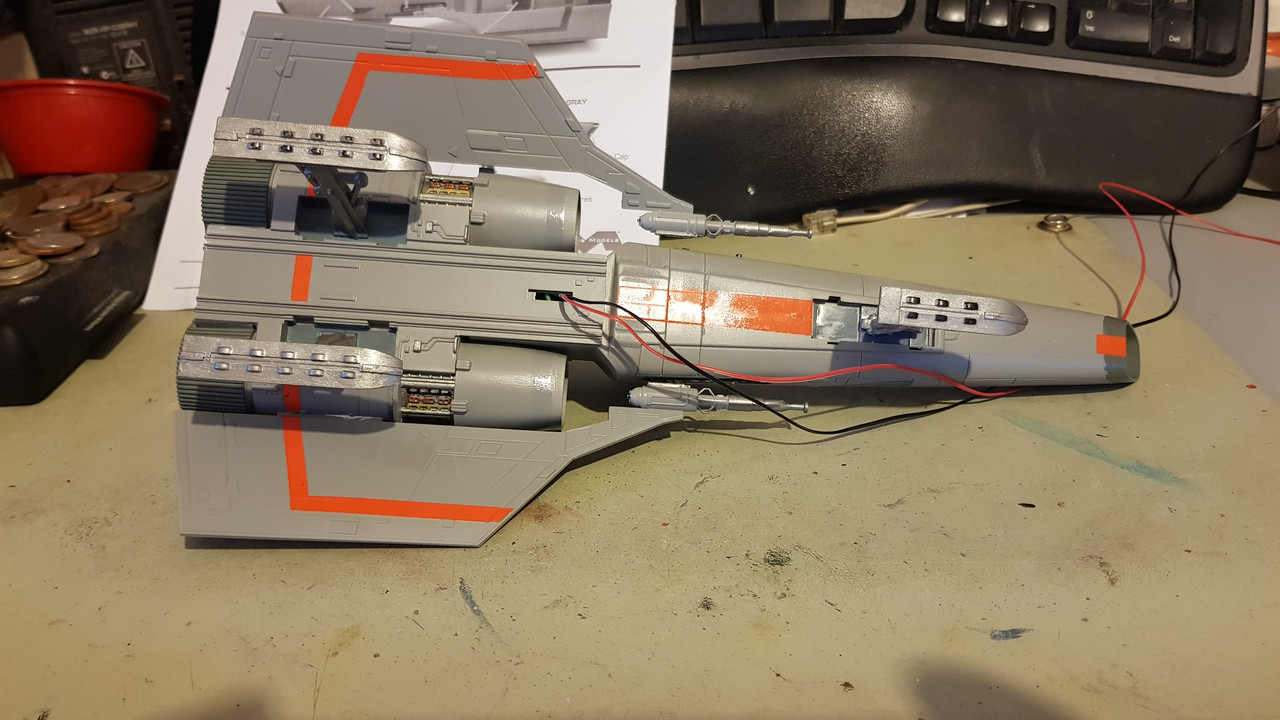
So - I got a hour or two to myself and thought I had better crack on with the Viper. I have the TOS Galactica awaiting painting but I want to try my new (to me) airbrush out on that and the Viper is nearly complete.
Todays work then as I've waffled too much already:
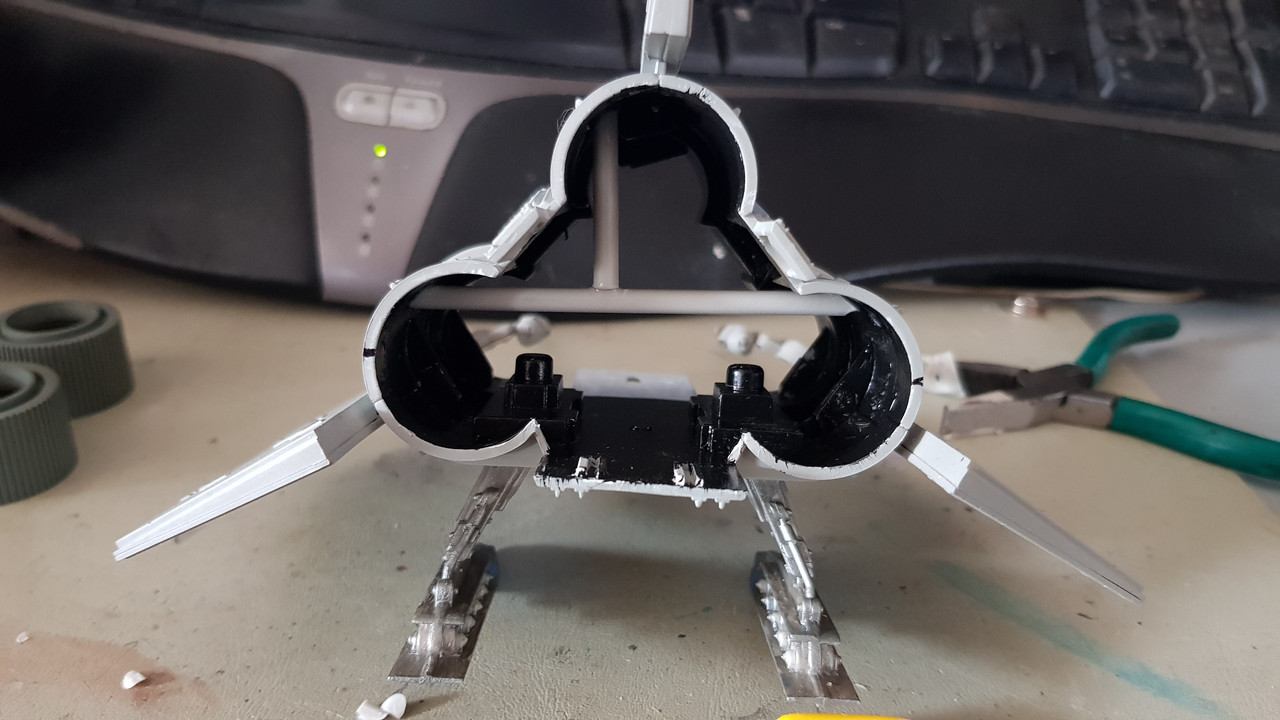
Firstly I fabricated and installed the supports for the engine LED's - held in by CA glue:
Next job was to take all the major sub-assemblies that need it for decals upstairs to the improvised spray area and give them a clear gloss coat:
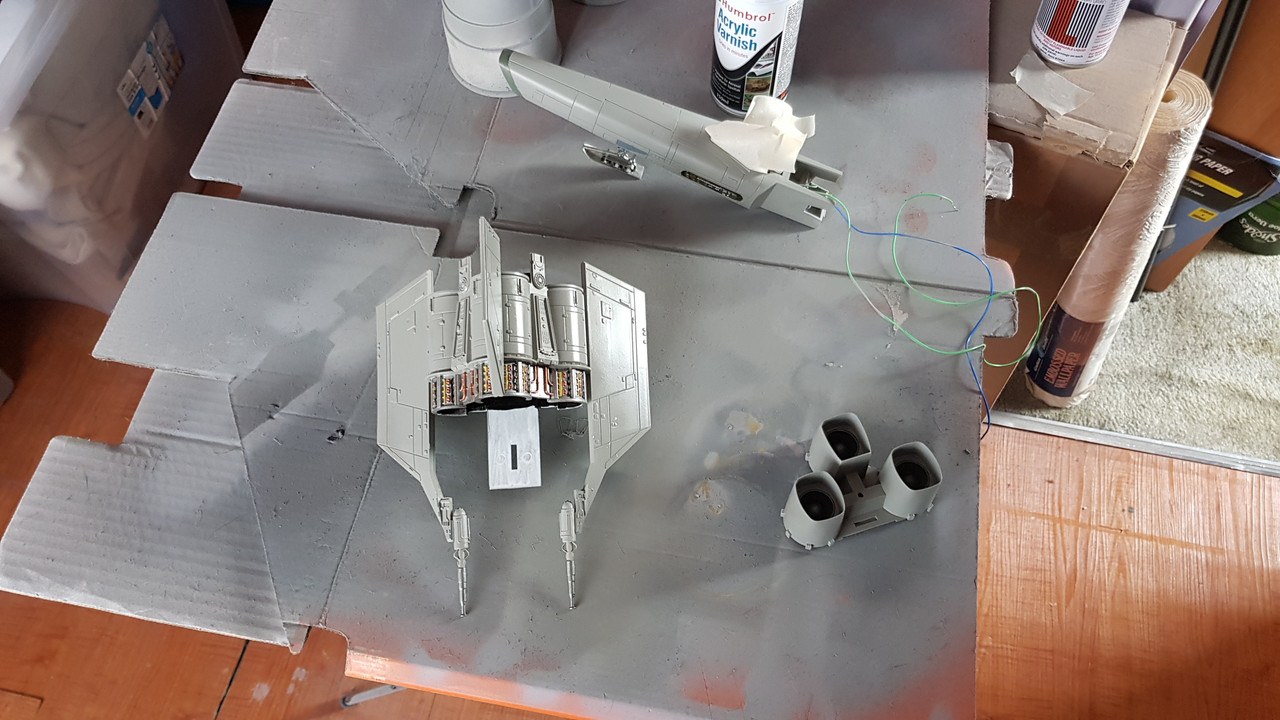
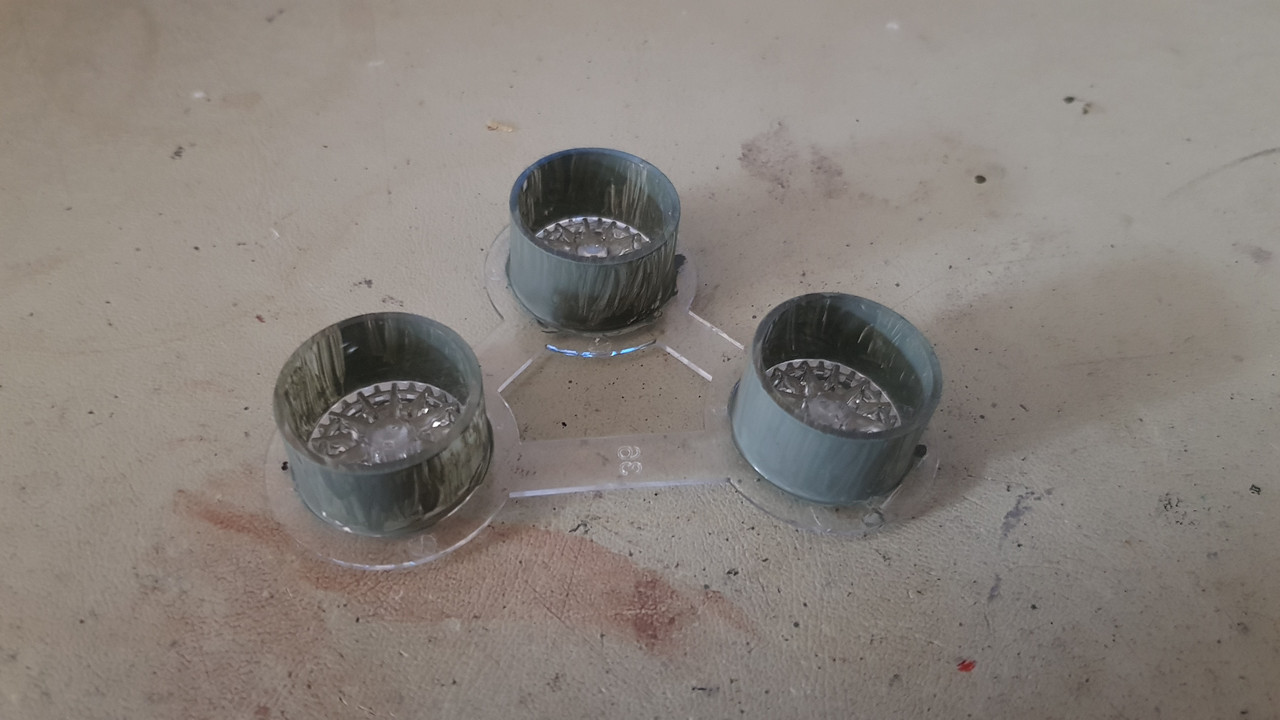
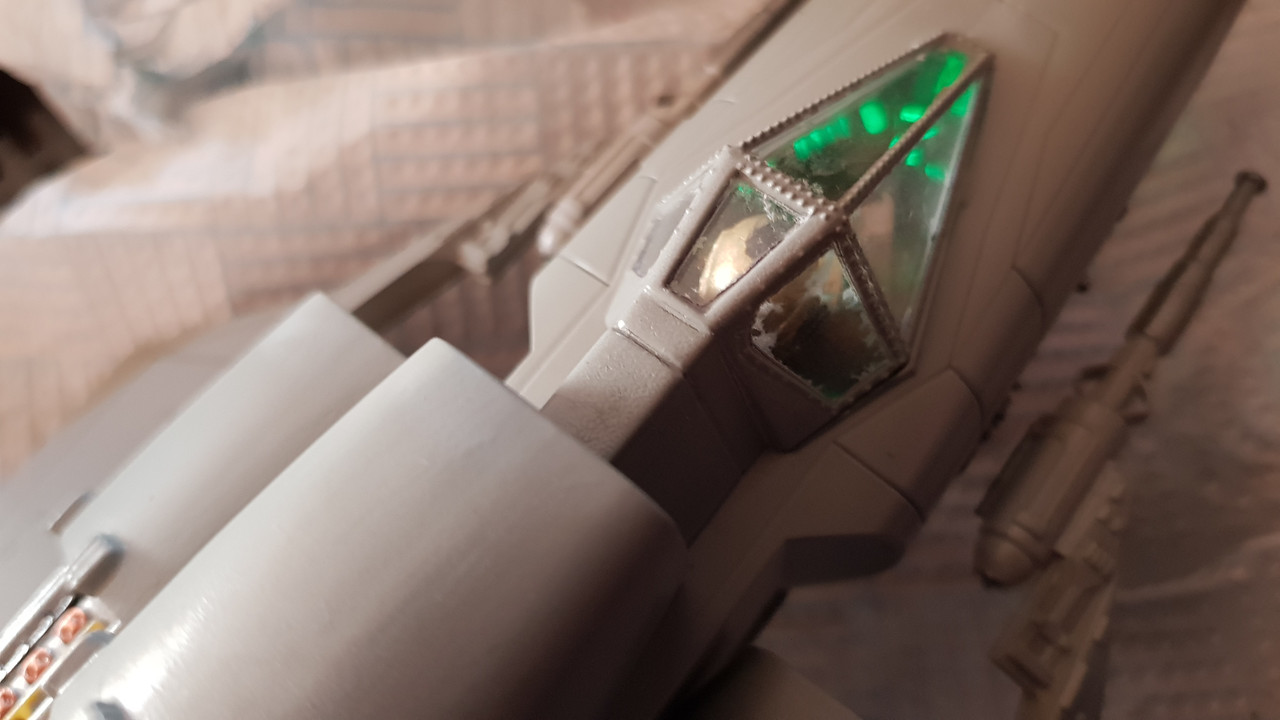
And finally the transparent part for the engine exhaust. The instruction book says the walls need to be the same dark grey as the outside area but having seen the lights on I am thinking I will paint the inside, hidden faces grey so when "static" it looks like they are grey but when the lights go on the outside faces will reflect the light and look a bit more authentic. So thats what I did - and yes, its going to need at least 1 more coat. Once its all together we will see if I am right. The exhaust section will not get cemented on just yet as I may need the opening to switch from external power to the wireless couplers @bfrd is experimenting with.
And that's all for today folks - back to being harried house person as the wife is making "what about my evening meal" noises..
Been rushed off my feet with the wife but there is light at the end of the tunnel now. District nurse paid her daily visit and was pleased to say the infection around the keyhole stitches is almost gone and the rest is healing very nicely indeed. Plus her surgeon called yesterday - the biopsy results were back and they confirmed that they had got everything!. Needless to say - the wife was overjoyed and which probably explains the sudden start in picking up today.
So - I got a hour or two to myself and thought I had better crack on with the Viper. I have the TOS Galactica awaiting painting but I want to try my new (to me) airbrush out on that and the Viper is nearly complete.
Todays work then as I've waffled too much already:
Firstly I fabricated and installed the supports for the engine LED's - held in by CA glue:
Next job was to take all the major sub-assemblies that need it for decals upstairs to the improvised spray area and give them a clear gloss coat:
And finally the transparent part for the engine exhaust. The instruction book says the walls need to be the same dark grey as the outside area but having seen the lights on I am thinking I will paint the inside, hidden faces grey so when "static" it looks like they are grey but when the lights go on the outside faces will reflect the light and look a bit more authentic. So thats what I did - and yes, its going to need at least 1 more coat.
And that's all for today folks - back to being harried house person as the wife is making "what about my evening meal" noises..
On the board now:
Airfix 1/35 Alvis Stalwart Mk2 FV622
Airfix 1/72 Angel Interceptor
Academy 1/48 Grumman TBM-3 Avenger
Italeri 1/72 Saab JAS-29 Gripen
Airfix 1/24 Wallis Autogyro
Scalemates stash info
=58417&fkSTASHSTATUS[]=58417-Stash&page=stash]Scalemates Stash manager
-
BigWall
- Chief Warrant Officer 5

- Posts: 2961
- Joined: Sun Mar 15, 2020 11:44 pm
- Location: Denver, Colorado

Re: Colonial Viper Mk1
I'm so happy to hear your wife's good news!!!!
Nice progress on the viper as well!
Nice progress on the viper as well!
Joe

Re: Colonial Viper Mk1
Great news about the Mrs and the kit is looking good.
Its been tried and tested, it works! So don't blame the system if you're no good.
Re: Colonial Viper Mk1
Good to hear your Missus is on the mend must be a huge relief.
Great work on the kit too.

Great work on the kit too.
Re: Colonial Viper Mk1
Great news about the missus mate! Also great progress on the build, looking forward to the finished product
Re: Colonial Viper Mk1
-
RangerNeil
- Captain
- Posts: 4369
- Joined: Fri Jul 12, 2019 9:42 pm
- Location: Dagenham
- Contact:
Re: Colonial Viper Mk1
Again - thanks for the kind words everyone - I'm suffering from a lack of build mojo at the moment and the good words are carrying me through!!
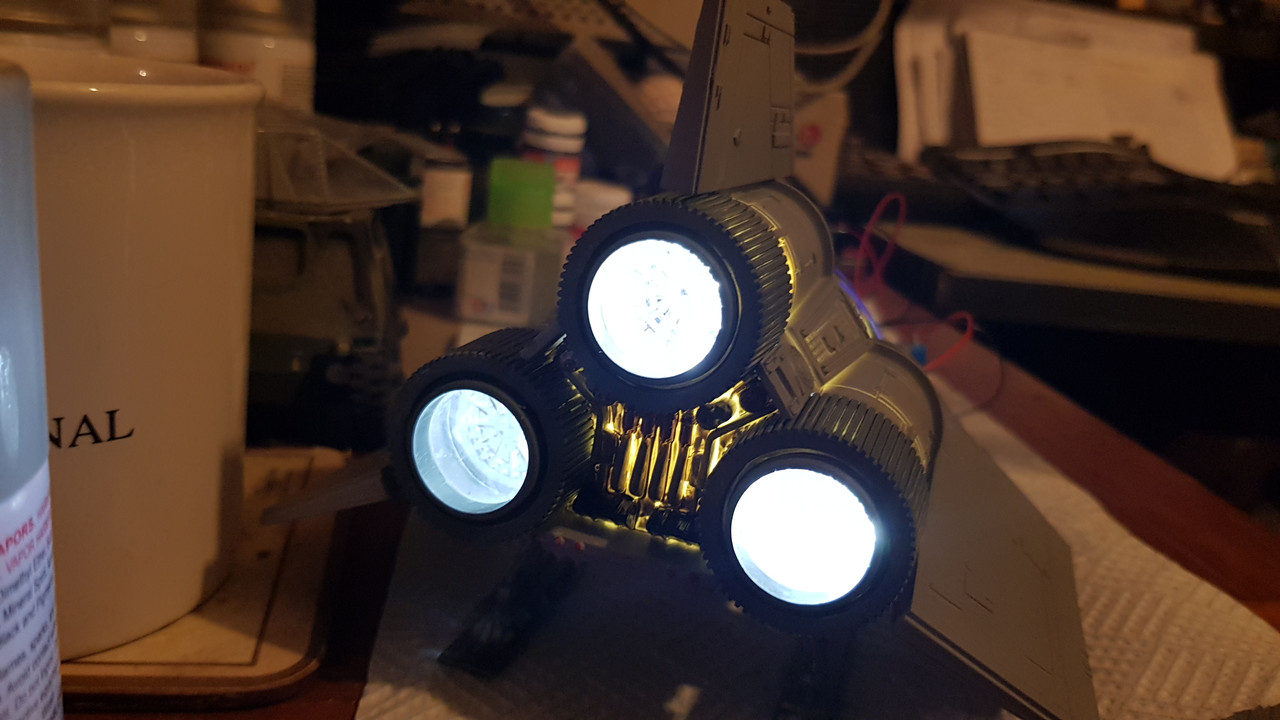
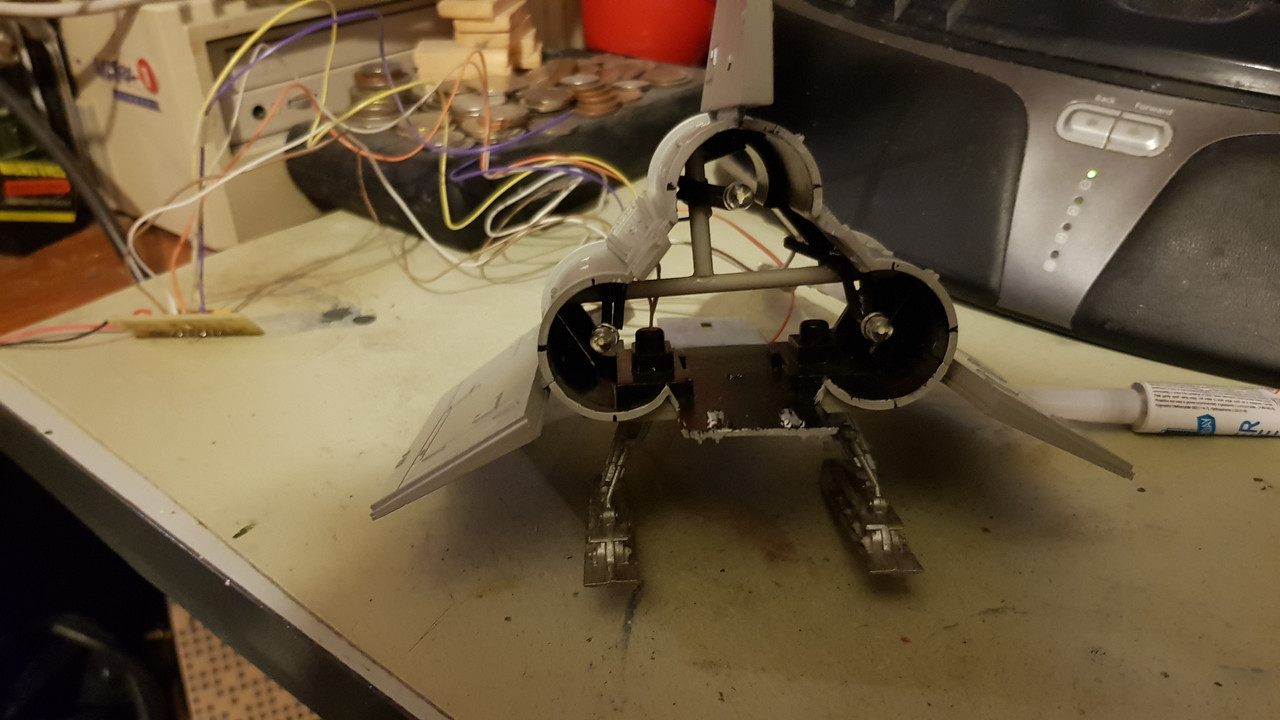
Tonight I got another bit of time to myself so I got the LED's mounted on the carriers. Fiddlier job than I thought but got there in the end - look closely and you can just make them out:
Once the CA adhesive had set I tested the circuits - this time you can see them
So - just to make sure all was well I dry fitted the exhaust section to see if there were any light leaks still.
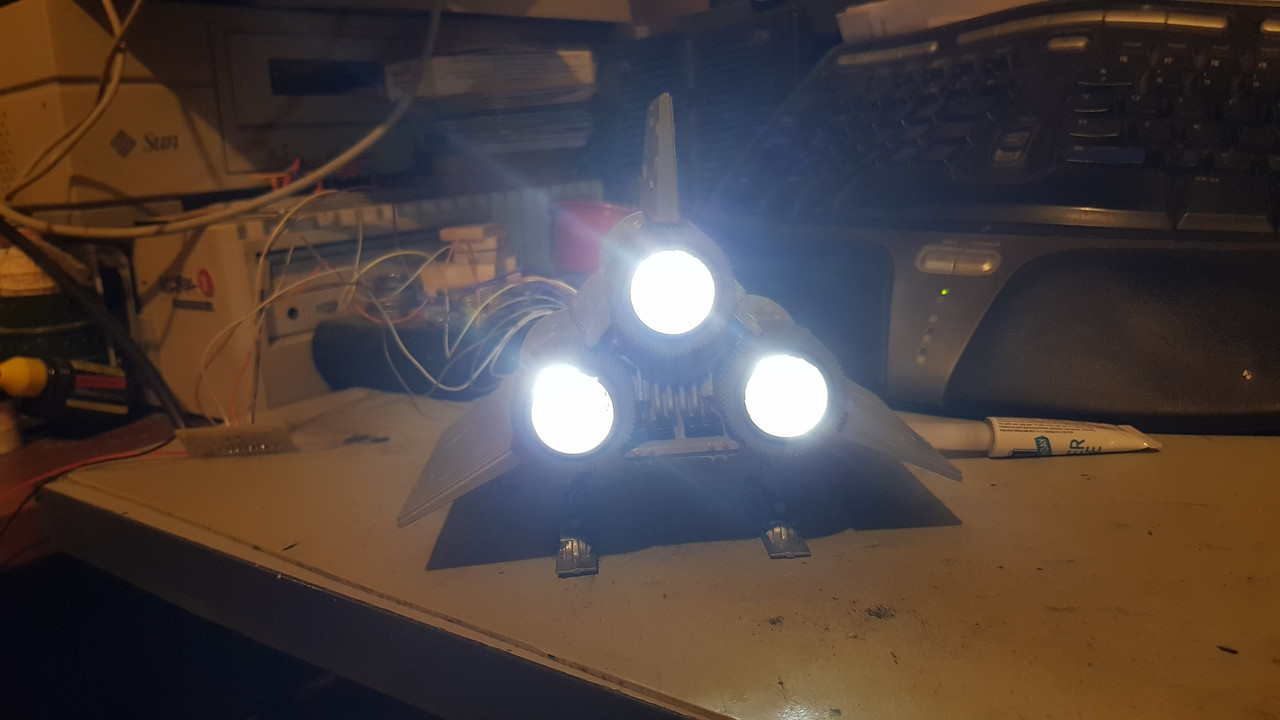
I think the effect is not bad. I rather like the way the light fills the inner faces of the exhaust- glad I never painted them. But that digreses. I found a couple of little places where there is light bleed-through so those will get another coat of black on the interior faces before final assembly.
Once that is done I need to shorten this jumble of cables - there is not enough room inside the engine section to coil all that up AND slip the circuit board in.
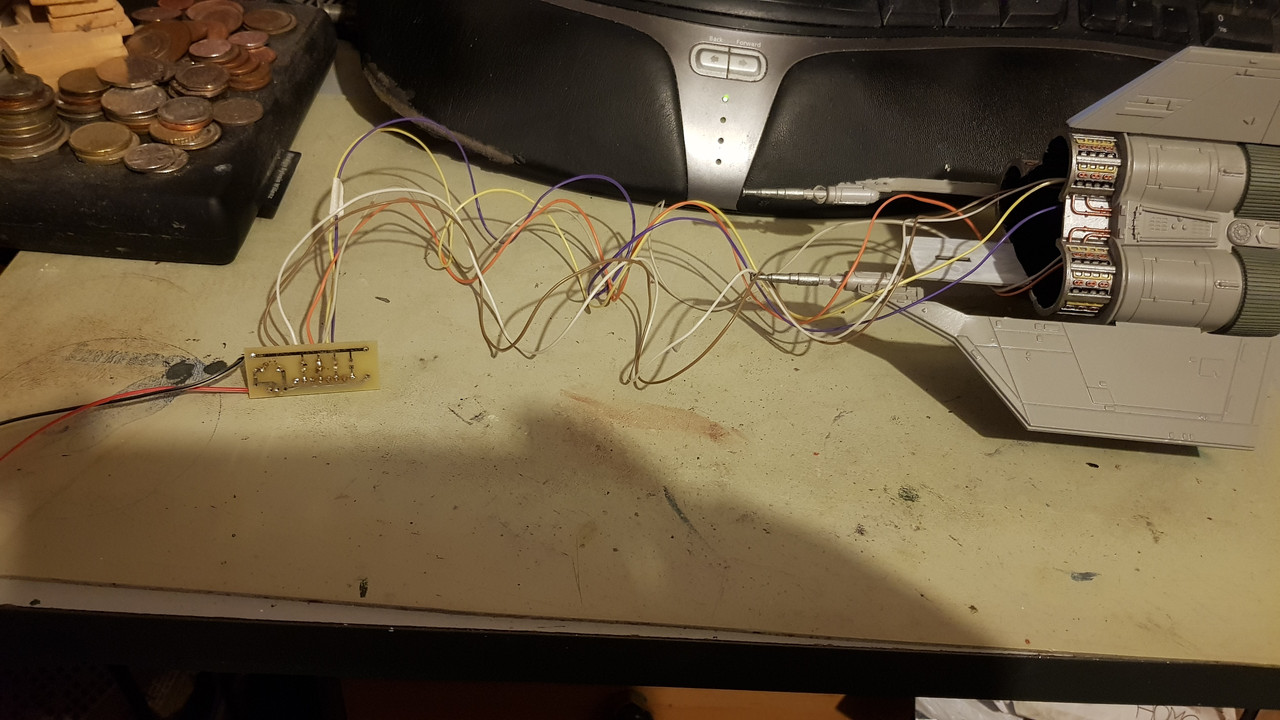
Not sure yet whether I will un-solder them from the board, shorten the cables then re-solder back on or just cut a section out, solder the ends and wrap the join in insulating tape. Decisions, decisions, decisons....
Tonight I got another bit of time to myself so I got the LED's mounted on the carriers. Fiddlier job than I thought but got there in the end - look closely and you can just make them out:
Once the CA adhesive had set I tested the circuits - this time you can see them
So - just to make sure all was well I dry fitted the exhaust section to see if there were any light leaks still.
I think the effect is not bad. I rather like the way the light fills the inner faces of the exhaust- glad I never painted them. But that digreses. I found a couple of little places where there is light bleed-through so those will get another coat of black on the interior faces before final assembly.
Once that is done I need to shorten this jumble of cables - there is not enough room inside the engine section to coil all that up AND slip the circuit board in.
Not sure yet whether I will un-solder them from the board, shorten the cables then re-solder back on or just cut a section out, solder the ends and wrap the join in insulating tape. Decisions, decisions, decisons....
On the board now:
Airfix 1/35 Alvis Stalwart Mk2 FV622
Airfix 1/72 Angel Interceptor
Academy 1/48 Grumman TBM-3 Avenger
Italeri 1/72 Saab JAS-29 Gripen
Airfix 1/24 Wallis Autogyro
Scalemates stash info
=58417&fkSTASHSTATUS[]=58417-Stash&page=stash]Scalemates Stash manager
Re: Colonial Viper Mk1
Effect looks great. The 3 engines look like they’re on full power
Its been tried and tested, it works! So don't blame the system if you're no good.
Re: Colonial Viper Mk1
Great effect, beautiful.
It stead of painting you could just glue metal foil in there, absolutely guaranteed no light will penetrate that.
It stead of painting you could just glue metal foil in there, absolutely guaranteed no light will penetrate that.
Re: Colonial Viper Mk1
Looking good!
-
RangerNeil
- Captain
- Posts: 4369
- Joined: Fri Jul 12, 2019 9:42 pm
- Location: Dagenham
- Contact:
Re: Colonial Viper Mk1
Did actually think of that - the cockpit section is so lined - although I have to admit I did it there because there is only 1 Green LED in front of the centre display and not enough light was reaching the side panels to illuminate them from behind. Put the foil in and - WHAM - instant illuminated side panels.
Problem with the engine section is it has a number of joining brackets and reinforcing brackets inside. Its made up from 3 separate pieces and so has aligning butts to get the radius of the engine inlets and outlets correct. I will try a layer of black tomorrow and see if that cuts it out - its only a couple of spots and might be where I thinned the paint too much. If that doesn't do it then I will have to pursue the tin foil route.
On the board now:
Airfix 1/35 Alvis Stalwart Mk2 FV622
Airfix 1/72 Angel Interceptor
Academy 1/48 Grumman TBM-3 Avenger
Italeri 1/72 Saab JAS-29 Gripen
Airfix 1/24 Wallis Autogyro
Scalemates stash info
=58417&fkSTASHSTATUS[]=58417-Stash&page=stash]Scalemates Stash manager
-
Twokidsnosleep

- General

- Posts: 18139
- Joined: Thu Aug 07, 2014 4:07 pm
- Location: BC,Canada

Re: Colonial Viper Mk1
You are doing awesome with the lighting
It gets a bit addictive, no
You start looking for other stuff to light
It gets a bit addictive, no
You start looking for other stuff to light
Scott
On, Under or near the desk
Brewster Buffalo ..buddy build
Rockford Firebird
1/72 Black Pearl Pirate Ship in dry dock
On, Under or near the desk
Brewster Buffalo ..buddy build
Rockford Firebird
1/72 Black Pearl Pirate Ship in dry dock
Re: Colonial Viper Mk1
Nice job Neil, loving the LED's


Re: Colonial Viper Mk1
Man this is so cool!
Also, great news about the missus mate, chuffed for you guys!
Also, great news about the missus mate, chuffed for you guys!
Previously on the bench: Tamiya 1/20 McLaren MP4/4 - Top Studio super detail set.
Current build: Tamiya 1/12 Honda VF750R & Hobby Design set
Current build: Tamiya 1/12 Honda VF750R & Hobby Design set
Re: Colonial Viper Mk1
Awesome news about your wife mate
And good too see you're still pottering away at this one - the result with the leds switched on at the back is great so hope you can tidy everything up to your satisfaction. You're doing a great job sticking with this!
And good too see you're still pottering away at this one - the result with the leds switched on at the back is great so hope you can tidy everything up to your satisfaction. You're doing a great job sticking with this!
Cheers, Neil
On the Bench:
Revell 1/72 Millennium Falcon
Tamiya 1/48 P-38F/G
On the Bench:
Revell 1/72 Millennium Falcon
Tamiya 1/48 P-38F/G
-
RangerNeil
- Captain
- Posts: 4369
- Joined: Fri Jul 12, 2019 9:42 pm
- Location: Dagenham
- Contact:
Re: Colonial Viper Mk1
Bit more progress - and one set back today - but overall progress.
I shortened all the leads and got the circuit board into the engine compartment, fed the Cockpit LED leads back through the intake panel and the power leads out of it to go through the stand slot then hooked up the cockpit LED to the circuit board. Tested it with twisted power connections and all was OK. So I soldered the black leads together and the read leads to the switch, tried it again and nothing!! The terminals in the switch had broken off when I soldered the leads on.
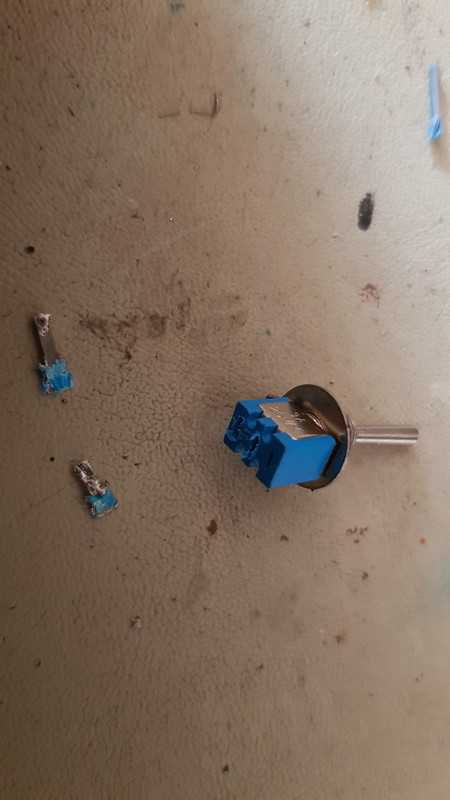
Doh!! However - whilst sat kicking myself up the backside I realise I hadn't fed the red and black leads out through the stand slot. So - I had to separate the leads again anyway, feed them through the slots and then put the modules together dry - that way I can separate them for the decals later.
Then I tried out the lighting again having soldered the two black leads together and just twisted the positive leads together so I can fit a switch later
(ignore the voice in the background - the wife won't stop talking on the phone )
So - next job is to finish off the landing gear and a couple of touch up sports on the paint work - I can only assume its been rubbed by handling - and then its decal time.
Question: Is it best to put the decals on then do a panel wash? Or do the wash first?
I shortened all the leads and got the circuit board into the engine compartment, fed the Cockpit LED leads back through the intake panel and the power leads out of it to go through the stand slot then hooked up the cockpit LED to the circuit board. Tested it with twisted power connections and all was OK. So I soldered the black leads together and the read leads to the switch, tried it again and nothing!! The terminals in the switch had broken off when I soldered the leads on.
Doh!! However - whilst sat kicking myself up the backside I realise I hadn't fed the red and black leads out through the stand slot. So - I had to separate the leads again anyway, feed them through the slots and then put the modules together dry - that way I can separate them for the decals later.
Then I tried out the lighting again having soldered the two black leads together and just twisted the positive leads together so I can fit a switch later
(ignore the voice in the background - the wife won't stop talking on the phone
So - next job is to finish off the landing gear and a couple of touch up sports on the paint work - I can only assume its been rubbed by handling - and then its decal time.
Question: Is it best to put the decals on then do a panel wash? Or do the wash first?
On the board now:
Airfix 1/35 Alvis Stalwart Mk2 FV622
Airfix 1/72 Angel Interceptor
Academy 1/48 Grumman TBM-3 Avenger
Italeri 1/72 Saab JAS-29 Gripen
Airfix 1/24 Wallis Autogyro
Scalemates stash info
=58417&fkSTASHSTATUS[]=58417-Stash&page=stash]Scalemates Stash manager
Re: Colonial Viper Mk1
That looks awesome. I love the iconic shape too.
Its been tried and tested, it works! So don't blame the system if you're no good.
-
BigWall
- Chief Warrant Officer 5
- Posts: 2961
- Joined: Sun Mar 15, 2020 11:44 pm
- Location: Denver, Colorado
Re: Colonial Viper Mk1
The lighting looks great!
I prefer to put the decals on first and then do the panel wash, particularly if the decals sit in the panel lines.
I prefer to put the decals on first and then do the panel wash, particularly if the decals sit in the panel lines.
Joe
Re: Colonial Viper Mk1
Lovely result coming up. I do the decals first. The pin wash is really going to make this pop going from damn to good to Wow !
Re: Colonial Viper Mk1
Looking forward to seeing the orange decals. This is looking brilliant.
On The Bench (Dining Table) - CF-104 Starfighter
-
RangerNeil
- Captain
- Posts: 4369
- Joined: Fri Jul 12, 2019 9:42 pm
- Location: Dagenham
- Contact:
Re: Colonial Viper Mk1
Cheers folk - decals first it is. Off to YouTube now for some hints on how to use that Vallejo Model Wash!!
On the board now:
Airfix 1/35 Alvis Stalwart Mk2 FV622
Airfix 1/72 Angel Interceptor
Academy 1/48 Grumman TBM-3 Avenger
Italeri 1/72 Saab JAS-29 Gripen
Airfix 1/24 Wallis Autogyro
Scalemates stash info
=58417&fkSTASHSTATUS[]=58417-Stash&page=stash]Scalemates Stash manager
Re: Colonial Viper Mk1
Awesome Neil, this is looking so cool 
-
RangerNeil
- Captain
- Posts: 4369
- Joined: Fri Jul 12, 2019 9:42 pm
- Location: Dagenham
- Contact:
Re: Colonial Viper Mk1
Many thanks kind sir
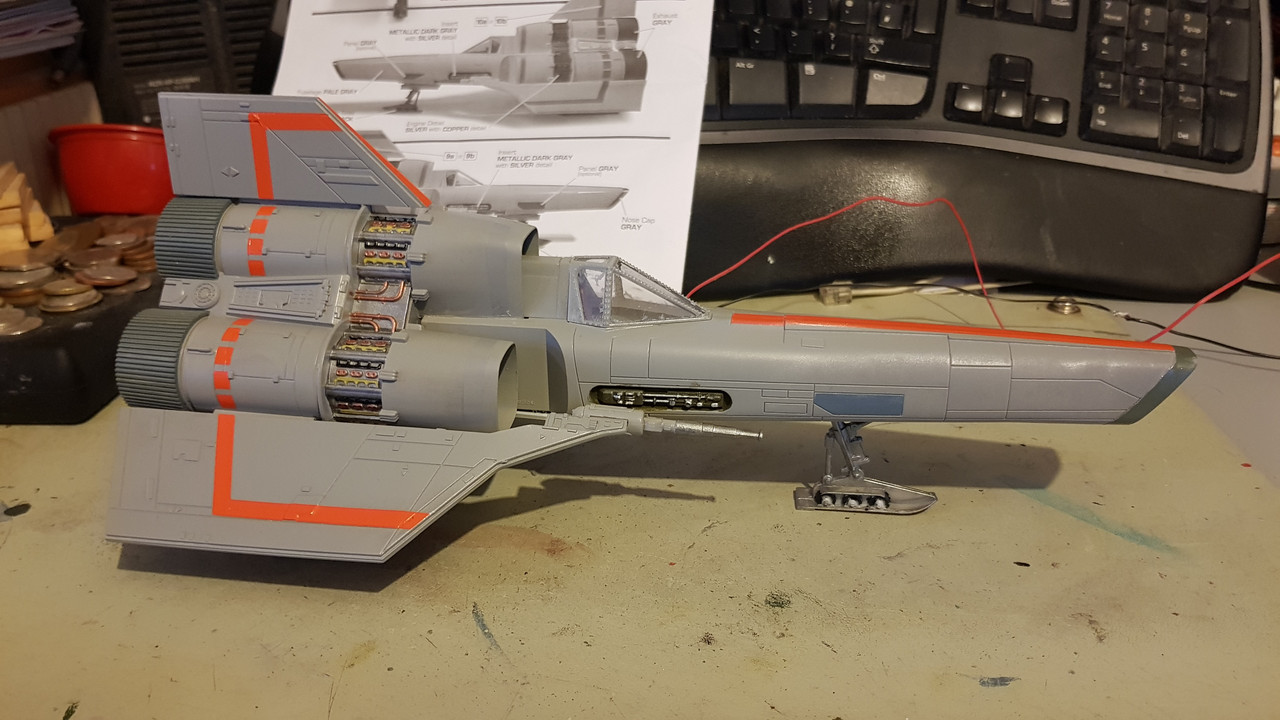
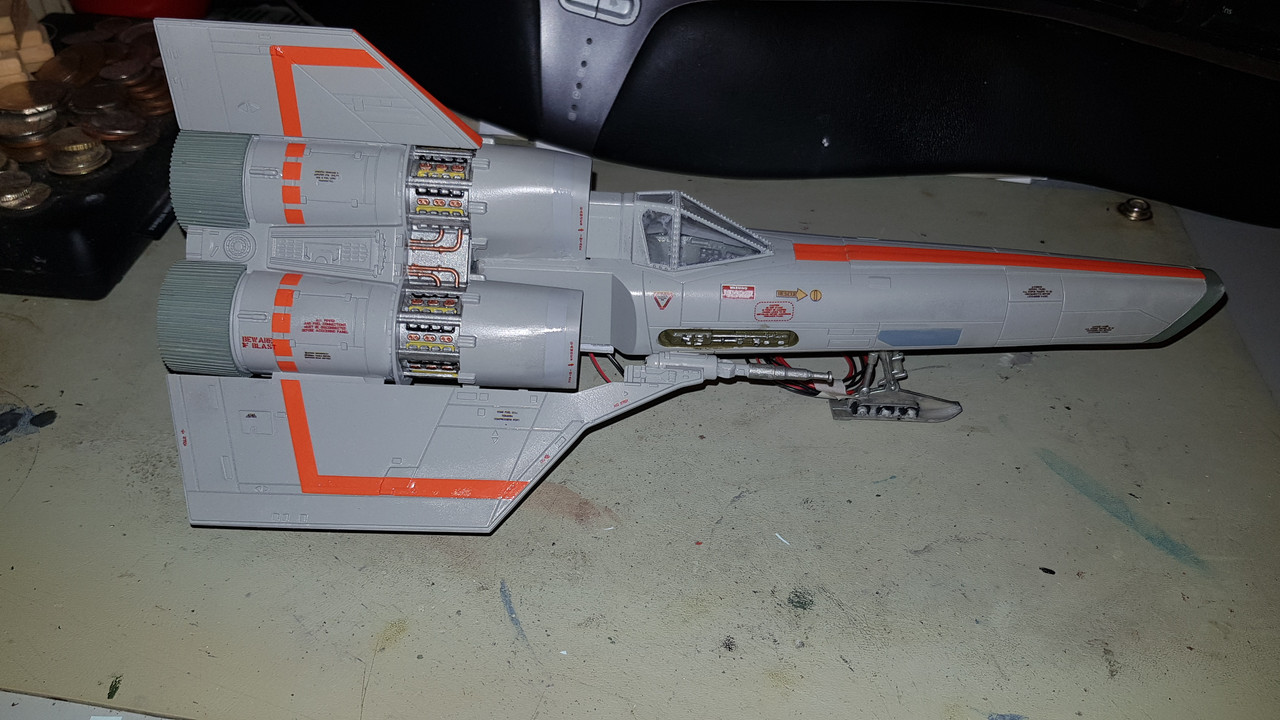
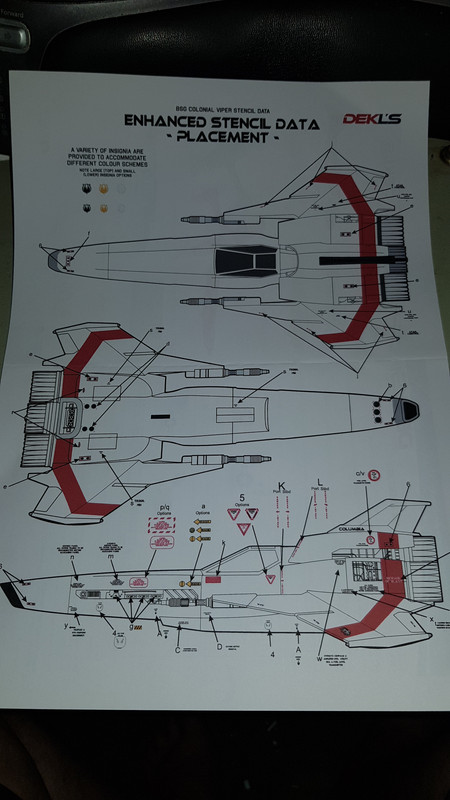
Got a bit more done today - all the kit decals are now on and I am allowing them to set before I go to the advanced set - stencilling etc. Had a bit of an issue on opening that as it was advertised as being for the Viper Mk 1 but the instructions are for a Viper MkII! However I can use most of them - "Do Not Step" is "Do Not Step" regardless of what it goes on after all.
Also had one little contretemps with the missus - I was in the midst of applying one of the wing decals and she wanted something done - because I didn't respond immediately she shoved a notepad in front of my face - in the process knocking over the open bottle of MicroSet! So that went from nearly full to about a quarter of a bottle - and as a result of grapping for that the decal got screwed up... I was not a happy bunny!!
Anyways - here is the Viper more or less assembled and with the kit decals on.
Am I right in thinking before applying a wash it would be best to give the decals a coat of gloss first?
On the board now:
Airfix 1/35 Alvis Stalwart Mk2 FV622
Airfix 1/72 Angel Interceptor
Academy 1/48 Grumman TBM-3 Avenger
Italeri 1/72 Saab JAS-29 Gripen
Airfix 1/24 Wallis Autogyro
Scalemates stash info
=58417&fkSTASHSTATUS[]=58417-Stash&page=stash]Scalemates Stash manager
-
Twokidsnosleep
- General
- Posts: 18139
- Joined: Thu Aug 07, 2014 4:07 pm
- Location: BC,Canada
Re: Colonial Viper Mk1
This looks better than the one on the TV show!
My thoughts on clear before weathering: YES
That way if I muff it up, I can take off the wash easier.
Usually I am using the Ultimate clay washes for weathering and you can get all of it off if there is a clear present
My thoughts on clear before weathering: YES
That way if I muff it up, I can take off the wash easier.
Usually I am using the Ultimate clay washes for weathering and you can get all of it off if there is a clear present
Scott
On, Under or near the desk
Brewster Buffalo ..buddy build
Rockford Firebird
1/72 Black Pearl Pirate Ship in dry dock
On, Under or near the desk
Brewster Buffalo ..buddy build
Rockford Firebird
1/72 Black Pearl Pirate Ship in dry dock
Re: Colonial Viper Mk1
Regardless of your little mishap it looks marvelous.
yep clear on before the weathering, only have to go over the decals.
yep clear on before the weathering, only have to go over the decals.
Re: Colonial Viper Mk1
If you're going to apply a wash then use a gloss clear beforehand. Otherwise it will suck down on to matt surface and will be much harder to remove.
Its been tried and tested, it works! So don't blame the system if you're no good.
-
RangerNeil
- Captain
- Posts: 4369
- Joined: Fri Jul 12, 2019 9:42 pm
- Location: Dagenham
- Contact:
Re: Colonial Viper Mk1
Cheers Stokesy, Digger & TwoKids.
Today, when I get some free time, I will be adding the enhanced decals and when they are set and dry I will give it another gloss coat.
Let that dry over night and then the fun will begin..... Never ever done a wash before so......
Today, when I get some free time, I will be adding the enhanced decals and when they are set and dry I will give it another gloss coat.
Let that dry over night and then the fun will begin.....
 Never ever done a wash before so......
On the board now:
Airfix 1/35 Alvis Stalwart Mk2 FV622
Airfix 1/72 Angel Interceptor
Academy 1/48 Grumman TBM-3 Avenger
Italeri 1/72 Saab JAS-29 Gripen
Airfix 1/24 Wallis Autogyro
Scalemates stash info
=58417&fkSTASHSTATUS[]=58417-Stash&page=stash]Scalemates Stash manager
-
RangerNeil
- Captain
- Posts: 4369
- Joined: Fri Jul 12, 2019 9:42 pm
- Location: Dagenham
- Contact:
Re: Colonial Viper Mk1
Little bit more done!! 
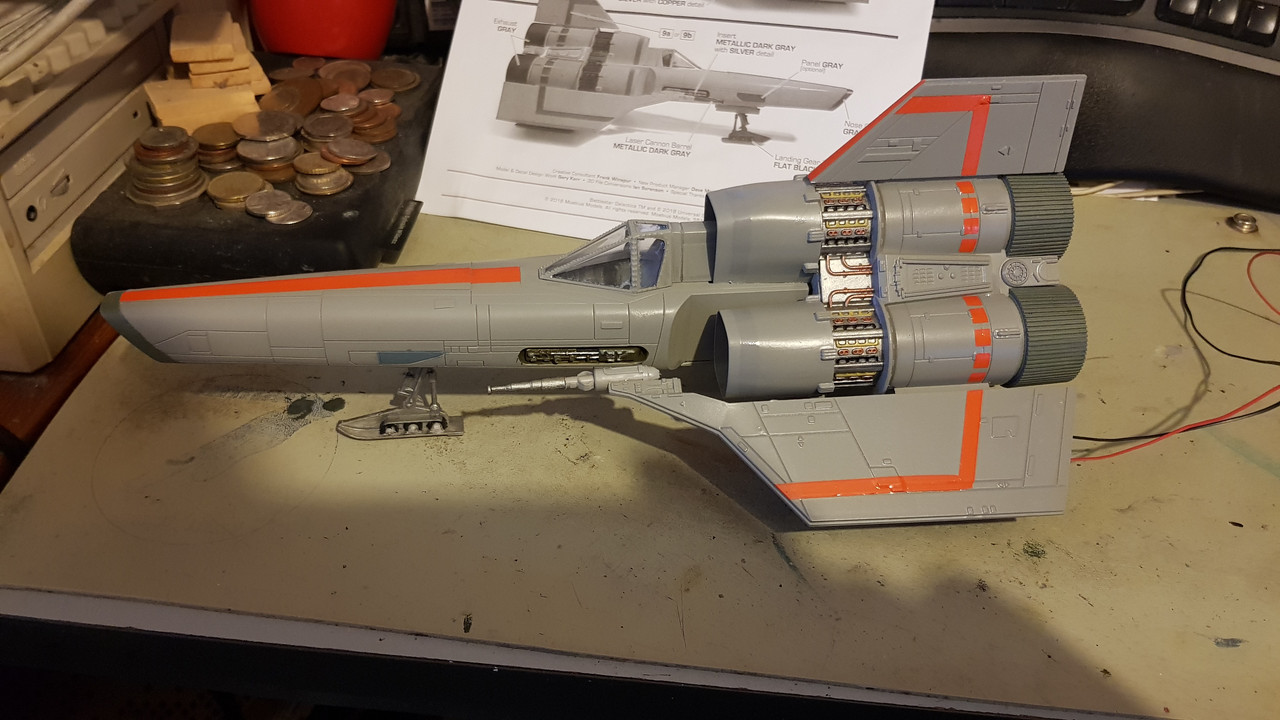
This time I remembered the decals are printed on a continuous sheet so trimmed them right down before applying. As you see the Viper now its about 80% done on the upper surfaces and then I need to start on the underside.
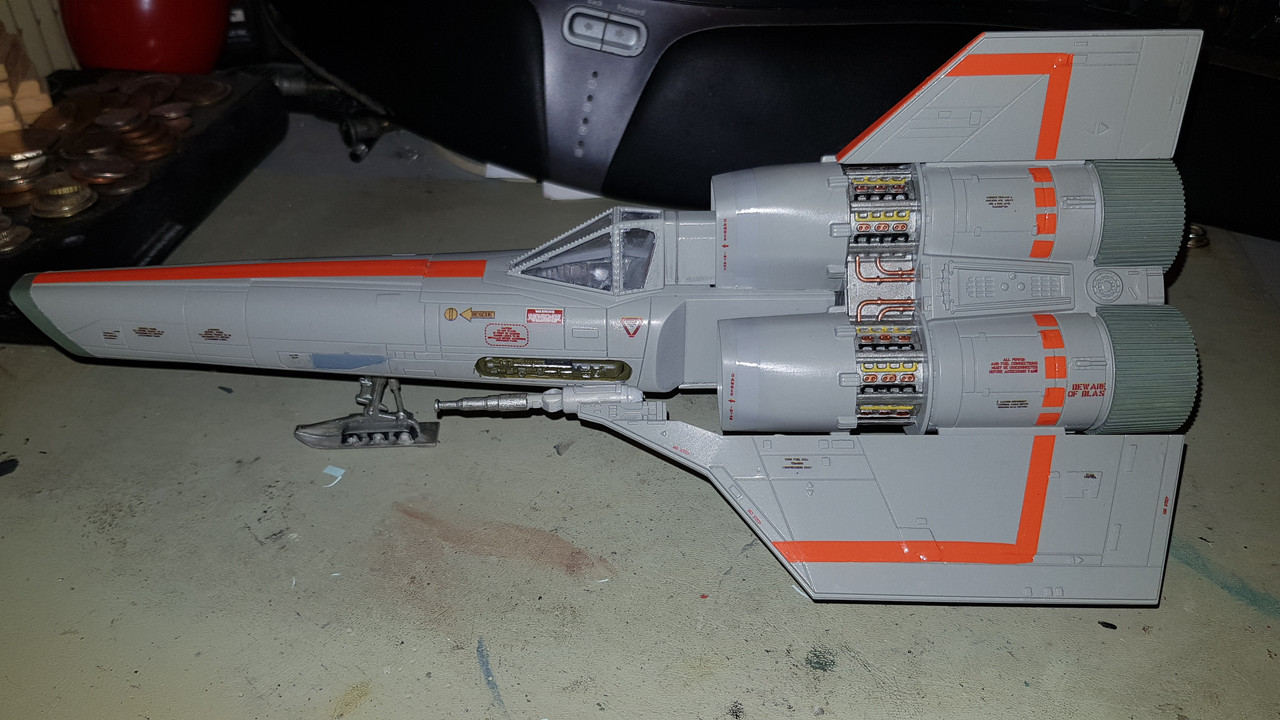
See what I mean about the decals being for the Mk II...
This time I remembered the decals are printed on a continuous sheet so trimmed them right down before applying.
See what I mean about the decals being for the Mk II...
On the board now:
Airfix 1/35 Alvis Stalwart Mk2 FV622
Airfix 1/72 Angel Interceptor
Academy 1/48 Grumman TBM-3 Avenger
Italeri 1/72 Saab JAS-29 Gripen
Airfix 1/24 Wallis Autogyro
Scalemates stash info
=58417&fkSTASHSTATUS[]=58417-Stash&page=stash]Scalemates Stash manager
Re: Colonial Viper Mk1
The decals really make it pop, it’s looking so cool
