Northrop YB-49

Post Reply
Mike00
Staff Sergeant
Staff Sergeant
Posts: 230
Joined: Tue Oct 29, 2013 2:48 am
Location: Betsy Layne, Kentucky, USA

Northrop YB-49

Post by Mike00 »

Image
Image
I will be attempting to do two bombers for this build. My first choice is AMT/ERTL YB-49 Flying wing in 1/72 scale. The kit is large with a wingspan of 28 1/2 inches. The model has 90 parts that have sharp clean molding. The parts have engraved panel lines.
On the bench

Opel Workshop Truck
Italeri SWS with Flak 73
Airfix Spitfire
Kilgon Bird of Prey
User avatar
pedrofernandes
Sergeant
Sergeant
Posts: 123
Joined: Sat Aug 24, 2013 11:21 am
Location: Aveiro - Portugal
Contact:
Portugal

Re: Northrop YB-49

Post by pedrofernandes »

What a big wing!!! :D

Very nice entry will be following the progress of this beauty !!
User avatar
DC87
Chief Warrant Officer 2
Posts: 1799
Joined: Wed Jun 05, 2013 7:16 pm
Location: Exeter, Devon, UK
England

Re: Northrop YB-49

Post by DC87 »

WOW that is something a bit different, not much of a fuselage.

Will definitely be following with interest.
Dan C

Filling the workbench with:
Sopwith Snipe late post war
WW1 RFC SE5a

WW1-1/32 Snipe
Workbench gets full with models being built - Buys another workbench!

Image
Johni044
Sergeant First Class
Posts: 309
Joined: Tue Jun 04, 2013 5:29 pm
Location: Skelmersdale, Lancashire, U.K.

Re: Northrop YB-49

Post by Johni044 »

Cool plane. Will be watching avidly as I have this to make some time in the future.

You going to have any Martian war machines on the horizon ?

Same wingspan as the B2 I believe.
My Portfolio
2014: acquired 51; Built 27

On the bench, Urm a lot.....
User avatar
patrickroos
Sergeant Major of the Army
Posts: 1181
Joined: Sat Jul 20, 2013 9:38 pm
Location: Sweden
Sweden

Re: Northrop YB-49

Post by patrickroos »

WOW! Fantastic model!! :th:

The history of Jack Northrop and his obsession with Flying wing designs is extremely fascinating.
He was way ahead of his time. Never got to realise his ideas..but lived to see the B-2 become a reality.
This is a Beautiful airplane with an very interesting history.
GREAT CHOICE!

:cheers2:
-----------------------
In progress:
A long list of stuff to finish...

Finished stuff (I have actually managed to finish something :dance: ):
http://intscalemodeller.com/viewtopic.p ... 88&start=0
User avatar
DBMiller
Chief Warrant Officer 3
Posts: 2227
Joined: Mon Jan 06, 2014 8:10 pm
Location: Guilford, Vermont, USA
United States of America

Re: Northrop YB-49

Post by DBMiller »

Yea! I have one of these, I can't wait to see one built!
Yellowlazer101
Corporal
Corporal
Posts: 75
Joined: Sat Nov 16, 2013 1:21 am
Location: Ballymena

Re: Northrop YB-49

Post by Yellowlazer101 »

Looking forward to seeing the completed wing. Like you choice of kit.
Barry


On the bench
Revell 1/48 Chinook
User avatar
T3hGuppy
Second Lieutenant
Second Lieutenant
Posts: 3467
Joined: Wed Jun 12, 2013 11:20 pm
Location: Bournemouth, UK
Contact:
Great Britain

Re: Northrop YB-49

Post by T3hGuppy »

Damn this aircraft looks insane!!

Great choice.
On the bench

Too much to list. !!


Youtube channel:https://www.youtube.com/user/bnealuk
Mike00
Staff Sergeant
Staff Sergeant
Posts: 230
Joined: Tue Oct 29, 2013 2:48 am
Location: Betsy Layne, Kentucky, USA

Re: Northrop YB-49

Post by Mike00 »

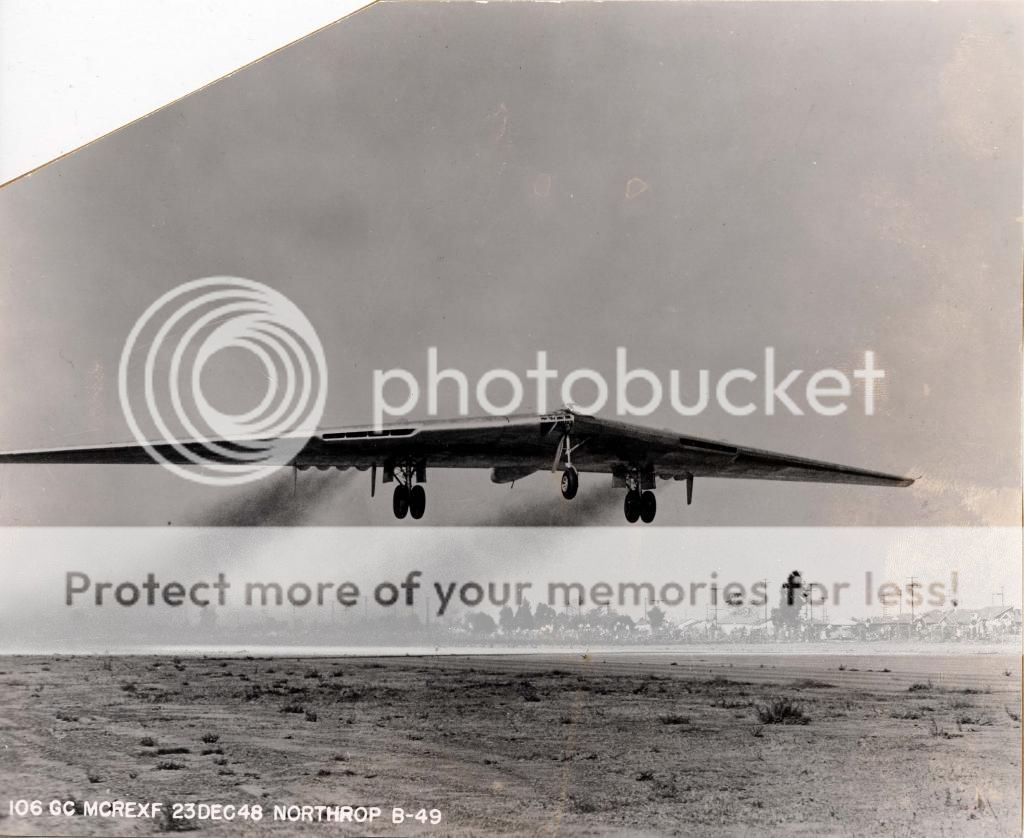
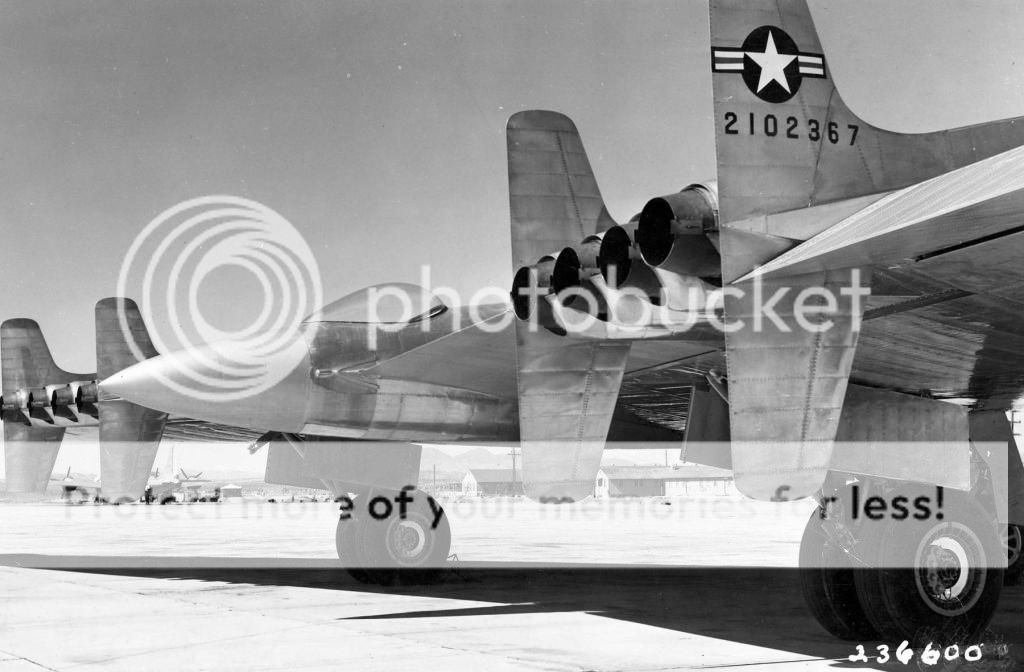
In 1945 two YB-35s were modified by replacing the four radial engines with counter rotating propellers with eight J35 turbojet engines.
Image
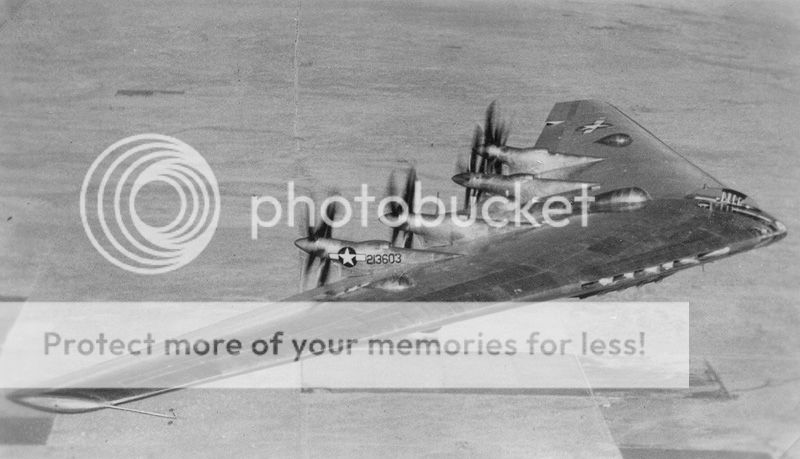
Four vertical stabilizers were added and air dams to promote better airflow over the wing. The guns were also removed to reduce drag. The completed aircraft were designated YB-49.
Image
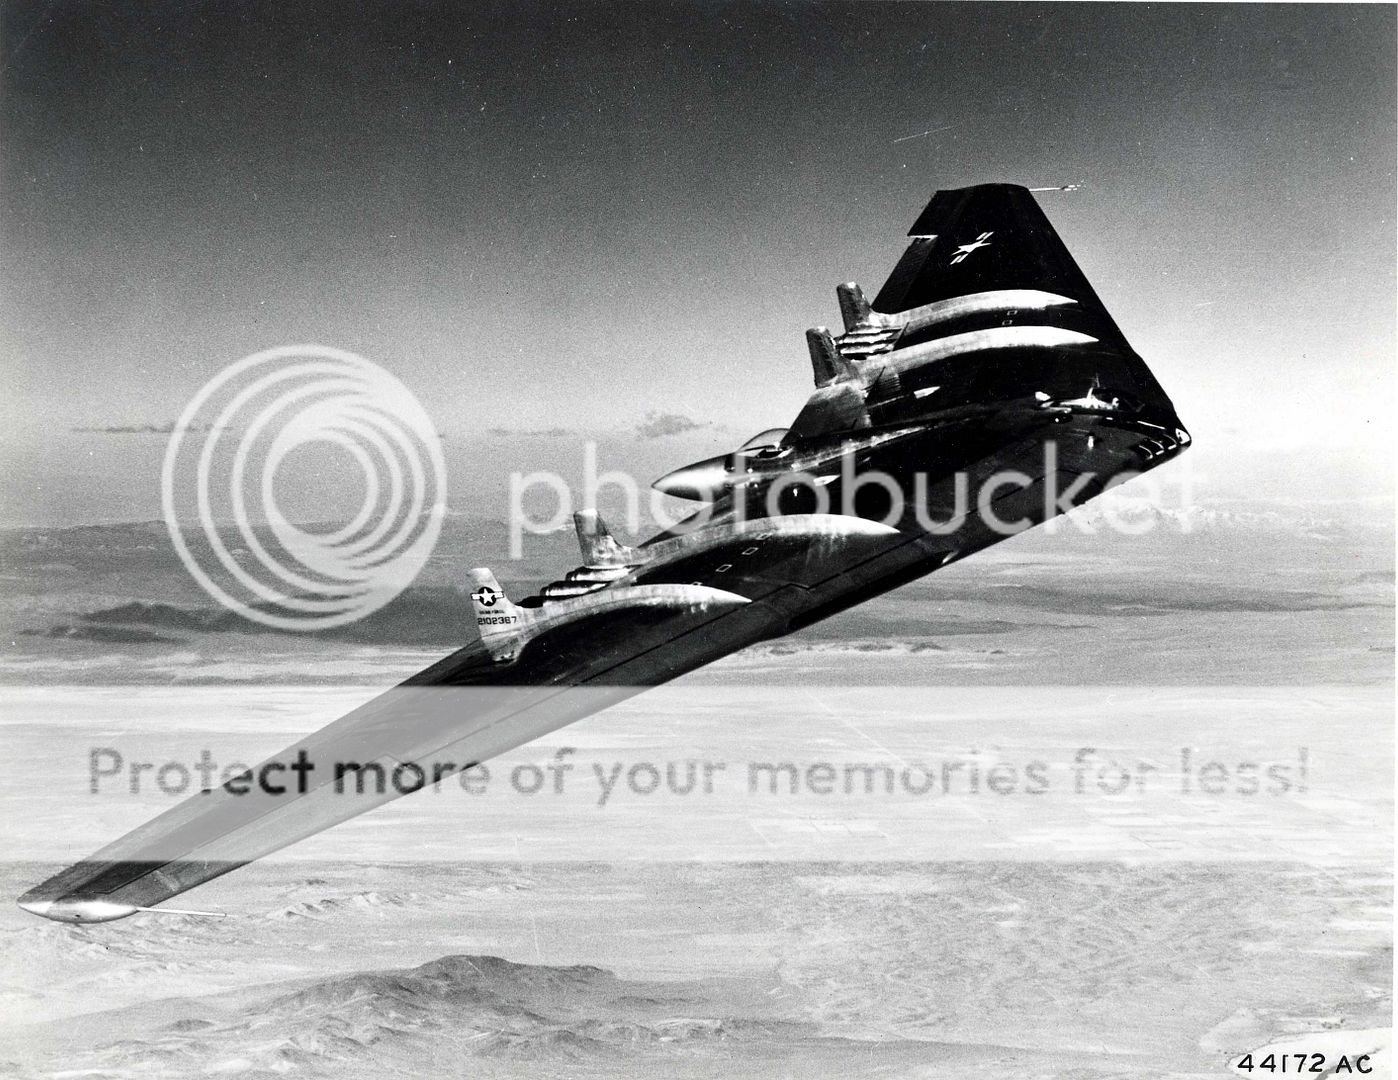
The first flight of YB-49 was on October 21 1947. The second aircrafts first flight was on January 13, 1948.
Image
Image
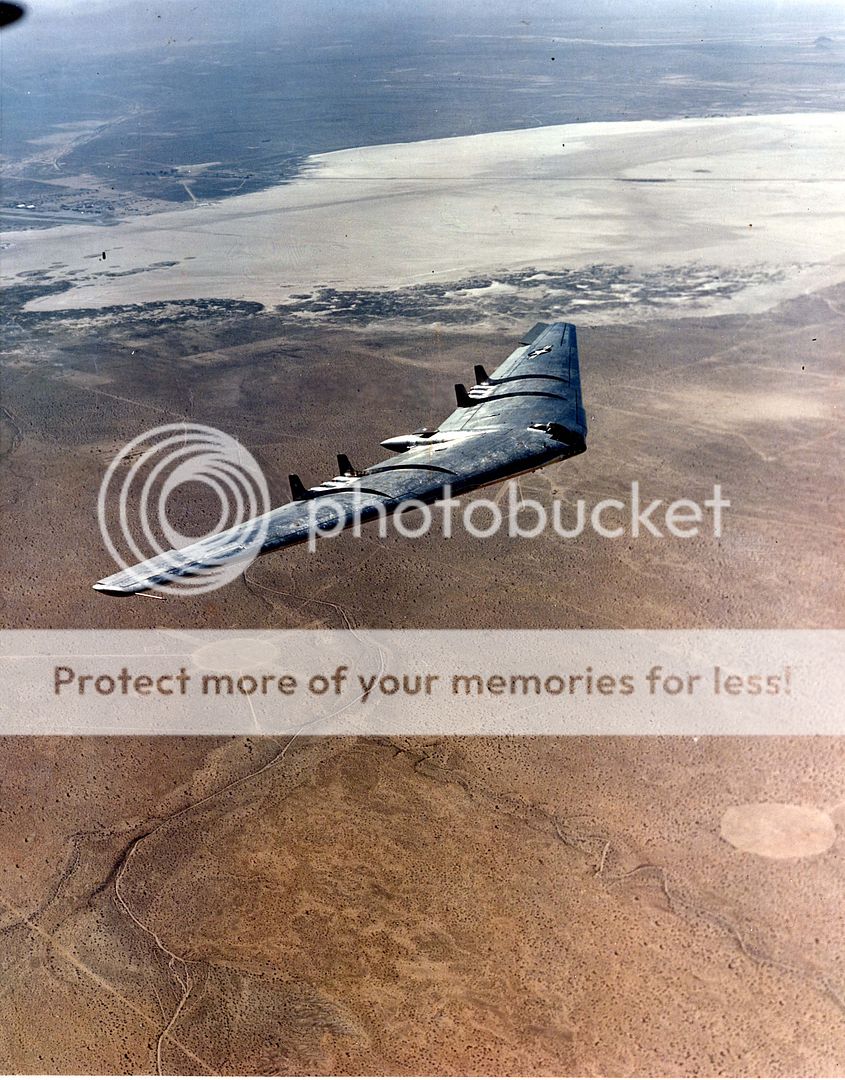
the political climate and a stability problem during bomb runs would put an end to this bomber. Testing continued and on June 5, 1948 the second aircraft crashed, with a loss of all six crewmembers. On march 15,1950 during testing on a high speed taxi run the nose landing gear collapsed. The first YB-49 was destroyed. Not until The B-2 stealth bomber did the flying wing concept find a place with the USAF.
Image
Image
Image

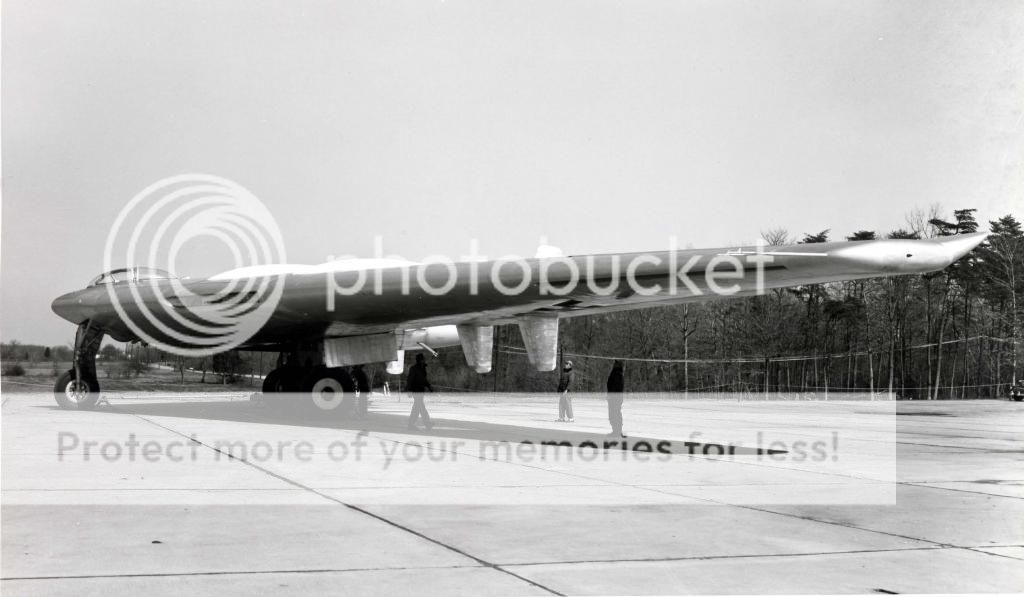
YB-49 All-Jet Flying Wing

Technical Notes

Armaments: Designed for bomb loads up to 16,000 lbs.
Engines: Eight Allison J35-A-5 axial flow turbojet engines with 4,000 lbs. of thrust
Maximum speed: 495 mph
Cruising speed: 420 mph
Range: 4,000 miles with 10,000 lbs. of bombs
Service ceiling:42,000 ft.
Span: 172 ft.
Length: 53 ft. 1 in.
Height: 15 ft. 2 in.
Weight: Approx. 213,5000 lbs.
Crew: Six ( pilot, copilot, flight engineer, radio operator, bombardier, gunner)
Serial numbers: 42-102367 and 42-102368
On the bench

Opel Workshop Truck
Italeri SWS with Flak 73
Airfix Spitfire
Kilgon Bird of Prey
User avatar
snappercity
Staff Sergeant
Staff Sergeant
Posts: 229
Joined: Mon Dec 02, 2013 12:05 am
Location: Surrey

Re: Northrop YB-49

Post by snappercity »

Cool choice.
Mark - Too many models, Not enough time...

On the bench:
Airfix 1:72 Vulcan
Takom 1:35 Zwilling Flak 40
Roden 1:144 C-141B Starlifter
User avatar
T3hGuppy
Second Lieutenant
Second Lieutenant
Posts: 3467
Joined: Wed Jun 12, 2013 11:20 pm
Location: Bournemouth, UK
Contact:
Great Britain

Re: Northrop YB-49

Post by T3hGuppy »

Damn it looks like something out of a 50's B-movie in that last pic.

Very cool unique aircraft. :th:
On the bench

Too much to list. !!


Youtube channel:https://www.youtube.com/user/bnealuk
Mike00
Staff Sergeant
Staff Sergeant
Posts: 230
Joined: Tue Oct 29, 2013 2:48 am
Location: Betsy Layne, Kentucky, USA

Re: Northrop YB-49

Post by Mike00 »

Image
Image
I got started on my B-49 today. the first thing I did was wash the part in Dawn dish soap and let dry. I started on the cockpit by spraying a coat of Dupi-Color clear adhesion primer. This primer is an automotive paint primer that is used to prime plastic parts before they are painted with automotive paint. It also works well on plastic models. I have used this product and have used primer or just straight paint over the primer with no problems. After the primer had dried about 20 minutes I brushed on a coat of Testors Aluminum. After this coat dried most of the day I sprayed a coat of Testors Gloss Coat to seal the metallic paint so I could paint details without reactivating the aluminum and causing the two colors to mix. In the picture is the start of the detail painting. The two prototypes of the B-49, the interior surfaces were bare metal, but had they gone into production they would have been painted interior green. My problem with an aluminum finish the details will not show up. I am kicking around the ideal of over weathering the interior to help bring out the details. I guess I will over weather the interior and see what happens.
On the bench

Opel Workshop Truck
Italeri SWS with Flak 73
Airfix Spitfire
Kilgon Bird of Prey
Mike00
Staff Sergeant
Staff Sergeant
Posts: 230
Joined: Tue Oct 29, 2013 2:48 am
Location: Betsy Layne, Kentucky, USA

Re: Northrop YB-49

Post by Mike00 »

Image
Image
Image
Image
I managed to assemble the flight deck today. It turned out OK, or at least I'm happy with it. I mounted it in the lower fuselage and let it dry for a couple of hours. I then assembled the two halves of the wing, and all the worrying about the flight deck details was for nothing. Most of the flight deck can not be seen. Oh well I know its there.
On the bench

Opel Workshop Truck
Italeri SWS with Flak 73
Airfix Spitfire
Kilgon Bird of Prey
User avatar
snappercity
Staff Sergeant
Staff Sergeant
Posts: 229
Joined: Mon Dec 02, 2013 12:05 am
Location: Surrey

Re: Northrop YB-49

Post by snappercity »

It looks like the pit from a space ship. Not an A/C. Good work so far..
Mark - Too many models, Not enough time...

On the bench:
Airfix 1:72 Vulcan
Takom 1:35 Zwilling Flak 40
Roden 1:144 C-141B Starlifter
User avatar
patrickroos
Sergeant Major of the Army
Posts: 1181
Joined: Sat Jul 20, 2013 9:38 pm
Location: Sweden
Sweden

Re: Northrop YB-49

Post by patrickroos »

Wow, conference room style cockpit! :D

Looking good!
:cheers2:
-----------------------
In progress:
A long list of stuff to finish...

Finished stuff (I have actually managed to finish something :dance: ):
http://intscalemodeller.com/viewtopic.p ... 88&start=0
User avatar
T3hGuppy
Second Lieutenant
Second Lieutenant
Posts: 3467
Joined: Wed Jun 12, 2013 11:20 pm
Location: Bournemouth, UK
Contact:
Great Britain

Re: Northrop YB-49

Post by T3hGuppy »

Loving the interior of this.

Looks like something from Star Trek,
On the bench

Too much to list. !!


Youtube channel:https://www.youtube.com/user/bnealuk
Mike00
Staff Sergeant
Staff Sergeant
Posts: 230
Joined: Tue Oct 29, 2013 2:48 am
Location: Betsy Layne, Kentucky, USA

Re: Northrop YB-49

Post by Mike00 »

Image
Image
Image
Image
I started the major assemblies today. I had some fit problems where the middle section of the wing and the outer sections of the wing meet. I added a couple of strips of sheet plastic, because the wing is a curved surface I laminated two pieces per side. After the reinforcements dried I glued on the wing sections, the modification helped a great deal I now have manageable seams. I usually use Model Master liquid glue, but for these major assemblies I used the Testors tube glue it is thick and will weld the large pieces in place. On if the pictures shows the flight deck installed. The last picture shows the model on my desk with a one dollar bill for size comparison.

One of the earlier post said that one of the photos looked it came out of a 50's B movie. Well check out the 50's version of "War of the Worlds" the B-49 drops an atomic bomb on the Martians.
On the bench

Opel Workshop Truck
Italeri SWS with Flak 73
Airfix Spitfire
Kilgon Bird of Prey
Mike00
Staff Sergeant
Staff Sergeant
Posts: 230
Joined: Tue Oct 29, 2013 2:48 am
Location: Betsy Layne, Kentucky, USA

Re: Northrop YB-49

Post by Mike00 »

This model build was going so smooth that I thought the modeling gods were smiling on me. It turns out I had a false sense of accomplishment. I have not built very many aircraft kits, the last one about 15 years ago. I failed to find the center of gravity. When I test fit the landing gear to my horror I found the bomber was tail heavy. :eeek: I ran through my options, should I break apart the major assemblies and weight the nose, or cut holes in the wing and weight it. I chose the later feeling that the major seams were in great shape with very little seam repair I was afraid I would cause myself a bigger problems trying to reassemble them. So I cut holes in the lower part of forward wing on both sides of the flight deck and using 5 minute epoxy glued lead weights in the nose.
Image
Image
I plan on spending the day filling the holes and doing seam repair on the wing. I also will be working on the landing gear
On the bench

Opel Workshop Truck
Italeri SWS with Flak 73
Airfix Spitfire
Kilgon Bird of Prey
User avatar
patrickroos
Sergeant Major of the Army
Posts: 1181
Joined: Sat Jul 20, 2013 9:38 pm
Location: Sweden
Sweden

Re: Northrop YB-49

Post by patrickroos »

Not many options there dude...and trust me we have all been there... :doh:
Hehehe I built lots of planes in my former Life.
I completely forgot nose weight in some, nose Wheel and it was a tail sitter.
Back then I did not care much, solved it by hanging them from the ceiling. :lol:
Now on the other hand I would have solved it same as You, no other options as I see it.
Have to get the weights in there somehow...fill it, sand it, polish it and I dont Think it will show at the end.

I just had a :bash: moment myself. Dicovered that I had glued the cockpit panel to the over/sun panel skewed.
Had to carefully cut it loose, scrape, sand, re-glue...sigh.
Oh well, all part of building! :shifty:

Keep it up, love this plane!
:cheers2:
-----------------------
In progress:
A long list of stuff to finish...

Finished stuff (I have actually managed to finish something :dance: ):
http://intscalemodeller.com/viewtopic.p ... 88&start=0
Mike00
Staff Sergeant
Staff Sergeant
Posts: 230
Joined: Tue Oct 29, 2013 2:48 am
Location: Betsy Layne, Kentucky, USA

Re: Northrop YB-49

Post by Mike00 »

Thanks for the encouraging words. I mostly do armor models and a mistake can sometimes be covered up and make it look like it was part of the models character. Aircraft are like building automotive kits blemishes are noticeable. I hope I will be able to get it smoothed out.
On the bench

Opel Workshop Truck
Italeri SWS with Flak 73
Airfix Spitfire
Kilgon Bird of Prey
User avatar
patrickroos
Sergeant Major of the Army
Posts: 1181
Joined: Sat Jul 20, 2013 9:38 pm
Location: Sweden
Sweden

Re: Northrop YB-49

Post by patrickroos »

Just sand in steps down to finest grits and finish up with the polisher. :th:
If needed finish of with some Mr surfacer or even finer -some paint!
(Paint is good to fill tiny gaps and to smooth out small stuff, and easy to sand/polish)
Put back the panel lines and rivets if needed.
And its on the belly right, naa this will be fine, just take your time.
If it shows a little, well, its been repaired right, panels replaced...artistic license, no prob.
:cheers2:
-----------------------
In progress:
A long list of stuff to finish...

Finished stuff (I have actually managed to finish something :dance: ):
http://intscalemodeller.com/viewtopic.p ... 88&start=0
User avatar
Nige201980
Captain
Captain
Posts: 4095
Joined: Wed Jun 05, 2013 9:30 am
Location: Doncaster South Yorkshire UK
Contact:

Re: Northrop YB-49

Post by Nige201980 »

loving the look of this great work so far mate
http://www.youtube.com/channel/UCy-TGcs5u_ZXSZ9kObNfsPg


On the go at the Mo

Quite a few :banana:
Mike00
Staff Sergeant
Staff Sergeant
Posts: 230
Joined: Tue Oct 29, 2013 2:48 am
Location: Betsy Layne, Kentucky, USA

Re: Northrop YB-49

Post by Mike00 »

My electricity was out most of the day so didn't get much done. I have been sanding seams and holes. I used Squadron Whit Putty to fill the major seams. This product dries hard and won't crack easily if the plastic moves while sanding. I then used a coat of Bondo Spot putty over the white putty. The Bondo product is softer and will sand out smoother than the Squadron putty. This picture is before sanding the Bondo.
Image
On the bench

Opel Workshop Truck
Italeri SWS with Flak 73
Airfix Spitfire
Kilgon Bird of Prey
ludicrusmaximus
Staff Sergeant
Staff Sergeant
Posts: 166
Joined: Fri Dec 13, 2013 9:50 am
Location: Sydney Australia

Re: Northrop YB-49

Post by ludicrusmaximus »

I thought I'd commented on this thread earlier, but I guess I didnt. This is a great build of an awesome aircraft! Good save with the weighting too. I've just had the same problem with my current build, even WITH adding a weight (it still sits on its butt :x )
User avatar
wally
Staff Sergeant
Staff Sergeant
Posts: 234
Joined: Thu Oct 24, 2013 2:50 pm
Location: Warsaw [Poland]
Poland

Re: Northrop YB-49

Post by wally »

Wow this is the unusual subject for the bomber. Nice start of this flying wing you have. I'm looking forward to see next progress on this build. :th:
Wally
My Protfolio:
http://intscalemodeller.com/viewtopic.php?f=69&t=4138
On the Bench:
1/48 Mig-21PFM
1/48 PV-1 Ventura
Mike00
Staff Sergeant
Staff Sergeant
Posts: 230
Joined: Tue Oct 29, 2013 2:48 am
Location: Betsy Layne, Kentucky, USA

Re: Northrop YB-49

Post by Mike00 »

Image
Image
A quick update, I finished the sanding on the seams. Everything feels nice and smooth. I then glued on the vertical stabilizers
and the engine exhausts. Tomorrow I need to clean up dried glue on the stabilizers and mask off the openings to prime the model. I will be using Dupli-Color gray automotive primer, I will let it dry for at least two days then another round of sanding to achieve a smooth finish.
On the bench

Opel Workshop Truck
Italeri SWS with Flak 73
Airfix Spitfire
Kilgon Bird of Prey
User avatar
T3hGuppy
Second Lieutenant
Second Lieutenant
Posts: 3467
Joined: Wed Jun 12, 2013 11:20 pm
Location: Bournemouth, UK
Contact:
Great Britain

Re: Northrop YB-49

Post by T3hGuppy »

Filling seems to be going well dude.

Can really see the size of this thing!!!
On the bench

Too much to list. !!


Youtube channel:https://www.youtube.com/user/bnealuk
Mike00
Staff Sergeant
Staff Sergeant
Posts: 230
Joined: Tue Oct 29, 2013 2:48 am
Location: Betsy Layne, Kentucky, USA

Re: Northrop YB-49

Post by Mike00 »

Another Quick update. All sanding is done and a coat of automotive primer on the model. Another day to dry and a quick wet sand with 600 grit, and it will be ready for a coat of aluminum.
Image
On the bench

Opel Workshop Truck
Italeri SWS with Flak 73
Airfix Spitfire
Kilgon Bird of Prey
User avatar
conradschmid99
Sergeant First Class
Posts: 311
Joined: Wed Oct 30, 2013 7:19 pm
Location: Pasadena, CA

Re: Northrop YB-49

Post by conradschmid99 »

Great job
that's one of the coolest airplanes
"Interdum feror cupidine partium magnarum Europae vincendarum"
"Sometimes I get this urge to conquer large parts of Europe."
-unknown
Mike00
Staff Sergeant
Staff Sergeant
Posts: 230
Joined: Tue Oct 29, 2013 2:48 am
Location: Betsy Layne, Kentucky, USA

Re: Northrop YB-49

Post by Mike00 »

Image
Today I mask installed the clear parts and masked them off for painting. I put the first coat of aluminum on the B-49. After it dries overnight I will check to see if I need to fix any problem spots. I used Sherwin Williams Controls Rust Aluminum spray paint for the metal finish.
On the bench

Opel Workshop Truck
Italeri SWS with Flak 73
Airfix Spitfire
Kilgon Bird of Prey
Mike00
Staff Sergeant
Staff Sergeant
Posts: 230
Joined: Tue Oct 29, 2013 2:48 am
Location: Betsy Layne, Kentucky, USA

Re: Northrop YB-49

Post by Mike00 »

Image
Image
After the Walking Dead Marathon I thought I would put a coat of aluminum on the B-49. All was going well until :eeek: While trying to set the big bomber on three staining stands I stuck my big fat thumb into the tacky paint. Oh well I will sand it out and try to repaint tomorrow.
On the bench

Opel Workshop Truck
Italeri SWS with Flak 73
Airfix Spitfire
Kilgon Bird of Prey
User avatar
DBMiller
Chief Warrant Officer 3
Posts: 2227
Joined: Mon Jan 06, 2014 8:10 pm
Location: Guilford, Vermont, USA
United States of America

Re: Northrop YB-49

Post by DBMiller »

Well, Zombies will do that to you. You should have known.
Mike00
Staff Sergeant
Staff Sergeant
Posts: 230
Joined: Tue Oct 29, 2013 2:48 am
Location: Betsy Layne, Kentucky, USA

Re: Northrop YB-49

Post by Mike00 »

I just wanted to tell everyone following my builds I have been forced to take a break. Dew to financial concerns caused by the stroke I had last year I am moving sooner than I thought I would have to. Hopefully I will get moved and set back up to model in a few weeks and finish these builds on time.
On the bench

Opel Workshop Truck
Italeri SWS with Flak 73
Airfix Spitfire
Kilgon Bird of Prey
User avatar
T3hGuppy
Second Lieutenant
Second Lieutenant
Posts: 3467
Joined: Wed Jun 12, 2013 11:20 pm
Location: Bournemouth, UK
Contact:
Great Britain

Re: Northrop YB-49

Post by T3hGuppy »

Okay buddy we will all still be here when you get back.

Hope the move gores well . :th:
On the bench

Too much to list. !!


Youtube channel:https://www.youtube.com/user/bnealuk
User avatar
HistoryRider
First Sergeant
First Sergeant
Posts: 585
Joined: Fri Jan 31, 2014 11:49 pm
Location: Washington State

Re: Northrop YB-49

Post by HistoryRider »

It never is easy when life gets in the way, I wish you all the best!
HistoryRider
https://www.youtube.com/user/ThudWeasel

On the Bench___________________________________
Revell 1:48 Convair F-106 - Homeland Group Build
Academy 1:48 General Dynamics F-16 - Homeland Group Build
Tamiya 1:35 M4 Sherman
Tamiya 1:35 Panzer IV AusfD


On Deck___________________________________
To Be Determined
eoinfinnegan
Sergeant First Class
Posts: 321
Joined: Sun Oct 27, 2013 12:52 pm

Re: Northrop YB-49

Post by eoinfinnegan »

Good luck with the move, u hope everything works out for you
Mike00
Staff Sergeant
Staff Sergeant
Posts: 230
Joined: Tue Oct 29, 2013 2:48 am
Location: Betsy Layne, Kentucky, USA

Re: Northrop YB-49

Post by Mike00 »

Image
Hey guys got the move out of the way (mostly). I am ready to get back to my builds. I moved my work space into half of a huge walk in closet. I built myself a new work bench that is almost double the size of my last desk. I started sanding out the thumb print in the B49. I also had a yellowing problem with the decals. I taped the decal sheet in a southern facing window and let the sun do its magic. After a couple of days the decals have cleared up and will be ready to apply in about a week, after my repaint dries.
On the bench

Opel Workshop Truck
Italeri SWS with Flak 73
Airfix Spitfire
Kilgon Bird of Prey
Mike00
Staff Sergeant
Staff Sergeant
Posts: 230
Joined: Tue Oct 29, 2013 2:48 am
Location: Betsy Layne, Kentucky, USA

Re: Northrop YB-49

Post by Mike00 »

Well with the move out of the way and my Steel Rain entry finished it is time to get back to my bomber builds. I gave the B-49 a coat Future floor polish to seal the aluminum paint. The paint was a leafing product, which means when you rub your finger over the finish the paint will come off. This is a good thing when painting metal it helps to prevent rust, but is bad for applying decals as the paint would flake off after a while and take the decal with it. I worked on the landing gear today and she is standing on her own legs tonight.
Image
I started decaling tonight. The wing decals are huge so I only did the top of the wing. After placing each decal I gave it a coat of Micro-sol decal solvent to snug them down. The large USAF decal is kind of foggy, it looks like there was to much adhesive on the back. The decals laid down nice I can only hope that they clear up as they dry.
Image
Image
Image
On the bench

Opel Workshop Truck
Italeri SWS with Flak 73
Airfix Spitfire
Kilgon Bird of Prey
User avatar
T3hGuppy
Second Lieutenant
Second Lieutenant
Posts: 3467
Joined: Wed Jun 12, 2013 11:20 pm
Location: Bournemouth, UK
Contact:
Great Britain

Re: Northrop YB-49

Post by T3hGuppy »

Shame about the fogging on the decals.

Otherwise this is looking great. :th:
On the bench

Too much to list. !!


Youtube channel:https://www.youtube.com/user/bnealuk
User avatar
HistoryRider
First Sergeant
First Sergeant
Posts: 585
Joined: Fri Jan 31, 2014 11:49 pm
Location: Washington State

Re: Northrop YB-49

Post by HistoryRider »

Lookin Great! Congrats on the move and new Bench!! It's going to look awesome when all said and done!

:th:
HistoryRider
https://www.youtube.com/user/ThudWeasel

On the Bench___________________________________
Revell 1:48 Convair F-106 - Homeland Group Build
Academy 1:48 General Dynamics F-16 - Homeland Group Build
Tamiya 1:35 M4 Sherman
Tamiya 1:35 Panzer IV AusfD


On Deck___________________________________
To Be Determined
Mike00
Staff Sergeant
Staff Sergeant
Posts: 230
Joined: Tue Oct 29, 2013 2:48 am
Location: Betsy Layne, Kentucky, USA

Re: Northrop YB-49

Post by Mike00 »

Well I am getting close spent my time on painting the engines with Testors Jet Exhaust color. The remainder of my modeling time using a pencil to darken the panel lines. Using a wash made the lines to dark on the aluminum finish, and the lines were very fine. So fine that in some places they got sanded away. The pencil allowed me to use a straight edge and draw the lines back and not look different than the scribed lines.
Image
Image
Image
Image
I have to repair some ejector pin marks on the landing gear doors and paint. When I get the doors installed and paint the air intakes I think this one will be done. Hopefully that will be tomorrow, will see The University of Kentucky Wildcats play tomorrow night in the NCAA tournament. GO BIG BLUE!!
On the bench

Opel Workshop Truck
Italeri SWS with Flak 73
Airfix Spitfire
Kilgon Bird of Prey
Mike00
Staff Sergeant
Staff Sergeant
Posts: 230
Joined: Tue Oct 29, 2013 2:48 am
Location: Betsy Layne, Kentucky, USA

Re: Northrop YB-49

Post by Mike00 »

After the Cats lost I drowned my sorrows with a Diet Mountain Dew and went to the bench. I glued thr landing gear doors on and painted the air intake. I am calling this one done.
Image
On the bench

Opel Workshop Truck
Italeri SWS with Flak 73
Airfix Spitfire
Kilgon Bird of Prey
Post Reply

Return to “Builds”