Airfix Harrier GR.1/GR.3 Diorama
-
EasyEight96

- Sergeant Major of the Army

- Posts: 1012
- Joined: Sat Jul 20, 2013 2:04 pm
- Location: Malaysia

Re: Airfix Harrier GR.1/GR.3 Diorama
Great job on the truck it looked so real.
Hi Rob how are you long time no see
Hi Rob how are you long time no see
In -progress
Too many on the bench!!!
Matchbox Kits lover....
Too many on the bench!!!
Matchbox Kits lover....
-
Gav0909

- Chief Warrant Officer 5

- Posts: 2927
- Joined: Tue May 28, 2013 11:56 am
- Location: Fife, Scotland
- Contact:
Re: Airfix Harrier GR.1/GR.3 Diorama
I hope to be able to furnish you lovely people with a picture update later tonight. Work has been a bit mad lately with me working 9 nights in a row on top of full days of PhD thesis writing! But I have a night off from the pub tonight and will be making the most of it by spending it at the bench! Hopefully getting some paint on the random small parts etc which will allow me to then move on with this project.
Until later amigos!
Until later amigos!


-
Paul
- Site Admin

- Posts: 12622
- Joined: Thu May 23, 2013 4:47 pm
- Location: Merseyside, England, UK
- Contact:

Re: Airfix Harrier GR.1/GR.3 Diorama
Look forward to the update gavGav0909 wrote:I hope to be able to furnish you lovely people with a picture update later tonight. Work has been a bit mad lately with me working 9 nights in a row on top of full days of PhD thesis writing! But I have a night off from the pub tonight and will be making the most of it by spending it at the bench! Hopefully getting some paint on the random small parts etc which will allow me to then move on with this project.
Until later amigos!
Products I use in my builds viewtopic.php?f=192&t=27234
My Paul-Ism page https://www.facebook.com/thebenchwithpaul/
Friday Live show here https://www.facebook.com/groups/120548821977514/

My Paul-Ism page https://www.facebook.com/thebenchwithpaul/
Friday Live show here https://www.facebook.com/groups/120548821977514/


Re: Airfix Harrier GR.1/GR.3 Diorama
Me too dude!!!
 cool... I like this smiley.


-
Gav0909
- Chief Warrant Officer 5
- Posts: 2927
- Joined: Tue May 28, 2013 11:56 am
- Location: Fife, Scotland
- Contact:
Re: Airfix Harrier GR.1/GR.3 Diorama
Update 17
Sorry I didn't get this up last night, was too late for me to be bothering with pictures etc. I got some work done, but not huge amounts.
Firstly I got the UC painted and installed on the two Harriers and got some paint on the UC bay doors etc. I am going to go over those with the airbrush though to neaten them up, the paint is a touch streaky and I don't like it. Once dry I will then install the airbrakes, UC doors etc. Once that is done I need to mask the canopies and glue them in place. I tried to Klear them last night though and the Klear hasn't dried even, so they look worse now than without!
Does anyone know how to safely remove Klear from clear plastic without ruining the plastic?
Anyway, some pictures.
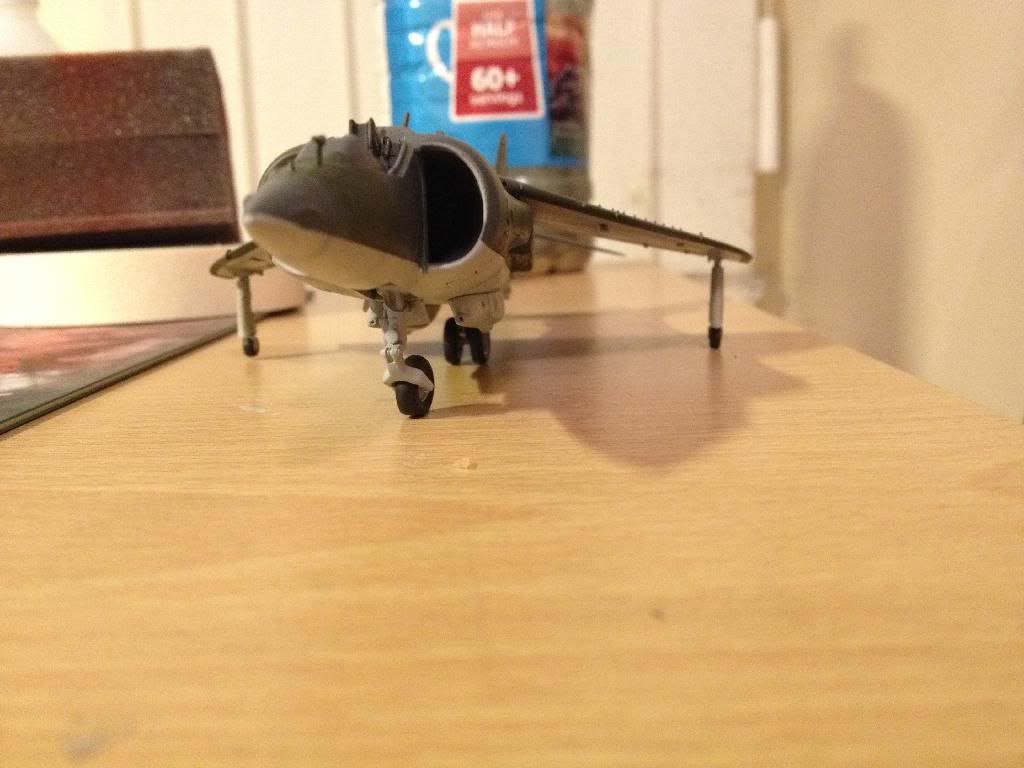
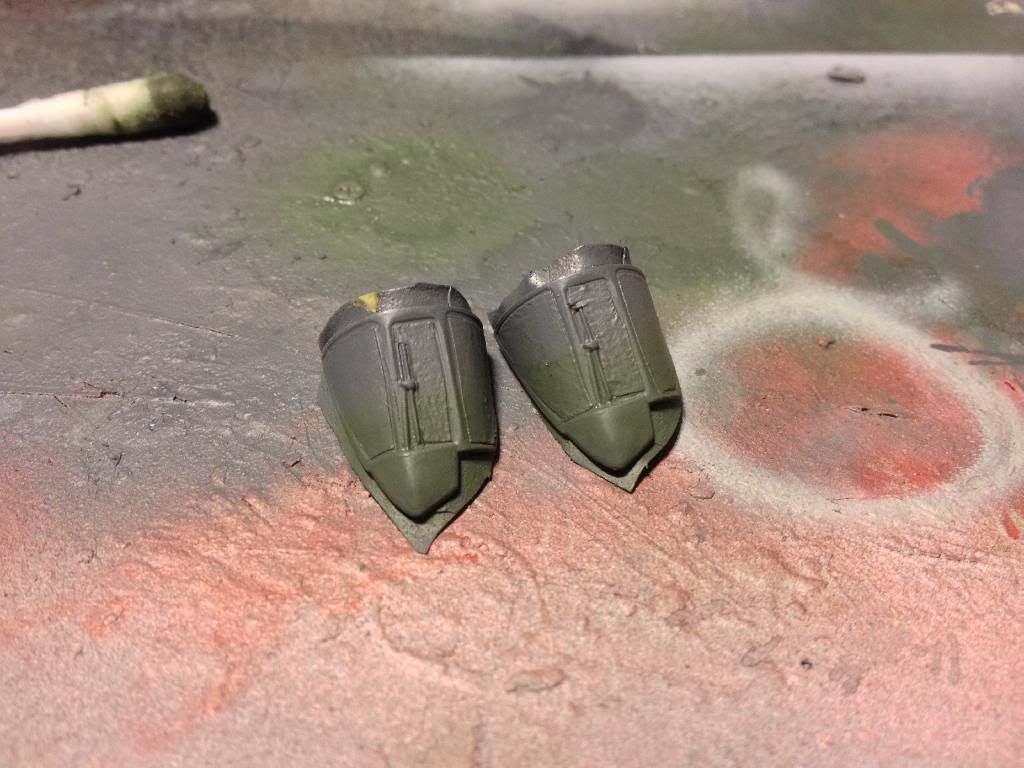
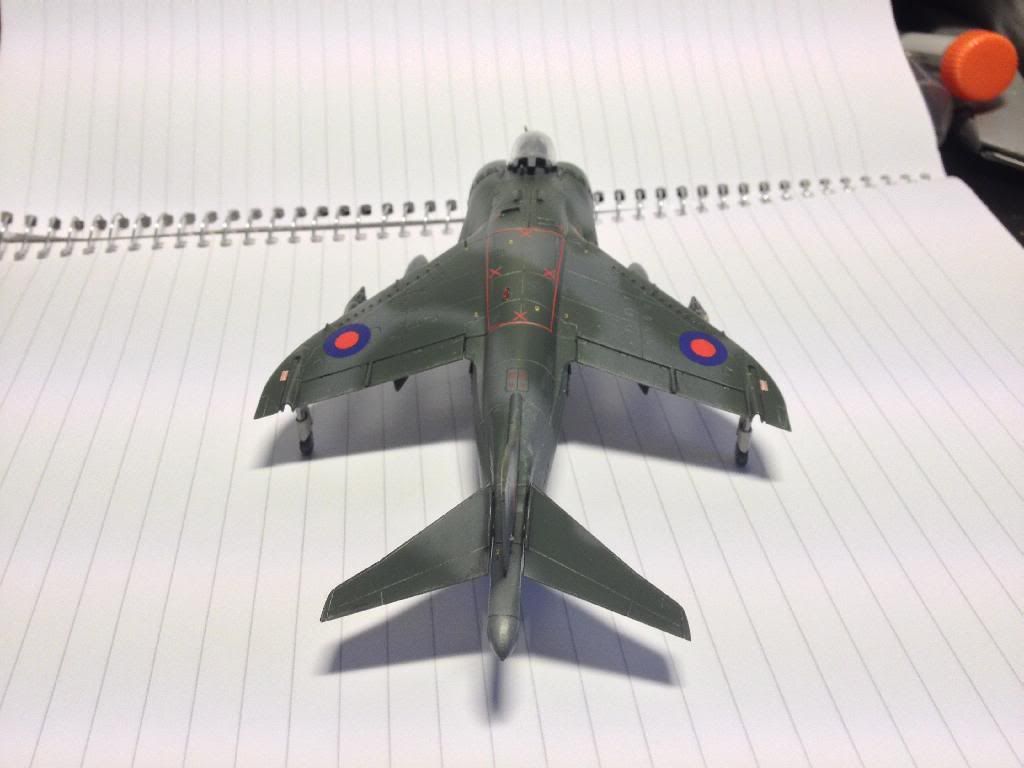
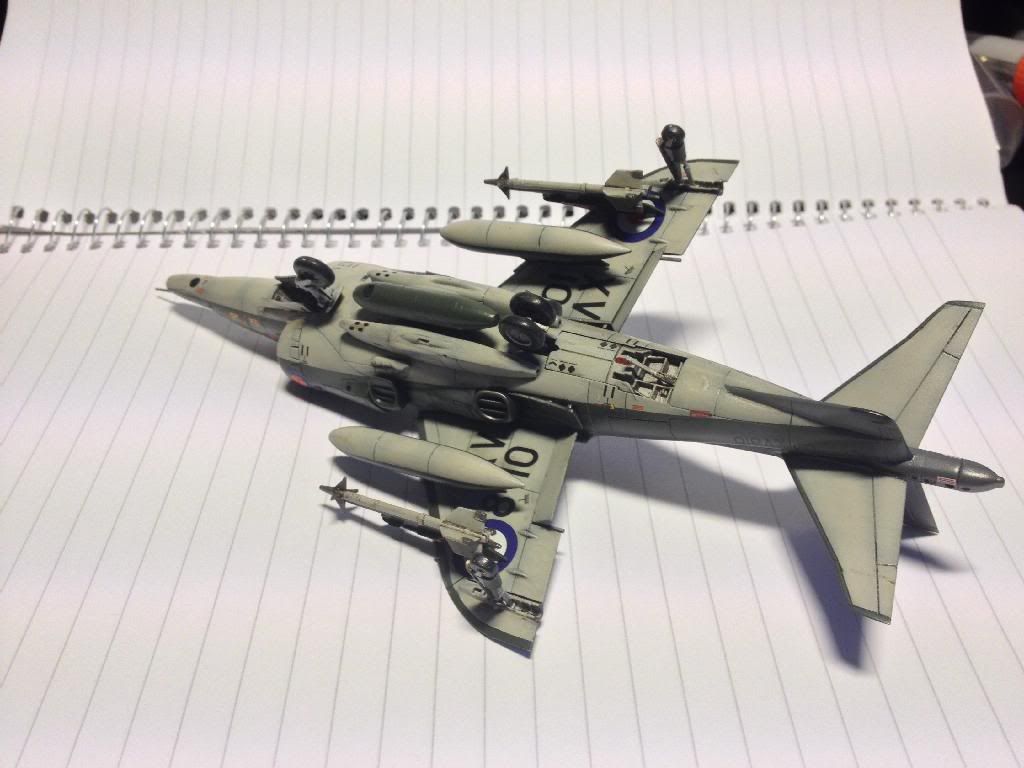
Random parts painting
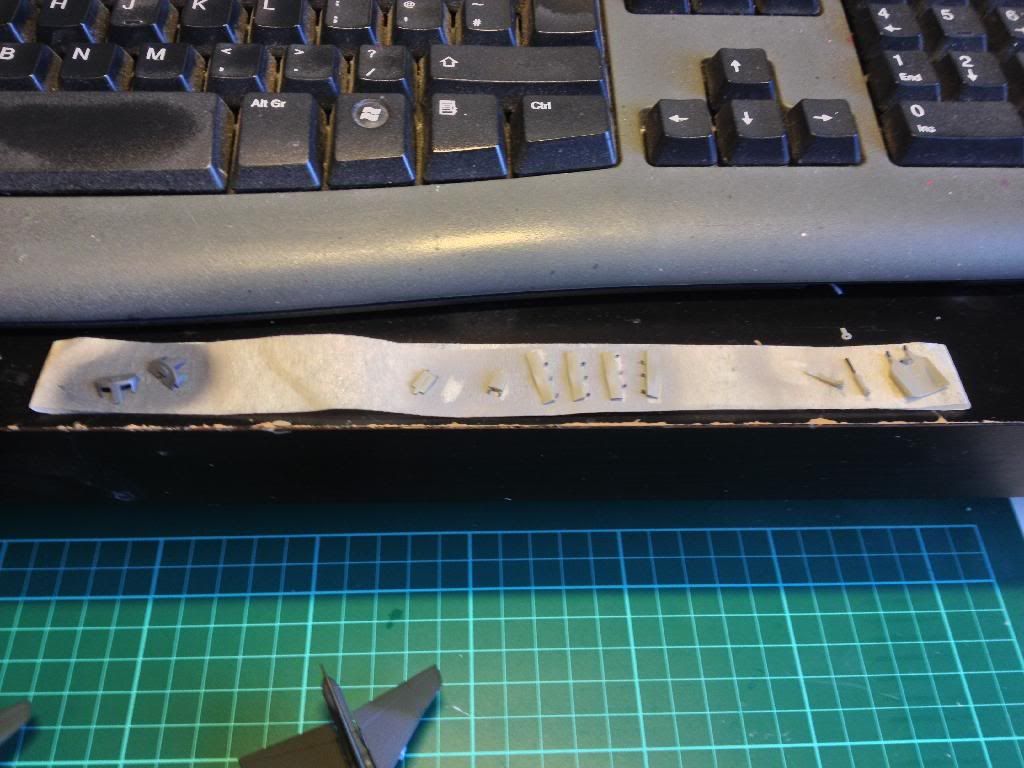
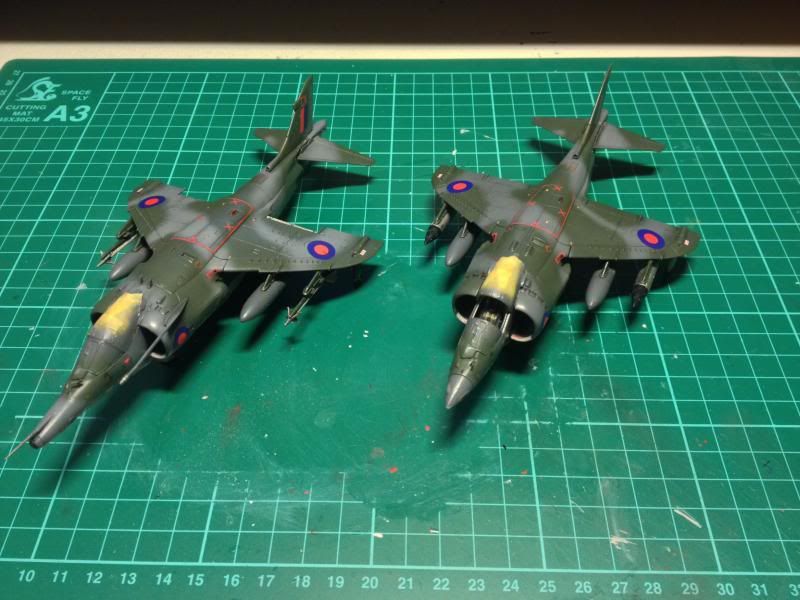
Two Harriers on their own wheels
Oh and proof that it is possible to get a model Harrier sitting on all 4 wheels at once! (If you have ever built a Harrier you will know that this is a common issue with models of them, they tend to sit to one side a bit).
So until the next update, which should be both Harriers Kleared and decalling started!
Ciao for now!
Sorry I didn't get this up last night, was too late for me to be bothering with pictures etc. I got some work done, but not huge amounts.
Firstly I got the UC painted and installed on the two Harriers and got some paint on the UC bay doors etc. I am going to go over those with the airbrush though to neaten them up, the paint is a touch streaky and I don't like it. Once dry I will then install the airbrakes, UC doors etc. Once that is done I need to mask the canopies and glue them in place. I tried to Klear them last night though and the Klear hasn't dried even, so they look worse now than without!
Does anyone know how to safely remove Klear from clear plastic without ruining the plastic?
Anyway, some pictures.
Random parts painting

Two Harriers on their own wheels


Oh and proof that it is possible to get a model Harrier sitting on all 4 wheels at once! (If you have ever built a Harrier you will know that this is a common issue with models of them, they tend to sit to one side a bit).

So until the next update, which should be both Harriers Kleared and decalling started!
Ciao for now!
Re: Airfix Harrier GR.1/GR.3 Diorama
Oh wow... those are looking freaking awesome Dude. I love them.
Wicked!!!
Ammonia removes Klear Gav.
Just use some glass cleaner (with ammonia) and gently rub it off with a cotton bud.
Don't let it sit on the paint because it can fog some types. Especially enamels.
Just dip your cotton bud, rub off a section, then wipe off any of the cleaner that is still on the model.
-
Nige201980

- Captain

- Posts: 4095
- Joined: Wed Jun 05, 2013 9:30 am
- Location: Doncaster South Yorkshire UK
- Contact:
Re: Airfix Harrier GR.1/GR.3 Diorama
they are looking great mate and well done at getting them to sit on there wheels properly make's them look so much better this is going to be a cool little dio when it finished.
http://www.youtube.com/channel/UCy-TGcs5u_ZXSZ9kObNfsPg
On the go at the Mo
Quite a few
On the go at the Mo
Quite a few
-
wappynutter

- Chief Warrant Officer 3

- Posts: 2256
- Joined: Mon Jun 17, 2013 11:39 pm
- Location: Sutton in Ashfield, Nottinghamshire. UK

Re: Airfix Harrier GR.1/GR.3 Diorama
Top drawer harrier builds birthday boy........
Very well done, love the camo finish..

Very well done, love the camo finish..

-
Gav0909
- Chief Warrant Officer 5
- Posts: 2927
- Joined: Tue May 28, 2013 11:56 am
- Location: Fife, Scotland
- Contact:
Re: Airfix Harrier GR.1/GR.3 Diorama
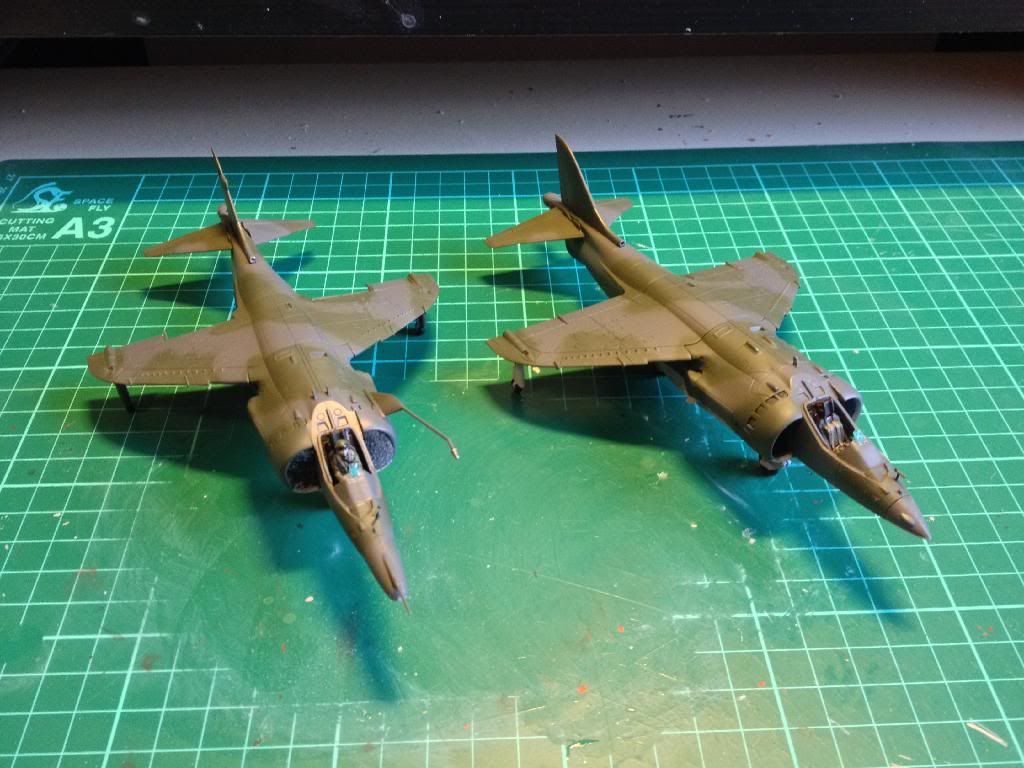
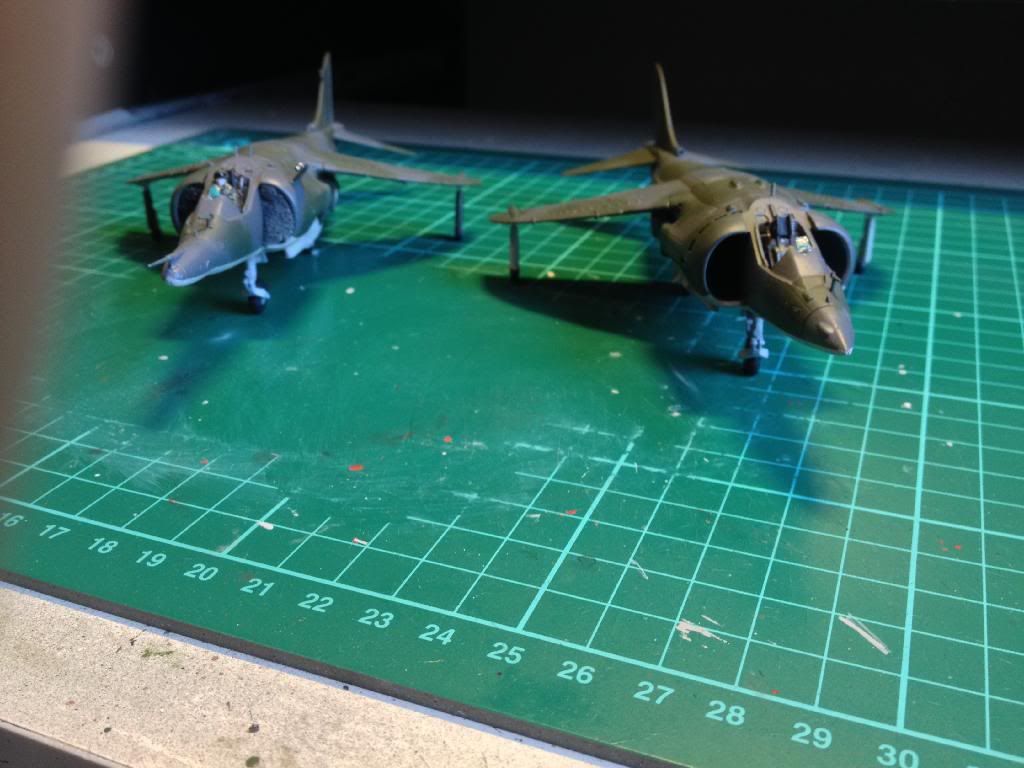
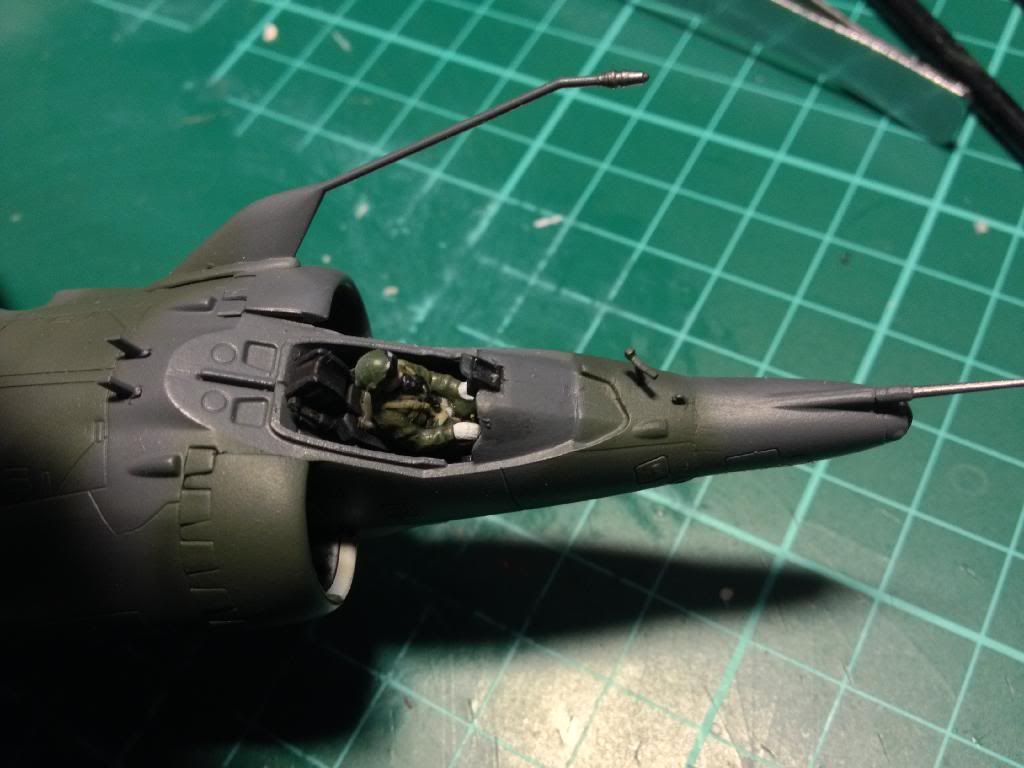
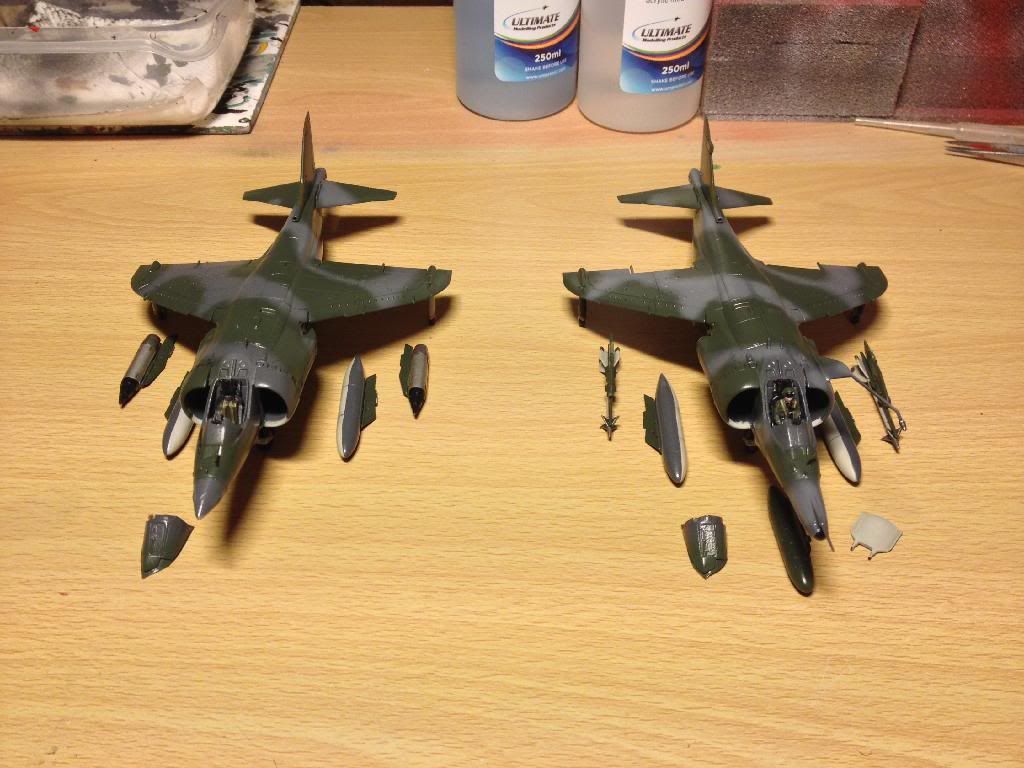
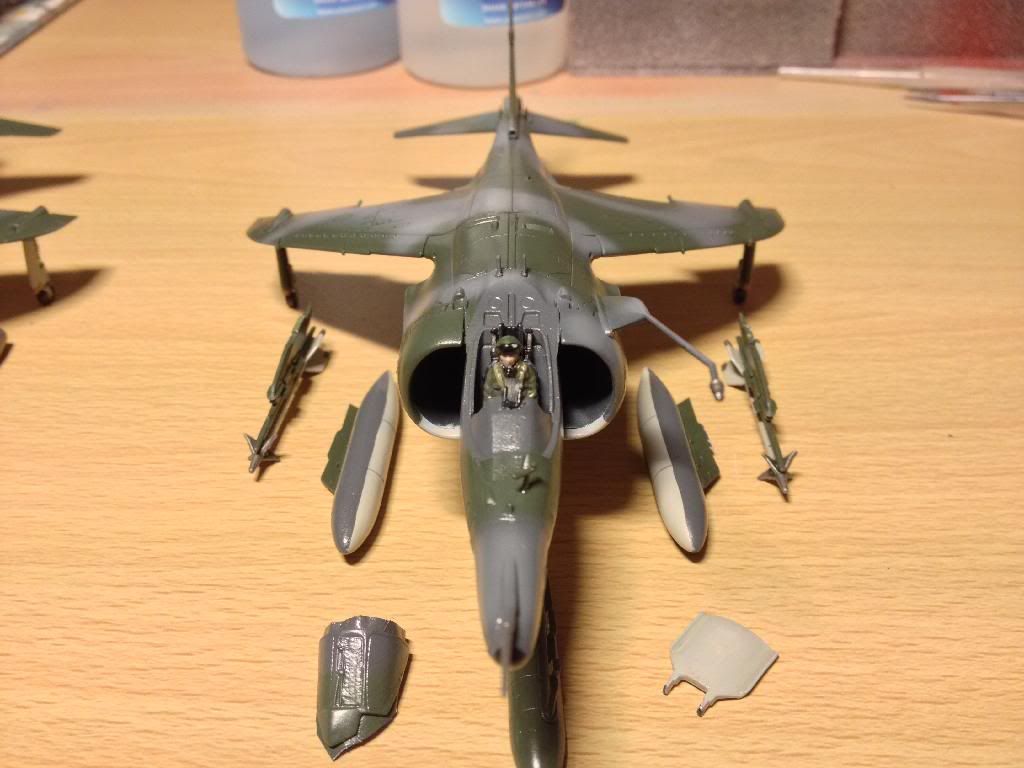
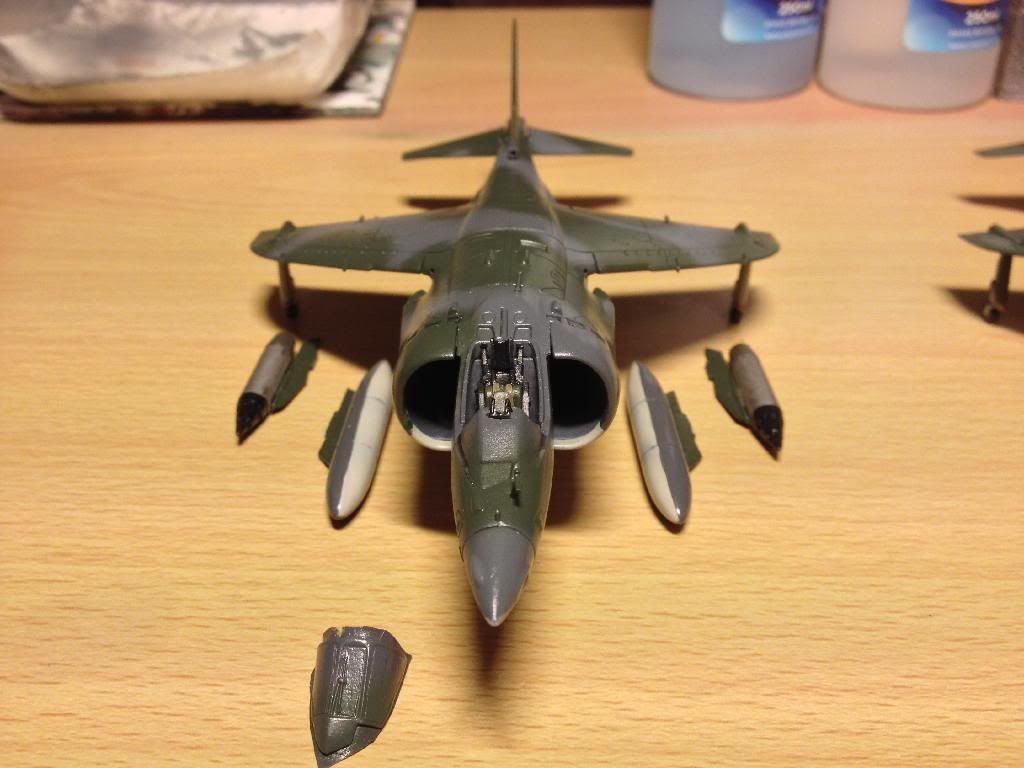
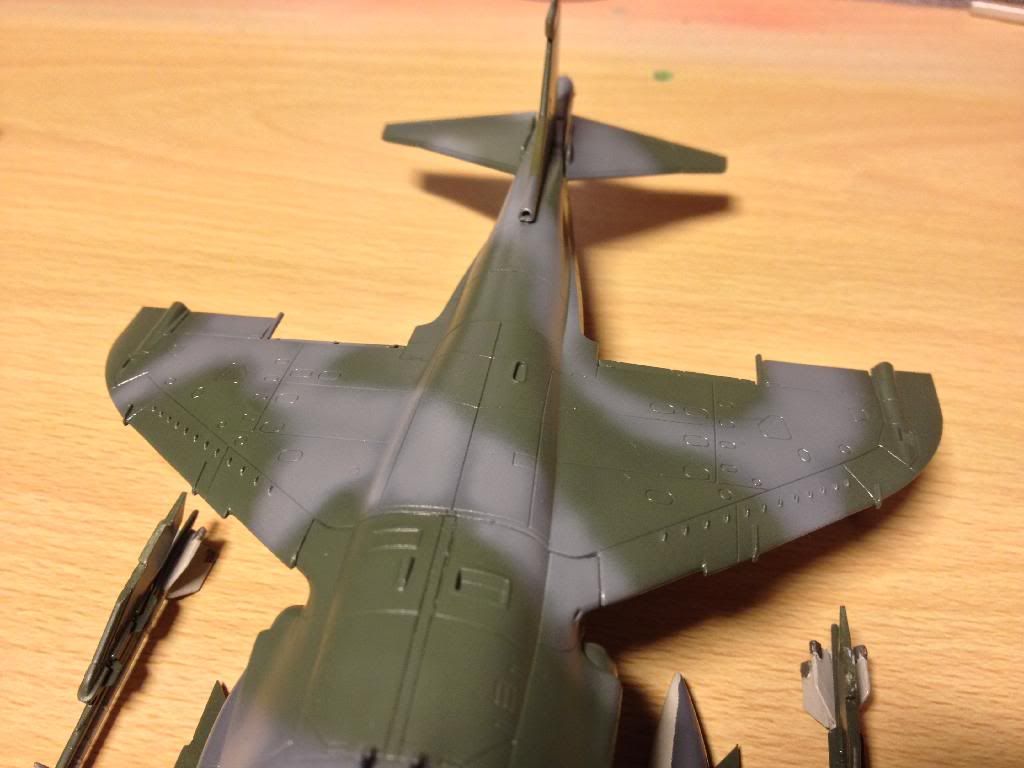
Update 18
So bloody one step forward two steps back!
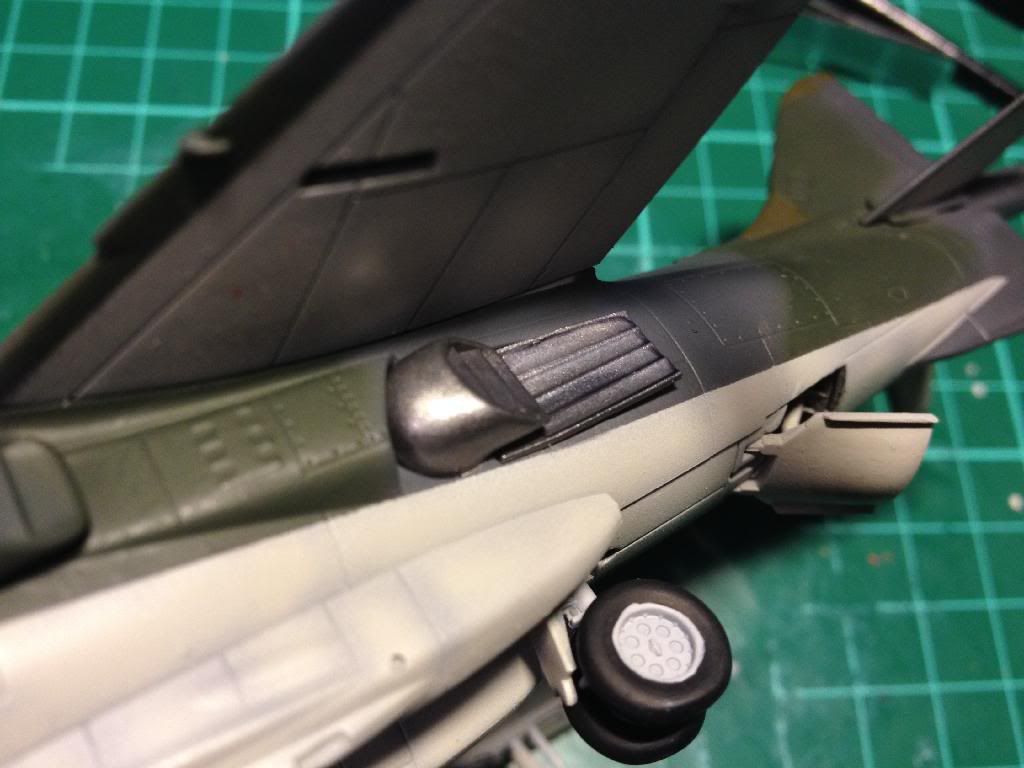
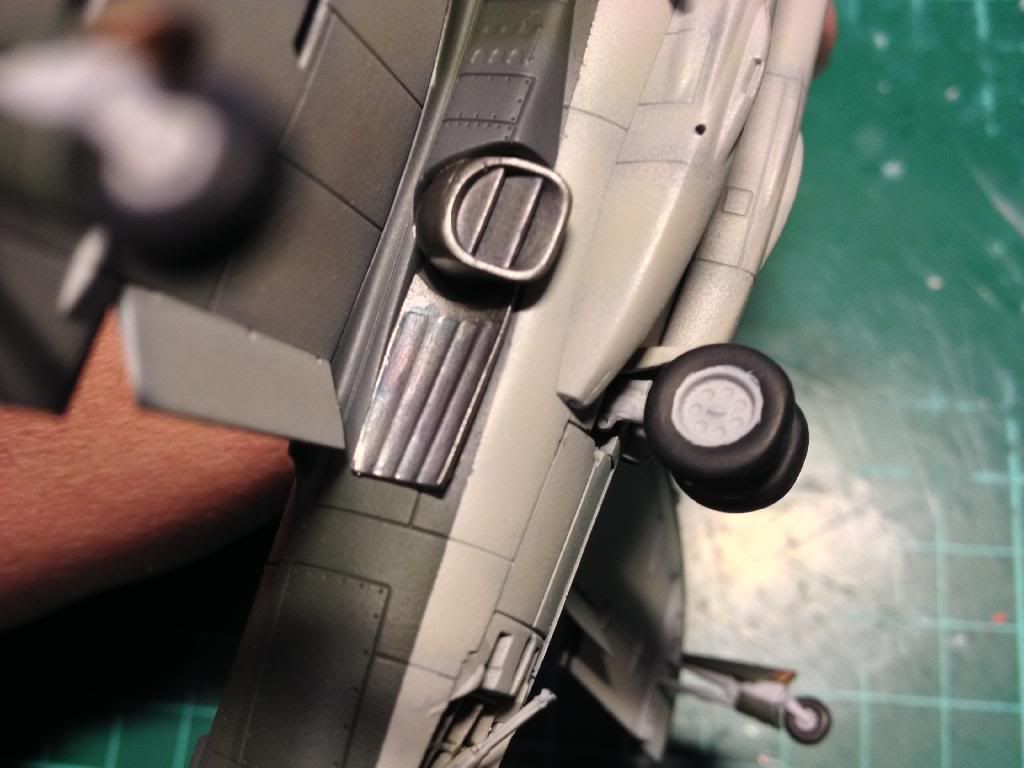
I got the UC doors and airbrakes installed last night on the two Harriers. I can't install the airbrake on the GR3 until I go to mount it on the diorama as the airbrake in the lowered position sticks out past the rear landing gear leg. I have added the hydraulic ram that controls it, but will pop the brake on later.
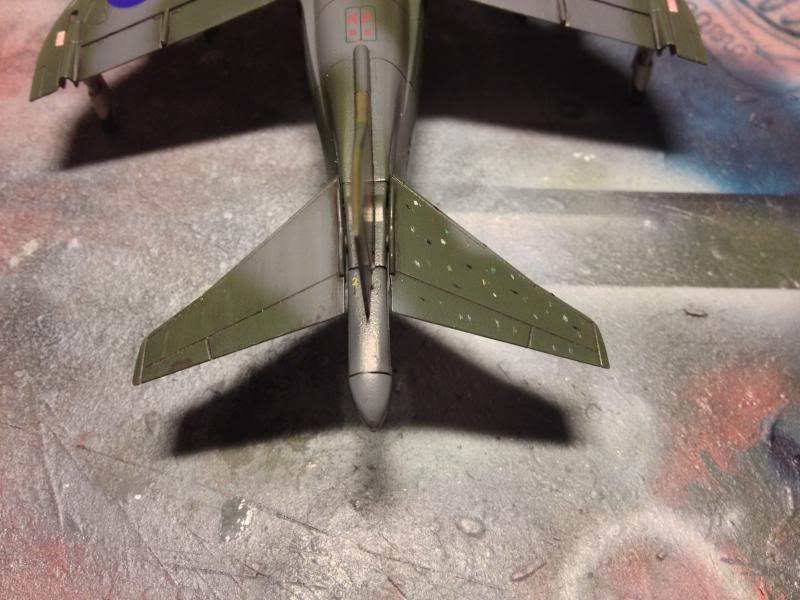
I also then played around with some green, blue, purple and red washes to try and get a heat effect on the heat shields by the rear exhaust nozzles. I will also add some soot marks later, but wanted to try this as well. I think it looks ok, better than plain clean silver anyway!
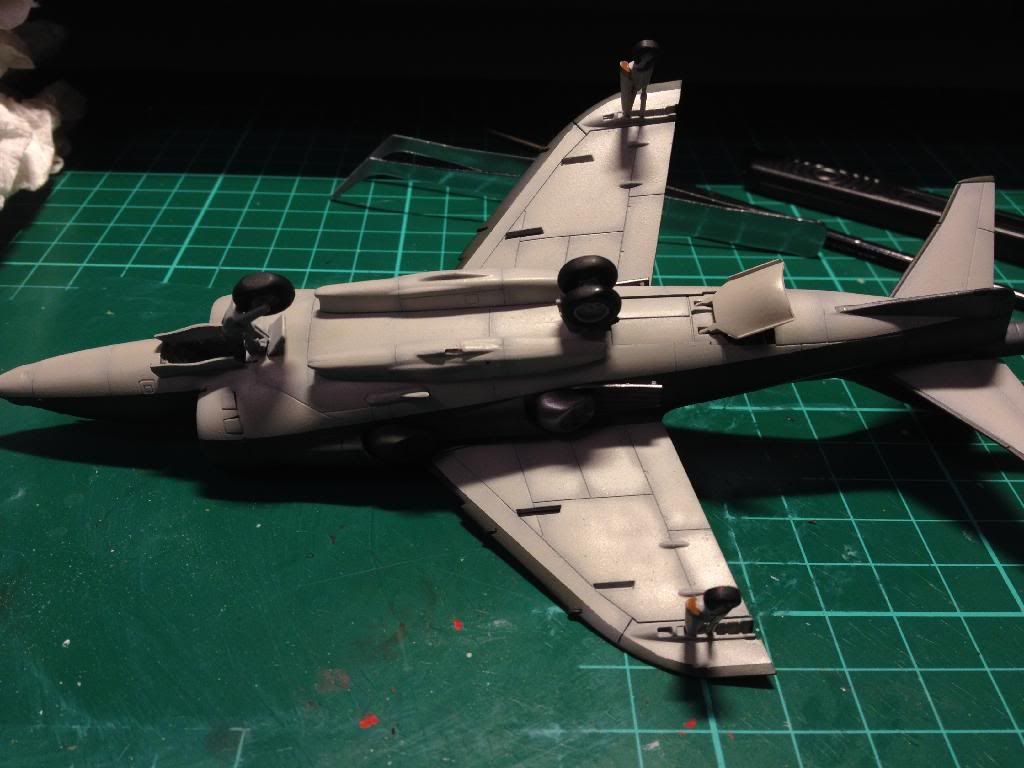
I also installed the HUDs and painted the frames on them black, as well as installed the seats etc.
And now the two steps back

I have been trying to clean the Klear off these canopies as it had pooled and left marks on them. I had been using some Ultimate cleaner and Windolene to try and get the marks out, and it was kind of working, but wasn't leaving a perfect finish. So I have just used a touch of white spirit to see if I could remove the stubborn bits. I first tested on the clear sprue to check the spirit wasn't going to fog the plastic.
However this bloody happened!
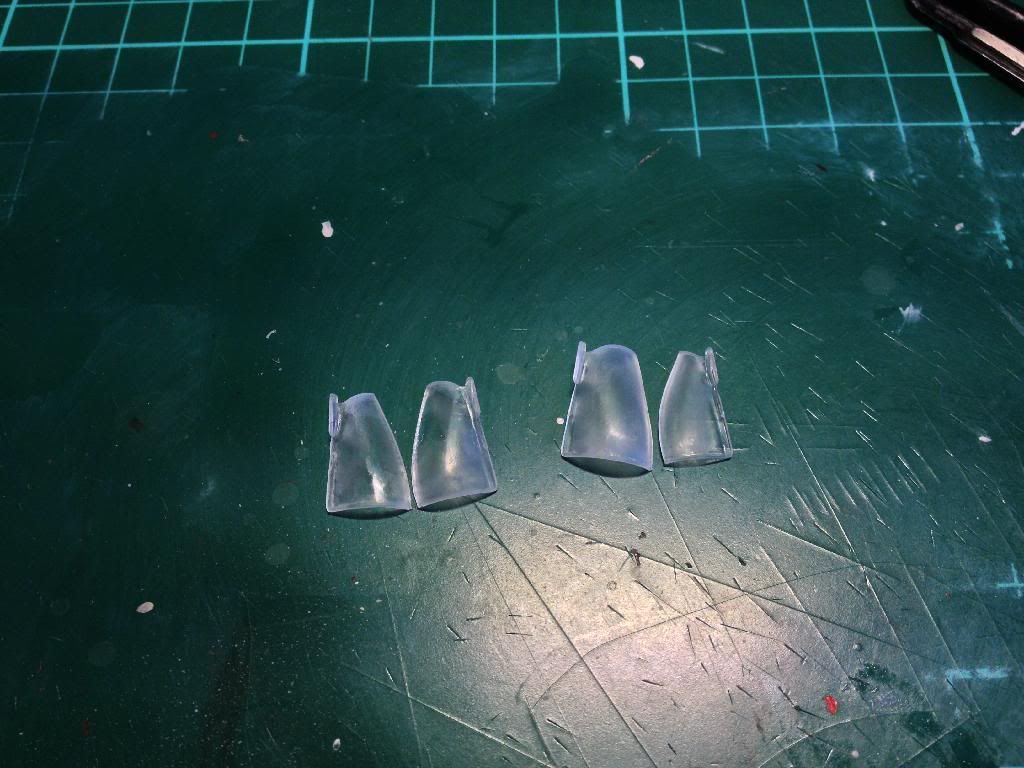
I was gently holding the part, gently rubbing the areas I needed too with a cotton bud, and it literally just split in my hand. They both did it, and then fogged up! Cue one email to the Airfix spares dept! And this time I won't be bothering with Klear, I can never get the dipping to give me the finish others seem to be able to get! The new Airfix clears are usually ok as is, and so I won't be dipping the replacements when I get them.
Grrr! To say the least!
Anyway, comments are welcome.
Ciao for now
So bloody one step forward two steps back!
I got the UC doors and airbrakes installed last night on the two Harriers. I can't install the airbrake on the GR3 until I go to mount it on the diorama as the airbrake in the lowered position sticks out past the rear landing gear leg. I have added the hydraulic ram that controls it, but will pop the brake on later.
I also then played around with some green, blue, purple and red washes to try and get a heat effect on the heat shields by the rear exhaust nozzles. I will also add some soot marks later, but wanted to try this as well. I think it looks ok, better than plain clean silver anyway!


I also installed the HUDs and painted the frames on them black, as well as installed the seats etc.

And now the two steps back
I have been trying to clean the Klear off these canopies as it had pooled and left marks on them. I had been using some Ultimate cleaner and Windolene to try and get the marks out, and it was kind of working, but wasn't leaving a perfect finish. So I have just used a touch of white spirit to see if I could remove the stubborn bits. I first tested on the clear sprue to check the spirit wasn't going to fog the plastic.
However this bloody happened!

I was gently holding the part, gently rubbing the areas I needed too with a cotton bud, and it literally just split in my hand. They both did it, and then fogged up! Cue one email to the Airfix spares dept! And this time I won't be bothering with Klear, I can never get the dipping to give me the finish others seem to be able to get! The new Airfix clears are usually ok as is, and so I won't be dipping the replacements when I get them.
Grrr! To say the least!
Anyway, comments are welcome.
Ciao for now
Re: Airfix Harrier GR.1/GR.3 Diorama
That really sucks about the canopys Gav!!!! The rest of the work is top drawer buddy.
You've really got those little birds looking first rate.
I don't think that there's a way to fix those canopys though. Even if you manged to get the fog off with another coat of Klear that seam down the middle won't be going anywhere.
Crap!!
After you dip your canopys are you setting them on some paper towel or tissue paper to dry?
Paper towel should wick away any excess Klear that settles and the base of the canopy. Tissue paper is a bit linty so I don't like it much, but it's better for sucking up the excess Klear.
I'm still new to the whole aircraft building business, but that means I've been reading a lot of how tos and asking lots of irritating questions.
Canopys scare the beans outta me so I asked around about them
-
Gav0909
- Chief Warrant Officer 5
- Posts: 2927
- Joined: Tue May 28, 2013 11:56 am
- Location: Fife, Scotland
- Contact:
Re: Airfix Harrier GR.1/GR.3 Diorama
Yeah once they are broken like that they aren't going back together. I have emailed Airfix for spares, so will see if they send me any.
I did take the excess off before I left them to dry, but it was more on the tops, the Klear was like repelling away in places, resulting in an uneven finish, which then dried leaving marks. The fronts are ok and anyway I think I am going to have one covered. The GR1 will be on the ground with the canopy open, but think I will stick a small tarp over the front window just for a bit of added interest.
I did take the excess off before I left them to dry, but it was more on the tops, the Klear was like repelling away in places, resulting in an uneven finish, which then dried leaving marks. The fronts are ok and anyway I think I am going to have one covered. The GR1 will be on the ground with the canopy open, but think I will stick a small tarp over the front window just for a bit of added interest.
-
Paul
- Site Admin
- Posts: 12622
- Joined: Thu May 23, 2013 4:47 pm
- Location: Merseyside, England, UK
- Contact:
Re: Airfix Harrier GR.1/GR.3 Diorama
Damn that is unlucky gav, at least airfix will sort you out, just it may take a while, I've recently contacted them about the missing canopy from the bf109.
Hope it gets sorted asap for you mate
Hope it gets sorted asap for you mate
Products I use in my builds viewtopic.php?f=192&t=27234
My Paul-Ism page https://www.facebook.com/thebenchwithpaul/
Friday Live show here https://www.facebook.com/groups/120548821977514/
My Paul-Ism page https://www.facebook.com/thebenchwithpaul/
Friday Live show here https://www.facebook.com/groups/120548821977514/
Re: Airfix Harrier GR.1/GR.3 Diorama
Do you think that it was mould release on the canopy?Gav0909 wrote:Yeah once they are broken like that they aren't going back together. I have emailed Airfix for spares, so will see if they send me any.
I did take the excess off before I left them to dry, but it was more on the tops, the Klear was like repelling away in places, resulting in an uneven finish, which then dried leaving marks. The fronts are ok and anyway I think I am going to have one covered. The GR1 will be on the ground with the canopy open, but think I will stick a small tarp over the front window just for a bit of added interest.
It sounds like there was some sort of contaminate on there.
-
Gav0909
- Chief Warrant Officer 5
- Posts: 2927
- Joined: Tue May 28, 2013 11:56 am
- Location: Fife, Scotland
- Contact:
Re: Airfix Harrier GR.1/GR.3 Diorama
Well I had Kleared it, and by the time I tried the white spirit I had also cleaned them several times in Ultimate cleaner and Windolene stuff. So maybe they weakened the plastic, but its odd that the white spirit made them crack down the middle. I guess the spirit was reacting with one of the other things there, the Klear, or traces of the cleaners.
As Paul says, Airfix will sort me out. Their spares dept is pretty good. Just means that I will have to try and mask the cockpits somehow in the mean time so I can Klear the Harriers ready for decals and washes.
As Paul says, Airfix will sort me out. Their spares dept is pretty good. Just means that I will have to try and mask the cockpits somehow in the mean time so I can Klear the Harriers ready for decals and washes.
-
Nige201980
- Captain
- Posts: 4095
- Joined: Wed Jun 05, 2013 9:30 am
- Location: Doncaster South Yorkshire UK
- Contact:
Re: Airfix Harrier GR.1/GR.3 Diorama
That is really tough luck mate hope they can't sort it for you mate. The rest looks great mate.
I must be one of the lucky ones to you give it a gentle shake and then let the excess drip of before putting it on kitchen paper.
I must be one of the lucky ones to you give it a gentle shake and then let the excess drip of before putting it on kitchen paper.
http://www.youtube.com/channel/UCy-TGcs5u_ZXSZ9kObNfsPg
On the go at the Mo
Quite a few
On the go at the Mo
Quite a few
-
Gav0909
- Chief Warrant Officer 5
- Posts: 2927
- Joined: Tue May 28, 2013 11:56 am
- Location: Fife, Scotland
- Contact:
Re: Airfix Harrier GR.1/GR.3 Diorama
I got an email today saying that my replacement parts were being sent out 1st class post. So I should have them this week.
I am off from the pub tonight so I hope to get some more progress made on these planes. I am going to mask off the cockpits and get a coat of Klear on each plane so that I can add the decals.
I am still on the hunt for ways of making decent looking scale trees for not very much, so any ideas on that are much appreciated. Someone mentioned elsewhere that grape stalks might work as tree trunks for younger trees if embellished with some suitable scatter material, so I might look into that.
Ciao for now
P.S. I was chatting to one of the regulars in the pub the other evening. He is an older gentleman who served in the Royal Engineers, and then in the REME as a fitter. During this time he spent time in Germany, and on occasion on attachment to various RAF or Army units. He was telling me that one time he was working near to an RAF Harrier flight based out in the woods, and was lucky enough to get a flight in a two-seat Harrier. Was pretty cool I thought!
There is another older guy who comes in who is an ex-Para, and I have a feeling he might be a Falklands vet, he would probably be the right kind of age. I might ask him next time he is in.
-
UKscalemodeller
- Chief Warrant Officer 3
- Posts: 2062
- Joined: Tue May 28, 2013 12:31 pm
Re: Airfix Harrier GR.1/GR.3 Diorama
Looking great gav, it's a good thing they are airfix and not revell, revell take 6-8 weeks.
-
Gav0909
- Chief Warrant Officer 5
- Posts: 2927
- Joined: Tue May 28, 2013 11:56 am
- Location: Fife, Scotland
- Contact:
Re: Airfix Harrier GR.1/GR.3 Diorama
Update 19
Time for some progress!
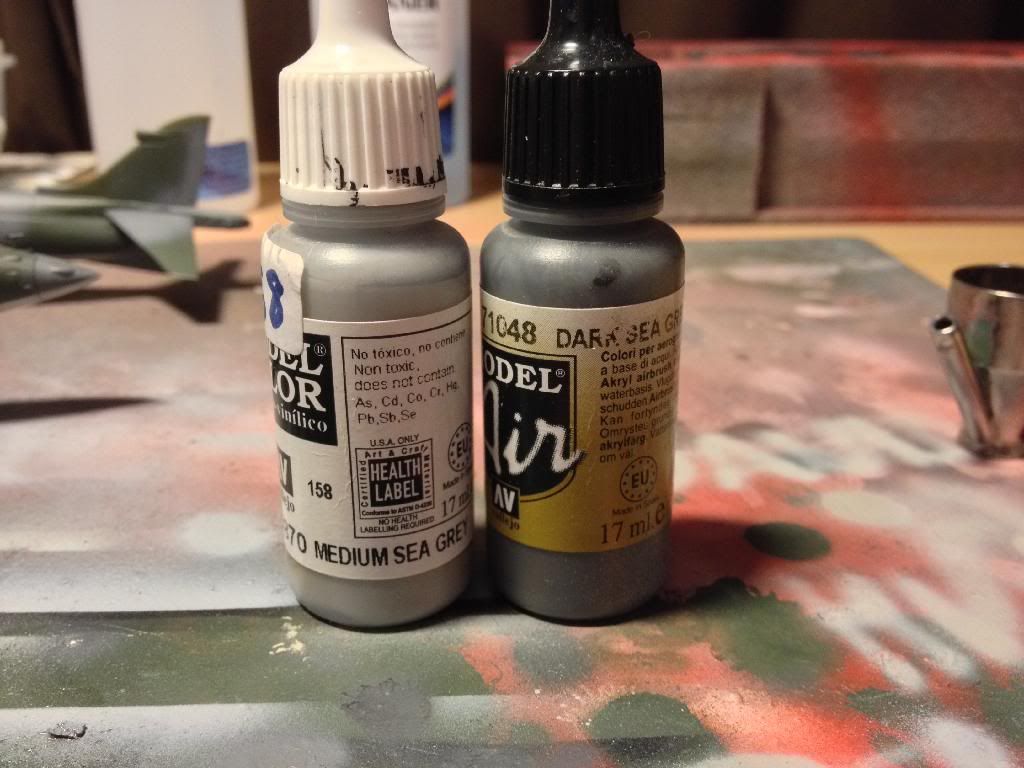
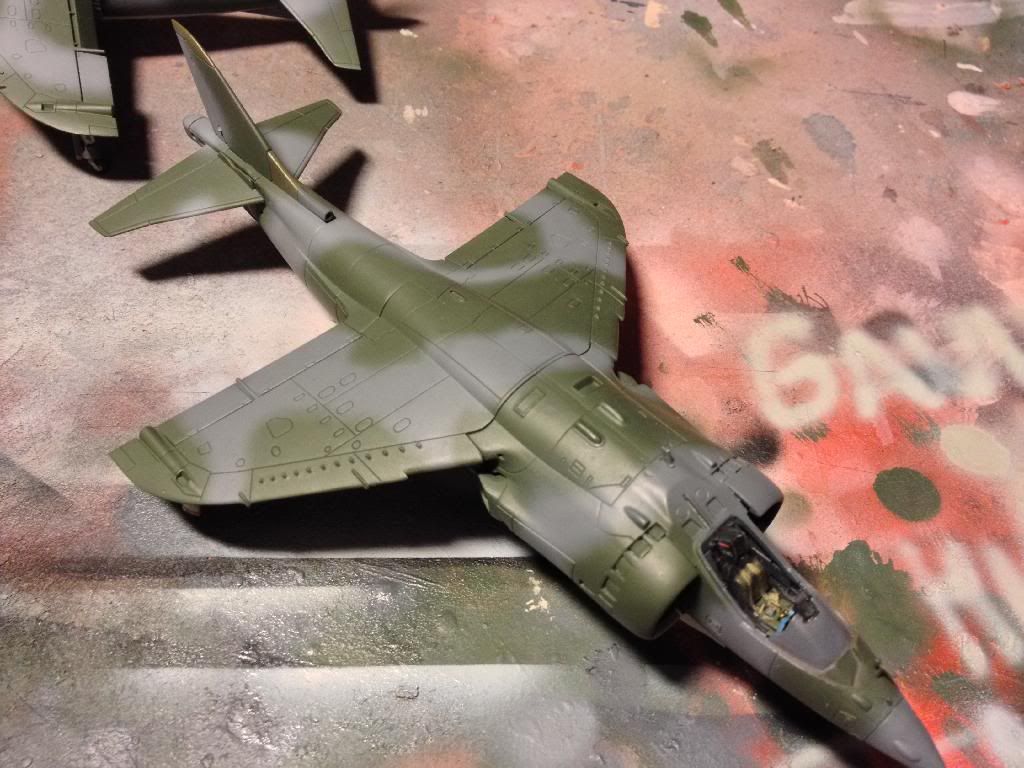
I wanted to make the grey a touch more interesting on the Harriers, and also I wanted a bit more contrast between the green and grey. So I took the two paints below, Medium and Dark Sea Grey and mixed a touch of the lighter grey into the Dark Sea Grey (the current grey tone on the models) and added this as a highlight over the Dark Sea Grey. And I am much happier with the grey tone now, there is a touch more contrast which is nice at this smaller scale.
The result
I also masked and painted the front canopies.
I will paint the main canopies when they arrive from Airfix, which should be this week some time.
So next job was to spray a coat of Klear onto the models ready for decals and then a wash. The Klear was duly sprayed and here are two rather shiny Harriers.
Hopefully this also shows the lighter highlighted grey a bit better,
I tried to do some fading etc on the green, but it meant the contrast was lost, so I haven't bothered with the green. What I might do though later is to add some oil filtering just to add some slight dust and fading in places to generally weather the two planes.
So next update hopefully might be showing the decals going on, exciting times!
Comments and criticisms are most welcome of course.
Ciao for now
Time for some progress!
I wanted to make the grey a touch more interesting on the Harriers, and also I wanted a bit more contrast between the green and grey. So I took the two paints below, Medium and Dark Sea Grey and mixed a touch of the lighter grey into the Dark Sea Grey (the current grey tone on the models) and added this as a highlight over the Dark Sea Grey. And I am much happier with the grey tone now, there is a touch more contrast which is nice at this smaller scale.

The result

I also masked and painted the front canopies.

I will paint the main canopies when they arrive from Airfix, which should be this week some time.
So next job was to spray a coat of Klear onto the models ready for decals and then a wash. The Klear was duly sprayed and here are two rather shiny Harriers.


Hopefully this also shows the lighter highlighted grey a bit better,

I tried to do some fading etc on the green, but it meant the contrast was lost, so I haven't bothered with the green. What I might do though later is to add some oil filtering just to add some slight dust and fading in places to generally weather the two planes.
So next update hopefully might be showing the decals going on, exciting times!
Comments and criticisms are most welcome of course.
Ciao for now
Re: Airfix Harrier GR.1/GR.3 Diorama
Oh wow... Gav those are freaking nice buddy.
You nailed that camo colour I think. I'm no expert, but my eyes are happy.
Really nice dude!!!
You nailed that camo colour I think. I'm no expert, but my eyes are happy.
Really nice dude!!!
-
Paul
- Site Admin
- Posts: 12622
- Joined: Thu May 23, 2013 4:47 pm
- Location: Merseyside, England, UK
- Contact:
Re: Airfix Harrier GR.1/GR.3 Diorama
Great job gav. Paintwork looks spot on
Products I use in my builds viewtopic.php?f=192&t=27234
My Paul-Ism page https://www.facebook.com/thebenchwithpaul/
Friday Live show here https://www.facebook.com/groups/120548821977514/
My Paul-Ism page https://www.facebook.com/thebenchwithpaul/
Friday Live show here https://www.facebook.com/groups/120548821977514/
-
Nige201980
- Captain
- Posts: 4095
- Joined: Wed Jun 05, 2013 9:30 am
- Location: Doncaster South Yorkshire UK
- Contact:
Re: Airfix Harrier GR.1/GR.3 Diorama
Great work Gav they truly are looking the part mate
http://www.youtube.com/channel/UCy-TGcs5u_ZXSZ9kObNfsPg
On the go at the Mo
Quite a few
On the go at the Mo
Quite a few
-
Gav0909
- Chief Warrant Officer 5
- Posts: 2927
- Joined: Tue May 28, 2013 11:56 am
- Location: Fife, Scotland
- Contact:
Re: Airfix Harrier GR.1/GR.3 Diorama
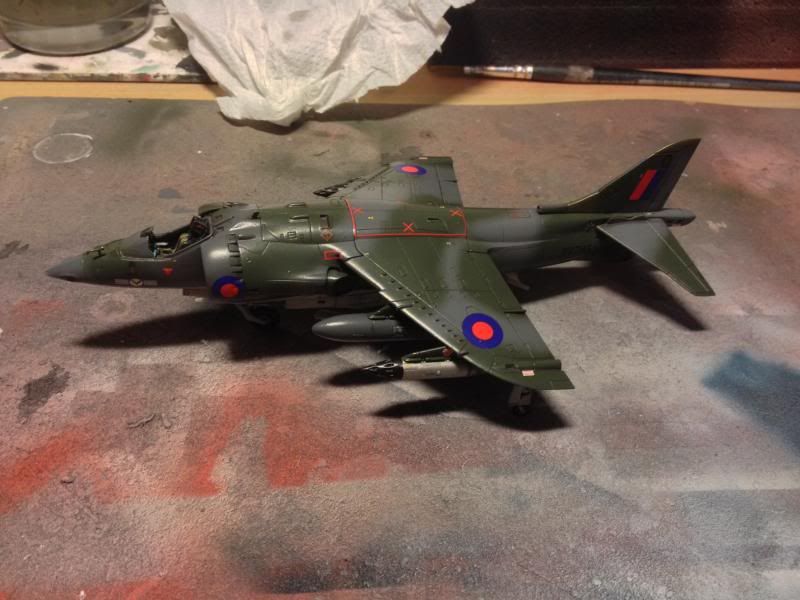
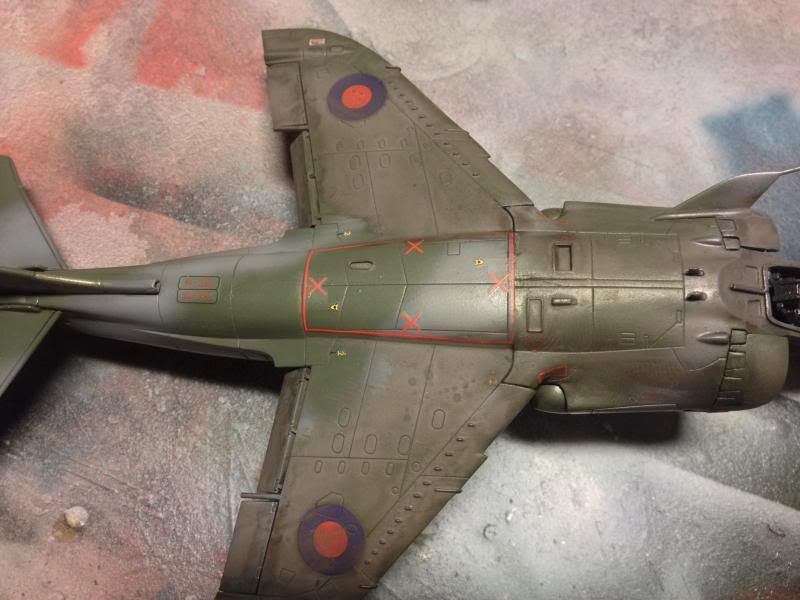
Its that time already....Update 20 
Ok so enough melodrama! Last night I commenced "Operation Decal TM" on the Harrier GR1. More or less all night after dinner, until bed time it took me, and there really aren't that many decals! Anywho it got done, and so the GR1 is now ready for a wash.
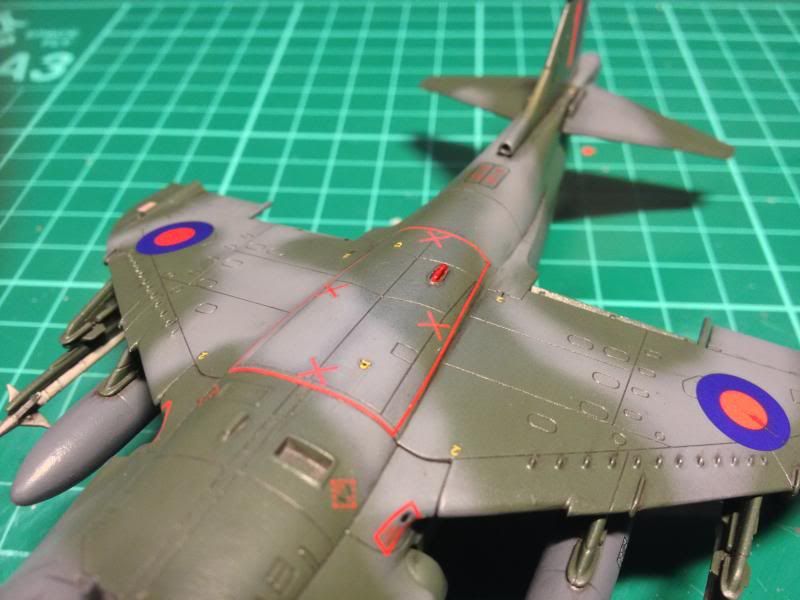
Stencils on the drop tanks and SNEB pods
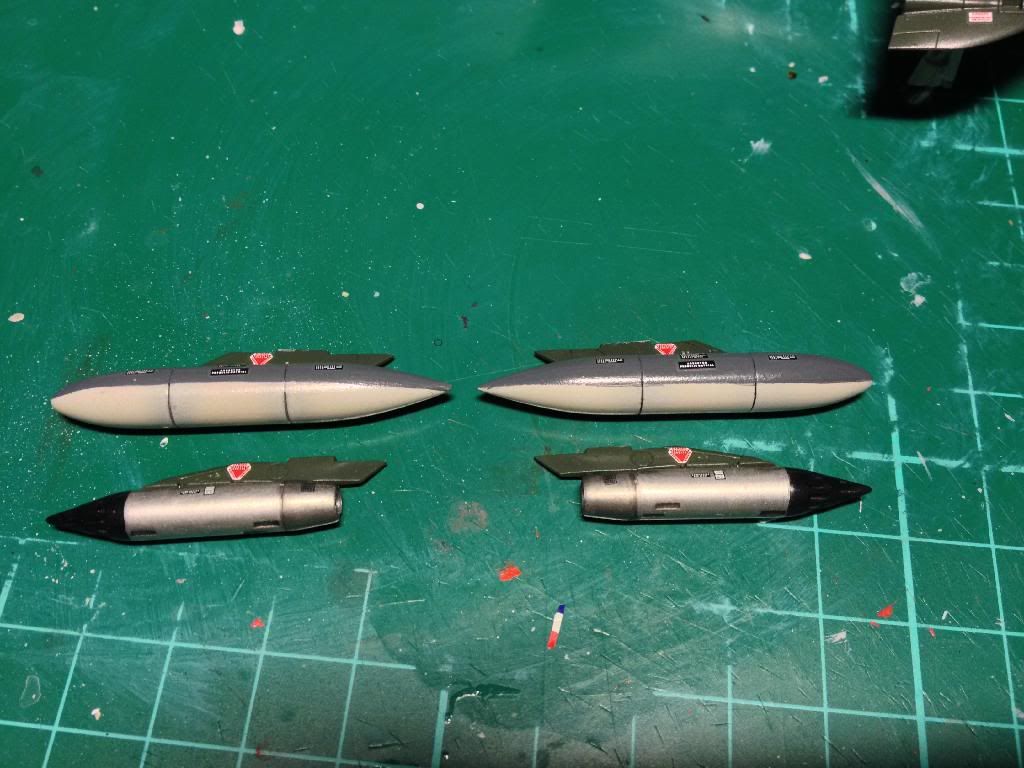
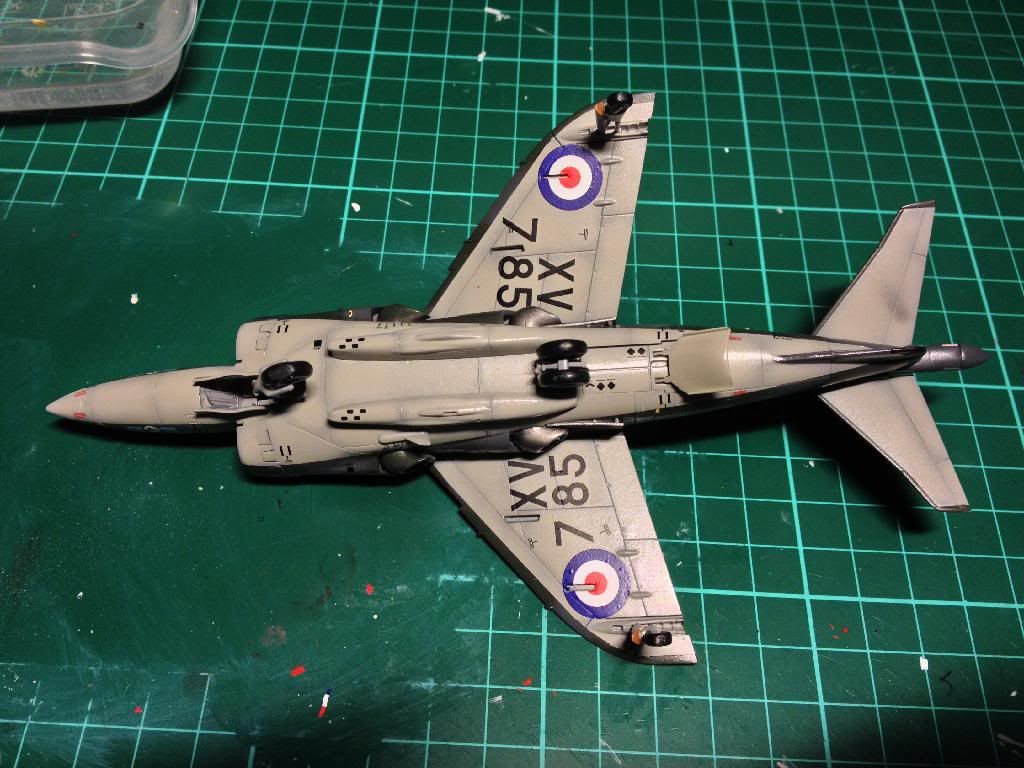
The RAF roundels on the sides need a touch more Micro Sol as they ask you to place them over the intakes that are around the main intake. Plus the area is curved, not a decal friendly place I tell ya! I might cut the decal slightly to make sure its still clear there is an intake there that can open, rather than it looking like its covered, as in real life its paint which won't foul the operation of the intake. Not the most clever idea from Airfix, but in the end if that's where the marking is on the real thing then....
I tested the Ultimate Dark Dirt Mk2 just on one of the elevators last night, and took it off this morning and it looks great. So later today I will slap a load more on the model and leave it to dry.
I think that's it, just a short update.
Comments and criticism welcome as per usual.
Ciao for now
Ok so enough melodrama! Last night I commenced "Operation Decal TM" on the Harrier GR1. More or less all night after dinner, until bed time it took me, and there really aren't that many decals! Anywho it got done, and so the GR1 is now ready for a wash.
Stencils on the drop tanks and SNEB pods


The RAF roundels on the sides need a touch more Micro Sol as they ask you to place them over the intakes that are around the main intake. Plus the area is curved, not a decal friendly place I tell ya! I might cut the decal slightly to make sure its still clear there is an intake there that can open, rather than it looking like its covered, as in real life its paint which won't foul the operation of the intake. Not the most clever idea from Airfix, but in the end if that's where the marking is on the real thing then....
I tested the Ultimate Dark Dirt Mk2 just on one of the elevators last night, and took it off this morning and it looks great. So later today I will slap a load more on the model and leave it to dry.
I think that's it, just a short update.
Comments and criticism welcome as per usual.
Ciao for now
-
Paul
- Site Admin
- Posts: 12622
- Joined: Thu May 23, 2013 4:47 pm
- Location: Merseyside, England, UK
- Contact:
Re: Airfix Harrier GR.1/GR.3 Diorama
Great work gav, decals look great, cracking looking pair of harriers
Products I use in my builds viewtopic.php?f=192&t=27234
My Paul-Ism page https://www.facebook.com/thebenchwithpaul/
Friday Live show here https://www.facebook.com/groups/120548821977514/
My Paul-Ism page https://www.facebook.com/thebenchwithpaul/
Friday Live show here https://www.facebook.com/groups/120548821977514/
Re: Airfix Harrier GR.1/GR.3 Diorama
Holy molly Gav... those really made all the difference.
Have you already done a wash on them? It looks like some of the panel lines have already been done.
Or is that the preshading doing that. Looks completely cool dude!!!
Have you already done a wash on them? It looks like some of the panel lines have already been done.
Or is that the preshading doing that. Looks completely cool dude!!!
-
Gav0909
- Chief Warrant Officer 5
- Posts: 2927
- Joined: Tue May 28, 2013 11:56 am
- Location: Fife, Scotland
- Contact:
Re: Airfix Harrier GR.1/GR.3 Diorama
Cheers lads.
Coen on the underside that is just the pre-shading and me using light coats of the grey that makes the panel lines look washed already. But no, no wash yet. Next time I update there should be, and I will do a side by side of the two to show the wash and non-wash.
I need to do some general fading over the entire model I think, the decals especially are all a bit bright just now. But once the wash is on I will matt coat it, then start doing some dot filtering on the upper surfaces to help dull those decals down etc.
Cheers
-
JayCub

- Command Sergeant Major

- Posts: 907
- Joined: Mon Oct 21, 2013 11:58 pm
- Location: Wicklow Ireland
Re: Airfix Harrier GR.1/GR.3 Diorama
Fantastic update gav, i browsed the work log yesterday and now there is even more to see, i only wish i could detail like that now.
Tom
Tom
-
T3hGuppy
- Second Lieutenant

- Posts: 3467
- Joined: Wed Jun 12, 2013 11:20 pm
- Location: Bournemouth, UK
- Contact:
Re: Airfix Harrier GR.1/GR.3 Diorama
Great update dude nice work on the decals.
-
Nige201980
- Captain
- Posts: 4095
- Joined: Wed Jun 05, 2013 9:30 am
- Location: Doncaster South Yorkshire UK
- Contact:
Re: Airfix Harrier GR.1/GR.3 Diorama
Decals look great Gav really brings it all together
http://www.youtube.com/channel/UCy-TGcs5u_ZXSZ9kObNfsPg
On the go at the Mo
Quite a few
On the go at the Mo
Quite a few
-
longlance67
- Warrant Officer

- Posts: 1371
- Joined: Fri Aug 16, 2013 5:22 pm
- Location: Galway, Ireland
Re: Airfix Harrier GR.1/GR.3 Diorama
Beautiful work Gav looks stunning mate
keep up the top notch job mate
Shane
keep up the top notch job mate
Shane
On the Bench:
Trumpeter Stryker ESV
Hobby Boss 1/48 F18 Hornet
1/72 Dragon King Tiger with Zimm
28mm Napoleonic project
28mm Norman Conquest of Ireland painting project
My Channel:
http://www.youtube.com/user/longlance67
Trumpeter Stryker ESV
Hobby Boss 1/48 F18 Hornet
1/72 Dragon King Tiger with Zimm
28mm Napoleonic project
28mm Norman Conquest of Ireland painting project
My Channel:
http://www.youtube.com/user/longlance67
-
Gav0909
- Chief Warrant Officer 5
- Posts: 2927
- Joined: Tue May 28, 2013 11:56 am
- Location: Fife, Scotland
- Contact:
Re: Airfix Harrier GR.1/GR.3 Diorama
Update 21
 to the next update! Ok, so I am going to start this one off with a bit of history on the two squadrons that the Harriers represent. Now please bear in mind that the actual scenario I am depicting with the models is not one that is likely to have happened, but the squadrons are real.
No. 4 Squadron RAF

Badge: A sun in splendour divided per bend by a flash of lightning - approved by HRH King Edward VIII in May 1936. The red and black segmented sun suggests round-the-clock operations, while the lightning flash is a reference to the unit's early use of wireless telephony for artillery co-operation.
Motto: In futurum videre - To see into the future.
Key Dates:
1912 - Formed at Farnborough.
1922 - Deployed to Turkey during the Chanak crisis.
1982 - Detachment based at RAF Stanley after the Falklands War
History of IV Squadron:
The Formative Years
In 1912 the Army founded the Royal Flying Corps (RFC), recognising a need to grant aviation more autonomy. No 4 Sqn was created out of No 2 Flt No 2 Sqn at Farnborough on 16 Sep 1912. As soon as a nucleus of pilots had been formed the Sqn moved to Netheravon. The first aircraft operated by 4 Sqn included Breguet and BE2A bi-planes. In the period between its formation and the outbreak of the First World War, the Sqn carried out intensive training in the army co-operation role including reconnaissance, artillery co-operation, cross-country and night flying. A number of experimental tasks were also carried out including aerial photography and wireless communication.
The 1914 – 1918 War
In the opening days of the First World War, 4 Sqn was tasked with naval and anti-Zeppelin patrols and proved the concept of undertaking artillery observations by wireless-carrying aircraft. The Sqn deployed to France in August 1914. Its many duties included reconnaissance, artillery observation, photography, tactical bombing and machine gunning. In the Autumn of 1915, the Sqn took on the new task of landing covert agents behind enemy lines.
The following year brought an ever-increasing tempo despite much of the weather being unsuitable for flying. Amazing feats were performed without the aid of radar or navigation aids. An extended use of contact patrols became the norm with the opening of the Battle of Somme offensive in Jul 1916. Aircraft kept a check on the position of our troops, attacked enemy positions and dropped supplies to troops cut off by the enemy. After the battle, tasking reverted to more normal intensity until the situation flared up again in the Spring of 1917. In Jun of that year the Sqn was re-equipped with the RE8 aircraft.
The Inter War Years
In Jan 1919 the Sqn (now part of the newly-formed Royal Air Force) moved back to England and by Feb had been reduced to a small cadre at Northolt before disbanding on 20 Sep 1919. This was not uncommon throughout the RAF, which had gone from a strength of 200 sqns in RFC guide at the end of WWI to only 29 in the RAF, 7 of which were of cadre status. The Sqn reformed at Farnborough in Apr 1920 with Bristol F2B fighters.
In the Autumn of 1920, A Flt proceeded to Aldergrove to aid in communications duties as the roads were very vulnerable to ambush in the Irish civil war. In May 1921 the Flt relocated to Baldonnell where it remained until rejoining the full Sqn at Farnborough in Jan 1922 where a new technique of picking up written messages without landing was developed. Messages could now be received from small units in the field and relayed to the Corps HQ without the need to equip each section with an expensive and bulky wireless set.
In Aug 1922, No 4 Sqn embarked on HMS Air Royal with FE2Bs as an expeditionary force against overt Turkish aggression during the Chanak crisis. The aircraft were then transferred to HMS Argus and flown off the deck. Returning to Farnborough a year later, the Sqn settled down into a cosy routine of training flights, summer camps and Army co-operation duties and showed off its skills at the annual Hendon Pageant. In 1924 all sqns were authorised to include their role in the sqn title and so from May, No 4 Sqn became No 4 (Army Cooperation) Squadron. In 1929 the Sqn received dedicated Atlas aircraft and then Audaxes in 1931 and Hectors in 1937 followed by the Lysander in 1938.
Second World War
The Sqn moved to France on 23 Sep 1939 with the Lysanders shortly after war was declared and occupied a variety of locations before withdrawing to UK via Dunkirk on 22 May 1940. During the Battle of France the Sqn sustained 60% casualties amongst the groundcrew and 18 aircrew were killed along with the loss of all but 11 aircraft and all the heavy equipment.
The Sqn settled at Linton-on-Ouse then Clifton on the outskirts of York but maintained an Air Sea Rescue detachment at Manston. A switch to reconnaissance tasks in 1942 saw the Lysander exchanged for Mustang aircraft and with it, the posting out of all the air gunners.
In Oct 1942 the Sqn became operational once again carrying out photographic reconnaissance patrols of the French coast as well as strafe attacks on numerous tactical targets. In 1943 the Sqn was withdrawn from operations and received Mosquito PR XVI and Spitfire PR XI reconnaissance versions for work in connection with the forthcoming invasion of Europe. Now part of 2ATAF, operations recommenced early in Mar 1944 with the Sqn entirely engaged on high-level photographic reconnaissance. D-Day itself proved a disappointment, however, with cloud obscuring the area and only 1 sortie flown.
In Aug 1944, the Sqn found itself once again operating from bases in France and moving forward to bases in Holland with the advancing armies. The Sqn took delivery of the recce version of the Typhoon in Oct 1944 in the low level recce role to add to their armoury of high-altitude PR Spitfires, only to have the Typhoons withdrawn early in 1945. The Sqn role remained that of low and high level photographic reconnaissance mainly in support of the 21st Army Group and the First Canadian Army until VE Day on 8 May 1945. After moving to Celle in occupied Germany on 28 May 1945 the Sqn conducted aerial surveys of Germany until Sqn disbandment on 31 Aug 1945.
Post Second World War
No 605 Sqn was renumbered IV(AC) Squadron at Volkel on 1 Sep 1945 and the role changed from photographic reconnaissance to Light Bomber with the Mosquito FB6 becoming the new Sqn aircraft. The Sqn first took up residence at Gutersloh in Nov 1945, later to become the Sqn’s base when flying Hunters and Harriers. Training included air to air and air to ground firing, low level navigation, formation practice and participation in both Army and Air Force exercises.
The Mosquitoes remained with the Squadron until 1950 when they were replaced firstly by Vampires then Sabres and Hunters. The Sqn moved to a succession of Germany bases including Celle, Wunstorf and then Jever for nearly 9 years until disbandment on 31 Dec 1960. However, the Sqn was reformed on 1 Jan 1961 after No 79 Sqn was renumbered as IV(AC) Sqn and returned to Jever for 6 months followed by Gutersloh with Hunters until re-roling with the Harrier in 1969/70. In Nov 1963 the Sqn celebrated 50 years of service to the crown. This was also the year the Sqn began to take part in the AFCENT annual aerial reconnaissance competition and, for the next 5 years, winning the trophy outright.
The Harrier Years in Germany
On 22 Jun 1970 four Harrier GR1 aircraft were delivered to IV(AC) Sqn at RAF Wildenrath, Germany. By Apr 1971 the Sqn was fully manned and equipped and declared operational and assigned to NATO in the attack role. On I Sep 1972 the Sqn adopted the dual role of attack and tactical reconnaissance. To support the recce role a Reconnaissance Intelligence Centre (RIC) was attached to the Sqn to facilitate recce exploitation.
Recognising the vulnerability of static airfields, the Harrier Force’s war role was to disperse and operate from non-airfield sites to aid survival. Operating forward in ‘field sites’, Close Air Support and recce missions were flown mainly in support of 1(BR) Corps conducting cockpit turnrounds to increase sortie rates and reduce reaction times when responding to CAS/Recce requests. On 4 Jan 1977 the Sqn moved to RAF Gutersloh on the withdrawal of air defence Lightnings in order to be closer to the army formations it was earmarked to support. At the end of Feb 1977, the Sqn strength increased to 18 aircraft/24 pilots with the recent disbandment of No 20 Sqn at RAF Wildenrath.
In Aug 1978 the Sqn took over the Harrier GR3 support of the British forces in Belize, sharing the commitment with No 1(F) Sqn and No 3(F) Sqn until withdrawal in 1993. In 1982 following the Falklands conflict, Sqn pilots deployed to the Falklands on a regular basis until withdrawal of the Harrier GR3 from theatre in 1985.
The Sqn continued operating the Harrier GR3 until 1989 when it was replaced with the much enhanced and bigger Harrier GR5 with greatly improved range/payload and Hands on Throttle and Stick (HOTAS) cockpit. This was followed by the GR7 ‘night attack’ aircraft 2 years later.
After a lengthy period at Gutersloh, the Squadron moved to RAF Laarbruch in Nov 1992 and within 6 months became embroiled in Op WARDEN, deploying to Incirlik, Turkey in order to protect the Kurds and enforce the Northern Iraq No Fly Zone. Over nearly 3 years, the commitment was conducted in rotation with 1(F) Sqn and 3(F) Sqn until handing over to the Tornado GR1s in Jan 1995.
There was however no let up, with further operations beginning in Jul 1995 in support of Op DENY FLIGHT over the troubled Former Republic of Yugoslavia with the Sqn deploying to Gioia del Colle in Southern Italy. The already unstable situation worsened and on 30 Aug 1995, NATO air strikes were authorised. In the ensuing 2 weeks the Sqn flew 144 missions on Op DELIBERATE FORCE, the NATO air strikes over Bosnia, employing Laser Guided and Freefall 1000lb bombs. The bombing missions, which represented the first use of offensive air power in Europe since 1945, resulted in a successful outcome with the signing of the Dayton Peace Accord. Subsequent deployments, shared with sister Harrier sqns, continued until IV(AC) Sqn were stood down in autumn 1996.
In the summer of 1998 IV(AC) Sqn redeployed to Gioia in response to continued Serbian aggression. The commitment, which was shared with its sister sqns, continued through Op DELIBERATE FORGE and ultimately several Sqn members participated in Op ALLIED FORCE, the air strikes that helped persuade Slobodan Milosovic to withdraw Serbian troops from Kosovo.
In Apr 1999, No IV(AC) Sqn (and No1(F) Sqn) were transferred to RAF Cottesmore thus ending 50 years of continuous service in Germany.
Present Day
Despite the disruption of relocating, the Sqn continued to maintain its commitment to Op DELIBERATE FORGE on a rotational basis with the other 2 Harrier sqns. First in and last out of the Balkans, the Sqn departed from Gioia del Colle in Apr 2001, the Harrier Force having been stood down from the Operation.
The Sqn then focused on a period of training which included Ex SAIF SAREEA II in Oct 2001. The Ex included a work-up phase on HMS ILLUSTRIOUS for a month in the Mediterranean, a transit through the Suez Canal and the Red Sea before deploying to Masirah in Oman. This event was the longest period that the Sqn had spent on a carrier since the Chanak crisis over 80 years previously.
The entire Sqn deployed to Kuwait in Feb 2003 with personnel from 1(F) Sqn to take part in Op TELIC (IRAQI FREEDOM), conducting CAS using mixed Paveway 2 and Maverick weapon loads. The Sqn returned from Op TELIC in May 2003 and rapidly rebuilt skill sets for the European theatre. However, the desert beckoned again and Joint Force Harrier (JFH) was soon on the move. In Aug 2004, the Force deployed to Kandahar Airfield to support NATO troops in Afghanistan for Op HERRICK. In Mar 2005, whilst deployed to HMS INVINCIBLE for Ex MAGIC CARPET, No IV(AC) Sqn conducted the UK's first strike mission from an aircraft carrier into Kandahar Airfield. The Sqn's role in Afghanistan was to provide close air support (CAS) and reconnaissance to the NATO International Security and Assistance Force and to Op ENDURING FREEDOM. The Sqn’s capabilities were significantly enhanced with the introduction of the Harrier GR9/9A and associated systems including SNIPER Advanced Targeting Pod. The Sqn’s final detachment from Dec 2008 until Apr 2009 achieved a 100% success rate in terms of missions flown against missions tasked.
IV(R) was re-formed on the 31 March 2010 following the disbandment of 20(R) Squadron.
Battle Honours
Western Front 1914-1918*, Mons*, Neuve Chapelle, Somme 1916, Ypres 1917*, Lys, Somme 1918*, France and Low Countries 1939-1940*, Fortress Europe 1942-1944, France and Germany 1944-1945*, Normandy 1944*, Arnhem*, Rhine, Iraq 2003*.
No. 20 (R) Squadron RAF

Badge: In front of the rising sun, an eagle, wings elevated and perched on a sword - approved by King George VI in June 1937. The rising sun is intended to commemorate the unit's long association with the East. The eagle is perched on 'Talwar' indicative of the Squadron's work with the Army in India.
Motto: Facta non verba - 'Deeds not words'
Key Dates:
1915 - Formed at Netheravon.
1917 - Sergeant T Mottershead was posthumously awarded the VC.
Battle Honours:
Western Front 1916-1918, Somme 1916*, Arras*, Ypres 1917*, Somme 1918*, Lys, Hindenburg Line, Mahsud 1919-1920, Waziristan 1919-1925, Mohmand 1927, North West Frontier 1930-1931, Mohmand 1933, North West Frontier 1935-1939, North Burma 1943-1944, Arakan 1943-1944, Manipur 1944*, Burma 1944-1945*, North Borneo 1964, Gulf 1991.
(Honours marked with an asterisk, may be emblazoned on the Squadron Standard)
The History of XX(R) Squadron:
Formed at Netheravon on 1 September 1915 from No. 7 Reserve Squadron, the unit deployed to France in January 1916 with FE2Bs in the fighter-reconnaissance role. The Squadron devised the 'flying circle' where patrolling pilots flew a continuous orbit in formation while their gunners fires outwards, covering each other.
A year later, Sergeant T Mottershead was posthumously awarded the VC for saving the life of his observer, Lt WE Gower after their stricken aircraft had crash-landed and caught fire. Lt Gower managed to escape the burning wreck and with assistance dragged his pilot from the wreckage. However, Sgt Mottershead died four days later from his burns, and he became the only RFC NCO to be awarded the Victoria Cross during World War I.
In 1917, the Bristol Fighter arrived, and with the Squadron constantly refining their tactics, 56 German aircraft were accounted for in April 1918 alone. In May 1919, the Squadron left the continent for India and assumed army co-operation tasks along the North-West Frontier. The trusty 'Brisfits' were finally replaced in 1932 by Wapitis, and then Audaxes three years later. Lysanders replaced these in late 1941, and these were joined by Hurricane 'tank busters' in mid-1942.
In July 1947, No. 20 Squadron was disbanded whilst in India, reforming briefly as a target squadron during 1949-51. The Squadron was reformed at Jever in Germany in July 1952 with Vampire fighter-bombers, these lasting barely a year before Sabres arrived for interceptor duties before these aircraft were themselves replaced by Hunters. The Squadron was disbanded at the end of 1960. No. 20 Squadron reformed in July of the following year at Tengah in Singapore, again with Hunters, but in the ground attack role. The Squadron spent six months during 1962 in Thailand as a counter to communist incursions from Laos, and in 1964 was involved in operations in North Borneo, but disbanded again during 1970 following the withdrawal of RAF units from the Far East.
By December, No. 20 Squadron had reformed at Wildenrath with Harriers, but these were replaced during 1977 with Jaguars. During 1984, Tornado GR1s arrived and these remained until under 'Options for Change' the unit disbanded in May 1992. Later that year, the Squadron numberplate was assigned to the Harrier OCU at Wittering.
As I said if you then read through all that you will realise that its not possible for these two units to have been in the same place at the same time with Harriers. However, that's the units that come with the kits I wanted to use, and I didn't want to go down the AM decal route.
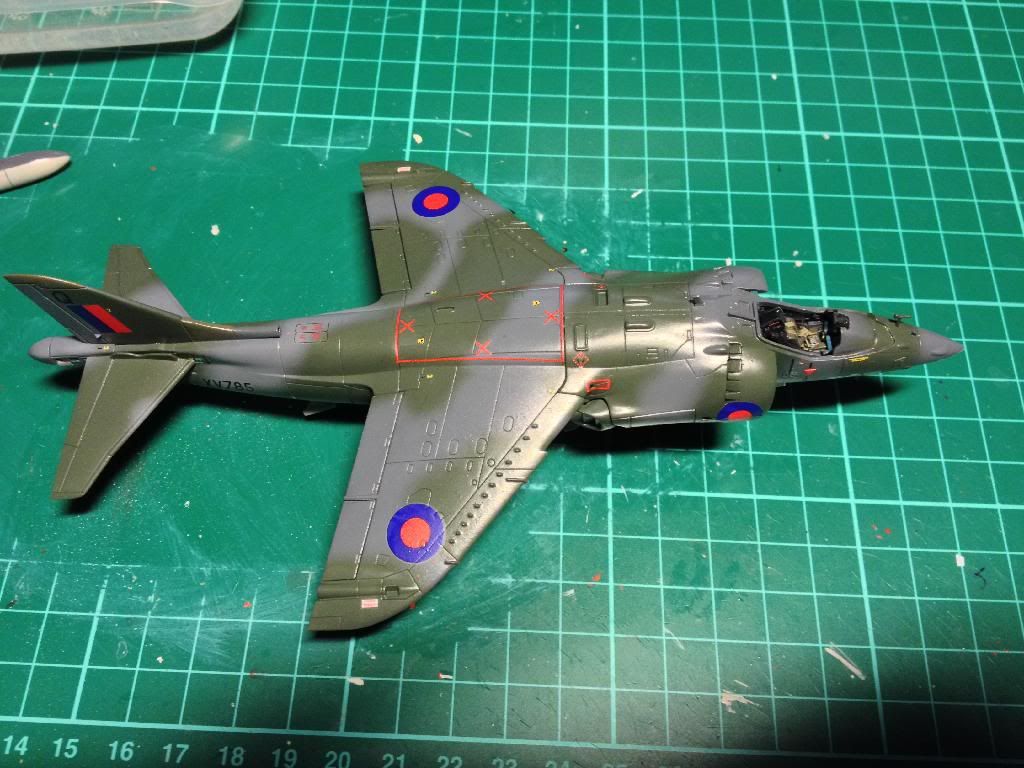
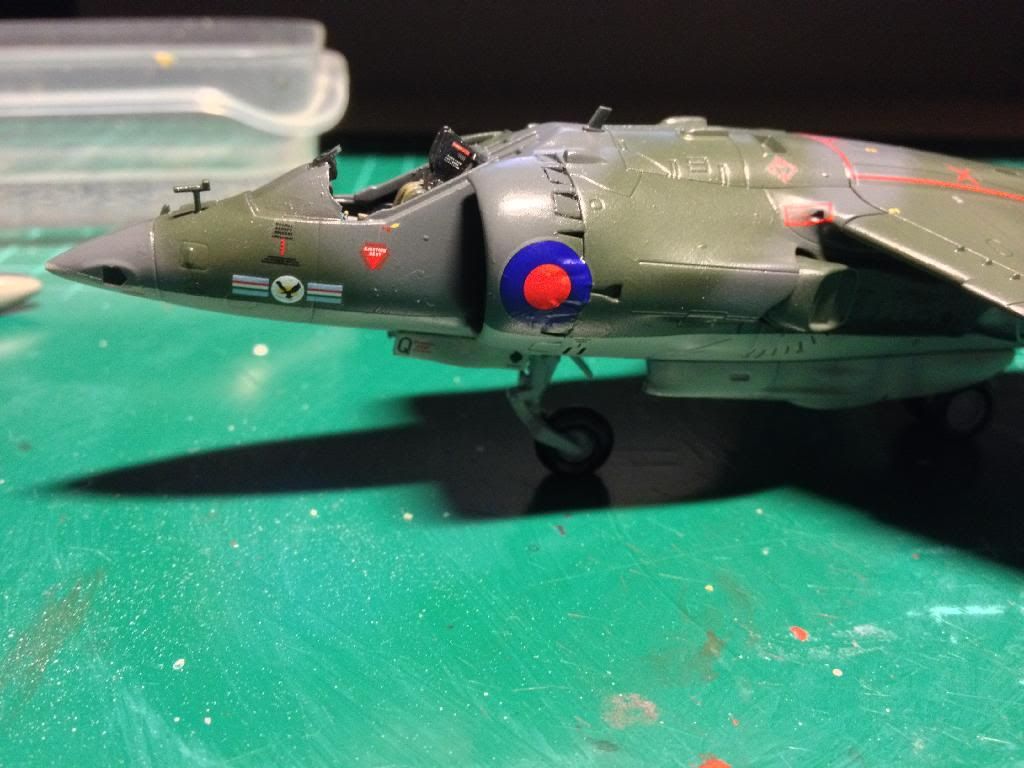
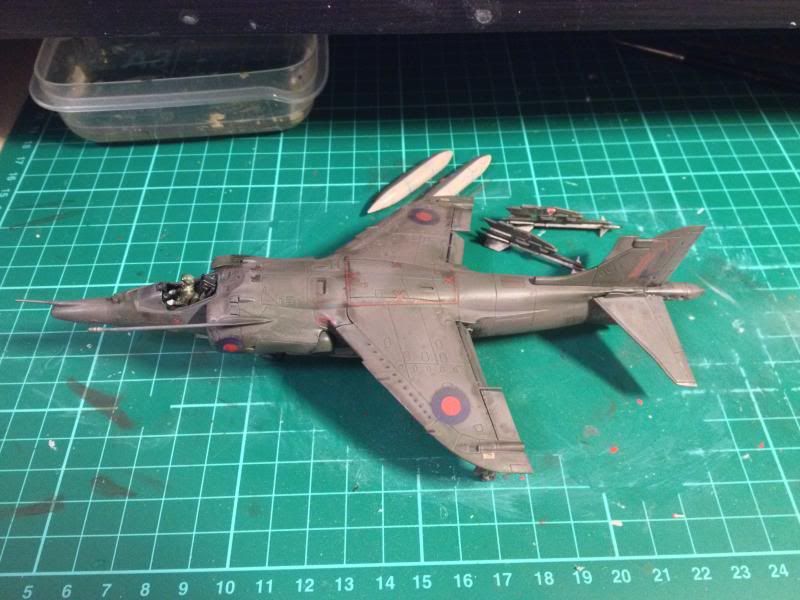
Progress update then. My last update showed the decals onto the GR1, which was awaiting a wash. Current state of affairs is the GR1 washed and matt varnished (which turned out a bit satin....). GR3 is decaled, washed and varnished also. Canopies are glued in place on both planes as well now.
So next step, which is started on the GR1 is some oil dot filtering to add some variation and fading to the upper surfaces of the planes. This seems to be giving a nice effect on the GR1 so far.
So enough chatter, pictures!
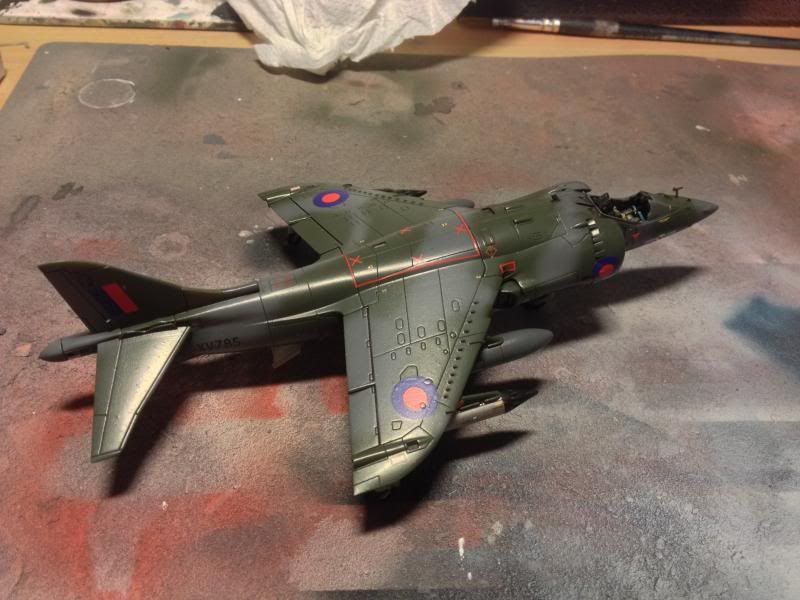
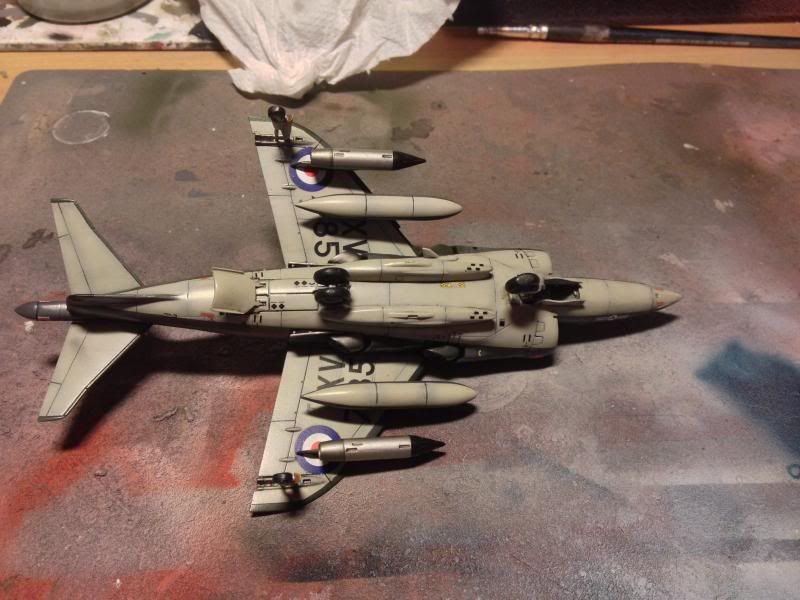
GR1 with wash, decals and matt coat (although as I said, it turned out too satin, but its ok as its not going to be the final finish).
GR3 with Ultimate Dark Dirt wash on
And removing the wash
Two birds together with canopies in place
Close up of the fuselage lights, painted with Tamiya clear red
Oil filtering on the GR1
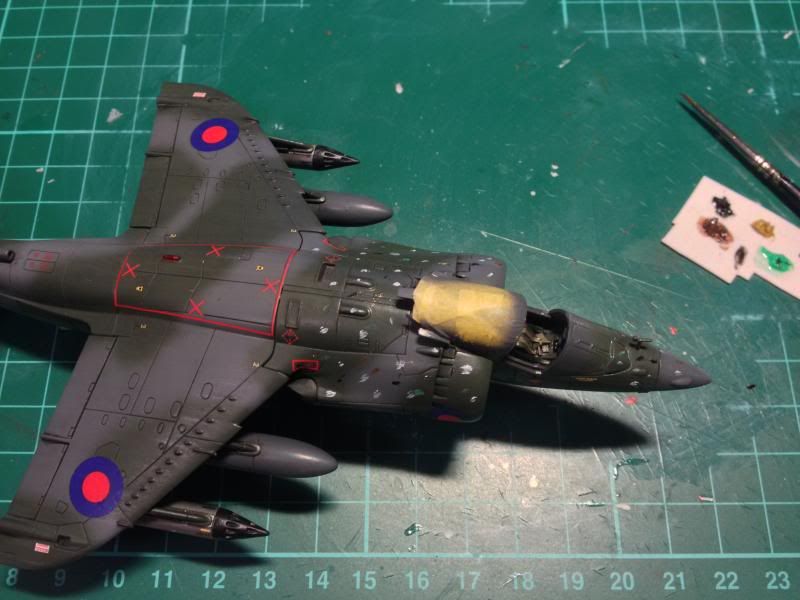
I checked the filtering this morning after it had dried overnight a bit, and its a touch streaky, but I will go over with the white spirit again, but it looks like it will be quite a good effect all told!
A long update I'm afraid, but hopefully if you have taken the time to read the history you will know a bit more about the Squadrons I am depicting here.
Next steps
Once the planes themselves are finished (which won't be much longer), then I will finish off the refuelling truck. I then need to start on the base. So I will be sourcing a picture frame big enough and figuring out the layout etc and how to go about depicting some of the features etc.
So stay tuned!
Comments and criticisms are most welcome!
Ciao for now
No. 4 Squadron RAF
Badge: A sun in splendour divided per bend by a flash of lightning - approved by HRH King Edward VIII in May 1936. The red and black segmented sun suggests round-the-clock operations, while the lightning flash is a reference to the unit's early use of wireless telephony for artillery co-operation.
Motto: In futurum videre - To see into the future.
Key Dates:
1912 - Formed at Farnborough.
1922 - Deployed to Turkey during the Chanak crisis.
1982 - Detachment based at RAF Stanley after the Falklands War
History of IV Squadron:
The Formative Years
In 1912 the Army founded the Royal Flying Corps (RFC), recognising a need to grant aviation more autonomy. No 4 Sqn was created out of No 2 Flt No 2 Sqn at Farnborough on 16 Sep 1912. As soon as a nucleus of pilots had been formed the Sqn moved to Netheravon. The first aircraft operated by 4 Sqn included Breguet and BE2A bi-planes. In the period between its formation and the outbreak of the First World War, the Sqn carried out intensive training in the army co-operation role including reconnaissance, artillery co-operation, cross-country and night flying. A number of experimental tasks were also carried out including aerial photography and wireless communication.
The 1914 – 1918 War
In the opening days of the First World War, 4 Sqn was tasked with naval and anti-Zeppelin patrols and proved the concept of undertaking artillery observations by wireless-carrying aircraft. The Sqn deployed to France in August 1914. Its many duties included reconnaissance, artillery observation, photography, tactical bombing and machine gunning. In the Autumn of 1915, the Sqn took on the new task of landing covert agents behind enemy lines.
The following year brought an ever-increasing tempo despite much of the weather being unsuitable for flying. Amazing feats were performed without the aid of radar or navigation aids. An extended use of contact patrols became the norm with the opening of the Battle of Somme offensive in Jul 1916. Aircraft kept a check on the position of our troops, attacked enemy positions and dropped supplies to troops cut off by the enemy. After the battle, tasking reverted to more normal intensity until the situation flared up again in the Spring of 1917. In Jun of that year the Sqn was re-equipped with the RE8 aircraft.
The Inter War Years
In Jan 1919 the Sqn (now part of the newly-formed Royal Air Force) moved back to England and by Feb had been reduced to a small cadre at Northolt before disbanding on 20 Sep 1919. This was not uncommon throughout the RAF, which had gone from a strength of 200 sqns in RFC guide at the end of WWI to only 29 in the RAF, 7 of which were of cadre status. The Sqn reformed at Farnborough in Apr 1920 with Bristol F2B fighters.
In the Autumn of 1920, A Flt proceeded to Aldergrove to aid in communications duties as the roads were very vulnerable to ambush in the Irish civil war. In May 1921 the Flt relocated to Baldonnell where it remained until rejoining the full Sqn at Farnborough in Jan 1922 where a new technique of picking up written messages without landing was developed. Messages could now be received from small units in the field and relayed to the Corps HQ without the need to equip each section with an expensive and bulky wireless set.
In Aug 1922, No 4 Sqn embarked on HMS Air Royal with FE2Bs as an expeditionary force against overt Turkish aggression during the Chanak crisis. The aircraft were then transferred to HMS Argus and flown off the deck. Returning to Farnborough a year later, the Sqn settled down into a cosy routine of training flights, summer camps and Army co-operation duties and showed off its skills at the annual Hendon Pageant. In 1924 all sqns were authorised to include their role in the sqn title and so from May, No 4 Sqn became No 4 (Army Cooperation) Squadron. In 1929 the Sqn received dedicated Atlas aircraft and then Audaxes in 1931 and Hectors in 1937 followed by the Lysander in 1938.
Second World War
The Sqn moved to France on 23 Sep 1939 with the Lysanders shortly after war was declared and occupied a variety of locations before withdrawing to UK via Dunkirk on 22 May 1940. During the Battle of France the Sqn sustained 60% casualties amongst the groundcrew and 18 aircrew were killed along with the loss of all but 11 aircraft and all the heavy equipment.
The Sqn settled at Linton-on-Ouse then Clifton on the outskirts of York but maintained an Air Sea Rescue detachment at Manston. A switch to reconnaissance tasks in 1942 saw the Lysander exchanged for Mustang aircraft and with it, the posting out of all the air gunners.
In Oct 1942 the Sqn became operational once again carrying out photographic reconnaissance patrols of the French coast as well as strafe attacks on numerous tactical targets. In 1943 the Sqn was withdrawn from operations and received Mosquito PR XVI and Spitfire PR XI reconnaissance versions for work in connection with the forthcoming invasion of Europe. Now part of 2ATAF, operations recommenced early in Mar 1944 with the Sqn entirely engaged on high-level photographic reconnaissance. D-Day itself proved a disappointment, however, with cloud obscuring the area and only 1 sortie flown.
In Aug 1944, the Sqn found itself once again operating from bases in France and moving forward to bases in Holland with the advancing armies. The Sqn took delivery of the recce version of the Typhoon in Oct 1944 in the low level recce role to add to their armoury of high-altitude PR Spitfires, only to have the Typhoons withdrawn early in 1945. The Sqn role remained that of low and high level photographic reconnaissance mainly in support of the 21st Army Group and the First Canadian Army until VE Day on 8 May 1945. After moving to Celle in occupied Germany on 28 May 1945 the Sqn conducted aerial surveys of Germany until Sqn disbandment on 31 Aug 1945.
Post Second World War
No 605 Sqn was renumbered IV(AC) Squadron at Volkel on 1 Sep 1945 and the role changed from photographic reconnaissance to Light Bomber with the Mosquito FB6 becoming the new Sqn aircraft. The Sqn first took up residence at Gutersloh in Nov 1945, later to become the Sqn’s base when flying Hunters and Harriers. Training included air to air and air to ground firing, low level navigation, formation practice and participation in both Army and Air Force exercises.
The Mosquitoes remained with the Squadron until 1950 when they were replaced firstly by Vampires then Sabres and Hunters. The Sqn moved to a succession of Germany bases including Celle, Wunstorf and then Jever for nearly 9 years until disbandment on 31 Dec 1960. However, the Sqn was reformed on 1 Jan 1961 after No 79 Sqn was renumbered as IV(AC) Sqn and returned to Jever for 6 months followed by Gutersloh with Hunters until re-roling with the Harrier in 1969/70. In Nov 1963 the Sqn celebrated 50 years of service to the crown. This was also the year the Sqn began to take part in the AFCENT annual aerial reconnaissance competition and, for the next 5 years, winning the trophy outright.
The Harrier Years in Germany
On 22 Jun 1970 four Harrier GR1 aircraft were delivered to IV(AC) Sqn at RAF Wildenrath, Germany. By Apr 1971 the Sqn was fully manned and equipped and declared operational and assigned to NATO in the attack role. On I Sep 1972 the Sqn adopted the dual role of attack and tactical reconnaissance. To support the recce role a Reconnaissance Intelligence Centre (RIC) was attached to the Sqn to facilitate recce exploitation.
Recognising the vulnerability of static airfields, the Harrier Force’s war role was to disperse and operate from non-airfield sites to aid survival. Operating forward in ‘field sites’, Close Air Support and recce missions were flown mainly in support of 1(BR) Corps conducting cockpit turnrounds to increase sortie rates and reduce reaction times when responding to CAS/Recce requests. On 4 Jan 1977 the Sqn moved to RAF Gutersloh on the withdrawal of air defence Lightnings in order to be closer to the army formations it was earmarked to support. At the end of Feb 1977, the Sqn strength increased to 18 aircraft/24 pilots with the recent disbandment of No 20 Sqn at RAF Wildenrath.
In Aug 1978 the Sqn took over the Harrier GR3 support of the British forces in Belize, sharing the commitment with No 1(F) Sqn and No 3(F) Sqn until withdrawal in 1993. In 1982 following the Falklands conflict, Sqn pilots deployed to the Falklands on a regular basis until withdrawal of the Harrier GR3 from theatre in 1985.
The Sqn continued operating the Harrier GR3 until 1989 when it was replaced with the much enhanced and bigger Harrier GR5 with greatly improved range/payload and Hands on Throttle and Stick (HOTAS) cockpit. This was followed by the GR7 ‘night attack’ aircraft 2 years later.
After a lengthy period at Gutersloh, the Squadron moved to RAF Laarbruch in Nov 1992 and within 6 months became embroiled in Op WARDEN, deploying to Incirlik, Turkey in order to protect the Kurds and enforce the Northern Iraq No Fly Zone. Over nearly 3 years, the commitment was conducted in rotation with 1(F) Sqn and 3(F) Sqn until handing over to the Tornado GR1s in Jan 1995.
There was however no let up, with further operations beginning in Jul 1995 in support of Op DENY FLIGHT over the troubled Former Republic of Yugoslavia with the Sqn deploying to Gioia del Colle in Southern Italy. The already unstable situation worsened and on 30 Aug 1995, NATO air strikes were authorised. In the ensuing 2 weeks the Sqn flew 144 missions on Op DELIBERATE FORCE, the NATO air strikes over Bosnia, employing Laser Guided and Freefall 1000lb bombs. The bombing missions, which represented the first use of offensive air power in Europe since 1945, resulted in a successful outcome with the signing of the Dayton Peace Accord. Subsequent deployments, shared with sister Harrier sqns, continued until IV(AC) Sqn were stood down in autumn 1996.
In the summer of 1998 IV(AC) Sqn redeployed to Gioia in response to continued Serbian aggression. The commitment, which was shared with its sister sqns, continued through Op DELIBERATE FORGE and ultimately several Sqn members participated in Op ALLIED FORCE, the air strikes that helped persuade Slobodan Milosovic to withdraw Serbian troops from Kosovo.
In Apr 1999, No IV(AC) Sqn (and No1(F) Sqn) were transferred to RAF Cottesmore thus ending 50 years of continuous service in Germany.
Present Day
Despite the disruption of relocating, the Sqn continued to maintain its commitment to Op DELIBERATE FORGE on a rotational basis with the other 2 Harrier sqns. First in and last out of the Balkans, the Sqn departed from Gioia del Colle in Apr 2001, the Harrier Force having been stood down from the Operation.
The Sqn then focused on a period of training which included Ex SAIF SAREEA II in Oct 2001. The Ex included a work-up phase on HMS ILLUSTRIOUS for a month in the Mediterranean, a transit through the Suez Canal and the Red Sea before deploying to Masirah in Oman. This event was the longest period that the Sqn had spent on a carrier since the Chanak crisis over 80 years previously.
The entire Sqn deployed to Kuwait in Feb 2003 with personnel from 1(F) Sqn to take part in Op TELIC (IRAQI FREEDOM), conducting CAS using mixed Paveway 2 and Maverick weapon loads. The Sqn returned from Op TELIC in May 2003 and rapidly rebuilt skill sets for the European theatre. However, the desert beckoned again and Joint Force Harrier (JFH) was soon on the move. In Aug 2004, the Force deployed to Kandahar Airfield to support NATO troops in Afghanistan for Op HERRICK. In Mar 2005, whilst deployed to HMS INVINCIBLE for Ex MAGIC CARPET, No IV(AC) Sqn conducted the UK's first strike mission from an aircraft carrier into Kandahar Airfield. The Sqn's role in Afghanistan was to provide close air support (CAS) and reconnaissance to the NATO International Security and Assistance Force and to Op ENDURING FREEDOM. The Sqn’s capabilities were significantly enhanced with the introduction of the Harrier GR9/9A and associated systems including SNIPER Advanced Targeting Pod. The Sqn’s final detachment from Dec 2008 until Apr 2009 achieved a 100% success rate in terms of missions flown against missions tasked.
IV(R) was re-formed on the 31 March 2010 following the disbandment of 20(R) Squadron.
Battle Honours
Western Front 1914-1918*, Mons*, Neuve Chapelle, Somme 1916, Ypres 1917*, Lys, Somme 1918*, France and Low Countries 1939-1940*, Fortress Europe 1942-1944, France and Germany 1944-1945*, Normandy 1944*, Arnhem*, Rhine, Iraq 2003*.
No. 20 (R) Squadron RAF
Badge: In front of the rising sun, an eagle, wings elevated and perched on a sword - approved by King George VI in June 1937. The rising sun is intended to commemorate the unit's long association with the East. The eagle is perched on 'Talwar' indicative of the Squadron's work with the Army in India.
Motto: Facta non verba - 'Deeds not words'
Key Dates:
1915 - Formed at Netheravon.
1917 - Sergeant T Mottershead was posthumously awarded the VC.
Battle Honours:
Western Front 1916-1918, Somme 1916*, Arras*, Ypres 1917*, Somme 1918*, Lys, Hindenburg Line, Mahsud 1919-1920, Waziristan 1919-1925, Mohmand 1927, North West Frontier 1930-1931, Mohmand 1933, North West Frontier 1935-1939, North Burma 1943-1944, Arakan 1943-1944, Manipur 1944*, Burma 1944-1945*, North Borneo 1964, Gulf 1991.
(Honours marked with an asterisk, may be emblazoned on the Squadron Standard)
The History of XX(R) Squadron:
Formed at Netheravon on 1 September 1915 from No. 7 Reserve Squadron, the unit deployed to France in January 1916 with FE2Bs in the fighter-reconnaissance role. The Squadron devised the 'flying circle' where patrolling pilots flew a continuous orbit in formation while their gunners fires outwards, covering each other.
A year later, Sergeant T Mottershead was posthumously awarded the VC for saving the life of his observer, Lt WE Gower after their stricken aircraft had crash-landed and caught fire. Lt Gower managed to escape the burning wreck and with assistance dragged his pilot from the wreckage. However, Sgt Mottershead died four days later from his burns, and he became the only RFC NCO to be awarded the Victoria Cross during World War I.
In 1917, the Bristol Fighter arrived, and with the Squadron constantly refining their tactics, 56 German aircraft were accounted for in April 1918 alone. In May 1919, the Squadron left the continent for India and assumed army co-operation tasks along the North-West Frontier. The trusty 'Brisfits' were finally replaced in 1932 by Wapitis, and then Audaxes three years later. Lysanders replaced these in late 1941, and these were joined by Hurricane 'tank busters' in mid-1942.
In July 1947, No. 20 Squadron was disbanded whilst in India, reforming briefly as a target squadron during 1949-51. The Squadron was reformed at Jever in Germany in July 1952 with Vampire fighter-bombers, these lasting barely a year before Sabres arrived for interceptor duties before these aircraft were themselves replaced by Hunters. The Squadron was disbanded at the end of 1960. No. 20 Squadron reformed in July of the following year at Tengah in Singapore, again with Hunters, but in the ground attack role. The Squadron spent six months during 1962 in Thailand as a counter to communist incursions from Laos, and in 1964 was involved in operations in North Borneo, but disbanded again during 1970 following the withdrawal of RAF units from the Far East.
By December, No. 20 Squadron had reformed at Wildenrath with Harriers, but these were replaced during 1977 with Jaguars. During 1984, Tornado GR1s arrived and these remained until under 'Options for Change' the unit disbanded in May 1992. Later that year, the Squadron numberplate was assigned to the Harrier OCU at Wittering.
As I said if you then read through all that you will realise that its not possible for these two units to have been in the same place at the same time with Harriers. However, that's the units that come with the kits I wanted to use, and I didn't want to go down the AM decal route.
Progress update then. My last update showed the decals onto the GR1, which was awaiting a wash. Current state of affairs is the GR1 washed and matt varnished (which turned out a bit satin....). GR3 is decaled, washed and varnished also. Canopies are glued in place on both planes as well now.
So next step, which is started on the GR1 is some oil dot filtering to add some variation and fading to the upper surfaces of the planes. This seems to be giving a nice effect on the GR1 so far.
So enough chatter, pictures!
GR1 with wash, decals and matt coat (although as I said, it turned out too satin, but its ok as its not going to be the final finish).


GR3 with Ultimate Dark Dirt wash on

And removing the wash

Two birds together with canopies in place


Close up of the fuselage lights, painted with Tamiya clear red

Oil filtering on the GR1


I checked the filtering this morning after it had dried overnight a bit, and its a touch streaky, but I will go over with the white spirit again, but it looks like it will be quite a good effect all told!
A long update I'm afraid, but hopefully if you have taken the time to read the history you will know a bit more about the Squadrons I am depicting here.
Next steps
Once the planes themselves are finished (which won't be much longer), then I will finish off the refuelling truck. I then need to start on the base. So I will be sourcing a picture frame big enough and figuring out the layout etc and how to go about depicting some of the features etc.
So stay tuned!
Comments and criticisms are most welcome!
Ciao for now
-
Paul
- Site Admin
- Posts: 12622
- Joined: Thu May 23, 2013 4:47 pm
- Location: Merseyside, England, UK
- Contact:
Re: Airfix Harrier GR.1/GR.3 Diorama
Great looking pair of birds Gav, nice weathering really showing of those Camo schemes now
Products I use in my builds viewtopic.php?f=192&t=27234
My Paul-Ism page https://www.facebook.com/thebenchwithpaul/
Friday Live show here https://www.facebook.com/groups/120548821977514/
My Paul-Ism page https://www.facebook.com/thebenchwithpaul/
Friday Live show here https://www.facebook.com/groups/120548821977514/
-
T3hGuppy
- Second Lieutenant
- Posts: 3467
- Joined: Wed Jun 12, 2013 11:20 pm
- Location: Bournemouth, UK
- Contact:
Re: Airfix Harrier GR.1/GR.3 Diorama
Nice update dude.
The oil filtering is something im looking to try soon .
Really like the effect on the Harrier
The oil filtering is something im looking to try soon .
Really like the effect on the Harrier
-
Gav0909
- Chief Warrant Officer 5
- Posts: 2927
- Joined: Tue May 28, 2013 11:56 am
- Location: Fife, Scotland
- Contact:
Re: Airfix Harrier GR.1/GR.3 Diorama
Update 22
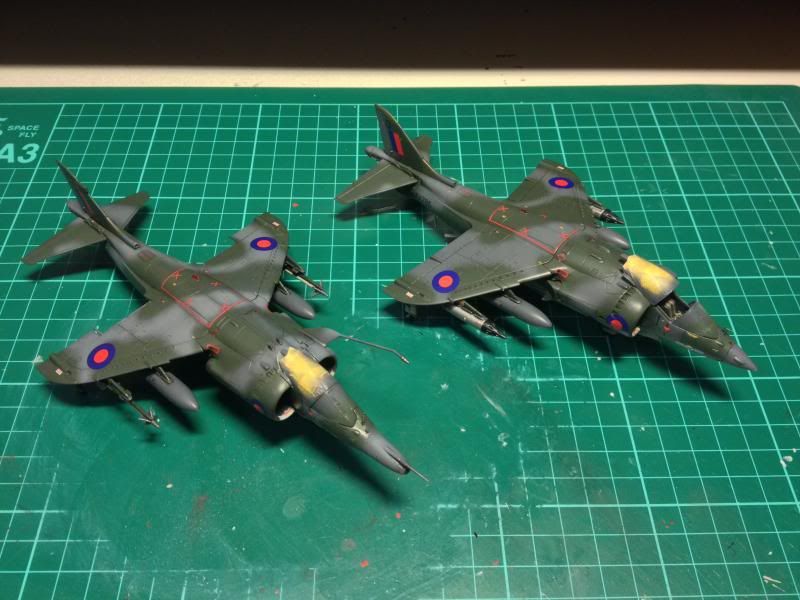
Well well this is a monumental occasion! The Harriers and their refuelling truck are finished
Well I say finished, there are one or two small jobs to do on the Harriers, but they are minor things which can be done later as I construct the diorama.
My overall thoughts are that I am pleased with them, especially the little truck. As with all models there are areas that I am less pleased with, most of which are due to my lack of knowledge on some things and lack of skill to achieve things I was trying too as I saw them in my head. But overall I am happy, and if they are recieved well then that's good.
Onto some pictures!
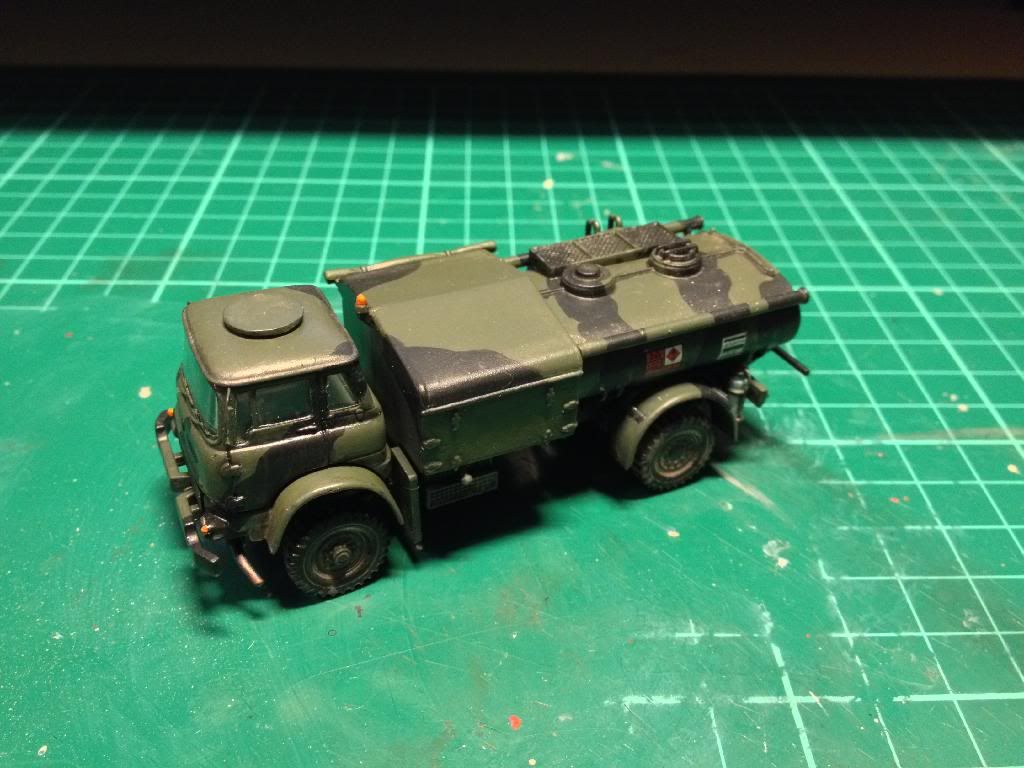
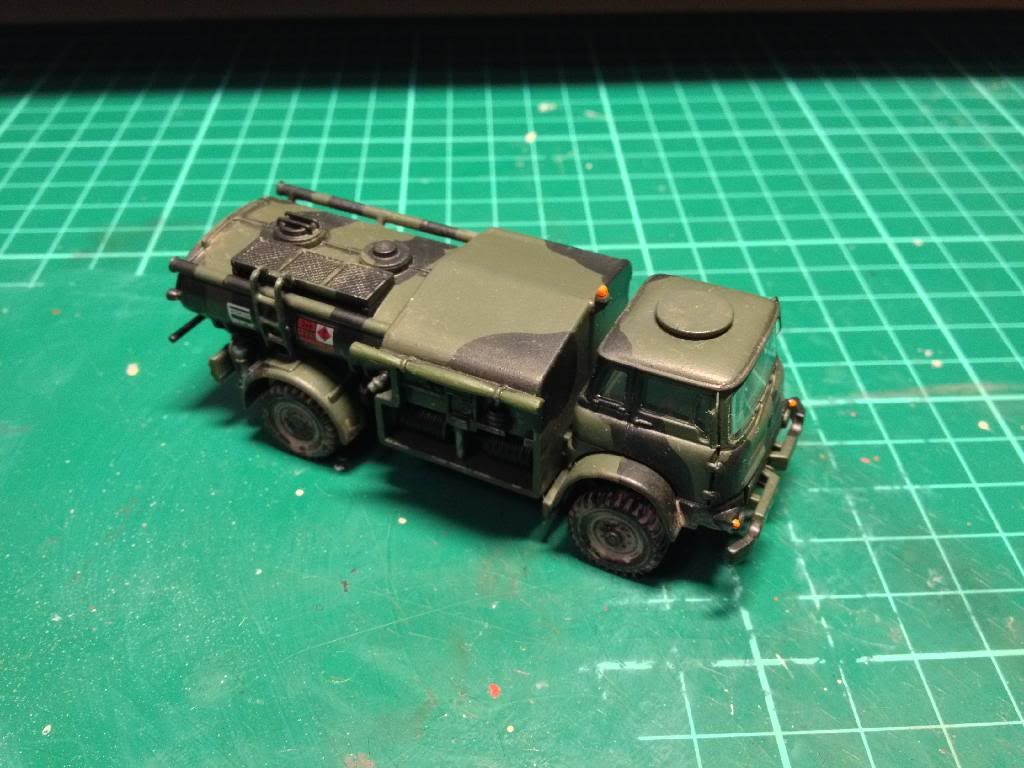
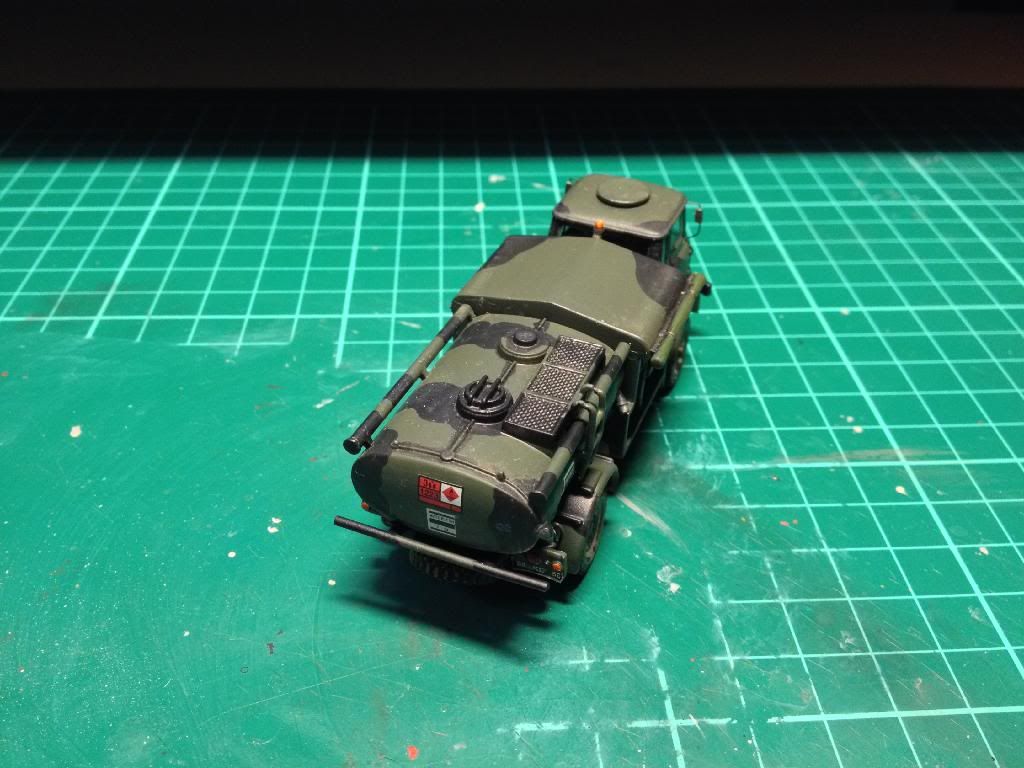
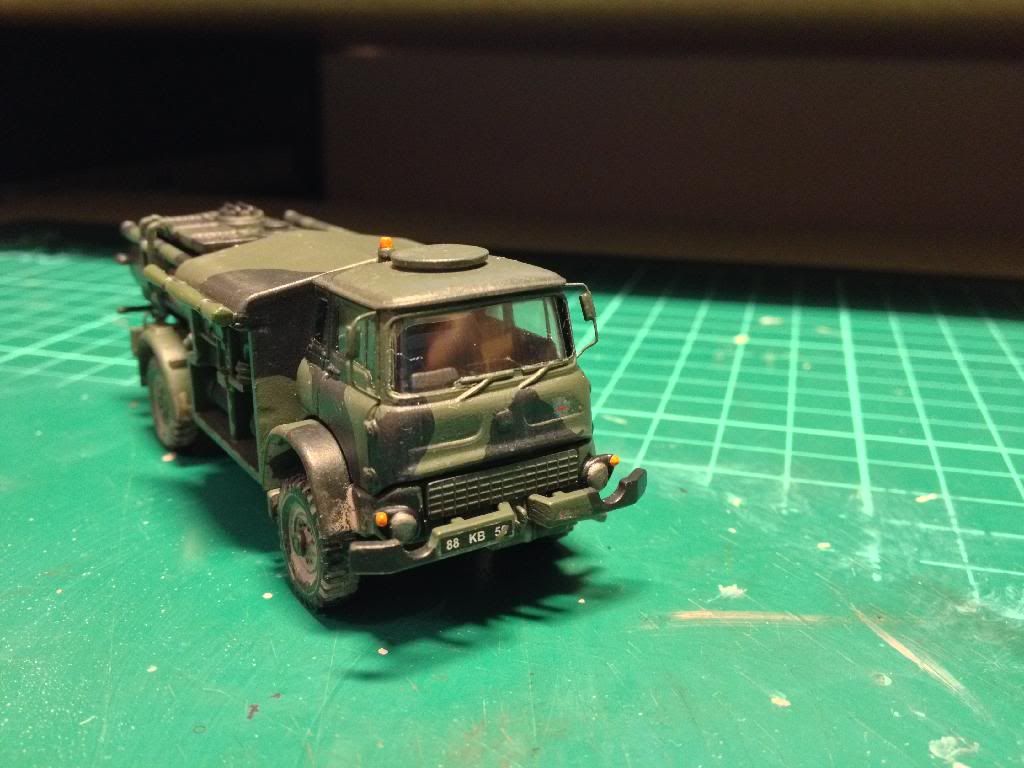
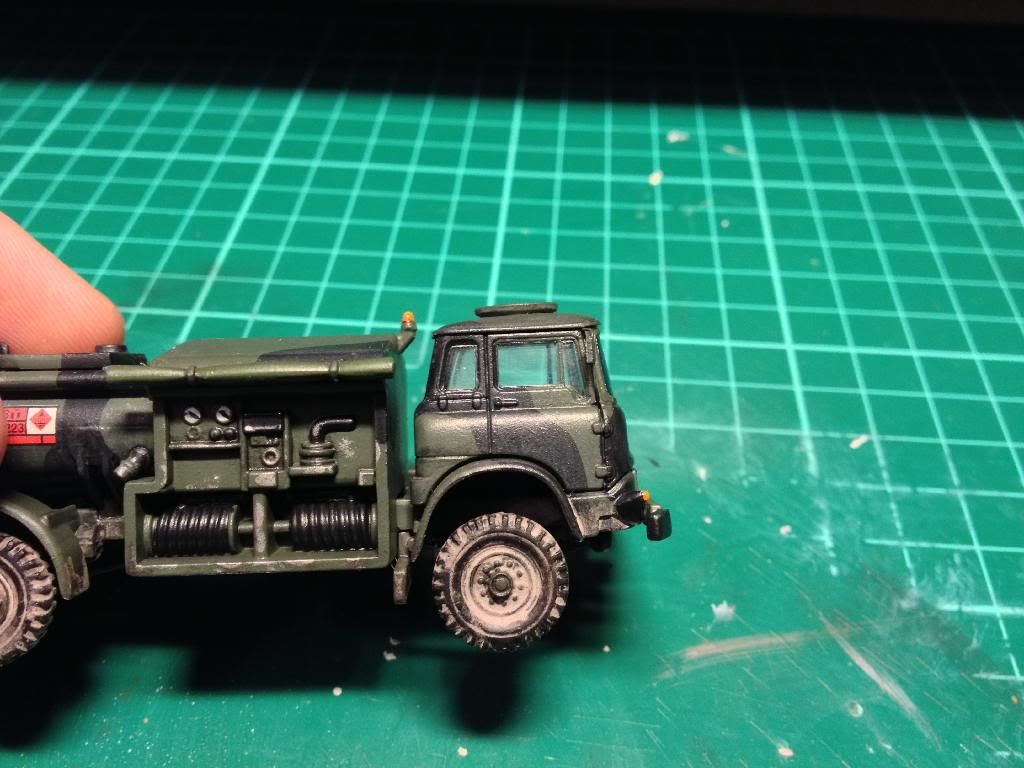
First up the Airfix Bedford Tactical Air Refueller truck. Painted using Vallejo Model Colour Yellow Olive and Black. This was then weathered using the Ultimate washes, with an oil dot filter on the upper surfaces. The wing mirrors were added with some wire and plasticard.
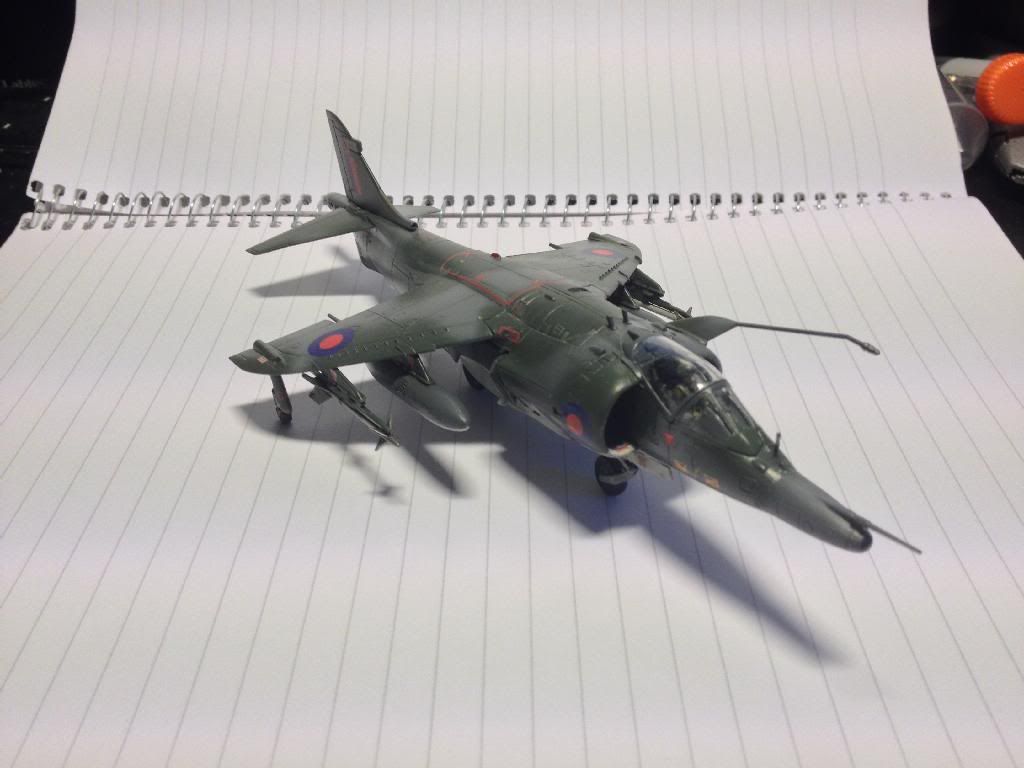
And the Airfix Harrier GR1 (new tool). Painted with Vallejo and Humbrol paints. No AM was used on the plane itself, bar some RBF tags from Eduard (two are in place so far, with more to add).
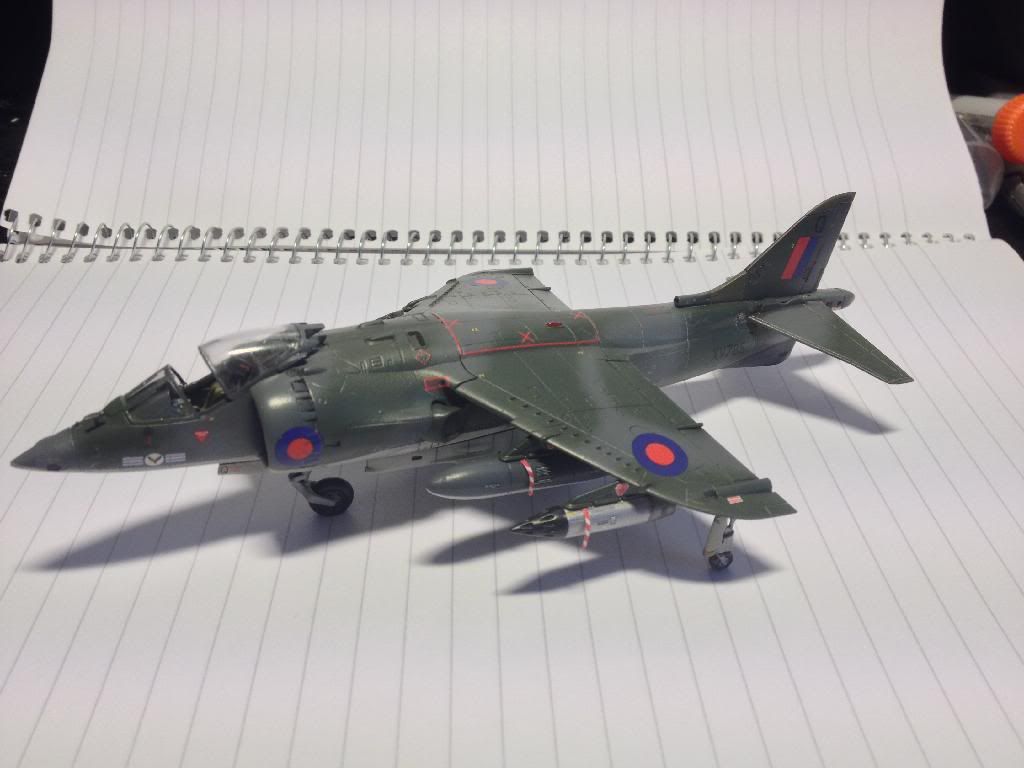
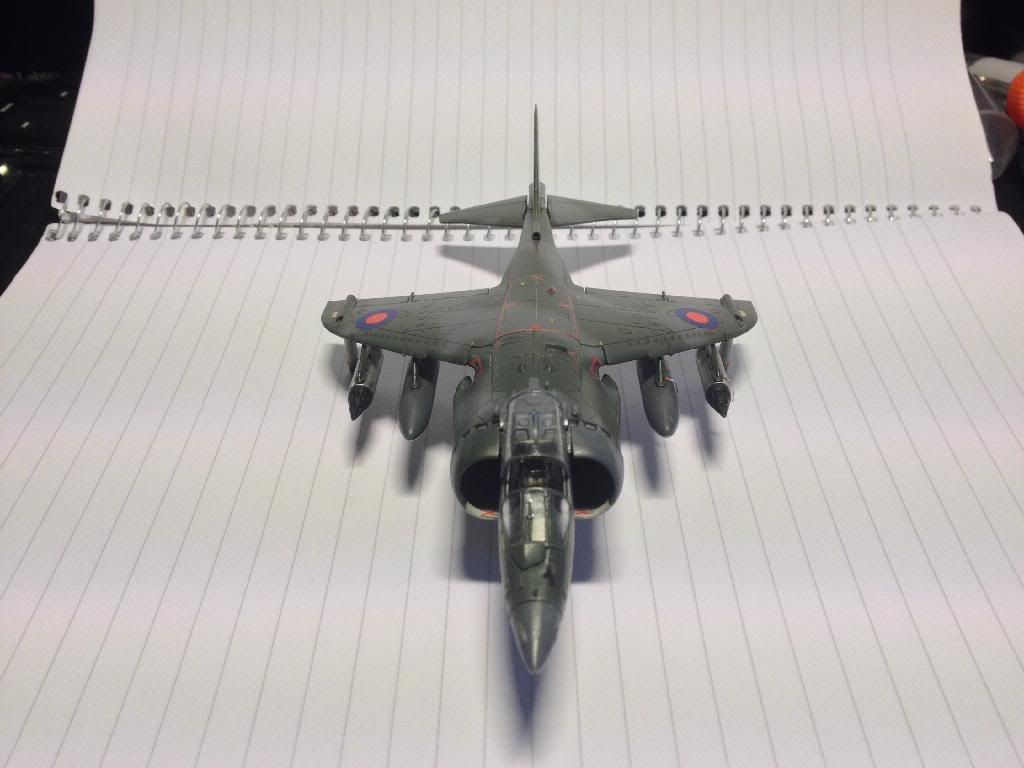
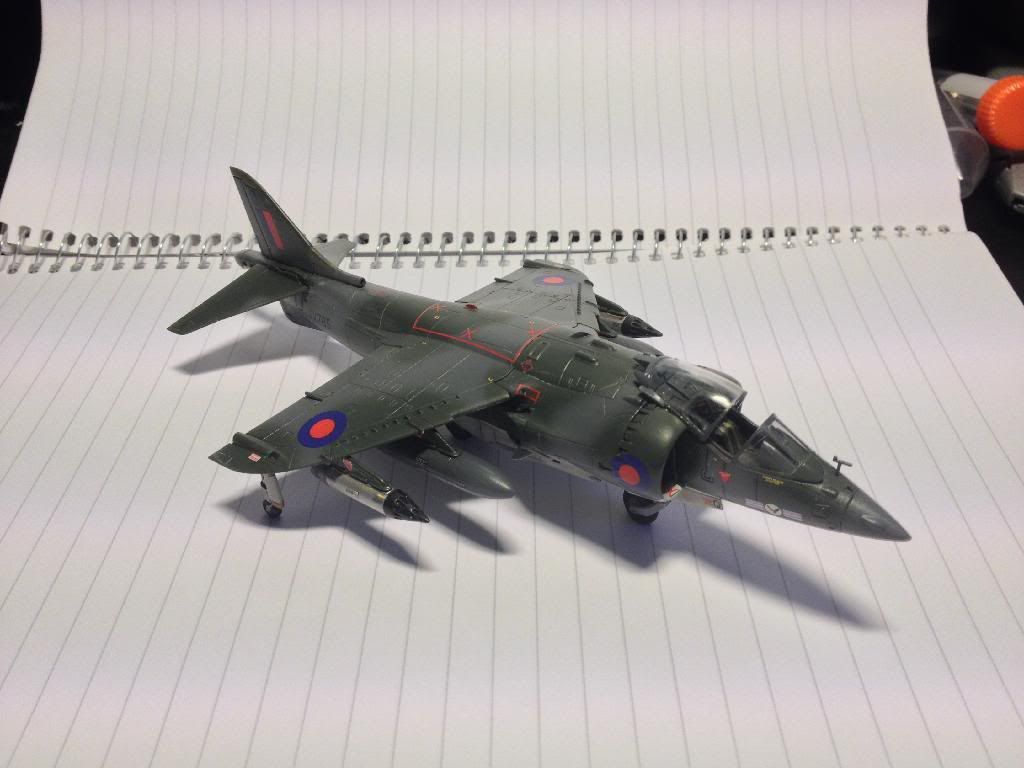

Airfix Harrier GR3, built completely OOB and painted with the same paints as the GR1.
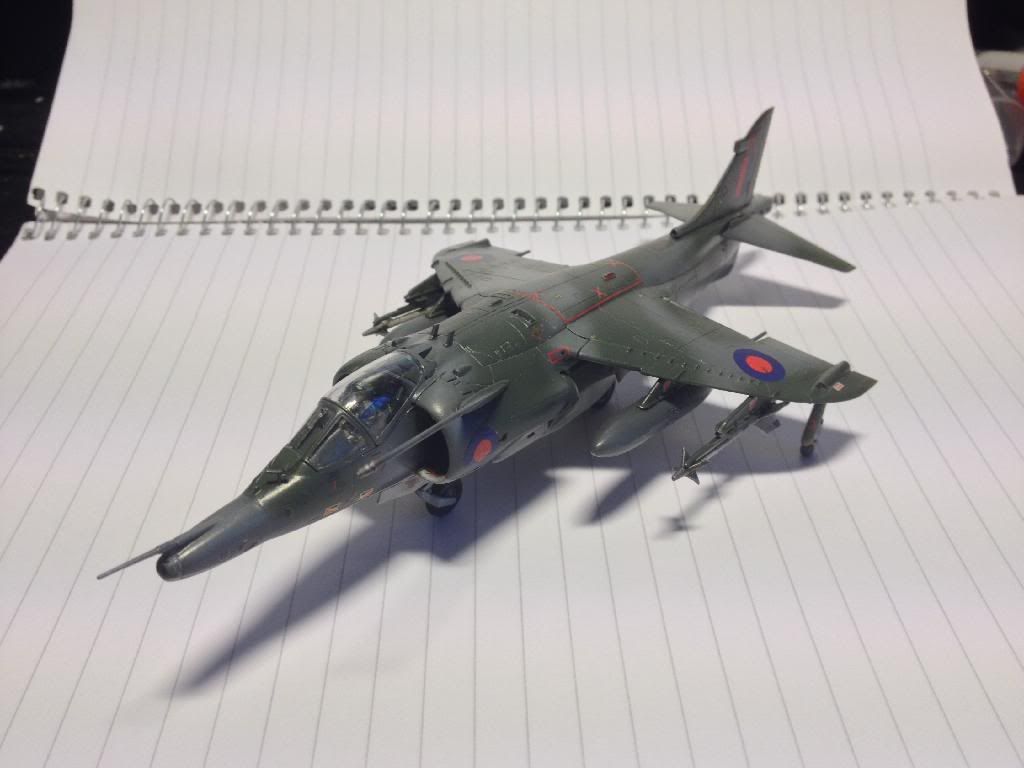
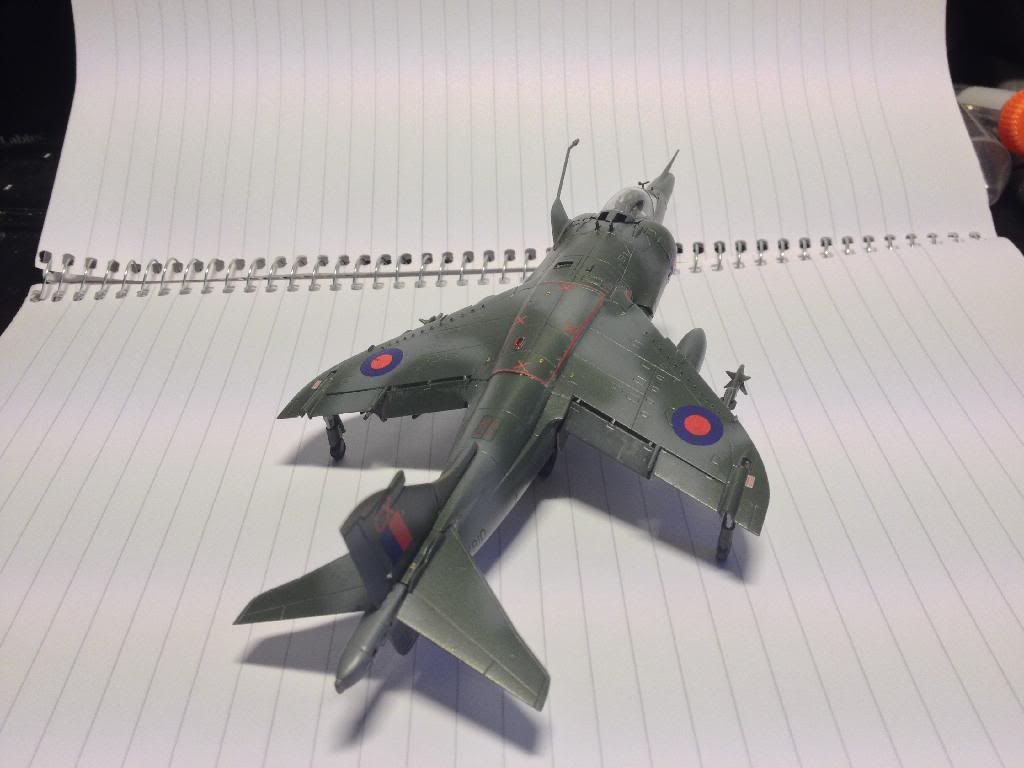
And both together
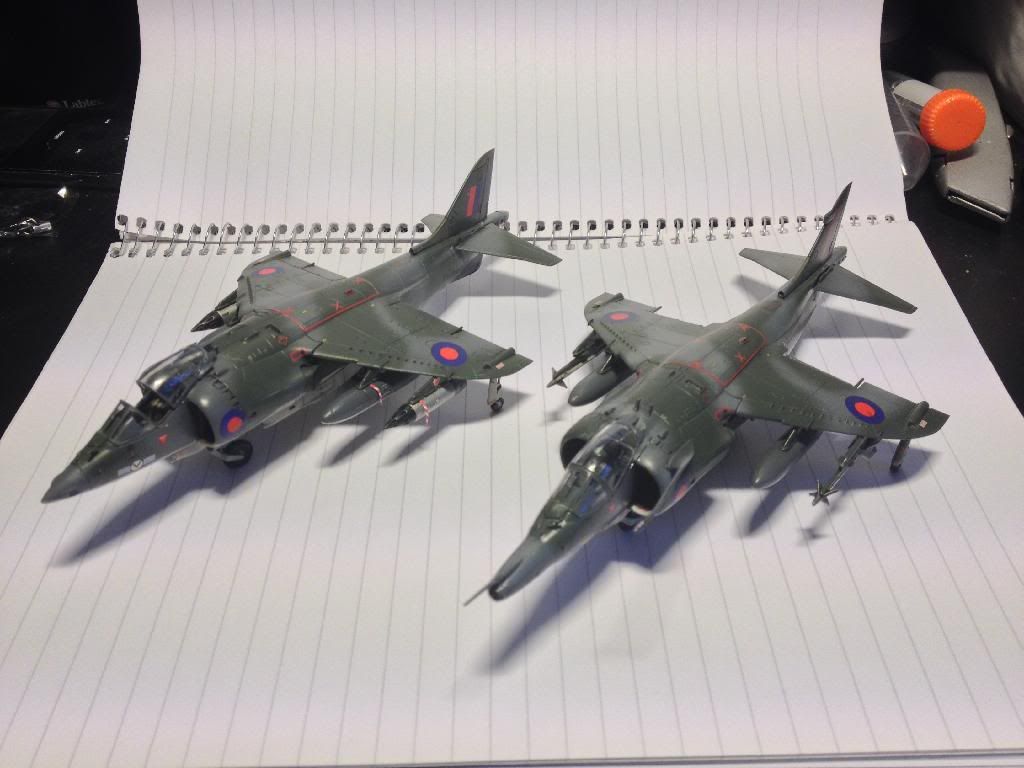
I am not happy with the canopy on the GR1 and so I might model a canopy over on it a) for some added interest, but b) to hide the canopy! I also need to replace the pitot tube on the nose, and on both planes I need to paint in the nose gear light. The GR1 will have more RBF tags on it as well.
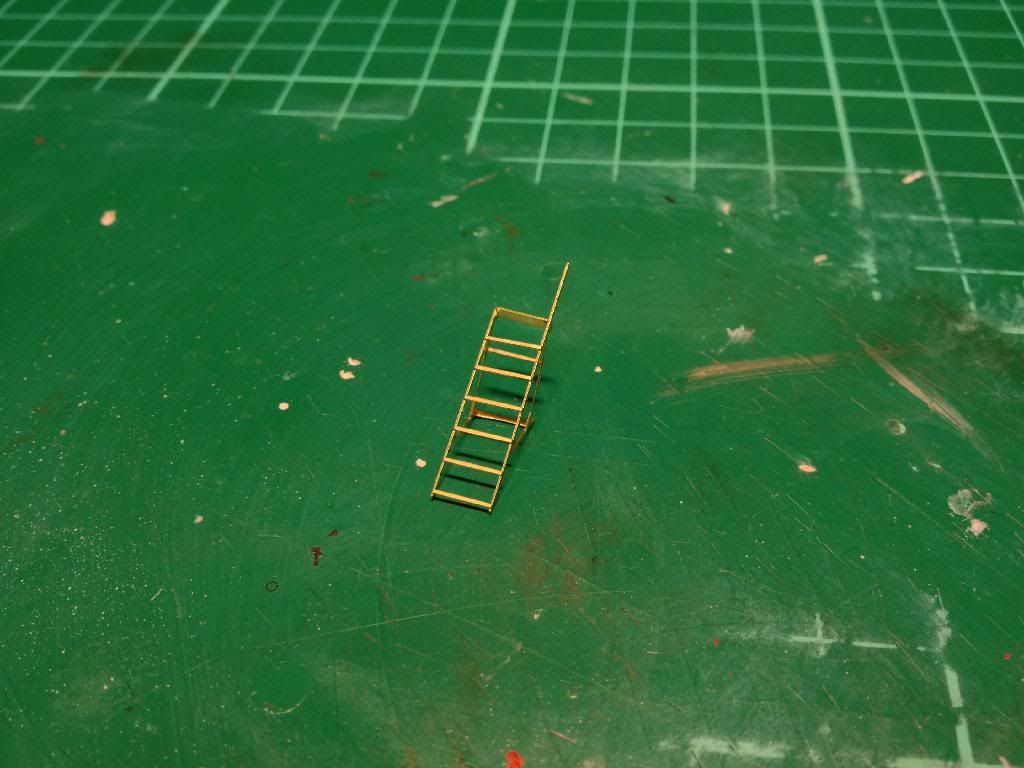
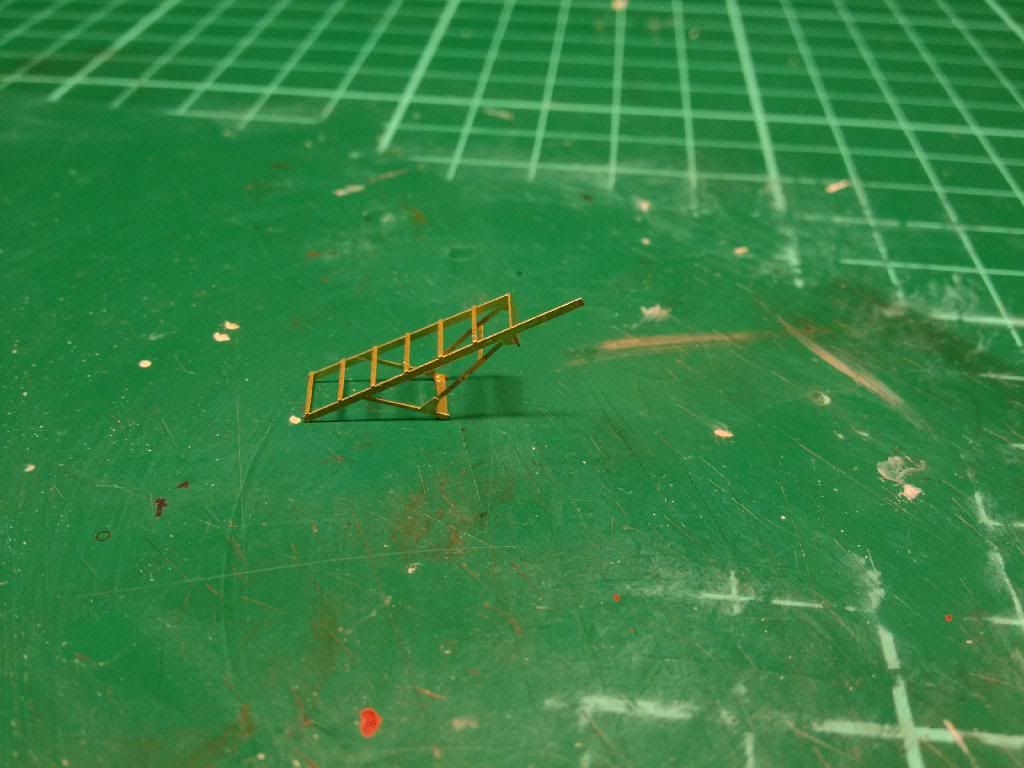
So once they were done I built up the Brengun Harrier boarding ladder.
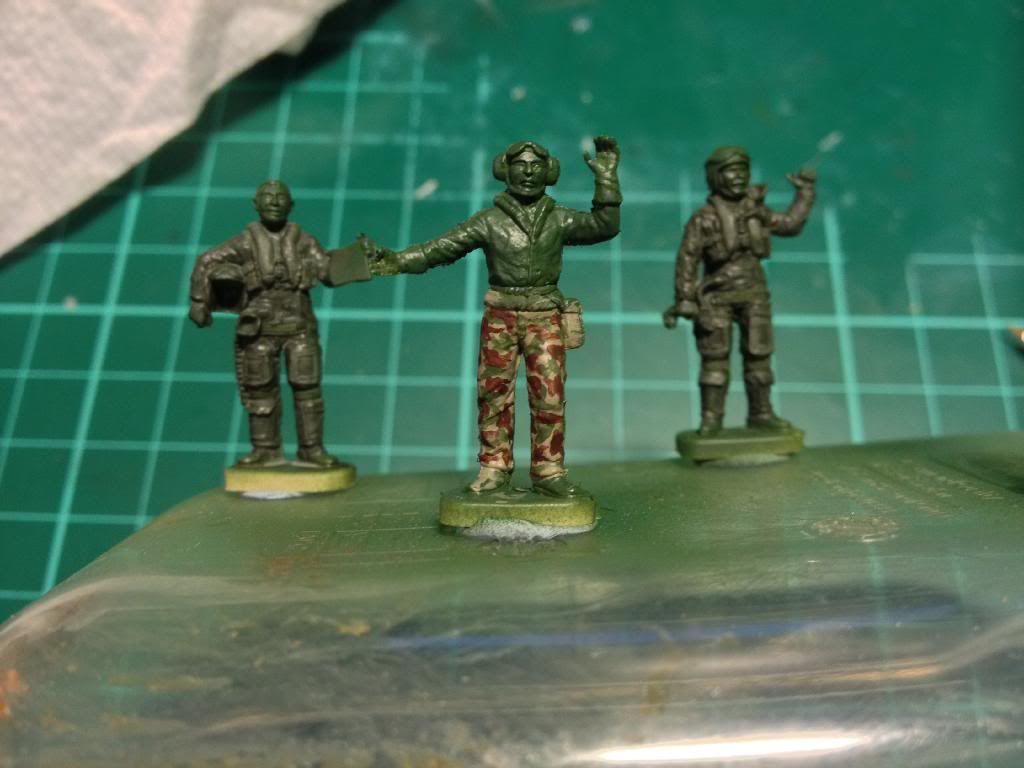
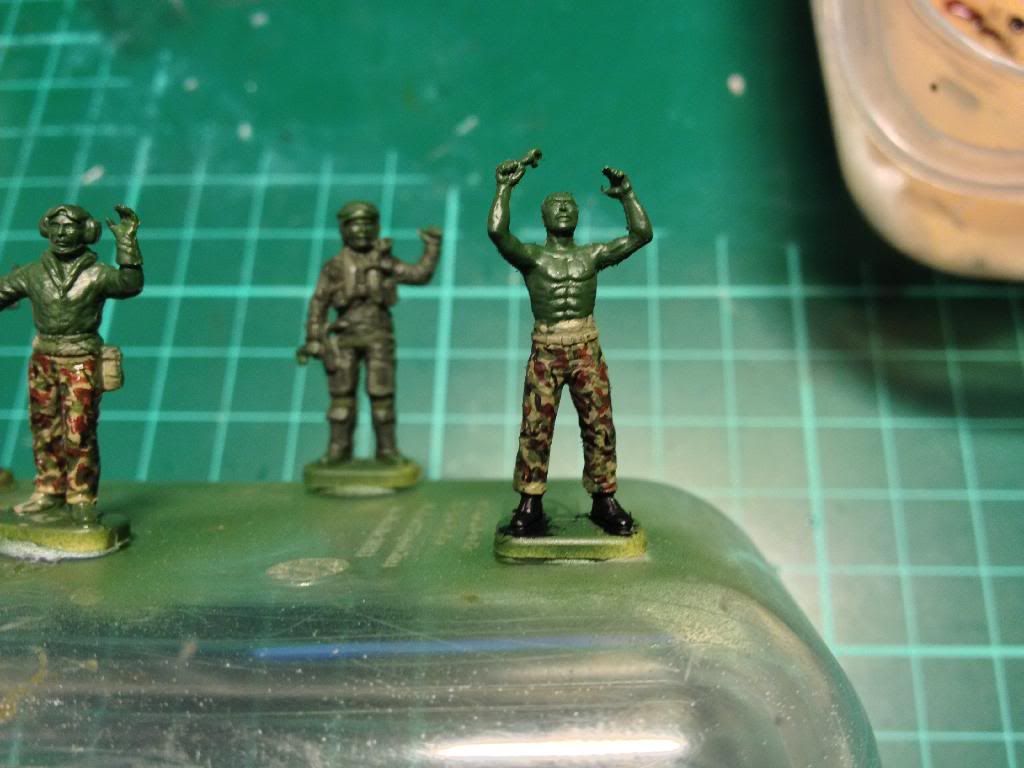
And I chose the few ground crew figs I want to use and primed them green (just to save me painting a layer of green). The shirtless guy looks like a mini Hulk lol.
I am going to have the pilots having a chat next to the GR1, the spanner guy under the wing and the other guy will be guiding the GR3 in to land. I might get another guy to look like he is overseeing the refuelling of the GR1, or I might just sit the tanker nearby, but not actually in the refuelling process to save me some work, but without taking away from the diorama.
Whew, long post!
Please be honest in your critique of the Harriers! I look forward to your comments.
Next will be an update on my figure painting progress. So stay tuned.
Ciao for now!
Well well this is a monumental occasion! The Harriers and their refuelling truck are finished
Well I say finished, there are one or two small jobs to do on the Harriers, but they are minor things which can be done later as I construct the diorama.
My overall thoughts are that I am pleased with them, especially the little truck. As with all models there are areas that I am less pleased with, most of which are due to my lack of knowledge on some things and lack of skill to achieve things I was trying too as I saw them in my head. But overall I am happy, and if they are recieved well then that's good.
Onto some pictures!
First up the Airfix Bedford Tactical Air Refueller truck. Painted using Vallejo Model Colour Yellow Olive and Black. This was then weathered using the Ultimate washes, with an oil dot filter on the upper surfaces. The wing mirrors were added with some wire and plasticard.


And the Airfix Harrier GR1 (new tool). Painted with Vallejo and Humbrol paints. No AM was used on the plane itself, bar some RBF tags from Eduard (two are in place so far, with more to add).


Airfix Harrier GR3, built completely OOB and painted with the same paints as the GR1.


And both together

I am not happy with the canopy on the GR1 and so I might model a canopy over on it a) for some added interest, but b) to hide the canopy! I also need to replace the pitot tube on the nose, and on both planes I need to paint in the nose gear light. The GR1 will have more RBF tags on it as well.
So once they were done I built up the Brengun Harrier boarding ladder.


And I chose the few ground crew figs I want to use and primed them green (just to save me painting a layer of green). The shirtless guy looks like a mini Hulk lol.

I am going to have the pilots having a chat next to the GR1, the spanner guy under the wing and the other guy will be guiding the GR3 in to land. I might get another guy to look like he is overseeing the refuelling of the GR1, or I might just sit the tanker nearby, but not actually in the refuelling process to save me some work, but without taking away from the diorama.
Whew, long post!
Please be honest in your critique of the Harriers! I look forward to your comments.
Next will be an update on my figure painting progress. So stay tuned.
Ciao for now!
-
Paul
- Site Admin
- Posts: 12622
- Joined: Thu May 23, 2013 4:47 pm
- Location: Merseyside, England, UK
- Contact:
Re: Airfix Harrier GR.1/GR.3 Diorama
Great work gav, I think the harriers look superb as does it all mate, nice one
Products I use in my builds viewtopic.php?f=192&t=27234
My Paul-Ism page https://www.facebook.com/thebenchwithpaul/
Friday Live show here https://www.facebook.com/groups/120548821977514/
My Paul-Ism page https://www.facebook.com/thebenchwithpaul/
Friday Live show here https://www.facebook.com/groups/120548821977514/


Re: Airfix Harrier GR.1/GR.3 Diorama
just gone through all your thread top work bud the jets are looking superb and so is the truck real nice weathering on all..will keep up to date with this build thread now looking forward to seeing more

-
Nige201980
- Captain
- Posts: 4095
- Joined: Wed Jun 05, 2013 9:30 am
- Location: Doncaster South Yorkshire UK
- Contact:
Re: Airfix Harrier GR.1/GR.3 Diorama
The harriers looks stunning mate and the bedford looks just right mate really great work.
http://www.youtube.com/channel/UCy-TGcs5u_ZXSZ9kObNfsPg
On the go at the Mo
Quite a few
On the go at the Mo
Quite a few
-
longlance67
- Warrant Officer
- Posts: 1371
- Joined: Fri Aug 16, 2013 5:22 pm
- Location: Galway, Ireland
Re: Airfix Harrier GR.1/GR.3 Diorama
lovely work Gav !
stunning work indeed
Shane
stunning work indeed
Shane
On the Bench:
Trumpeter Stryker ESV
Hobby Boss 1/48 F18 Hornet
1/72 Dragon King Tiger with Zimm
28mm Napoleonic project
28mm Norman Conquest of Ireland painting project
My Channel:
http://www.youtube.com/user/longlance67
Trumpeter Stryker ESV
Hobby Boss 1/48 F18 Hornet
1/72 Dragon King Tiger with Zimm
28mm Napoleonic project
28mm Norman Conquest of Ireland painting project
My Channel:
http://www.youtube.com/user/longlance67
-
JayCub
- Command Sergeant Major
- Posts: 907
- Joined: Mon Oct 21, 2013 11:58 pm
- Location: Wicklow Ireland
Re: Airfix Harrier GR.1/GR.3 Diorama
i think you meant a short work log, i have enjoyed reading and seeing this come together and to-date its just awesome, and now i just want to see more 
-
Gav0909
- Chief Warrant Officer 5
- Posts: 2927
- Joined: Tue May 28, 2013 11:56 am
- Location: Fife, Scotland
- Contact:
Re: Airfix Harrier GR.1/GR.3 Diorama
Cheers everyone. I am not entirely sure if I am going to have time to get the diorama base done, but I will try. If not at least the models themselves are done and I can submit those as my entry come the end of the GB.
I am going to paint up the figures at least as they shouldn't take long. I will pick up a picture frame base and get some ground cover on it and go from there.
Cheers!
I am going to paint up the figures at least as they shouldn't take long. I will pick up a picture frame base and get some ground cover on it and go from there.
Cheers!
-
UKscalemodeller
- Chief Warrant Officer 3
- Posts: 2062
- Joined: Tue May 28, 2013 12:31 pm
Re: Airfix Harrier GR.1/GR.3 Diorama
Just pure EPIC Gav
-
T3hGuppy
- Second Lieutenant
- Posts: 3467
- Joined: Wed Jun 12, 2013 11:20 pm
- Location: Bournemouth, UK
- Contact:
Re: Airfix Harrier GR.1/GR.3 Diorama
Really nice work dude.
-
Gav0909
- Chief Warrant Officer 5
- Posts: 2927
- Joined: Tue May 28, 2013 11:56 am
- Location: Fife, Scotland
- Contact:
Re: Airfix Harrier GR.1/GR.3 Diorama
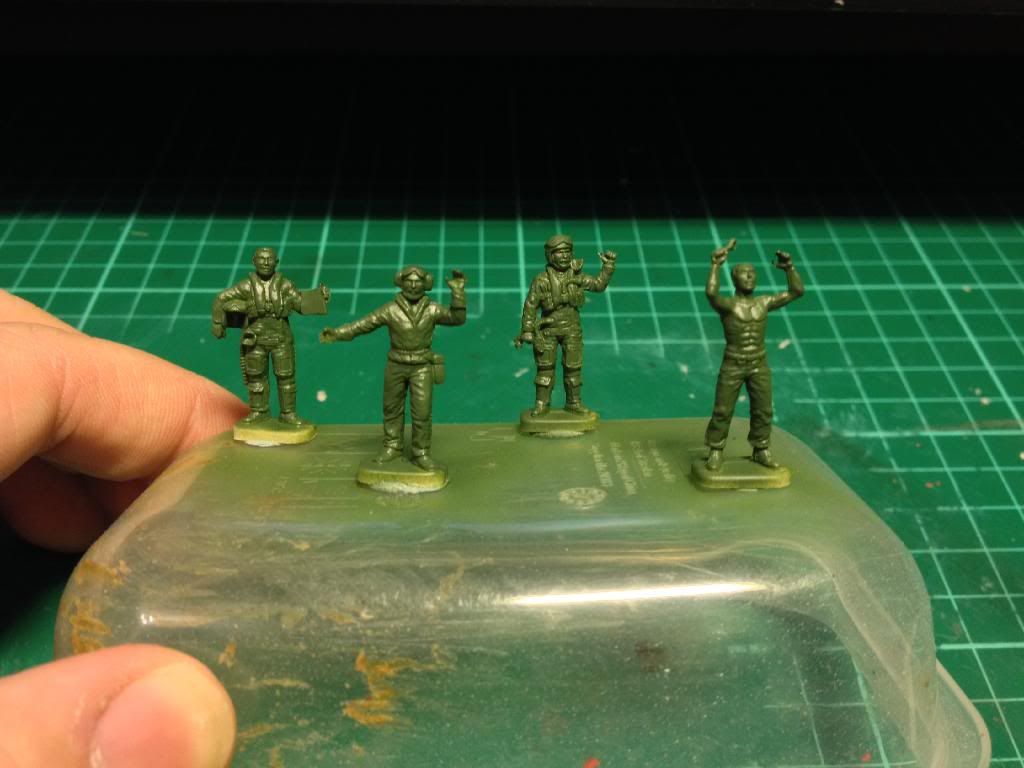
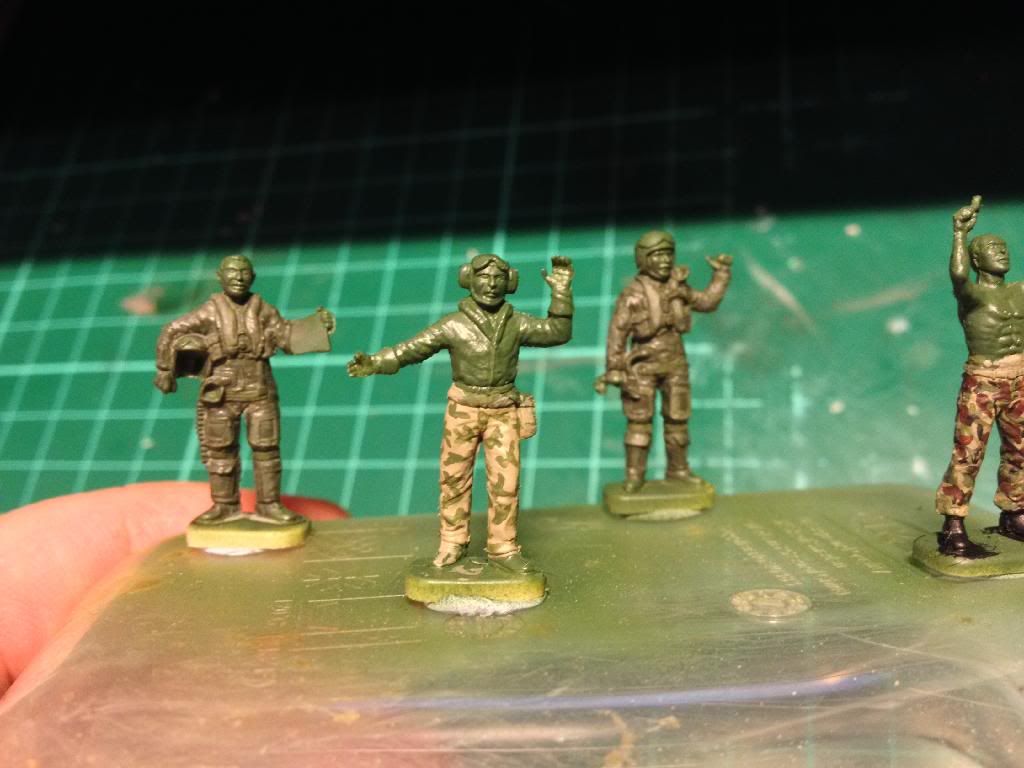
Update 23 - Tutorial
This update is going to be somewhat of a tutorial. I am going to show you lovely people how I go about painting British DPM on figures. 1/72 figures to be exact!
First of all some background (which to most will be no surprise since your ex-military!)
Here is a good example of British DPM.

Now DPM comes in both temperate woodland (as above) and desert (same pattern but with just two tones, a sand and a light brown). Now there are two main "flavours", Soldier 94 and Soldier 95, and to my knowledge the main difference is only in the tone of the colours used, and not the pattern at all. So S94 often looks a bit lighter than S95. I am going to be painting a representation of S94.
Ok so the colours I used (you could use different ones, these are just what I had, and what I felt was closest).
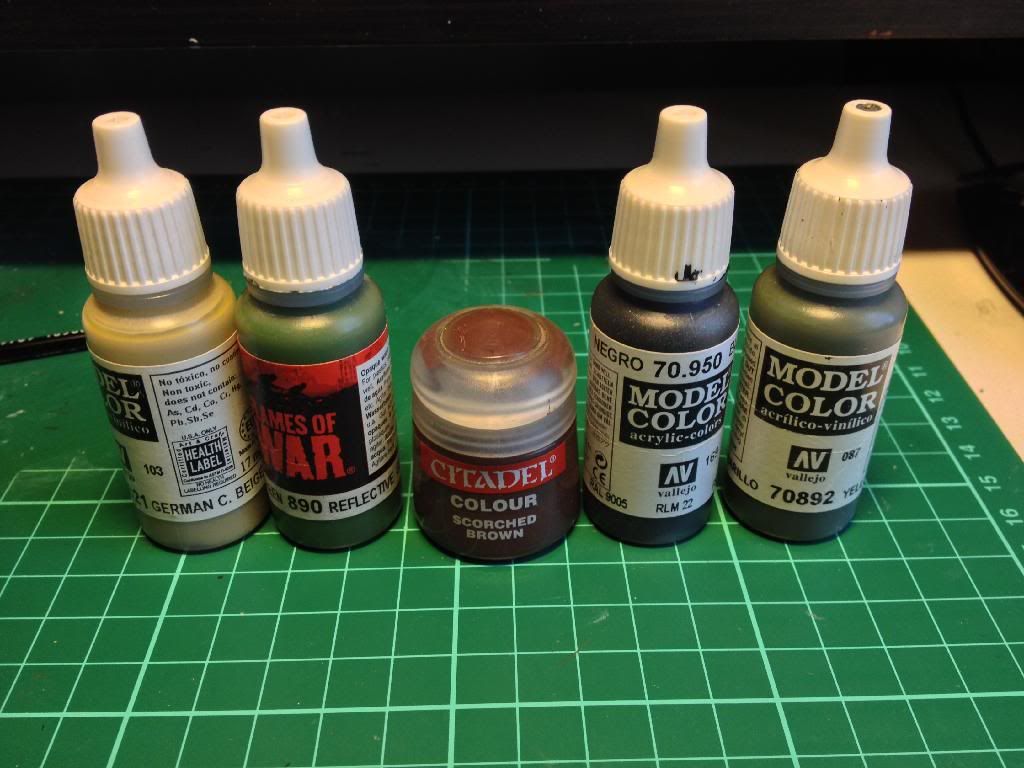
Left to right we have VMC German Camo Beige, VMC Reflective Green, Citadel Scorched Brown, VMC Black, VMC Yellow Olive.
Start by painting the entire area in the German C. Beige like so
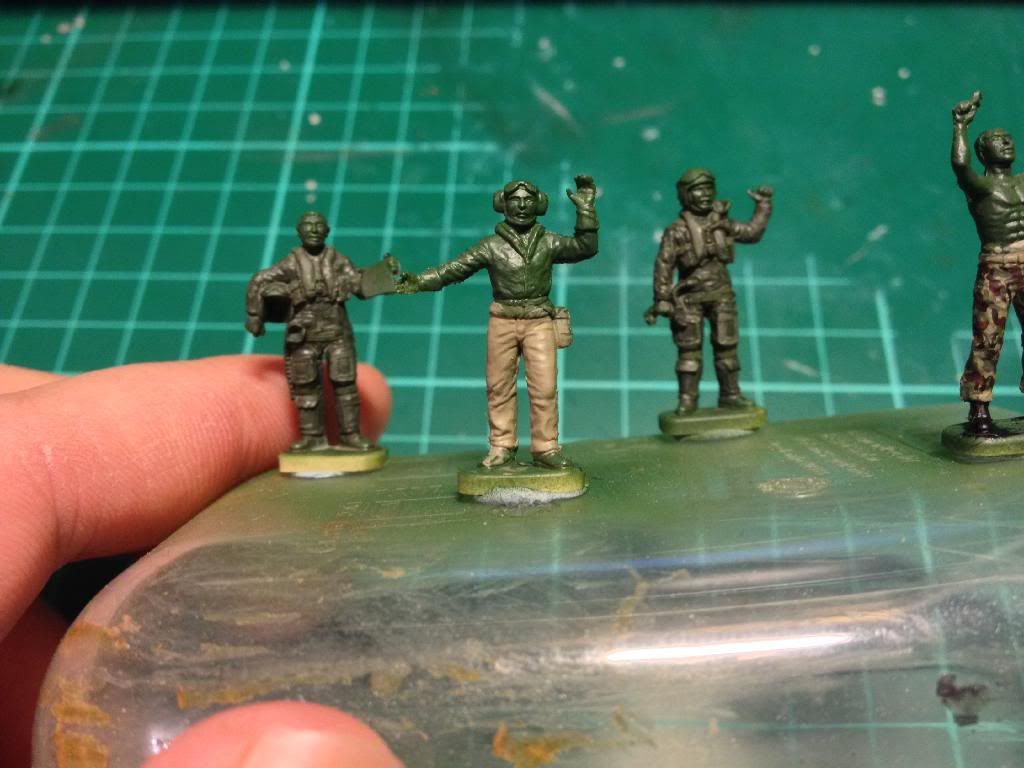
Add random patches of the Reflective Green, trying to get them similar to the pattern as seen in the example above.
Do the same with the Scorched Brown.
And finally mix a bit of black into the brown to get a really dark brown and add the final very small black/brown pattern.

Then I diluted the Yellow Olive into a thin wash and added a thin layer all over, this helps tie the colours together and take the harshness out of the light base colour. When dry it should look something like this.
I hope that someone found this useful. The same method can be applied to other scales, its just a case of scaling up the pattern to fit.
If anyone would like me too I can do a similar tutorial when I come to paint the skin tones. There are only small faces to do, but one guy has his top off which gives a good platform to paint some flesh on. Let me know!
I aim to have these figs finished soon, then its just the diorama base to do!
Thanks for reading, please do comment and critique/advice etc is more than welcome.
Ciao for now
This update is going to be somewhat of a tutorial. I am going to show you lovely people how I go about painting British DPM on figures. 1/72 figures to be exact!
First of all some background (which to most will be no surprise since your ex-military!)
Here is a good example of British DPM.
Now DPM comes in both temperate woodland (as above) and desert (same pattern but with just two tones, a sand and a light brown). Now there are two main "flavours", Soldier 94 and Soldier 95, and to my knowledge the main difference is only in the tone of the colours used, and not the pattern at all. So S94 often looks a bit lighter than S95. I am going to be painting a representation of S94.
Ok so the colours I used (you could use different ones, these are just what I had, and what I felt was closest).

Left to right we have VMC German Camo Beige, VMC Reflective Green, Citadel Scorched Brown, VMC Black, VMC Yellow Olive.
Start by painting the entire area in the German C. Beige like so

Add random patches of the Reflective Green, trying to get them similar to the pattern as seen in the example above.

Do the same with the Scorched Brown.

And finally mix a bit of black into the brown to get a really dark brown and add the final very small black/brown pattern.

Then I diluted the Yellow Olive into a thin wash and added a thin layer all over, this helps tie the colours together and take the harshness out of the light base colour. When dry it should look something like this.

I hope that someone found this useful. The same method can be applied to other scales, its just a case of scaling up the pattern to fit.
If anyone would like me too I can do a similar tutorial when I come to paint the skin tones. There are only small faces to do, but one guy has his top off which gives a good platform to paint some flesh on. Let me know!
I aim to have these figs finished soon, then its just the diorama base to do!
Thanks for reading, please do comment and critique/advice etc is more than welcome.
Ciao for now
-
UKscalemodeller
- Chief Warrant Officer 3
- Posts: 2062
- Joined: Tue May 28, 2013 12:31 pm
Re: Airfix Harrier GR.1/GR.3 Diorama
Really great work Gav, a great tutorial and top notch background info.
-
Nige201980
- Captain
- Posts: 4095
- Joined: Wed Jun 05, 2013 9:30 am
- Location: Doncaster South Yorkshire UK
- Contact:
Re: Airfix Harrier GR.1/GR.3 Diorama
WOW Gav that looks fantastic buddy one thing are you going to put a wash or filter over it because its a tad light other than that i think
its spot on mate.
its spot on mate.
http://www.youtube.com/channel/UCy-TGcs5u_ZXSZ9kObNfsPg
On the go at the Mo
Quite a few
On the go at the Mo
Quite a few
-
Paul
- Site Admin
- Posts: 12622
- Joined: Thu May 23, 2013 4:47 pm
- Location: Merseyside, England, UK
- Contact:
Re: Airfix Harrier GR.1/GR.3 Diorama
Awesome gav great work dude.
I would be interested In seeing a skin tutorial mate
I would be interested In seeing a skin tutorial mate
Products I use in my builds viewtopic.php?f=192&t=27234
My Paul-Ism page https://www.facebook.com/thebenchwithpaul/
Friday Live show here https://www.facebook.com/groups/120548821977514/
My Paul-Ism page https://www.facebook.com/thebenchwithpaul/
Friday Live show here https://www.facebook.com/groups/120548821977514/
-
Gav0909
- Chief Warrant Officer 5
- Posts: 2927
- Joined: Tue May 28, 2013 11:56 am
- Location: Fife, Scotland
- Contact:
Re: Airfix Harrier GR.1/GR.3 Diorama
Update 24 - Tutorial
Thanks for the comments on the DPM.
@Hollywood Modelling - yes mate these are 1/72. I have no real issues painting in this scale, I painted 15mm figures for years!
For the rest of the evening I finished painting the figures, and I have taken some shots and will attempt to show how I paint skintones. This isn't a great tutorial as it was also my first time using the Lifecolour Flesh Paint Set and so I am still learning the various tones and the best way to use them.
First off I took the No. 1 Flesh Base and painted all the skin areas with this.
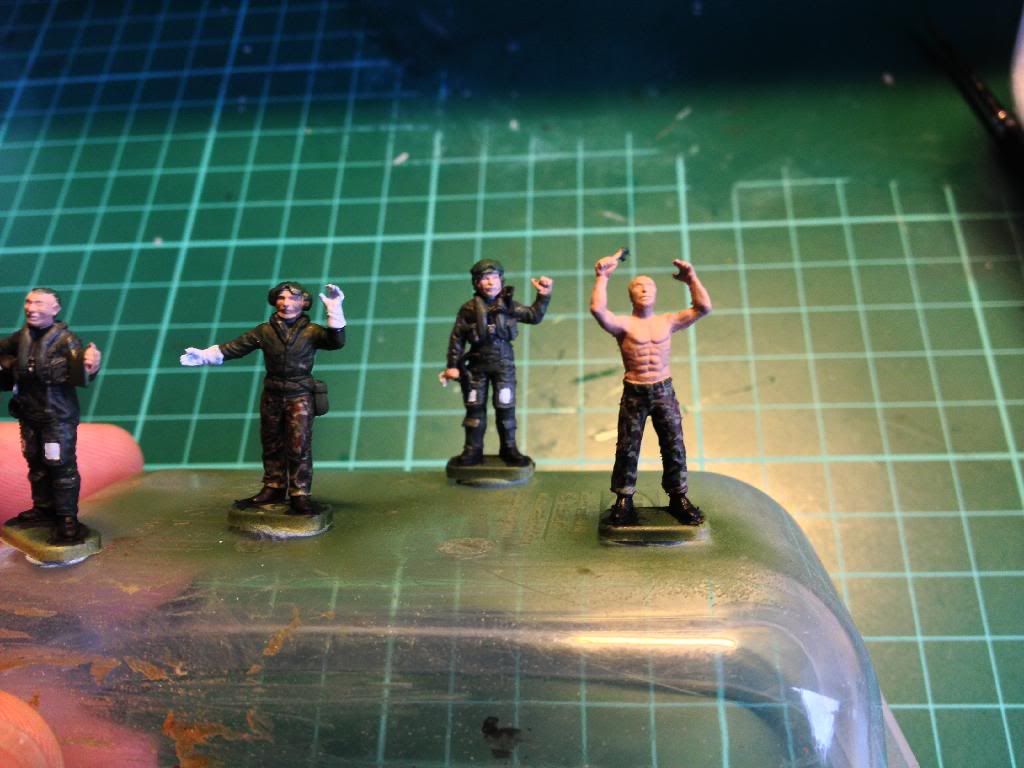
I then took the No.1 shadow and watered it down a bit. This I then applied to the recesses etc.
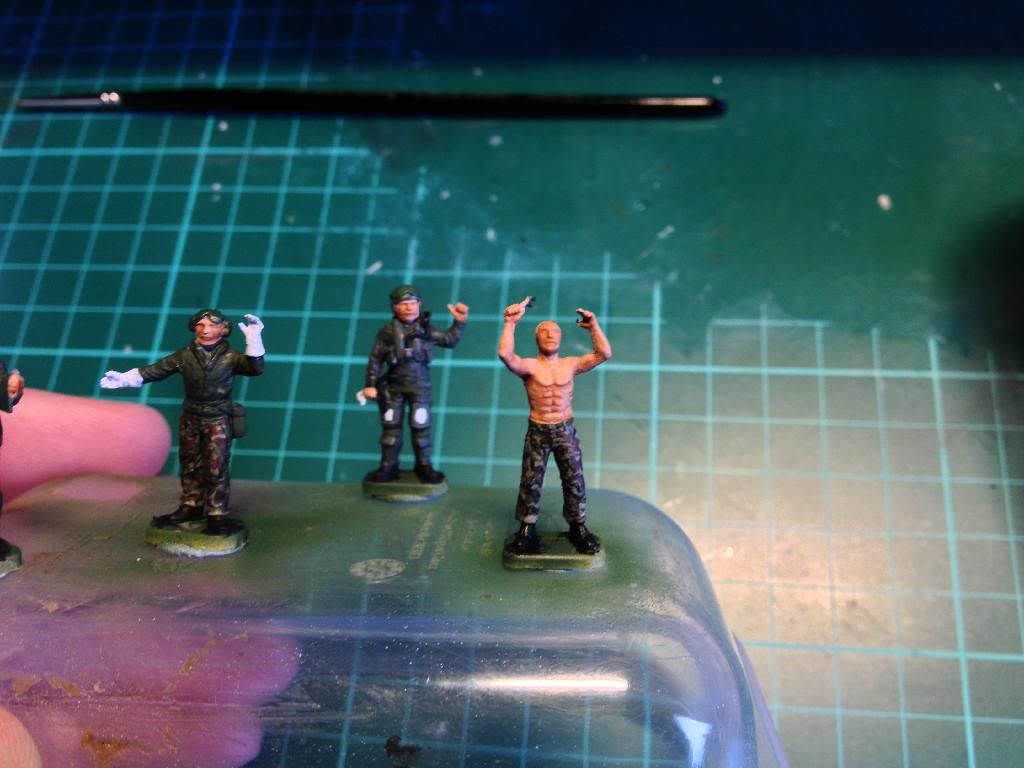
Then I took the No. Highlight and applied that to the higher areas, such as the pecs, biceps, nose, cheeks etc etc etc.
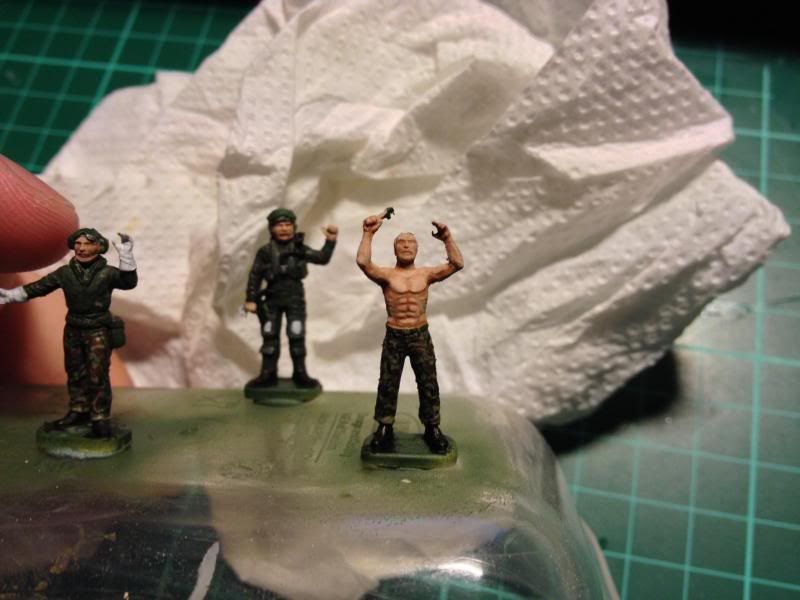
I then added a bit of the No. 2 Shadow to the deep recesses. I found this to be a bit too much constrast at this scale and toned it back a bit with some of the lighter shadow.
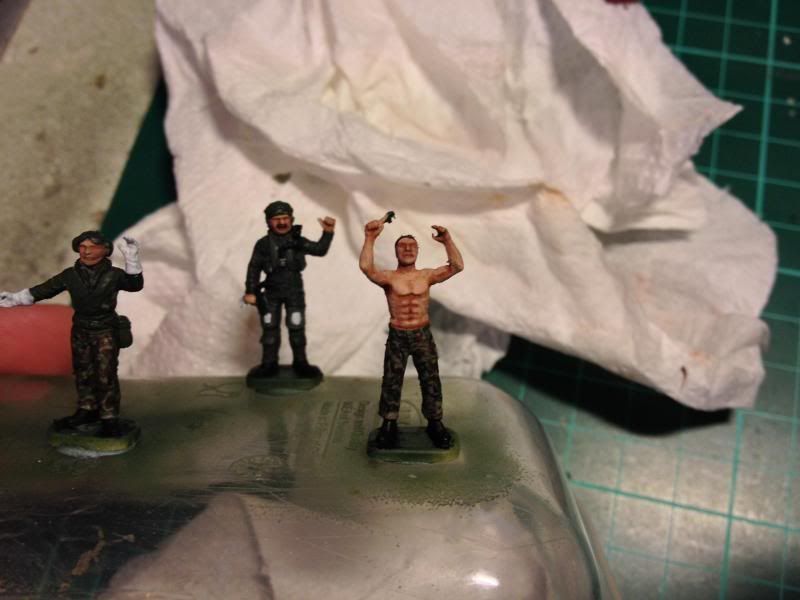
Some bad pics of the final result. I will take some better pics tomorrow so you can see it more clearly, and also see the fact I painted in their eyes....
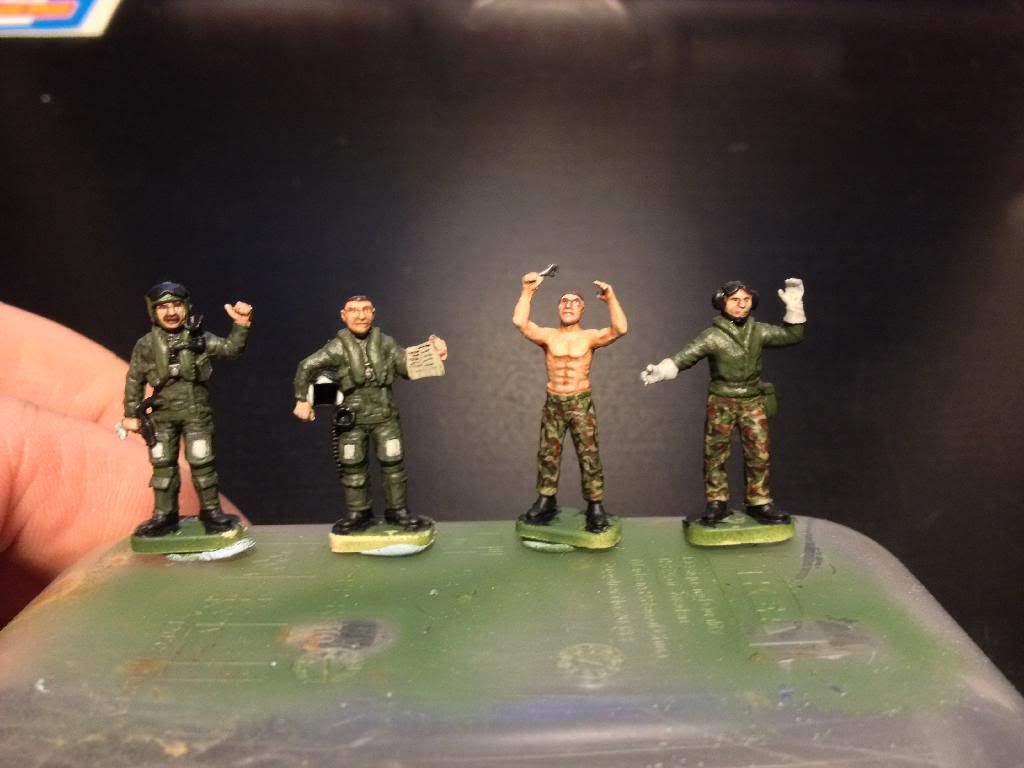
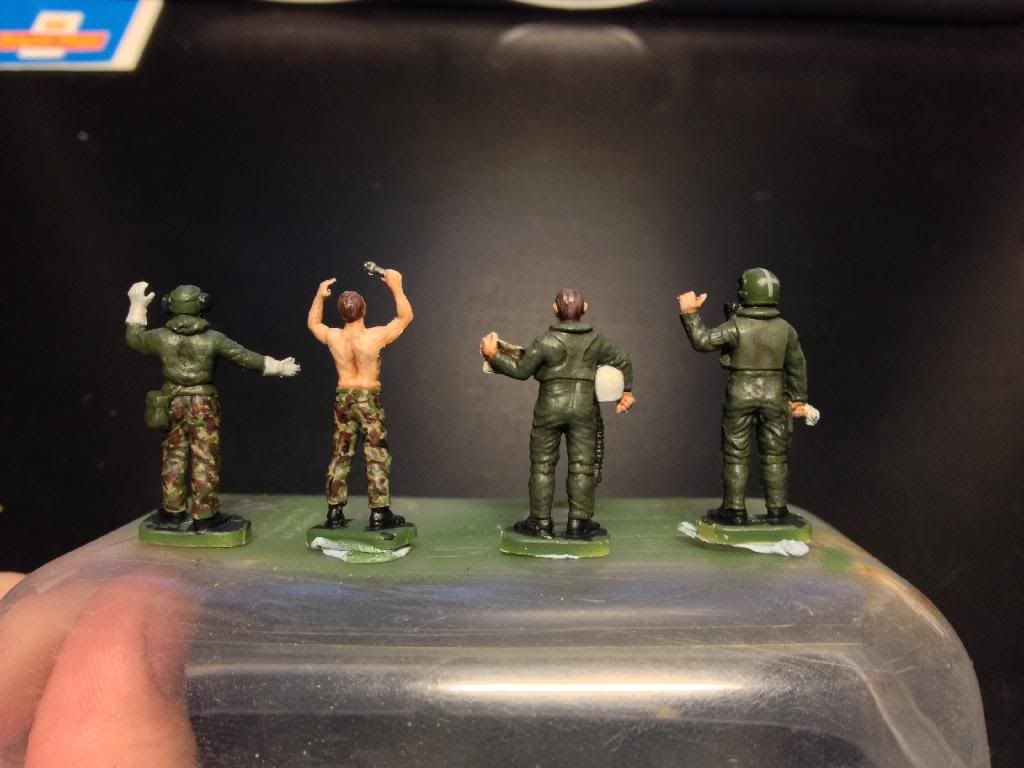
And a wee shot of the figs in place next to the GR.1. The guy with the gloves will be directing the GR.3 in to land in the final diorama.
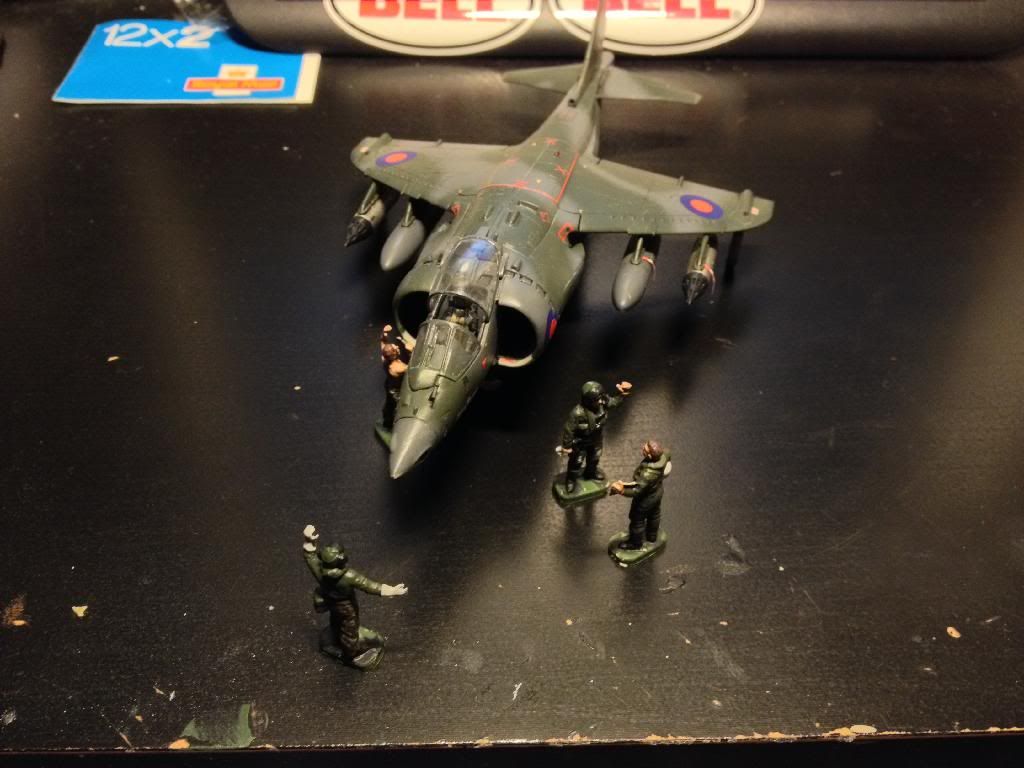
As usual, comments and criticisms are welcome. I hope you found the wee tutorial useful. Any questions, feel free to ask!
Ciao for now!
-
T3hGuppy
- Second Lieutenant
- Posts: 3467
- Joined: Wed Jun 12, 2013 11:20 pm
- Location: Bournemouth, UK
- Contact:
Re: Airfix Harrier GR.1/GR.3 Diorama
Liking the figures dude.
Thanks for the camo tutorial very useful will be giving that ago a some point.
Thanks for the camo tutorial very useful will be giving that ago a some point.
-
Paul
- Site Admin
- Posts: 12622
- Joined: Thu May 23, 2013 4:47 pm
- Location: Merseyside, England, UK
- Contact:
Re: Airfix Harrier GR.1/GR.3 Diorama
Nice work gav great job on the flesh dude
Products I use in my builds viewtopic.php?f=192&t=27234
My Paul-Ism page https://www.facebook.com/thebenchwithpaul/
Friday Live show here https://www.facebook.com/groups/120548821977514/
My Paul-Ism page https://www.facebook.com/thebenchwithpaul/
Friday Live show here https://www.facebook.com/groups/120548821977514/
-
wappynutter
- Chief Warrant Officer 3
- Posts: 2256
- Joined: Mon Jun 17, 2013 11:39 pm
- Location: Sutton in Ashfield, Nottinghamshire. UK
Re: Airfix Harrier GR.1/GR.3 Diorama
Excellent figure work dude...
....and at 1/72 makes it extra special....
You need to double post this paint section or rewrite with lots of pictures and stick it in the tips and tricks or how-to section for reference so it doesn't get lost !!!
Well done again, very smart indeed!!
....and at 1/72 makes it extra special....
You need to double post this paint section or rewrite with lots of pictures and stick it in the tips and tricks or how-to section for reference so it doesn't get lost !!!
Well done again, very smart indeed!!
