1/35 M8 Greyhound

Post updates of your builds here

Moderator: T3hGuppy

Post Reply
User avatar
Tiger213
Master Sergeant
Master Sergeant
Posts: 433
Joined: Wed Mar 02, 2016 10:39 am
Location: Slovakia
Contact:
Slovakia

1/35 M8 Greyhound

Post by Tiger213 »

Image
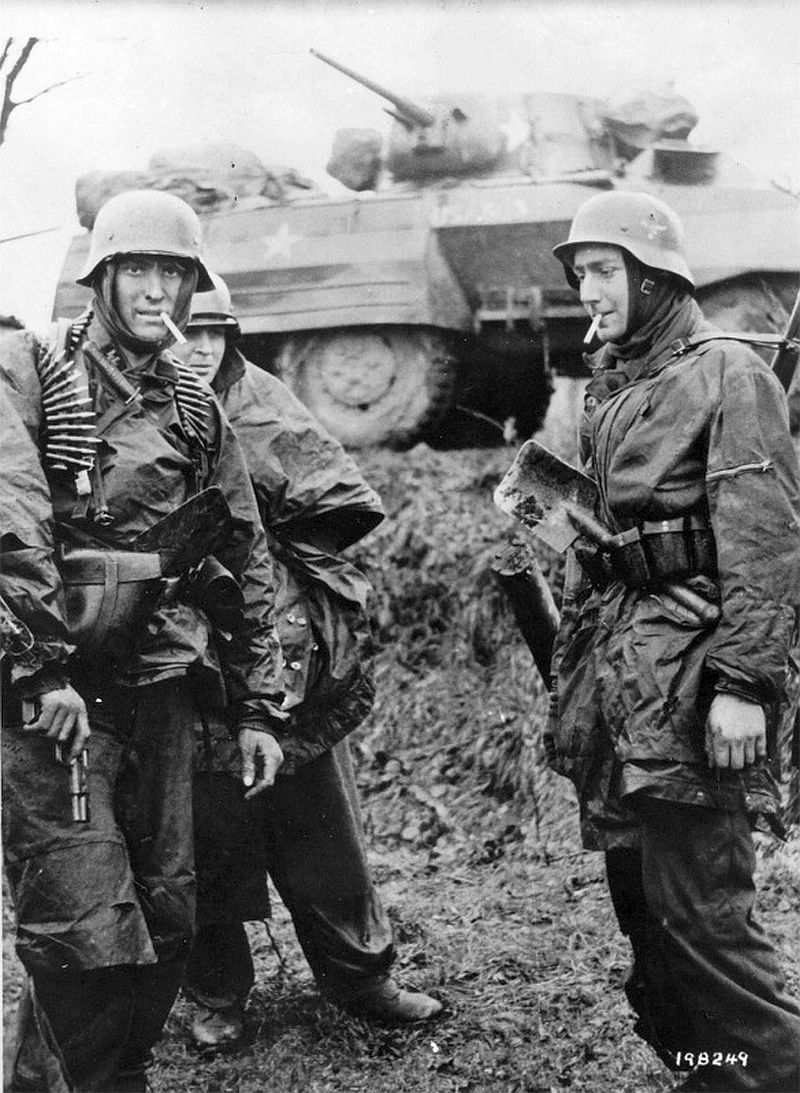
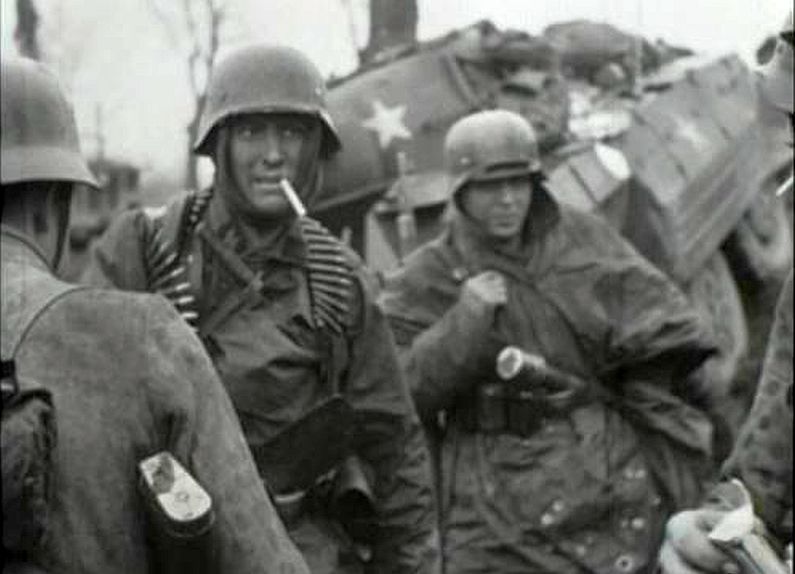
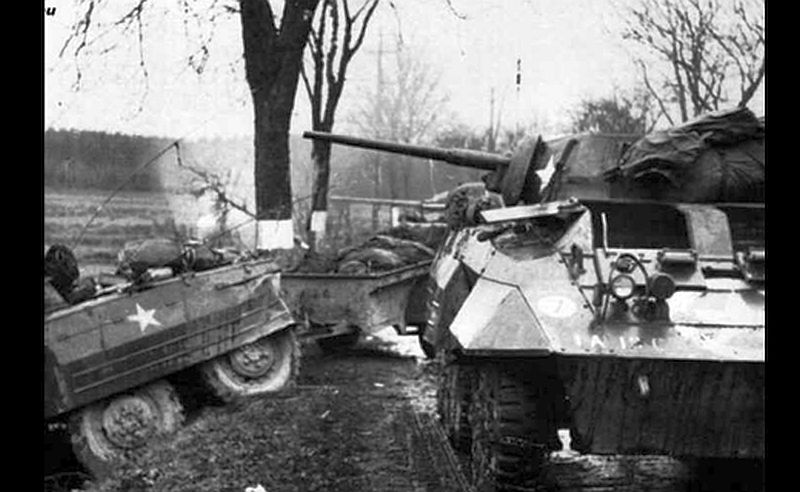
On 18th December 1944, early in the morning, vehicles and soldiers from C Troop, 18th and 32th Cavalry Reconnaissance Squadron, 14th Cavalry Group moving from Poteau direction Recht ran into infantry from Kampfgruppe Hansen, supported by Jagdpanzer IV. The ambush took part on a road near Poteau and americans lost 2 soldiers Charles L. Yost and Henry A. Brueninger as well as half-tracks, jeeps, Stuart light tanks and M8 Greyhounds.
Pictures taken after the battle by German propaganda camera man are very famous. My interest gained the abandoned vehicles, particularly the M8 Greyhound standing on the road behind the German soldiers.

Image

Image

Image

HISTORY:
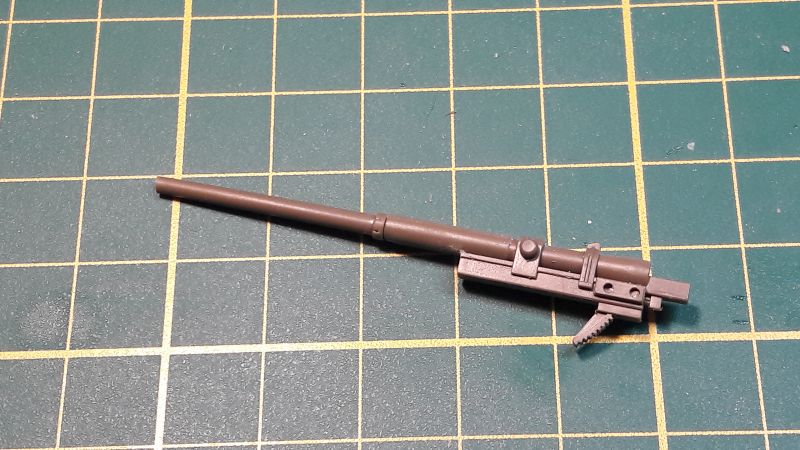
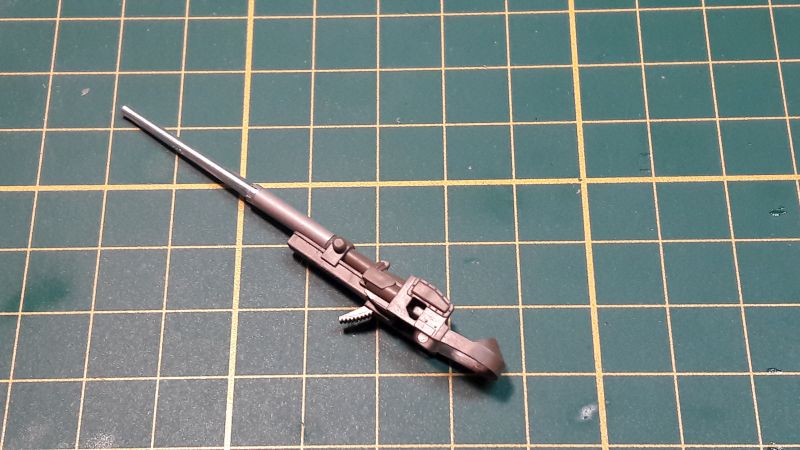
M8 Greyhound, IMHO a very interesting vehicle, produced by the Ford Motor Company, was a 6x6 wheeled armoured car used during WW2. The vehicle was used by United States and British troops, first seeing action in 1943. The was fitted with a 37 mm M6 gun as well as a .30 Browning machine gun. Additional .50 machine gun could be mounted on a turret ring. The 37mm main gun could fire HE, AP and canister rounds, usually carrying more HE and canister rounds as the 37mm AP rounds were generally ineffective against most German armor.
It had a crew of four consisting of the driver sitting in the left front with the co-driver/radio operator on the right. The turret had the commander/loader on the right side, while the gunner sat on the left. The M8 was powered by a six cylinder in-line, JXD Hercules 110hp gasoline engine.
The Ford built over 8,500 M8s between 1943 and 1945. A number of these vehicles were sent to the British under Lend Lease.
It’s mobility became it’s greatest asset however it’s light armour was susceptible to anti-tank mines. Hence many crews would stack sandbags over the vehicle to help defend against any such attack. Many Third World countries operated this vehicle after the WWII.

Sources:
PALLUD, Jean Paul. Battle of the Bulge, Then and now.
ZALOGA, Steven. The Battle of the Bulge.
LEHMANN, Rudolf. The Leibstandarte IV/1-2 .
ZALOGA, Steven. M8 Greyhound Light Armored Car 1941–91.
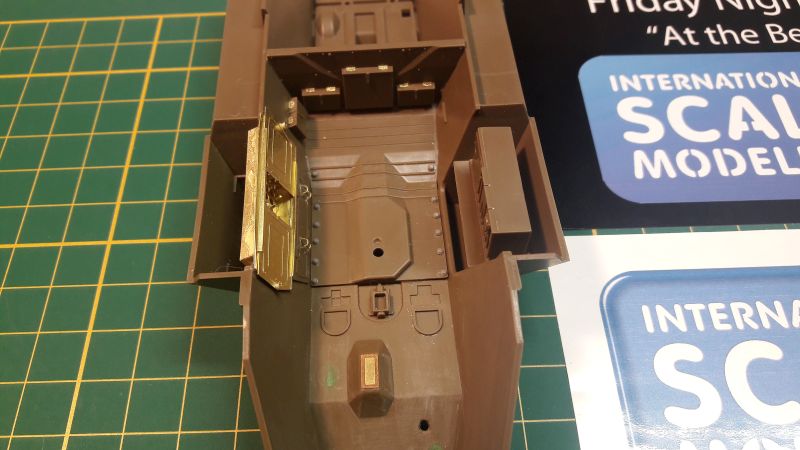
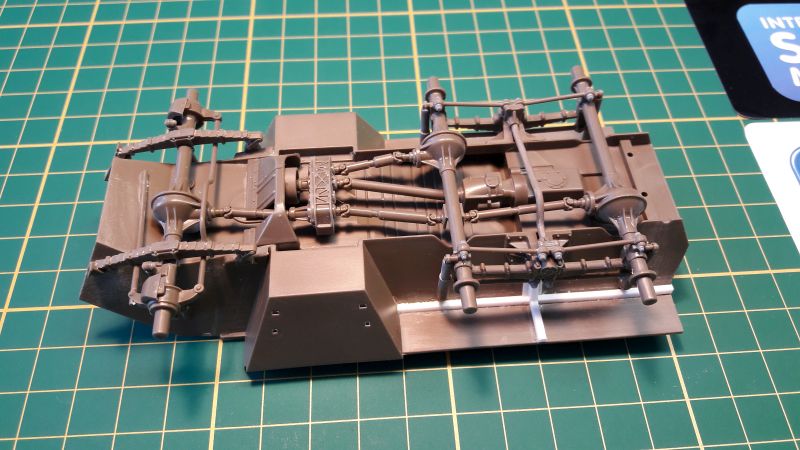
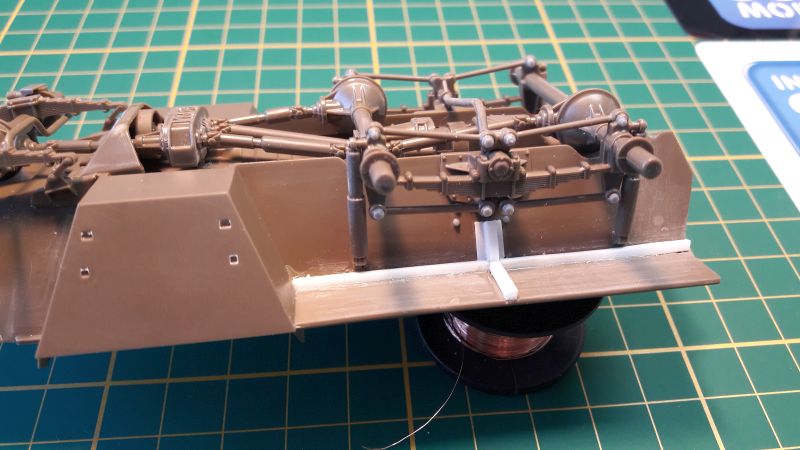
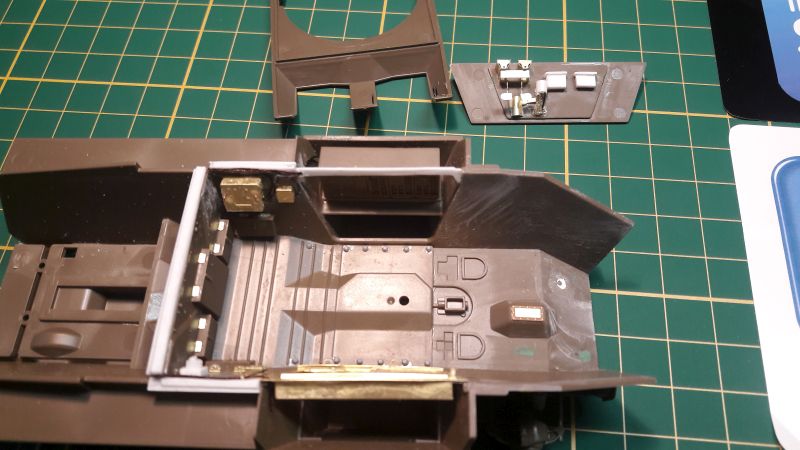

THE MODEL:
This is going to be my first model after a few months break. I was very happy to see ISM picked this topic.

Image

Image

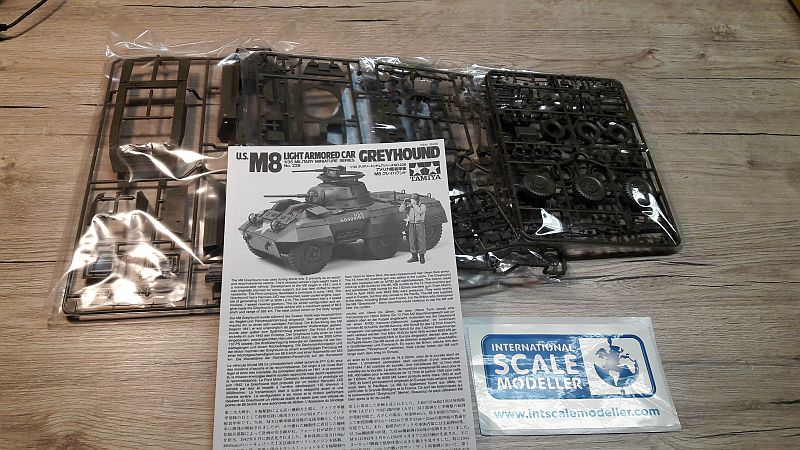
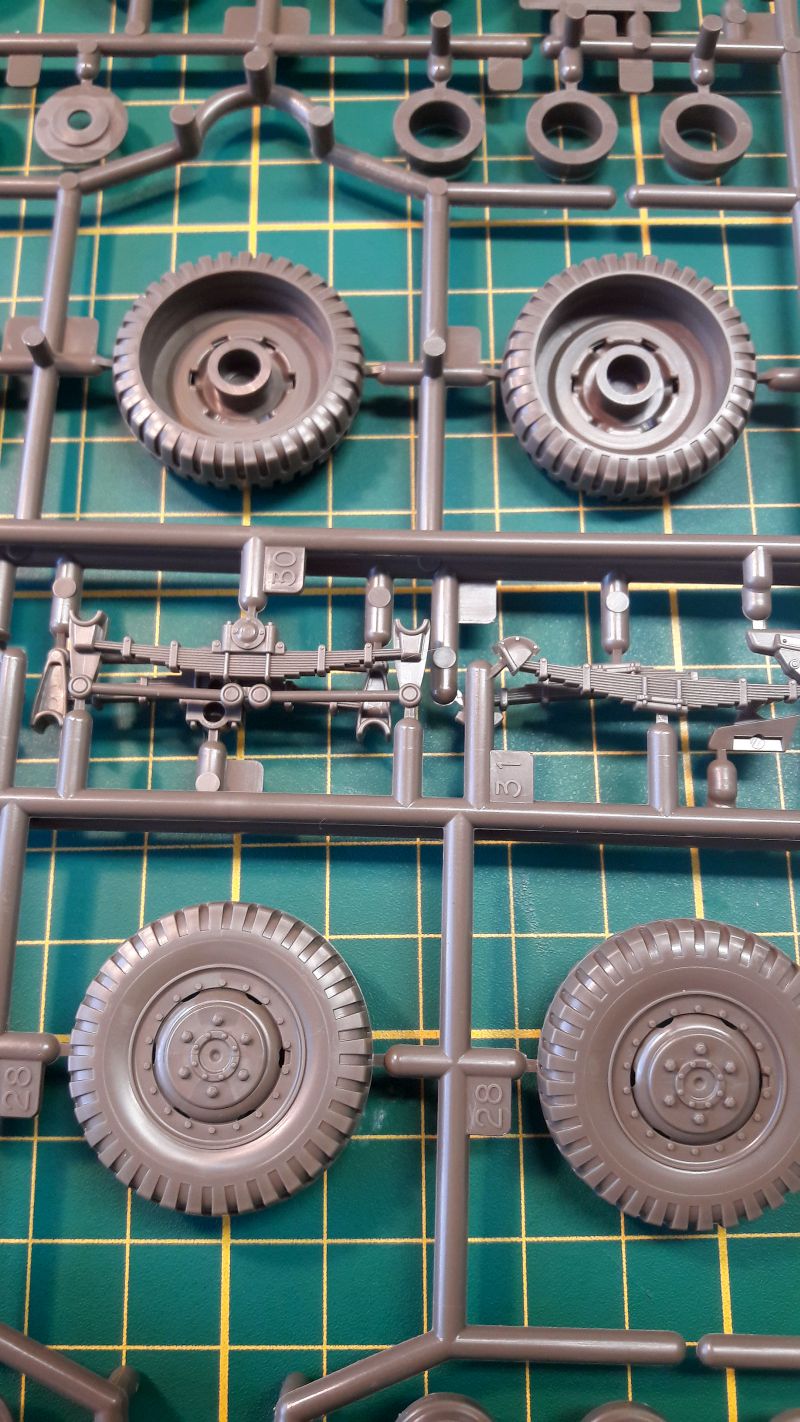
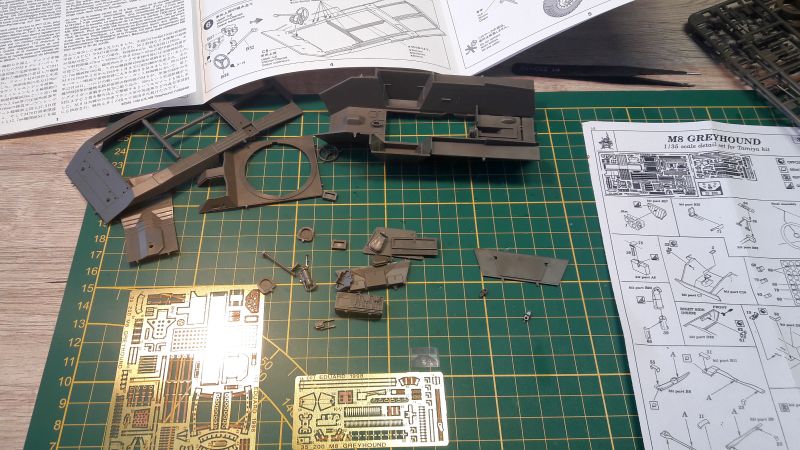
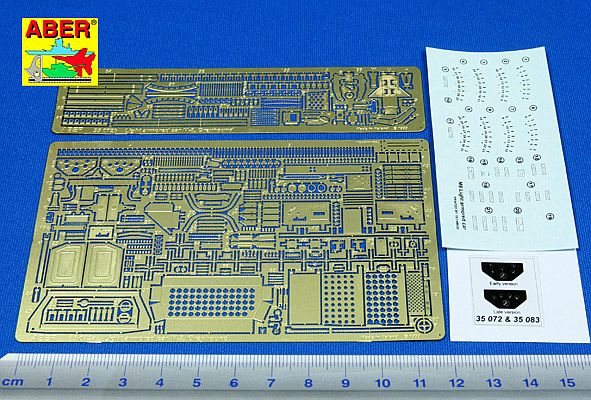
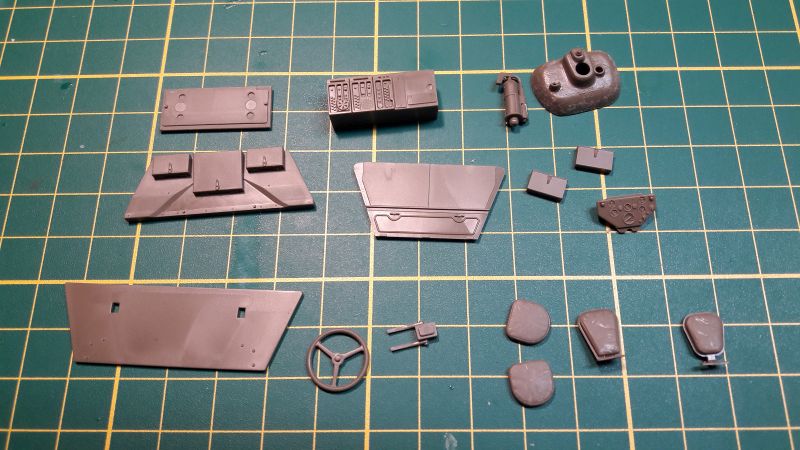
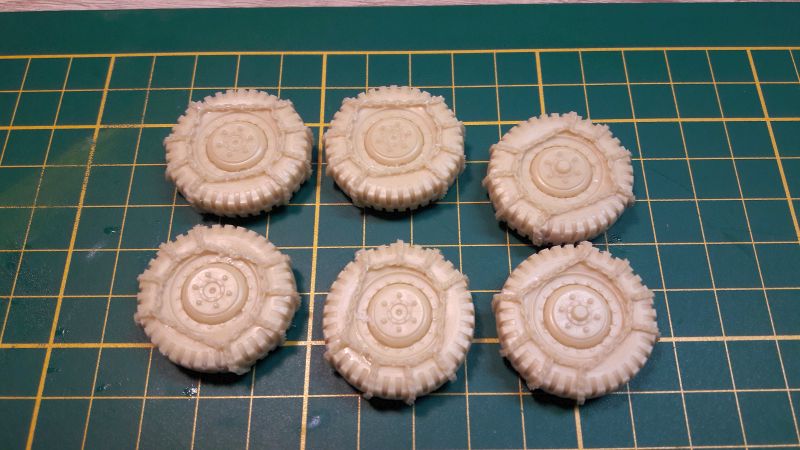
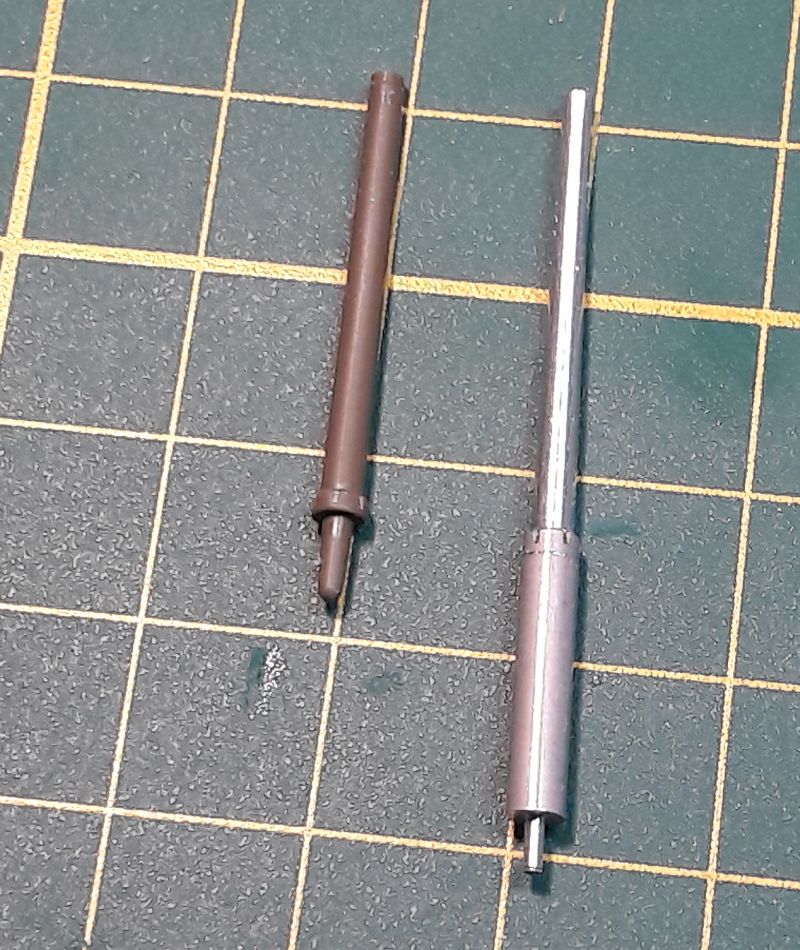
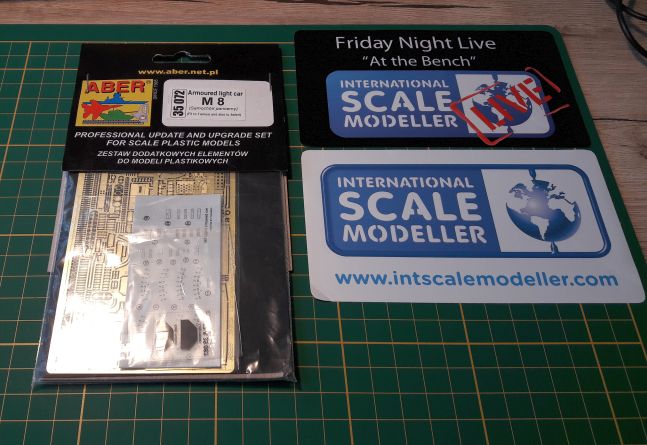
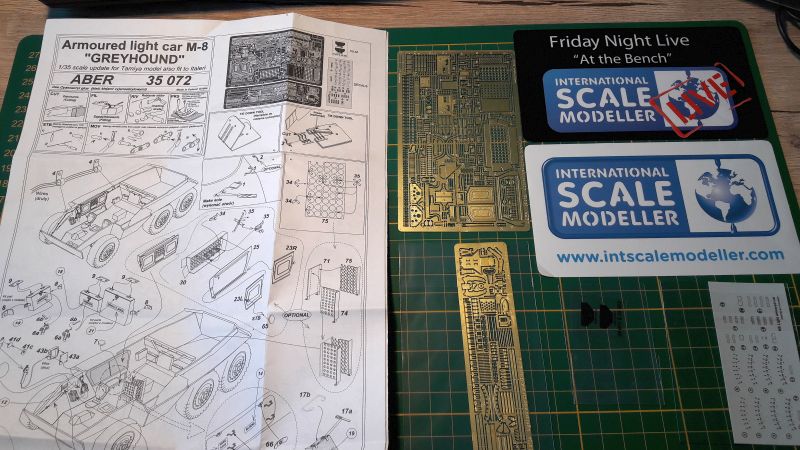
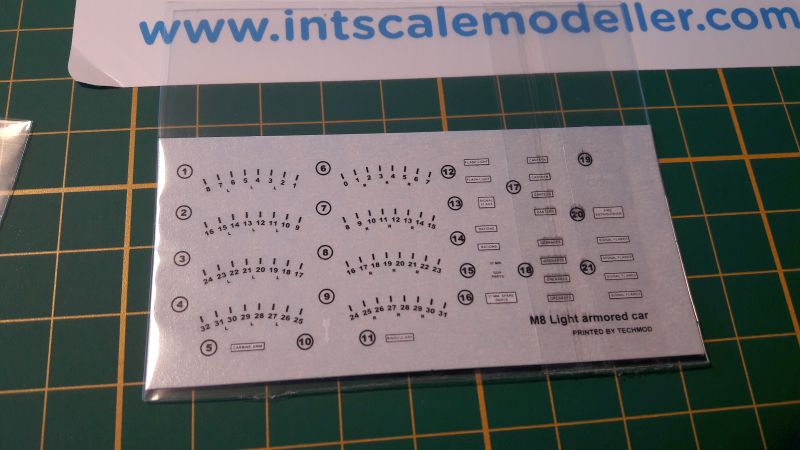
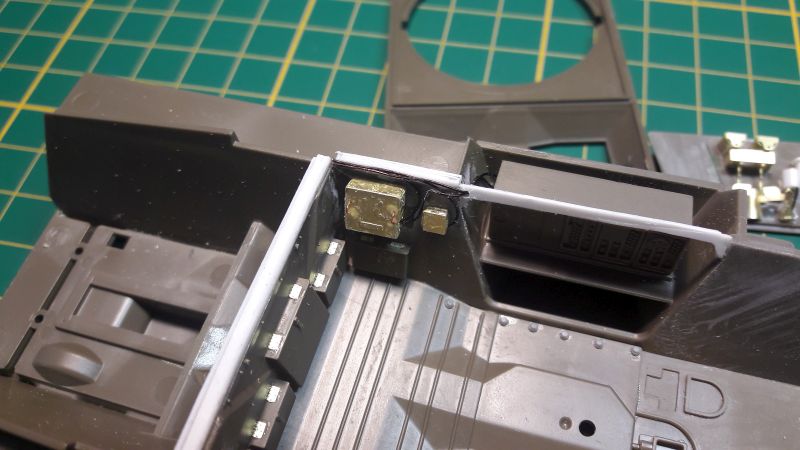
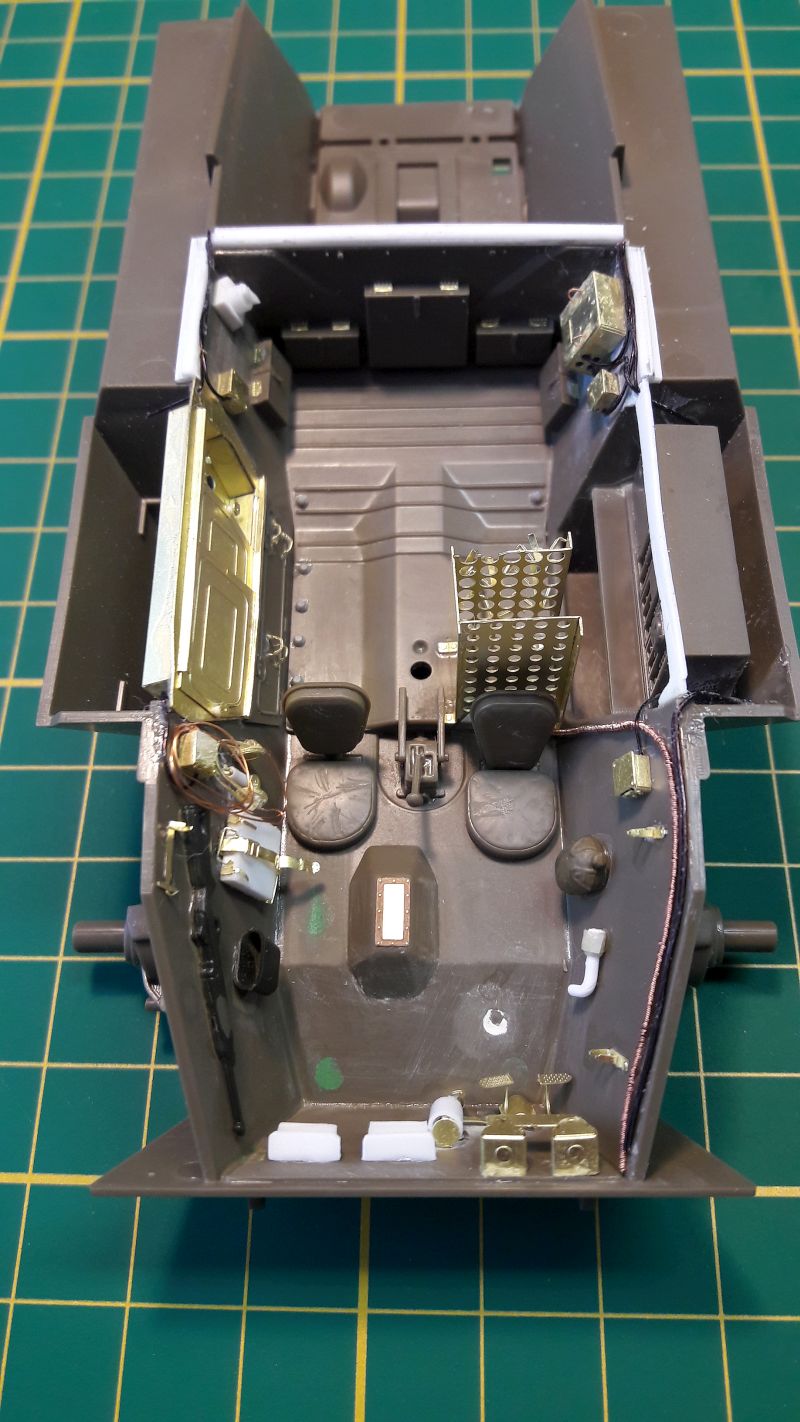
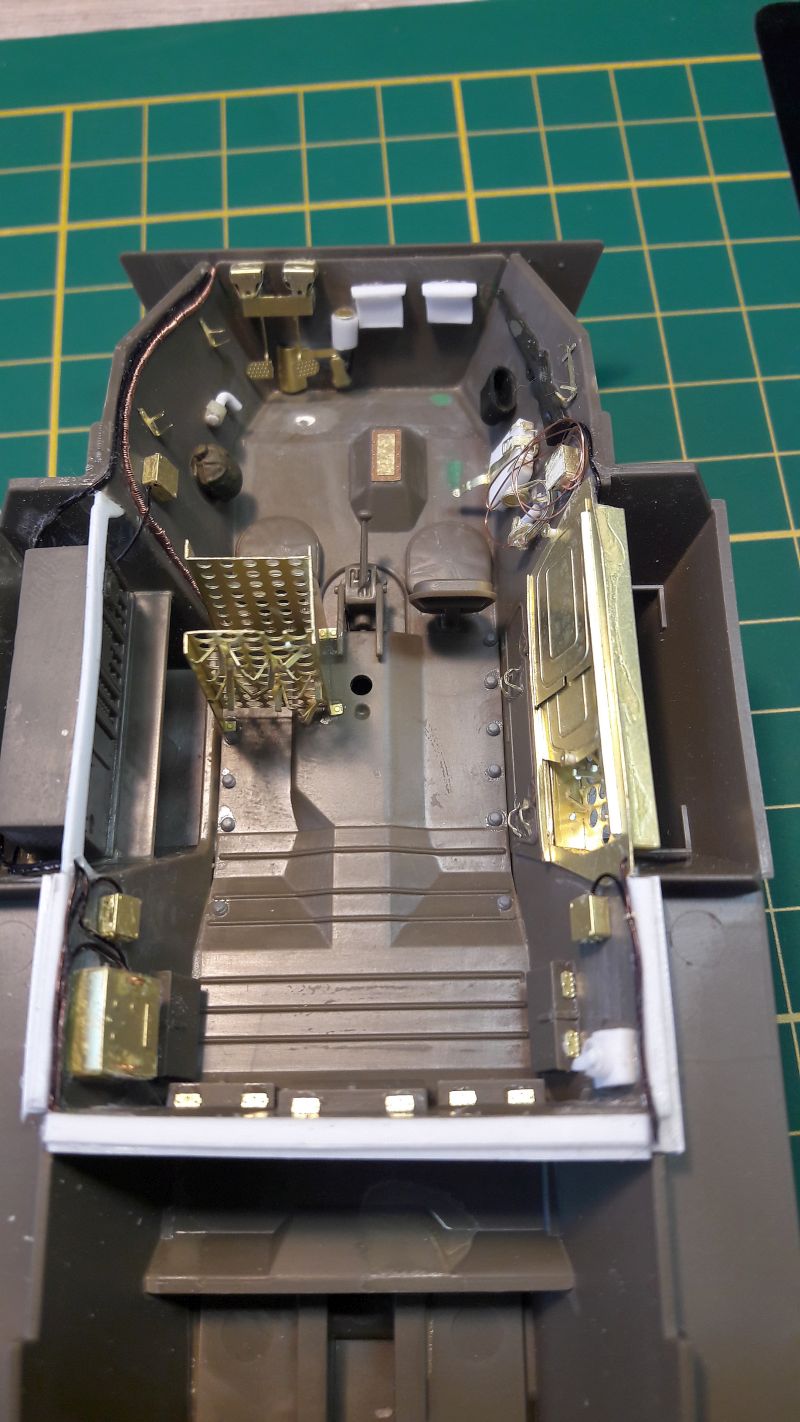
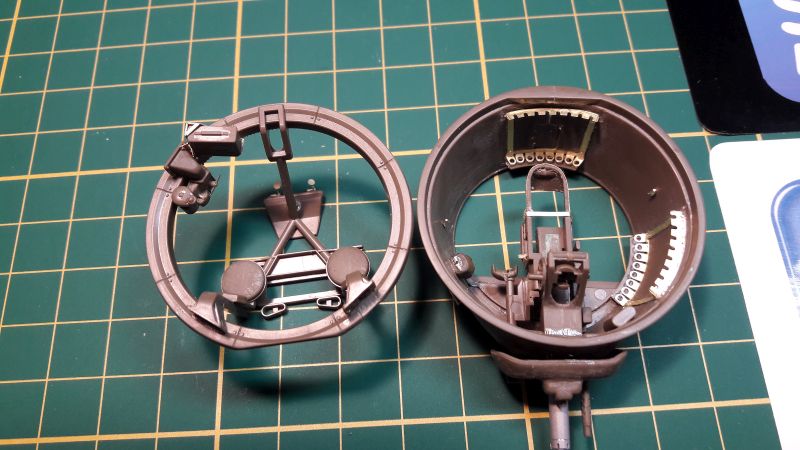
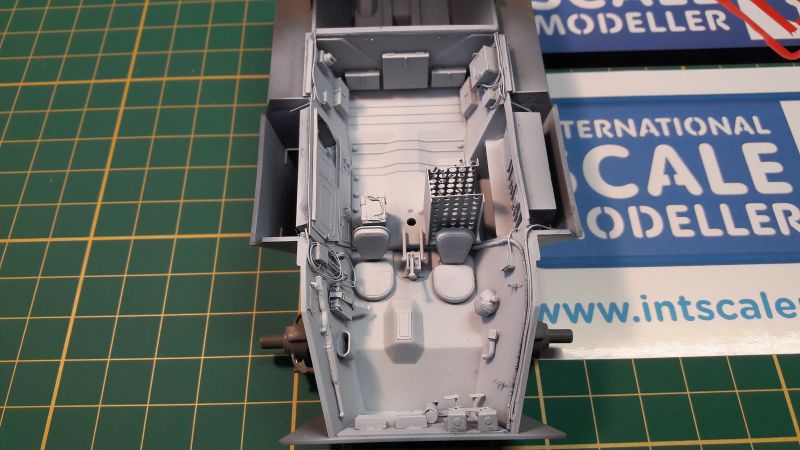
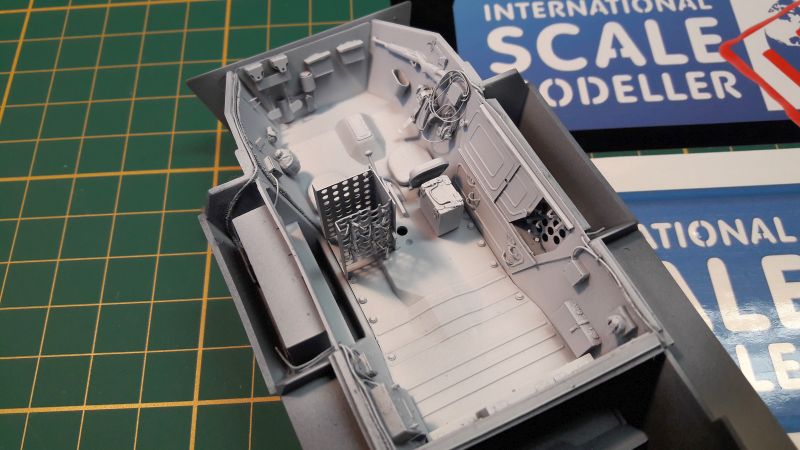
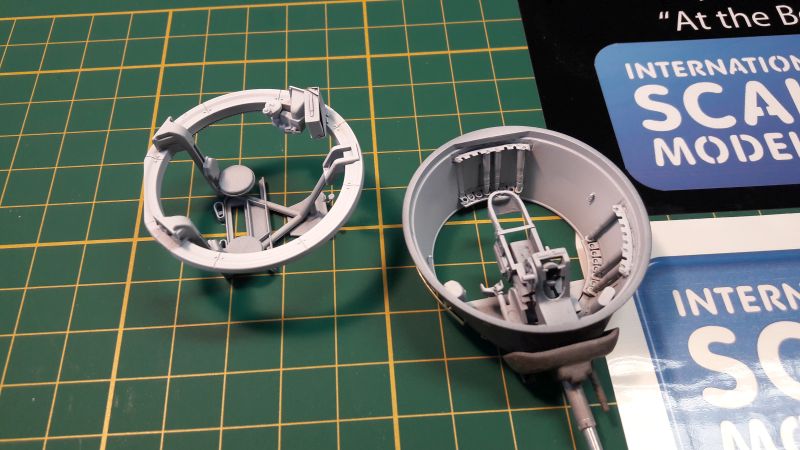
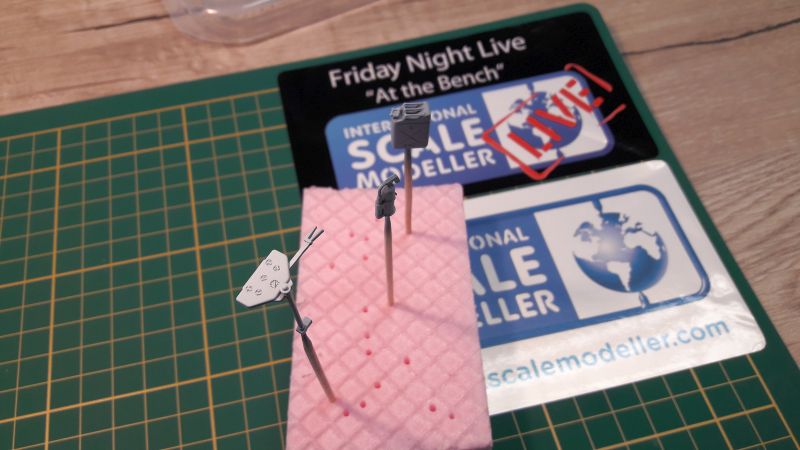
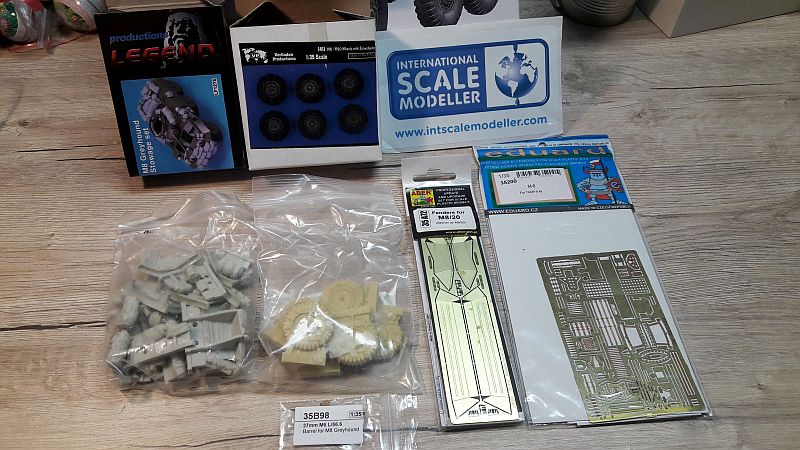
The kis is Tamiya 1/35 35228 M8 Greyhound - U.S. Light Armored Car, supported by several after marked products – RB 35B98 metal barrel, Aber 35A72 Fenders, Eduard 35200 Photoetched parts, Legend LF1275 Stowage set and Verlinden 1411 Wheels and Snowchains.

Image

I will post the build progress as well as my experience with the aftermarket products, as these I have not been using very often. I am looking forward as this model was a couple of years resting on the shelf.

:cheers2:
TheNordus
Master Sergeant
Master Sergeant
Posts: 453
Joined: Wed Jul 02, 2014 10:03 pm
Location: Finland
Finland

Re: 1/35 M8 Greyhound

Post by TheNordus »

Looking forward to this! I have one without any aftermarket in the stash and looking for inspiration!
-Tommi

There's always armour on my work bench.
User avatar
Tiger213
Master Sergeant
Master Sergeant
Posts: 433
Joined: Wed Mar 02, 2016 10:39 am
Location: Slovakia
Contact:
Slovakia

Re: 1/35 M8 Greyhound

Post by Tiger213 »

TheNordus wrote: Sat Jan 19, 2019 2:33 am Looking forward to this! I have one without any aftermarket in the stash and looking for inspiration!
Thanks mate ;)
From what I can say right now, the wheels are a tragedy.
Evidence enclosed:
Image

I am very happy to have the replacement from Verlinden. I belive there are also wheels without snowchains - I think DEF model is one of the producers. Really recommend to buy at least the wheels.

:cheers2:
User avatar
Tiger213
Master Sergeant
Master Sergeant
Posts: 433
Joined: Wed Mar 02, 2016 10:39 am
Location: Slovakia
Contact:
Slovakia

Re: 1/35 M8 Greyhound

Post by Tiger213 »

My weekend progress:
Image

I started building with the interior, only to realize, there is almost no interior in the kit :scratch:: Moreover, the Eduard PE include only very few parts for the interior /ammo box, turret ammo rack and something for the drivers section/ which is not helping me at all :bash:
I have to scratch some parts or look for other PE set

For those interested - think twice before buying Eduard 35200 Photoetched parts.

BUT, I have found an old Italery M20 kit including various american decals /a present from my colleague/, which might be useful.
Image

Here are some useful parts I have take from it:
Image

:cheers2:
User avatar
gaz45
Chief Warrant Officer 3
Posts: 1971
Joined: Mon Jan 06, 2014 3:35 pm
Location: Nottingham uk
Great Britain

Re: 1/35 M8 Greyhound

Post by gaz45 »

Nice choice there mate
User avatar
Tiger213
Master Sergeant
Master Sergeant
Posts: 433
Joined: Wed Mar 02, 2016 10:39 am
Location: Slovakia
Contact:
Slovakia

Re: 1/35 M8 Greyhound

Post by Tiger213 »

gaz45 wrote: Thu Jan 24, 2019 12:01 pm Nice choice there mate
Thank you very much, mate.

:cheers2:
User avatar
Tiger213
Master Sergeant
Master Sergeant
Posts: 433
Joined: Wed Mar 02, 2016 10:39 am
Location: Slovakia
Contact:
Slovakia

Re: 1/35 M8 Greyhound

Post by Tiger213 »

So, I have ordered a new PE set for this model. My choice is Aber 35072, it includes various details for interior AND decals for interior and turret ring.
I know I will have to scratch some parts, but this kit PE set looks much better than the Eduard set.

Image

Image

In the mean time, I have been studying available materials about the vehicle and its interior...as well as cleaning parts and preparing.

Image

Image

I have cleaned the wheels with snow chains, they look very good.

Image

As the original wheels from the kit have no use, I may use one of it as spare wheel. Can you tell the difference? :whistle:

Image

:cheers2:
User avatar
Tiger213
Master Sergeant
Master Sergeant
Posts: 433
Joined: Wed Mar 02, 2016 10:39 am
Location: Slovakia
Contact:
Slovakia

Re: 1/35 M8 Greyhound

Post by Tiger213 »

Slowly progressing... the 37mm gun:

The original barrel and RB metal barel compared:
Image

The look of the barrel from the kit:
Image

The metal barrel in place:
Image

:cheers2:
User avatar
chief5437
Major
Major
Posts: 4810
Joined: Fri May 31, 2013 1:25 pm
Location: England
England

Re: 1/35 M8 Greyhound

Post by chief5437 »

this looks like its going to be an awesome build, some great after market parts you've got there! good luck with the rest of the build :th: :th:
Chief
User avatar
Tiger213
Master Sergeant
Master Sergeant
Posts: 433
Joined: Wed Mar 02, 2016 10:39 am
Location: Slovakia
Contact:
Slovakia

Re: 1/35 M8 Greyhound

Post by Tiger213 »

chief5437 wrote: Sun Feb 03, 2019 3:27 pm this looks like its going to be an awesome build, some great after market parts you've got there! good luck with the rest of the build :th: :th:
Thank you for your support, mate. The PE part have finally arrived! :banana:

:cheers2:
User avatar
Tiger213
Master Sergeant
Master Sergeant
Posts: 433
Joined: Wed Mar 02, 2016 10:39 am
Location: Slovakia
Contact:
Slovakia

Re: 1/35 M8 Greyhound

Post by Tiger213 »

So, finally at home:
Image

The PE set from Aber looks fantastic, looking forward...hope I will not mess up:
Image

One detail I am very happy about - decals for interior and turret ring:
Image

:cheers2:
User avatar
chief5437
Major
Major
Posts: 4810
Joined: Fri May 31, 2013 1:25 pm
Location: England
England

Re: 1/35 M8 Greyhound

Post by chief5437 »

lots of shiny pe there! have fun buddy :th: :th:
Chief
User avatar
Tiger213
Master Sergeant
Master Sergeant
Posts: 433
Joined: Wed Mar 02, 2016 10:39 am
Location: Slovakia
Contact:
Slovakia

Re: 1/35 M8 Greyhound

Post by Tiger213 »

The fun begins ;)

Weekend progress - added some bolts on the floor, added some small details and made the right box for ammo - the doors are working :crazy:

Image

Image

:cheers2:
User avatar
Tiger213
Master Sergeant
Master Sergeant
Posts: 433
Joined: Wed Mar 02, 2016 10:39 am
Location: Slovakia
Contact:
Slovakia

Re: 1/35 M8 Greyhound

Post by Tiger213 »

I had to move away from interior for a while, as there was a hole in the front part due to steering conection. To fill it, I needed to finish the suspension.
Another small progress - suspension done:

Image

I added some small details - bolts and a sort of "rail" based on the pictures I have. I know it is not perfect, however I believe better than the empty space before ;)

Image

Image

:cheers2:
User avatar
Tiger213
Master Sergeant
Master Sergeant
Posts: 433
Joined: Wed Mar 02, 2016 10:39 am
Location: Slovakia
Contact:
Slovakia

Re: 1/35 M8 Greyhound

Post by Tiger213 »

Weekend progress:

I added some details in the interior, wires and PE parts. The driver's pedals are also ready.
Image

The rear parts of the interior is now done.
Image

For the front part I needed a hose with structure, so I made one using these two wires.
Image

:cheers2:
User avatar
Tiger213
Master Sergeant
Master Sergeant
Posts: 433
Joined: Wed Mar 02, 2016 10:39 am
Location: Slovakia
Contact:
Slovakia

Re: 1/35 M8 Greyhound

Post by Tiger213 »

Interior done :banana:
Aber PE parts are really good to work with, have used more than I thought, not all of them, some parts are scratched:

Image

Image

:cheers2:
User avatar
alextheblue
Chief Warrant Officer 5
Posts: 2679
Joined: Mon Jul 15, 2013 11:30 am
Location: Slough, United Kingdom
Contact:
Scotland

Re: 1/35 M8 Greyhound

Post by alextheblue »

Great interior detail, that's going to shine once its painted and weathered! :th: :banana:
"Courage is feeling fear and acting anyway."

www.alextheblue.com
User avatar
Tiger213
Master Sergeant
Master Sergeant
Posts: 433
Joined: Wed Mar 02, 2016 10:39 am
Location: Slovakia
Contact:
Slovakia

Re: 1/35 M8 Greyhound

Post by Tiger213 »

alextheblue wrote: Sat Mar 02, 2019 12:46 pm Great interior detail, that's going to shine once its painted and weathered! :th: :banana:
Thank you for your kind words, mate. I hope it will ;)
I'm going to paint it after the turret interior is done.

:cheers2:
User avatar
Kevthemodeller
Lieutenant Colonel
Lieutenant Colonel
Posts: 5642
Joined: Sat Mar 26, 2016 8:31 am
Location: Newton Abbot UK
England

Re: 1/35 M8 Greyhound

Post by Kevthemodeller »

Very nice PE work :clap:
Kev

On the bench:
Border Model FOCKE-WULF W190A-8 R2 - 8
User avatar
gaz45
Chief Warrant Officer 3
Posts: 1971
Joined: Mon Jan 06, 2014 3:35 pm
Location: Nottingham uk
Great Britain

Re: 1/35 M8 Greyhound

Post by gaz45 »

Great detail there mate with the PE looks great
User avatar
Tiger213
Master Sergeant
Master Sergeant
Posts: 433
Joined: Wed Mar 02, 2016 10:39 am
Location: Slovakia
Contact:
Slovakia

Re: 1/35 M8 Greyhound

Post by Tiger213 »

gaz45 wrote: Wed Mar 06, 2019 11:10 am Great detail there mate with the PE looks great
Kevthemodeller wrote: Mon Mar 04, 2019 9:17 am Very nice PE work :clap:
Thank you guys. This is my first "massive" use of PE part and though it is very time consuming, I like the results.
Aber PE are very good, much better than Eduard and really worth buying.

:cheers2:
User avatar
Tiger213
Master Sergeant
Master Sergeant
Posts: 433
Joined: Wed Mar 02, 2016 10:39 am
Location: Slovakia
Contact:
Slovakia

Re: 1/35 M8 Greyhound

Post by Tiger213 »

Turret interior done :banana:

Image

And some details on turret exterior:

Image

Now, finally, let's go painting

:cheers2:
User avatar
Kevthemodeller
Lieutenant Colonel
Lieutenant Colonel
Posts: 5642
Joined: Sat Mar 26, 2016 8:31 am
Location: Newton Abbot UK
England

Re: 1/35 M8 Greyhound

Post by Kevthemodeller »

Very nice PE work :clap:
Kev

On the bench:
Border Model FOCKE-WULF W190A-8 R2 - 8
User avatar
Tiger213
Master Sergeant
Master Sergeant
Posts: 433
Joined: Wed Mar 02, 2016 10:39 am
Location: Slovakia
Contact:
Slovakia

Re: 1/35 M8 Greyhound

Post by Tiger213 »

After a bit of a break, I was quite ill...a flu or something, but got me more that a week away from everything...

Some painting after all...

Black primer:

Image

And some white as the interior will be mostly in this colour:

Image

Image

Image

And the base for dashboard, fire extinguisher and a jerry can.

Image

:cheers2:
robwuk
Master Sergeant
Master Sergeant
Posts: 358
Joined: Mon Jun 29, 2020 3:19 pm
England

Re: 1/35 M8 Greyhound

Post by robwuk »

very nice, was there ever any more progress?... I have the M8 and have been wondering about some AM for it - the ABER set looks VERY nice but above my skill (need to learn to solder before I pull the plug)... will get a barrel as well, as for wheels, will have to have a look
User avatar
digger303
General
General
Posts: 15920
Joined: Mon Mar 16, 2015 10:01 am
Location: Western Australia
Australia

Re: 1/35 M8 Greyhound

Post by digger303 »

Tiger213 wrote: Fri Mar 29, 2019 9:24 pm After a bit of a break, I was quite ill...a flu or something, but got me more that a week away from everything...

Some painting after all...

Black primer:

Image

And some white as the interior will be mostly in this colour:

Image

Image

Image

And the base for dashboard, fire extinguisher and a jerry can.

Image

:cheers2:
Very nice. My burning question is did the fire extinguisher come with the kit ? .....I'm in dire need of one just like that.
:th: :th: :cheers2:
Listen and appear wise
Image
Image

scalemates stash https://www.scalemates.com/profiles/mat ... ION[]=Kits
Image
Post Reply

Return to “Build threads”