More Aber wow's

Post Reply
User avatar
Kevthemodeller
Lieutenant Colonel
Lieutenant Colonel
Posts: 5631
Joined: Sat Mar 26, 2016 8:31 am
Location: Newton Abbot UK
England

More Aber wow's

Post by Kevthemodeller »

As I mentioned in another post I was having issues with parts not being scribed, making bending very difficult and even damaging areas of a bend.

I've just started on the kit for the M4A3 (35 032) where many parts are applicable to the E8, mainly the turret, hull and MG's. I started on the hatch periscopes, these appear to be universal on all Sherman's. There are three parts to the internal and the same to the external if you include the protection cage. The issues here are two fold excuse the pun: -

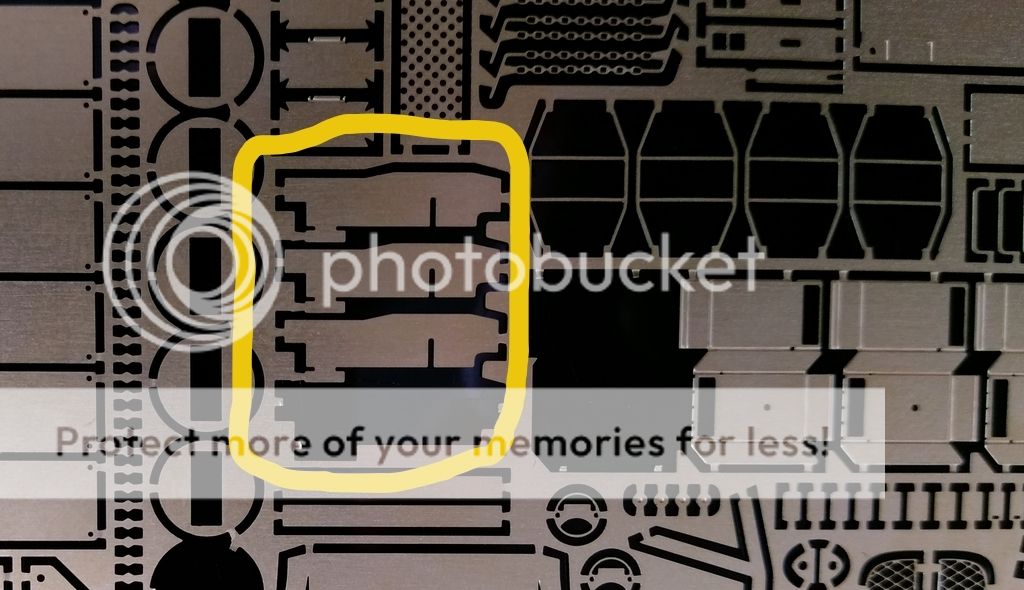
1. Scribe marks for folds missing, this shot shows you part 21 encircled in yellow, which must be folded into a oblong tube as you can see there are no scribe marks.
Image

This shot shows the tree parts that make up the inner periscope from left to right are parts 22, 21, 20, this also shows the reverse side of of 21.

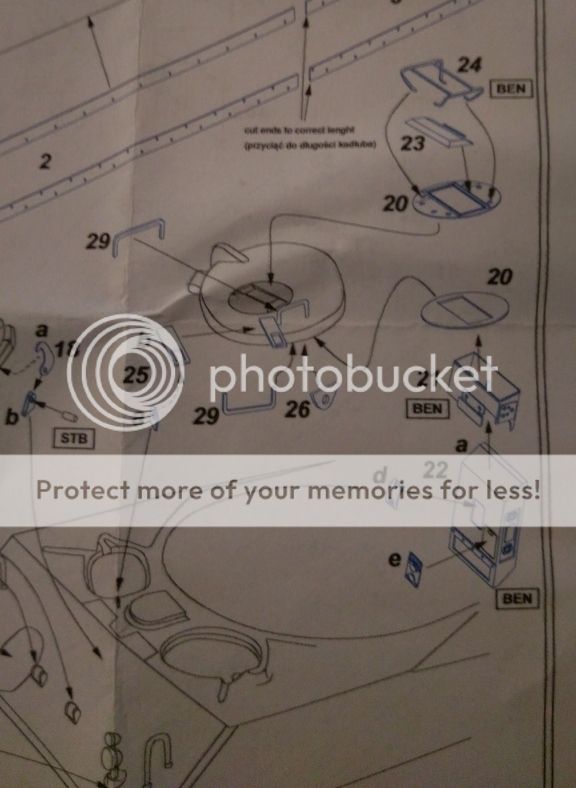
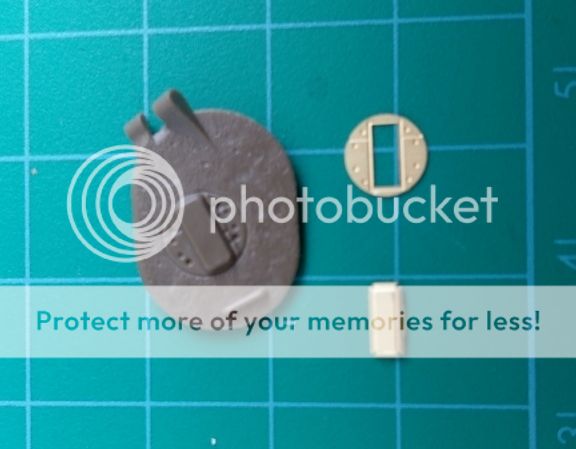
2. This shot shows the external periscope parts. I'm assuming part 20 is supposed to fit over and around the moulded periscope and part 23 over the top? If so 20 will not fit over the aperture is to small, or are you supposed to remove all the moulding on the hatch?
Image

This is a shot of the instructions
Image

Now it's very possible I've got this all wrong as this is my first experience with photoetch, you don't get scribing s on all folds and you're supposed to do a lot more removing of manufactures mouldings. I believe this is the case with the barrel lock stay mounts you can just see it off the left hand side, it would certainly would help if it was stated.

All help is gratefully received
Kev

On the bench:
Border Model FOCKE-WULF W190A-8 R2 - 8
User avatar
chief5437
Major
Major
Posts: 4810
Joined: Fri May 31, 2013 1:25 pm
Location: England
England

Re: More Aber wow's

Post by chief5437 »

I'm reading this in bed, full of man flu, so forgive me if I've missed anything. Generally, you need to remove the detail that is being replaced by PE, I would say definitely in this case. It would've been nice of them to put fold lines on the PE, maybe they're testing your abilities, lol!!
Chief
User avatar
Vleugelmoer
Sergeant Major of the Army
Posts: 1011
Joined: Mon Mar 21, 2016 3:06 pm
Location: Geleen, Limburg, The Netherlands
Contact:

Re: More Aber wow's

Post by Vleugelmoer »

Hi Kev,

Just had a look on the Aber website www.aber.net.pl so I could have a look at the complete instructions. As I already thought, from my experience with this brand, any area that is colored light grey is to be removed. On the hatches on the lower hull it actually says CUT outlined in a box.

Good luck on the reproscopes.

Best regards, happy modeling and keep sticking PE in this case ;)
Damm the glue is getting to me :crazy:

On the Bench:

1:35 Italeri Jeep Follow Me Jeep for the PTO GB
1:32 Revell F-4 Phantom for the Phantom Freaks SIG
User avatar
digger303
General
General
Posts: 15916
Joined: Mon Mar 16, 2015 10:01 am
Location: Western Australia
Australia

Re: More Aber wow's

Post by digger303 »

I think kev's question is how do you get a sharp fold line so all the required pieces fit as they should. Cause if you don't get that sharp bend then things like the top square of photo etch won't fit.

Kev are you using a proper tool like what small shop sells....The Hold and Fold....http://www.thesmallshop.com/ these are a big help. You also may have to anneal the PE if it is stiff.

admendment.... I didn't read the previous post so I may have gotten it all wrong. :shhh:
Listen and appear wise
Image
Image

scalemates stash https://www.scalemates.com/profiles/mat ... ION[]=Kits
Image
User avatar
Kevthemodeller
Lieutenant Colonel
Lieutenant Colonel
Posts: 5631
Joined: Sat Mar 26, 2016 8:31 am
Location: Newton Abbot UK
England

Re: More Aber wow's

Post by Kevthemodeller »

digger303 wrote:I think kev's question is how do you get a sharp fold line so all the required pieces fit as they should. Cause if you don't get that sharp bend then things like the top square of photo etch won't fit.

Kev are you using a proper tool like what small shop sells....The Hold and Fold....http://www.thesmallshop.com/ these are a big help. You also may have to anneal the PE if it is stiff.

admendment.... I didn't read the previous post so I may have gotten it all wrong. :shhh:
Yes mate all the proper tools.

I've now figured things out, ref the shaded areas and not having scored lines. As I said in another post http://www.intscalemodeller.com/viewtop ... 59&t=17549 these aren't really meant for my kit, some fit and you can see these in this posthttp://www.intscalemodeller.com/viewtopic.php?f=29&t=17439 although some of the etch requires modification. I think this particular etch is perhaps old and now Aber are trying to fit it to too many variants. There's also the element of me having never worked with etch before and learning/developing the skills as it were, I do feel though the instructions could be better. The instructions for the barrel are much better even in colour which was a nice surprise :th:

Some of the bits which should fit don't due to angles mainly the protector cages for the lights. These are pre cut you just have to bend them but the angels are wrong which leave them sticking too far back or forward, so I've used the kit parts which I have to say are pretty good, this could be due to a up date/retooling on the kit. I'm still happy with what I've done/got out of the etch and I'm sure at some point I'll have another Sherman which all the unused etch can go on, if nothing else it's been good training/experience for me,
Kev

On the bench:
Border Model FOCKE-WULF W190A-8 R2 - 8
Post Reply

Return to “Photo-etch & Resin”