
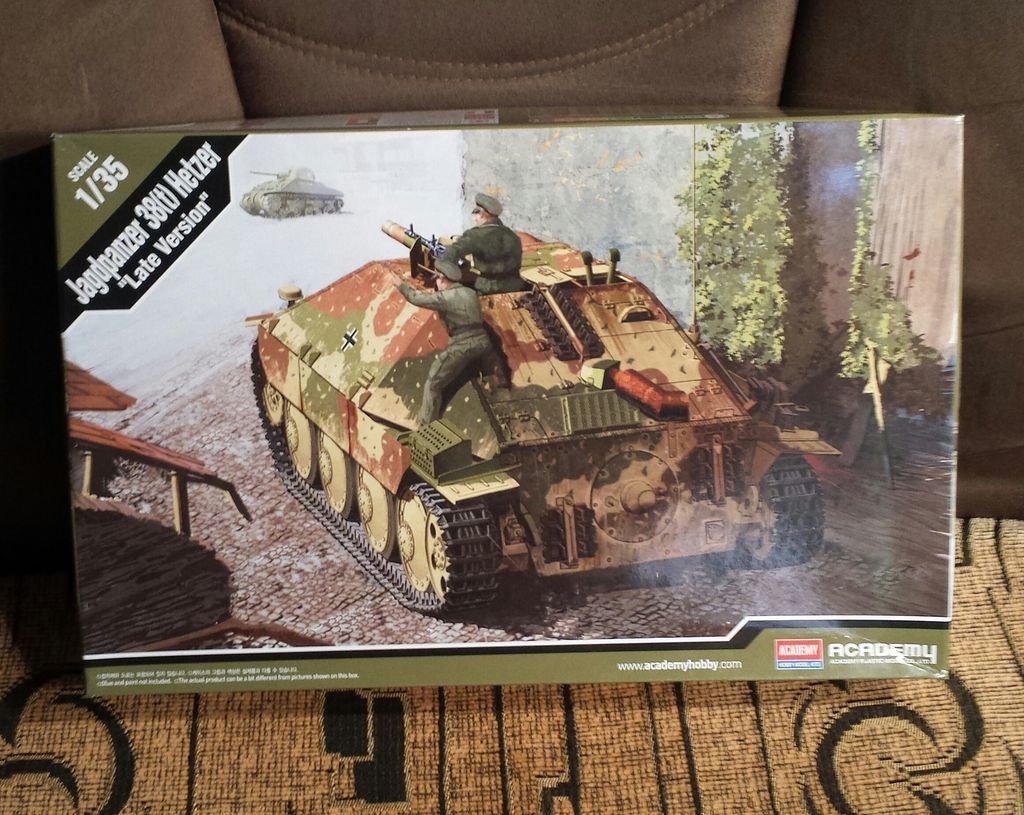
HANS HETZER
-
martin57

- Command Sergeant Major

- Posts: 897
- Joined: Tue Apr 01, 2014 8:44 pm
- Location: oundle, east northants.
HANS HETZER
This will be my entry in to this great sig looking forward to haveing some fun .
-
MarkVerploeg

- Major

- Posts: 4837
- Joined: Wed Oct 16, 2013 12:21 am
- Location: Oss, Noord Braband The Netherlands

Re: HANS HETZER
Nice choise Martin
That is a fun kit to build and the masks help a lot to get the tricky disc camo on there
Good luck with the build
That is a fun kit to build and the masks help a lot to get the tricky disc camo on there
Good luck with the build
On the bench
GB builds
1/35 Trumpeter M1132 ESV
Personal builds
1/35 Hobby Boss M1070 tractor with M1000 semi trailer and Meng M1A2 TUSK II Abrams
1/35 Takom V2 rocket with the Meillerwagen and SS100 tractor
GB builds
1/35 Trumpeter M1132 ESV
Personal builds
1/35 Hobby Boss M1070 tractor with M1000 semi trailer and Meng M1A2 TUSK II Abrams
1/35 Takom V2 rocket with the Meillerwagen and SS100 tractor


-
NAMBiohazard

- Master Sergeant

- Posts: 474
- Joined: Fri Jun 21, 2013 3:21 pm
- Location: Windhoek, Namibia
Re: HANS HETZER
That is a nice looking kit.
can't wait to see it built..
can't wait to see it built..
Keep the glue on the Sprue
Bjorn
Bjorn
-
AlkaSeltzer
- Staff Sergeant

- Posts: 234
- Joined: Tue Aug 19, 2014 7:21 pm
- Location: U.S.A.
Re: HANS HETZER
Everyone loves the Hetzer! Or at least they should  Can't wait to see this one come together. Post a lot of pictures.
My Dog Looks Like A Jack Rabbit and he ate my model that's why it looks like that 


Re: HANS HETZER
Will be great to see this kit built, had an eye on this one a while back
On the Bench...
1/35 TAKOM Mark. IV Heavy Battle tank
1/35 TAKOM Mark. IV Heavy Battle tank


Re: HANS HETZER
I was considering getting this kit for the SIG, but I got something else. I'm curious to see how your's turns out.
"Excuses are tools of incompetence used to build monuments of nothingness. Those who use them seldom amount to anything."
-
martin57
- Command Sergeant Major
- Posts: 897
- Joined: Tue Apr 01, 2014 8:44 pm
- Location: oundle, east northants.
Re: HANS HETZER
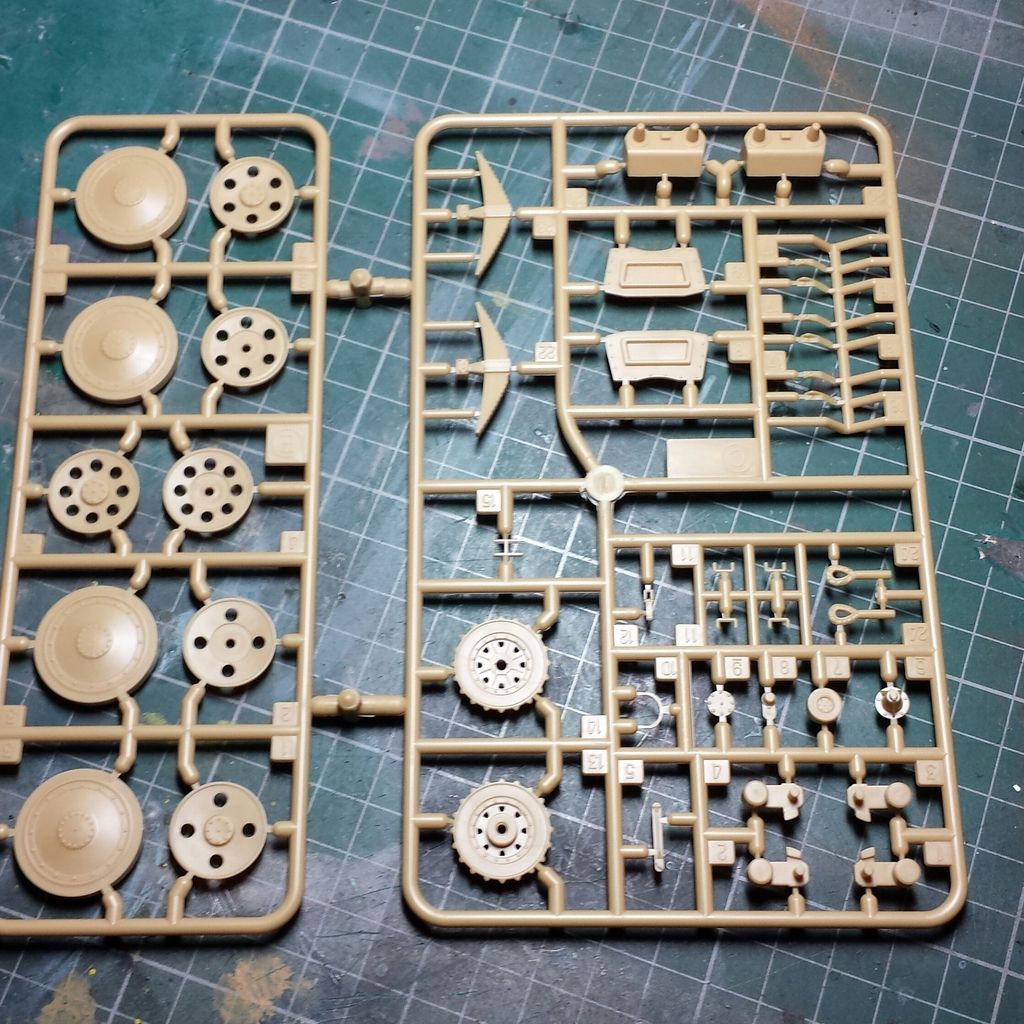
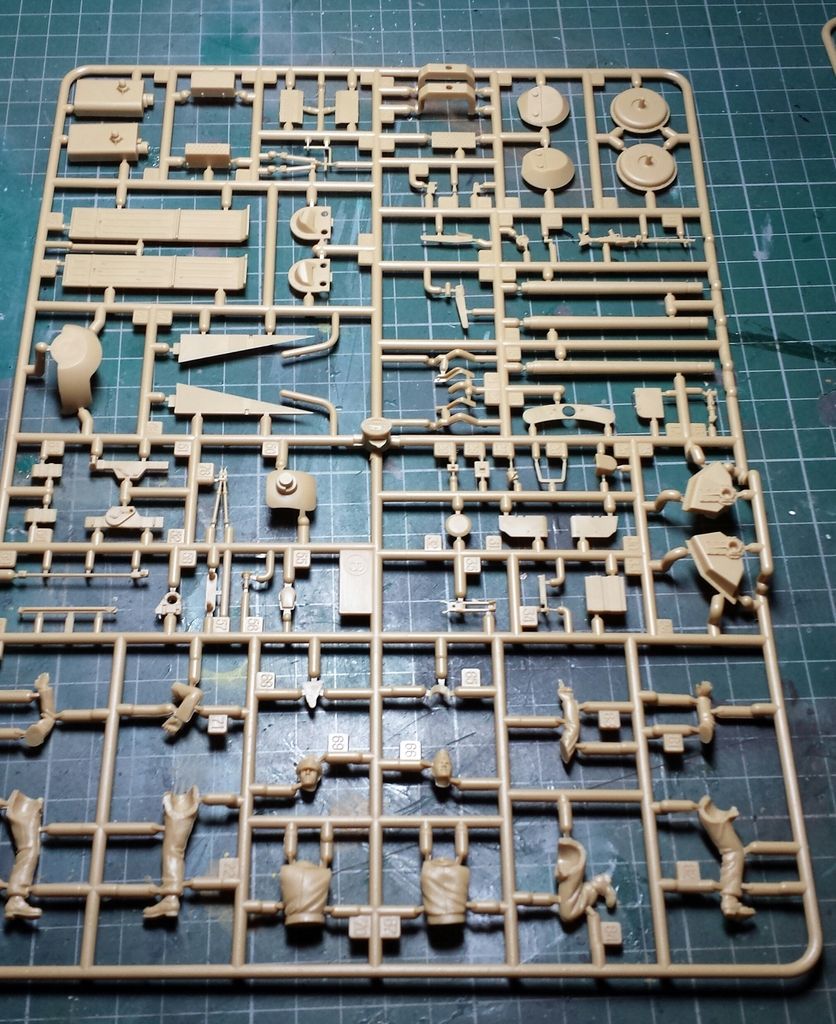
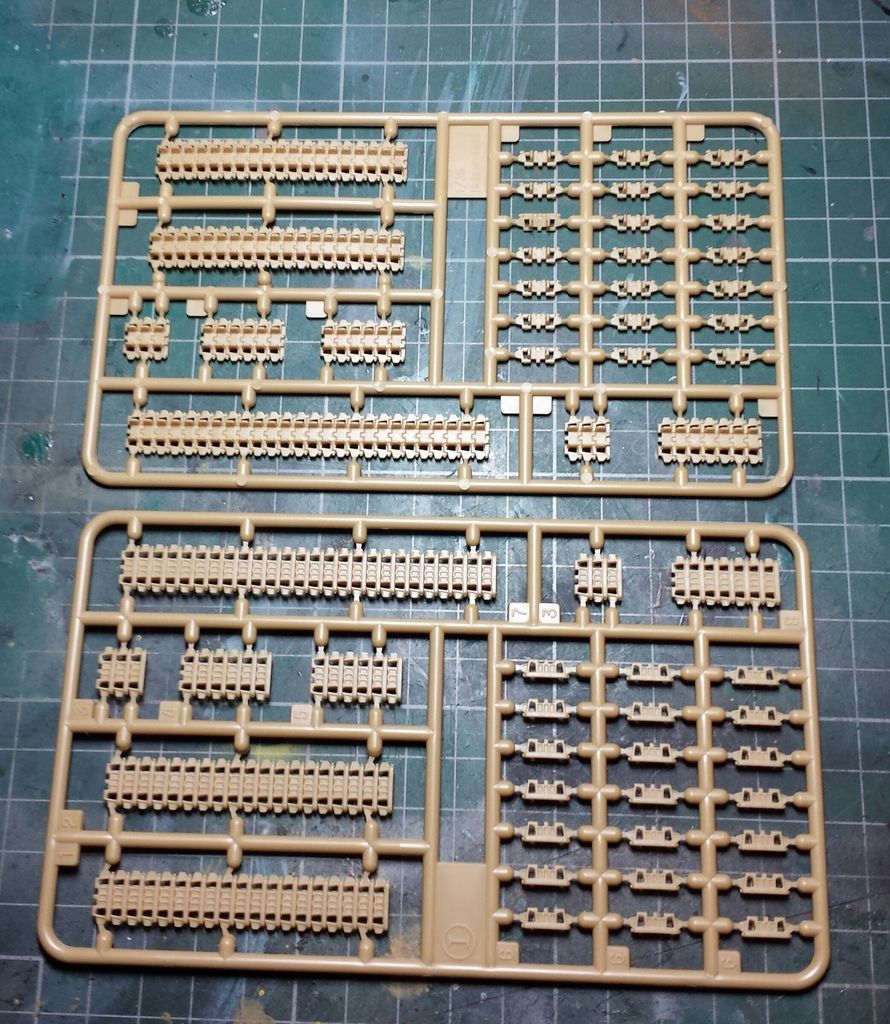
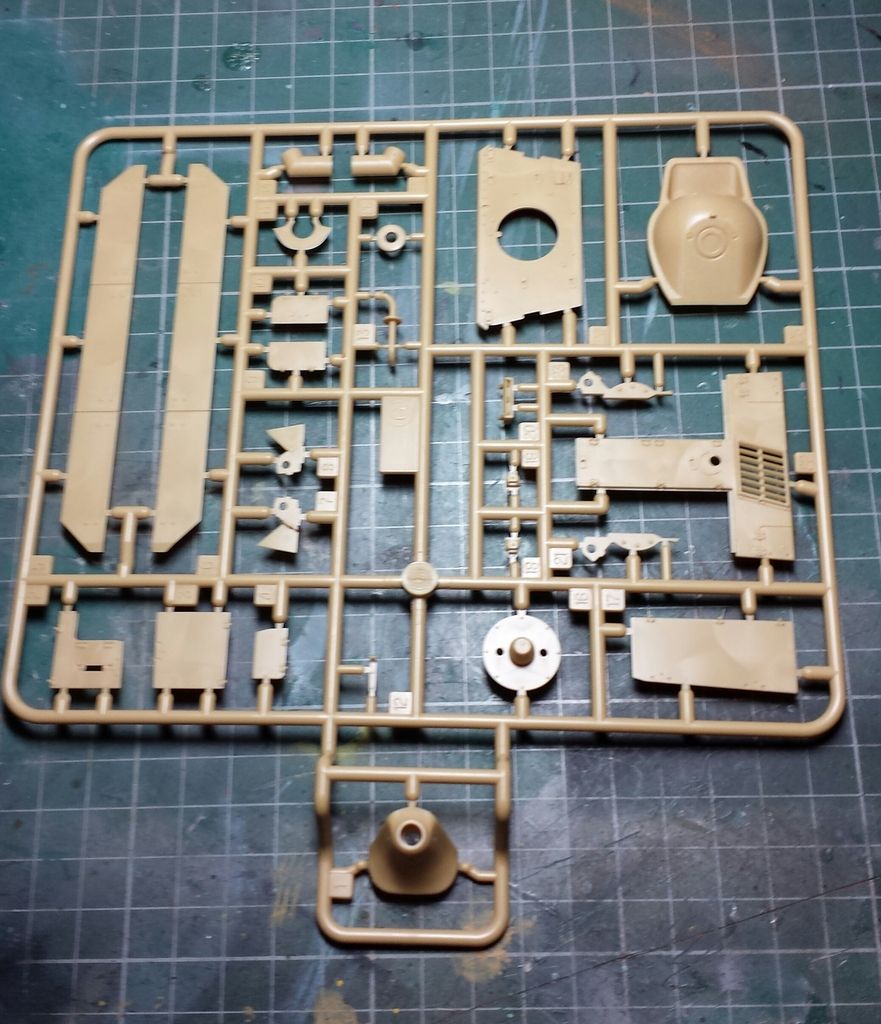
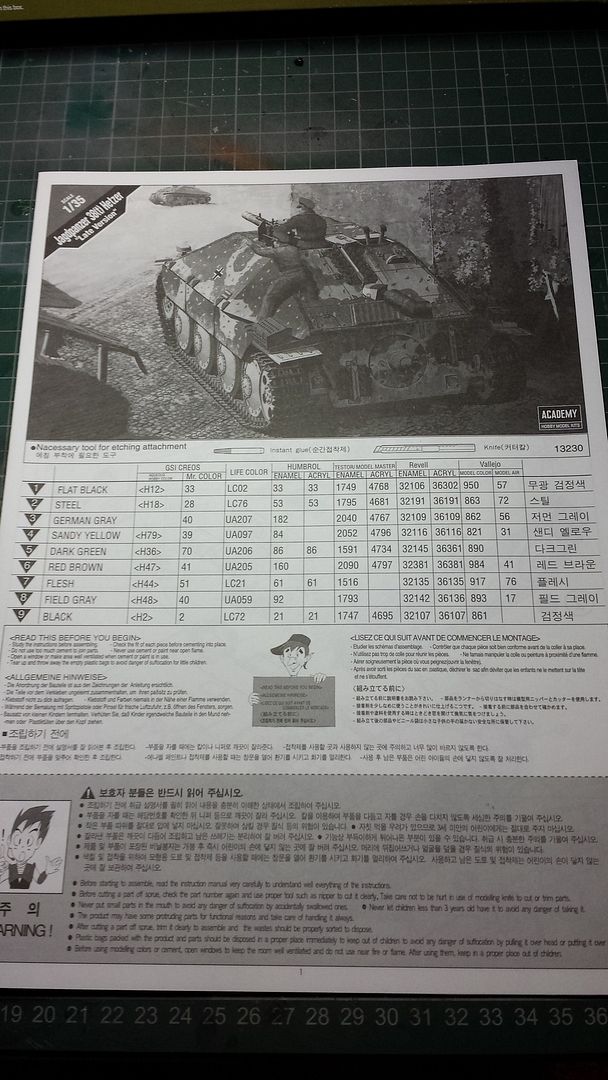
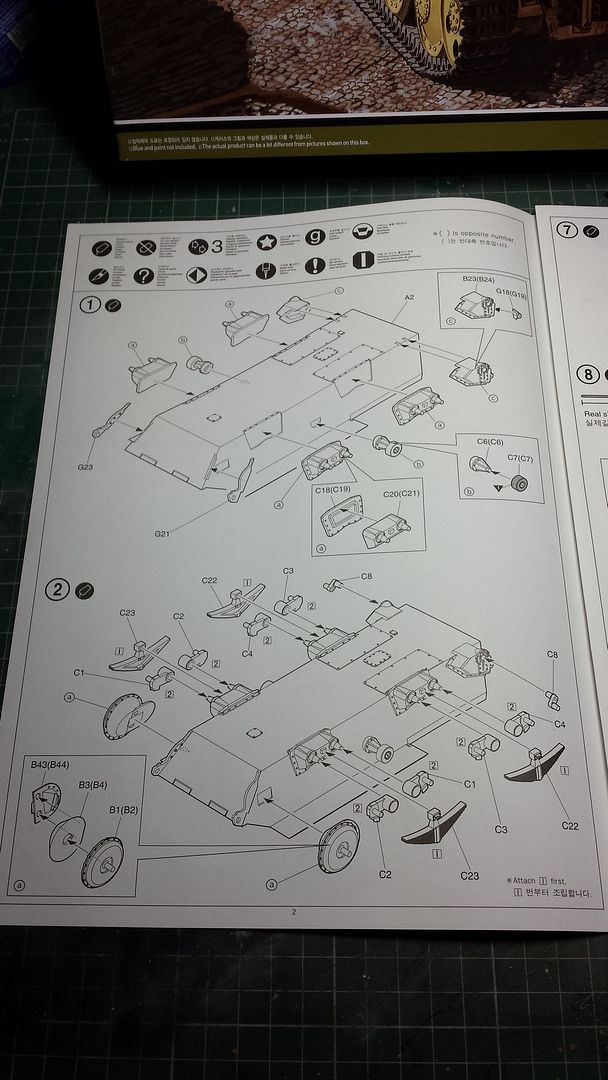
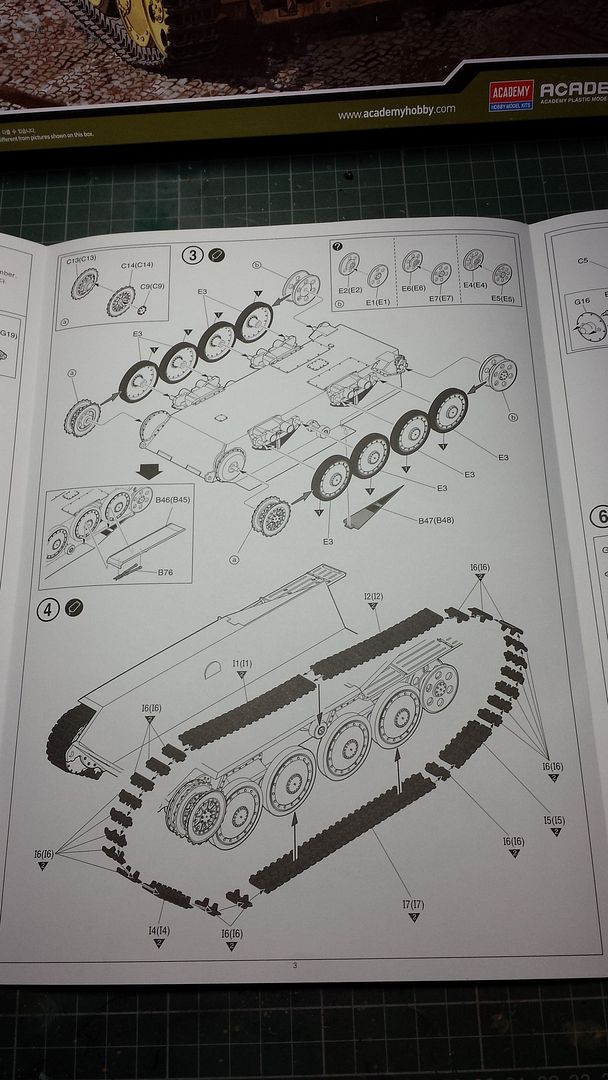
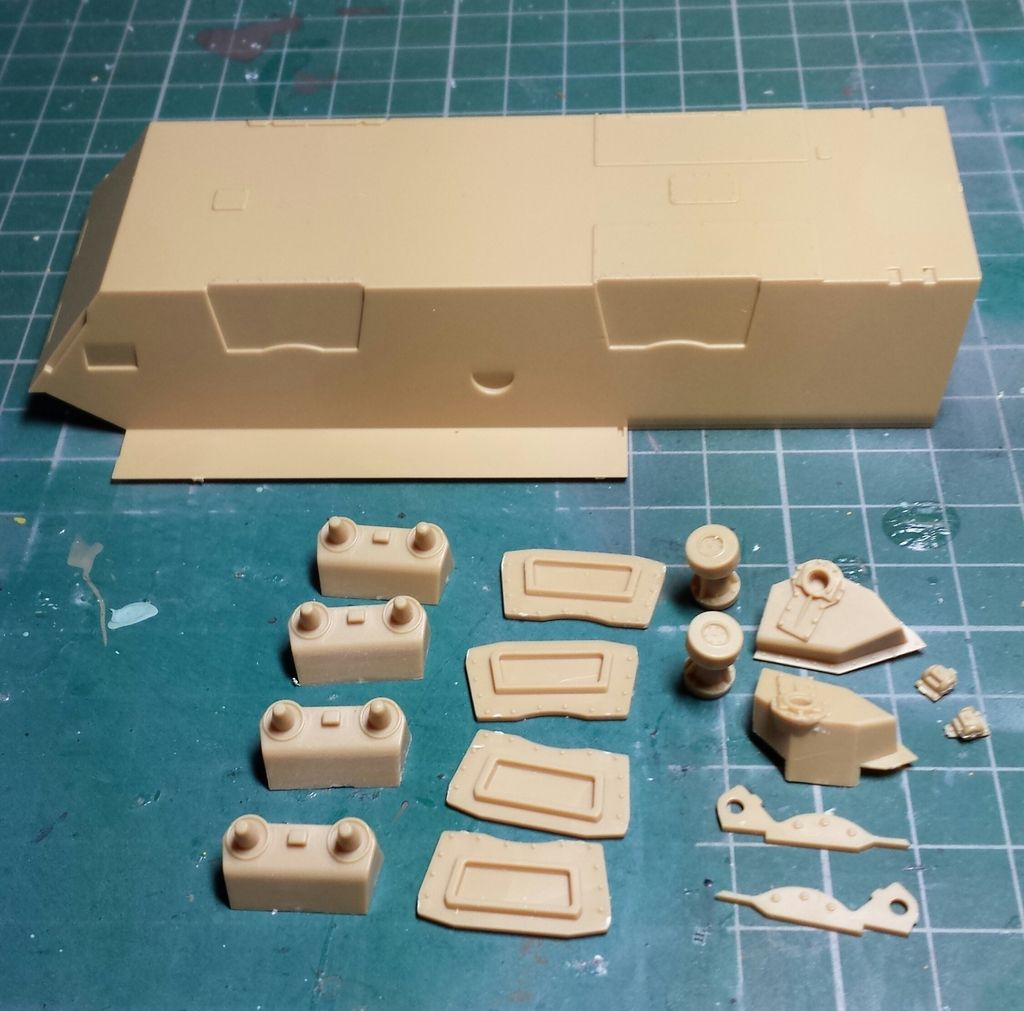
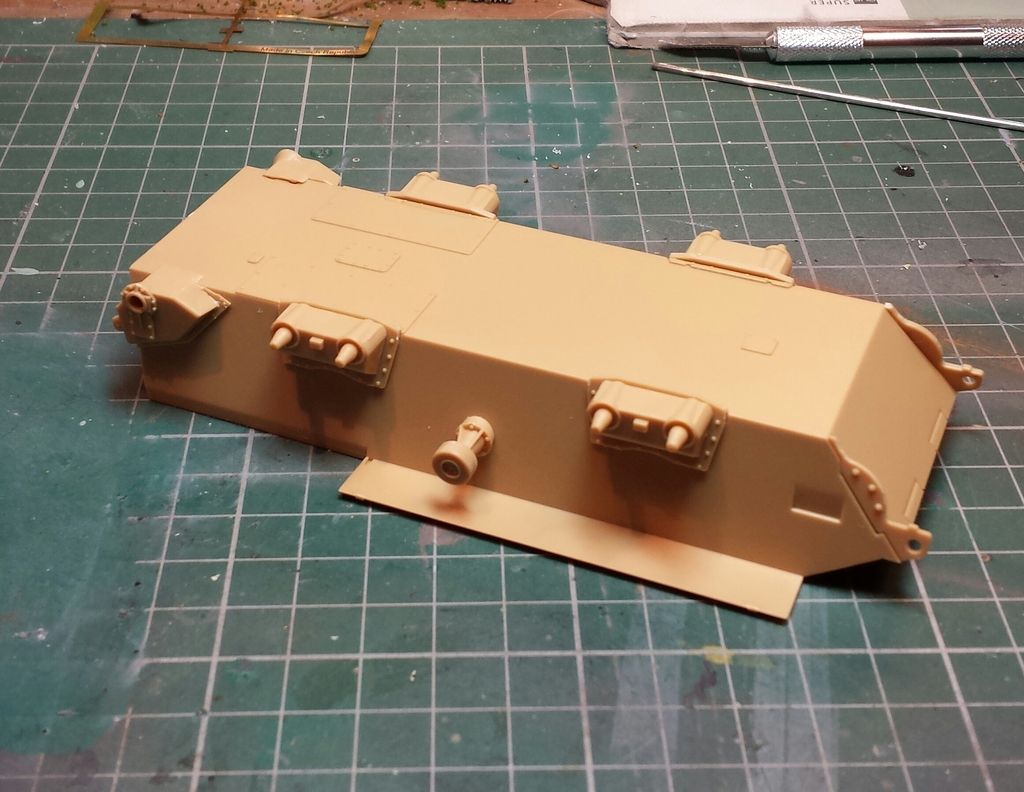
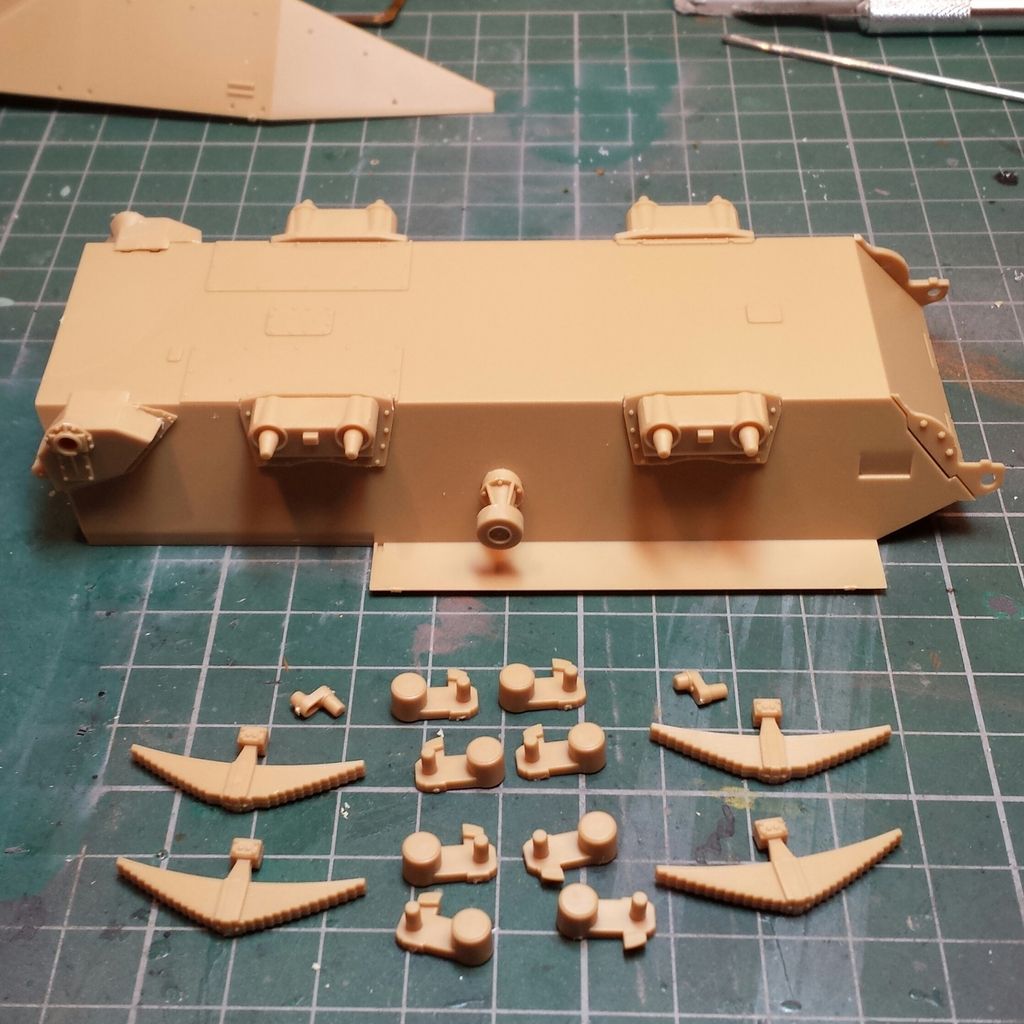
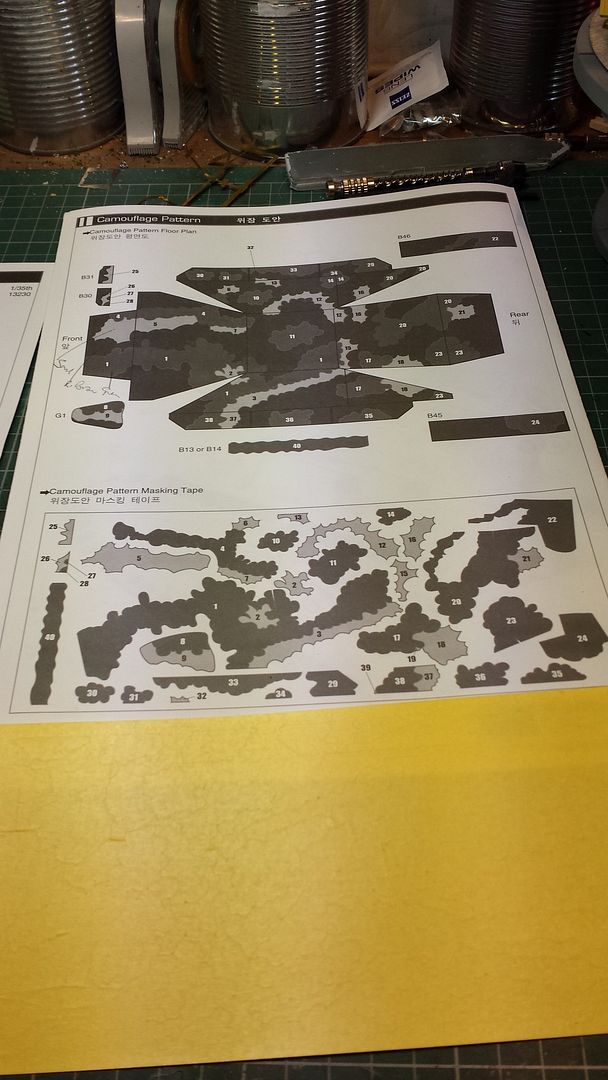
Ok then here we go , here are the sprue shots first , not that many so thats good .
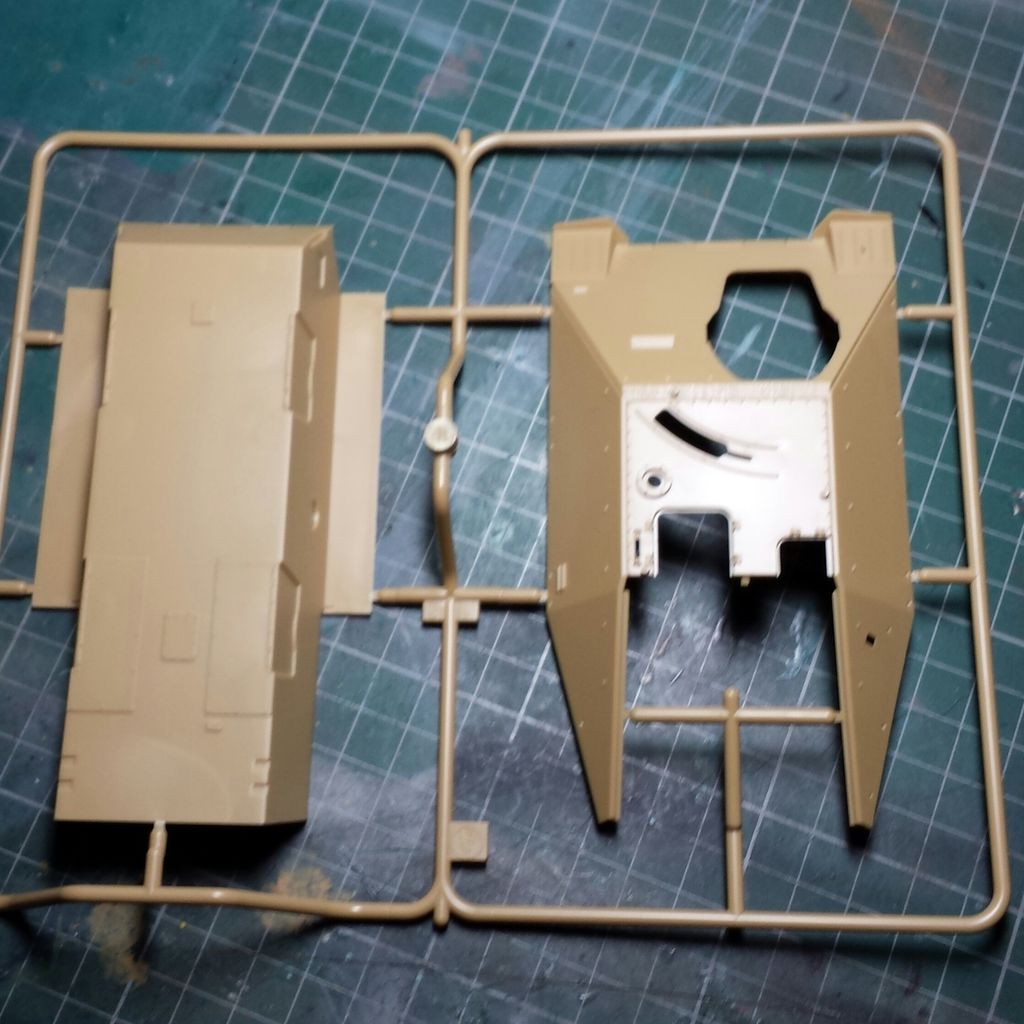
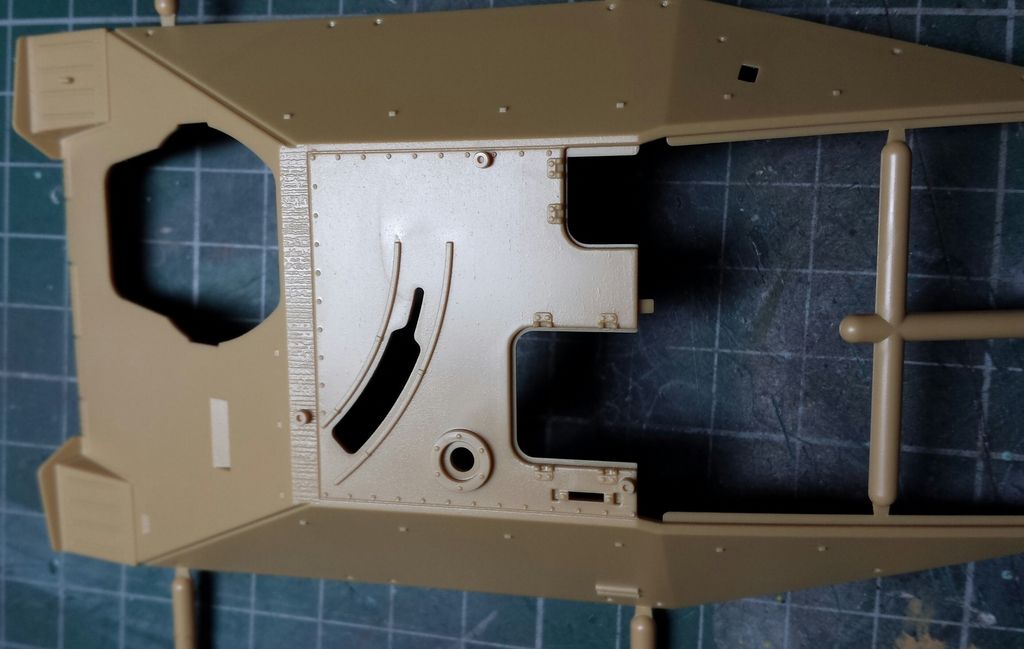

the masking sheet.
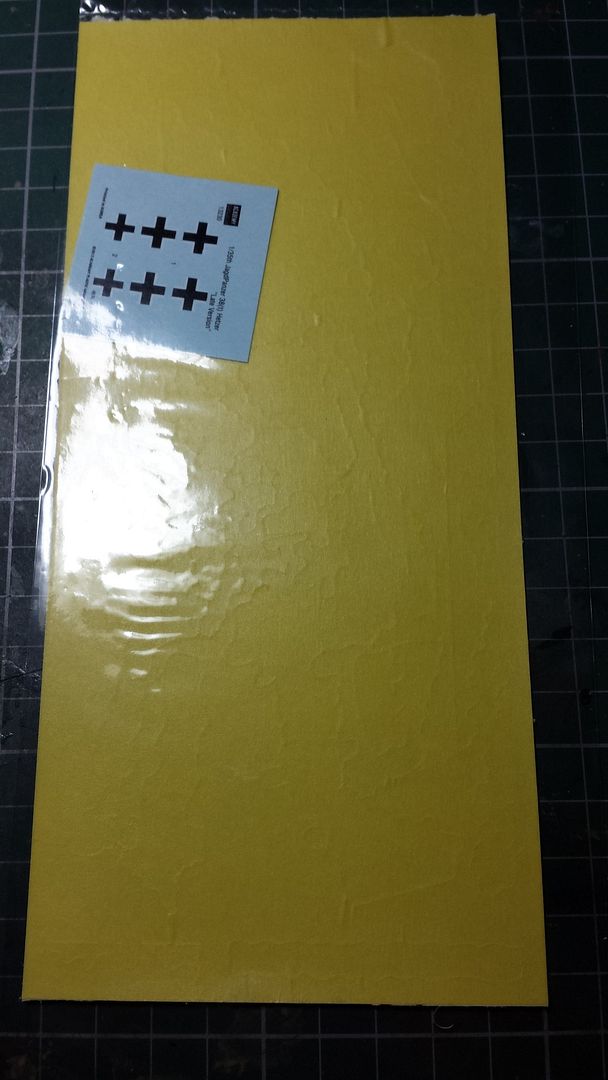

lay out for the paint masking.
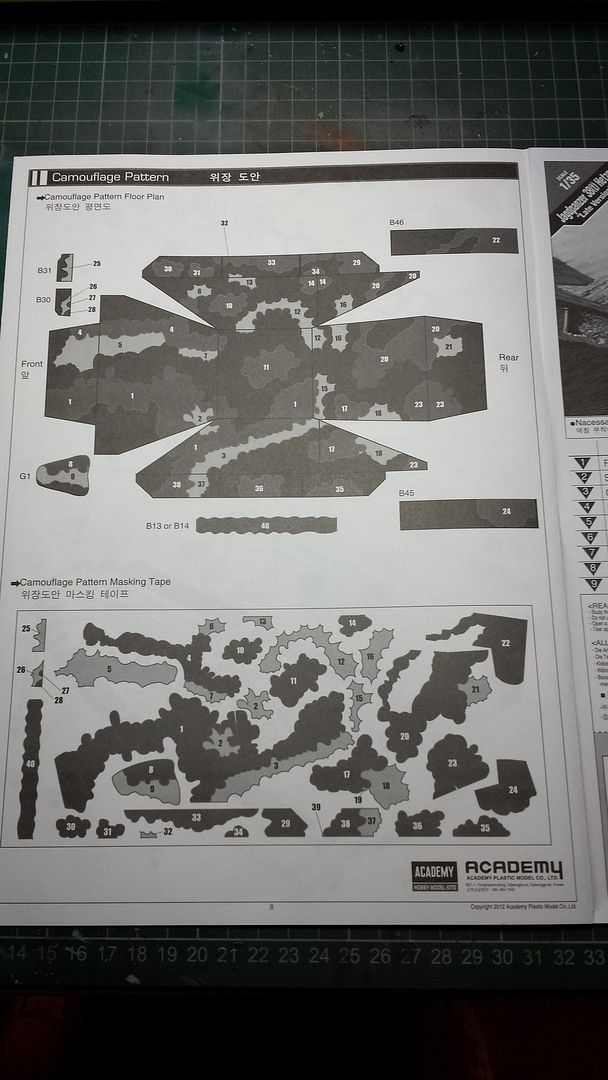
Right thats out of the way , so i started to give it a go .
started with the suspension and wheels .
that was painless so i thought , made a boob but did not twig on till the next stage , see if you can spot it .
If you have not spotted my mistake yet all will be clear as i found out myself in a bit .
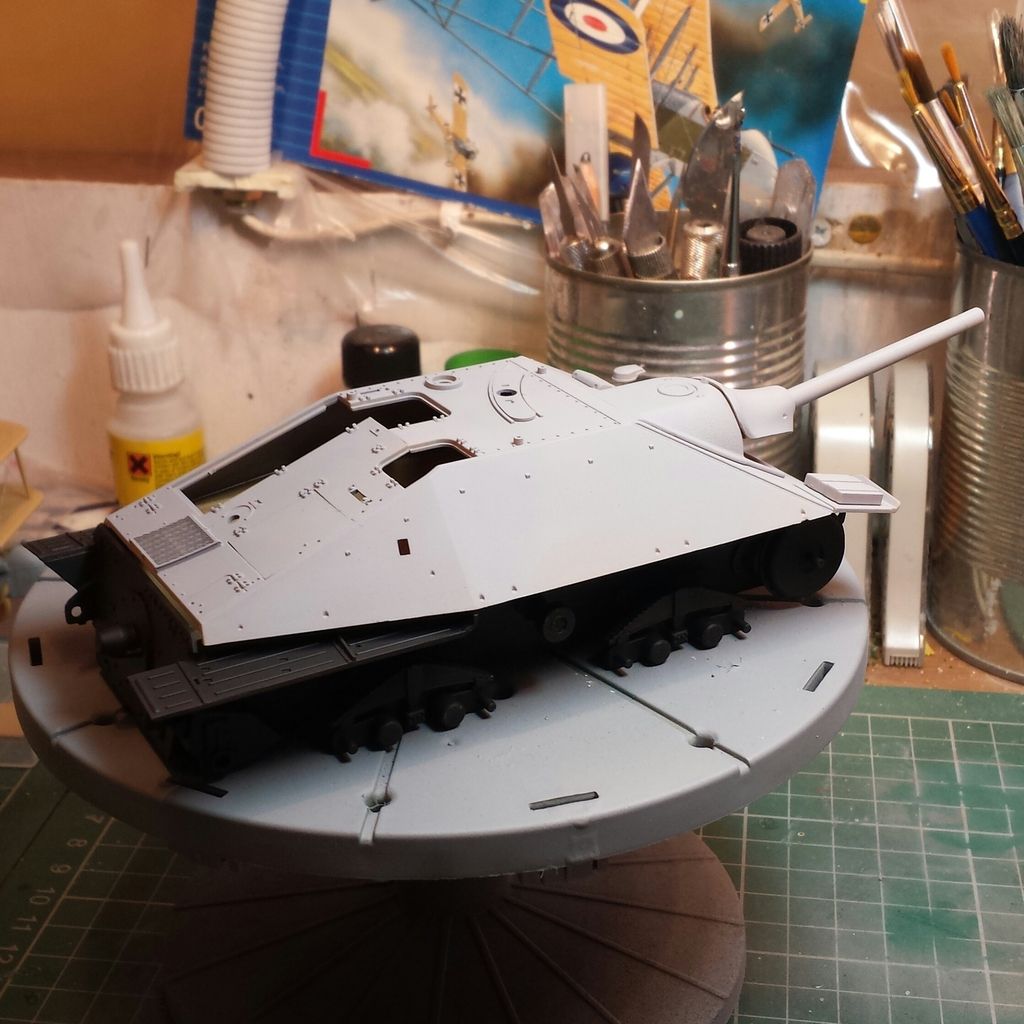
this next stage i found a bit of a pain the recess the front wheel assembly goes in is a bit shallow and i had trouble getting it to sit right.
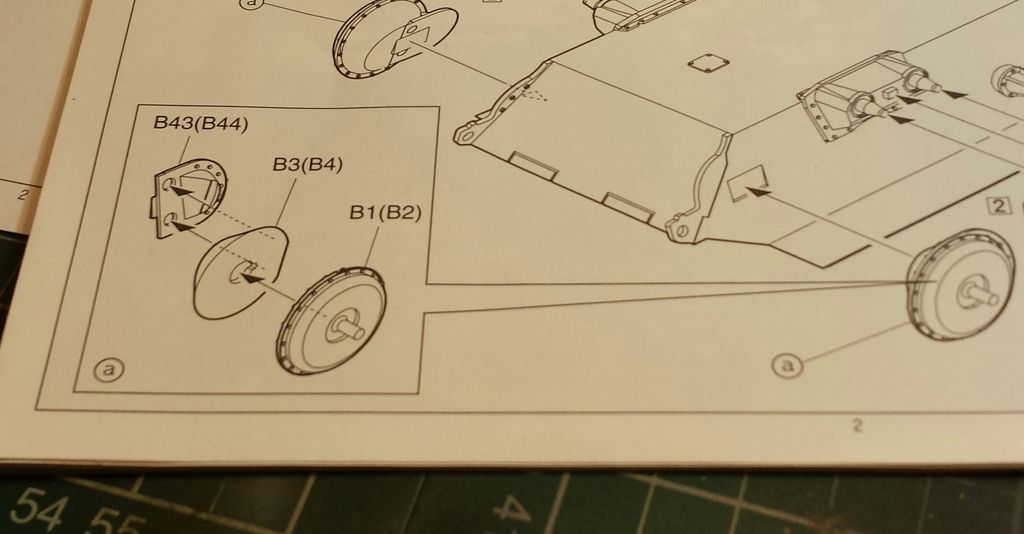
got it right , now the boob that i made i put the front shackle parts on the wrong way round the riveted parts should have been on the inside not the outside as you can see if you go back a couple of pictures , so i put it right .
here you go all better now .
i left the rear arms of for now because thay are a lose fit and so i will glue them when i dry fit all the wheels so i can get the right angle .
having fun see you soon


the masking sheet.


lay out for the paint masking.


Right thats out of the way , so i started to give it a go .
started with the suspension and wheels .

that was painless so i thought , made a boob but did not twig on till the next stage , see if you can spot it .


If you have not spotted my mistake yet all will be clear as i found out myself in a bit .
this next stage i found a bit of a pain the recess the front wheel assembly goes in is a bit shallow and i had trouble getting it to sit right.


got it right , now the boob that i made i put the front shackle parts on the wrong way round the riveted parts should have been on the inside not the outside as you can see if you go back a couple of pictures , so i put it right .
here you go all better now .

i left the rear arms of for now because thay are a lose fit and so i will glue them when i dry fit all the wheels so i can get the right angle .

having fun see you soon
-
NAMBiohazard
- Master Sergeant
- Posts: 474
- Joined: Fri Jun 21, 2013 3:21 pm
- Location: Windhoek, Namibia
Re: HANS HETZER
Nice.... the kit has a mask set 
that should make painting easier.
off to a great start I see.....
that should make painting easier.
off to a great start I see.....
Keep the glue on the Sprue
Bjorn
Bjorn
-
Nige99

- Command Sergeant Major
- Posts: 751
- Joined: Sun May 26, 2013 2:53 pm
- Location: Wrexham North Wales
Re: HANS HETZER
Looks a tidy kit with plenty of stuff to boot.
You can run, but you'll only die tired!

Re: HANS HETZER
very nice kit mate well spotted with the mistake early good luck with the rest of the build


Re: HANS HETZER
I built this kit a while ago and I can say it is a lot of fun, especially with the masking sheet. Looking forward to see what you do with it.


Re: HANS HETZER
I'm starting the same kit, so I'll be watching this one! Already seen something to watch out for, thanks for the info buddy! Good luck with the rest of it
Chief

-
martin57
- Command Sergeant Major
- Posts: 897
- Joined: Tue Apr 01, 2014 8:44 pm
- Location: oundle, east northants.
Re: HANS HETZER
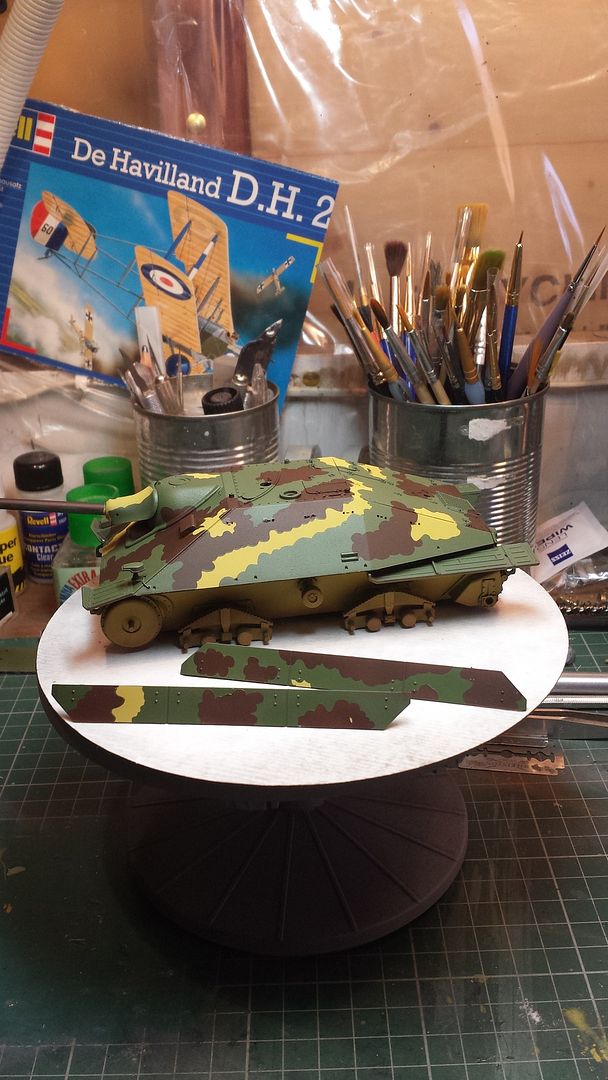
Just a quick update on the hetzer.
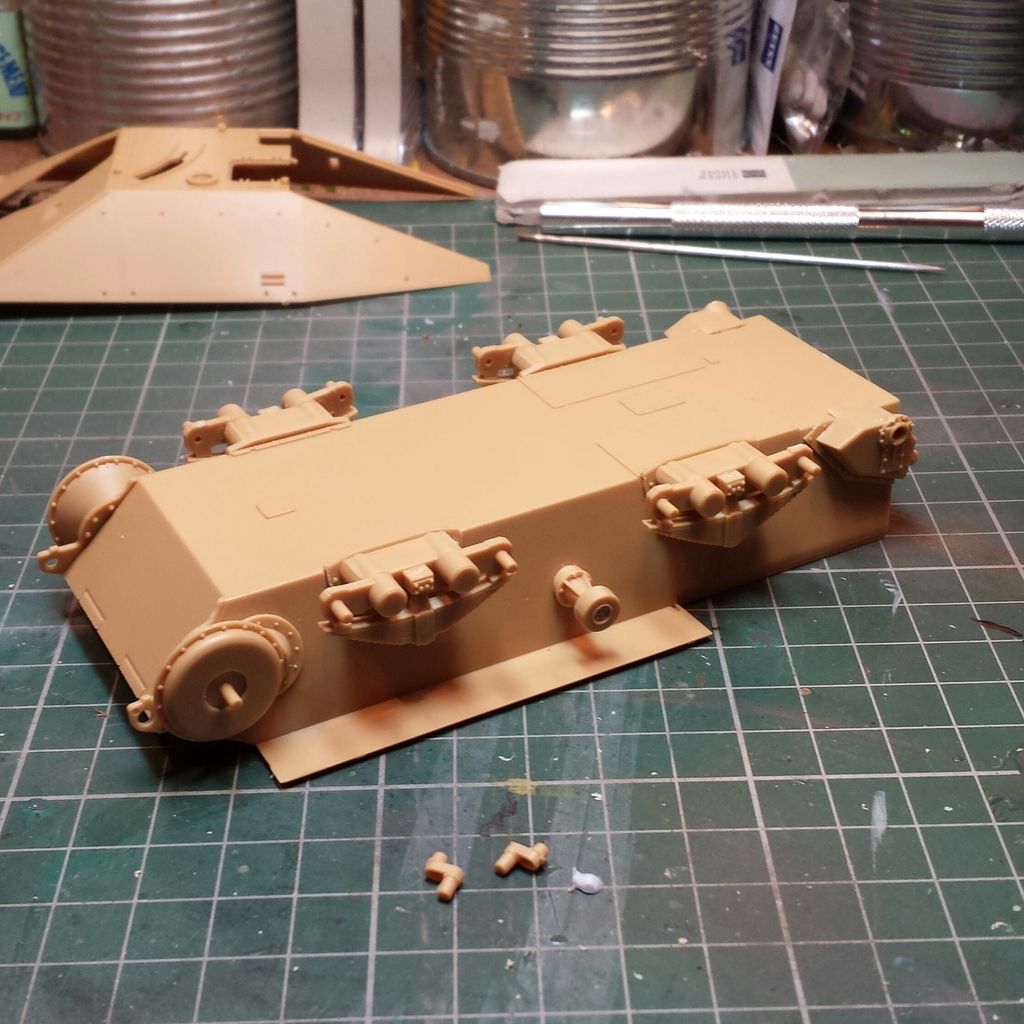
dry fitted the wheels , then removed them for painting with badger black primer ,as with all the lower hull to give the base coat a bit of depth .
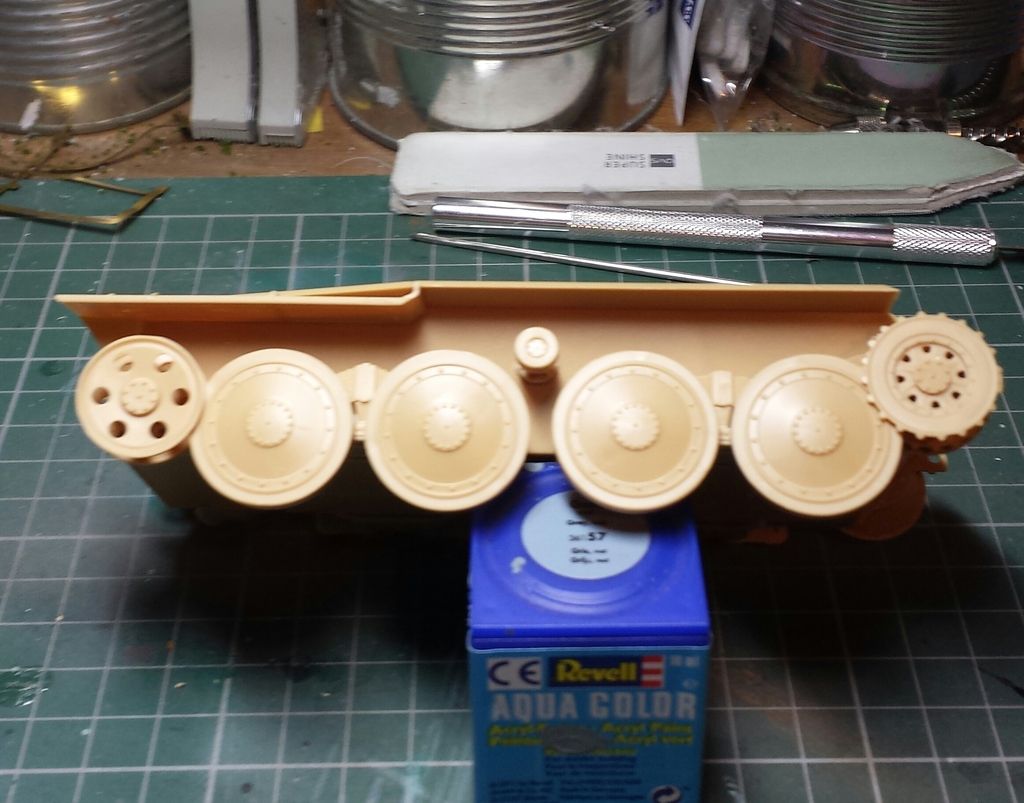
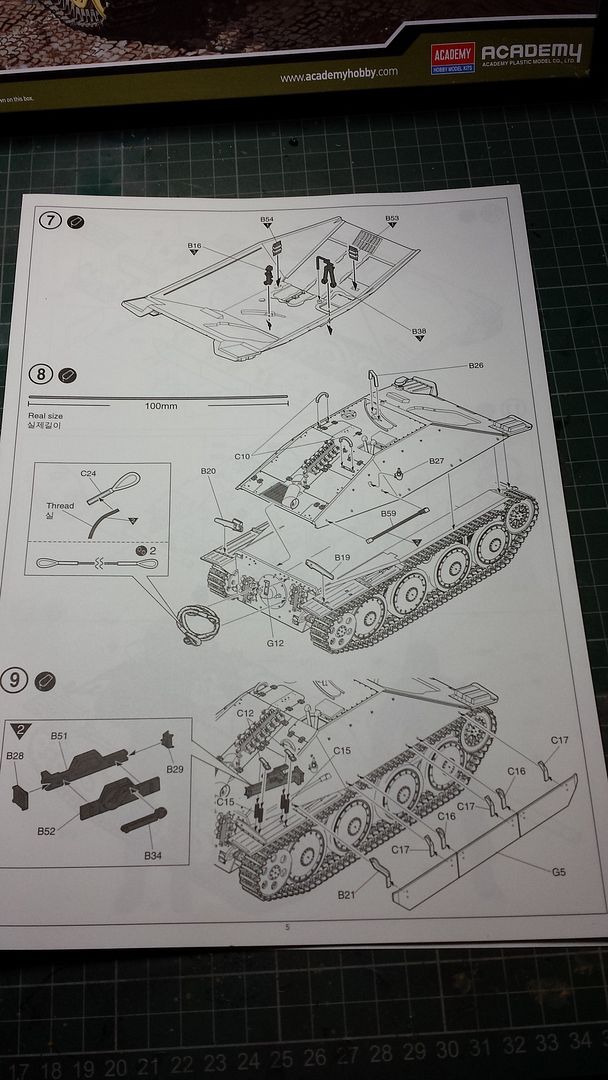
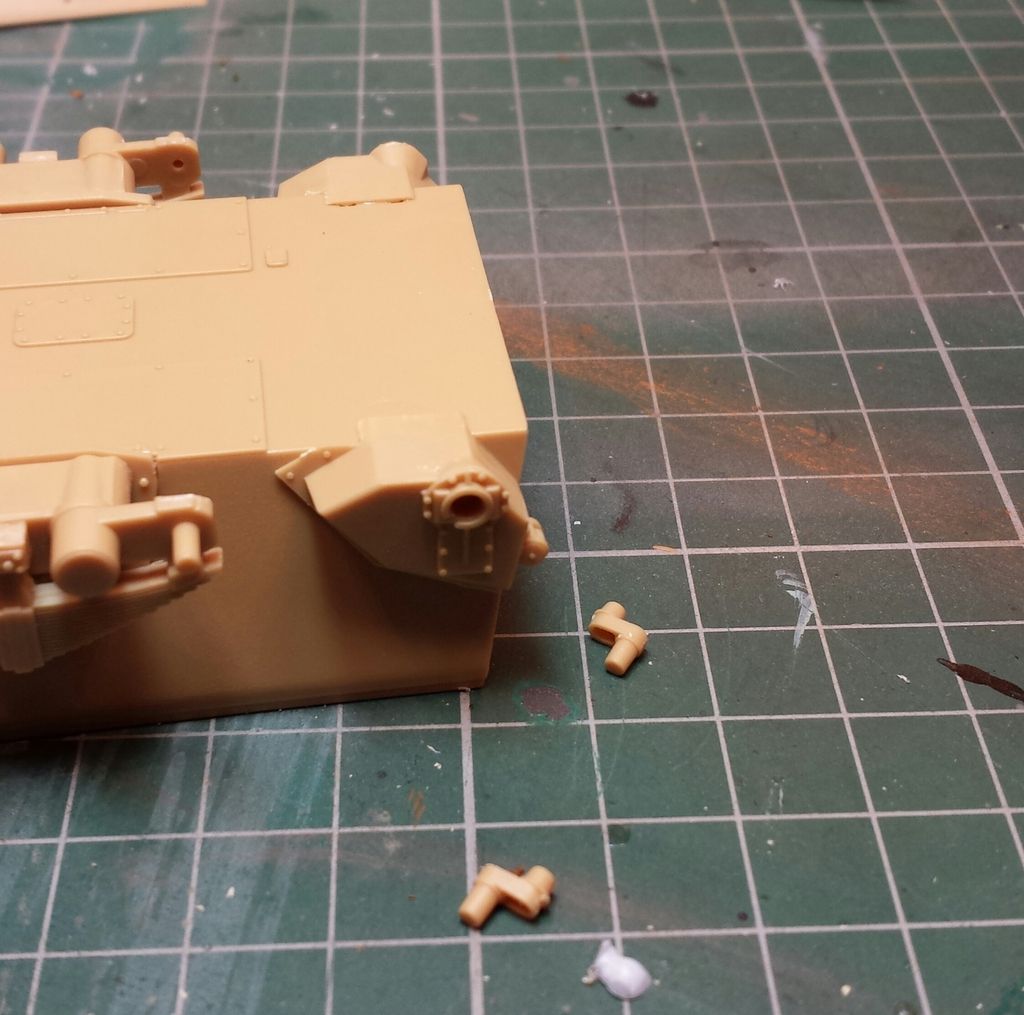
fitted the back plate and back fenders .
then the primer , i do like this badger primer.
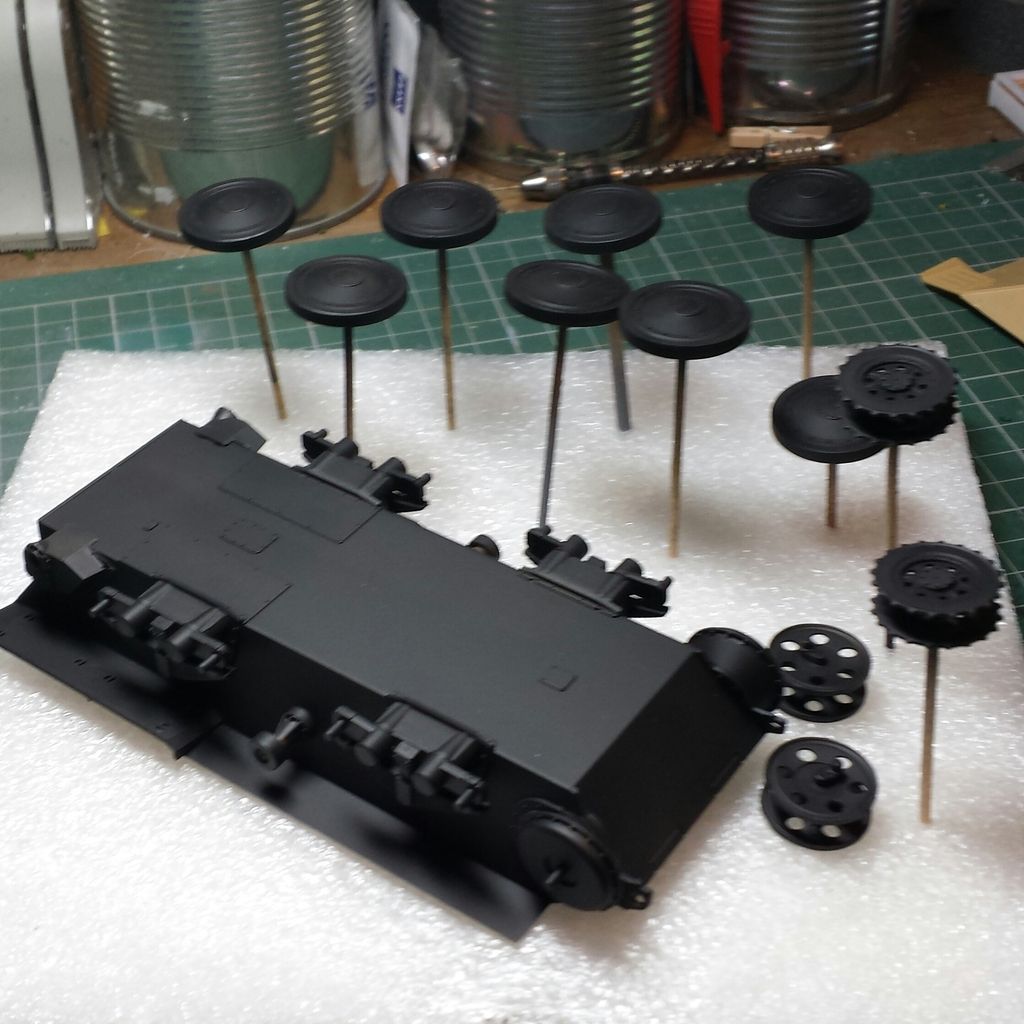
whist that was left to dry i moved on to the main gun this went together no problem.
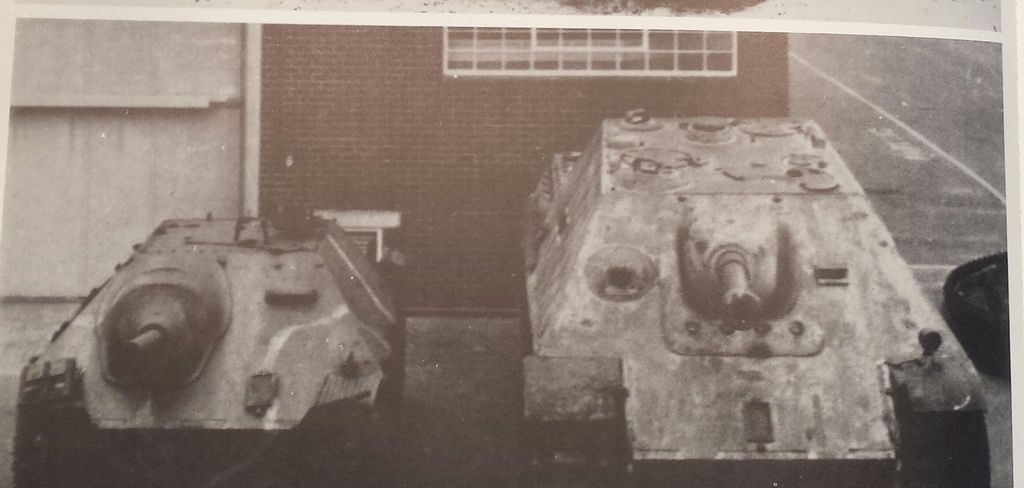
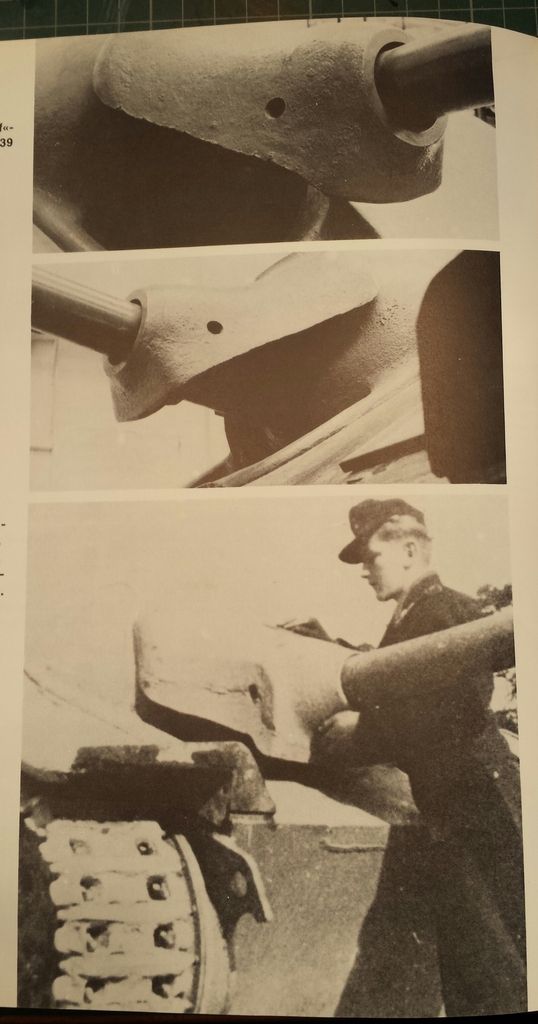
Here are some pictures and some history .
meet big brother
The Jagdpanzer 38 was intended to be more cost-effective than the much more ambitious Jagdpanther and Jagdtiger designs of the same period. Using a proven chassis, it avoided the mechanical problems of the larger armoured vehicles.
Hetzer was built on the Panzerkampfwagen 38(t)‘s widened and lengthened chassis with modified suspension (larger road-wheels from Praga TNH n.A prototype reconnaissance tank) and up-rated engine. The new engine was 160hp Praga AC/2 6-cylinder engine controlled by Praga-Wilson gearbox (5 forward and 1 reverse gear). Chassis was modified in order to accommodate larger gun and thicker armour than regular Panzerkampfwagen 38(t) tank. Its combat weight was 16 metric tons (verses 9.8-tons for the Pz 38(t)) and it could travel at maximum speed of some 42km/h.
It was better armored than the thinly armoured earlier Panzerjäger Marder and Nashorn with a sloped armour front plate of 60 mm sloped back at 60 degrees from the vertical (equivalent in protection to about 120 mm), carried a reasonably powerful 75mm gun, was mechanically reliable, small and easily concealed. It was also cheap to build.
The Jagdpanzer 38 succeeded the open-top Marder III (based on the same chassis) in production from April 1944; about 2584 were built until the end of the war. The older Marder III Panzerjäger series retained the same vertically sided chassis as Panzer 38(t). In the Jagdpanzer 38, the lower hull sides slope 15 degrees outward to make roughly hexagonal shape when viewed from front or rear. This increased the available interior space and enabled a fully enclosed casemate-style fighting compartment. Because of the fully enclosed armor, it was 5 tonnes heavier than the Marder III. To compensate for the increased weight, track width was increased from 293 mm to 350 mm.[4]
Initial production Jagdpanzer 38 did not sit even with the ground because gun, transmission and thicker frontal armor weighed the front down. Leaf springs were strengthened from June 1944 which leveled the posture of the vehicle. From May–July 1944, accessibility was improved in the form of more hatches: commander's smaller hatch opening to the rear, then right rear corner for radiator access, and left rear corner for fuel tank access. From August 1944 lighter inner and outer mantle reduced the weight by 200 kg. These are more conical looking mantle than half cone shaped initial mantles. Also from August 1944, new rear idler wheels were introduced. These had 8, 6, and 4 (not necessarily in that order) lightening holes instead of 12. These simplified the manufacturing process. In September 1944, front 16 spring leaves were increased in thickness to 9mm per leaf, rear 16 leaves maintained 7mm each in thickness. Also in September side Schurtzen's front and rear tips were bent inward to prevent them from catching bushes and get dismounted. It was discovered that driver's periscope housing acted like a shot trap, preventing incoming shells from bouncing off the front glacis. The protruding housing was removed, instead periscope was inserted into vertical cuts to the front armor from October 1944. Also from October 44, flame reducing muffler was introduced. These reduced visibility and backfire. Commander's head cushion was added to the hatch from October 1944. At the same time, road wheel's rims were riveted instead of using bolts. To cope with heavy front, and the necessity to traverse the vehicle to aim, gear ratio was lowered to 1:8 instead of 1:7.33 to reduce the stress on final gears from January 1945. Button-down Jagdpanzer 38 was blind to the right side. Since 20mm side armors (same as late model Panzer II's side armor) were only adequate to protect the crew from fairly small caliber guns, it was important to face the threat forward. Hence, commander's field of view was planned to be improved by installing a rotating periscope in Jagdpanzer 38 Starr, just as Sturmgeschutz III and Elefant had evolved from a single pair of periscopes to all around vision blocks. However, Jagdpanzer 38 Starr came too late to see the action in the field.
Swiss Army G-13
The Jagdpanzer 38 equipped the Panzerjägerabteilungen (tank destroyer battalions) of the infantry divisions, giving them some limited mobile anti-armor capability. After the war Czechoslovakia continued to build the type (versions ST-I and ST-III for training version, about 180 units built) and exported 158 vehicles (version G-13) to Switzerland. Most vehicles in today's collections are of Swiss origin.
By order of Adolf Hitler in November 1944, a number of Jagdpanzer 38s were refurbished straight from the factory with a Keobe flamethrower and accompanying equipment instead of the normal gun. The flame projector, encased in a metal shield reminiscent of that of a gun barrel, was easily prone to damage. Fewer than 50 of these vehicles, designated Flammpanzer 38, were completed before the end of the war, but they were used operationally against Allied forces on the Western Front.
Further variants were a Jagdpanzer 38 carrying the 150 mm sIG 33/2 Howitzer, of which 30 were produced before the end of the war, and the Bergepanzer 38, a light recovery vehicle of which 170 were produced. Plans were made to produce other variants, including an assault gun version of the Jagdpanzer 38 carrying a 105 mm StuH 42 main cannon, a version mounting the 7.5 cm KwK 42 L/70 gun from the Panther, and an anti-aircraft variant mounted with a Flak turret. The war ended before these proposed models were put into production. Prototypes were also developed for the Jagdpanzer 38 Starr, this was a simplified version of the Jagdpanzer 38 and also a step towards the E-10. The design removed the recoil absorber from the main 7.5 cm Pak 39 gun, instead attaching the gun to the chassis, and using the Jagdpanzer 38's bulk and suspension to absorb the recoil. 10 were built, but never issued. 9 converted back to normal Jagdpanzer 38 and Hitler ordered the remaining prototype destroyed rather than let it be captured at the end of the war.[5][6]
Variants[edit]
Jagdpanzer 38, exhibited in the Texas Military Forces Museum in Austin, USA.
Befehlswagen 38 Command variant. Fitted with a 30W FuG 8 radio set.[5][6]
Flammpanzer 38 Jagdpanzer 38 modified with a Keobe flamethrower in place of the main gun. Deployed on the Western Front, with first use during the Battle of the Bulge (20 in 352nd and 353rd Panzer-Flamm-Kompanies attached to Army Group G). Less than 50 units produced.[6]
Panzerjaeger 38(t) mit 75mm L/70 Prototype version experimenting with mounting the 7.5cm KwK 42 L/70 gun from the Panther. 3 prototypes built, but the long gun and extra weight caused even bigger problems driving the vehicles. Proposal made by Krupp to modify the Jagdpanzer 38 with a superstructure to the rear to mount the gun, but no more development was done on this idea.[6]
Jagdpanzer 38 Starr A simplified version of the Jagdpanzer 38 which attached the 7.5cm Pak 39 gun to the chassis, and fitted with a Tatra diesel engine. 10 were built, 9 converted back to normal Jagdpanzer 38. The remaining prototype was destroyed at the end of the war.[5][6]
Panzerjaeger 38(t) mit 105mm StuH 42/2 L/28 Proposed version of the Jagdpanzer 38 Starr armed with a 10.5 cm howitzer.[6]
ST-I Post-war Czech designation for new manufactured or repaired Jagdpanzer 38. 249 in service, together with 50 ST-III/CVP driver training vehicles (Unarmed chassis, some with a superstructure). Prototype developments included Praga VT-III armoured recovery vehicle and PM-I flamethrower tank.[6]
G13 Post war version of the Jagdpanzer 38 built for Switzerland, armed with a StuK 40 gun.[6]
Designs based on chassis[edit]
Bergepanzer 38 Light recovery vehicle, issued to units along with the Jagdpanzer 38. 170 units produced. A prototype was developed to fit the design with a 2cm Flak 38.
15 cm Schweres Infanteriegeschütz 33/2 (Sf) auf Jagdpanzer 38 Jagdpanzer 38 chassis mounting a 15 cm sIG 33 in a superstructure. Intended as a replacement for the Grille. 30 built, from December 44.[6]
Vollkettenaufklärer 38(t) Reconnaissance vehicle based on the Bergepanzer 38. Several prototypes tested, mounting single or twin 2cm Flak 38, and in one case a 7.5 cm K51 L/24 gun.[6]
Vollkettenaufklarer 38(t) Kätzchen A fully tracked reconnaissance vehicle based on the Jagdpanzer 38. Prototypes were built by BMM and ordered into production, but never built. The prototypes were believed to be destroyed before the end of the war.[6]
Flakpanzer 38(t) Kugelblitz Proposal to mount the turret from a Flakpanzer IV Kugelblitz on a Jagdpanzer 38 chassis. No production due to the war situation.[6]
Panzerjäger 38(t) with Panzer IV turret Krupp proposal to mount the turret of a Panzer IV with a 7.5 cm KwK 40 or 8 cm PAW 600 gun on the chassis of Panzerjäger 38(t). The proposal was not pursued.[6]
Panzerjager 38(d) a larger version of the Panzerjager 38 prototype only[7]
Performance[edit]
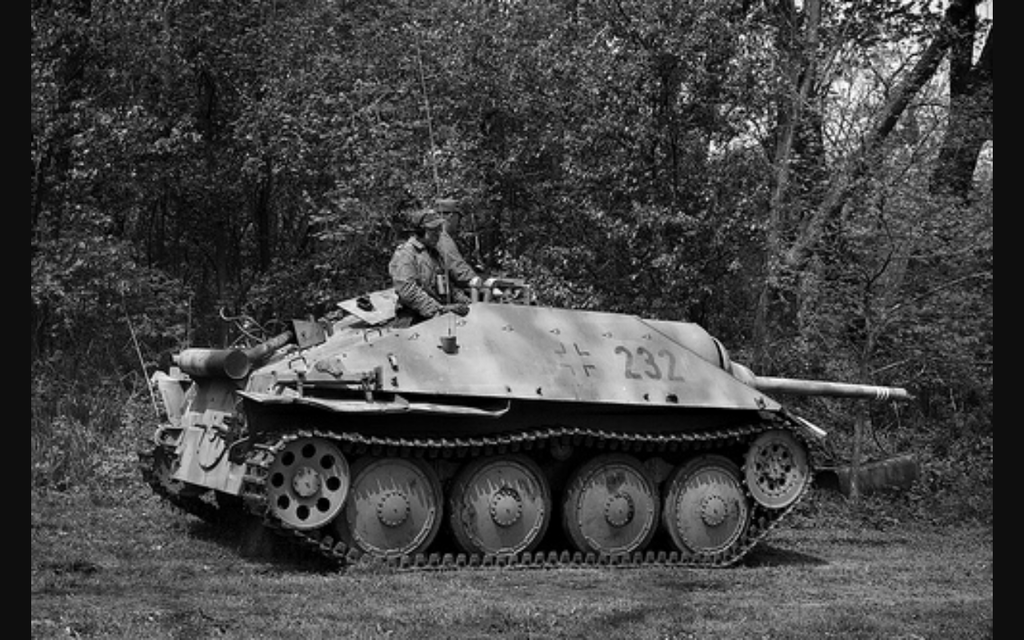
Jagdpanzer 38 of 8th SS Cavalry Division Florian Geyer, Hungary, 1944
The Jagdpanzer 38 fit into the lighter category of German tank destroyers that began with the Panzerjäger I, continued with the Marder series and ended with the Jagdpanzer 38. The 75 mm Pak 39 L/48 gun of the Jagdpanzer 38 was a modified version of the 75 mm StuK 40 L/48 used in the StuG III and StuG IV assault guns. With this gun the Jagdpanzer 38 was able to destroy nearly all Allied or Soviet tank types in service at long ranges (except heavy tanks) and its fully enclosed armor protection made it a safer vehicle to crew than the open-topped Marder II or Marder III series.
The Jagdpanzer 38 was one of the most common late-war German tank destroyers. It was available in relatively large numbers and was generally mechanically reliable.[8] Like some other late-war German SPGs, the Jagdpanzer 38 mounted a remote-control machine gun mount which could be fired from within the vehicle. This proved popular with crews, though to reload the gun a crewmember needed to expose himself to enemy fire.
Also, its small size made it easier to conceal than larger vehicles. A self-propelled gun such as this was not intended for a mobile, meeting engagement or the typical Wehrmacht blitzkrieg style of warfare. Instead, a light self-propelled gun like the Jagdpanzer 38 excelled when emplaced along pre-determined lines of sight where the enemy was expected to approach and when used in defensive positions to support a prepared ambush. The Jagdpanzer 38 is similar in its dimensions and vertical profile to the minuscule and undergunned Panzer II, a prewar tank. However, by 1944 the majority of tanks were dramatically larger and heavier, making a Jagdpanzer 38 waiting motionless in ambush a very small target to detect, much less hit. Its main failings were comparatively thin side armor, limited ammunition storage, poor gun traverse, poor internal layout that made operating the vehicle difficult, as well as leaf springs and drive wheels that were prone to failure due to the increased weight.[9] Using the Jagdpanzer 38 and similar vehicles according to a defensive doctrine would offset some of the disadvantages of poor side armor and limited gun traverse.
this would make a nice dio scene

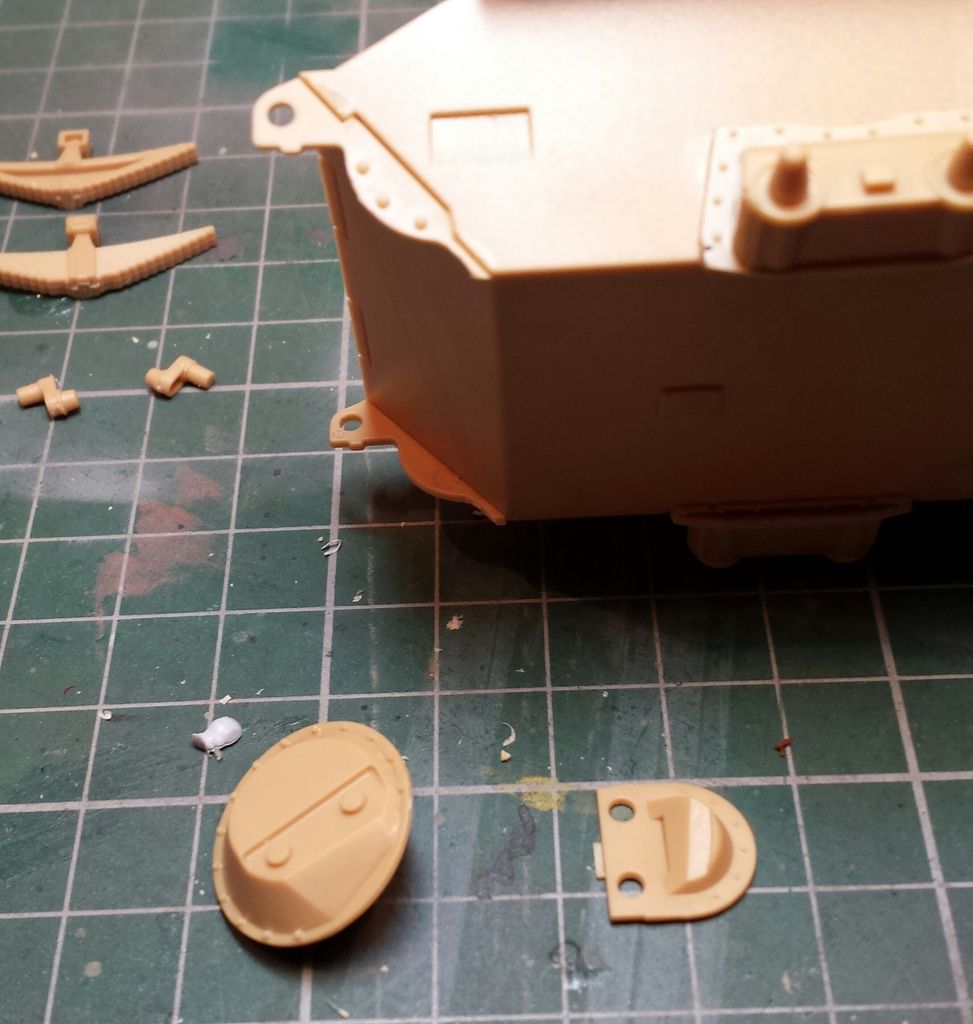
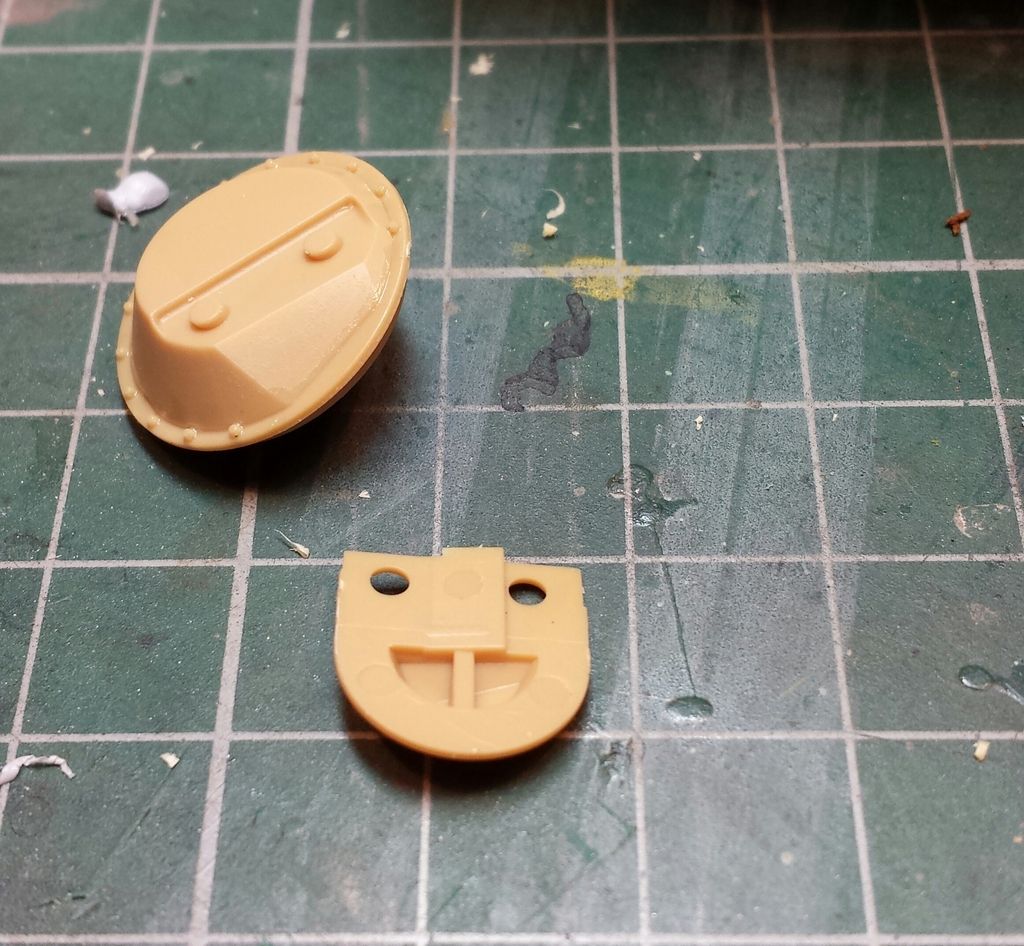
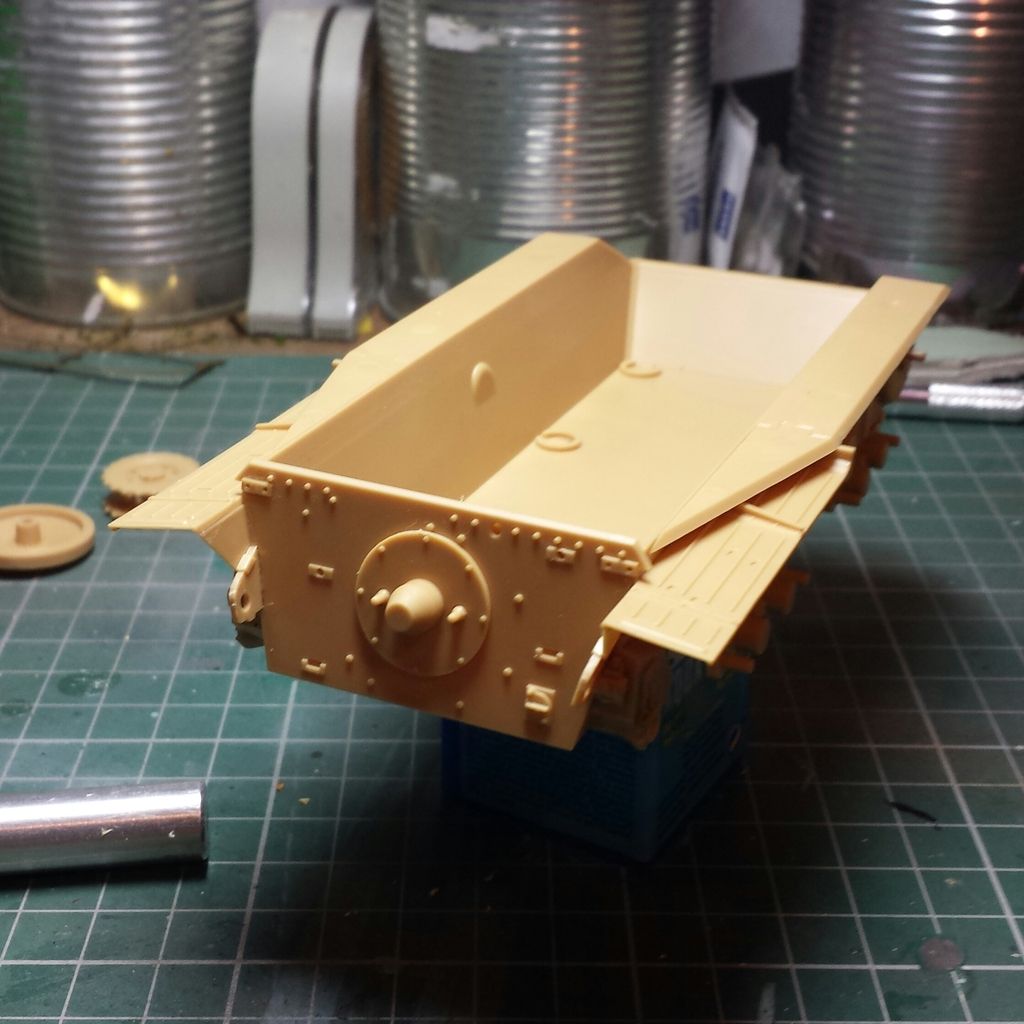
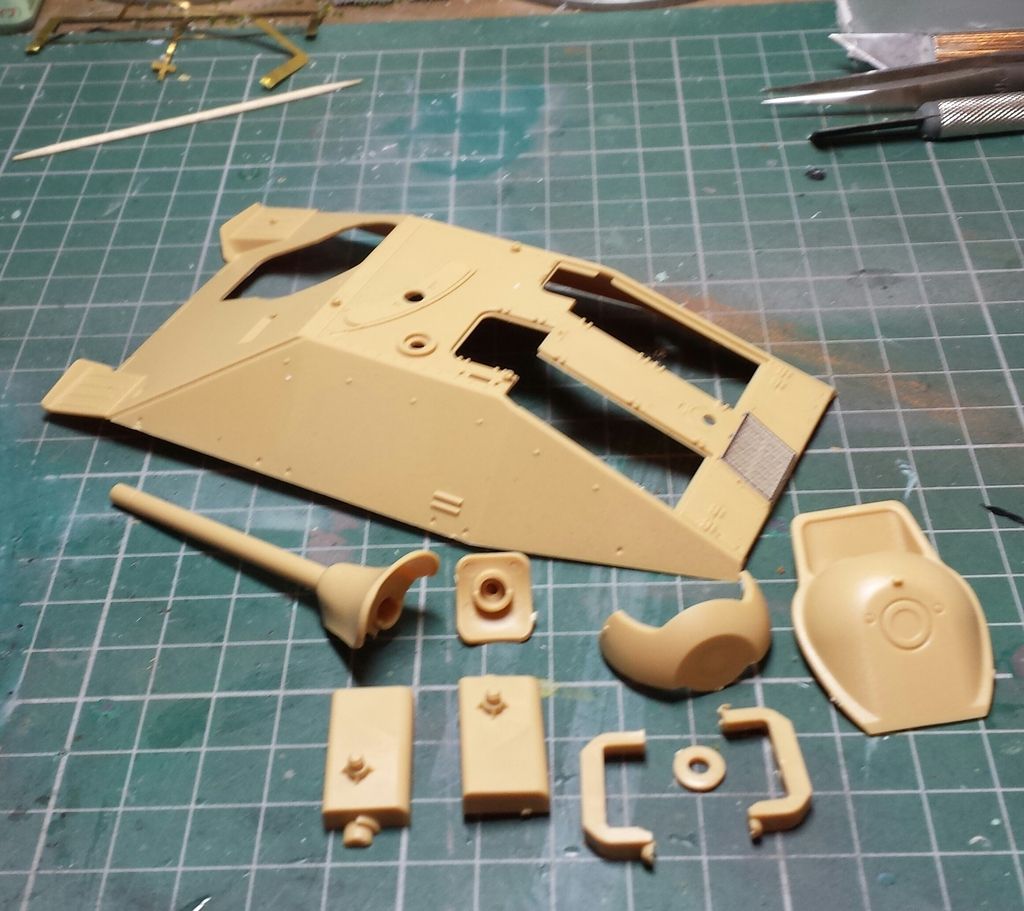
Right next up was the P E just one part for the grill , i have not yet put all the hatches in place or the grab handles because i might do some work on
inside yet i am waiting on a book to turn up hopfull in the next day or so , as for the grab handles because this has a masking sheet with it iam thinking the less stuff to break of whilst masking and painting .
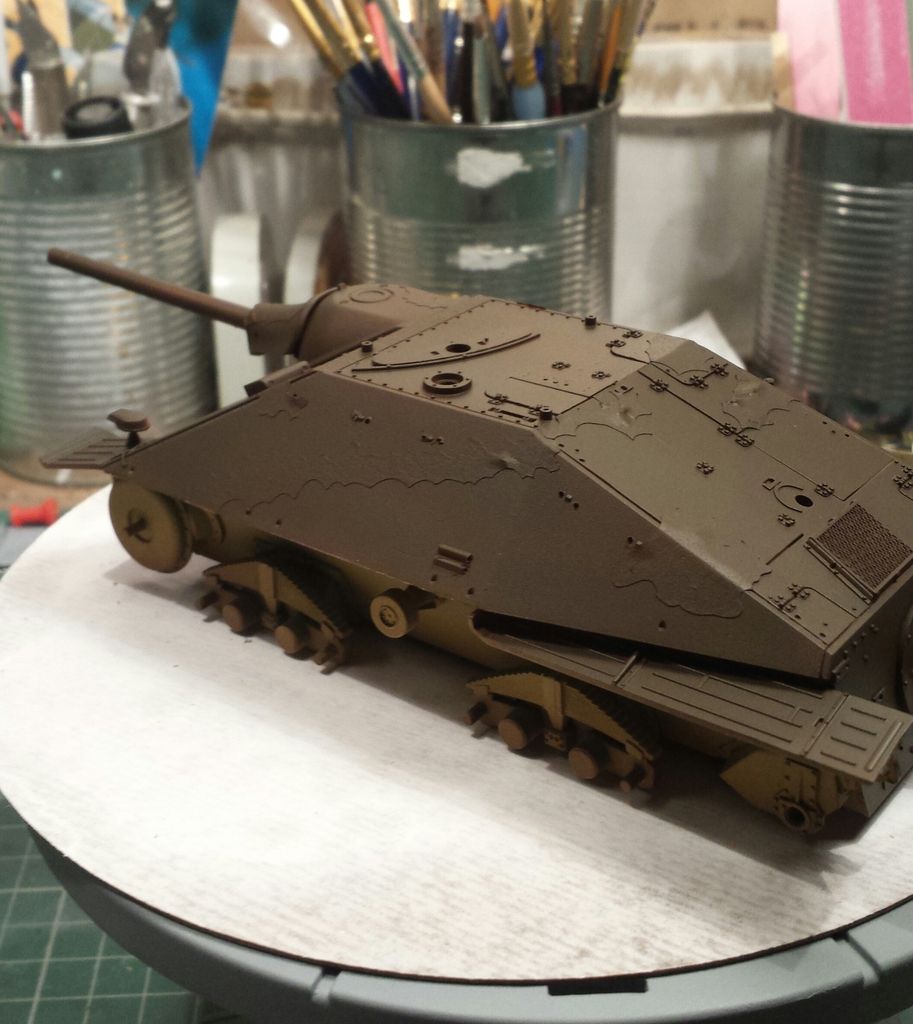
so i have primed the upper hull and the inside with mig ammo grey primmer.
and thats it for now , i have just rested the upper hull on the lower hull just for the photo .
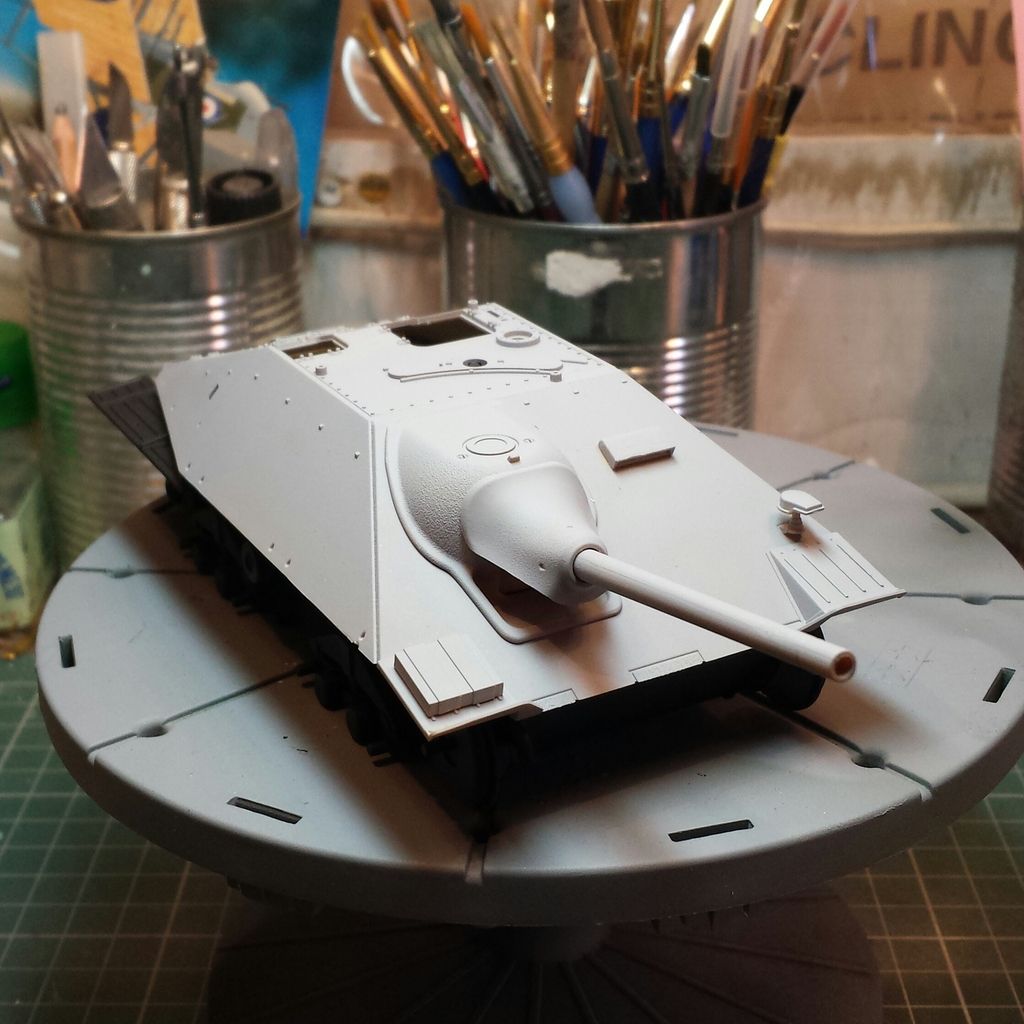
thanks for looking
dry fitted the wheels , then removed them for painting with badger black primer ,as with all the lower hull to give the base coat a bit of depth .

fitted the back plate and back fenders .

then the primer , i do like this badger primer.

whist that was left to dry i moved on to the main gun this went together no problem.

Here are some pictures and some history .
meet big brother

The Jagdpanzer 38 was intended to be more cost-effective than the much more ambitious Jagdpanther and Jagdtiger designs of the same period. Using a proven chassis, it avoided the mechanical problems of the larger armoured vehicles.
Hetzer was built on the Panzerkampfwagen 38(t)‘s widened and lengthened chassis with modified suspension (larger road-wheels from Praga TNH n.A prototype reconnaissance tank) and up-rated engine. The new engine was 160hp Praga AC/2 6-cylinder engine controlled by Praga-Wilson gearbox (5 forward and 1 reverse gear). Chassis was modified in order to accommodate larger gun and thicker armour than regular Panzerkampfwagen 38(t) tank. Its combat weight was 16 metric tons (verses 9.8-tons for the Pz 38(t)) and it could travel at maximum speed of some 42km/h.
It was better armored than the thinly armoured earlier Panzerjäger Marder and Nashorn with a sloped armour front plate of 60 mm sloped back at 60 degrees from the vertical (equivalent in protection to about 120 mm), carried a reasonably powerful 75mm gun, was mechanically reliable, small and easily concealed. It was also cheap to build.
The Jagdpanzer 38 succeeded the open-top Marder III (based on the same chassis) in production from April 1944; about 2584 were built until the end of the war. The older Marder III Panzerjäger series retained the same vertically sided chassis as Panzer 38(t). In the Jagdpanzer 38, the lower hull sides slope 15 degrees outward to make roughly hexagonal shape when viewed from front or rear. This increased the available interior space and enabled a fully enclosed casemate-style fighting compartment. Because of the fully enclosed armor, it was 5 tonnes heavier than the Marder III. To compensate for the increased weight, track width was increased from 293 mm to 350 mm.[4]
Initial production Jagdpanzer 38 did not sit even with the ground because gun, transmission and thicker frontal armor weighed the front down. Leaf springs were strengthened from June 1944 which leveled the posture of the vehicle. From May–July 1944, accessibility was improved in the form of more hatches: commander's smaller hatch opening to the rear, then right rear corner for radiator access, and left rear corner for fuel tank access. From August 1944 lighter inner and outer mantle reduced the weight by 200 kg. These are more conical looking mantle than half cone shaped initial mantles. Also from August 1944, new rear idler wheels were introduced. These had 8, 6, and 4 (not necessarily in that order) lightening holes instead of 12. These simplified the manufacturing process. In September 1944, front 16 spring leaves were increased in thickness to 9mm per leaf, rear 16 leaves maintained 7mm each in thickness. Also in September side Schurtzen's front and rear tips were bent inward to prevent them from catching bushes and get dismounted. It was discovered that driver's periscope housing acted like a shot trap, preventing incoming shells from bouncing off the front glacis. The protruding housing was removed, instead periscope was inserted into vertical cuts to the front armor from October 1944. Also from October 44, flame reducing muffler was introduced. These reduced visibility and backfire. Commander's head cushion was added to the hatch from October 1944. At the same time, road wheel's rims were riveted instead of using bolts. To cope with heavy front, and the necessity to traverse the vehicle to aim, gear ratio was lowered to 1:8 instead of 1:7.33 to reduce the stress on final gears from January 1945. Button-down Jagdpanzer 38 was blind to the right side. Since 20mm side armors (same as late model Panzer II's side armor) were only adequate to protect the crew from fairly small caliber guns, it was important to face the threat forward. Hence, commander's field of view was planned to be improved by installing a rotating periscope in Jagdpanzer 38 Starr, just as Sturmgeschutz III and Elefant had evolved from a single pair of periscopes to all around vision blocks. However, Jagdpanzer 38 Starr came too late to see the action in the field.
Swiss Army G-13
The Jagdpanzer 38 equipped the Panzerjägerabteilungen (tank destroyer battalions) of the infantry divisions, giving them some limited mobile anti-armor capability. After the war Czechoslovakia continued to build the type (versions ST-I and ST-III for training version, about 180 units built) and exported 158 vehicles (version G-13) to Switzerland. Most vehicles in today's collections are of Swiss origin.
By order of Adolf Hitler in November 1944, a number of Jagdpanzer 38s were refurbished straight from the factory with a Keobe flamethrower and accompanying equipment instead of the normal gun. The flame projector, encased in a metal shield reminiscent of that of a gun barrel, was easily prone to damage. Fewer than 50 of these vehicles, designated Flammpanzer 38, were completed before the end of the war, but they were used operationally against Allied forces on the Western Front.
Further variants were a Jagdpanzer 38 carrying the 150 mm sIG 33/2 Howitzer, of which 30 were produced before the end of the war, and the Bergepanzer 38, a light recovery vehicle of which 170 were produced. Plans were made to produce other variants, including an assault gun version of the Jagdpanzer 38 carrying a 105 mm StuH 42 main cannon, a version mounting the 7.5 cm KwK 42 L/70 gun from the Panther, and an anti-aircraft variant mounted with a Flak turret. The war ended before these proposed models were put into production. Prototypes were also developed for the Jagdpanzer 38 Starr, this was a simplified version of the Jagdpanzer 38 and also a step towards the E-10. The design removed the recoil absorber from the main 7.5 cm Pak 39 gun, instead attaching the gun to the chassis, and using the Jagdpanzer 38's bulk and suspension to absorb the recoil. 10 were built, but never issued. 9 converted back to normal Jagdpanzer 38 and Hitler ordered the remaining prototype destroyed rather than let it be captured at the end of the war.[5][6]
Variants[edit]
Jagdpanzer 38, exhibited in the Texas Military Forces Museum in Austin, USA.
Befehlswagen 38 Command variant. Fitted with a 30W FuG 8 radio set.[5][6]
Flammpanzer 38 Jagdpanzer 38 modified with a Keobe flamethrower in place of the main gun. Deployed on the Western Front, with first use during the Battle of the Bulge (20 in 352nd and 353rd Panzer-Flamm-Kompanies attached to Army Group G). Less than 50 units produced.[6]
Panzerjaeger 38(t) mit 75mm L/70 Prototype version experimenting with mounting the 7.5cm KwK 42 L/70 gun from the Panther. 3 prototypes built, but the long gun and extra weight caused even bigger problems driving the vehicles. Proposal made by Krupp to modify the Jagdpanzer 38 with a superstructure to the rear to mount the gun, but no more development was done on this idea.[6]
Jagdpanzer 38 Starr A simplified version of the Jagdpanzer 38 which attached the 7.5cm Pak 39 gun to the chassis, and fitted with a Tatra diesel engine. 10 were built, 9 converted back to normal Jagdpanzer 38. The remaining prototype was destroyed at the end of the war.[5][6]
Panzerjaeger 38(t) mit 105mm StuH 42/2 L/28 Proposed version of the Jagdpanzer 38 Starr armed with a 10.5 cm howitzer.[6]
ST-I Post-war Czech designation for new manufactured or repaired Jagdpanzer 38. 249 in service, together with 50 ST-III/CVP driver training vehicles (Unarmed chassis, some with a superstructure). Prototype developments included Praga VT-III armoured recovery vehicle and PM-I flamethrower tank.[6]
G13 Post war version of the Jagdpanzer 38 built for Switzerland, armed with a StuK 40 gun.[6]
Designs based on chassis[edit]
Bergepanzer 38 Light recovery vehicle, issued to units along with the Jagdpanzer 38. 170 units produced. A prototype was developed to fit the design with a 2cm Flak 38.
15 cm Schweres Infanteriegeschütz 33/2 (Sf) auf Jagdpanzer 38 Jagdpanzer 38 chassis mounting a 15 cm sIG 33 in a superstructure. Intended as a replacement for the Grille. 30 built, from December 44.[6]
Vollkettenaufklärer 38(t) Reconnaissance vehicle based on the Bergepanzer 38. Several prototypes tested, mounting single or twin 2cm Flak 38, and in one case a 7.5 cm K51 L/24 gun.[6]
Vollkettenaufklarer 38(t) Kätzchen A fully tracked reconnaissance vehicle based on the Jagdpanzer 38. Prototypes were built by BMM and ordered into production, but never built. The prototypes were believed to be destroyed before the end of the war.[6]
Flakpanzer 38(t) Kugelblitz Proposal to mount the turret from a Flakpanzer IV Kugelblitz on a Jagdpanzer 38 chassis. No production due to the war situation.[6]
Panzerjäger 38(t) with Panzer IV turret Krupp proposal to mount the turret of a Panzer IV with a 7.5 cm KwK 40 or 8 cm PAW 600 gun on the chassis of Panzerjäger 38(t). The proposal was not pursued.[6]
Panzerjager 38(d) a larger version of the Panzerjager 38 prototype only[7]
Performance[edit]
Jagdpanzer 38 of 8th SS Cavalry Division Florian Geyer, Hungary, 1944
The Jagdpanzer 38 fit into the lighter category of German tank destroyers that began with the Panzerjäger I, continued with the Marder series and ended with the Jagdpanzer 38. The 75 mm Pak 39 L/48 gun of the Jagdpanzer 38 was a modified version of the 75 mm StuK 40 L/48 used in the StuG III and StuG IV assault guns. With this gun the Jagdpanzer 38 was able to destroy nearly all Allied or Soviet tank types in service at long ranges (except heavy tanks) and its fully enclosed armor protection made it a safer vehicle to crew than the open-topped Marder II or Marder III series.
The Jagdpanzer 38 was one of the most common late-war German tank destroyers. It was available in relatively large numbers and was generally mechanically reliable.[8] Like some other late-war German SPGs, the Jagdpanzer 38 mounted a remote-control machine gun mount which could be fired from within the vehicle. This proved popular with crews, though to reload the gun a crewmember needed to expose himself to enemy fire.
Also, its small size made it easier to conceal than larger vehicles. A self-propelled gun such as this was not intended for a mobile, meeting engagement or the typical Wehrmacht blitzkrieg style of warfare. Instead, a light self-propelled gun like the Jagdpanzer 38 excelled when emplaced along pre-determined lines of sight where the enemy was expected to approach and when used in defensive positions to support a prepared ambush. The Jagdpanzer 38 is similar in its dimensions and vertical profile to the minuscule and undergunned Panzer II, a prewar tank. However, by 1944 the majority of tanks were dramatically larger and heavier, making a Jagdpanzer 38 waiting motionless in ambush a very small target to detect, much less hit. Its main failings were comparatively thin side armor, limited ammunition storage, poor gun traverse, poor internal layout that made operating the vehicle difficult, as well as leaf springs and drive wheels that were prone to failure due to the increased weight.[9] Using the Jagdpanzer 38 and similar vehicles according to a defensive doctrine would offset some of the disadvantages of poor side armor and limited gun traverse.


this would make a nice dio scene

Right next up was the P E just one part for the grill , i have not yet put all the hatches in place or the grab handles because i might do some work on
inside yet i am waiting on a book to turn up hopfull in the next day or so , as for the grab handles because this has a masking sheet with it iam thinking the less stuff to break of whilst masking and painting .
so i have primed the upper hull and the inside with mig ammo grey primmer.
and thats it for now , i have just rested the upper hull on the lower hull just for the photo .


thanks for looking
-
OliveDrab

- Command Sergeant Major
- Posts: 823
- Joined: Thu Dec 25, 2014 4:48 am
- Location: Missouri, USA

Re: HANS HETZER
Nice work, the more I see of these Hetzers, the more I like them. The Academy kit looks rather nice aslo.
Curt


Re: HANS HETZER
I had no idea that the Jadgpanzer 38(t) was so popular.
Most folks think that they're pretty ugly little machines.
It will be really Cool to see how everyone builds theirs up.
Well chosen and nice work so far.
Most folks think that they're pretty ugly little machines.
It will be really Cool to see how everyone builds theirs up.
Well chosen and nice work so far.

-
martin57
- Command Sergeant Major
- Posts: 897
- Joined: Tue Apr 01, 2014 8:44 pm
- Location: oundle, east northants.
Re: HANS HETZER
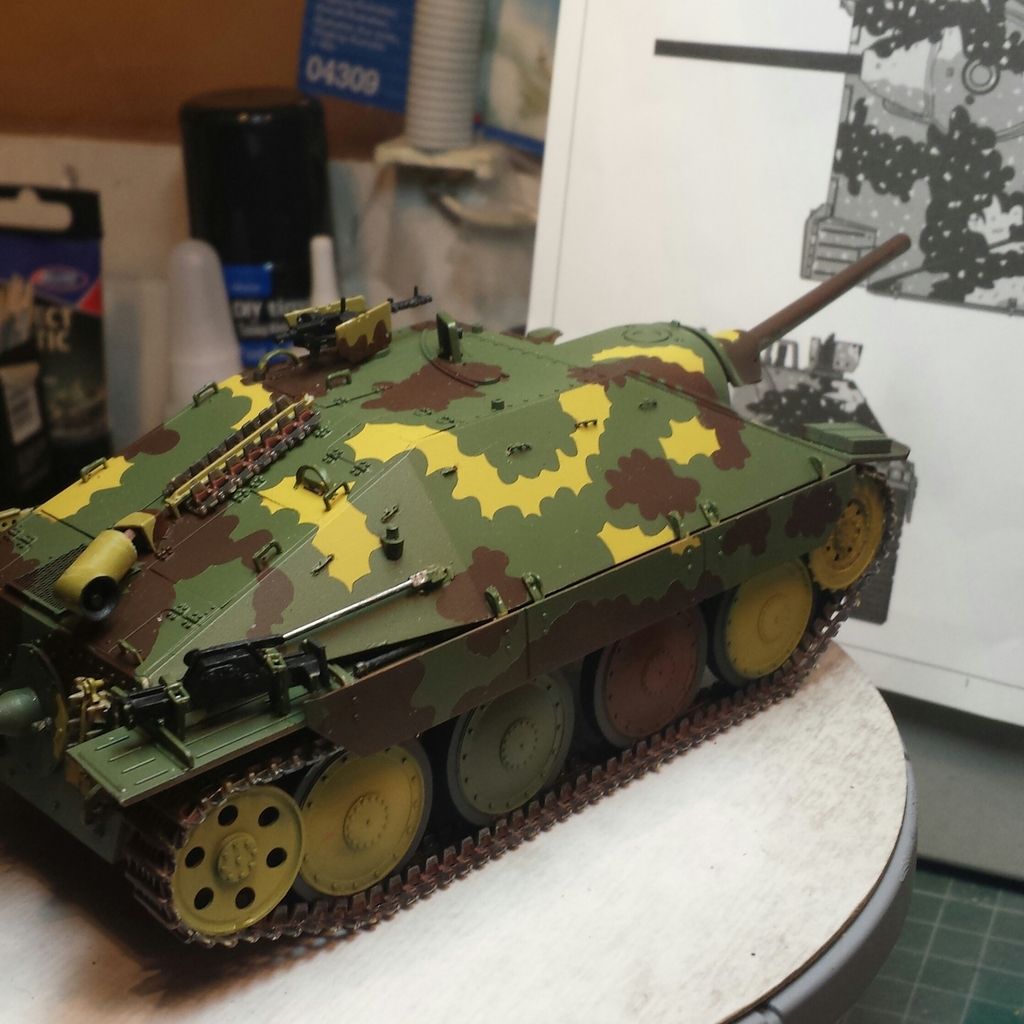
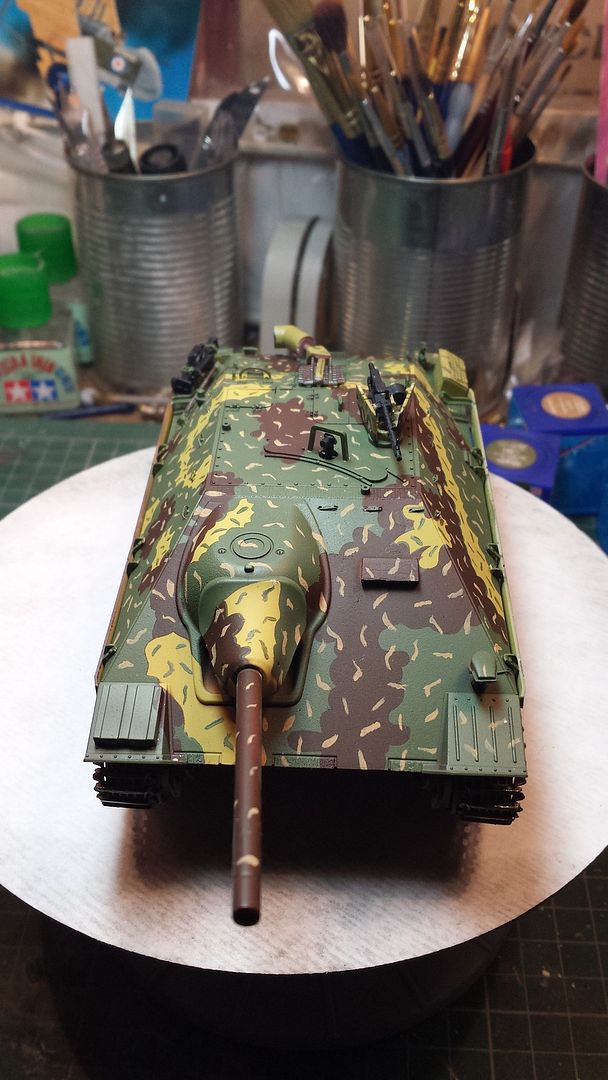
Ok moving on with this little jem,
After drilling a load of small holes around the top side of the hull so i can put some carrying handles witch i will make out of wire .
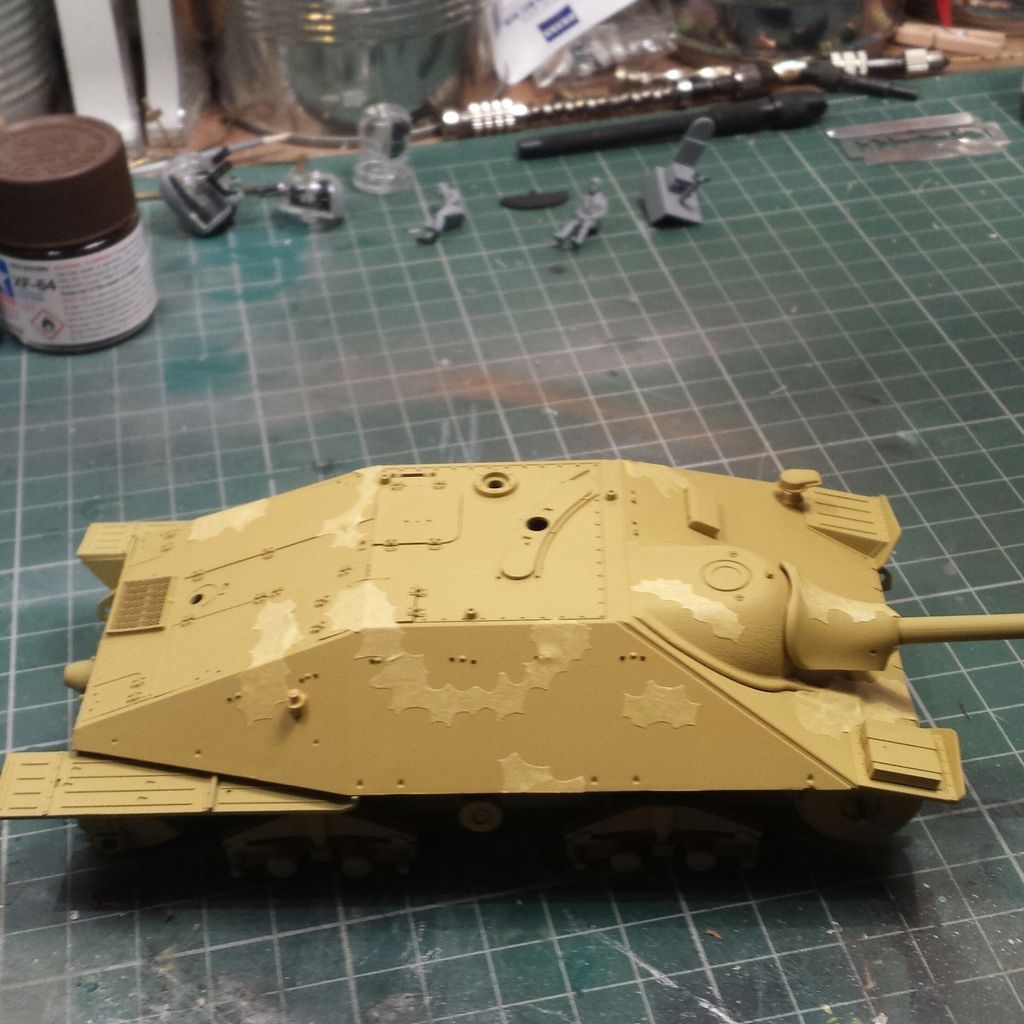
i taped up the hatches from the inside ,so i have the choice latter to have them open or closed , then i put a spot of white glue to hold the upper and lower parts together whist i did the painting .
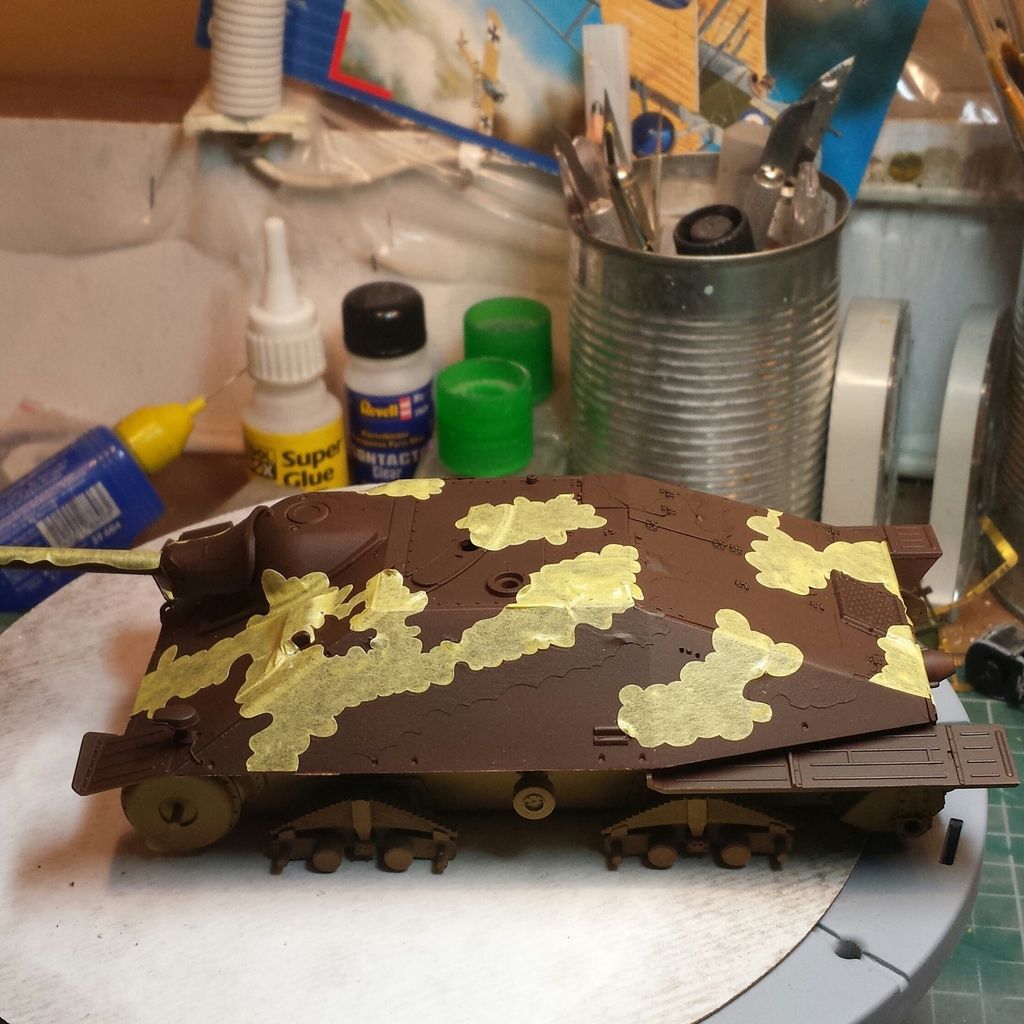
started of with the dark yellow , the paint diagrams are good but it does not tell you wot colour to lay down first ,and the masking can be a pain ,
if you havent done this before please take your time and double check before you start it is difficult to follow .
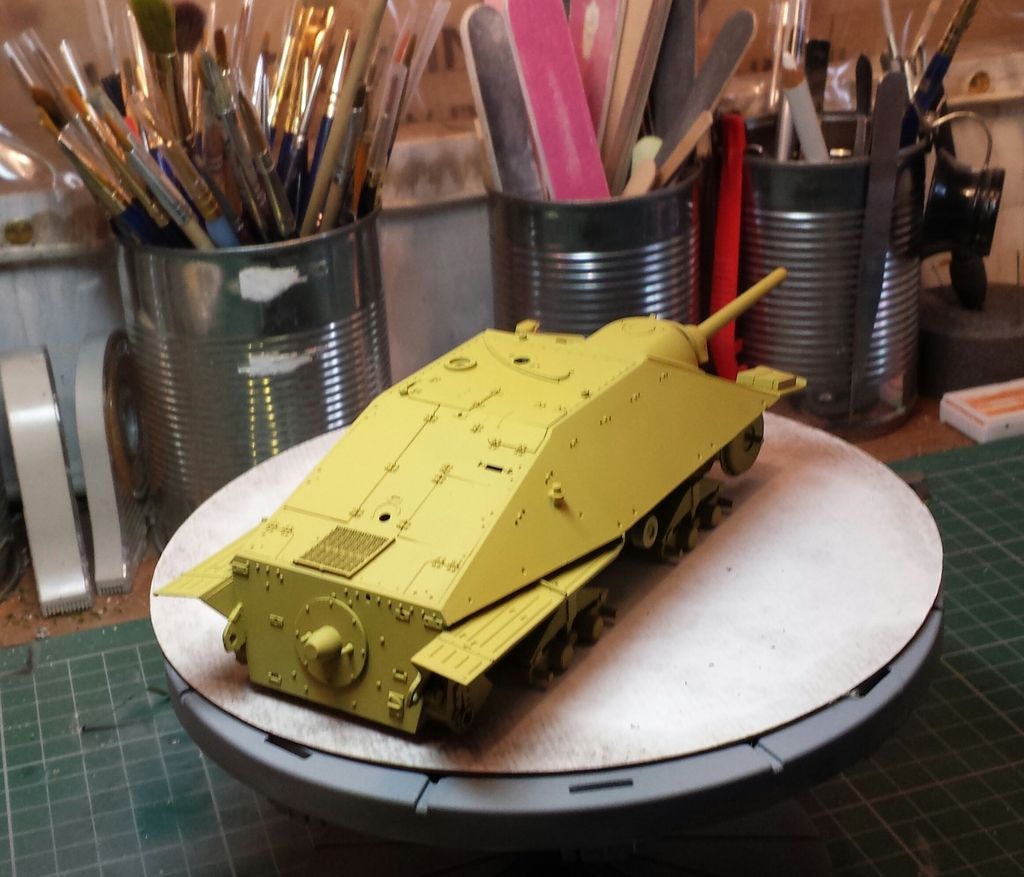
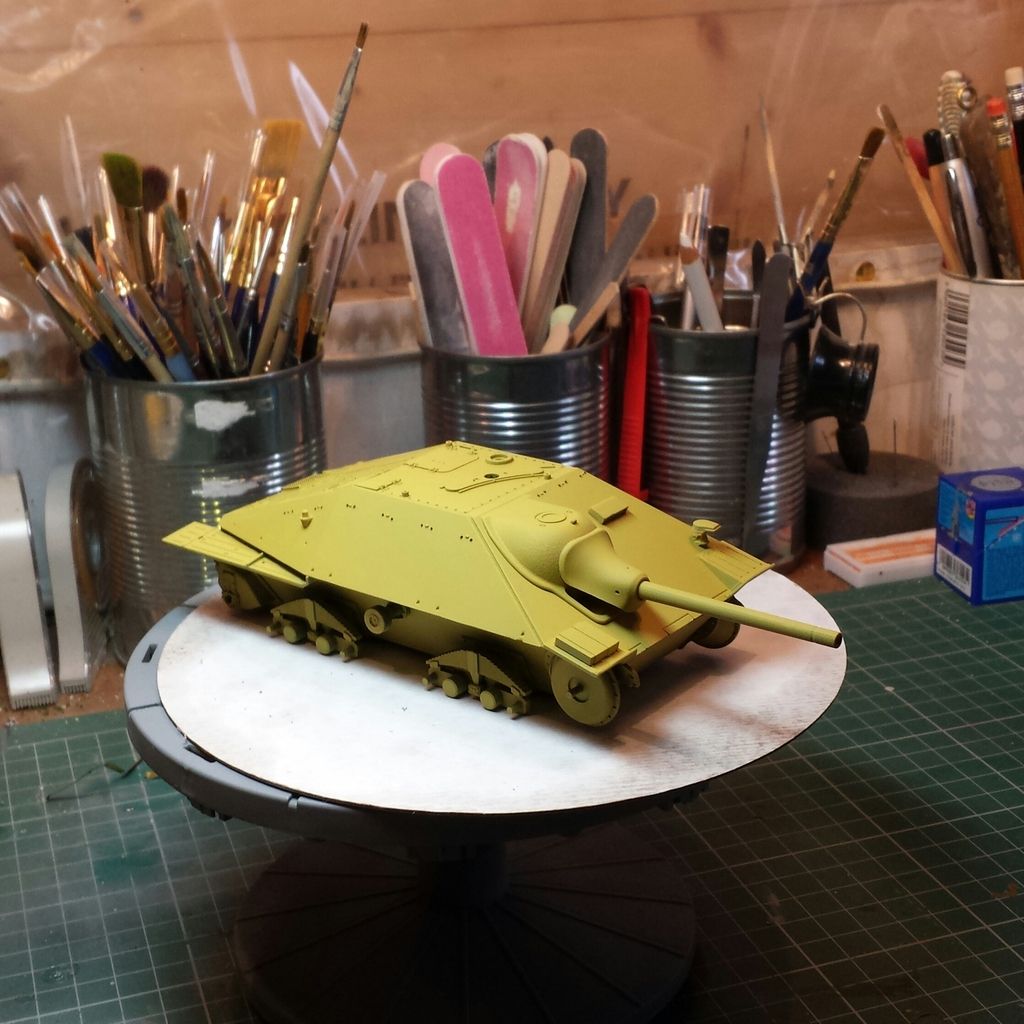
Now the fun begins , as you can see i have not placed the tools , handles or the muffler and side skirts on because it will make it better for masking .
well the first bit done .
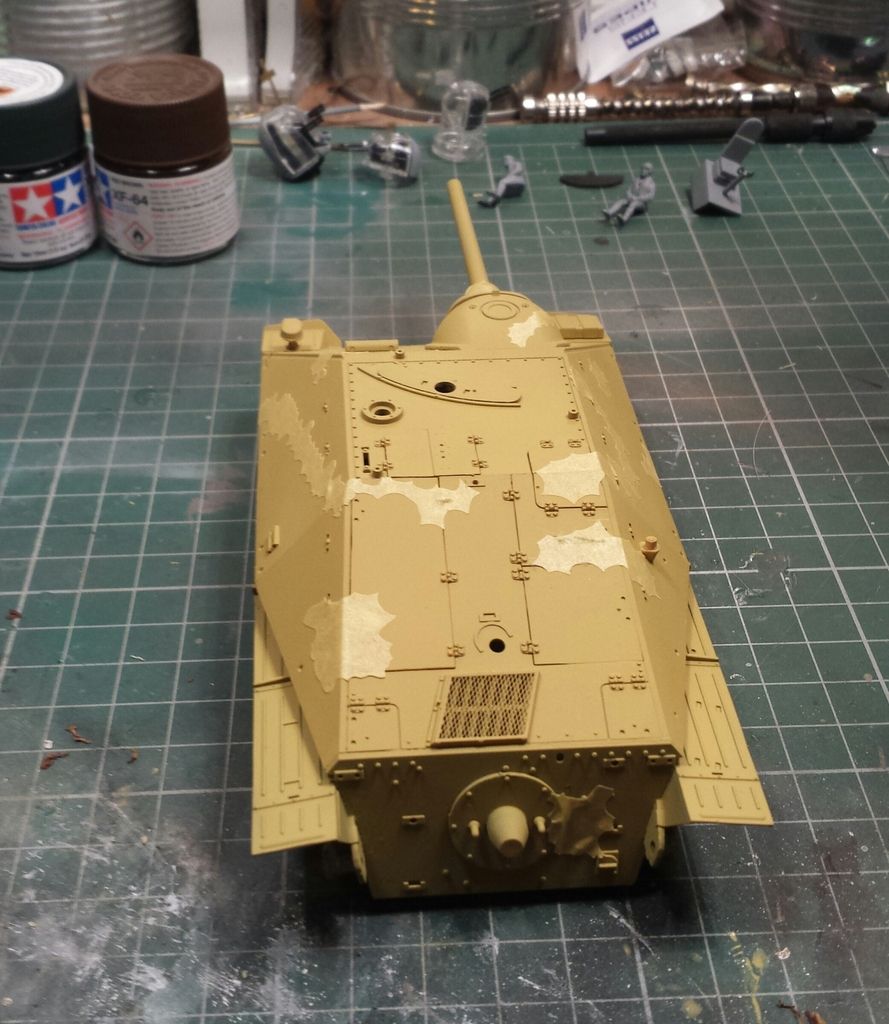
then sprayed the red brown , do not know what i was worried about .
i let that dry for a few hours, then came the last part of the masking ,this is the part that took the longest because you have to try and line up the
new mask with the previous one in places to make it look right, took a few goes but got it the best i could .
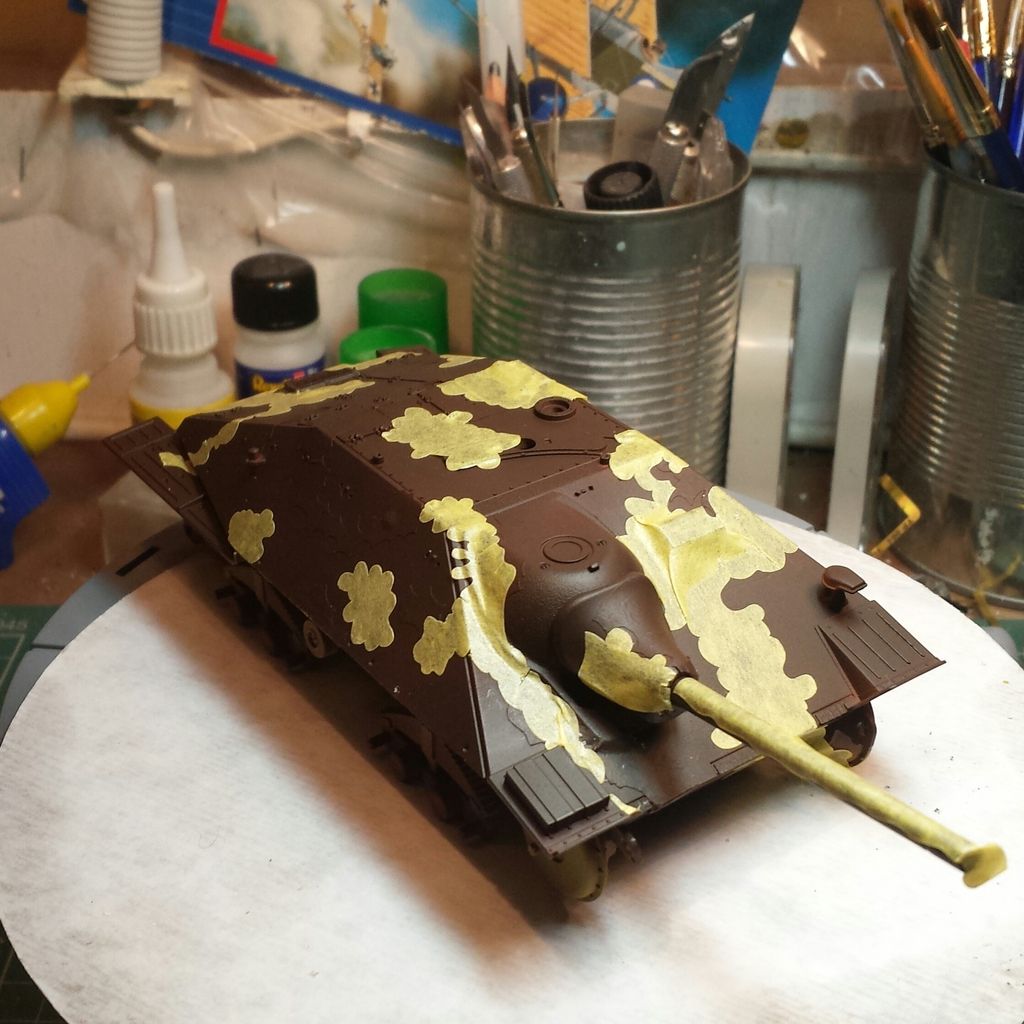
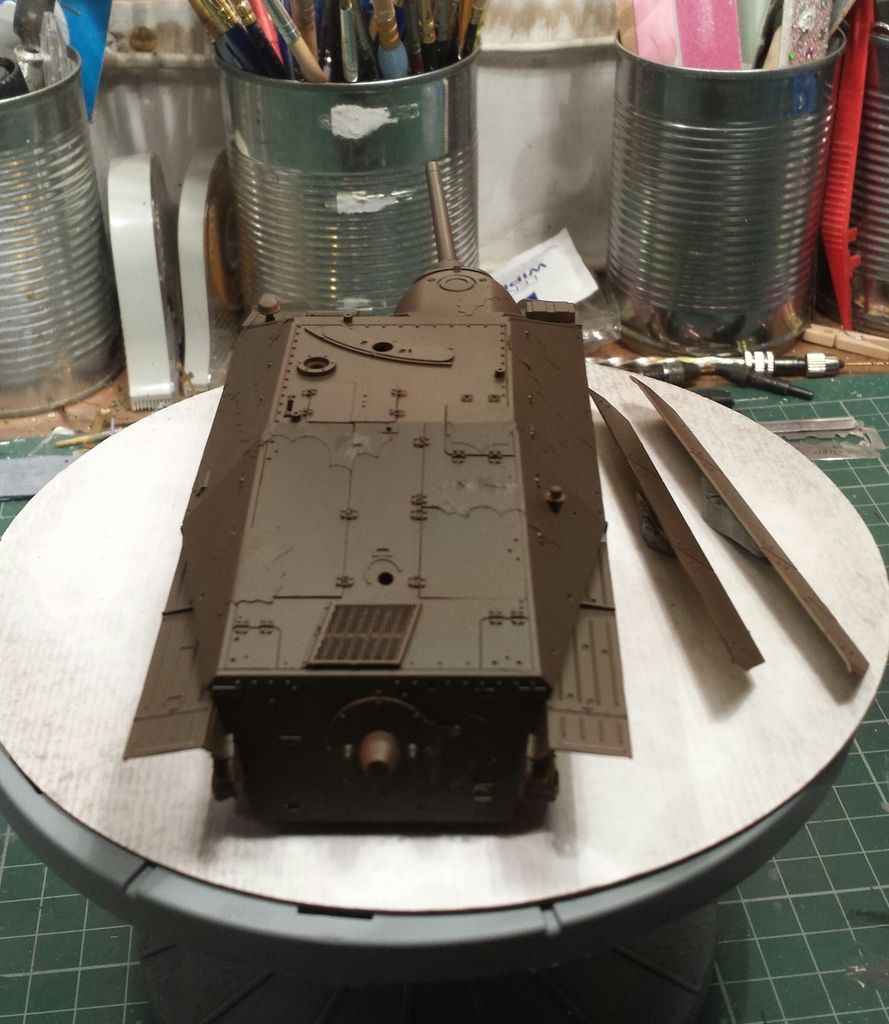
After that was done on went the green and when it was all done masking tape was taken of not leaving it on to long i did not want to risk any chipping .
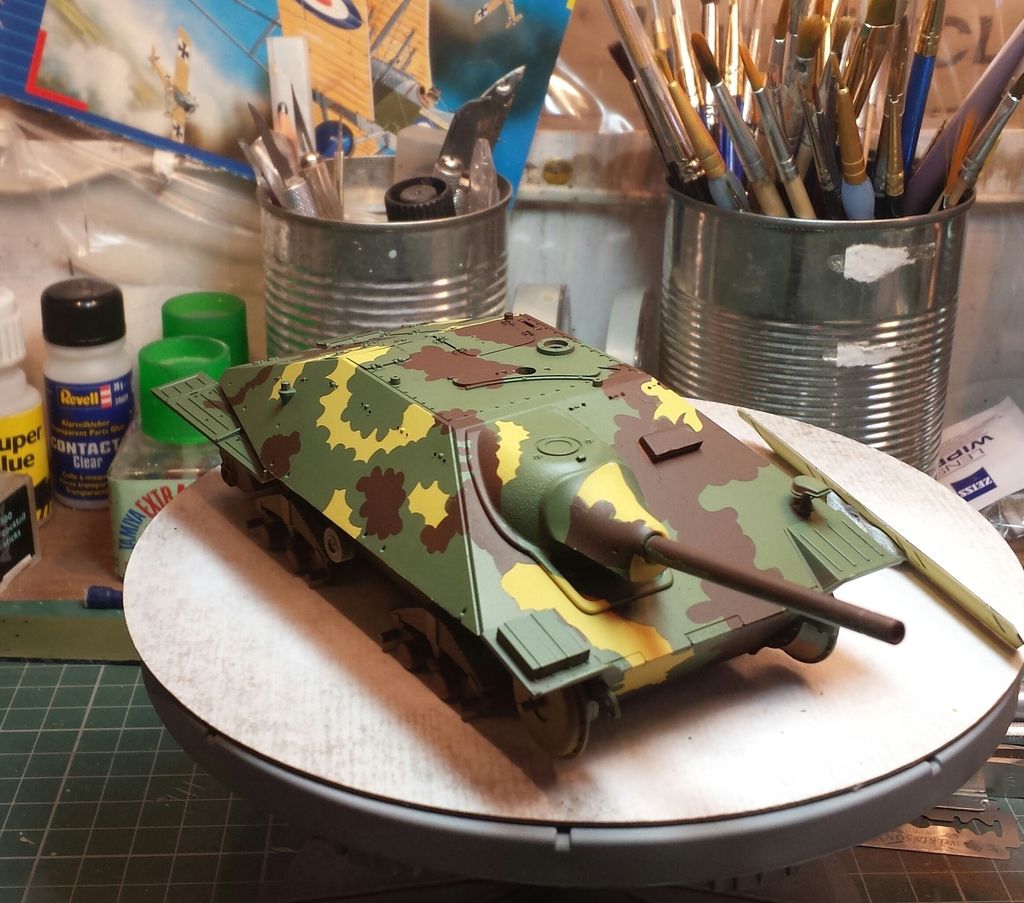
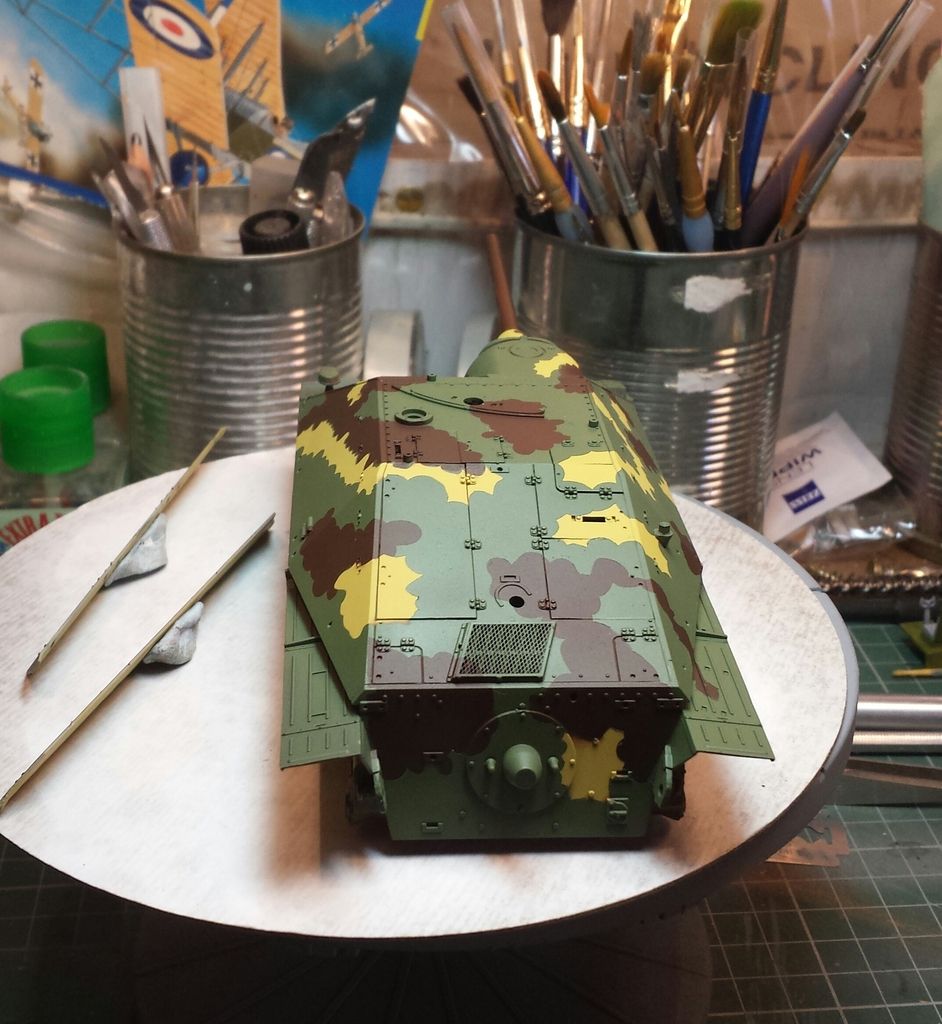
next job will be all the little lines all over it .
well that;s it for now .
After drilling a load of small holes around the top side of the hull so i can put some carrying handles witch i will make out of wire .
i taped up the hatches from the inside ,so i have the choice latter to have them open or closed , then i put a spot of white glue to hold the upper and lower parts together whist i did the painting .
started of with the dark yellow , the paint diagrams are good but it does not tell you wot colour to lay down first ,and the masking can be a pain ,
if you havent done this before please take your time and double check before you start it is difficult to follow .


Now the fun begins , as you can see i have not placed the tools , handles or the muffler and side skirts on because it will make it better for masking .

well the first bit done .


then sprayed the red brown , do not know what i was worried about .


i let that dry for a few hours, then came the last part of the masking ,this is the part that took the longest because you have to try and line up the
new mask with the previous one in places to make it look right, took a few goes but got it the best i could .


After that was done on went the green and when it was all done masking tape was taken of not leaving it on to long i did not want to risk any chipping .


next job will be all the little lines all over it .
well that;s it for now .
-
Schoof
- Chief Warrant Officer 3

- Posts: 2165
- Joined: Thu Aug 15, 2013 7:09 am
- Location: Veghel, Noord-Brabant, The Netherlands
Re: HANS HETZER
GREAT progress! ! Love the fact they put a mask in the kit
On the Bench:
Uhm. .... That. ..... And. .. uhm. ... That. ..... And. ..... uhm. ..... That. .... And. ... uhm. .. waaaaaaaaaaaaay too much
Uhm. .... That. ..... And. .. uhm. ... That. ..... And. ..... uhm. ..... That. .... And. ... uhm. ..
Re: HANS HETZER
Bold, brave, and beautiful you are for doing that bud. That's tricky stuff.
Super freaking well done!
Super freaking well done!
-
Nige201980

- Captain

- Posts: 4095
- Joined: Wed Jun 05, 2013 9:30 am
- Location: Doncaster South Yorkshire UK
- Contact:
Re: HANS HETZER
a cool little tank you've got there Martin and brilliant paint job buddy
http://www.youtube.com/channel/UCy-TGcs5u_ZXSZ9kObNfsPg
On the go at the Mo
Quite a few
On the go at the Mo
Quite a few
-
MarkVerploeg
- Major
- Posts: 4837
- Joined: Wed Oct 16, 2013 12:21 am
- Location: Oss, Noord Braband The Netherlands
Re: HANS HETZER
Very nice work on the paint
Certainly looks much better then my attempt with this kit
But that had something to do airbrush skills
Keep up the good work
Certainly looks much better then my attempt with this kit
But that had something to do airbrush skills
Keep up the good work
On the bench
GB builds
1/35 Trumpeter M1132 ESV
Personal builds
1/35 Hobby Boss M1070 tractor with M1000 semi trailer and Meng M1A2 TUSK II Abrams
1/35 Takom V2 rocket with the Meillerwagen and SS100 tractor
GB builds
1/35 Trumpeter M1132 ESV
Personal builds
1/35 Hobby Boss M1070 tractor with M1000 semi trailer and Meng M1A2 TUSK II Abrams
1/35 Takom V2 rocket with the Meillerwagen and SS100 tractor


Re: HANS HETZER
Beautiful paint job. Top skills. Looks like a gem of a kit too.
Its been tried and tested, it works! So don't blame the system if you're no good. 
Re: HANS HETZER
Very nice work there mate top job
-
martin57
- Command Sergeant Major
- Posts: 897
- Joined: Tue Apr 01, 2014 8:44 pm
- Location: oundle, east northants.
Re: HANS HETZER
Ok back again,
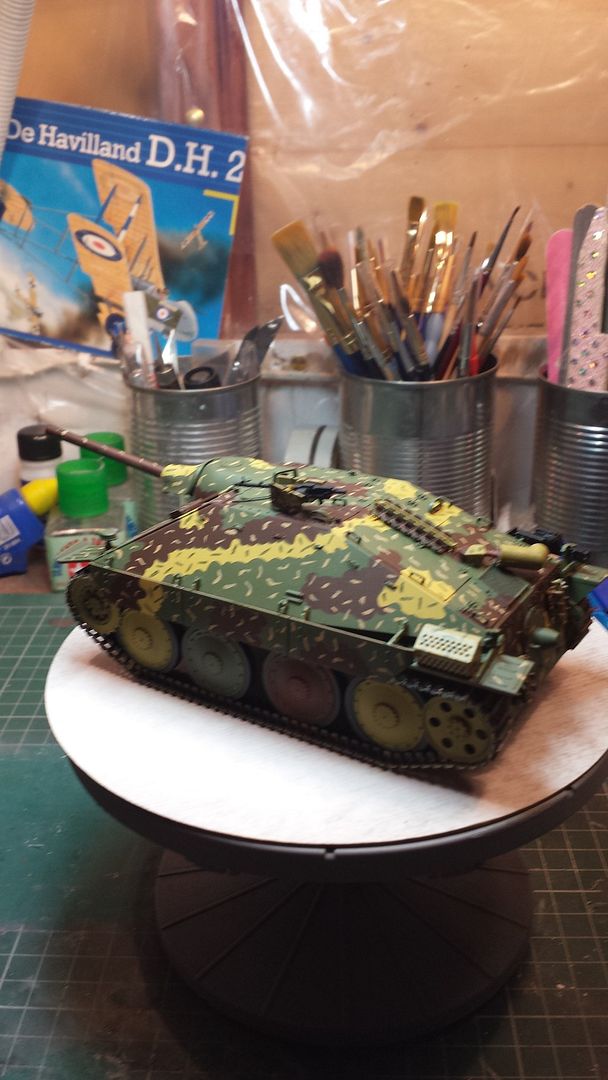
after painting the camo pattern i put all the other parts on .
no real drama ,i drilled the holes out on the box that goes on the back fender .
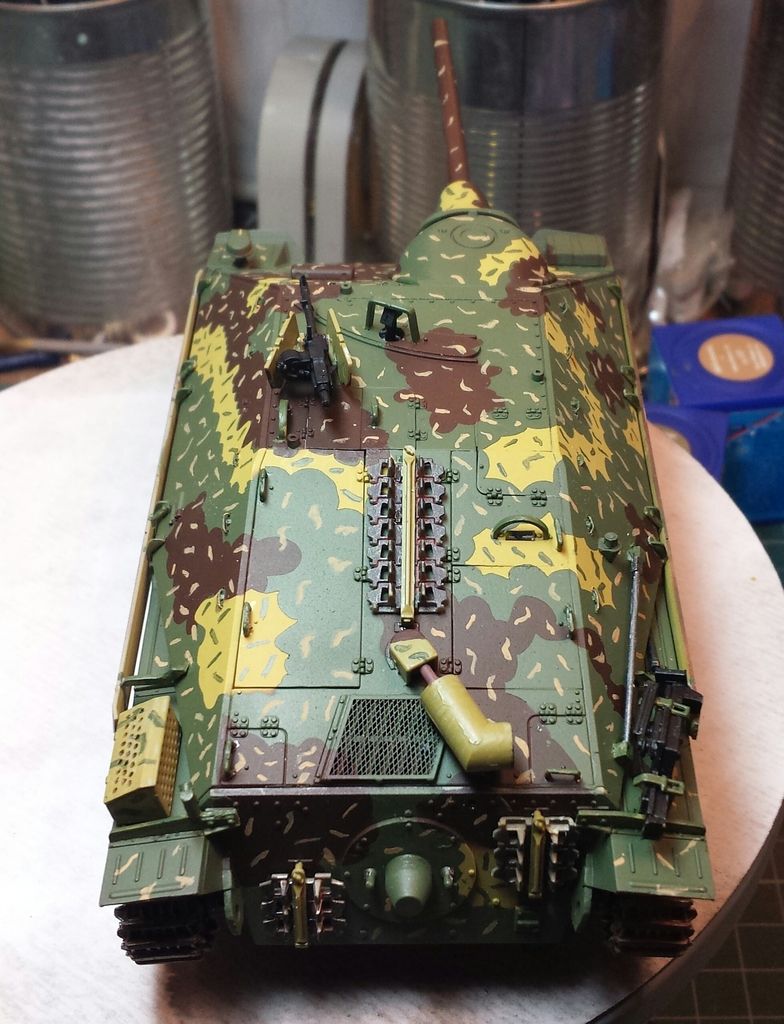
then moved on to doing the small lines in dark yellow and olive green,
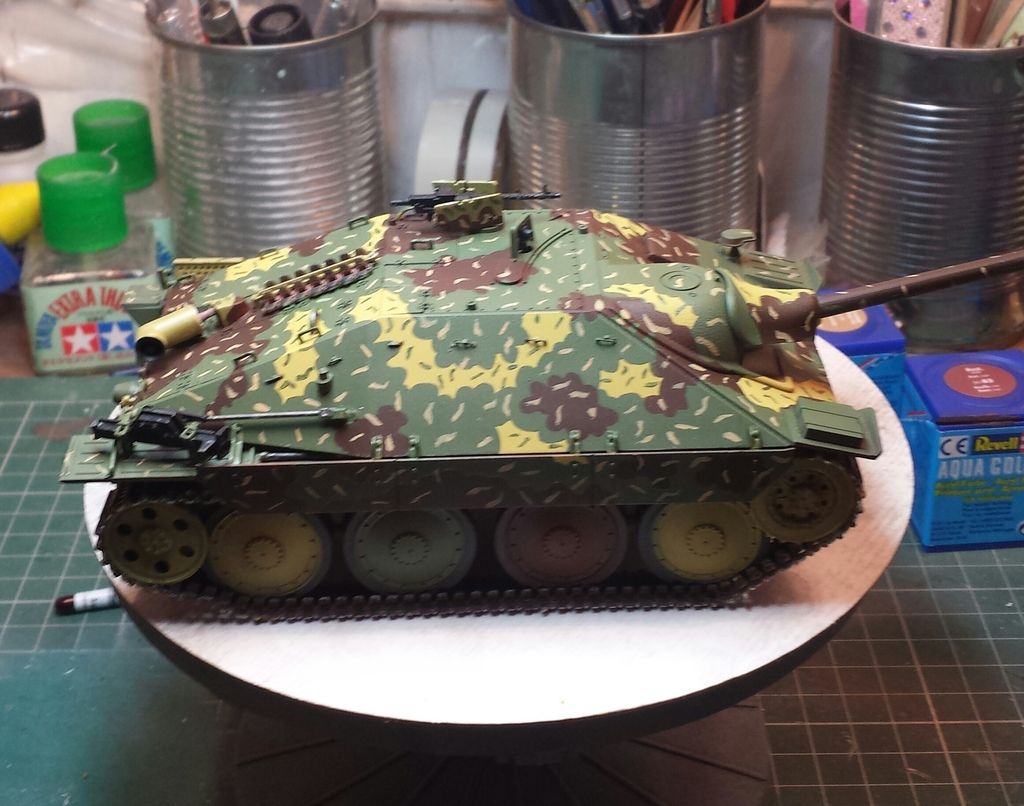
used a 00 brush took a bit of time trying not to rush it or go overboard .
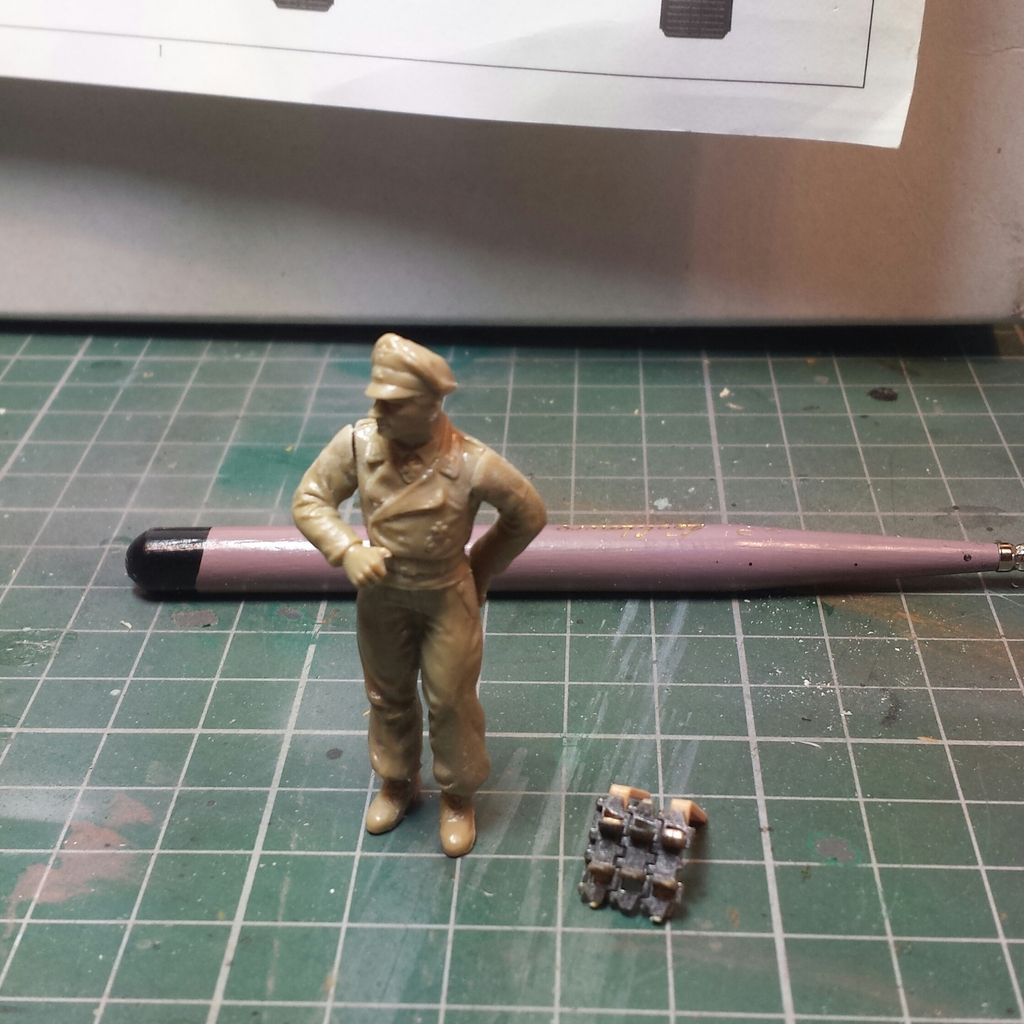
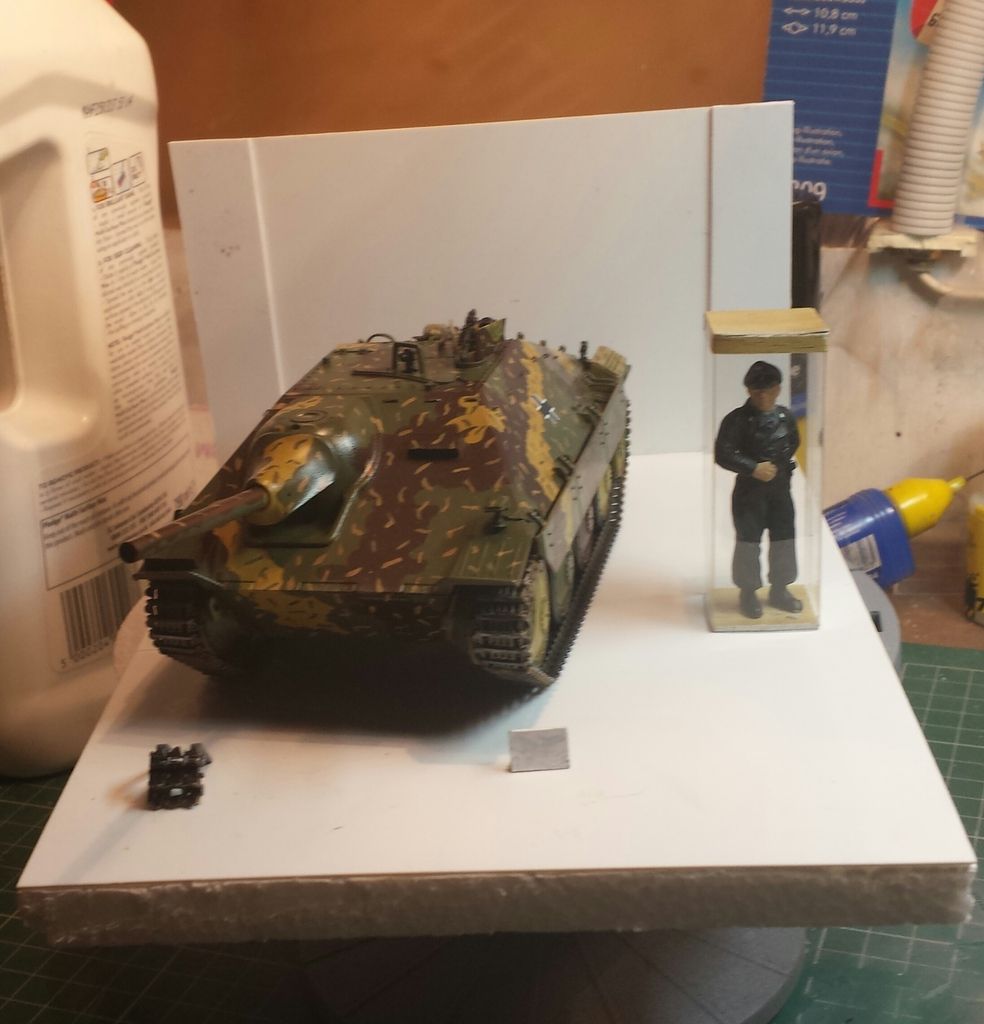
It was at this point i changed my mind for the dio instead of doing it all battle worn and dirty, i choose to do it restored and in a museum
first i found a figure i wanted out of the scrap box, then a slight alteration and some black primer and we are getting some were .
and a peice of spare track put on a display stand .
After the figure was dry i wanted to put it in a display case , so i had a hunt round for some thing that would work but no luck so i made one myself
out of a sheet of clear visor .
cut to size and scored and folded .
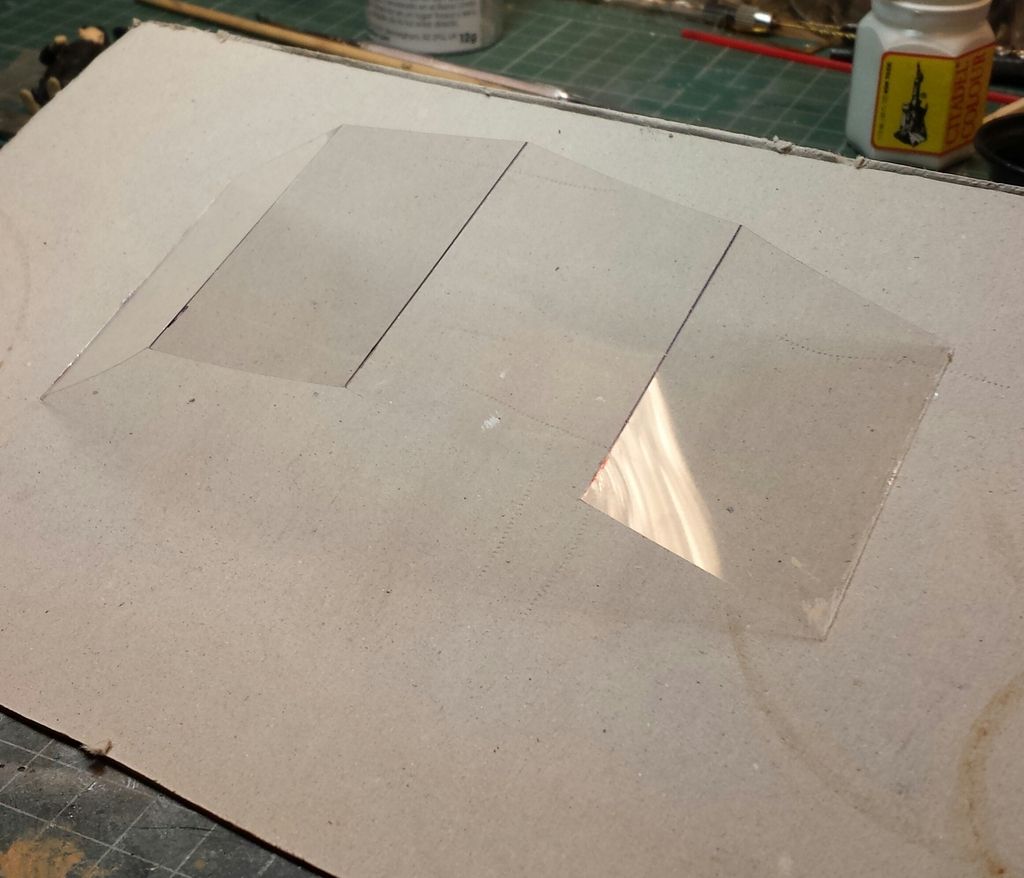
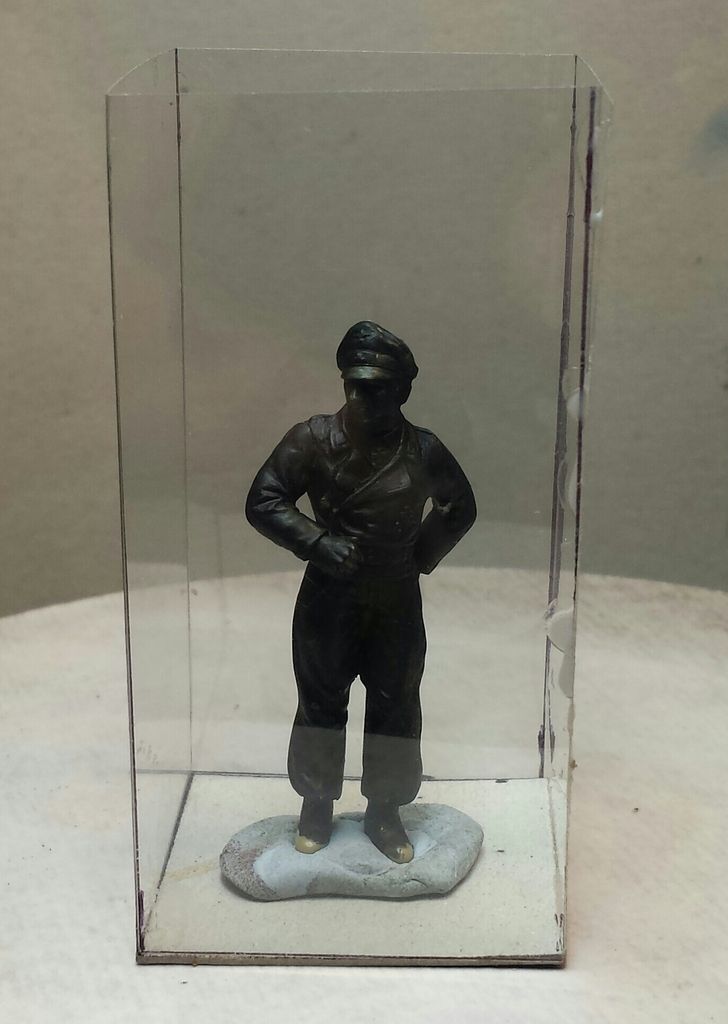
a bit big so i will do another one .
the base was made up of plastic card and pollystirene .so here is a mock up .
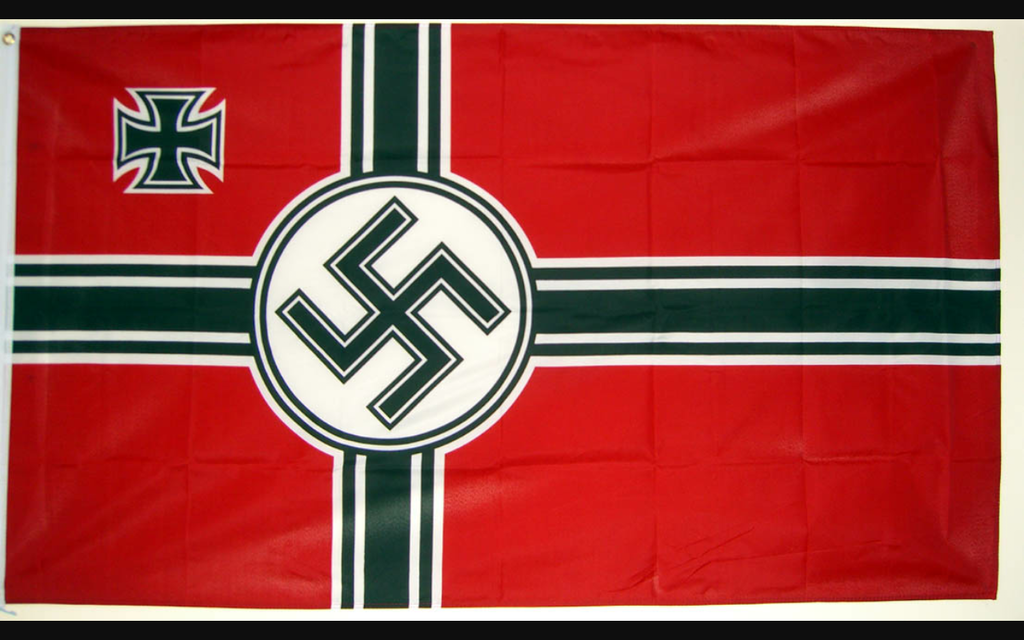
needed a flag for the back wall so found this and will scale it down a bit to fit .
And here is the base all painted and flag up .
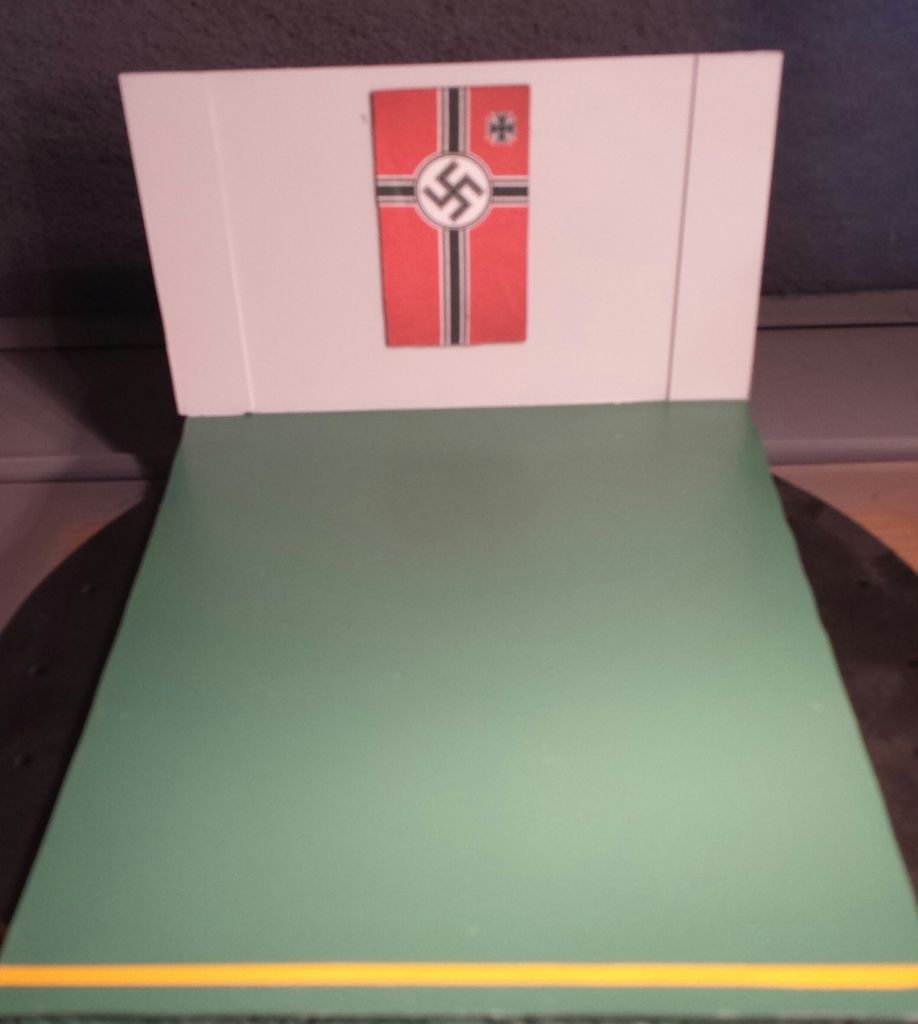
so that is it all to do now is place them in position and we are all done.
So nip over to the revel page and see the finished job
thanks for looking
after painting the camo pattern i put all the other parts on .
no real drama ,i drilled the holes out on the box that goes on the back fender .


then moved on to doing the small lines in dark yellow and olive green,

used a 00 brush took a bit of time trying not to rush it or go overboard .


It was at this point i changed my mind for the dio instead of doing it all battle worn and dirty, i choose to do it restored and in a museum
first i found a figure i wanted out of the scrap box, then a slight alteration and some black primer and we are getting some were .
and a peice of spare track put on a display stand .

After the figure was dry i wanted to put it in a display case , so i had a hunt round for some thing that would work but no luck so i made one myself
out of a sheet of clear visor .

cut to size and scored and folded .


a bit big so i will do another one .
the base was made up of plastic card and pollystirene .so here is a mock up .

needed a flag for the back wall so found this and will scale it down a bit to fit .

And here is the base all painted and flag up .

so that is it all to do now is place them in position and we are all done.
So nip over to the revel page and see the finished job
thanks for looking
Re: HANS HETZER
Massively cool work buddy... Just saw the reveal, completely awesome!!
Re: HANS HETZER
Very nice work there mate
