S1 Scout Car

Post Reply
User avatar
hansolo
Warrant Officer
Warrant Officer
Posts: 1524
Joined: Mon Jun 17, 2013 12:36 pm
Location: Amsterdam
Contact:
Netherlands

S1 Scout Car

Post by hansolo »

Hi guys,

Here’s my entry into the Eye Spy SiG.

When I was looking for an interesting vehicle to build for this SiG,
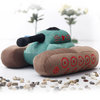
I came across this image:

Image

When I looked up info about it, I read that it was a very rare vehicle.
Well, that’s right up my alley.
It turned out to be an Australian built Scout Car for the American Army
To survey an guard Australian airfields. It’s based on an
English Ford 15A Cargo Truck chassis with an armored super structure.
Only 40 were ever build and only two still exist today. One unrestored one
in Sid Beck’s military museum at Mareeba Australia and a restored one,
still running today:

Click the small image to watch the video:

Image

Image

Here are some more pictures of the S1:

Image

Image

Image

Image

Image

This vehicle is of course ideal for me;
I can enter this SiG with it and it’s a rare conversion!
My favorite kind!

I even found a top view drawing to help me with the lay out
of the gun rail and the interior.

Image

————————————————————

For those who want all the info on the S1, this is the info I found:
The Scout Car S1 (American) - About fifty of these vehicles were designed and built in Australia for U.S. forces in 1942/43. They were based on Ford F15 (2-wheel drive, 15 cwt) Blitzes and were to be used for airfield defence in northern Australia. This vehicle is No. 5 and may have been one of five built at Newport Railway Workshops in Melbourne. The rest were assembled at Ford’s Geelong plant. The hull is of locally invented and produced bulletproof plate - A.B.P.3. The first parts of it were found north of Miles where it had once been owned by the Little family. The hull sides turned up a few years later. The only other one known is unrestored and in Sid Beck’s military museum at Mareeba. Still missing is the skate rail around the top of the hull that carried two .30 calibre and one .50 calibre machine guns. With three machine guns and a crew of five, it would have been a pretty busy place if it had ever got into action.
The Scout Car S1 was produced by Australia for the use of the US Army during the Second World War per request of the United States Army Air Force [USAAF] in 1942. This light armored car, built by Ford Australia, was used for patrolling and airfield defense. Only forty units of the Scout Car S1 were made.

————————————————————

The build:

I bought these two kits for the build:

Image

Image

The machine gun kit came in first so I started on that one.

Image

Image

That’s it for now folks.
Next up is the build of the S1 Scout Car.
(The kit finally arrived after one month delay. :-( )

cheers
Cheers
Hansolo

May the sprue be with you. :th:
User avatar
hansolo
Warrant Officer
Warrant Officer
Posts: 1524
Joined: Mon Jun 17, 2013 12:36 pm
Location: Amsterdam
Contact:
Netherlands

Tiny Fun Update

Post by hansolo »

Hi guys,

Couldn't resist pimping and coloring the black & white image.
This is what it may have looked like if they had taken a color photograph back then:

Image

The before shot:

Image

:banana:

cheers
Cheers
Hansolo

May the sprue be with you. :th:
User avatar
rodrant
Chief Warrant Officer 2
Posts: 1774
Joined: Wed Feb 19, 2014 9:22 pm
Location: Maia - Portugal
Portugal

Re: S1 Scout Car

Post by rodrant »

OK ..I expect the usual great build from you :D

This is a great choice and a great idea ....never saw this armoured car before ...like the armament layout ...it means business :-)

Good luck with your build , should be real nice to follow I'm sure !

:cheers2:
Cheers ,
António

On the Bench
a lot of stuff right now :-)
User avatar
hansolo
Warrant Officer
Warrant Officer
Posts: 1524
Joined: Mon Jun 17, 2013 12:36 pm
Location: Amsterdam
Contact:
Netherlands

Re: S1 Scout Car

Post by hansolo »

rodrant wrote:OK ..I expect the usual great build from you :D

This is a great choice and a great idea ....never saw this armoured car before ...like the armament layout ...it means business :-)

Good luck with your build , should be real nice to follow I'm sure !

:cheers2:
Thanks very much!
I'm going to have a lot of fun with this semi-scratch-build. :thumb1:

cheers
Cheers
Hansolo

May the sprue be with you. :th:
User avatar
hansolo
Warrant Officer
Warrant Officer
Posts: 1524
Joined: Mon Jun 17, 2013 12:36 pm
Location: Amsterdam
Contact:
Netherlands

Update

Post by hansolo »

Hi guys,

In the old pictures I saw that the 30 Caliber guns from the set that I bought,
weren't the same model as in the pictures. So I took to 3D modeling again to
design and print different barrels. And the set also only profided one 30 Cal.
mount like the ones in the pictures. So I also made these in 3D.

I constructed the barrels in my 3D application Cinema 4D.

Image

I opened and adjusted than in the application for the 3D printer, called Cura.

Image

And printed them.
They still need a lot of sanding and cleaning up. And some smaller details will have to bee added.

Image

For the mount part I did the same thing, except here I opened a picture of a mount in Adobe Illustrator.

Image

Traced the contours.

Image

Image

Opened these in Cinema 4D and extruded them to the acquired thickness.
I had some details like bolts and a thicker rim, but the 3D print process wasn't precise enough to reproduce those tiny
details. So they got lost. :(

Image

Opened a simplified version of them in Cura.

Image

And printed them.
They too need some work. ;)

Image

That's it for now folks.
Tomorrow I'll be starting on the build of the truck. :banana:

cheers
Cheers
Hansolo

May the sprue be with you. :th:
generalgrog
Sergeant First Class
Posts: 330
Joined: Sun Oct 20, 2013 4:19 am
Location: Baltimore, MD. U.S.A.
United States of America

Re: S1 Scout Car

Post by generalgrog »

Wow..just...wow.

As an engineer in really digging what your doing with the 3d printing.

Watching with interest!

GG
User avatar
hansolo
Warrant Officer
Warrant Officer
Posts: 1524
Joined: Mon Jun 17, 2013 12:36 pm
Location: Amsterdam
Contact:
Netherlands

Update

Post by hansolo »

Hi guys,

I got under way with the building of the truck.

The instruction sheets. Seperate A4's!

Image

Image

Image

Image

Image

The sprews.

Image

Image

Wheel assembly.

Image

The tow hook.

Image

The petrol tanks. (That in the end I didn't attach.)

Image

The exhaust.

Image

The cabin. Of which most of it will probably be cut away later on.

Image

Image

Springs.

Image

Chassis.

Image

Chassis + cabin.

Image

Image

To get measurements I made pictures of the top and side of the built chassis and placed them in Adobe Illustrator.
Combined with the drawing I downloaded, I could figure out (with some guess work here and there) the measurements of the side armor
and the fenders. I can now lay these drawings 1:1 on the plate material to cut out the sides and fenders.

Image

Image

That's all for now folks.
Nest up: The scratch building fun can begin!

cheers
Cheers
Hansolo

May the sprue be with you. :th:
User avatar
hansolo
Warrant Officer
Warrant Officer
Posts: 1524
Joined: Mon Jun 17, 2013 12:36 pm
Location: Amsterdam
Contact:
Netherlands

Update

Post by hansolo »

Hi guys,

I started with the scratch building.

First the bottom plate.
I had to make some adjustments to the initial layout for the wheels to fit.

Image

Bottom plate assembled.

Image

For the fenders and the side plates I printed out my drawings,
glued them slightly to the plate material with spray mount,
in order to make easy cutouts.

Image

The fenders cut out.

Image

The fenders bent.

Image

Fenders and sides glued together.

Image

Fenders and sides glued to the bottom plate.

Image

That’s it for now folks.
Next up: Construction of the front and rear.

cheers
Cheers
Hansolo

May the sprue be with you. :th:
User avatar
wappynutter
Chief Warrant Officer 3
Posts: 2256
Joined: Mon Jun 17, 2013 11:39 pm
Location: Sutton in Ashfield, Nottinghamshire. UK
Great Britain

Re: S1 Scout Car

Post by wappynutter »

Just camping on an #AWESOME# post again Han... :jd:
:bow:: :clap: :clap: :bow::
Well done so far..... Continued success with the 3d printing/building mate.. :th:
:pop: :pop: " munch...munch...munch..."...
:cheers2:
Regards Andy...Image
YouTube Channel..... http://www.youtube.com/channel/UCRdZFBjr6oO-T-2ydSB4HIg
User avatar
hansolo
Warrant Officer
Warrant Officer
Posts: 1524
Joined: Mon Jun 17, 2013 12:36 pm
Location: Amsterdam
Contact:
Netherlands

Re: S1 Scout Car

Post by hansolo »

Thanks Wappy! :bow::

cheers
Cheers
Hansolo

May the sprue be with you. :th:
User avatar
hansolo
Warrant Officer
Warrant Officer
Posts: 1524
Joined: Mon Jun 17, 2013 12:36 pm
Location: Amsterdam
Contact:
Netherlands

Update

Post by hansolo »

Hi guys,

I continued with the building process.
To make the back bumpers I used the metal of a Coke Can. Later on I redid them, cause they were to big.
And first finished the back part of the hull.

Imagexxx

Image

Image

Than I constructed the front side panels and the hood.

Image

Image

Image

Image

Than followed the windscreen and windscreen armor.

Image

Because I had to cut away a lot of the front interior cause it didn’t fit,
I had to make new gas paddles and a brake paddle.
I also made a new dash board and reconnected the steering wheel.

Image

Image

The wind screen and armor attached.

Image

Built the storage compartments. And gave them locks from leftover PE parts.

Image

Image

Made the three chairs for the gunners / crew.

Image

Image

So this is where it at now.

Image

Image

Image

Image

Image

Next up: More detailing.

cheers
Cheers
Hansolo

May the sprue be with you. :th:
User avatar
hansolo
Warrant Officer
Warrant Officer
Posts: 1524
Joined: Mon Jun 17, 2013 12:36 pm
Location: Amsterdam
Contact:
Netherlands

Update

Post by hansolo »

Hi guys,

Here’s the final building part of the Scout Car.

The MG rail was the trickiest part to construct with all it round corners and bending upward in the front end.
First I made the part that connects the rail to the vehicle in 2 parts.

The front end.

Image

And the back end.

Image

Assembled.

Image

Than I made the rail itself, consisting of 3 different parts, bent it into the right shape and glued it in.

Image

To create the side doors I simply scratched the outlines in the side armor plates.
I drilled visor holes in the doors and made visor covers from PE and rails from PS.
Attached pivots and door handles from left over parts.
And some loops again from PE leftovers.
Added mirrors and headlights from the original Ford kit.
The clear part of the headlights will be added after painting the shiny interior of the lights.
I also added a shovel and a rod.

Image

At the back I added 2 grips and the tripots of the .30 cal. MG’s.

Image

On the hood I added bolts made from thinly sliced PS rod.
And added towing hooks from the original Ford Kit.

Image

Finally I added the MG mounts and the MG’s.
And made the .30 cal. shields from PE.

Image

Image

Image

Image

Image

Image

Image

Image

Image

Image

Here’s a walk around of the finished built model before painting.

Image

Image

Image

Image

Image

Image

Image

Image

Next up: Painting. :th:

cheers
Cheers
Hansolo

May the sprue be with you. :th:
User avatar
hansolo
Warrant Officer
Warrant Officer
Posts: 1524
Joined: Mon Jun 17, 2013 12:36 pm
Location: Amsterdam
Contact:
Netherlands

Update

Post by hansolo »

Hi guys,

Already here with the paint update.

I painted the rubber tires too. Because I like to weather them and the black rubber is just to black.

Image

First I painted the Scout Car with grey as the base colour.
And for the first time I tried the pre shading technique.

Image

Image

Then my well known layer of hairspray for later shipping.

Image

Image

Then the final olive green colour.

Image

Image

I lightened the centers of the panels with a slightly lighter green for fading effect.

Image

Image

Detail painting. For metal I use Metal Cote enamel paint. When applied it's a dull grey, but if you rub it with a cotton swab when dry, it gets a metal shine.
Later on I will darken it considerably with a strong dark wash. To give it a more blackened metal look.

Image

Image

Next up: More detail painting and washes.

cheers
Last edited by hansolo on Tue Aug 11, 2015 6:26 am, edited 1 time in total.
Cheers
Hansolo

May the sprue be with you. :th:
heel
Sergeant First Class
Posts: 285
Joined: Thu Nov 06, 2014 3:29 pm
Location: North Carolina, USA

Re: S1 Scout Car

Post by heel »

It's hard to know what to say when watching you build because it's always so fantastic and unique. Awesome stuff.
User avatar
hansolo
Warrant Officer
Warrant Officer
Posts: 1524
Joined: Mon Jun 17, 2013 12:36 pm
Location: Amsterdam
Contact:
Netherlands

Re: S1 Scout Car

Post by hansolo »

Thanks Heel!
Much appreciated. :th:

cheers
Cheers
Hansolo

May the sprue be with you. :th:
User avatar
alextheblue
Chief Warrant Officer 5
Posts: 2679
Joined: Mon Jul 15, 2013 11:30 am
Location: Slough, United Kingdom
Contact:
Scotland

Re: S1 Scout Car

Post by alextheblue »

Incredible work Han, just mind blowing. Some people excel at building, others excel at painting and weathering, you my friend excel at both!

And 3D printing as well!! :eeek: :jd: :th:
"Courage is feeling fear and acting anyway."

www.alextheblue.com
User avatar
hansolo
Warrant Officer
Warrant Officer
Posts: 1524
Joined: Mon Jun 17, 2013 12:36 pm
Location: Amsterdam
Contact:
Netherlands

Re: S1 Scout Car

Post by hansolo »

Thanks Alex!

cheers
Cheers
Hansolo

May the sprue be with you. :th:
User avatar
hansolo
Warrant Officer
Warrant Officer
Posts: 1524
Joined: Mon Jun 17, 2013 12:36 pm
Location: Amsterdam
Contact:
Netherlands

Re: S1 Scout Car

Post by hansolo »

Hi guys,

I tried chipping the green layer of the grey one with the hairspray layer in between but
I had a hard time do so. Apparently I put the green on to thick so the water couldn't get through. :(
So I had to resort to painting on the chips. This vehicle never saw combat. Do chipping will have been
modest anyway. So I didn't have to do a lot.

I gave the wheels an Australian red earth pigment treatment to make them nice and dusty.

Did some pin washing and the dark wash on the MG’s.

Some oil paint rendering on the shovel handle.

Painted the chairs and did pigment under the fenders.

Image

Image

Seeing that the decals are obviously non existent I have to make them my self.
I do have a ‘do it yourself’ decal kit but I can not make white decals with it.
So I will make black decals and paint over them with white paint.

Here’s how I prepared the decals.

Image

Next I’ll print the little black letters on a decal sheet, fixate the print with decal fixer
and my decals are ready to be applied.

After decal application there will be a lot of oil paint rendering and more pigments.

cheers
Last edited by hansolo on Fri Aug 14, 2015 7:55 am, edited 1 time in total.
Cheers
Hansolo

May the sprue be with you. :th:
User avatar
wappynutter
Chief Warrant Officer 3
Posts: 2256
Joined: Mon Jun 17, 2013 11:39 pm
Location: Sutton in Ashfield, Nottinghamshire. UK
Great Britain

Re: S1 Scout Car

Post by wappynutter »

Superb buddy... :jd: :jd:
Scratchbuilding at its finest... :bow:: :bow:: :bow::
You are truly a Master and this build deserves heaps more recognition... :clap: :clap: :clap:
Love every part of the build so far. Do you have figures and a small dio planned?
Well done again Sir... Continued success.. :thumb1:
:cheers2:
Regards Andy...Image
YouTube Channel..... http://www.youtube.com/channel/UCRdZFBjr6oO-T-2ydSB4HIg
User avatar
hansolo
Warrant Officer
Warrant Officer
Posts: 1524
Joined: Mon Jun 17, 2013 12:36 pm
Location: Amsterdam
Contact:
Netherlands

Re: S1 Scout Car

Post by hansolo »

wappynutter wrote:Superb buddy... :jd: :jd:
Scratchbuilding at its finest... :bow:: :bow:: :bow::
You are truly a Master and this build deserves heaps more recognition... :clap: :clap: :clap:
Love every part of the build so far. Do you have figures and a small dio planned?
Well done again Sir... Continued success.. :thumb1:
:cheers2:
Thanks Wappy!!
I already have chosen a figure that I'm going to ad and I'm going to make a small dio, consisting of a small part
of an Australian airfield with a hangar and a small patch of Australian red earth. :th:

cheers
Cheers
Hansolo

May the sprue be with you. :th:
User avatar
wappynutter
Chief Warrant Officer 3
Posts: 2256
Joined: Mon Jun 17, 2013 11:39 pm
Location: Sutton in Ashfield, Nottinghamshire. UK
Great Britain

Re: S1 Scout Car

Post by wappynutter »

hansolo wrote:
wappynutter wrote:Superb buddy... :jd: :jd:
Scratchbuilding at its finest... :bow:: :bow:: :bow::
You are truly a Master and this build deserves heaps more recognition... :clap: :clap: :clap:
Love every part of the build so far. Do you have figures and a small dio planned?
Well done again Sir... Continued success.. :thumb1:
:cheers2:
Thanks Wappy!!
I already have chosen a figure that I'm going to ad and I'm going to make a small dio, consisting of a small part
of an Australian airfield with a hangar and a small patch of Australian red earth. :th:

cheers
Cool!.......
Already sat waiting for the pictures... :whistle:
Good luck as always Han.. :thumb1:
:cheers2:
Regards Andy...Image
YouTube Channel..... http://www.youtube.com/channel/UCRdZFBjr6oO-T-2ydSB4HIg
User avatar
fly1ngdutchm4n
First Lieutenant
First Lieutenant
Posts: 3554
Joined: Fri Aug 09, 2013 11:17 pm
Location: Hoogerheide The Netherlands
Netherlands

Re: S1 Scout Car

Post by fly1ngdutchm4n »

You sir, are a wizard with plastic card and 3d printing :bow::
Love your scratch building, always inspiring to look at.
Amazing stuff one's again! :clap:
Build what you love, Love what you build
User avatar
hansolo
Warrant Officer
Warrant Officer
Posts: 1524
Joined: Mon Jun 17, 2013 12:36 pm
Location: Amsterdam
Contact:
Netherlands

Update

Post by hansolo »

Hi guys,

I printed the decals.

Here’s the print out on the decal sheet.

Image

Image

The decal fixer.

Image

The cut out decals. They have to be cuts tightly as possible to minimize the decal shiny effect around the letters.

Image

Here’s the Scout Car with the decals applied.
Including the applied oil paint rendering, pigments and graphite.

Image

Image

Image

Image

Image

Image

Image

Image

Image

Image

Image

Image

Image

Scout Car + Scout.

Image

Image

Image

Image

Image

Next is the dio.

I started of with a wooden base.

Image

The lay out drawn on.

Image

The edges sealed of with card board.

Image

Poured the plaster.

Image

The plaster is semi dry. Removed the edges. And scraped the plaster surface to be evenly flatted.

Image

Applied a DAS clay layer to go underneath the ‘sand’ area.

Image

Scratched in the edges of the concrete tiles.

Image

Re masked the sand area.

Image

Applied the earth-glue-water mixture.

Image

Image

That’s where the duo is at this point. Now it needs to dry.

The scout hanging around in the Scout Car would probably need some food and drink at some point.
This is why I supplied him with some water, a nice bottle of Australian white wine and some bread.

I made a bottle out of clear sprew leftovers.

Image

Image

Image

A plate made of some leftover part and some bread again made sprew.

Image

I also added and painted some other stuff that you might find on an airfield.

Image

Here is John enjoying his well deserved lunch.

Image

Image

Image

That’s it for now, folks!

Next up is more progress on the dio.
I decided to make part of a Bellman Hangar from heavy paper…..

cheers
Cheers
Hansolo

May the sprue be with you. :th:
User avatar
hansolo
Warrant Officer
Warrant Officer
Posts: 1524
Joined: Mon Jun 17, 2013 12:36 pm
Location: Amsterdam
Contact:
Netherlands

mis post

Post by hansolo »

mis post
Last edited by hansolo on Sun Aug 16, 2015 11:03 pm, edited 1 time in total.
Cheers
Hansolo

May the sprue be with you. :th:
User avatar
rwsmith14
Sergeant Major of the Army
Posts: 1277
Joined: Thu Jun 05, 2014 1:24 am
Location: Aledo, TX, USA
United States of America

Re: S1 Scout Car

Post by rwsmith14 »

Outstanding !!! :thumb2: :thumb2: :thumb2: really find the vehicle interesting !
Image
User avatar
hansolo
Warrant Officer
Warrant Officer
Posts: 1524
Joined: Mon Jun 17, 2013 12:36 pm
Location: Amsterdam
Contact:
Netherlands

Re: S1 Scout Car

Post by hansolo »

rwsmith14 wrote:Outstanding !!! :thumb2: :thumb2: :thumb2: really find the vehicle interesting !
Thanks RW! :-)

Cheers
Cheers
Hansolo

May the sprue be with you. :th:
User avatar
hansolo
Warrant Officer
Warrant Officer
Posts: 1524
Joined: Mon Jun 17, 2013 12:36 pm
Location: Amsterdam
Contact:
Netherlands

Update

Post by hansolo »

Hi guys,

I started building the Bellman Hangar.
I made a layout of the door elements and the roof part in Adobe Illustrator.

Image

Image

Image

Image

I ended up constructed the whole hangar from a mixture of heavy paper, ply wood, card board and PS plate.
When it was finished I painted and weathered it. But at the end of the day I wasn’t satisfied with the result.

Image

It wasn’t realistic enough to me, because of the paper parts. It was to big; it dwarfed the Scout Car on the dio.
And it’s a bit dull. There isn’t a lot of detail, not much going on, not nostalgic enough.

So I started from scratch. Looked for an other building to liven up the dio.
I found this image. A much more interesting and more detailed building.

Image

I started with the brick wall part. Made a lego cast to pour the plaster in.
Scratched in the brick pattern and painted and weathered it.

Image

Image

Image

Image

Image

Image

Then I made the windows from PS plate. Painted and weathered.

Image

Image

Image

The aluminum siding was next.
I used 2 large beer cans for the metal. Somehow they were closest at hand. ;-)

Image

Made a little rivet bender.

Image

Glued the metal to a PS plate.

Image

Image

Painted and weathered.

Image

Image

Made a rain pipe from PS plate. And wall connectors from PE leftover.
Made a gutter, again form the beer can metal. See, I only drink to model! :-)

Image

Image

Image

Image

And weathered them.

Image

That’s it for now, folks.

Gotta go to the store and model shop for more supplies.

cheers
Cheers
Hansolo

May the sprue be with you. :th:
User avatar
Coen
General
General
Posts: 10136
Joined: Wed May 29, 2013 2:04 am
Location: Nova Scotia, Canada
Contact:
Canada

Re: S1 Scout Car

Post by Coen »

Good gravy!! What the hell!!
This is outrageous work Han.
Kits? We don't need no stinking kits!
Haha
Amazing !!!
User avatar
hansolo
Warrant Officer
Warrant Officer
Posts: 1524
Joined: Mon Jun 17, 2013 12:36 pm
Location: Amsterdam
Contact:
Netherlands

Re: S1 Scout Car

Post by hansolo »

Coen wrote:Good gravy!! What the hell!!
This is outrageous work Han.
Kits? We don't need no stinking kits!
Haha
Amazing !!!
Thanks so much, Mike!
I am appreciating the hell out this. :bow:: :bow:: :bow::

Cheers
Cheers
Hansolo

May the sprue be with you. :th:
User avatar
ForbesHutton
Chief Warrant Officer 3
Posts: 1956
Joined: Mon Sep 02, 2013 9:10 am
Location: To,On,Ca
Scotland

Re: S1 Scout Car

Post by ForbesHutton »

Image

Amazing!

Legend does a 1/35 kangaroo http://www-legend.co.kr/portfolio/lf0118-kangaroo/
if your not making your own.
Last edited by ForbesHutton on Wed Aug 19, 2015 9:05 am, edited 1 time in total.
Image
User avatar
hansolo
Warrant Officer
Warrant Officer
Posts: 1524
Joined: Mon Jun 17, 2013 12:36 pm
Location: Amsterdam
Contact:
Netherlands

Final Update!

Post by hansolo »

Hi guys,

Check out the final reveals here: http://intscalemodeller.com/viewtopic.php?f=405&t=14125

cheers
Cheers
Hansolo

May the sprue be with you. :th:
Oper8or
Corporal
Corporal
Posts: 93
Joined: Sat Jul 04, 2015 6:33 am

Re: S1 Scout Car

Post by Oper8or »

I came over here after watching Coen's video for his build. Then.. well..

:jd:

I've seen some excellent builds on here. Some real skill far beyond anything I will have or be able to do. Then I see this build. I really don't know what else to say. Its amazing. There are people in this world that can do things like this and I have no idea how..

Thank you for doing this. You have out done yourself sir. :bow::
User avatar
Nige99
Command Sergeant Major
Posts: 751
Joined: Sun May 26, 2013 2:53 pm
Location: Wrexham North Wales

Re: S1 Scout Car

Post by Nige99 »

I am in complete ore of your work Hans!! Who needs to buy kits when you can scratch build like this. :bow:: :bow:: amazing work. :clap:
You can run, but you'll only die tired!
User avatar
DBMiller
Chief Warrant Officer 3
Posts: 2229
Joined: Mon Jan 06, 2014 8:10 pm
Location: Guilford, Vermont, USA
United States of America

Re: S1 Scout Car

Post by DBMiller »

:crazy: The work you are putting in is just super!
Post Reply

Return to “Builds”