Dragon 1:35 SAS Jeep

Post Reply
User avatar
MarkVerploeg
Major
Major
Posts: 4837
Joined: Wed Oct 16, 2013 12:21 am
Location: Oss, Noord Braband The Netherlands
Netherlands

Dragon 1:35 SAS Jeep

Post by MarkVerploeg »

Hi guys
So it is time for me to join this sig
I actually have 2 builds i want to enter but i thought i would start with the smallest of the 2 and have a relatively fast build for a change
And the kit i will be building is this one
Image
It should resemble the one in the rear of the boxart
But that is missing the jerrycans on the hood or bonnit wichever is used in your country
So i think i may do some additional changes to it

Image
This is what is inside the box when you first open it
But as a starting proof everything is still nicely packaged

And now for some sprueshots
Image
The body of the jeep

Image
The B sprue with all the standard Jeep parts like suspension , engine and drivetrain

Image
Wheels with molded on tyres
You need to add the smaller rings in the back of the tyres but they look nice with a good threadpattern

Image
You get 2 of these sprues
They have a different threadpattern on them and are build up from multiple parts
I won't use these if i don't have to as i always find a way to damage them while cleaning them

Image
A bunch of jerrycans with all the small details molded seperate
The detail looks nice on them so that is a big plus

Image
Some German style jerrycans are included too (good for water cans) and guns and some clear parts for the headlights

Image
And some photo etch for the straps and some steel planking
And the decals

Image
There are 2 figures in the box aswell
I think they are also included in the figure set that dragon has for these jeeps wich allows you to make the scene from the famous photo of the first men in the SAS along with the comander of the unit

So that is everything that is in the box
I don't plan on making big changes to the kit as it looks pretty good to me but if there are enough of those straps i may add the 5 jerrycans on the hood and i think the condensator on the front needs some tubing but that is about all i could find that i want to change
I think i will make a small vignette style base for it as i don't have anything in the stash that would go with this vehicle
But i want to keep things simple for this build and don't want to worry about a complex build as that is basicly what i will do with my second entry but that is coming around when this build is getting closer to being finished
I will be posting some additional information about the vehicle , Unit and the time that they where active but i am still gathering information on those topics so i will do that with the updates

So thanks for stopping by and untill next time
Cheers Mark
On the bench
GB builds
1/35 Trumpeter M1132 ESV

Personal builds
1/35 Hobby Boss M1070 tractor with M1000 semi trailer and Meng M1A2 TUSK II Abrams
1/35 Takom V2 rocket with the Meillerwagen and SS100 tractor
User avatar
timtamtung
Sergeant Major
Sergeant Major
Posts: 689
Joined: Fri Aug 01, 2014 3:42 am
Location: Melbourne, Australia

Re: Dragon 1:35 SAS Jeep

Post by timtamtung »

Naiceee. Another little Jeep! Wow dragon packs so much for something so small. Nice to join the sas gang :)
-tungy
Image
To do list:

1:35 Tasca Fury+Bravo6 crew | 1:48 Danger Zone F-14 |
User avatar
MarkVerploeg
Major
Major
Posts: 4837
Joined: Wed Oct 16, 2013 12:21 am
Location: Oss, Noord Braband The Netherlands
Netherlands

Re: Dragon 1:35 SAS Jeep

Post by MarkVerploeg »

Yep there is a lot in the box
I saw it together with a tamiya version and the box is a lot bigger allthough that has to do with the B sprue wich is large the rest is pretty small
There is one.of these jeeps in the Dutch war and resistance museum allthough i don't know if it is a real one or a reproduction for display use
I am still looking for information about the numbers of vehicles that where used and build aswell as more about the initial unitmembers but it is going the right way and i found a lot so.far
Lookimg forward to get this little warmachine build and make some updates
Cheers
On the bench
GB builds
1/35 Trumpeter M1132 ESV

Personal builds
1/35 Hobby Boss M1070 tractor with M1000 semi trailer and Meng M1A2 TUSK II Abrams
1/35 Takom V2 rocket with the Meillerwagen and SS100 tractor
User avatar
rwsmith14
Sergeant Major of the Army
Posts: 1277
Joined: Thu Jun 05, 2014 1:24 am
Location: Aledo, TX, USA
United States of America

Re: Dragon 1:35 SAS Jeep

Post by rwsmith14 »

Great, Mark !!! I have this one on the stash. I'll be following !! :thumb2:
Image
User avatar
MarkVerploeg
Major
Major
Posts: 4837
Joined: Wed Oct 16, 2013 12:21 am
Location: Oss, Noord Braband The Netherlands
Netherlands

Re: Dragon 1:35 SAS Jeep

Post by MarkVerploeg »

Thank you
I forgot i have it until i was cleaning yesterday and it popped out of a drawer
I made a start last night and it is a good kit
There is one thing i found wrong in the instructions
You need to put the grill on the body first and then add the radiator but i managed to put the grill on a bit low so it didn't fit right
After i removed the grill i glued the radiator on it and then glued it back on the body wich then fitted like it should be
On the bench
GB builds
1/35 Trumpeter M1132 ESV

Personal builds
1/35 Hobby Boss M1070 tractor with M1000 semi trailer and Meng M1A2 TUSK II Abrams
1/35 Takom V2 rocket with the Meillerwagen and SS100 tractor
User avatar
Nige99
Command Sergeant Major
Posts: 751
Joined: Sun May 26, 2013 2:53 pm
Location: Wrexham North Wales

Re: Dragon 1:35 SAS Jeep

Post by Nige99 »

Great kit Mark, look forward to following this build thread.
You can run, but you'll only die tired!
User avatar
MarkVerploeg
Major
Major
Posts: 4837
Joined: Wed Oct 16, 2013 12:21 am
Location: Oss, Noord Braband The Netherlands
Netherlands

Re: Dragon 1:35 SAS Jeep

Post by MarkVerploeg »

Thanks Nige
I think i can make a update somewhere this week
I am still working on the stowage and the guns
After i finish that i will make a update and then everything comes to a halt as i cracked my last airbrush nozzle so i will have to get some new ones but the airbrush shop i go to is closed as they are on vacation and will return in the beginning of next month so i will pay them a visit when they are back and get back
But i have a second build i want to enter in this sig so i can get building while i wait to go shopping
I probably end up with a new airbrush aswell but no harm in having another one i guess
On the bench
GB builds
1/35 Trumpeter M1132 ESV

Personal builds
1/35 Hobby Boss M1070 tractor with M1000 semi trailer and Meng M1A2 TUSK II Abrams
1/35 Takom V2 rocket with the Meillerwagen and SS100 tractor
User avatar
fly1ngdutchm4n
First Lieutenant
First Lieutenant
Posts: 3554
Joined: Fri Aug 09, 2013 11:17 pm
Location: Hoogerheide The Netherlands
Netherlands

Re: Dragon 1:35 SAS Jeep

Post by fly1ngdutchm4n »

Sweet!
I Love these jeeps!
Had it in mind myself, but went for the Staghound instead.
I really love those steel plates of PE. :th:
Good luck and following with interest!
Build what you love, Love what you build
User avatar
MarkVerploeg
Major
Major
Posts: 4837
Joined: Wed Oct 16, 2013 12:21 am
Location: Oss, Noord Braband The Netherlands
Netherlands

Re: Dragon 1:35 SAS Jeep

Post by MarkVerploeg »

Thank you Frans
It is a nice kit to build , not the best but still good
Those pe plates where good they made a notch in them so you can't bend them too far
I will try to make the guns tonight so the building stage is done
And then i have to wait a few days to get new airbrush parts but my vacation starts tomorrow evening so i will have enough build time on the other entry i am planning to do and i still need to make a update for this but i will do the building part in 1 update as i think the intresting part of this build will be in painting and weathering
Well that is my opinion anyway
On the bench
GB builds
1/35 Trumpeter M1132 ESV

Personal builds
1/35 Hobby Boss M1070 tractor with M1000 semi trailer and Meng M1A2 TUSK II Abrams
1/35 Takom V2 rocket with the Meillerwagen and SS100 tractor
User avatar
Jack
Sergeant
Sergeant
Posts: 137
Joined: Sun Jul 05, 2015 11:01 am
Location: Bristol, England, UK

Re: Dragon 1:35 SAS Jeep

Post by Jack »

Looks like a great kit, might have to add one to my stash, look forward to following the build good luck :th: :th:
On the bench:
Tamiya 1/35 Tiger 1 mid production
Bandai AT-ST
Dragon 1/35 M4 DV
User avatar
MarkVerploeg
Major
Major
Posts: 4837
Joined: Wed Oct 16, 2013 12:21 am
Location: Oss, Noord Braband The Netherlands
Netherlands

Re: Dragon 1:35 SAS Jeep

Post by MarkVerploeg »

Thank you Jack
The build is nearly done already and then it will be ready for paint
It is a nice kit bit i think the tamiya kit is okay and this one is pretty expensive for what you get in my honest opinion
I don't know if these are easy to find online but i haven't seen one in shops for a while
On the bench
GB builds
1/35 Trumpeter M1132 ESV

Personal builds
1/35 Hobby Boss M1070 tractor with M1000 semi trailer and Meng M1A2 TUSK II Abrams
1/35 Takom V2 rocket with the Meillerwagen and SS100 tractor
User avatar
MarkVerploeg
Major
Major
Posts: 4837
Joined: Wed Oct 16, 2013 12:21 am
Location: Oss, Noord Braband The Netherlands
Netherlands

Re: Dragon 1:35 SAS Jeep

Post by MarkVerploeg »

hi guys
so finally a update
i'm sorry it has taken me so long but work was a bit crazy this week and i had some long days so i didn't get to do a lot of building
but the building stages are done

but before i go to the build lets start with some background information about these SAS Jeeps

let's start with with the base , the Jeep itself

Advances in early 20th century technology resulted in widespread mechanisation of the military during World War I. The United States Army deployed four-wheel drive trucks in it, supplied by Four Wheel Drive Auto (FWD) and the Thomas B. Jeffery Company. By the eve of World War II the United States Department of War had determined it needed a light, cross-country reconnaissance vehicle.

Anxious to have one in time for America's entry into World War II, the U.S. Army solicited proposals from domestic automobile manufacturers for a replacement for its existing, aging light motor vehicles, mainly motorcycles and sidecars, and some Ford Model Ts.[4][5] Marmon-Herrington presented five 4x4 Fords in 1937, and American Bantam delivered three Austin roadsters in 1938. Recognizing the need to create standard specifications, the Army formalized its requirements on July 11, 1940, and submitted them to 135 U.S. automotive manufacturers.

By now the war was under way in Europe, so the Army's need was urgent and demanding[citation needed]. Bids were to be received by July 22, a span of just eleven days. Manufacturers were given 49 days to submit their first prototype and 75 days for completion of 70 test vehicles. The Army's Ordnance Technical Committee specifications were equally demanding: the vehicle would be four-wheel drive, have a crew of three on a wheelbase of no more than 75 in (1,905 mm) - that was later upped to 80 in (2,032 mm) - and tracks no more than 47 in (1,194 mm), feature a fold-down windshield, 660 lb (299 kg) payload and be powered by an engine capable of 85 lb·ft (115 N·m) of torque. The most daunting demand, however, was an empty weight of no more than 1,300 lb (590 kg).

Initially, only two companies entered: American Bantam Car Company and Willys-Overland Motors; Ford Motor Company joined the competition later. Though Willys-Overland was the low bidder, Bantam received the bid, being the only company committing to deliver a pilot model in 49 days and production examples in 75. Under the leadership of designer Karl Probst, Bantam built their first prototype, dubbed the "Blitz Buggy" (and in retrospect "Old Number One"), and delivered it to the Army vehicle test center at Camp Holabird, Maryland on September 23, 1940. This presented Army officials with the first of what eventually evolved into the World War II U.S. Army Jeeps: the Willys MB and Ford GPW.

Since Bantam did not have the production capacity or fiscal stability to deliver on the scale needed by the War Department, the other two bidders, Ford and Willys, were encouraged to complete their own pilot models for testing. The contract for the new reconnaissance car was to be determined by trials. As testing of the Bantam prototype took place from September 27 to October 16, Ford and Willys technical representatives present at Holabird were given ample opportunity to study the vehicle's performance. Moreover, in order to expedite production, the War Department forwarded the Bantam blueprints to Ford and Willys, claiming the government owned the design. Bantam did not dispute this move due to its precarious financial situation. By November 1940, Ford and Willys each submitted prototypes to compete with the Bantam in the Army's trials. The pilot models, the Willys Quad and the Ford Pygmy, turned out very similar to each other and were joined in testing by Bantam's entry, now evolved into a Mark II called the BRC 60. By then the U.S. and its armed forces were already under such pressure that all three cars were declared acceptable and orders for 1,500 units per company were given for field testing. At this time it was acknowledged the original weight limit (which Bantam had ignored) was unrealistic, and it was raised to 2,160 lb (980 kg).

For these respective pre-production runs, each vehicle received revisions and a new name. Bantam's became the BRC 40. Production began on March 31, 1941, with a total of 2,605 built up to December 6. As the company could not meet the Army's demand for 75 Jeeps a day, production contracts were also awarded to Willys and to Ford.

After reducing the vehicle's weight by 240 pounds, Willys changed the designation to "MA" for "Military" model "A". The Fords went into production as "GP", with "G" for a "Government" type contract and "P" commonly used by Ford to designate any passenger car with a wheelbase of 80 in (2,032 mm).

By July 1941, the War Department desired to standardize and decided to select a single manufacturer to supply them with the next order for 16,000 vehicles. Willys won the contract mostly due to its more powerful engine (the "Go Devil"), which soldiers raved about, and its lower cost and silhouette. The design features the Bantam and Ford entries had which were an improvement over Willys' were then incorporated into the Willys car, moving it from an "A" designation to "B", thus the "MB" nomenclature. Most notable was a flat wide hood, adapted from Ford GP.

By October 1941, it became apparent Willys-Overland could not keep up with the production demand and Ford was contracted to produce them as well. The Ford car was then designated GPW, with the "W" referring to the "Willys" licensed design. During World War II, Willys produced 363,000 Jeeps and Ford some 280,000. Approximately 51,000 were exported to the U.S.S.R. under the Lend-Lease program.

A further roughly 13,000 amphibian jeeps were built by Ford under the name GPA (nicknamed 'Seep' for Sea Jeep). Inspired by the larger DUKW, the vehicle was produced too quickly and proved to be too heavy, too unwieldy, and of insufficient freeboard. In spite of participating successfully in the Sicily landings in July 1943, most GPAs were routed to the U.S.S.R. under the Lend-Lease program. The Soviets were sufficiently pleased with its ability to cross rivers to develop their own version of it after the war, the GAZ-46.

and the specs

Type
1⁄4 short ton (0.22 long tons; 0.23 t)[1] 4x4 utility truck

Place of origin United States

Production history:

Manufacturer
Willys-Overland (MB)
Ford (GPW)

Number built
MB: 359,489 (willys)
GPW: 277,896 (Ford)

Specifications (MB and GPW same due to the standard specs requested by the US Department of Defence)

Weight 2,453 lb (1,113 kg) empty

Length 132 1⁄4 in (3.36 m)

Width 62 in (1.57 m)

Height 69 3⁄4 in (1.77 m)[

Engine Willys Go Devil engine (134.2 cu in (2,199 cc) gasoline powered )

Transmission 3 spd. x 2 range trf. case

Suspension Live axles on leaf springs

Fuel capacity 15 US gal (12.5 imp gal; 56.8 L)

Operational range 300 mi (482.8 km)

Speed 65 mph (105 km/h)

so that is the basic Jeep but the SAS version is different as it carries weapons and a huge load of equipment and fuel and water jerrycans
allthough this added weight affects the range it can go about 200 km (125 mi) further on each jerrycan of fuel is carries
this means that the SAS increased the range for about 3 to 4 times to well over 1200 km

and now for some specs on the SAS version

weapons :
3 Vickers K drum feed machineguns (1 seperate and a double mounted)
1 Browning M2 aircooled 0.50 Cal. (12.7mm) machine gun
the positions could be different on the vehicles as some had the double vickers guns on the high mount in the rear and the Browning in front of the passengers seat and others had this switched around with the BMG in the back and the double Vickers in the front

Tools :
basicly non as the Original tools of the Jeep where removed but the crews replaced the shovel as that was needed in the dessert
also so small tools would be present to repair the vehicle in the field and ofcourse the skidplates they added for the times they would get stuck in the sand

Stowage :
this consists of jerrycans most often 10 or kore containing fuel (gasoline) and water
other things present in the vehicles would be personal equipment of the crew like their normal issued items and fire arms

this is mostly gathered information from Wikipedia and by simply looking at photo's of the real vehicles

here are some photo's of the real ones

Image
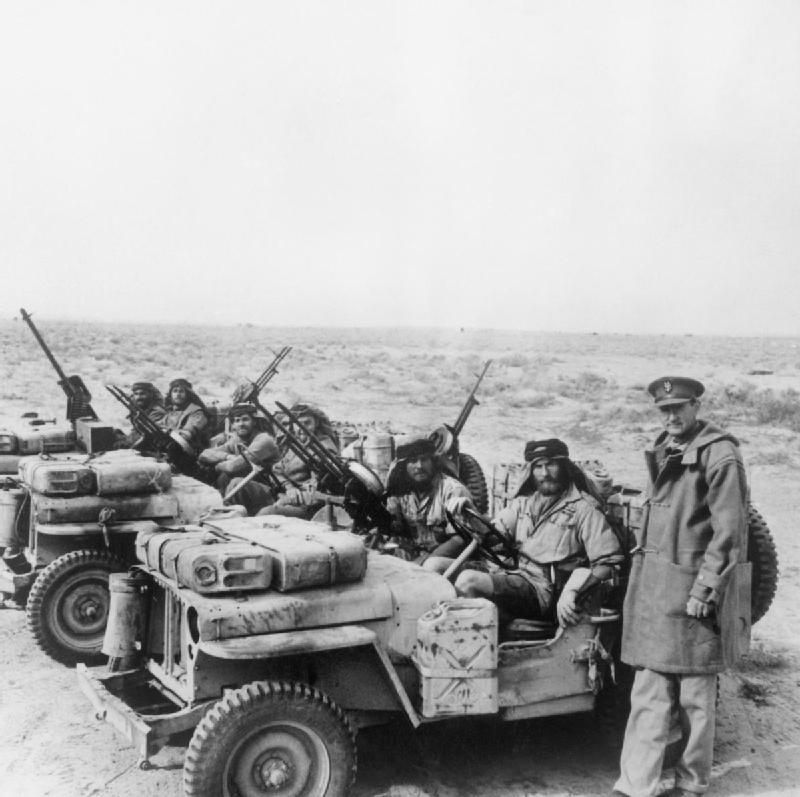
this is ofcourse one of the best known photo's of the SAS in North Africa
this shows 3 of the jeeps along with the unit commander Colonel David Sterling who was closely involved with the beginning of the unit and was the first commander

Image
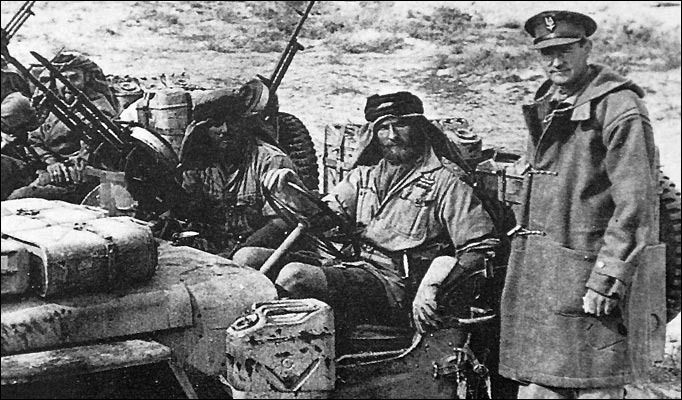
same photo but enlarged
you can see the large amount of paintchipping on the jerrycans and jeep

Image
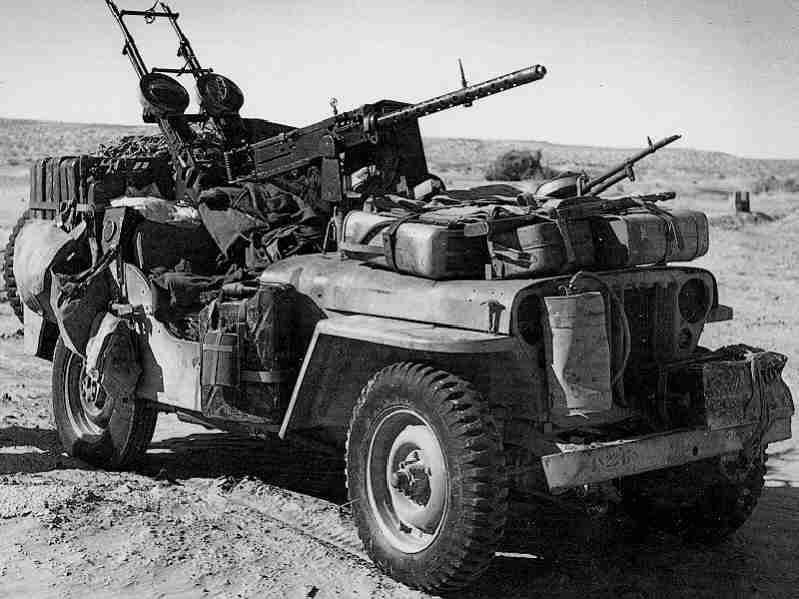
this vehicle shows the weapons in a different position then i have done with the kit
the large 0.50 cal is in the front position in front of the passenger seat
the gun has the large 200 round ammo box attached to it while they can also mount smaller 100 and 50 round boxes

Image
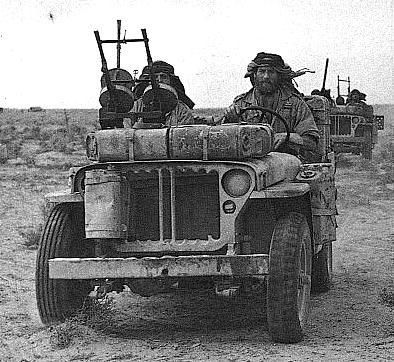
yet another layout of the guns
this vehicle lacks the Vickers k mg for the driver and only has the double mounted and a single one in the rear
you can also see that this vehicle had to have it's right front wheel replaced as it has a different thread pattern then the stock tyre on the left side of the vehicle

Image
not a North Africa jeep but still a SAS jeep
this is the later design that was used in Western Europe
the large amount of jerrycans are replaces by 2 fueltanks that are placed in the back of the vehicle
it also has small windscreens for the driver and the gunner

and that was my information bit for now
i will try to find some information about the SAS and the war in the northern part of Africa for the next update
and now for the build

Image
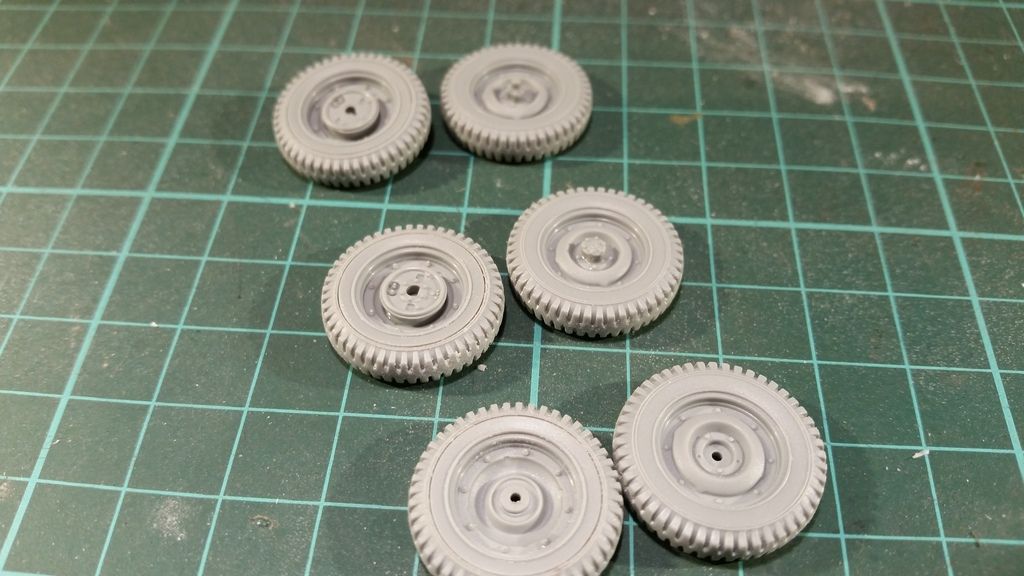
the build starts with the wheels
you have the option of 2 styles of tyres but i went for the regular style that was used the entire war
these are the front wheels , rear and spare (from top to bottom)

Image
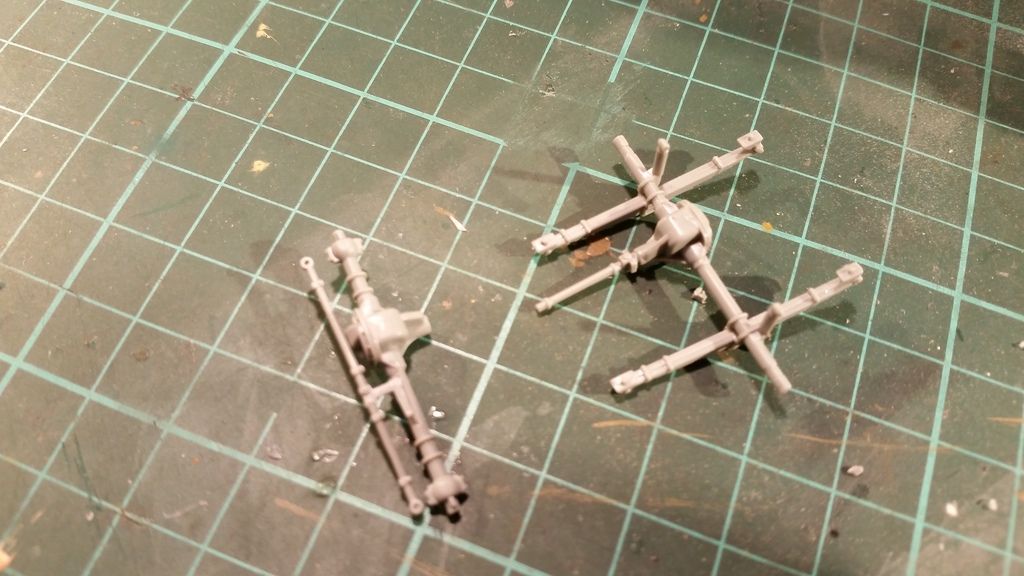
next where the axles

Image
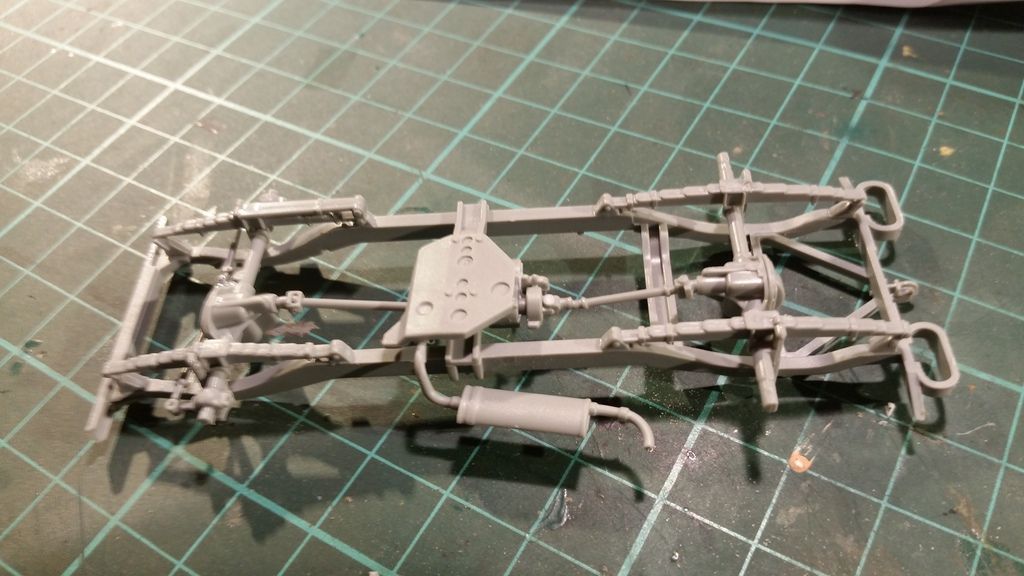
the axles where fitted to the chassis aswell as the bottom protection plate wich covers the transmission box

Image
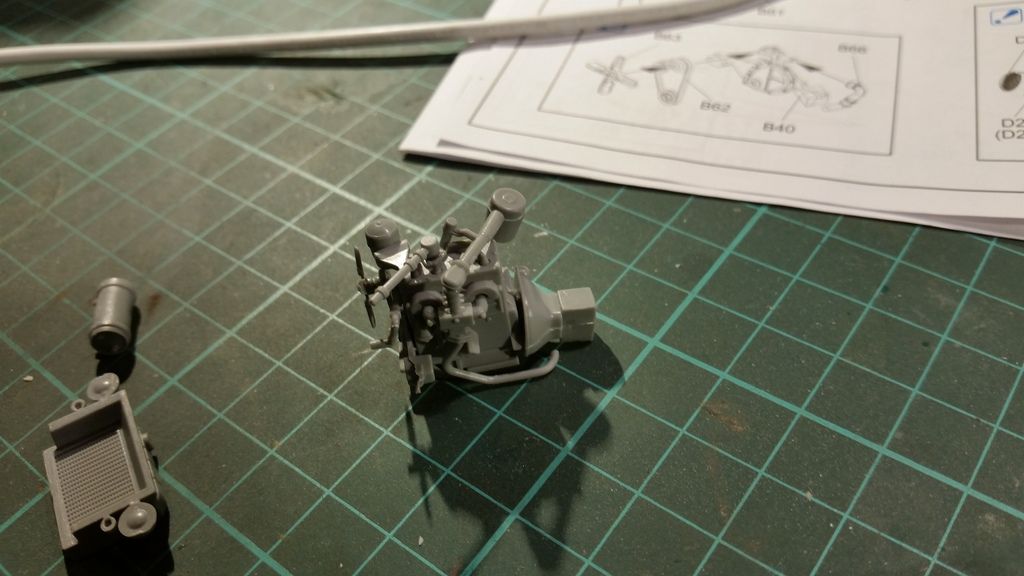
then you get to build the "go devil"engine wich is nicely detailed and only misses the spark plug wire
but because i will make this kit with the hood closed it will be hidden so i didn't spend the time to add details to it

Image
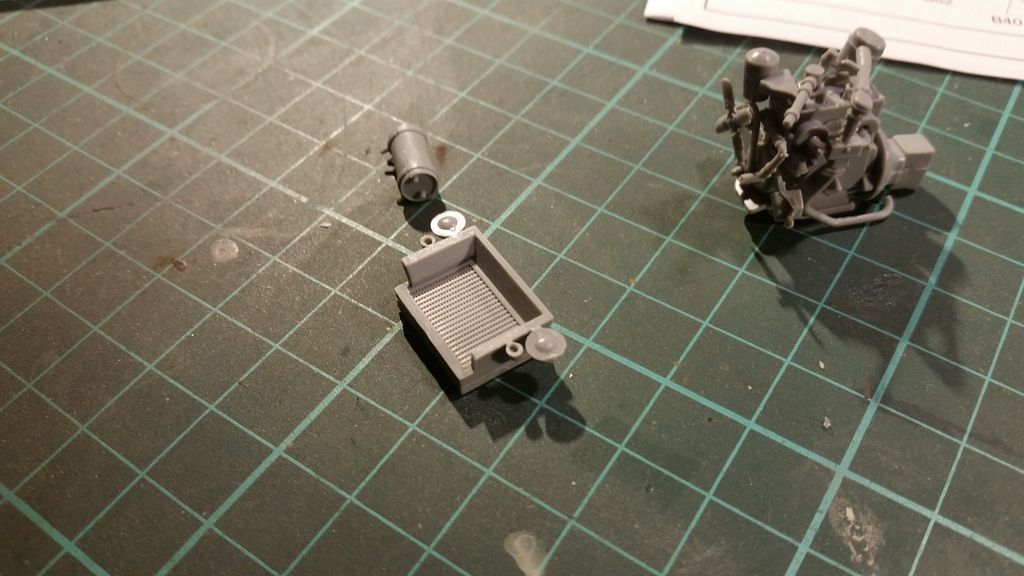
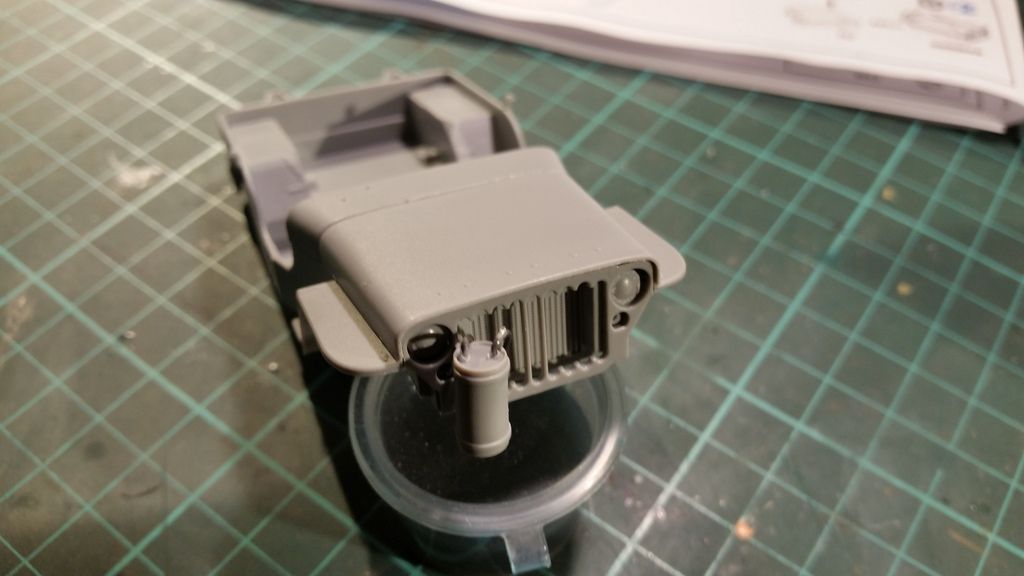
the radiator with the lights molded on
i will add the clear parts later once evrything is painted

Image
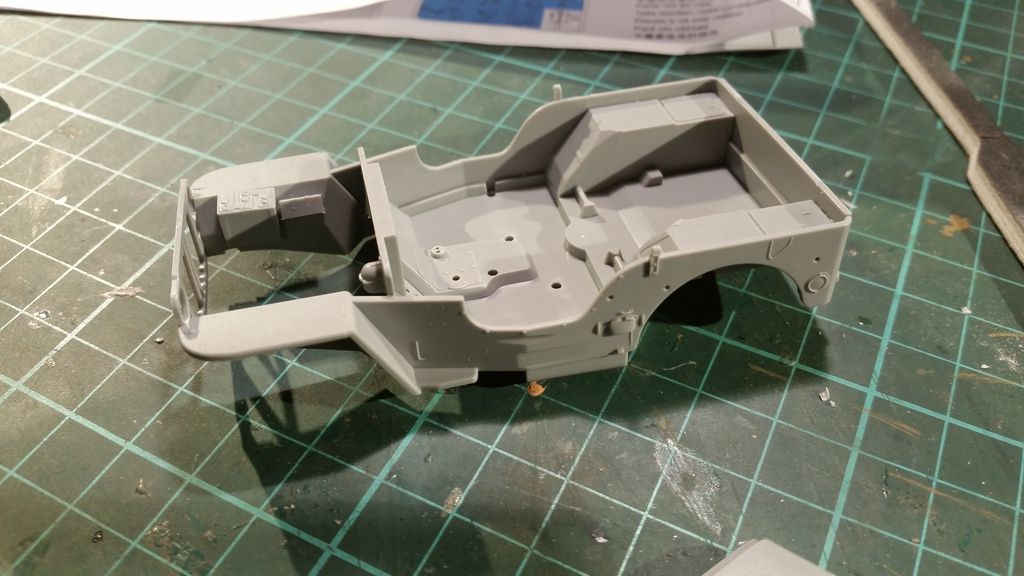
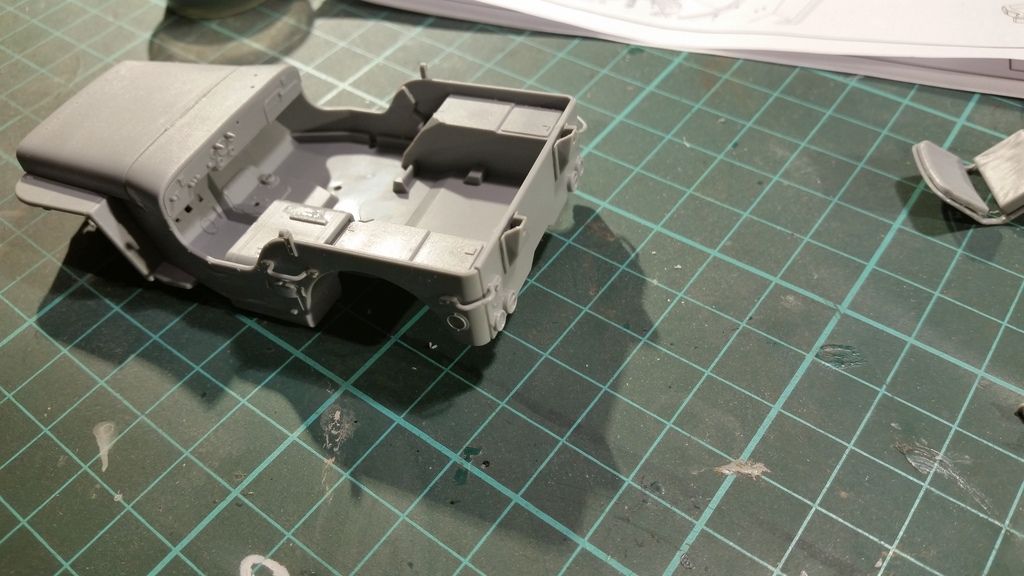
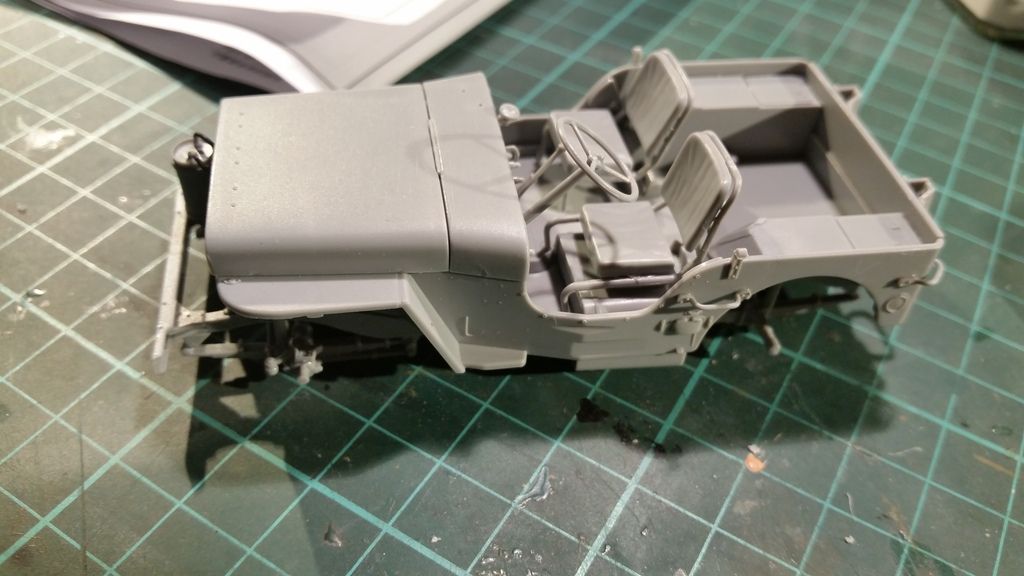
the body tub of the jeep with the first details added like the battery box

Image
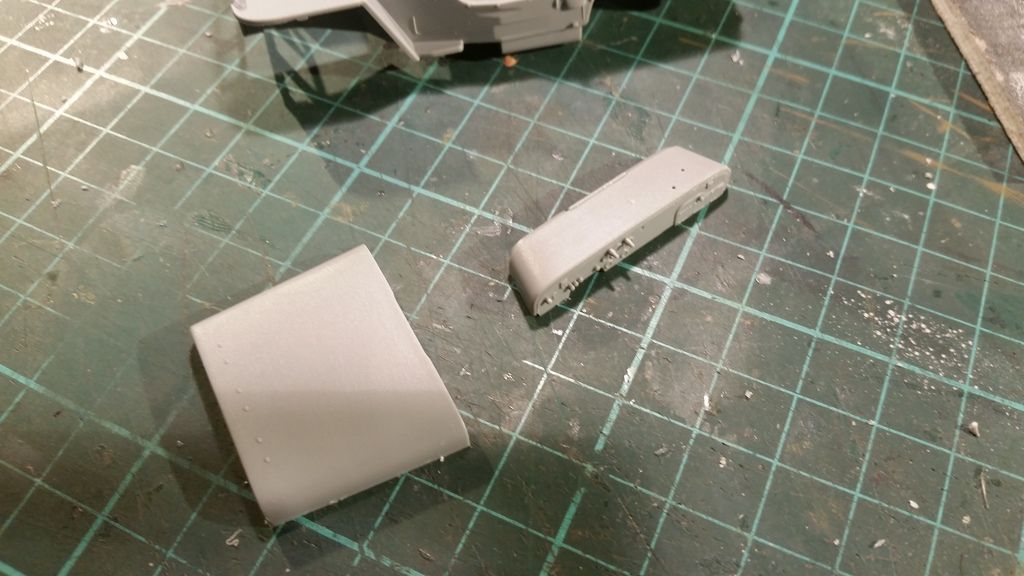
the hood and instrument panel

Image
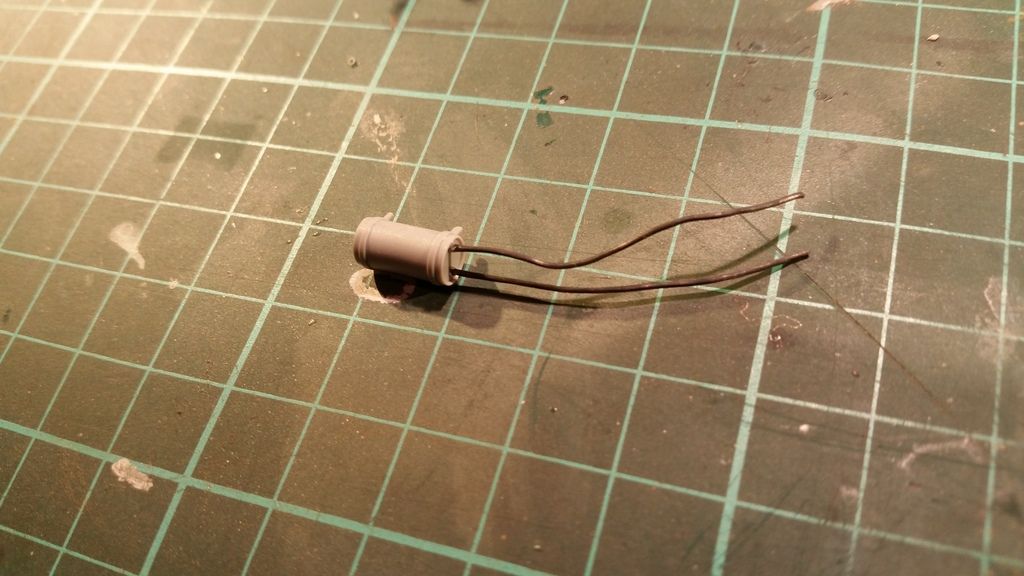
using 0.5mm leadwire i added some tubing to the condenser that goes on the front of the jeep

Image
everything was then added to the body

Image
some exterior details where added

Image
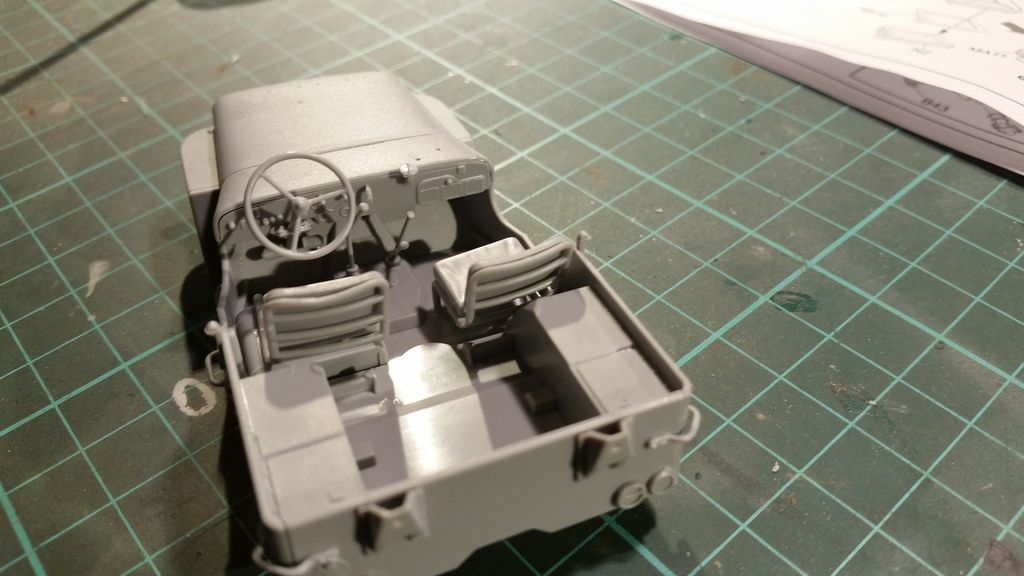
i then added the seats
i wasn't happy with them as the holes in the bottom are 1 mm or even bigger
the supports of the seat are not even half as big so there where some big holes to fill

Image
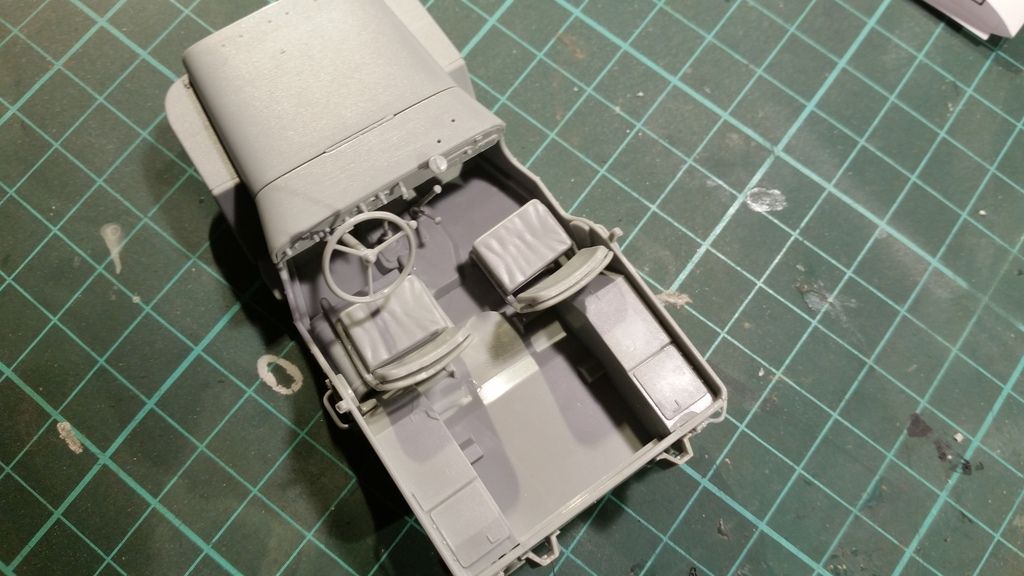
same step but now shown from above
the passenger seat is still out of position but that was fixed after i shot this photo (i noticed it when i made this pic)

Image
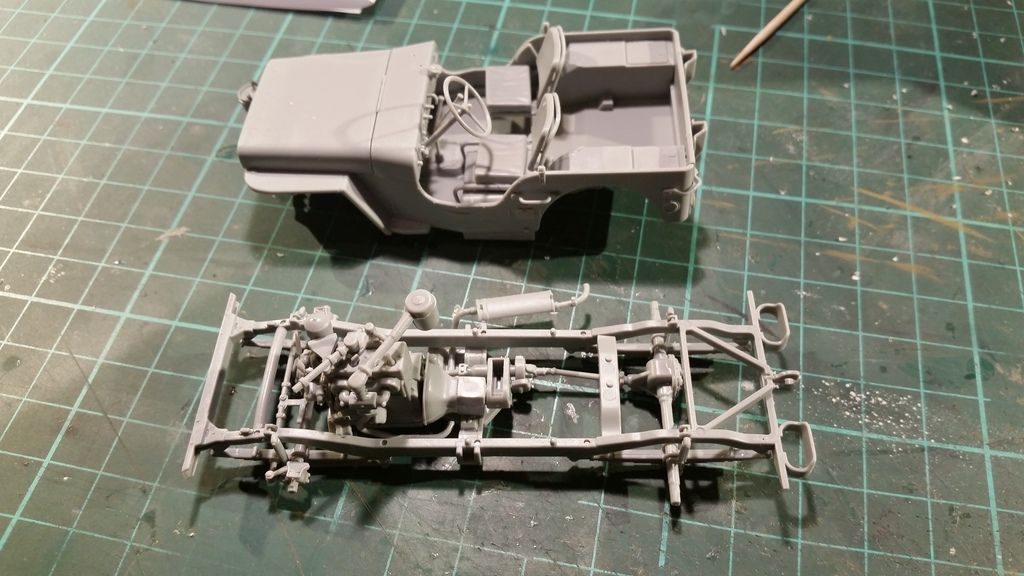
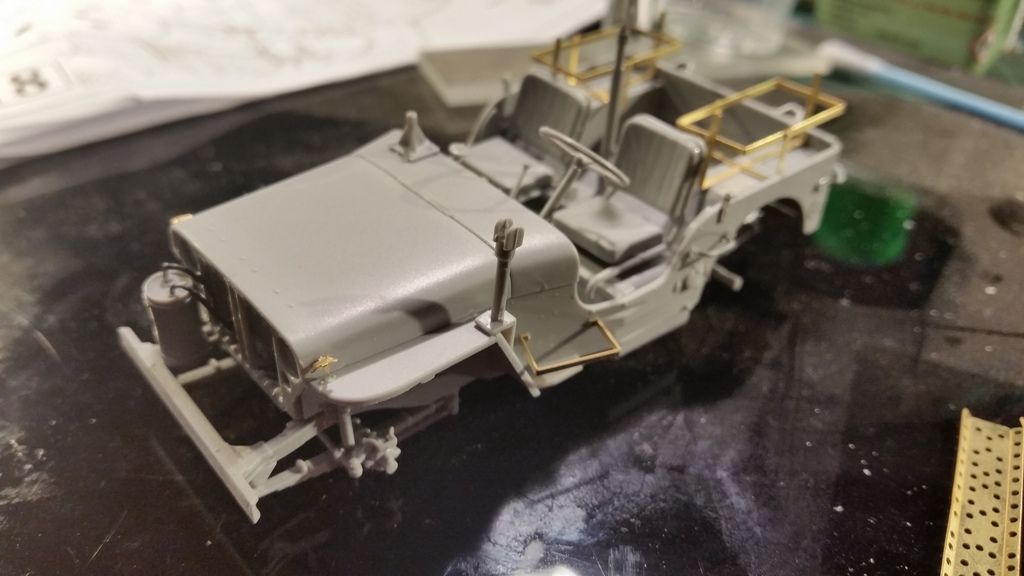
the build up chassis and body
the instruction want you to finish the body first and add all the guns and other details before you join the chassis and body
i think there is too much risk of damaging something so i will do it at this point

Image
the 2 halfs are joined
this wasn't really a smooth fit so i used a lot of pressure and ca glue to get everything glued together

Image
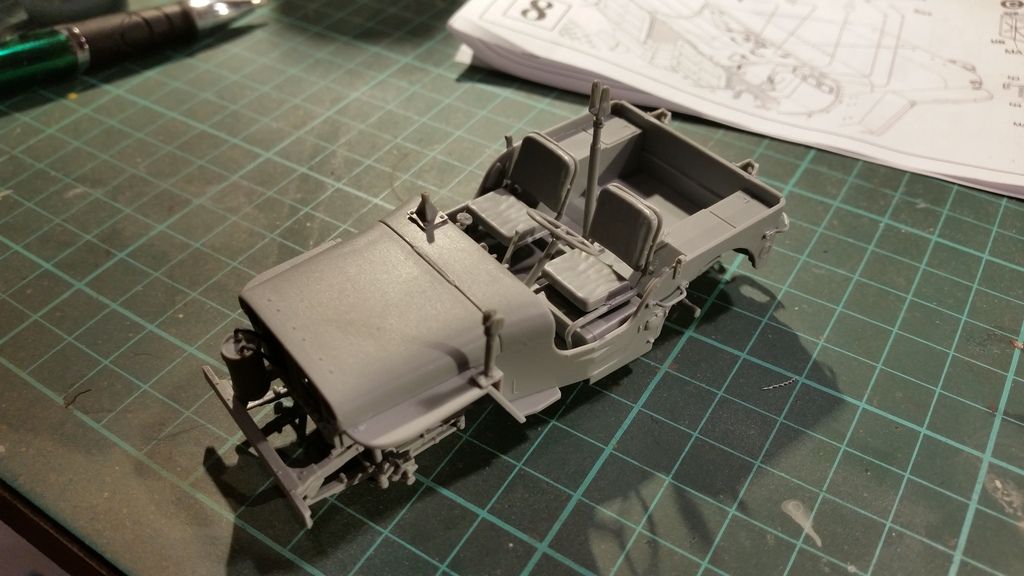
the gun mounts where added
now all that is left are the guns and stowage

Image
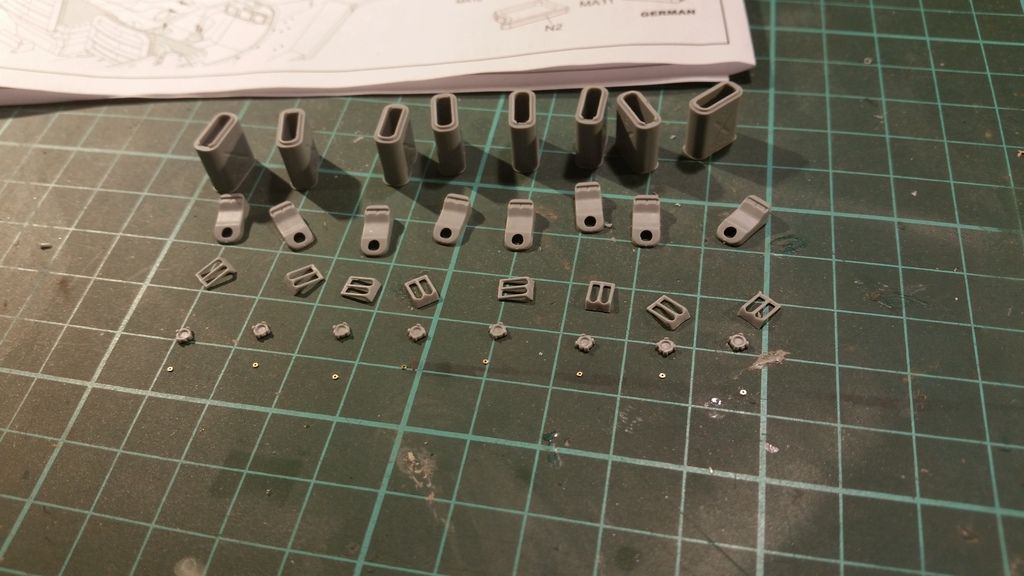
all the parts for the US style jerrycans

Image
and the parts for the German style jerrycans
i think they need to look at their design though
they give you styrene parts for 3 cans but pe inserts for 2 , seems a bit dumb to me

Image
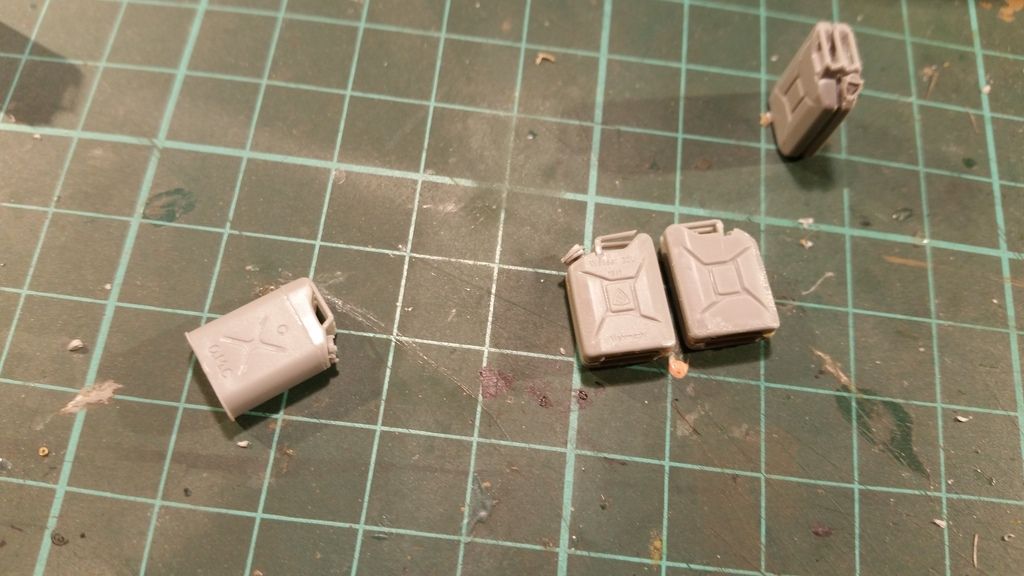
the finished jerrycans
i will add the straps later when i glue the cans in position ,this makes it easier to paint and weather them without the risk of spilling paint on already painted parts

Image
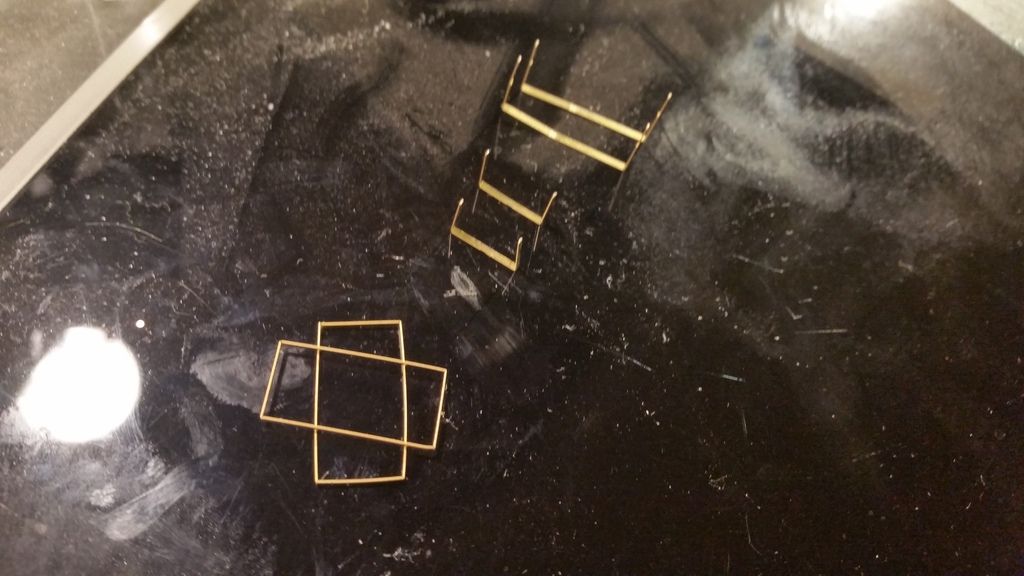
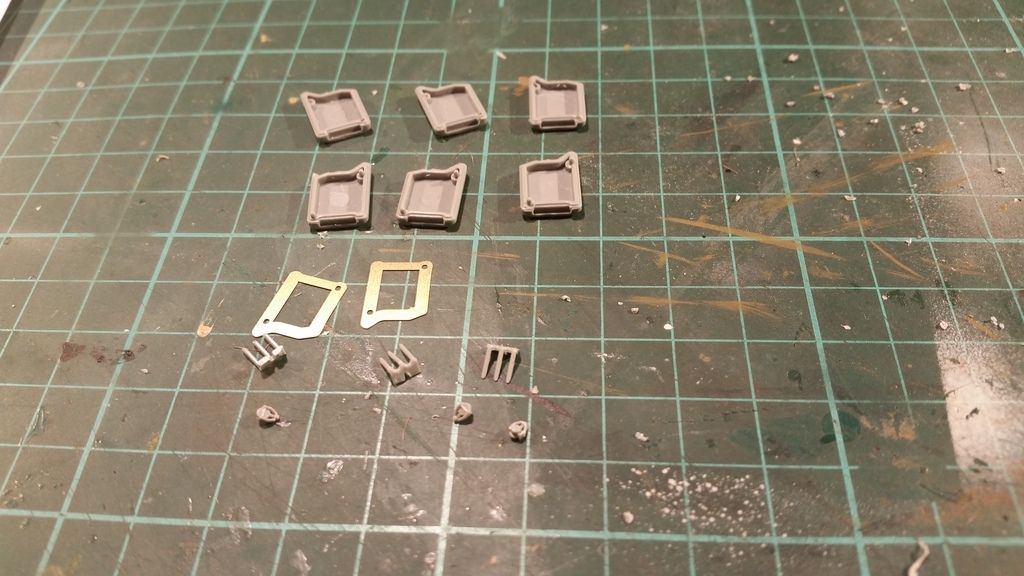
the parts for the jerrycan racks
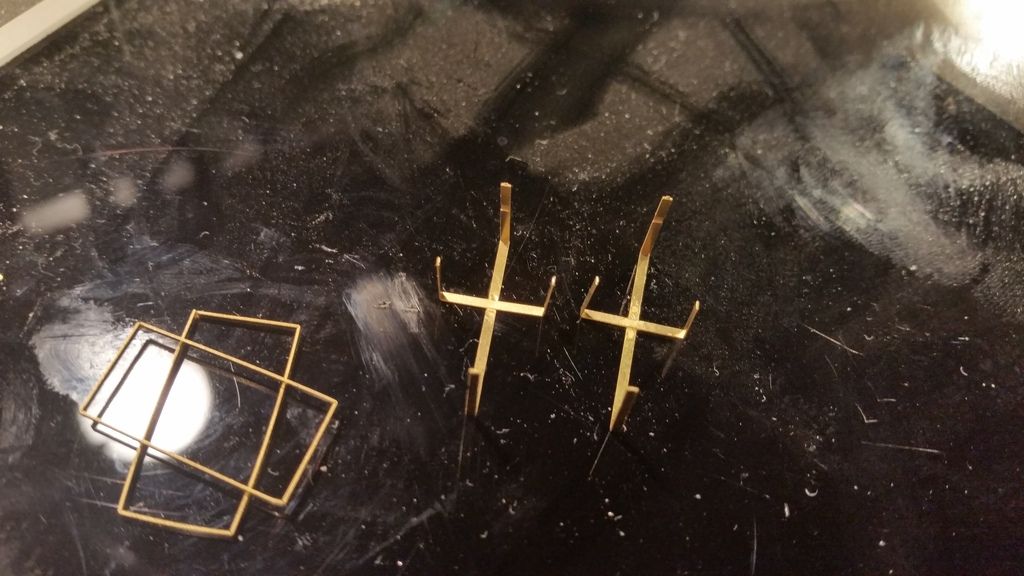
Image
half way there
there are notches in the parts wich help you to get everything in the right place
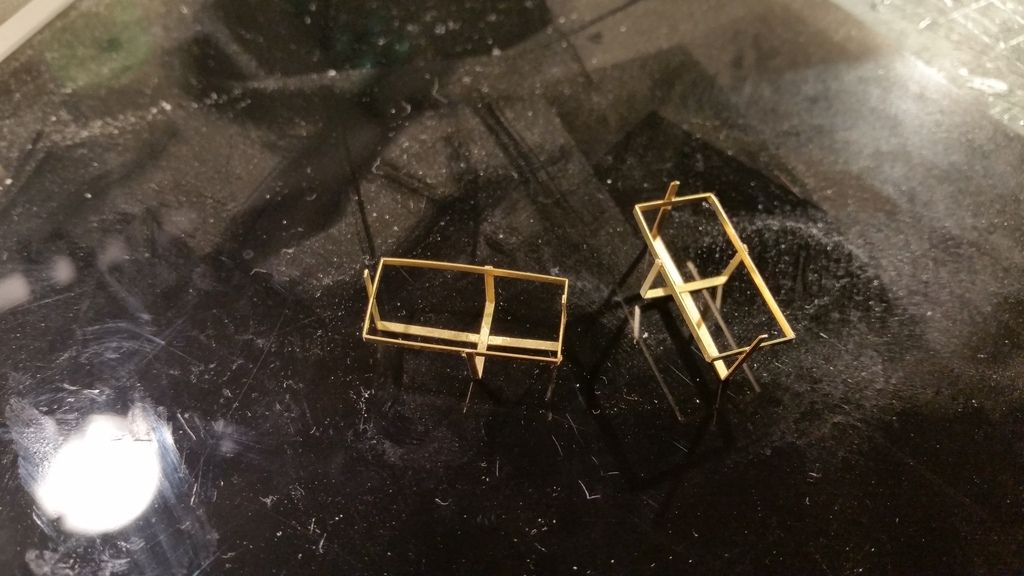
Image
the finished racks

Image
the photo etch details where added , not that much but it adds something to the build and styrene would have looked a bit thick in my opinion

Image
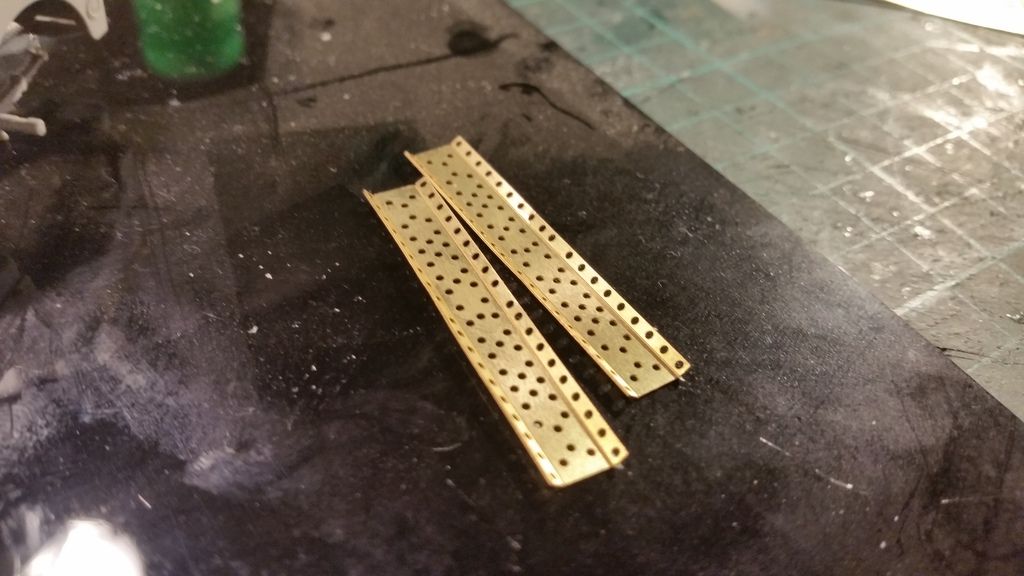
the drive/skid plates are pe and have nothes on the sides where you need to bend them
this works well as you can't over bend them so they will look the right way without a lot of corrections

Image
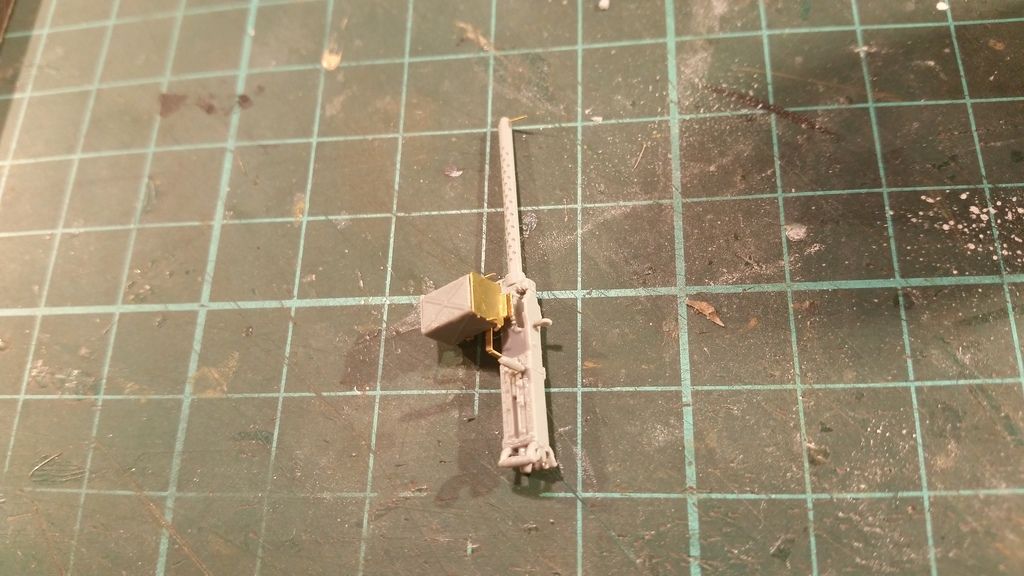
the finished .50 cal Browning
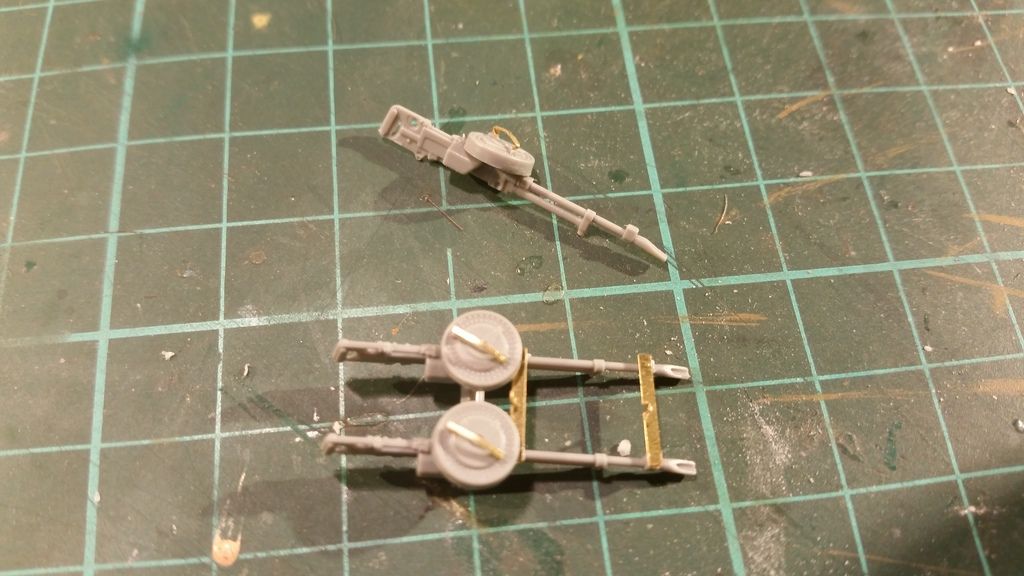
Image
the Vickers K mg's

Image
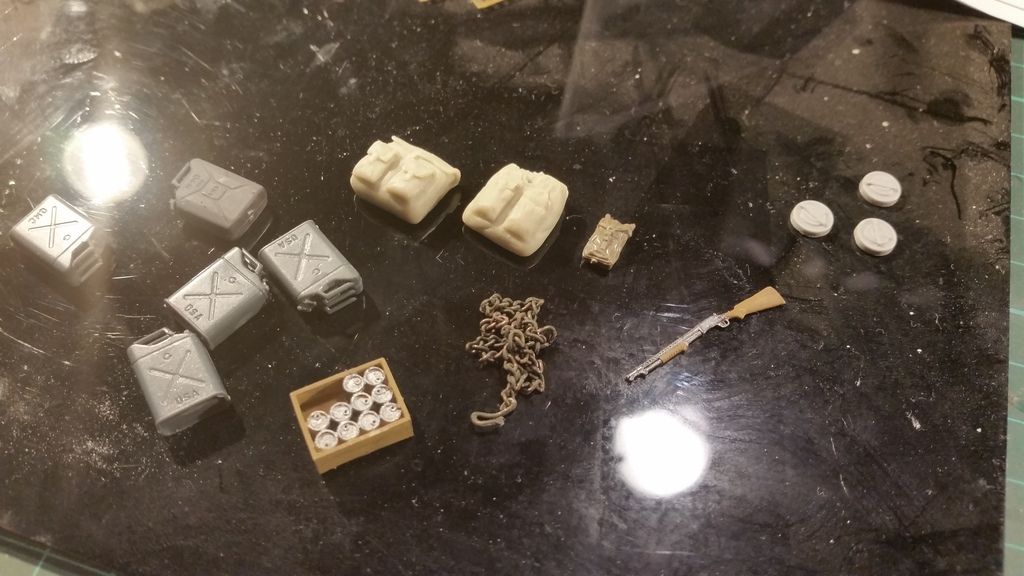
the other stowage i want to add

and here are some testfitting shots of how it will be build up after painting
Image
Image
Image
Image
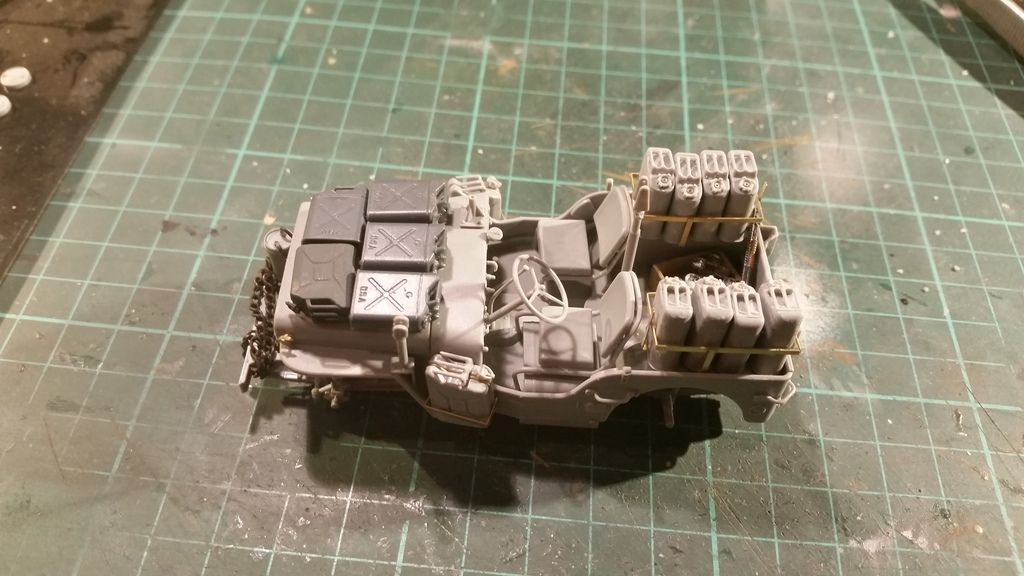
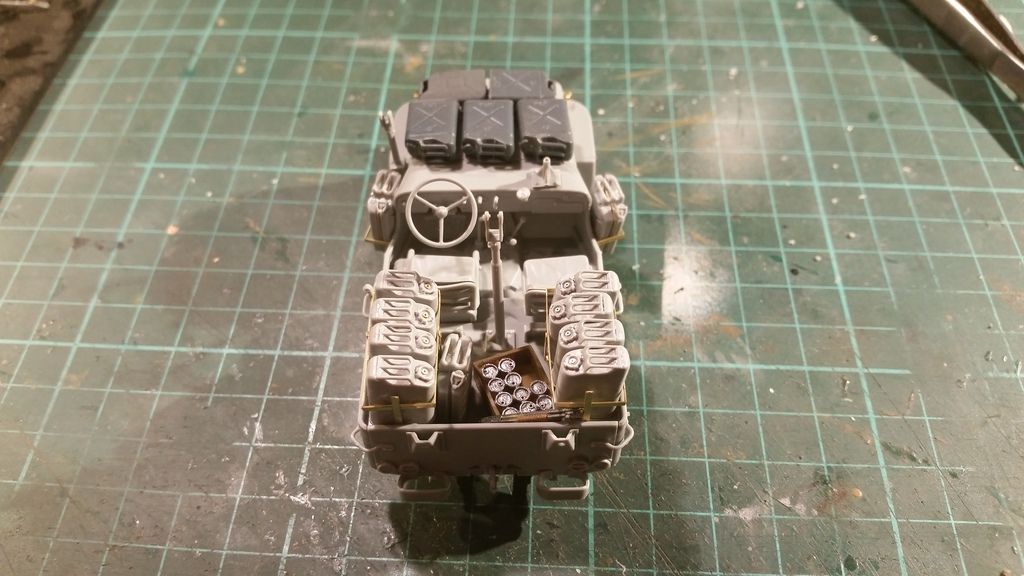
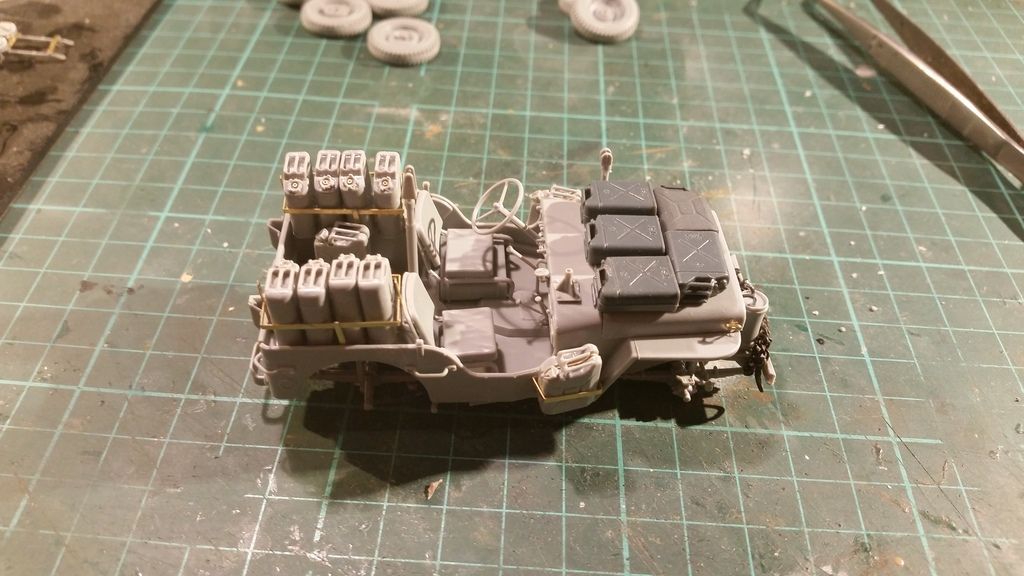
i couldn't place the guns as they are held in place with small pins and i think i will break them when i try to remove the guns for painting so those will be added later

and that is all i have for now
i will have to wait with painting as i cracked the nozzles of my airbrushes :bash: so i will have to get some new ones but the shop i go to is closed as the owners are on vacation but i have more builds on the go so i don't worry about that
i will get back to this as soon as i can
thanks for stopping by and having a look
happy modelling and untill next time
cheers Mark
On the bench
GB builds
1/35 Trumpeter M1132 ESV

Personal builds
1/35 Hobby Boss M1070 tractor with M1000 semi trailer and Meng M1A2 TUSK II Abrams
1/35 Takom V2 rocket with the Meillerwagen and SS100 tractor
User avatar
Danta2er
Staff Sergeant
Staff Sergeant
Posts: 210
Joined: Tue Apr 28, 2015 2:25 am
Location: Roanoke, Virginia

Re: Dragon 1:35 SAS Jeep

Post by Danta2er »

I really appreciate your detail in fitting out this kit to look like the picture :clap:
Awaiting tools of the trade 1:32 Trumpeter Messerschmitt Bf109E-4 In the closet waiting 1:96 Revell USS Constitution 1:96 Revell 1964 Cutty Sark, H-395

"Nature does not hurry, yet everything is accomplished." ~ Lao Tzu
User avatar
MarkVerploeg
Major
Major
Posts: 4837
Joined: Wed Oct 16, 2013 12:21 am
Location: Oss, Noord Braband The Netherlands
Netherlands

Re: Dragon 1:35 SAS Jeep

Post by MarkVerploeg »

Thank you very much
I won't be acurate to the famous photo if that is the one you mean
Those jeeps had guns for the passenger and on the large mount in the middle of the jeep
The kit has a mg for the driver wich was used back then but was not fitted to the early vehicles and they where installed at a later date
But it is kind of hard to find detailed information about these jeeps as they where field modified so if it would fit they used it but no real build plans where there to show how to do it
The jerrycans on the hood are another feature that was changed later as the earliest vehicles had a strap that was fixed to the hood with a small bracket and later ones had a sort of basket that was half as high as the jerrycan so they could not slip out of the strap when the breaked hard or went offroad
So i think these vehicles where often changed and adapted to what was needed
On the bench
GB builds
1/35 Trumpeter M1132 ESV

Personal builds
1/35 Hobby Boss M1070 tractor with M1000 semi trailer and Meng M1A2 TUSK II Abrams
1/35 Takom V2 rocket with the Meillerwagen and SS100 tractor
User avatar
MarkVerploeg
Major
Major
Posts: 4837
Joined: Wed Oct 16, 2013 12:21 am
Location: Oss, Noord Braband The Netherlands
Netherlands

Re: Dragon 1:35 SAS Jeep

Post by MarkVerploeg »

hi guys
time for a new update
the build is going well and the painting is done
the Jeep is now ready for weathering so today i will try to explain how i got to the point where the build is now
i wanted to add some more information about the SAS in this update but i found out i have a lot of pictures already so i decided to keep that for the next update or even the one after that as those will be smaller updates then this one
so let's go to the build shall we

Rust color
Image
the Jeep and all the stowage are primed using Ammo for Mig grey primer
i recently discovered that this primer sprays much better with a 0.4mm setup on my airbrush unlike the 0.15 i used before (was too small)
once the primer was dry i started to paint the Jeep in rust colors
for this i used the rust color set by Ammo ich seem to be the only paints from the brand that i like but a series of brown red and orange paint can be used for the same effect
the first color is old rust (dark brown)

Image
then the second color was added in a smaller amount and in a random way
this color is medium rust (orange brown)

Image
the final color is light rust (yellow) wich was used in a even smaller amount
after this step i covered the entire model in 2 coats of aqua gloss (alclad)
this is done to protect the rust colored paint from the chipping fluid and the chipping proces itself and protect it from scratches

Image
how it looks in daylight
this shows the colors a bit better

Basecolor and chipping
Image
then it was sprayed with AK interactive chipping fluid and left to dry
you could do the same with hairspray if you decant it first as the propelant can damage the paint
i didn't have the correct basecolor wich is suppossed to be light yellow so i mixed my own with sandy yellow and white from the mr hobby aqueous range (H79 and H1)
the green is Tamiya darg green XF-61 mixed with a drop of buff in about a 5:1 ratio


Image
this proces was also done on the wheels
once the paint is dry i use a old brush and some regular tap water
i used the brush only to make the paint wet allthough you can use it to scratch the paint
instead i used a cocktail stick to make all the scratches and paintchipping

how it looks on the vehicle
Image
the rear will be filled with stowage but i think it is best to do this part aswell ,just in case it doesn't get covered

Image
the drivers side

Image
passenger side

Image
the front

Image
from above
my goal was to make more variation in the chipping and i think it works as the color can be different in the chipping even if some spots are close to eachother
this was the first time i tried this though but i think that i will do this more often in the future

English Jerrycan
Image
the rust colors where also used on the jerrycans
this was where my complete lack of British military equipment comes in
i sprayed the rust on the US style cans but they are painted in red brown wich makes the chipping nearly invisible

Image
so i decided to use a sponge and Vallejo modelcolor German camo black brown


Seats
Image
the colors i used for the seats

Image
the seats where first painted with US field drab wich serves as the dark basecolor

Image
i then dry brushed the seats about 2 or 3 times to make the regular basecolor
this is the Canvas paint

Image
and finally some middlestone for worn places


Weapons
Image
the guns where brush pinted with mr metal buffable dark iron

Image
they where then buffed with a old brush with short hairs to get a sheen on all the raised details

Image
the wooden handles where painted with a 4:1 mix of Vallejo English uniform and white
the ammo box is painted with US olive drab (also Vallejo)
i forgot to make a second photo but the green was dry brushed with Vallejo field grey and the wood was drybrushed with Vallejo smoke to make a woodgrain effect


backpacks
Image
the backpacks where painted in Vallejo flat earth (right) and later heavily dry bruched with the same color and a drop of white to make the basecolor (left)

Image
then by adding more white i made the highlight color wich was drybrushed on the gear to finish them


Wooden crate with cans
Image
the wood effect i mentionned earlier
this crate is painted with the same color as the gun handles and later dry brushed with the Vallejo smoke to make a wood grain effect

Image
the tin cans where painted with mr metal stainless steel (buffable)

Pierced steel plates
Image
the photo etch plates where first cleaned with some dishwashing soap and dried
they where soaked in some pe blackening solution
i did this to have a dark color in case the paint peels of during painting and weathering
now it will be nearly black otherwise it would be a shiny brass color

Image
they where then sprayed with shadow rust and dark rust (Ammo)

Image
some medium rust was added

Image
and the light rust to finish off the rust colors

Image
then i used a sponge and some Vallejo natural steel and made small specks of metal where the plate isn't rusted yet

Image
the plates where finshed by mixing Vallejo middlestone and white in a 1:1 ratio to make it look like the basecolor of the vehicle
this was then applied with a sponge on the plates to make a chipped paint effect


German jerrycans
Image
the german jerrycans where painted in the same rust colors as the Jeep
they where also sealed with aqua gloss and sprayed with the chipping fluid
once the chipping fluid was dry i sprayed them in tamiya dark yellow

Image
then i scratched them using water and a cocktail stick

Image
after leaving them to dry for about 20 minutes i masked the jerrycans to make the white cross on them marking them as water cans
petrol cans where dark yellow without the cross or german (dark) grey but again without the cross

Image
adding the white

Image
after i removed the masks

Image
and more scratches and chipping


detail painting the last bits and pieces
Image
starting with the tyres
these where painted with a 3:1 mix of Vallejo black and german grey
they where highlighted a bit with german grey but that makes almost no difference as it is very hard to see

Image
the radiator was painted with Vallejo black
this was then dry brushed with natural steel by Vallejo
also the headlights ,rearlights and side reflectors where painted with mr metal chrome silver

Image
the lbrake lights where painted with clear red from mr hobby aqueous the same goes for the turn signals allthough with clear orange
the reverse lights (is that how they are called) where filled with a drop of aqua gloss

Image
the side reflector

Image
the headlights where placed
the tubes for the can on the front where painted with the same dark grey mix as the tyres

Image
the knobs on the leavers and steering wheel where also painted with the grey mix

Image
everything is ready for the gloss coat and decals


and that is all i have for now
i hope to get started on the weathering soon but i am changing my workbench so that may take a few days
anyway thanks for watching and i hope you like it
untill next time
cheers Mark
On the bench
GB builds
1/35 Trumpeter M1132 ESV

Personal builds
1/35 Hobby Boss M1070 tractor with M1000 semi trailer and Meng M1A2 TUSK II Abrams
1/35 Takom V2 rocket with the Meillerwagen and SS100 tractor
User avatar
rwsmith14
Sergeant Major of the Army
Posts: 1277
Joined: Thu Jun 05, 2014 1:24 am
Location: Aledo, TX, USA
United States of America

Re: Dragon 1:35 SAS Jeep

Post by rwsmith14 »

Outstanding paint work Mark ! Love the"rusty color" :thumb2:
Image
User avatar
MarkVerploeg
Major
Major
Posts: 4837
Joined: Wed Oct 16, 2013 12:21 am
Location: Oss, Noord Braband The Netherlands
Netherlands

Re: Dragon 1:35 SAS Jeep

Post by MarkVerploeg »

Thank you very much
Glad you like it
On the bench
GB builds
1/35 Trumpeter M1132 ESV

Personal builds
1/35 Hobby Boss M1070 tractor with M1000 semi trailer and Meng M1A2 TUSK II Abrams
1/35 Takom V2 rocket with the Meillerwagen and SS100 tractor
User avatar
MarkVerploeg
Major
Major
Posts: 4837
Joined: Wed Oct 16, 2013 12:21 am
Location: Oss, Noord Braband The Netherlands
Netherlands

Re: Dragon 1:35 SAS Jeep

Post by MarkVerploeg »

hi guys
hopefully every one is doing well
i have e new update for this build
this time the weathering of the jeep
i kept everything pretty basic so this should be a quick one for a change

Image
after i gloss coated all the parts last time
i could now go on with some wash
i used mig prod. dark wash on the US style jerrycans
this helps to get shadows in the large cross in the middle and to make the indented letter more visible

Image
i decided to use all the red brown as petrol cans instead of a mix of water cans and petrol cans
so to make them look a bit morfe like petrol cans i added some streaks of fuel
i used AK fuel stains for this , this is a thick slightly crlear brown wash to create fuel stains and streaks

Image
the German water cans freceived a wash with AK DAK wash wich is a very dark brown wash
i think that the dark wash i used on the other cans is too dark as that is basicly black
on a light color like the dark yellow that i used for the cans it would look too strong and dark
this wash is a softer color wich in my opinion anyway works a lot better

Image
i then dusted the lower parts of the jerrycans with mig prod. gulf war sand

Image
the same was done to the Germsn cans

Image
then i added the kit provided photo etch straps to the cans that would need it
the cans that will go on hood of the jeep and the 2 on the sides received these straps
the 8 cans that will go in the crates on the back won't need them

Image
the AK DAK wash was also used on the jeep
i kept it to a minimum really and only pinwashed the raised details

Image
then it was time to focus on the dusting of the jeep
i wanted to add thicker layers of dust in the wheelwells
so those are the places that where dusted a bit heavier then the sides
i used the mig prod. gulf war sand pigment again

Image
the wheels and tyres where also dusted
i again used a large amount of pigments here
i Always work above a piece of paper when i work with pigments
mainly because it saves a lot of time with cleaning but you can poor the fallen pigments back in the bottle aswell and spill less of it

Image
i used a old brush to remove some of the excess pigments and to make sure it will stay inside the groves of the tyres

Image
Image
Image
once i glued the wheels in place i started to build up the stowage i prepared earlier
in the end the jeep looks pretty packed but several photo's of the real vehicles show them being loaded with gear
i decided to go for that look as i don't use a lot of stowage with most builds so it is a nice change

Image
once the glue on the stowage had set i started to work on the exhaust
i didn't have to wait to do this but it simply slipped my mind to do it earlier
these are the products i used

Image
the end result
this was done by covering the exhaust with th rust wash
while this is wet i add the pigments and leave them to dry

Image
and finally i added the gulf war sand pigments to the top and sides of the jeep

and that is all i have done to weather this vehicle
i think that the most important part of weatheringg a dessert vehicle would be dust so that is what i focussed on here
and here are some (kind of) reveal shots of the jeep

Image
Image
Image
Image

but this build is not over yet
there are still these 2 jolly chaps that need to be painted
Image
the driver
Image
the gunner/passenger
the figures are regular dragon quality figures
no gen 2 but still okay to work with

Image
this was the only bad fit they had and that was fixed with ease


so that is all i have for
i will get bck to this after i have done some painting on several other builds
as i don't like to paint figures and i need some more for a other build i decided to do those all at once and get it over with in 1 go

so i hope you like it and untill next time
cheers Mark
On the bench
GB builds
1/35 Trumpeter M1132 ESV

Personal builds
1/35 Hobby Boss M1070 tractor with M1000 semi trailer and Meng M1A2 TUSK II Abrams
1/35 Takom V2 rocket with the Meillerwagen and SS100 tractor
User avatar
rwsmith14
Sergeant Major of the Army
Posts: 1277
Joined: Thu Jun 05, 2014 1:24 am
Location: Aledo, TX, USA
United States of America

Re: Dragon 1:35 SAS Jeep

Post by rwsmith14 »

As always , Mark, incredible work!!
Image
User avatar
MarkVerploeg
Major
Major
Posts: 4837
Joined: Wed Oct 16, 2013 12:21 am
Location: Oss, Noord Braband The Netherlands
Netherlands

Re: Dragon 1:35 SAS Jeep

Post by MarkVerploeg »

Thank you very much
Glad you like it
On the bench
GB builds
1/35 Trumpeter M1132 ESV

Personal builds
1/35 Hobby Boss M1070 tractor with M1000 semi trailer and Meng M1A2 TUSK II Abrams
1/35 Takom V2 rocket with the Meillerwagen and SS100 tractor
User avatar
Danta2er
Staff Sergeant
Staff Sergeant
Posts: 210
Joined: Tue Apr 28, 2015 2:25 am
Location: Roanoke, Virginia

Re: Dragon 1:35 SAS Jeep

Post by Danta2er »

This really looks terrific
Awaiting tools of the trade 1:32 Trumpeter Messerschmitt Bf109E-4 In the closet waiting 1:96 Revell USS Constitution 1:96 Revell 1964 Cutty Sark, H-395

"Nature does not hurry, yet everything is accomplished." ~ Lao Tzu
User avatar
MarkVerploeg
Major
Major
Posts: 4837
Joined: Wed Oct 16, 2013 12:21 am
Location: Oss, Noord Braband The Netherlands
Netherlands

Re: Dragon 1:35 SAS Jeep

Post by MarkVerploeg »

Thank you very much
Glad you like it so far but it isn't finished yet
I still need to paint the figures and make a small vignette style base for it
On the bench
GB builds
1/35 Trumpeter M1132 ESV

Personal builds
1/35 Hobby Boss M1070 tractor with M1000 semi trailer and Meng M1A2 TUSK II Abrams
1/35 Takom V2 rocket with the Meillerwagen and SS100 tractor
User avatar
AlkaSeltzer
Staff Sergeant
Staff Sergeant
Posts: 234
Joined: Tue Aug 19, 2014 7:21 pm
Location: U.S.A.

Re: Dragon 1:35 SAS Jeep

Post by AlkaSeltzer »

I am impressed by this build you have so far! :bow:: I really like the way you have constructed the photo etch parts. Those parts alone show your skill level is second to none. It is a pleasure to see this Jeep come to life since I know it is small with tricky parts and since it is made by Dragon it has more parts than a real one. LOL. great Job! :thumb2:
My Dog Looks Like A Jack Rabbit and he ate my model that's why it looks like that :banana:
User avatar
MarkVerploeg
Major
Major
Posts: 4837
Joined: Wed Oct 16, 2013 12:21 am
Location: Oss, Noord Braband The Netherlands
Netherlands

Re: Dragon 1:35 SAS Jeep

Post by MarkVerploeg »

Thank you very much
I am glad you like it so far
I am in the middle of painting a bunch of figures for this build and my other entry into this sig so i hope to finish this build soon
It will get a small base but that will probably be a very simple one
But it has to be finished soon as the end of this build is getting closer
On the bench
GB builds
1/35 Trumpeter M1132 ESV

Personal builds
1/35 Hobby Boss M1070 tractor with M1000 semi trailer and Meng M1A2 TUSK II Abrams
1/35 Takom V2 rocket with the Meillerwagen and SS100 tractor
User avatar
rwsmith14
Sergeant Major of the Army
Posts: 1277
Joined: Thu Jun 05, 2014 1:24 am
Location: Aledo, TX, USA
United States of America

Re: Dragon 1:35 SAS Jeep

Post by rwsmith14 »

Looking great Mark !!
Image
User avatar
MarkVerploeg
Major
Major
Posts: 4837
Joined: Wed Oct 16, 2013 12:21 am
Location: Oss, Noord Braband The Netherlands
Netherlands

Re: Dragon 1:35 SAS Jeep

Post by MarkVerploeg »

Thank you very much RW
I am glad you like it so far
The way it looks now i should be able to finish it somewhere this week so hopefully i can get a update done in the next 2 or 3 days about the figures
They will get a gloss coat and a wash today so i hope to flat coat them tomorrow and once that is dry some pigments to finish them
On the bench
GB builds
1/35 Trumpeter M1132 ESV

Personal builds
1/35 Hobby Boss M1070 tractor with M1000 semi trailer and Meng M1A2 TUSK II Abrams
1/35 Takom V2 rocket with the Meillerwagen and SS100 tractor
User avatar
MarkVerploeg
Major
Major
Posts: 4837
Joined: Wed Oct 16, 2013 12:21 am
Location: Oss, Noord Braband The Netherlands
Netherlands

Re: Dragon 1:35 SAS Jeep

Post by MarkVerploeg »

hi guys
so time for a final update in this build
not everything went according to plan as i painted the figures but in the end i didn't like them so i decided to leave them of the Jeep and do a reveal without them
i will show what i did to paint them and maybe someone can tell me where i can improve them or that the opinion i have of them is right
as i think the amount of detail on them is low but also the detail is very soft wich means i have less to work with and with my limited figure painting skill that doesn't end very good

anyway here is the way i painted the figures
they are photo's of the figures i used on my german recon diorama for the most part but i didn't see any use in make pictures of the same step on these figures at the time as i would have doubles of each step

Image
so i started out with priming the figures black

Image
i then dry brushed the part where the skin is showing with white

Image
i then dry brushed the basecolr on
this is a 1:1 mix of Sunny skintone and salmon rose

Image
that layer was covered with a wash made up of English uniform , flat brown , vermillion and the basecolor
they where mixed in a 2:2:1:5 ratio and then mixed with some Ultimate thinner to thin it down to a wash
i picked the Ultimate thinner as this dries faster then vallejo's own thinner

Image
i then did some highlights by adding a drop of white to the basecolor

Image
i added a drop of flat brown to the basecolor topaint the lips

Image
i then painted the eyes using white and and dark prussian blue
they are to big at this point but you can correct this when you paint the eyelids so they will get a normal size

Image
Image
i then added this stuff
i use this for a long time now and it gives a light sheen on the skin tones and works a bit like a wash

Image
i then painted the uniforms in tan yellow

Image
the vest of the passenger is painted with flat brown

Image
the uniforms where highlighted with buff around the raised parts

Image
the head gear was painted with black and white

Image
here is one of the "finished"figures

Image
here they are in the Jeep
i hope you can understand why i decided to keep them out of the finished build

and now i will show how i made rhe simple base for this build
i wanted to keep the base simple as i want the viewer to look at the vehicle so the ground work is just a extra thing that is there and not the important part of the build
it does however help with placing the vehicle in a setting

Image
the base itself is made up with 3 small blocks of wood tht i glued together

Image
i then stained the wood with mig prod. dark wash
this is much faster then staining agents you can get at the diy store

Image
i then masked off the edges and sides
i applied a mix of water , white glue and birdcage sand on the top to make the dessert floor

Image
once i made so tyre marking in the sand i sprayed the base with Vallejo modelair light brown

Image
to finish it off i added mig prod. gulf war sand pigment to the base

so at this poit the base and the vehicle are ready to be put together

Image
and then it looks like this

i will post better pictures in the final reveal section as i tok those with daylight instead of indoors
and that is all i have for you
this build is finished so it is on to the next one
happy modelling
cheers Mark
On the bench
GB builds
1/35 Trumpeter M1132 ESV

Personal builds
1/35 Hobby Boss M1070 tractor with M1000 semi trailer and Meng M1A2 TUSK II Abrams
1/35 Takom V2 rocket with the Meillerwagen and SS100 tractor
Post Reply

Return to “Builds”