Working with photo Etch

Post Reply
User avatar
fly1ngdutchm4n
First Lieutenant
First Lieutenant
Posts: 3554
Joined: Fri Aug 09, 2013 11:17 pm
Location: Hoogerheide The Netherlands
Netherlands

Working with photo Etch

Post by fly1ngdutchm4n »

Here's a article I wrote a while ago about working with Photo Etch.
You guys might of read a lot about Photo Etch, But these are my experiences working with it.
I thought I share it.
Sorry for some spelling errors, but I think you guys can understand it..... :nena:


After building plastic models "right out of the box", almost every builder starts to think about adding extra "photo etched" details. In this way, the models are more realistic and detailed.

Today there are many different companies that make detail parts for modellers. From stickers, special paints and metal parts, to complete conversion kits. One of the most frequent upgrades available for plastic models are the so called Photo-Etched Detail sets (or upgraded parts).
In this small tutorial, I will try to share my knowledge about working with photo-etched parts (P / E)

Image


What is P / E or Photo Etch?

Photo etched parts Types

Photo etched parts are small metal parts made by a photochemical process of a sheet of thin metal (etching). This process can make very small and accurate parts of almost any shape with a high-precision . All the P / E parts are made of different materials. Steel, nickel, copper, and are available in different thicknesses.

Before the parts can be used on the model, they should be cleaned, just like any other part of the model. P / E parts connected to the frame can be cleaned with a damp cloth with water and detergent. It is essential to remove residue, to let paint and glue sticking on the P / E parts.

Image

Removing the P / E parts, tools

Parts included in the frame, can be cut with a craft knife. Place the frame on a hard cutting board. Not on a cutting mat! A cutting mat is too soft, and there is a risk that the parts may bend when cutting loose! Hold down the item securely, and cut the tabs loose. Try to cut as close to the part as possible, to minimize cleaning. When the P / E part is really small, there is a possibility that it can fly away when you cut! And believe me, I've lost many parts this way! The trick is to put the frame on a piece of tape. Than the part will stick to the tape, and is not going to fly. Some parts are so small, you'll never find them back otherwise. The carpet monster will eat it, or a vacuum cleaner will find it...
It's still a good idea to hold the part down while you cut the part loose.

Image

tools

Some of the standard tools:

• a very sharp craft knife
• a file
• a wire cutter
• tweezers
• C / A glue (superglue)
• and a toothpick

Image

One last thing ... Don't cut out all the parts at once, but only the parts that you really need for direct mounting. A majority of the parts are so small (even 0.2mm) that they are easy to lose. So work with one part at the time!


Bending of photo etched parts

Sometimes the instructions tells you to bend an item. On vehicle models, these are usually wipers, screens, engine parts, clamps, etc. Depending on the softness of the metal it can be sometimes difficult to bend, especially if you need a sharp angle. There are some special photo etch bending tools on the market if you plan to do a lot of bending. I use a so-called "hold and fold" from the small shop.

Image

With this tool you can clamp the part tight on the bending line. Slide an old-fashioned razor blade under the part, and lift it up for a prefect angle. Very useful when folding ammunition boxes for example . If you don't bent much P /E , you can also bend it with a metal ruler and a craft knife. Another alternative is the use of a flat long-nosed pliers or a pair of tweezers and craft knife.

Ways to attach to the model.

P / E glue

Since photo etched parts are made ​​of metal, plastic glue will not work on it. CA glue (superglue) is widely used because it almost glues everything. I use CA glue for many tasks, including P / E parts.
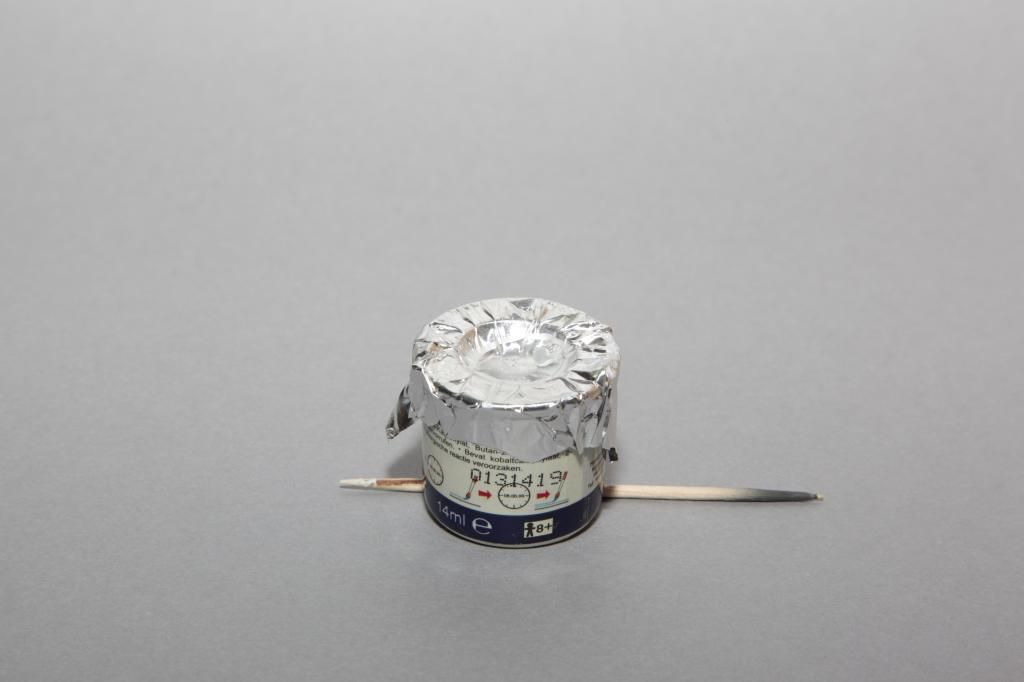
Note that you work very carefully with this glue, because you will need very little of it. You got quickly too much glue on your model, and its hard to remove. If you do spill, let it dry and scrape it away with a scalpel. I use a toothpick to apply glue. I sharp the tip of the toothpick, so I have a thin point that I can dip in the glue. I put a drop of C / A glue on a piece of plastic and dip the toothpick in there. I touch the place where the item should be, and I place the part.
Be carefull of your fingers! So do not press down the part with your fingers, because you will stick to your model are as it happens! Experience? Yes .... :oops:
Many parts can hold with tweezers, but do not squeeze too hard, the parts jump very far! Unfortunately I lost a lot of parts that way. Another way to deal with this problem is to putt at the end of a toothpick a piece of Pritt poster buddy. So you can pick up the small part and bring it to the model without flying away. Exercise is a requirement, it's really not easy in the beginning.

conclusion

Photo etch parts is a great way to get more realism and detail in your model.
Keep in mind that you should have some experience in modeling, because this technique is not easy and needs some experience.

But one must begin, and if one has mastered, he can make the most beautiful models!

Image

Image

Image

Image

Image


:cheers2: Cheers guys!
Build what you love, Love what you build
User avatar
Paul
Site Admin
Site Admin
Posts: 12622
Joined: Thu May 23, 2013 4:47 pm
Location: Merseyside, England, UK
Contact:
England

Re: Working with photo Etch

Post by Paul »

That's a great guide frans cheers.
Tamiyasnob
Master Sergeant
Master Sergeant
Posts: 356
Joined: Thu May 30, 2013 7:11 pm
Location: Shrewsbury, Shropshire UK
Contact:

Re: Working with photo Etch

Post by Tamiyasnob »

Superb,this has answered everything I wanted to know about PE. Extremely usefull with the amount of kit manufacturer,s including photo- etch in their kit,s now, a huge well done ,cheer,s Dave :th: BE AT PEACE WITH YOUR PLASTIC.
User avatar
T3hGuppy
Second Lieutenant
Second Lieutenant
Posts: 3467
Joined: Wed Jun 12, 2013 11:20 pm
Location: Bournemouth, UK
Contact:
Great Britain

Re: Working with photo Etch

Post by T3hGuppy »

Great intro to PE dude.

That Tiger is cool.
On the bench

Too much to list. !!


Youtube channel:https://www.youtube.com/user/bnealuk
User avatar
chief5437
Major
Major
Posts: 4810
Joined: Fri May 31, 2013 1:25 pm
Location: England
England

Re: Working with photo Etch

Post by chief5437 »

Great tutorial FD! Cheers.
Chief
User avatar
fly1ngdutchm4n
First Lieutenant
First Lieutenant
Posts: 3554
Joined: Fri Aug 09, 2013 11:17 pm
Location: Hoogerheide The Netherlands
Netherlands

Re: Working with photo Etch

Post by fly1ngdutchm4n »

Tamiyasnob wrote:Superb,this has answered everything I wanted to know about PE. Extremely usefull with the amount of kit manufacturer,s including photo- etch in their kit,s now, a huge well done ,cheer,s Dave :th: BE AT PEACE WITH YOUR PLASTIC.
Your welcome!
Happy to share it :thumb2:
Build what you love, Love what you build
User avatar
fly1ngdutchm4n
First Lieutenant
First Lieutenant
Posts: 3554
Joined: Fri Aug 09, 2013 11:17 pm
Location: Hoogerheide The Netherlands
Netherlands

Re: Working with photo Etch

Post by fly1ngdutchm4n »

T3hGuppy wrote:Great intro to PE dude.

That Tiger is cool.
chief5437 wrote:Great tutorial FD! Cheers.
Thanks guys! :cheers2:
Build what you love, Love what you build
User avatar
McLeod
Master Sergeant
Master Sergeant
Posts: 422
Joined: Sat Jul 20, 2013 4:59 pm
Location: Kent, UK

Re: Working with photo Etch

Post by McLeod »

Nice piece FD, thanks :th:
There can be only one!
Unless your building two, or three, or four - ah to hell with it.

My Youtube Channel
User avatar
Greg37985
Private First Class
Private First Class
Posts: 41
Joined: Sat Aug 17, 2013 8:22 pm
Location: Baschurch, Shropshire

Re: Working with photo Etch

Post by Greg37985 »

Ive never used photo etch so this tutorial is a little gem.
many thanks
User avatar
Dunno
Private First Class
Private First Class
Posts: 36
Joined: Sun Sep 29, 2013 2:18 pm
Location: Perth Australia

Re: Working with photo Etch

Post by Dunno »

Should have read this two days ago when I cut my first piece of PE and it shot off the bench into that place where socks get lost. Very easty to follow. Thanks
-----------------------------------------------
CHRIS

Currently on the bench

HobbyBoss PzKpfw 1 Ausf C (VK 610)
User avatar
jmar829
Sergeant
Sergeant
Posts: 155
Joined: Wed Aug 21, 2013 6:06 pm
Location: Bloomington, IN, U.S.A.

Re: Working with photo Etch

Post by jmar829 »

Using tape to keep the parts from flying is a handy piece of information.

Has anyone had any luck using the Tamiya photo etch bending tool that look like pliers?
If you're going through hell...keep going.
–Winston Churchill


:fly2:
User avatar
fly1ngdutchm4n
First Lieutenant
First Lieutenant
Posts: 3554
Joined: Fri Aug 09, 2013 11:17 pm
Location: Hoogerheide The Netherlands
Netherlands

Re: Working with photo Etch

Post by fly1ngdutchm4n »

Your welcome guys, Glad that I could help :th:
jmar829 wrote: Has anyone had any luck using the Tamiya photo etch bending tool that look like pliers?
Have seen the Tamiya pliers, don't now if they are any good.
I use the same kind of pliers from a DIY shop. I gues it kinda works the same.

:cheers2:
Build what you love, Love what you build
User avatar
Lego
Command Sergeant Major
Posts: 918
Joined: Fri Nov 08, 2013 6:16 pm
Location: Ireland
Ireland

Re: Working with photo Etch

Post by Lego »

For people who might prefer to use tooth picks and superglue there is a nice trick for keeping super glue from hardening allowing you to work for long periods of time.

All you need is tinfoil and an empty enamel paint tin like a humbrol one. Take the tin and cover it with tinfoil not to tight. Allow a little bit of give so you can just poke the tinfoil down into the tin a little. Then just pour superglue into it and hey presto it will work for ages. Don't know why it works but it does. Works for hours.

Image
“Never argue with an idiot. They will drag you down to their level and beat you with experience.”
Post Reply

Return to “How To Guides + Tips & Tricks”