Si's 1/35 Dragon Pz.Kpfw.IV Ausf.H mid-production HJ Div. Normandy

Post your in progress build threads

Moderator: T3hGuppy

Post Reply
User avatar
ScaleModelJedi
Master Sergeant
Master Sergeant
Posts: 396
Joined: Sun Dec 20, 2015 12:47 am
Location: Birmingham, UK
Contact:

Si's 1/35 Dragon Pz.Kpfw.IV Ausf.H mid-production HJ Div. Normandy

Post by ScaleModelJedi »

For this SIG I will be building the Dragon 1/35 Pz.Kpfw.IV Ausf.H mid-production with Zimmerit. The kit number is 6611 and is from 2013.
I will be replacing the kit tracks with some Fruil tracks and using Ultimate Burnishing liquid for the first time. The kit comes with 8 different schemes and I will be doing the first scheme which is the HJ.Div., Normandy 1944 with the number 615. I have also got some figures that I will be adding to the build but not sure which ones I will use yet.
Image

The box contents. The kit has over 560 parts that come on 28 sprues. As with a lot of Dragon kits there are a lot of sprues from other kits with some new ones for this kit. There are a few PE parts and a metal tow cable as well as the Magic tracks.
Image

Instructions and other bits.
Image

[youtube]TsXOfA2pDHw[/youtube]
Last edited by ScaleModelJedi on Tue Oct 04, 2016 9:13 am, edited 1 time in total.
There are no failed builds only learning experiences.
MY Youtube channel : Scale Model Jedi
https://www.youtube.com/channel/UCSk5py ... taceCr3_3g
User avatar
ScaleModelJedi
Master Sergeant
Master Sergeant
Posts: 396
Joined: Sun Dec 20, 2015 12:47 am
Location: Birmingham, UK
Contact:

Re: Si's 1/35 Dragon Pz.Kpfw.IV Ausf.H mid-production HJ Div. Normandy

Post by ScaleModelJedi »

The Panzerkampfwagen IV Ausf. H began production in June 1943 and received the designation Sd. Kfz. 161/2. The variant Ausf. H pretty much took the design to its limits, yet helping to keep the tank competitive. Between April 1943 and July 1944, a total of 3774 Panzer IV Ausf Hs were produced.

Main armament consisted of the 75mm KwK40 L/48 gun. It was an excellent all-round gun, which fired a potent high-explosive round and also had a good anti-armour performance. This was especially true at short ranges when using the PzGr40 armour-piercing, composite non-rigid round.

The integrity of the glacis armor was improved by manufacturing it as a single 80-millimetre (3.15 in) plate. To prevent adhesion of magnetic anti-tank mines, which the Germans feared would be used in large numbers by the Allies, Zimmerit paste was added to all the vertical surfaces of the tank's armor.

The vehicle's side and turret were further protected by the addition of 5-millimetre (0.20 in) side-skirts and 8-millimetre (0.31 in) turret skirts. During the Ausf. H's production run its rubber-tired return rollers were replaced with cast steel, the hull was fitted with triangular supports for the easily damaged side-skirts and the hole in the roof, designed for the Nahverteidigungswaffe, was plugged by a circular armored plate due to shortages of the weapon.

These modifications meant that the tank's weight increased to 25 tonnes (27.56 short tons). In spite of a new six-speed SSG 77 transmission borrowed from the Panzer III, cross country speed dropped to as low as 16 km/h (10 mph) on anything but hard, level surfaces. An experimental version of the Ausf H was fitted with a hydrostatic transmission but was not put into production.

In France in June 1944 most of the 748 Panzer IVs with the nine German panzer divisions were Ausf H models

Image
Image
There are no failed builds only learning experiences.
MY Youtube channel : Scale Model Jedi
https://www.youtube.com/channel/UCSk5py ... taceCr3_3g
User avatar
NorthernModeller
Command Sergeant Major
Posts: 927
Joined: Sat Jan 09, 2016 8:39 pm
Location: Preston, Lancashire, England
Contact:
England

Re: Si's 1/35 Dragon Pz.Kpfw.IV Ausf.H mid-production HJ Div. Normandy

Post by NorthernModeller »

I like it, cant wait to get mine and half start it ;)
SAMI Magazine, Model aircraft and Tamiya Model Magazine contributor
User avatar
ScaleModelJedi
Master Sergeant
Master Sergeant
Posts: 396
Joined: Sun Dec 20, 2015 12:47 am
Location: Birmingham, UK
Contact:

Re: Si's 1/35 Dragon Pz.Kpfw.IV Ausf.H mid-production HJ Div. Normandy

Post by ScaleModelJedi »

NorthernModeller wrote:I like it, cant wait to get mine and half start it ;)
I'm sure you will enjoy yours and get it finished :lol:
There are no failed builds only learning experiences.
MY Youtube channel : Scale Model Jedi
https://www.youtube.com/channel/UCSk5py ... taceCr3_3g
User avatar
ScaleModelJedi
Master Sergeant
Master Sergeant
Posts: 396
Joined: Sun Dec 20, 2015 12:47 am
Location: Birmingham, UK
Contact:

Re: Si's 1/35 Dragon Pz.Kpfw.IV Ausf.H mid-production HJ Div. Normandy

Post by ScaleModelJedi »

Instructions:

Sprue map
Image

Steps 1-6
Image

Steps 7-11
Image

Steps 12-15
Image

Steps 16-20
Image

Step 21 and colour call out
Image
There are no failed builds only learning experiences.
MY Youtube channel : Scale Model Jedi
https://www.youtube.com/channel/UCSk5py ... taceCr3_3g
User avatar
ScaleModelJedi
Master Sergeant
Master Sergeant
Posts: 396
Joined: Sun Dec 20, 2015 12:47 am
Location: Birmingham, UK
Contact:

Re: Si's 1/35 Dragon Pz.Kpfw.IV Ausf.H mid-production HJ Div. Normandy

Post by ScaleModelJedi »

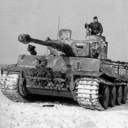
I started the build on Sunday evening and have made a good start on the build so far. The kit goes together really well with the only problems encountered so far are with the usual poor Dragon instructions.

As usual with armour kits the instructions start with the wheels.
The kit comes with two types of idler wheels, cast and welded. I will be using the welded idler wheels. The wheels have the general clean up required and all fit together with no problems.
Image

Next up was to make a start on the hull.
Image
Image
All the parts fitted together OK. As with a lot of dragon kits there are Sprues from other kits that have similar parts and also the same lettering on Sprues. I cut off the wrong part for one piece at first.

More parts for the hull.
Image
Image

Parts for the idler wheel mounts and exhaust.
Image
Image

Parts for the front section of the hull. Access hatches and spare track links.
Image
Image
The spare track links have 6 really small pieces for brackets which were really fiddly to clean up and fit in place. Nearly lost one part to the carpet monster but managed to find it.
Image

The fenders and and internal plate were fitted next
Image
Image

The front plate with the drivers vision blocks and the machine gun.
Image
Image

The side plates require holes opening out for the side skirts mounting brackets. Also fitted the other parts to these.
Image
Image

All the parts for the upper section of the hull all cleaned up and ready to be assembled.
Image
Image
All the parts fitted together with no real issues. Some parts were slightly warped but nothing to bad. These were fixed at one point then I held the other end in place whilst applying some Tamiya quick setting extra thin.

The upper section in place.
Image

The engine covers and hatches.
Image
Image

Next was to fit all the tools and other parts to the sides.
Image

All the tools and other parts fitted in place.
Image
Image

That's where I'm up to with the build so far and apart from the poor instructions it's been an excellent kit.
I still have a few parts to fit in place on the lower hull including some PE and more spare track links and it will be all built. I will do that before making a start on the turret and the fruil tracks.

Thank you for looking :th:
There are no failed builds only learning experiences.
MY Youtube channel : Scale Model Jedi
https://www.youtube.com/channel/UCSk5py ... taceCr3_3g
wookiee76
Command Sergeant Major
Posts: 864
Joined: Sun May 17, 2015 12:57 pm

Re: Si's 1/35 Dragon Pz.Kpfw.IV Ausf.H mid-production HJ Div. Normandy

Post by wookiee76 »

Coming on a pace Si, surprisingly there are quite a few fairly substantial differences in the actual construction compared to the ausf d.
John, whats on my bench? Usually a mess and a couple of different models a week.
My motto? I'm not lazy, just energy efficient.
User avatar
ScaleModelJedi
Master Sergeant
Master Sergeant
Posts: 396
Joined: Sun Dec 20, 2015 12:47 am
Location: Birmingham, UK
Contact:

Re: Si's 1/35 Dragon Pz.Kpfw.IV Ausf.H mid-production HJ Div. Normandy

Post by ScaleModelJedi »

wookiee76 wrote:Coming on a pace Si, surprisingly there are quite a few fairly substantial differences in the actual construction compared to the ausf d.
Yeah it's coming along really well. Had a few problems with the instructions but other than that it's a great kit.
There are no failed builds only learning experiences.
MY Youtube channel : Scale Model Jedi
https://www.youtube.com/channel/UCSk5py ... taceCr3_3g
User avatar
ScaleModelJedi
Master Sergeant
Master Sergeant
Posts: 396
Joined: Sun Dec 20, 2015 12:47 am
Location: Birmingham, UK
Contact:

Re: Si's 1/35 Dragon Pz.Kpfw.IV Ausf.H mid-production HJ Div. Normandy

Post by ScaleModelJedi »

The build is coming along really well so far and apart from the instructions it's a great kit. There were a few parts where I made a mistake by not paying attention but I managed to spot them before it was to late to change them.

First off was to finish adding the last few parts on the hull. This was mainly all the parts for the side skirt mounting. There was one bracket that had to be cut to get it to fit in place as the air filters are in the way of the mounting holes.
Image

Next up was to make a start on the turret.
The first part was to build up the gun. The barrel is a single piece mold so only the tabs from removing from the sprue needed to be cleaned up. The muzzle brake is made up of three parts and the kit also includes internal parts of the gun.
Image

The gun all built up and ready to be fitted to the turret. There were some small gaps that needed filling around the recoil brake armour. This was easily filled with some Mr dissolved putty. All the other parts went together OK and the only problem I had was me forgetting to put the front plate of the turret in place when building up the gun. I had to remove some parts to get it in place but fortunately I noticed this before the TET had fully cured.
Image

The parts for the turret. There is oneeded hole that needs opening out for the side armour bracket and some internal detail parts that need fitting before the turret is put together.
Image

The main part of the turret built up and the gun in place. No problems with the fit of any of the parts.
Image

The stowage bin and brackets for the side armour all cleaned up and ready to be fitted in place.
Image

The commander's cupola parts ready for assembly.
Image

The cupola all built up. The clear parts were masked with maskol. I will leave this loose and paint it separately from the rest so I can paint the internal parts easier. I will be leaving the hatch open and putting a figure in.
I lost one of the vision blocks so had to slightly modify one of the others that were on the sprue to get it to fit.
Image

The turret all built up and the cupola in place.
Image

The side armour fitted together. I will leave this off to make painting the turret easier as when fitted in place it will make some areas difficult to get to.
Image

The tank all done minus the side skirts. The wheels are loose and will be removed and painted separately as will the cupola.
Image

I still have the side skirts to sort out and the tracks to do but the main part of the build is done.
Really enjoyed this and looking forward to having a go at painting and weathering.

Thank you for looking more to come soon :th:
There are no failed builds only learning experiences.
MY Youtube channel : Scale Model Jedi
https://www.youtube.com/channel/UCSk5py ... taceCr3_3g
wookiee76
Command Sergeant Major
Posts: 864
Joined: Sun May 17, 2015 12:57 pm

Re: Si's 1/35 Dragon Pz.Kpfw.IV Ausf.H mid-production HJ Div. Normandy

Post by wookiee76 »

I got to the point where the guy who was doing the instructions realised it was nearly home time on friday! No mention of attaching fenders to upper hull or upper to lower hull, also no mention of the lower back plate, trimming off a bunch of tabs on said lower hull, oh and i still have holes in the main back plate that i have to figure out what fits into! Had a nice 2mm gap at the front of the hull too!
John, whats on my bench? Usually a mess and a couple of different models a week.
My motto? I'm not lazy, just energy efficient.
User avatar
ScaleModelJedi
Master Sergeant
Master Sergeant
Posts: 396
Joined: Sun Dec 20, 2015 12:47 am
Location: Birmingham, UK
Contact:

Re: Si's 1/35 Dragon Pz.Kpfw.IV Ausf.H mid-production HJ Div. Normandy

Post by ScaleModelJedi »

wookiee76 wrote:I got to the point where the guy who was doing the instructions realised it was nearly home time on friday! No mention of attaching fenders to upper hull or upper to lower hull, also no mention of the lower back plate, trimming off a bunch of tabs on said lower hull, oh and i still have holes in the main back plate that i have to figure out what fits into! Had a nice 2mm gap at the front of the hull too!
Yeah it sure does seem like a rush job on a Friday afternoon with the instructions. Having never built a Panzer IV before doesn't help either but I'm sure I'm more prepared for future ones from Dragon. To be fair if I wanted less of a challenge I would have built my Tamiya one, Self inflicted punishment LOL
There are no failed builds only learning experiences.
MY Youtube channel : Scale Model Jedi
https://www.youtube.com/channel/UCSk5py ... taceCr3_3g
User avatar
ScaleModelJedi
Master Sergeant
Master Sergeant
Posts: 396
Joined: Sun Dec 20, 2015 12:47 am
Location: Birmingham, UK
Contact:

Re: Si's 1/35 Dragon Pz.Kpfw.IV Ausf.H mid-production HJ Div. Normandy

Post by ScaleModelJedi »

After checking over the build trying to make sure I had not missed anything I prepared everything for priming.
Image

The hull, turret, drive wheels and idlers were primed with Ultimate Gelb. The road wheels were primed with Ultimate black.
Image

I will be using the Mig ammo paints for the main colour and camo.
I still have the side skirts to do which I will do before I paint the top coat.
I also want to get the tracks cleaned up and burnished so I can get those assembled and do a test fit before getting all the top coat on.

I made a start on the tracks yesterday and got one side all cleaned up and the holes opened out.
I used a needle file to clean off any flash and a 0.4mm drill in a pin vice to clean the holes out. I will get all of the other side done before giving all the links a good clean and then I can get them burnished.
Image
Last edited by ScaleModelJedi on Fri Dec 02, 2016 8:05 pm, edited 1 time in total.
There are no failed builds only learning experiences.
MY Youtube channel : Scale Model Jedi
https://www.youtube.com/channel/UCSk5py ... taceCr3_3g
User avatar
ScaleModelJedi
Master Sergeant
Master Sergeant
Posts: 396
Joined: Sun Dec 20, 2015 12:47 am
Location: Birmingham, UK
Contact:

Re: Si's 1/35 Dragon Pz.Kpfw.IV Ausf.H mid-production HJ Div. Normandy

Post by ScaleModelJedi »

[youtube]QHOxXUHn0v4[/youtube]
There are no failed builds only learning experiences.
MY Youtube channel : Scale Model Jedi
https://www.youtube.com/channel/UCSk5py ... taceCr3_3g
User avatar
Oddball007
Private First Class
Private First Class
Posts: 26
Joined: Wed Apr 13, 2016 7:14 am
Location: Brisbane
Australia

Re: Si's 1/35 Dragon Pz.Kpfw.IV Ausf.H mid-production HJ Div. Normandy

Post by Oddball007 »

Such a nice build.

watching this one with keen interest. :pop:
User avatar
ScaleModelJedi
Master Sergeant
Master Sergeant
Posts: 396
Joined: Sun Dec 20, 2015 12:47 am
Location: Birmingham, UK
Contact:

Re: Si's 1/35 Dragon Pz.Kpfw.IV Ausf.H mid-production HJ Div. Normandy

Post by ScaleModelJedi »

Apologies for the lack of updates on the progress of the build, I have made a lot of progress since my last post and will hopefully have the build all finished in the next week.

After drilling out the holes and cleaning up the track links I burnished them using the Ultimate burnishing liquid. I followed the video that Paul did on the ISM YouTube channel which is really worth watching if you have not used it before.
[youtube]ScuFVDdFgjk[/youtube]

One set of links after burnishing
Image

One set of links all joined up. I used a spot of BSI CA glue to fix the wire. After the glue has fully set I cut the remainder of the wire with some flush wire cutters.
Image

Both sets of tracks built up. I will give this a wash using the Mig Ammo tracks wash.
Image
There are no failed builds only learning experiences.
MY Youtube channel : Scale Model Jedi
https://www.youtube.com/channel/UCSk5py ... taceCr3_3g
User avatar
ScaleModelJedi
Master Sergeant
Master Sergeant
Posts: 396
Joined: Sun Dec 20, 2015 12:47 am
Location: Birmingham, UK
Contact:

Re: Si's 1/35 Dragon Pz.Kpfw.IV Ausf.H mid-production HJ Div. Normandy

Post by ScaleModelJedi »

The schurzen provided in the kit is metal that is mostly pre cut on a fret. The instructions have a 1:1 Scale template for locating the styrene brackets onto them. I made a copy of the templates and printed them out and cut out the highlighted area and placed it over the schurzen and the marked out the bracket locations.
Image

I used CA glue to attach the brackets but quickly found that they popped off really easily. I gave up using them and decided to use the templates to cut some out if 10thou styrene sheet. Being able to use TET to attach the brackets gave a much stronger bond.
Image

The schurzen test fitted in place. I will be leaving some off on both sides.
Image
Image
There are no failed builds only learning experiences.
MY Youtube channel : Scale Model Jedi
https://www.youtube.com/channel/UCSk5py ... taceCr3_3g
User avatar
ScaleModelJedi
Master Sergeant
Master Sergeant
Posts: 396
Joined: Sun Dec 20, 2015 12:47 am
Location: Birmingham, UK
Contact:

Re: Si's 1/35 Dragon Pz.Kpfw.IV Ausf.H mid-production HJ Div. Normandy

Post by ScaleModelJedi »

The paint sets I used for the base colour and camo. The Dunklegelb set comes with six colours but I only used three of them.
Image

First up on on the base colour was the AK Dunklegelb shadow. This was applied over the lower parts and in the corners of the model.
Image

Next was the AK Dunklegelb dark base. This was applied all over the top and over the shadow in a thin coat
Image

Next step was the AK Dunklegelb base. This was applied over the raised areas and most exposed parts.
Image

I used panzer putty to mask off the areas for the green on the camo. This was the first time using the putty and found it very easy to use especially around the detailed areas as the putty levels itself around these, although you do have to be very carefull when removing it if it wraps around parts as it can be tough to pull it apart from itself.
I used the base green colour first all over then the lighter and darker greens to highlight and add shadow.
Image

I stuck all the parts of the schurzen together with some masking tape and masked off the camo. Using the ones I was leaving out to ensure the camo matched up. I had to adjust the shape of these ones as I did not like how they looked.
Image

The tank with all the camo done and the schurzen fitted on to see how it all looks.
Image

I brush painted all the tools and spare tracks using the Ammo mig tools set and rust colours.
Image
Image

Next up the decals and chipping.
Thank you for looking :th:
There are no failed builds only learning experiences.
MY Youtube channel : Scale Model Jedi
https://www.youtube.com/channel/UCSk5py ... taceCr3_3g
privatepete
First Lieutenant
First Lieutenant
Posts: 3871
Joined: Thu Dec 11, 2014 1:13 pm

Re: Si's 1/35 Dragon Pz.Kpfw.IV Ausf.H mid-production HJ Div. Normandy

Post by privatepete »

Really nice build,like the como pattern and colour's look's good.
Pete :thumb2:
CraigPetterson
Corporal
Corporal
Posts: 98
Joined: Sat Aug 27, 2016 12:13 am
Contact:
Scotland

Re: Si's 1/35 Dragon Pz.Kpfw.IV Ausf.H mid-production HJ Div. Normandy

Post by CraigPetterson »

Looking forward to the chipping and weathering
On the Bench
Still deciding....
Stash
Eduard 1/48 Bf 109E-4
:cheers2:
User avatar
NorthernModeller
Command Sergeant Major
Posts: 927
Joined: Sat Jan 09, 2016 8:39 pm
Location: Preston, Lancashire, England
Contact:
England

Re: Si's 1/35 Dragon Pz.Kpfw.IV Ausf.H mid-production HJ Div. Normandy

Post by NorthernModeller »

Loving it Si, really nice work :)
SAMI Magazine, Model aircraft and Tamiya Model Magazine contributor
Safir
Private First Class
Private First Class
Posts: 30
Joined: Fri May 27, 2016 6:16 pm
Location: Aalst Belgium
Belgium

Re: Si's 1/35 Dragon Pz.Kpfw.IV Ausf.H mid-production HJ Div. Normandy

Post by Safir »

looking good mate topjob!
Image
User avatar
SergioSolo
Sergeant Major
Sergeant Major
Posts: 643
Joined: Sun Apr 03, 2016 10:31 pm
Location: Colombia
Contact:

Re: Si's 1/35 Dragon Pz.Kpfw.IV Ausf.H mid-production HJ Div. Normandy

Post by SergioSolo »

It's coming along nicely :th:
User avatar
ScaleModelJedi
Master Sergeant
Master Sergeant
Posts: 396
Joined: Sun Dec 20, 2015 12:47 am
Location: Birmingham, UK
Contact:

Re: Si's 1/35 Dragon Pz.Kpfw.IV Ausf.H mid-production HJ Div. Normandy

Post by ScaleModelJedi »

NorthernModeller wrote:Loving it Si, really nice work :)
Safir wrote:looking good mate topjob!
Sergiotron wrote:It's coming along nicely :th:
privatepete wrote:Really nice build,like the como pattern and colour's look's good.
Pete :thumb2:
Thank you guys :th:
There are no failed builds only learning experiences.
MY Youtube channel : Scale Model Jedi
https://www.youtube.com/channel/UCSk5py ... taceCr3_3g
User avatar
ScaleModelJedi
Master Sergeant
Master Sergeant
Posts: 396
Joined: Sun Dec 20, 2015 12:47 am
Location: Birmingham, UK
Contact:

Re: Si's 1/35 Dragon Pz.Kpfw.IV Ausf.H mid-production HJ Div. Normandy

Post by ScaleModelJedi »

The decals were applied using micro sol and set using the water brushes. There was 2 decals on the cupola that I struggled to gethe to sit down right and ended up damaging them to the point they were unusable so I left these off. The rest off the decals went on with no problems at all.
Image

All the decals done
Image

The chipping was done with Ammo mig chipping colour and was all done with a paint brush.
Chipping around the front area
Image

Chipping on the turret
Image

The exhaust was painted using the Ammo mig rust colours and then a wash of light rust.
Image

Next step was to add a coat of aqua gloss in preparation for applying a wash. After the aqua gloss dried I applied a coat of Ultimate dark dirt wash. This was applied with an airbrush all over.
Image

After the wash had dried I used cotton buds that were dampened with water to remove most of the wash leaving it in the corners and around the raised areas. I worked in the direction rain would run down to give some slight streaking aswell.
Image
There are no failed builds only learning experiences.
MY Youtube channel : Scale Model Jedi
https://www.youtube.com/channel/UCSk5py ... taceCr3_3g
User avatar
ScaleModelJedi
Master Sergeant
Master Sergeant
Posts: 396
Joined: Sun Dec 20, 2015 12:47 am
Location: Birmingham, UK
Contact:

Re: Si's 1/35 Dragon Pz.Kpfw.IV Ausf.H mid-production HJ Div. Normandy

Post by ScaleModelJedi »

Next up I added some dry mud to the lower areas using a mix of Vallejo European thick mud 73.807 and Vallejo Crushed grass 73.825, This was applies using a stiff brush.
Image

I added some Vallejo European splash mud 73.801, This was flicked over the lower areas using a paint brush and a cocktail stick.
Image

I then added all the wheels ready for the tracks to be fitted.
Image

The tracks all fitted in place and only the schurzen left to fit.
Image
Image

The shurzen was given a coat of Aqua gloss then a wash using Ultimate Dark dirt. The wash was removed using damp cotton ear buds in a vertical motion leaving some slight streaking. I then gave them a flat clear coat. I used the Ammo Mig Oilbrusher Rust to add some streaking rust from some of the chips. This was painted and using a brush dampened in thinners gently thinned out the streaks and dragged them downwards.
Image

All that was left was to fit the schurzen and take the final reveal photos.

Final reveal : http://www.intscalemodeller.com/viewtop ... 52&t=21001

Thank you for looking :th:
There are no failed builds only learning experiences.
MY Youtube channel : Scale Model Jedi
https://www.youtube.com/channel/UCSk5py ... taceCr3_3g
Bissyboat
Sergeant Major of the Army
Posts: 1254
Joined: Sun Jan 05, 2014 9:49 pm
Location: Norway

Re: Si's 1/35 Dragon Pz.Kpfw.IV Ausf.H mid-production HJ Div. Normandy

Post by Bissyboat »

Fantastic execution on that camo! :thumb2:
Where`s my dinghy?
User avatar
ScaleModelJedi
Master Sergeant
Master Sergeant
Posts: 396
Joined: Sun Dec 20, 2015 12:47 am
Location: Birmingham, UK
Contact:

Re: Si's 1/35 Dragon Pz.Kpfw.IV Ausf.H mid-production HJ Div. Normandy

Post by ScaleModelJedi »

Bissyboat wrote: Thu Feb 09, 2017 3:32 pm Fantastic execution on that camo! :thumb2:
Thank you, I'm pleased with how it turned out :thumb1:
There are no failed builds only learning experiences.
MY Youtube channel : Scale Model Jedi
https://www.youtube.com/channel/UCSk5py ... taceCr3_3g
User avatar
DrSprue
Warrant Officer
Warrant Officer
Posts: 1497
Joined: Wed Apr 26, 2017 3:24 am
United States of America

Re: Si's 1/35 Dragon Pz.Kpfw.IV Ausf.H mid-production HJ Div. Normandy

Post by DrSprue »

:jd:
Wow Si, this Dragon kit looks like it was a fantastic load of parts that is so big with so many, but your final paint work on this beast was simply amazing!! Your detail is so well done!

:thumb2: :thumb2: :thumb2:
-Doc
On the bench:
User avatar
ScaleModelJedi
Master Sergeant
Master Sergeant
Posts: 396
Joined: Sun Dec 20, 2015 12:47 am
Location: Birmingham, UK
Contact:

Re: Si's 1/35 Dragon Pz.Kpfw.IV Ausf.H mid-production HJ Div. Normandy

Post by ScaleModelJedi »

DrSprue wrote: Wed Jun 28, 2017 9:30 pm :jd:
Wow Si, this Dragon kit looks like it was a fantastic load of parts that is so big with so many, but your final paint work on this beast was simply amazing!! Your detail is so well done!

:thumb2: :thumb2: :thumb2:
Thank you :th:
There are no failed builds only learning experiences.
MY Youtube channel : Scale Model Jedi
https://www.youtube.com/channel/UCSk5py ... taceCr3_3g
Post Reply

Return to “Build threads”