Hero of the Soviet Union Tiger 212 1943


Re: Hero of the Soviet Union Tiger 212 1943
Chief


Re: Hero of the Soviet Union Tiger 212 1943

Re: Hero of the Soviet Union Tiger 212 1943
You really whipped that Bergepanther into shape nicely  The camo on the Tiger is awesome also.Did you use the Mig Ammo paint on it?If so I need to get some as that dark yellow looks great.Also how tough is that Stynlrez primer?I watched the vid where you were using the black and was just wondering.
Steve
Make something idiot proof and someone will come along and make a better idiot.
Make something idiot proof and someone will come along and make a better idiot.


Re: Hero of the Soviet Union Tiger 212 1943
Hillbilly wrote:You really whipped that Bergepanther into shape nicely
It's AMMO yes. Two colours of the yellow and one of the green. That badger primer is the best primer that I've ever used. The black and the grey are superb.


-
JayCub

- Command Sergeant Major

- Posts: 907
- Joined: Mon Oct 21, 2013 11:58 pm
- Location: Wicklow Ireland
Re: Hero of the Soviet Union Tiger 212 1943
Really enjoying the build Mike, I can watch Tiger builds all day and along with a few episodes of space 1999, I have quite a few eagles now
Tom
Tom
Re: Hero of the Soviet Union Tiger 212 1943
I think I will give them a go then when I run out of my Alclad primer (too bad I just ordered two more bottlesCoen wrote:
It's AMMO yes. Two colours of the yellow and one of the green. That badger primer is the best primer that I've ever used. The black and the grey are superb.
Steve
Make something idiot proof and someone will come along and make a better idiot.
Make something idiot proof and someone will come along and make a better idiot.
Re: Hero of the Soviet Union Tiger 212 1943
Let the detail painting begin.
I started by painting the exhaust stacks as well as the inside of the exhaust shrouds. Mig's dark rust, then stipples the successive lighter rust colours overtop of it. Later they'll get a little bit of rust pigments to add texture and depth and then a bit of soot.


Then I added some of the worn steel colours to the metal contact surfaces of the running gear using an HB pencil. This was a bugger to photograph.


Then the tools and accessories were basecoated along with the metal portions of the battle damage.


Then I added the decals as some of them overlapped some of the battle damage, so they needed to be blended in after they're set and sealed.


And that's where she is today.
-
Kevinzane
- Private First Class

- Posts: 47
- Joined: Mon Dec 01, 2014 12:43 pm
- Location: Karlstad, Sweden
Re: Hero of the Soviet Union Tiger 212 1943
Sweet man!
Really nice rusteffects!
Really nice rusteffects!
Kevin
On the bench:
StuG III Michale Wittman Barbarossa 1941 Diorama
King Tiger "what if"
On the bench:
StuG III Michale Wittman Barbarossa 1941 Diorama
King Tiger "what if"

Re: Hero of the Soviet Union Tiger 212 1943
Great stuff Mike, a couple of questions...
Why do you fix rope, tools and stuff on the hull and then paint? My aircraft brain says you should paint tools etc then fix to hull....you know after the camo...
Why are your sprockets fixed on?
Basic questions I'm sure, and more to follow...
Ta.
Why do you fix rope, tools and stuff on the hull and then paint? My aircraft brain says you should paint tools etc then fix to hull....you know after the camo...
Why are your sprockets fixed on?
Basic questions I'm sure, and more to follow...
Ta.
Yes.. It is supposed to look like that!
Tim (Ted)
British Aviation In Scale
https://www.facebook.com/groups/1185462564870290/
Tim (Ted)
British Aviation In Scale
https://www.facebook.com/groups/1185462564870290/
-
Paul

- Site Admin

- Posts: 12622
- Joined: Thu May 23, 2013 4:47 pm
- Location: Merseyside, England, UK
- Contact:

Re: Hero of the Soviet Union Tiger 212 1943
I used to do the same, but following mikes advice it is easier to paint them when there on the tankJoesdad wrote:Great stuff Mike, a couple of questions...
Why do you fix rope, tools and stuff on the hull and then paint? My aircraft brain says you should paint tools etc then fix to hull....you know after the camo...
Why are your sprockets fixed on?
Basic questions I'm sure, and more to follow...
Ta.
Looking great too mike
Products I use in my builds viewtopic.php?f=192&t=27234
My Paul-Ism page https://www.facebook.com/thebenchwithpaul/
Friday Live show here https://www.facebook.com/groups/120548821977514/

My Paul-Ism page https://www.facebook.com/thebenchwithpaul/
Friday Live show here https://www.facebook.com/groups/120548821977514/
-
mannloon

- Command Sergeant Major
- Posts: 985
- Joined: Thu Apr 17, 2014 10:57 pm
- Location: Madison, WI USA
- Contact:
Re: Hero of the Soviet Union Tiger 212 1943
So that's a very convincing tow cable, can I ask how you painted it? Is that just a great color or a series of things you did?
On the bench:
Cyber-Hobby T-34 Under New Management
Cyber-Hobby Tiger I Kursk
Rye Field Tiger I w/ Interior
Academy T-34 with bed spring armor
Cyber-Hobby T-34 Under New Management
Cyber-Hobby Tiger I Kursk
Rye Field Tiger I w/ Interior
Academy T-34 with bed spring armor
-
Tarasdad

- Sergeant First Class

- Posts: 301
- Joined: Sat Jun 21, 2014 2:56 am
- Location: California City, California

Re: Hero of the Soviet Union Tiger 212 1943
That's it, I quit. From now on it's nothing but Snap-Tite kits for me.
Tarasdad
aka Barry
aka Barry
Re: Hero of the Soviet Union Tiger 212 1943
It was a series of colours for the two rope, ammo gloss black then ammo dark rust over that, finally a thinned ammo dark track colour. Later I'll very gently dry brush them with Vallejo gungrey or ammo gunmetal.mannloon wrote:So that's a very convincing tow cable, can I ask how you painted it? Is that just a great color or a series of things you did?
The first tank that I built I knew nothing about how things were done in regards to procedures, tricks, methods, so I just painted it all after glueing all the bits on (including tracksJoesdad wrote:Great stuff Mike, a couple of questions...
Why do you fix rope, tools and stuff on the hull and then paint? My aircraft brain says you should paint tools etc then fix to hull....you know after the camo...
Why are your sprockets fixed on?
Basic questions I'm sure, and more to follow...
Ta.
After reading what mush have been sixty or so how-to books written by the grand poobahs of dioramas and armour I discovered that there are dozens of ways to build and paint armour and aircraft, but almost all of them were doing it the same way that I was already doing... With all the bits on.
Out of curiosity I tried three builds with all the bits and pieces on a dozen sticks and it took three times as long to paint and looked exatly the same as my other builds. So it was a really easy decision. All that I leave separate now are the tracks and wheels.
And why are my sprockets fixed on?
They aren't exactly fixed. I made them workable so that I can easily add the tracks for weathering. I do that on every build because it makes my life easier.
One thing that I never do if I can avoid it, is go anywhere near my model with glue once paint is on it.
-
mannloon
- Command Sergeant Major
- Posts: 985
- Joined: Thu Apr 17, 2014 10:57 pm
- Location: Madison, WI USA
- Contact:
Re: Hero of the Soviet Union Tiger 212 1943
Thanks Mike. I'm gonna try that as close as I can with Tamiya and Model Color paints.
On the bench:
Cyber-Hobby T-34 Under New Management
Cyber-Hobby Tiger I Kursk
Rye Field Tiger I w/ Interior
Academy T-34 with bed spring armor
Cyber-Hobby T-34 Under New Management
Cyber-Hobby Tiger I Kursk
Rye Field Tiger I w/ Interior
Academy T-34 with bed spring armor
Re: Hero of the Soviet Union Tiger 212 1943
Thank you gentlemen  good enough for me
Stand by......
Stand by......
Yes.. It is supposed to look like that!
Tim (Ted)
British Aviation In Scale
https://www.facebook.com/groups/1185462564870290/
Tim (Ted)
British Aviation In Scale
https://www.facebook.com/groups/1185462564870290/
-
Nige201980

- Captain

- Posts: 4095
- Joined: Wed Jun 05, 2013 9:30 am
- Location: Doncaster South Yorkshire UK
- Contact:
Re: Hero of the Soviet Union Tiger 212 1943
This is really beautiful work Mike I think I'll have to have a look at that badger primer.
http://www.youtube.com/channel/UCy-TGcs5u_ZXSZ9kObNfsPg
On the go at the Mo
Quite a few
On the go at the Mo
Quite a few


Re: Hero of the Soviet Union Tiger 212 1943
JediBoer
On the bench righ now: Hmm... Lots of unfinished business!
On the bench righ now: Hmm... Lots of unfinished business!
Re: Hero of the Soviet Union Tiger 212 1943
The Tiger is now all base painted, decaled, and chipped. Now I moved on to the bergepanther and the schwimmwagen.
I used multilayer chipping for the tiger. Lifecolour (a light tan, I can't read the label it wore of ages ago) on the zimmerit and a hemp for the unzimmerted areas. Then the centers were darkened with a dark NATO black from Vallejo.


I primed both the schimmwagen and the bergepanther in stylrez primer (that new badger primer) then I painted the bergepanther in Vallejo Air Dark Yellow (I ran out of the AMMO, it's the same colour but the mig spray's better). Then I hit all the top surfaces with AMMO light dunklegelb for panel fading.


For the wheels I sprayed them in the Vallejo Air Dark Yellow, but for about half the wheels I thinned the paint more so that they had a darker tone over the black primer.

Then I took a really nice blurry photo of the superstructure...

I've also started to paint the winch. I haven't decided how I won't to finish it yet as it will be really dirty when I'm done with it.

Next I'll base paint the schwimmwagen and begin detail painting both of them. I still haven't decided what colour to paint the schwimmwagen as yet.
Here's a video about the end of the build for the berge and the schwimm as well as a blather about the painting.
[youtube]smm-1KhY3Y8[/youtube]
Re: Hero of the Soviet Union Tiger 212 1943
Outstanding paint work Really love the chipping effects and the battle damage
Steve
Make something idiot proof and someone will come along and make a better idiot.
Make something idiot proof and someone will come along and make a better idiot.
-
Nige201980
- Captain
- Posts: 4095
- Joined: Wed Jun 05, 2013 9:30 am
- Location: Doncaster South Yorkshire UK
- Contact:
Re: Hero of the Soviet Union Tiger 212 1943
Stunning work mate
http://www.youtube.com/channel/UCy-TGcs5u_ZXSZ9kObNfsPg
On the go at the Mo
Quite a few
On the go at the Mo
Quite a few
Re: Hero of the Soviet Union Tiger 212 1943
More detail painting iw the order of the day the last day or so.
The berge is all detailed now and all that's left is the decals, chipping, then weathering.
I started with the layers of colour for the unditching log.
There's probably 5 colours on this thing, I still need to add a wash to it and then a light drybrushing, but the base colour is done.


Then I did the metal wear effects on the road wheels. Using and HB pencil to add bare metal to the edge of the rim for the contact surfaces.


Then I moved on to all of the tools and accessories on the hull and superstructure.


Today I'll add some decals, then chip it all to hell and gone. She's a utility vehicle that recovers tanks under fire so I want her to actually look the part.
After that I'll start painting the schwimmwagen.
Re: Hero of the Soviet Union Tiger 212 1943
Outstanding detail work 
Steve
Make something idiot proof and someone will come along and make a better idiot.
Make something idiot proof and someone will come along and make a better idiot.

Re: Hero of the Soviet Union Tiger 212 1943
Superb work
Looks great
Regards
Sergio
Looks great
Regards
Sergio
On the bench:
Egg plane gb entry - f22 Raptor
viewtopic.php?f=369&t=11783&p=159666#p159666
And some other stuff. That terrible Tamiya Harrier for one. Its not so bad really...
Egg plane gb entry - f22 Raptor
viewtopic.php?f=369&t=11783&p=159666#p159666
And some other stuff. That terrible Tamiya Harrier for one. Its not so bad really...
-
Kevinzane
- Private First Class
- Posts: 47
- Joined: Mon Dec 01, 2014 12:43 pm
- Location: Karlstad, Sweden
Re: Hero of the Soviet Union Tiger 212 1943
It looks amazing man! :-D
Kevin
On the bench:
StuG III Michale Wittman Barbarossa 1941 Diorama
King Tiger "what if"
On the bench:
StuG III Michale Wittman Barbarossa 1941 Diorama
King Tiger "what if"
Re: Hero of the Soviet Union Tiger 212 1943
My oh my! You have made some great looking vehicles. Awwwwsum!
-
CrazyMajor
- Sergeant

- Posts: 125
- Joined: Mon Mar 03, 2014 8:59 pm
- Location: Llantwit Major, South Wales

Re: Hero of the Soviet Union Tiger 212 1943
Some very nice work there sir.
________________________
Rhys
Possibility is just about the most awesome thing there is - it is in the realm of the future.
On the bench......
Dragon 1/35 Tiger Currnet Main Project
Tamyia 1/32 Vought Corsair F4U-1 .
HG 1/144 Gouf Custom and HG 1/144 GM Command Type (Spring 2014 dio)
MG 1/100 Red Frame Ki
... tbh all my Gunpla need painting!
Re: Hero of the Soviet Union Tiger 212 1943
Thanks fellas, it's really appreciated.
So I started the painting on the Schwimmwagen. I love this little kit. I so want to get more of these little gems. The kubel and some willy's jeeps are definitely on the list.
She started off primed and in pieces...

Then she was in base colours...


Window installed and masked...


Then I started the chipping on the Bergepanther.


And that's about it for today.
Re: Hero of the Soviet Union Tiger 212 1943
Jeez Coen! You're not hanging around with this one! Loving the detailing on the Bergepanther! Don't know about fast and furious, more like fast and awesome!!
Chief
Re: Hero of the Soviet Union Tiger 212 1943
Man that Bergepanther sure has been around the block hasn't she......love it though
Steve
Make something idiot proof and someone will come along and make a better idiot.
Make something idiot proof and someone will come along and make a better idiot.
-
Paul
- Site Admin
- Posts: 12622
- Joined: Thu May 23, 2013 4:47 pm
- Location: Merseyside, England, UK
- Contact:
Re: Hero of the Soviet Union Tiger 212 1943
Awesome work mike, that panther is looking great, loving that winch dude
Products I use in my builds viewtopic.php?f=192&t=27234
My Paul-Ism page https://www.facebook.com/thebenchwithpaul/
Friday Live show here https://www.facebook.com/groups/120548821977514/
My Paul-Ism page https://www.facebook.com/thebenchwithpaul/
Friday Live show here https://www.facebook.com/groups/120548821977514/

Re: Hero of the Soviet Union Tiger 212 1943
So much of modelling goodness
Fantastic work as usual, you are talented man Coen.
Fantastic work as usual, you are talented man Coen.
Sir, we're surrounded!
Excellent! Now we can attack in any direction!
------------------------------------------------
Model N1 DONE! - Tamiya 1:35 Panzerkampfwagen V Panther Sd.kfz.171 Ausf.A
Model N2 DONE! - Academy 1:72 M1126 Stryker
Working on:Trumpeter (00204)
Waiting: Meng (SS-004), Airfix (A50125), Tamiya (35068)
Excellent! Now we can attack in any direction!
------------------------------------------------
Model N1 DONE! - Tamiya 1:35 Panzerkampfwagen V Panther Sd.kfz.171 Ausf.A
Model N2 DONE! - Academy 1:72 M1126 Stryker
Working on:Trumpeter (00204)
Waiting: Meng (SS-004), Airfix (A50125), Tamiya (35068)
-
PaulAyrey

- Sergeant Major of the Army

- Posts: 1141
- Joined: Tue Feb 04, 2014 5:24 pm
- Location: Worthing, West Sussex, UK
- Contact:
Re: Hero of the Soviet Union Tiger 212 1943
Brilliant work as ever Mike, really enjoying this!

-
Nige99

- Command Sergeant Major
- Posts: 751
- Joined: Sun May 26, 2013 2:53 pm
- Location: Wrexham North Wales
Re: Hero of the Soviet Union Tiger 212 1943
Mike that Panther kit may have its pit falls you've done it justice mate, it looks the muts nuts dude. I can't stop zooming in to see the level of detail you've put on it.
You can run, but you'll only die tired!
-
Kevinzane
- Private First Class
- Posts: 47
- Joined: Mon Dec 01, 2014 12:43 pm
- Location: Karlstad, Sweden
Re: Hero of the Soviet Union Tiger 212 1943
A masterpiece! 
Kevin
On the bench:
StuG III Michale Wittman Barbarossa 1941 Diorama
King Tiger "what if"
On the bench:
StuG III Michale Wittman Barbarossa 1941 Diorama
King Tiger "what if"
Re: Hero of the Soviet Union Tiger 212 1943
Today I spent all day building figures and then constructing the base for the diorama.
No easy task. The figures weren't too bad, the two sets of Masterbox figures were good kits. Nice detail and the fits were ok.
The ICM kit was a bit of a stinker, reminiscent of some mini-art kits from a few years ago. It did have some cool poses though which is why I chose it.


These with the other figures that I've chosen for the build will hopefully tell an interesting story.
The dio is the same materials that I first mentioned in my video a while ago, only now I added a left over crate for storing oranges as part of the materials list. That I will cut to pieces to use a framing and surfacing.
The actual construction of the diorama's base isn't really important as every single one is different, only that careful planning and test layouts as well as mock ups are needed before you really commit to construction.
After the base was built and dry, I did a mock up to take a series of photos so I'll know where I want everything to be once the groundwork begins.

The box of bacon candy (thanks Forbes ) is to represent the storage shed that I plan to build; the wooden dowel the fallen tree.


I really like these fellas. I think that they really add the meat to the dio. These and the CO that's checking his watch in an impatient way.


So tomorrow I'll start the basics on the groundwork and then let that dry for a few days while I paint figures and weather the vehicles.
No easy task. The figures weren't too bad, the two sets of Masterbox figures were good kits. Nice detail and the fits were ok.
The ICM kit was a bit of a stinker, reminiscent of some mini-art kits from a few years ago. It did have some cool poses though which is why I chose it.


These with the other figures that I've chosen for the build will hopefully tell an interesting story.
The dio is the same materials that I first mentioned in my video a while ago, only now I added a left over crate for storing oranges as part of the materials list. That I will cut to pieces to use a framing and surfacing.
The actual construction of the diorama's base isn't really important as every single one is different, only that careful planning and test layouts as well as mock ups are needed before you really commit to construction.
After the base was built and dry, I did a mock up to take a series of photos so I'll know where I want everything to be once the groundwork begins.

The box of bacon candy (thanks Forbes


I really like these fellas. I think that they really add the meat to the dio. These and the CO that's checking his watch in an impatient way.


So tomorrow I'll start the basics on the groundwork and then let that dry for a few days while I paint figures and weather the vehicles.
-
ForbesHutton

- Chief Warrant Officer 3

- Posts: 1956
- Joined: Mon Sep 02, 2013 9:10 am
- Location: To,On,Ca

Re: Hero of the Soviet Union Tiger 212 1943
An ass? Well if you can't find a goat...
The Bacon candy's not even opened...
I think we may be in a race for the most figures, time to start counting...
The Bacon candy's not even opened...
I think we may be in a race for the most figures, time to start counting...

Re: Hero of the Soviet Union Tiger 212 1943
I know that's your schwimmwagen in there... Isn't that your ass too?
Was it you that sent me a pair of fallschimjager with a pair of donkeys?
Was it you that sent me a pair of fallschimjager with a pair of donkeys?
Re: Hero of the Soviet Union Tiger 212 1943
There were two tins of bacon candy..... 
I'm saving this one for a special occasion.
I'm saving this one for a special occasion.
-
ForbesHutton
- Chief Warrant Officer 3
- Posts: 1956
- Joined: Mon Sep 02, 2013 9:10 am
- Location: To,On,Ca
Re: Hero of the Soviet Union Tiger 212 1943
No that's not my ass, mine's been following me everywhere since whenever.Coen wrote:I know that's your schwimmwagen in there... Isn't that your ass too?
Was it you that sent me a pair of fallschimjager with a pair of donkeys?
Nope, didn't send you fallshimjagers.
Re: Hero of the Soviet Union Tiger 212 1943
Bacon candy?...and an ass........you're killing me  All joking aside that dio is going to be awesome,I think that the figures you chose fit the story perfectly
Steve
Make something idiot proof and someone will come along and make a better idiot.
Make something idiot proof and someone will come along and make a better idiot.
Re: Hero of the Soviet Union Tiger 212 1943
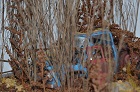
Work began on the diorama now that all of the figures, vehicles, and buildings are constructed.
After the mockup I started building the shack out of popcicle sticks. All cut to various sizes to mimic 1/35 lumber as best as I could.
Normally I'll use coffee stirrers but I was all out. They're longer, thinner and skinnier so they better reflect 1/35 lumber. The popcicle sticks are more scale to a joist then a wall board.
Either way... it's what I had so it's what I used.
I've also altered the setting of the diorama a bit. It was going to be mid winter on the northeastern front of 1944. Now It's late summer, early fall on the same front. I'm tired of doing winter dios of late (I've built 8 in the last few months), so I wanted to do something different.
The problem with that is that I built a December 1943 issued Tiger I. There's weren't too many of those around in September/October of 1943.
But it's only a problem for the rivet counters, as I'm going to continue in spite of it. I'm sick of winter scenes at the moment. So there hahaha.
So I started with the shack. All the boards cut to shape using my Chopper and a hobby knife.
The Roof...


The frame...

The Mess...

Get to the Chopper....

The shack is incredibly simple to build and you can make it much more complicated if you want. (I may yet )
)
I filmed a video on how to build a diorama and I'll link it below for any that are interested. I cover the construction in more detail in the video.
But it's not that hard. The most difficult part is visualising what you want to build and then building it from parts.


Then I mixed up some celluclay, added some burnt umber and raw umber paint to it and spread it all over the surface of the diorama.
I added it in two layers about 4-8 mm deep, with about 20 minutes between the layers. I do this because it tends to self-level when in thick piles or in mounds. If I let it dry for 20-30 minutes and add another layer the levelling effect is reduced. If I wanted to eliminate it, I would wait a day then add the second layer.
Once I built it up to the level that I wanted I smoothed out the "cake icing effect" where the celluclay takes on the look of sticky icing. You smooth that out with an artist's palette knife or something similar. Once you do that the surface looks more like a mud or wet ground. That's what you want. When it dries it will loose the shininess and look like earth.
After that I added surface texture to the wet celluclay. Some tallus, about 4 different kinds of sand, some coarse gravel, some crusher dust, and kitty litter for the road surface. I also added the furrow made by the tiger as she slide down the bank and the tracks of the bergepanther as she sat on the road. I didn't add tracks for the schwimmwagen as it's too light to make them on a gravel road.


I added some static grass to the area around the furrow as it's meant to represent the torn sod churned up by the passage of the tiger. It will all get painted when I come to that stage.
I marked out the fence posts and the fallen tress with a dowel and some cocktail sticks.


So now it will sit and dry for 3-5 days before I work on it again. It needs base paints for some of the texture materials, ground scatter, grasses, bushes, trees... still a ways to go yet.
Here's the video of the work so far, it's a bit over an hour long so I'll warn you now.
I'll be re-releasing it in April in a multipart series that will be broken up into many shorter videos.
[youtube]hZGu9L7XjsE[/youtube]
After the mockup I started building the shack out of popcicle sticks. All cut to various sizes to mimic 1/35 lumber as best as I could.
Normally I'll use coffee stirrers but I was all out. They're longer, thinner and skinnier so they better reflect 1/35 lumber. The popcicle sticks are more scale to a joist then a wall board.
Either way... it's what I had so it's what I used.
I've also altered the setting of the diorama a bit. It was going to be mid winter on the northeastern front of 1944. Now It's late summer, early fall on the same front. I'm tired of doing winter dios of late (I've built 8 in the last few months), so I wanted to do something different.
The problem with that is that I built a December 1943 issued Tiger I. There's weren't too many of those around in September/October of 1943.
But it's only a problem for the rivet counters, as I'm going to continue in spite of it. I'm sick of winter scenes at the moment. So there hahaha.
So I started with the shack. All the boards cut to shape using my Chopper and a hobby knife.
The Roof...


The frame...

The Mess...

Get to the Chopper....

The shack is incredibly simple to build and you can make it much more complicated if you want. (I may yet
I filmed a video on how to build a diorama and I'll link it below for any that are interested. I cover the construction in more detail in the video.
But it's not that hard. The most difficult part is visualising what you want to build and then building it from parts.


Then I mixed up some celluclay, added some burnt umber and raw umber paint to it and spread it all over the surface of the diorama.
I added it in two layers about 4-8 mm deep, with about 20 minutes between the layers. I do this because it tends to self-level when in thick piles or in mounds. If I let it dry for 20-30 minutes and add another layer the levelling effect is reduced. If I wanted to eliminate it, I would wait a day then add the second layer.
Once I built it up to the level that I wanted I smoothed out the "cake icing effect" where the celluclay takes on the look of sticky icing. You smooth that out with an artist's palette knife or something similar. Once you do that the surface looks more like a mud or wet ground. That's what you want. When it dries it will loose the shininess and look like earth.
After that I added surface texture to the wet celluclay. Some tallus, about 4 different kinds of sand, some coarse gravel, some crusher dust, and kitty litter for the road surface. I also added the furrow made by the tiger as she slide down the bank and the tracks of the bergepanther as she sat on the road. I didn't add tracks for the schwimmwagen as it's too light to make them on a gravel road.


I added some static grass to the area around the furrow as it's meant to represent the torn sod churned up by the passage of the tiger. It will all get painted when I come to that stage.
I marked out the fence posts and the fallen tress with a dowel and some cocktail sticks.


So now it will sit and dry for 3-5 days before I work on it again. It needs base paints for some of the texture materials, ground scatter, grasses, bushes, trees... still a ways to go yet.
Here's the video of the work so far, it's a bit over an hour long so I'll warn you now.
I'll be re-releasing it in April in a multipart series that will be broken up into many shorter videos.
[youtube]hZGu9L7XjsE[/youtube]
-
Filmman586
- First Sergeant

- Posts: 532
- Joined: Mon Dec 23, 2013 7:53 pm
- Location: Stratford, CT US
- Contact:
Re: Hero of the Soviet Union Tiger 212 1943
Great work Michael!

Re: Hero of the Soviet Union Tiger 212 1943
Very nice groundwork,you really nailed the furrows the Tiger made sliding down the hill I was wondering if you could get the same effect using Plaster of Paris? I was wondering as I have some left over from one of my kids school projects.
Steve
Make something idiot proof and someone will come along and make a better idiot.
Make something idiot proof and someone will come along and make a better idiot.

-
SyntaxModels

- First Sergeant
- Posts: 538
- Joined: Mon Sep 22, 2014 8:34 am
- Location: Melbourne, Victoria, Australia
Re: Hero of the Soviet Union Tiger 212 1943
Almightly Lord Coen The Dio Master at work! Hail Coen! Hail Coen!
- Leo
My Motto: "Eh, that'll do, wait a minute, this is my model I can do whatever the hell I want with it! Yes that's a good excuse!"
Visit my YouTube Channel!
https://www.youtube.com/channel/UCKvbyv ... DwSd88cMYg
My Motto: "Eh, that'll do, wait a minute, this is my model I can do whatever the hell I want with it! Yes that's a good excuse!"
Visit my YouTube Channel!
https://www.youtube.com/channel/UCKvbyv ... DwSd88cMYg
-
Nige99
- Command Sergeant Major
- Posts: 751
- Joined: Sun May 26, 2013 2:53 pm
- Location: Wrexham North Wales
Re: Hero of the Soviet Union Tiger 212 1943
Love the dio so far Mike you got that texture bang to rights!! Can't wait to see more dude. 3-5 days can I wait that long  well done buddy.
You can run, but you'll only die tired!
-
Kevinzane
- Private First Class
- Posts: 47
- Joined: Mon Dec 01, 2014 12:43 pm
- Location: Karlstad, Sweden
Re: Hero of the Soviet Union Tiger 212 1943
Amazing man! Good work!
Kevin
On the bench:
StuG III Michale Wittman Barbarossa 1941 Diorama
King Tiger "what if"
On the bench:
StuG III Michale Wittman Barbarossa 1941 Diorama
King Tiger "what if"
-
alextheblue

- Chief Warrant Officer 5

- Posts: 2679
- Joined: Mon Jul 15, 2013 11:30 am
- Location: Slough, United Kingdom
- Contact:
Re: Hero of the Soviet Union Tiger 212 1943
What an amazing build thread! First you show us your ass and then your chopper - what next!!
Seriously though, that ground work is amazing and I can't wait to see all this lovely modelling goodness come together!!

Seriously though, that ground work is amazing and I can't wait to see all this lovely modelling goodness come together!!
